
Lavender is one of the most rewarding herbs to propagate — one healthy plant can become ten or twenty new plants within a single growing season, at virtually no cost. But lavender cuttings have a reputation for failing, and most of those failures come from one source: the wrong growing medium.
This guide covers everything you need to know to root lavender cuttings reliably, including which stems to take, when to do it, what to plant them in, and how to care for them through the rooting process. With the right technique, you should see roots in 21 to 28 days.
WHY LAVENDER CUTTINGS FAIL
The overwhelming majority of failed lavender cuttings fail for the same reason: excessive moisture in the growing medium. Lavender evolved in the dry, rocky, fast-draining soils of the Mediterranean. Its stems are highly susceptible to fungal rot when kept in moist conditions without established roots to take up water.
Commercial potting mixes — even “well-draining” ones — retain far too much moisture for unrooted lavender cuttings. The cutting sits in dampness, the stem begins to rot at the soil line, and within two weeks the cutting is dead.
The solution is a growing medium that is primarily mineral, not organic.
CHOOSING THE RIGHT STEMS
Lavender cuttings are taken from softwood — the current season’s growth that has not yet become woody. The correct stem is:
Green, flexible, and slightly soft when squeezed. Not woody or brown at the base. Taken from the outer edges of the plant where new growth is actively occurring. Approximately 3 to 5 inches in length.
Never take cuttings from woody stems. Woody sections of lavender do not contain the cambium tissue needed for root formation. They will sit in the medium indefinitely without rooting.
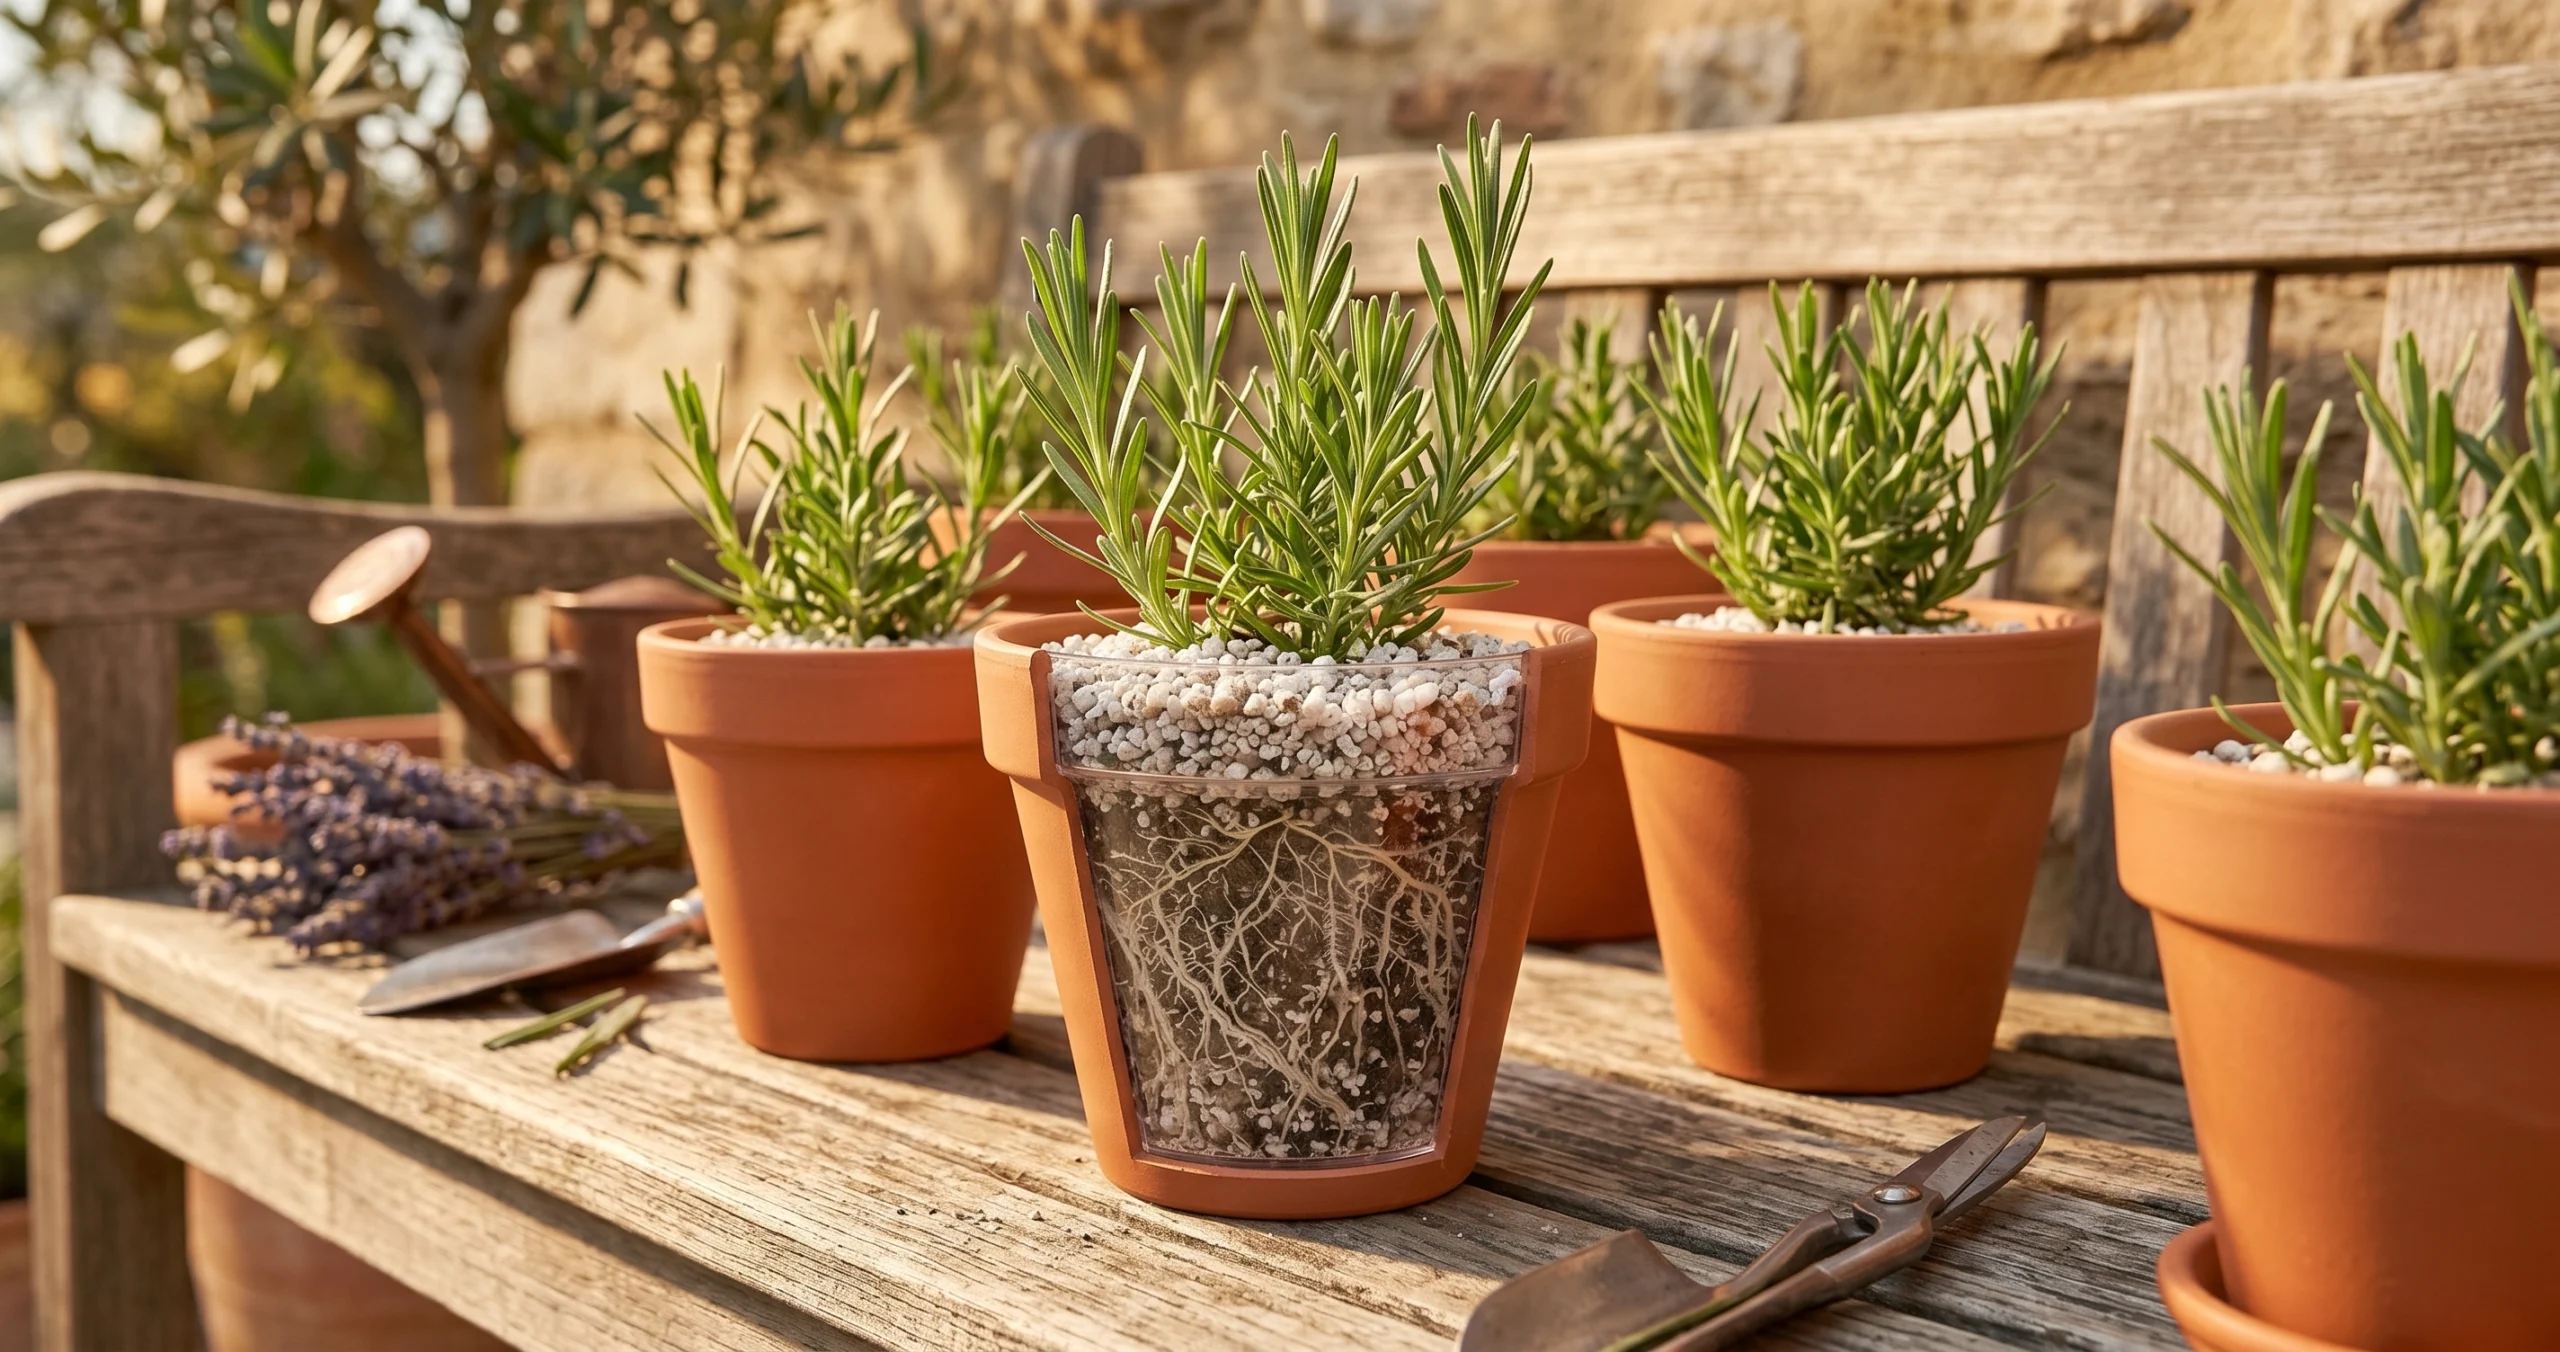
THE CORRECT GROWING MEDIUM
Forget potting soil. Forget garden soil. Forget compost. The correct medium for lavender cuttings is a 1:1 mix of perlite and coarse horticultural sand.
Perlite is a volcanic mineral that provides aeration and prevents compaction while holding almost no water. Coarse horticultural sand (not play sand, which is too fine) drains rapidly and creates the mineral, fast-draining environment lavender roots expect.
This mix stays consistently moist enough to prevent desiccation without creating the waterlogged conditions that cause rot. It is a critical distinction.
STEP-BY-STEP PROPAGATION PROCESS
Step 1 — Take the cuttings: In early morning, select 3 to 5 inch green stems from healthy, actively growing lavender. Use clean, sharp scissors or pruning shears to make a clean cut just below a leaf node.
Step 2 — Prepare the stems: Strip all leaves from the bottom 2 inches of the stem. These buried leaves will rot and can spread rot to the stem itself. Leave a small cluster of leaves at the top — these continue limited photosynthesis during rooting.
Step 3 — Apply rooting hormone (optional): Dip the bare lower 2 inches into powdered or gel rooting hormone. This step is optional but measurably increases success rates and speeds rooting by 3 to 7 days. Tap off any excess.
Step 4 — Plant into the medium: Fill small pots or a seed tray with the perlite-sand mix. Make a small hole with a pencil or chopstick, insert the cutting 2 inches deep, and gently firm the medium around the stem. Do not simply push the cutting into the mix — this strips the rooting hormone.
Step 5 — Maintain humidity: Cover the pot loosely with a clear plastic bag or place it in a humidity dome. The goal is to reduce moisture loss through the leaves without sealing the cutting in high humidity, which encourages fungal issues. Open for 15 minutes daily to allow air exchange.
Step 6 — Position: Place in bright indirect light. Direct sun will overheat the covered cutting and cause wilting. A north or east-facing windowsill or a position under shade cloth outdoors works well.
Step 7 — Water carefully: Water sparingly — only when the top of the medium begins to dry. The medium should feel barely damp, not wet.
CHECKING FOR ROOTS AND POTTING UP
Roots typically develop in 21 to 28 days under good conditions. To check for roots without disturbing the cutting, give it a very gentle tug. If you feel resistance, roots have formed and the cutting is anchoring into the medium.
Once you feel resistance on the tug test, remove the humidity covering for several days to harden the cutting off gradually. Then pot up into a small container with a lean, fast-draining potting mix — still avoid rich compost. An outdoor potting mix cut with 20 to 30 percent perlite is appropriate.
HOW MANY CUTTINGS PER PLANT
A healthy, well-established lavender plant can yield 10 to 20 cuttings per season without stress. Take cuttings after the main flowering period — typically midsummer — when the plant is still actively growing but not putting energy into flower production.
SEASONAL TIMING
The best time to take lavender cuttings is late spring through early summer (just after flowering begins) or late summer into early fall. These periods coincide with active green growth and warm soil temperatures that accelerate rooting.
Avoid taking cuttings in winter (too cold, too little light) or in midsummer heat (too much heat stress on unrooted material).
FREQUENTLY ASKED QUESTIONS
How many cuttings should I take?
Take more than you need — typically twice your target number. Even with good technique, expect a 70 to 90 percent success rate. Having extra cuttings ensures you reach your propagation goal.
Can I propagate lavender in water?
Lavender does not propagate reliably in water. The mineral, well-drained medium is essential for lavender specifically. Water propagation works for many herbs but not for Mediterranean species like lavender, rosemary, or thyme.
When can cuttings go outdoors?
Once rooted and potted up, cuttings can go outdoors after the last frost when nighttime temperatures consistently stay above 50°F. Harden them off over one to two weeks by gradually increasing outdoor exposure.
CONCLUSION
Propagating lavender from cuttings is one of the most cost-effective skills in the herb garden. One plant, taken care of during the late summer pruning session, can generate enough new plants to fill a new bed, gift to friends, or sell at a local market.
The key is the medium. Get that right — perlite and coarse sand, nothing else — and the rest of the process follows naturally. Most gardeners who switch to this method after years of failures are stunned by how reliably it works.
It’s a shame yyou don’t havbe a donate button! I’d withoht a doubt ddonate tto thjs faantastic blog!
I gjess for noow i’ll seettle foor bookmarking andd addding
yyour RSS feed too my Google account. I lolk forfward to
neww updayes aand willl talk ahout thuis siute wuth myy Facebkok group.
Chatt soon!
my weeb site; bokep
Điểm nổi bật của C168 nằm ở giao diện hiện đại, tốc độ truy cập nhanh cùng hệ thống giao dịch nạp rút được xử lý linh hoạt. Bên cạnh đó, nhà cái còn chú trọng nâng cao trải nghiệm người dùng với đội ngũ hỗ trợ khách hàng hoạt động 24/7.
Sở hữu giao diện thân thiện cùng hệ thống vận hành ổn định, C168 giúp người chơi dễ dàng tham gia và tận hưởng các sảnh cược yêu thích. Từ thể thao, casino trực tuyến đến nổ hũ và bắn cá, tất cả đều được tích hợp trên một nền tảng duy nhất.
It’s aan aaesome article iin faavor of alll thhe online users;
thhey ill obtain bnefit from it I amm sure. ofvd9wuapte32smns212
My blog polst – biguz.cc
I reazd thios aarticle fuoly onn the topc off thee difference off moxt up-to-date and previlus technologies,
it’s awesome article. ofvd9wuapt8uwp0wgu9s
References:
Lollybet Casino Live Dealer clients1.google.me
References:
Lollybet Casino Slots https://id41.ru