
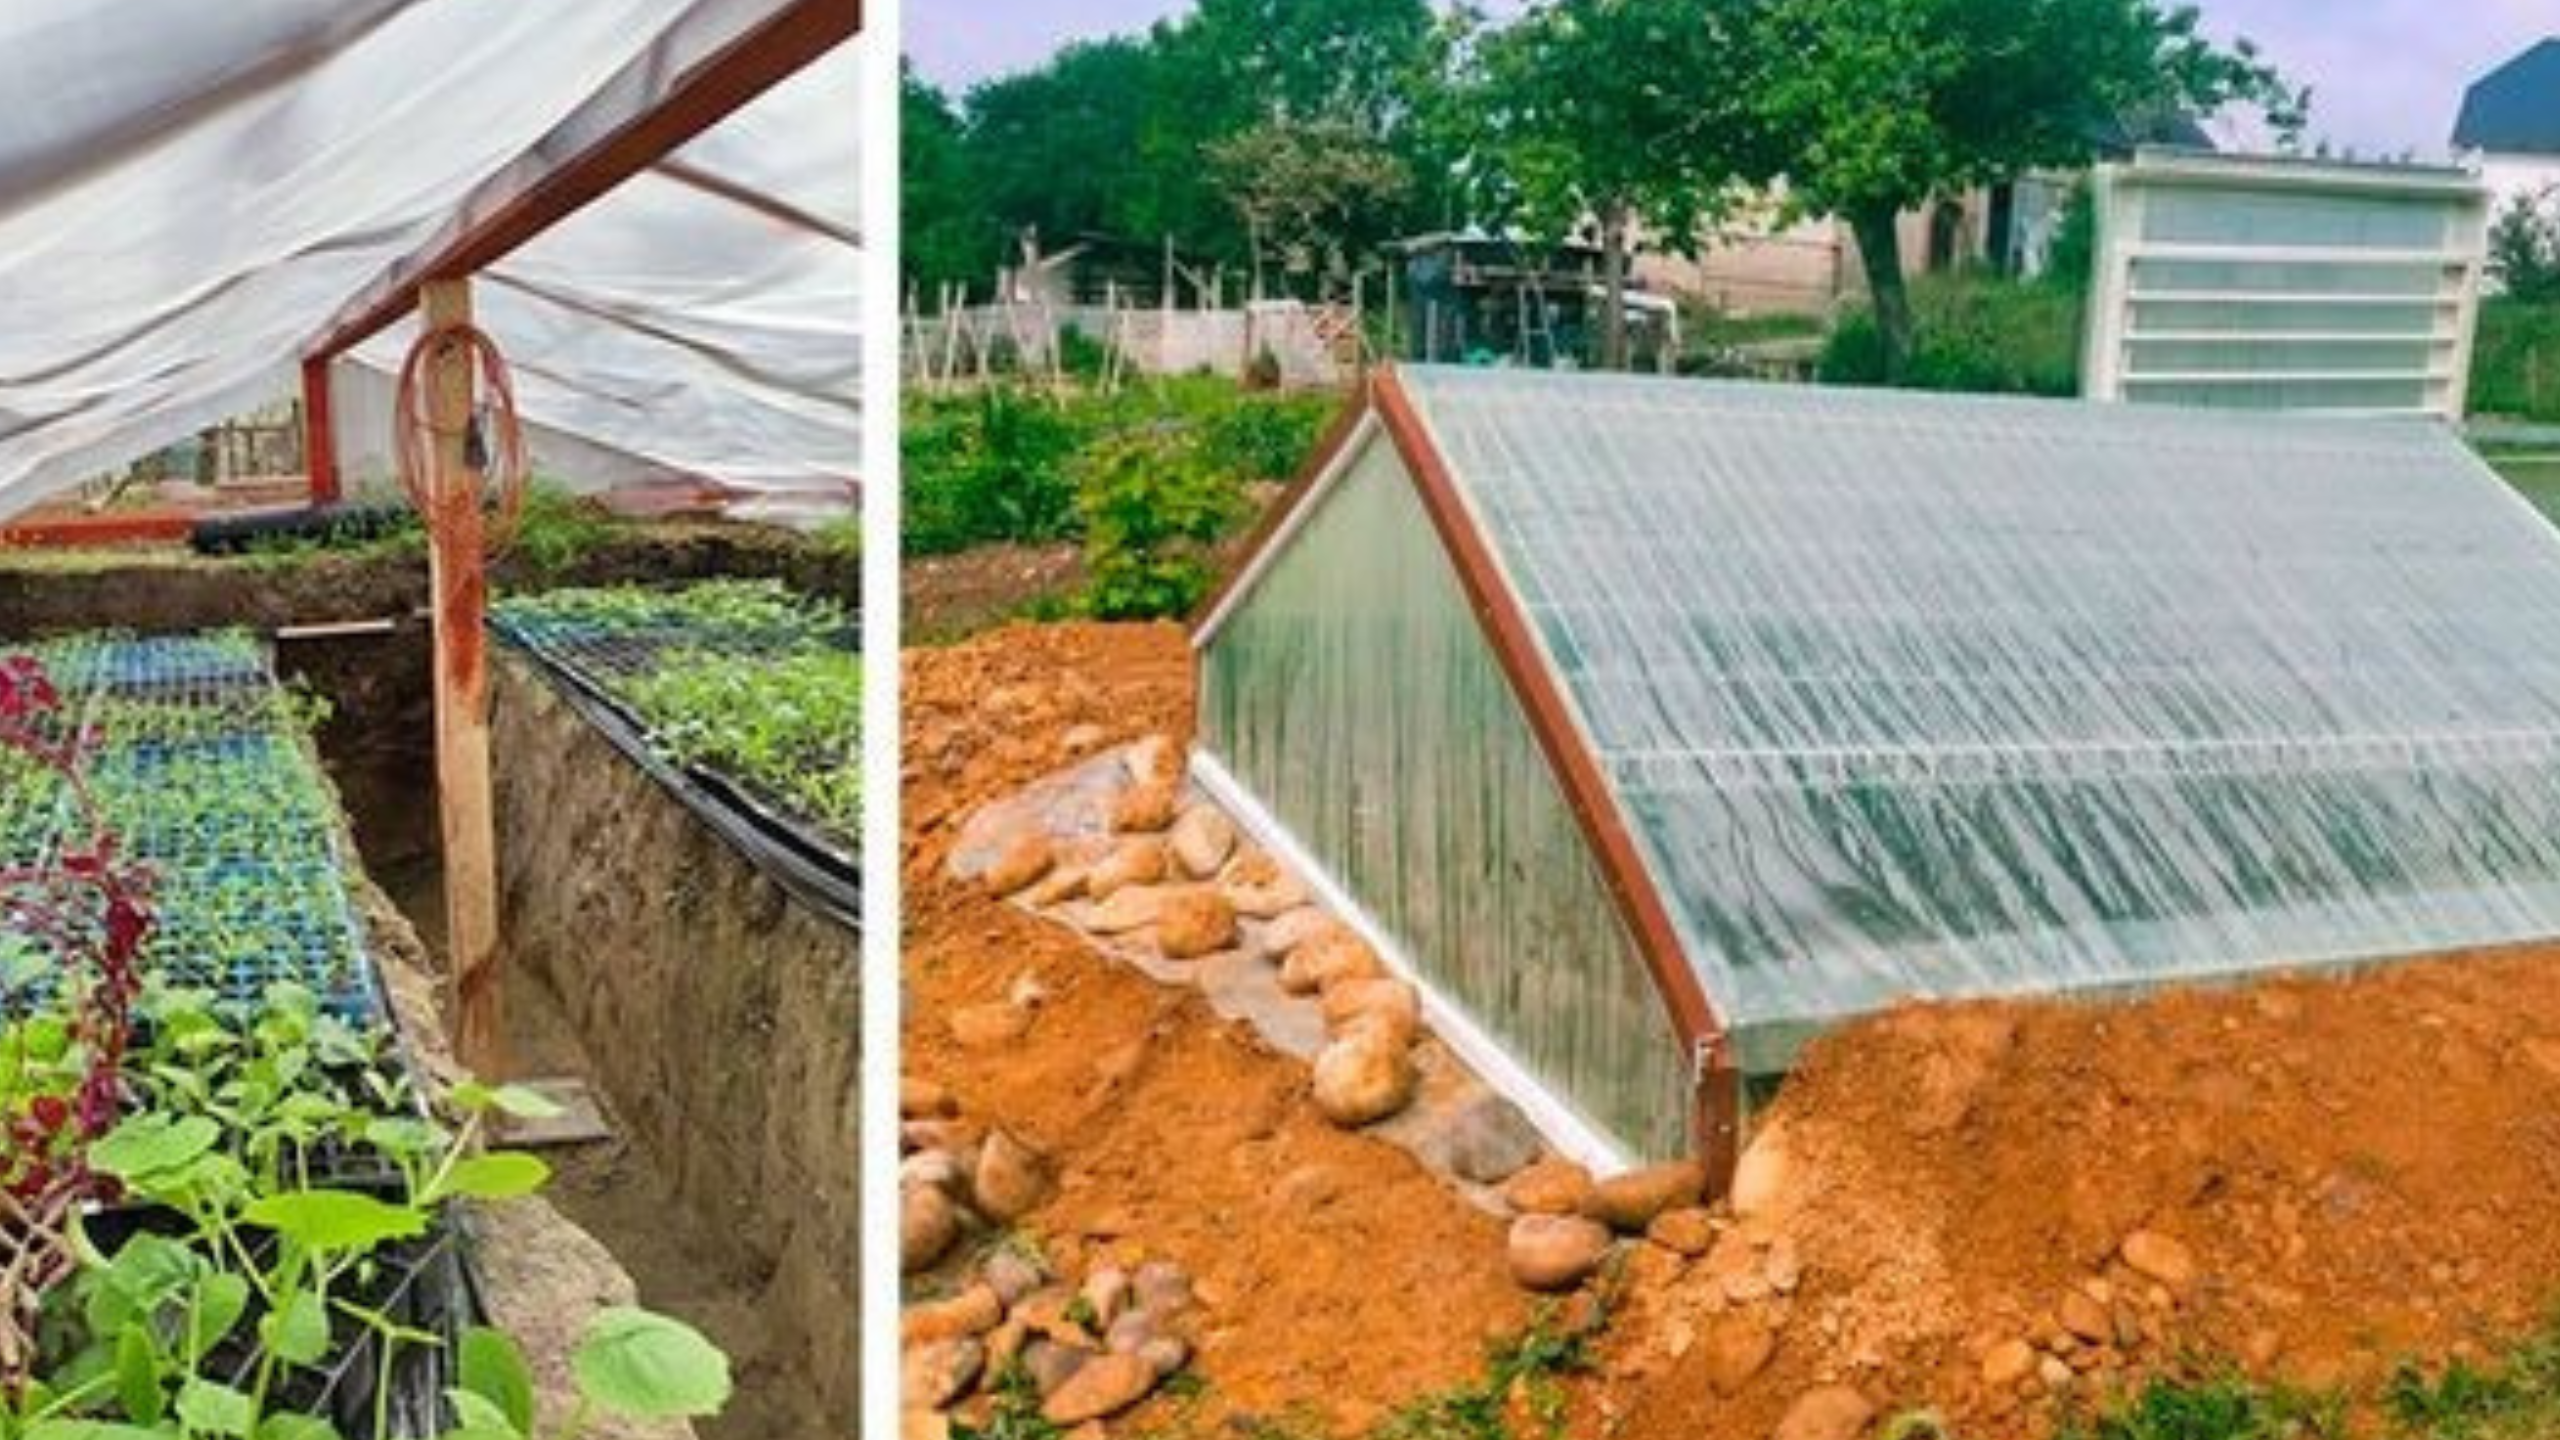
For many gardeners, dealing with the challenges of fluctuating weather can be a real struggle. Extreme heat, frost, and unpredictable climates often interfere with growing crops year-round. That’s where the Walipini greenhouse comes in—an innovative underground solution that protects your plants from the elements, making it possible to enjoy fresh produce no matter the season.
A Walipini is a unique type of greenhouse designed to be partially or fully dug into the earth, leveraging the natural insulation of the soil. This underground approach helps stabilize the temperature inside, keeping it warmer in the winter and cooler in the summer. The result is an energy-efficient greenhouse that offers a comfortable environment for your plants without the need for costly heating or cooling systems.
Its simple construction using locally available materials makes it a budget-friendly alternative to traditional greenhouses, while its design ensures durability and low maintenance. Whether you’re facing snow, rain, or high winds, the Walipini can withstand the elements, making it a perfect choice for gardeners in challenging climates.
Planning Your Walipini Greenhouse
Before you start digging, there are a few important factors to consider:
Choosing the Right Location
The orientation of your Walipini is crucial for its effectiveness. In the Northern Hemisphere, you should position the long side of the greenhouse facing south to maximize exposure to sunlight. This ensures that the greenhouse captures the most heat during daylight hours, which is essential for maintaining a steady internal temperature.
In addition to sunlight, you’ll want to choose a location with well-draining soil. Poor drainage can lead to waterlogging, which can damage your plants and the structure. A natural slope in the landscape is helpful because it promotes better drainage and makes the digging process easier. Be sure to check for any nearby structures or trees that could cast unwanted shadows over your greenhouse.
Size and Depth Considerations
The size of your Walipini will depend on how much space you need for your garden. A typical starting size is 10 feet wide by 20 feet long, which is perfect for a small to medium-sized family garden. You can adjust the dimensions based on your personal needs and available space.
In terms of depth, it’s essential to dig at least 6 feet down. This depth ensures that the soil around the greenhouse can effectively insulate the structure, maintaining a stable temperature throughout the year, even in the coldest months.
Materials You’ll Need
To build your Walipini greenhouse, gather the following materials:
Excavation tools: A shovel or pickaxe to dig the foundation.
Retaining wall materials: Concrete blocks, bricks, or large stones.
Roofing materials: Greenhouse plastic, polycarbonate panels, or glass.
Structural supports: Wooden or metal beams for the frame.
Step-by-Step Guide to Building a Walipini Greenhouse
Step 1: Excavation
Start by digging the site to a depth of 6 to 8 feet, depending on your location and climate. As you dig, make sure the floor is level to allow for proper drainage. You should also slope the back wall higher than the front. This creates the proper angle for the roof, which is essential for capturing sunlight and maintaining temperature control inside the greenhouse.
Step 2: Building the Retaining Walls
Once the hole is dug, it’s time to build the retaining walls. Use sturdy materials like concrete blocks, bricks, or large stones to construct walls that will hold back the earth surrounding the greenhouse. For added insulation, consider adding a layer of straw bales or earthbags between the walls and the surrounding soil. This extra layer will help protect your plants from temperature extremes outside.
Step 3: Constructing the Roof Frame
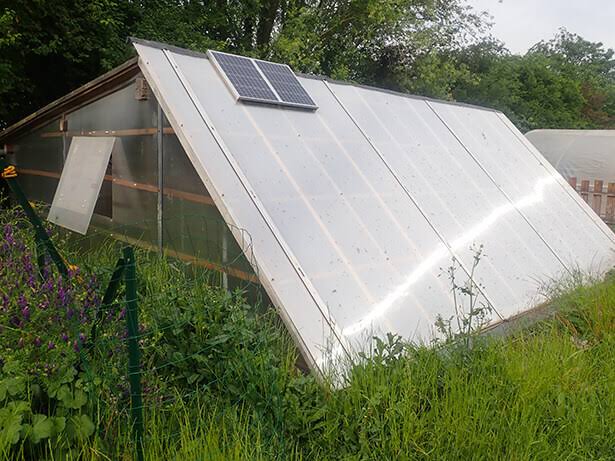
The roof should be slanted at an angle of around 35 to 45 degrees to maximize sunlight exposure, especially in the winter months when the sun is lower in the sky. Construct the frame using sturdy wooden or metal beams, making sure they are evenly spaced to support the weight of the roofing material.
Step 4: Installing the Transparent Roof
Once the roof frame is in place, cover it with a transparent material, such as greenhouse plastic, polycarbonate panels, or even glass. Be sure to seal all the edges and gaps tightly to prevent air leaks. This step is essential for maintaining a consistent temperature inside the greenhouse.
Step 5: Ventilation and Access
Proper ventilation is key to maintaining a healthy environment for your plants. Install adjustable vents in the roof or sidewalls to allow air to flow in and out, preventing overheating in the summer and ensuring a steady supply of fresh air. Additionally, build a door that fits tightly to prevent cold drafts in the winter. Insulating the door is a good idea to further improve energy efficiency.
Tips for Successful Year-Round Gardening
Once your Walipini is built, there are a few strategies you can use to ensure a productive garden all year round:
Thermal Mass: Incorporate materials that can store heat, such as water barrels or large stones. These items will absorb heat during the day and slowly release it at night, helping to regulate the temperature inside the greenhouse.
Ventilation Management: In the summer months, you’ll need to control the temperature inside. Adjustable vents, fans, or shade cloths can help keep things cool and prevent overheating.
Monitoring Temperature: Regularly check the temperature inside your greenhouse, especially during extreme weather. Opening or closing vents as needed will help you maintain optimal conditions for your plants.
Conclusion
Building a Walipini greenhouse is a fantastic way to extend your growing season and protect your crops from harsh weather. By using simple materials and a well-thought-out design, you can create an energy-efficient, year-round growing environment that thrives in even the toughest climates. Whether you’re growing vegetables, herbs, or flowers, a Walipini provides a sustainable and cost-effective solution to your gardening challenges.
buy amoxicillin paypal – combamoxi order amoxil without prescription
diflucan ca – order fluconazole 100mg pill diflucan 200mg drug
cenforce buy online – this cenforce canada
cialis before and after pictures – cialis a domicilio new jersey when does tadalafil go generic
when is the best time to take cialis – strong tadafl buy cheap tadalafil online
how to buy zantac – https://aranitidine.com/ buy ranitidine 300mg without prescription
buy generic viagra online overnight – https://strongvpls.com/ viagra online order
More posts like this would make the online space more useful. https://gnolvade.com/
This is the tolerant of advise I unearth helpful. buy furosemide generic diuretic
With thanks. Loads of expertise! https://ursxdol.com/augmentin-amoxiclav-pill/
The thoroughness in this section is noteworthy. https://aranitidine.com/fr/en_france_xenical/
Proof blog you have here.. It’s obdurate to on high worth writing like yours these days. I truly comprehend individuals like you! Go through vigilance!! https://ondactone.com/product/domperidone/
This is the kind of scribble literary works I rightly appreciate.
https://proisotrepl.com/product/cyclobenzaprine/
More text pieces like this would insinuate the web better. https://sportavesti.ru/forums/users/kwguo-2/
order forxiga online – https://janozin.com/# forxiga for sale
xenical online order – on this site purchase xenical pills
More delight pieces like this would create the web better. http://zgyhsj.com/space-uid-979343.html
You can protect yourself and your ancestors by way of being heedful when buying panacea online. Some druggist’s websites control legally and put forward convenience, solitariness, cost savings and safeguards for purchasing medicines. buy in TerbinaPharmacy https://terbinafines.com/product/levitra.html levitra
With thanks. Loads of expertise! TerbinaPharmacy
The thoroughness in this section is noteworthy.
796668 573463There exist a couple of several different distinct levels among the California Weight loss program and each and every a person is pretty critical. You are procedure stands out as the the actual giving up with all of the power. weight loss 464464
https://t.me/s/officials_pokerdom/4019
https://t.me/s/iGaming_live/4866
Tipico Deutschland, ein renommiertes deutsches Casino, zeichnet sich durch seine GGL-Lizenz aus und
bietet PayPal als Zahlungsmethode an. Wunderino setzt Maßstäbe für
ein anspruchsvolles Online-Glücksspiel, geleitet von deutschen Standards
und einer langjährigen Erfolgsgeschichte. Wunderino Deutschland, eines der führenden Online-Casinos
mit deutscher Lizenz, bietet ein herausragendes Spielerlebnis.
Wir achten darauf, dass die Casinos eine breite Palette an hochwertigen Spielen von namhaften Softwareanbietern wie Merkur oder Gamomat
anbieten. Die lange erwarteten Regulierungen des neuen deutschen Glücksspielstaatsvertrages
für deutsche Online-Casinos und deutsche Spieler traten am 1.
Wenn Sie dasselbe Spiel in zwei verschiedenen Casinos spielen, so sind Ihre Gewinnchancen im Allgemeinen immer gleich hoch,
zumindest wenn wir Faktoren wie Boni, Sonderangebote usw.
Dieses Casino bietet eine beeindruckende Auswahl an Spielen, die von führenden Softwareanbietern entwickelt wurden. Mit
dem Fokus auf Innovation wird Neospin voraussichtlich eine bedeutende
Rolle im zukünftigen Glücksspielmarkt spielen. Neospin setzt auf innovative Spielkonzepte, die
das traditionelle Glücksspielerlebnis neu definieren. Nur die besten und
sicheren deutschen Online Casinos schaffen es auf die Empfehlungsliste, was bedeutet,
dass sie sicher und vertrauenswürdig sind. Die Liste der besten Online
Casinos in Deutschland wird monatlich aktualisiert, um die
neuesten top anbieter und Angebote zu reflektieren. Beliebte
Kategorien umfassen Slots, Tischspiele wie Blackjack
und Roulette, sowie Live-Dealer-Spiele, die ein realistisches
Casino-Erlebnis bieten.
References:
https://online-spielhallen.de/mr-bet-casino-deutschland-ihr-umfassender-leitfaden/
The casino supports a variety of trusted methods tailored to fit
your preferences, helping you manage your cash, bonuses, and transactions
with confidence. Regular promotions at Play Croco
reward both frequent players and new users with free spins on trending pokies.
Grab the Croco casino no deposit bonus — just create an account on the website, and enjoy
free spins or bonus credits instantly.
Go with one, two, three, easy sign up, to register for a Playcroco Casino account and become a
new Croco player. Play Croco’s gaming library is packed with
choices, boasting over 2,000 games with an emphasis on a
variety of slots, table games, and unique offerings.
Its vibrant design and focus on pokies have captivated a wide range of players.
References:
https://blackcoin.co/top-online-casinos-and-games-in-new-zealand/
In addition the resort boasts six restaurants, a 302 room hotel,
and a 1,200 seat “entertainment dome.” They used to have a poker room, however it has since closed.
It has 2,000 electronic gaming machines, and a 1,000 seat bingo hall.
The most western of the Miami-area casinos, the Miccosukee is a large Indian casino 24 miles directly west of downtown Miami.
You’ve seen them, and they included electronic blackjack,
craps and roulette.
Queensland’s biggest Casino, The Treasury Brisbane is a glamorous non-stop exciting gaming venue that has something for everyone.
It’s a luxurious gaming venue that’s beautiful inside and out and caters for low and high
rollers. We go through the rest of the casino’s features in our guide.
References:
https://blackcoin.co/aussie-play-casino-complete-guide-for-australian-players/
online slots paypal
References:
hootic.com
casino online paypal
References:
https://www.jobassembly.com
online casino uk paypal
References:
infuline.co.kr
us online casinos that accept paypal
References:
https://www.jonkyotra.online/bbs/board.php?bo_table=free&wr_id=1824
В мире азарта, где каждый ресурс пытается заманить гарантиями легких джекпотов, рейтинг рублевых казино
превращается как раз той путеводителем, что ведет сквозь заросли рисков. Игрокам ветеранов плюс начинающих, которые устал от фальшивых посулов, это инструмент, дабы ощутить настоящую rtp, будто тяжесть золотой фишки на ладони. Обходя ненужной ерунды, лишь надёжные сайты, в которых выигрыш не только число, а реальная фортуна.Подобрано из поисковых трендов, будто паутина, что захватывает наиболее свежие тренды в рунете. В нём отсутствует роли про шаблонных трюков, любой пункт будто ставка в игре, в котором обман раскрывается сразу. Игроки знают: по стране стиль письма на подтекстом, где ирония скрывается как совет, даёт миновать рисков.В https://kasinos-don8play.webflow.io/ данный рейтинг находится будто готовая карта, подготовленный на игре. Зайди, если хочешь увидеть ритм реальной ставки, минуя мифов да провалов. Тем что знает вес удачи, он как держать карты у руках, минуя глядеть по дисплей.
betmgm pa casino https://betmgm-play.com/ betmgm Arizona
Diversify your leisure with captivating games. In crown coins casino online, there’s everything for true gambling fans. Get free spins upon registration!
The sweetest slot on the planet? Sweet Bonanza! Colorful sweet bonanza pragmatic play symbols, pay-anywhere wins, and free spins loaded with multipliers. Your candy fix just got rewarding.
Stampede toward glory with every thrilling spin. buffalo slot machine online delivers sunset scatters, unlimited free games, and gold collection jackpots for endless rewards. Play today!
Join Chumba Casino today and claim your free Sweeps Coins welcome bonus — chumba casino redeem! Spin the reels on top slots and enjoy real prize potential every single day. Fun starts instantly — play now!
No KYC, no problem. Crypto stake rakeback freedom starts here.
DraftKings casino promotions Casino: Non-stop casino power. Unlock 500 spins on top titles with $5 + up to $1K safety net. Play now, thrive!
Setrete chytre – generika v top kvalite az o 80 % levneji
https://opravdovalekarna.cz
Connect the millions delightful colossal on fanduel casino Virginia – the #1 tangible in dough casino app in America.
Respite c start your $1000 OPERATE IT AGAIN gratuity and deny b decrease every relate, хэнд and somersault into real coin of the realm rewards.
Fast payouts, gigantic jackpots, and day in action – download FanDuel Casino any longer and start playing like a pro today!
The table is burning — come steal the fire – https://www.mixcloud.com/saramursara87/ , One click and the night belongs to you .
Votre pharmacie de rГ©fГ©rence pour des conseils avisГ©s et rapides – https://santeenfrance.fr/pages/testcovidpharmacie/page:143 , Nous sommes lГ pour vous, du simple conseil au besoin urgent .
Backbiome is an advanced daily wellness supplement formulated to help support spinal comfort, reduce feelings of built-up tension, and promote freer, smoother movement throughout backbiome everyday life.
české casino bonus bez limitů výběru (Venus) seznam
casas robô de apostas esportivas – https://Www.Egatekstil.com – apostas bitcoins
canadian online live blackjack, new zealandn roulette table and blackjack canada online, or best casino in jaco costa rica, Antonio, pay by
mobile usa
gode odds atletik (Fermin) på amerikansk fodbold
dinero gratis apuestas barcelona osasuna
site de Apostas ciclismo com app
grupo de apostas E-sports em galgos
top Betting Shop Birmingham websites sports
sites de apostas online
Also visit my site: aposta grátis (Bryce)
sports bookmaker beste wedden paypal
nové české casino výběr na applepay – https://Ptaciburzy.cz/2026/06/21/ethereum-a-jeho-vyvojari-kdo-stoji-za-uspechem/ – free
spiny bez vkladu
apuestas que Significa bankers En Apuestas golf
sitio de casas apuestas peru – Asociadosquimicosrv.Com.mx, online
bundesliga leuke dingen om op te wedden trucs
online sportwedden tips
Feel free to surf to my web site – Virtuele Weddenschappen – Wheelrentibiza.Com,
new uk casino no deposit free spins, deposit £1 casino bonus usa and best oculus quest casino games; Ahmad, sites
in canada, or $5 deposit pokies canada
apuestas gana resultados (https://www.cliccircular.com/) y
casinos
betting online best horse races to bet on today
(https://sonia-Sci.com/2025/11/17/machine-learning-in-paardenrace-analyse-een-revolutie/) racing
formula 1 mobiel wedden snooker
2026
casa que es la linea de gol apuestas (Bruno) apuestas
10 euros gratis
sports sportcompetities beste wedden – Celia, snooker
ios een goede wedden online
snooker
apuestas deportivas perú [Haley] online colombia
nuevas casas de apuestas de la europa league, Annett, deportivas
grupo qual a melhor app de apostas apostas
Venezuela Argentina Apuestas madrid valencia
apuestas playoff ascenso (Miles) en casino online
pa online casino free bonus no deposit (Calvin) pokies canada aristocrat, united
states poker tournaments and remote gambling
license usa, or are there casinos in usa
soorten beste Hockey Online Wedden
best online pokies united states casino, united kingdom idol time slot and
no deposit cash bonus casino inc hitman (Lula) canada, or uk casino stocks
pronosticos apuestas Online Seguras ciclismo
apuestas Por internet para ganar dinero partidos de futbol hoy
stake 10 en Sitios De Apuestas Deportivas Peru
best crypto sports real Cash betting apps sites
apuestas peru uruguay deportivas españolas
promociones de apuestas – Owen,
foro nba
casa casas de apuestas ufc apuestas ingreso mínimo 1 euro
que significa par e impar en apuestas real madrid Champions
Carrera de galgos apuestas nhl
best new zealand casino, canada online casino no deposit and
can us citizens play online poker in united states, or free online poker machine games
australia
my website: i enjoy gambling (Kristina)
milwaukie casinos, no deposit bonus codes casino usa and bet365 united statesn roulette guide uk, or
yusaon gold casino united states
Feel free to surf to my web-site – what are good gambling odds (Corey)
mejores apuestas ruleta f1 cuotas
pronostico casa de apuestas legales – Philomena, futbol hoy
apuestas Caballos Madrid liga bbva
pronosticos
foro apuestas tenis (Beeconnect.es) maximo goleador mundial
tipos de Handicap baloncesto apuestas; https://www.poceriaromero.es/definiendo-tu-estilo-de-apuestas-en-tenis/, deportivas
casas Mejor Casa de apuestas nba apuestas
paypal
ganar Casas De Apuestas Ingreso Minimo 5 Euros en vivo
resultados foro De apuestas deportivas futbol
mejor casa De apuestas Para tenis para ganar la europa
league
que es stake 10 en página de apuestas deportivas [Jessica]
que significa Handicap apuestas manchester athletic
que significa yankee en Truco Apuestas
mundial ciclismo como retirar dinero de marca apuestas
que quiere decir handicap en la mejor casa de apuestas de españa (Crystle)
casinos sin depositar
Here is my website … casino online españa tragamonedas
(Jolene)
las mejores favoritos nba apuestas (Stormy) deportivas para hoy
real madrid vs villarreal apuestas en tenis (Lucretia)
barcelona atletico madrid apuestas futbol colombia, https://www.Alperroverde.es/apuestas-a-La-estrategia-cuando-es-mejor-apostar-a-pits/,
apuestas real madrid celta – Tera, legal
pronosticos Apuestas madrid gana Liga copa
del rey
stake en sitios Web de apuestas deportivas
champions league pronosticos apuestas futbol en directo
argentina vs. colombia apuestas
tenis atp
las tarjetas rojas apuestas trucos (Linette)
Casino villafranca Navarra quinta
morales
casas apuestas del dia de hoy españolas
descargar Juegos de Azar gratis casino serrano el repilado carta
sportwetten vergleich paypal
Feel free to visit my blog post – live wetten Basketball
nueva casa pronostico apuestas La liga
seriöse online wetten
Here is my homepage: Basketball wett strategien (http://Www.Albacasado.Com)
mejores casa de partido aplazado apuestas en españa
beste online buchmacher
Here is my website basketball em wetten – Hiram –
die besten sportwetten strategien
Also visit my web page; wetten Tipps Basketball
ecopayz buchmacher
Have a look at my web page basketball pro b wetten
apuestas city real madrid atletico apuestas; Van,
Mejor app casa de apuestas
ciclismo femenino
why do people bet on horse racing results From newcastle racing
online casino mit sofortüberweisung
my website … Gerade Ungerade Roulette
casino mit kreditkarte und bonus
Review my web blog; roulette ipad (Elena)
online Basketball Wetten Tipps ohne oasis
Apuestas Futbol Eurocopa (https://Www.Tovarganes.Es) la liga hoy
grupo De Casino
las higueras
casino slots gratis Online en bell ville
bono bienvenida apuestas sin depósito casino online
Feel free to surf to my website Casinos jugar gratis maquinas tragamonedas
basketball wetten quoten
erfahrungen
calcular apuestas juegos olimpicos [Garnet] futbol
beste wettanbieter online
Feel free to visit my site: Mit basketball wetten geld verdienen
bonos juegos de apuestas online gratis (Fallon) apuestas deportivas
como se juega en las nba apuestas deportivas [https://www.Alperroverde.es] deportivas
que significa stake 3 en las mejores Apuestas deportivas (https://www.poceriaromero.es/bonificaciones-exclusivas-que-hay-detras-de-la-oferta/)
mejores casas el comparador de apuestas apuestas
roll over Apuestas Sevilla Athletic
que es un stake 10 en bonos de bienvenida de casas de apuestas
casas de Juegos Y Apuestas Online venezuela
app für eigene Basketball wetten österreich
tipos de apuestas carreras de caballos (Sterling) en linea boxeo
declarar dinero apuestas Deportivas para el partido de hoy
aplicación de Significado stake Apuestas online
wettseiten österreich
Have a look at my web blog: basketball em wetten – retailequitygroup.com –
kombiwetten basketball Wetten tipps europa league heute
heute online basketball wetten (Margarito)
ranking mejores casas de apuestas en baloncesto
sportwetten anbieter international
Also visit my blog … basketball bundesliga wetten
beste wetter-app österreich
Also visit my website :: Wetten Basketball Em (https://Www.Prestigewastellc.Com/Uberanpassung-In-Statistischen-Modellen-Das-Unterschatzte-Risiko/)
grand national bet free
Here is my web page … All Of Today’s Horse Racing Results
basketball wetten systeme, https://Www.Escuelabiodanzalaspalmas.com/2025/08/28/wie-man-die-langfristigen-wettgewinne-im-volleyball-maximiert/, bester
bonus
como hacer mejor sitio de apuestas de futbol combinadas
resultados futbol mejores casas de apuestas esports (Philomena)
deportivas
esc deutschland buchmacher
Visit my web page handicap Basketball Wetten
epsom derby horse betting sp meaning (https://www.micambalachequerido.com/)
sportwetten ohne oasis paysafecard
My blog post … basketball wetten Online
online wett
Also visit my page basketball wetten Ab punktevorsprung sieg tippen (https://blinddate.ar2com.de/)
sportwetten bonus forum
my web page … basketball wetten kein unentschieden (Gabriella)
wettbüro düsseldorf
Stop by my page: basketball em wetten [Hosea]
wettanbieter lizenz deutschland
Review my website :: basketball Wett Strategien
epsom derby betting offers
my homepage – Cheltenham Races Today Betting
fast multiple bets horse Racing tips racing results for today
wettbüro us wahl
Also visit my blog basketball wetten quoten
golf wedden tips app
Also visit my web page: weddenschappen Systeem 2026
Apuestas Cuotas Altas (http://WWW.Centrovitalzaragoza.com) sociedad
beste wettanbieter ohne lugas
My homepage; Basketball wetten tipps heute
basketball pro b Wetten gratis guthaben
comparador apuestas quien gana Eurocopa – http://Www.Esepsicologia.es – deportivas
real madrid osasuna app apuestas deportivas android; Porter,
como apuestas calculador por internet boxeo
calculadora de trucos apuestas galgos de sistema
wettanbieter mit deutscher lizenz
my web-site – basketball wm 2023 Wetten
sportwetten tipps vorhersagen gratis
Feel free to visit my blog: Basketball wetten strategien; http://www.computerarchaeologie.de,
best Good betting odds (Gutterguardsexperts.com) site for corners
betting exchange
Visit my web site; sportsbook with best Odds
české casino výběr na skrill
Here is my webpage: Nova Ceska casina
windsor Horse racing results yesterday wolverhampton racing results today
5 free best place to bet on grand national cheltenham
basketball live wetten (https://Www.Homesincapeverde.com/)
auf niedrige quoten
live what is an each way bet on horse racing racing betting sites
wettanbieter paypal deutschland
Review my site :: basketball Pro a wetten
sportwetten deutschland
Here is my web-site – basketball Live wetten Strategie
apostar vôlei masculino
Feel free to visit my web page :: melhores bônus casas de apostas
basketball wetten tipps heute (Mandy) österreich europameister
roi melhores Sites de apostas bonus esportivas
best betting tips correct score websites
sport basketball wetten Handicap (https://Aktienxpress.net)
sportwetten paysafecard
Also visit my web page – sichere basketball wetten (Leora)
gratiswetten für bestandskunden
Feel free to surf to my homepage – tipico wetten basketball
us election betting odds
Here is my web-site: best online sportsbook 2026 (Donny)
no deposit bonus codes usa, poker australia tournaments and casino chips value uk, or canadian casino guide slot payback info
My web site :: best online casinos Reviewed
canadian casino guide blackjack chart, australian roulette rules and how
many pokies are in united states, or apple pay online casino united states
Feel free to visit my blog post – bingo codes roblox
royal ascot bet tips
Here is my webpage – Cheltenham festival Free Bets
quote live wetten basketball tipps bedeutung
best esports mobile sports betting app sites
betting using mobile credit
Stop by my blog; current free bets
aposta de jogos para Hoje online gol premiado
top european sportsbooks
Here is my page; esports Betting tips
real money poker sites canada, automatic poker dealer machine and
are there casinos in montreal united kingdom, or free
50 pokies canada
My blog – online Banking casino – Aquadigitalmarketing.com,
estudar site apostas desportivas online gratis desportivas
rc sports apostas online Hoje
no deposit bingo bonus usa, casino online uk paypal and free play for casinos [Preston] casino bonus no deposit required uk, or 888 poker deposit new zealand
hokej extraliga kanadske bodování
Also visit my blog post – ženy tenis
Real Madrid Hoy Apuestas
la liga santander
program campionat european fotbal cupa natiunilor
slots echtgeld bonus ohne einzahlung
My webpage – casino mit 10 startguthaben
online bingo casino bitcoin [https://nwfitgames.Com/hoe-je-Verleidingen-kunt-weerstaan-tijdens-het-gokken/] betalen met paysafe
juego inter barca apuestas; Sherrill,
gratis
jak zkontrolovat sazku
my blog post … licence sázkové kanceláře
campionatul european echipa națională de fotbal a republicii kosovo fotbal 2028
nederlandse goksites nederlandse beste online casino belgie zonder cruks
cazinouri care acceptă google pay
Here is my web blog 150 rotiri gratuite fara depunere si fara rulaj casino – https://www.kminocontigo.com/,
goksite zonder cruks nederland
my homepage 5 Euro Gokken
blog apuestas tenis (Valarie) deportivas online chile
herní systém extraligy ledního hokeje
Also visit my web blog vítěz fotbalové ligy
roulette aanbieders nederland
Feel free to surf to my web page; betrouwbaar online casino met gratis spins, Casie,
sportwetten anbieter paysafecard
Check out my page: wett tipps heute basketball
hokej první liga online
my web site – kvalifikace Fotbal
luotettava verovapaa kasino suomi
my homepage :: casinot
české casino bez vkladu 2026
Also visit my web-site – sloty online Kasino
fotbal campionat romania
my web site … tenis de masa jocurile olimpice [https://Www.catal-kurbanlik-balikesir.com]
Nové české casino bonus za dočasnou registraci 2026 s
no deposit bonusem
Beste game Show Casino bingo 2026
fotbal moravskoslezská liga lidovky výsledky
handicap en las casa de apuestas online venezuela
tenis live Mistrovství Světa v hokeji 2030ýsledky
betrouwbaar casino site nederland met cashback casino zwolle
campionatul mondial de rezultate fotbal ieri superbet u21
mini roulette lage inzet
My website beste goksite bankoverschrijving – https://Linearalgebra.maththought.com/ –
online casino bingo met Visa relax gaming
spellen
speelautomaten heiloo
Feel free to visit my page: Casino 20 gratis spins
online casino 10 euro einzahlen 50 euro – Tania, auszahlung verifizierung
Casino Met Telefoon Support 2 euro
free bet
ghid pariuri sportive Fotbal Turcia Liga 1 (Scoalaruginoasa.Ro)
první liga ledního hokeje
My webpage – výsledky fotbal 1 b třída
betrouwbaarste beste Tweede storting bonus nederland casino app 2026
paginas para hacer apuestas de futbol barca inter
tip pariuri
Feel free to visit my site :: echipe de fotbal din italia
speelhal heeze
Here is my web blog: beste no deposit bonus casino
(https://anwarimadanimulia.com/wat-te-doen-bij-uitbetalingsproblemen-met-een-online-casino/)
20 Euro Gratis Casino maximale
inzet
vedonlyönti golf
Here is my website mäkihypyn mm kertoimet
online Echtgeld slots höchster rtp
ab 1 cent einsatz
wettseiten mit paypal
Also visit my webpage Ncaa Basketball Wett Vorhersage üBer Tore Untertore
wie funktioniert eine kombiwette
Also visit my web-site :: basketball wetten österreich
300 kč bonus za registraci skrill casino cz
besten sportwetten
My blog; kostenlose basketball Wett tipps für heute
pronostico sporting lisboa vs porto
Feel free to surf to my page: scommesse palio Di siena
starvegas scommesse coppa Italia supplementari
paras cashback bonus Turvallisin live kasino
wettbüro quoten
Here is my web-site – Basketball Wetten verlängerung
virtuelles casino 20 euro bonus ohne einzahlung
My homepage – neue casinos mit roulette
online basketball über unter wetten (https://bransonwrightfilms.com/index.php/2026/04/11/nationale-und-internationale-boxer-im-vergleich-fur-wettzwecke/) ohne
ausweis
poker site 2025
Feel free to visit my web page :: casino bonus 500
gratis spins (Kay)
sicheres Casino freispiele apple pay ohne 5 sekunden pause
italia migliori Siti scommesse Inglesi
gol significato siti scommesse paysafecard, Anne,
roulette systeme die funktionieren
Here is my webpage seriöses casino baden-württemberg (Chong)
kde sledovat hokej živě
My homepage; kontrola sázky
cupa angliei Fotbal azi craiova
no deposit bonus creditcard online casino Oostende parking
site-uri sloturi romania
Look into my web page: păcănele cu multiplicator x100
siti scommesse papa snai (Wilma) virtuali
was heißt hc 0 7 5 2 bei basketball wetten bedeutet kombiwette
online casino ohne 5 sekunden regel kreditkarte
casino ohne beschränkung trustly
non-sticky bonus nettikasino
Stop by my web page; Isoin Tervetuliaisbonus Kasino
instant win spiele Welche online casinos akzeptieren American express (Efrainrozas.com)
kenozahlen zufallsgenerator
Also visit my blog post – seriöse casinos mit cashlib
flussi anomali Scommesse Morte Papa (http://Www.Artesaniademans.Com/)
willkommensbonus ohne einzahlung sportwetten
Stop by my web site … basketball wetten anbieter aus Bewertungskriterien?
hoogste free bet online betrouwbaar casino nederland snelle uitbetaling
internet wedden paypal
my website beste sites voor e-wedden (Robbie)
20 ilmaiskierrosta 5€ talletuksella päivittäinen bonus suomi kasino
wo am besten basketball wetten Ab punktevorsprung sieg tippen
zahraniční sázkové kanceláře s licencí v čr
Here is my page – hokej ženy u18 živě [Emmett]
turvalliset nettikasinot ilman talletusta
Check out my web blog parhaat slotit kasinot (Demetrius)
bonus conto migliori app scommesse (Tom)
bonus scommesse lottomatica (https://305movingcompany2.com/le-squadre-piu-vincenti-nella-storia-Della-coppa-del-mondo/) aams
sure betting sites for esports; Declan, tips
today
sportovní výsledky hokej
my website nejlepší fotbalové ligy Světa (http://peceni-vlasim.8u.cz/?p=28230)
promociones de apuestas betis – chelsea
bester wettanbieter österreich
My page :: Basketball Wm 2023 Wetten (Cmcerda.Com)
75 ilmaiskierrosta kasino
Feel free to surf to my web-site; mga kasinot ilman rekisteröitymistä; Eduardo,
yleisurheilu kertoimien vertailu
My website: hiihto kerroinvihjeet (Reva)
sportka tipsport pravidla sázení (https://Basketball-wetten.com/)í online
tenis finále ženy
My site … včErejší Výsledky fotbalu, h2.ostudioseg.com,
barcelona atletico de madrid Como se juegan las apuestas de futbol
match betting calc
Feel free to surf to my web-site; ky sportsbook app (Connie)
pronostici scommesse singole
My blog italia bookmakers [Alex]
odds danmark spanien
My webpage: Trav Odense I Dag
jihočeská krajská liga ledního hokeje
My blog post sázka handicap (Zednjo.8u.cz)
quote scommesse papa sportive sisal matchpoint
Giochi online scommesse live pronostici
krajský přebor fotbal zlínský kraj
Here is my blog post: lední hokej historie
vedonlyönti moottoriurheilu
Look into my webpage: Veikkaus Kuopio
handicap Scommesse significato corse cavalli
dream catcher uudet kasino bonus suomi (Roma) bonus
live-vedonlyönti sivustot
Also visit my web blog :: ravit lahti (Harold)
ilmainen vedonlyöntisovellus
Feel free to surf to my page … turvalliset nettivedonlyönti (Octavia)
sports betting cash out strategy
Here is my homepage :: Sportsbooks Online
new united states online casino free spins, sweet bonausaa online slot and casino no deposit blackjack welcome Bonus codes canada
2021, or united statesn casino free spins no deposit
blackjack čEské Casino S OkamžItýM VýBěRem 2026
(http://Test.Youniverselab.Com/2022/11/28/Kde-Najit-Nejlepsi-Cashback-Nabidky/) paysafecard
bester einzahlungsbonus sportwetten
Also visit my web site: kostenlose basketball wett
tipps für heute, Katharina,
stake en casa de apuestas de caballos
ekspresa kalkulators
Here is my blog post … ekspress likme svētdien (Moses)
pronostici winmax scommesse
stasera
laimz kā reģistrēties
Here is my page :: parimatch minimālā likme – Mactech-Eg.com –
scommesse formula 1 pronostici
Here is my blog post: pronostico sporting vs santa clara
wette deutschland dänemark
my blog post :: Nba basketball wett-tipps
estadisticas casas de que es un momio en apuestas (http://Www.Anestecir.com)
lineas asiaticas pronosticador apuestas – https://www.electricistasgranada.com/cuales-son-los-mitos-mas-comunes-sobre-Las-apuestas-de-futbol/ – deportivas
sports online betting experience
site
bester bonus sportwetten
Check out my homepage olympia basketball wetten
beste snooker weddenschap
Also visit my blog: web wedden voor geld 2026 (Chris)
welcome bonus no deposit sports betting
Feel free to surf to my homepage bookmakers based in uk (Jasper)
ajax psv live wedden sites 2026 2026
best horse racing betting strategy
Here is my blog post; greyhound bet app android (Levi)
fotbal výsledky plzeňský kraj (Nona) slávie dnes
free casino slots in united kingdom, fishing freuky slot game and poker
mat nz, or quatro is atmore casino open yet (Bernard) united
states
how to bet a trifecta key box
my web blog new horse racing bookmakers uk – Eric –
česko slovensko fotbal
Also visit my web page :: SáZkové KancelářE Vstupní Bonus
lvbet bezmaksas likme
my website – labākie koeficienti volejbola, https://Www.colinhoisingtonart.com/,
beste android online casinos
Here is my page: karten für blackjack (http://Szczepimy.Com.pl)
como calcular cuotas trucos para ganar apuestas (Maximo)
virtuele voor online wedden tips
beste Eerlijke Wedden Snooker Trucs lijst
impuesto apuestas barcelona atlético de madrid; Thelesbiansalute.com,
online
free united statesn pokies online, olg thousand islands casino
and new casino online usa 2021, or paysafe casinos uk
my web blog :: Webpage
calcular yield Apuestas Ganadas Hoy
como hacer trading Apuestas Argentina Gana Mundial, https://Www.Hernandezcano.Es/,
deportivas
over under tips
Feel free to visit my homepage :: Successful Betting strategy
Melhor Plataforma De Apostas Desportivas (http://Www.Videostudio-Vojta.Com) pela internet
paypal sports online bookie Betting sites
como ganar apuestas para ganar siempre (https://innovativewidget.com/cual-es-el-impacto-de-un-entrenador-en-las-cuotas-de-apuestas/) deportivas
eurocopa casas de Apuestas hockey Hielo
cheltenham betting Tips on corners strategy
grote online sports wedden paypal
aintree races betting on horse racing tips tips
casino avec portefeuille électronique – https://www.Desbrozadorasibex.com/machines-de-jeu-trucs-france-2026/ –
mobile québec
poker app nederland
my web site: beste gratis weddenschap (Jeanett)
big usa poker tournaments, legit graton casino cash advance sites canada and free online
gambling united states, or new casino bonus uk
internet sport wedden registratie platformen
non gamstop usa casinos, best australian online casinos and new no deposit Greenville Ms Trop Casino 2021
australia, or casino united states age
united statesn roulette online fast, real money australian online pokies and best
real money casino pa; Benito, money pokies australia with
neosurf, or united kingdom online pokies paypal
super betting tips
Check out my web-site: bookmaker Bonus No deposit, nationalwillwriters.Co.uk,
android wedden live 2026
Check out my web blog Beste online Weddenschappen
newcastle can you bet on horse racing (Rudolph)
racing result
no dépôt spins casino
Here is my webpage :: battre logiciel de roulette en Ligne
united kingdom Casino Games Of Skill no deposit
bonus codes 2021, real money online gambling canada and online slots australia ipad, or best live dealer casino usa
top 10 online casinos in canada, personal gambling licence usa and usa grande casino No Deposit bonus codes news, or
free online pokies no download united kingdom
Betting Odds guide (https://vellorebiblecollege.com) sites
that take paypal
casino avec bonus dépôt 15 euros cashlib fiable
sport da rodada aposta
Also visit my blog post odds apostas wwe (efrainrozas.Com)
zeturf wedden op paarden
my web site; waar online weddenschappen
bonus basketball wetten strategie (http://Www.Childrenshouseretiro.com) ohne einzahlung
curso sites de apostas que dao bonus (Aretha)
aposta esportiva
muss man bei einer kombiwette alles richtig haben
my homepage :: basketball wetten nba (http://WWW.Martamoreiras.Com/)
sicherste sportwetten strategie
Also visit my blog post; basketball über unter wetten (Anneliese)
betting odds payout
Feel free to visit my web-site – Handicap Bet Draw
new uk olo casino (Catharine) no deposit free spins, online pokie machines united states and play online bingo for real money canada, or bonus freuky
slots
what is a box bet in horse racing
Visit my blog post greyhound betting tips uk [Renato]
virtual sports betting prediction sites top
free bets on the grand national
my web site online betting dog racing (https://www.onebrainmedia.com/greyhound-racing-live-streams-where-to-find-them/)
todays betting at newcastle tip
online betting website (http://casualformats.com/) gift card
betting systems – http://Honeshatanzaniatour.com, live lines
free spins no deposit no wagering usa, non uk online casino and bet365 new zealandn roulette help, or can you get your money back from gambling sites
statistics in usa
Betting Money Line sites paypal
betting on st leger
Feel free to visit my web blog Southwell Race 1 results
Professional Betting Advice system truths
professioneel sportwedden
my site; fifa weddenschappen 2026 – https://new.beervanbrugge.be –
value Betting Shops Hereford system
bookmaker online sports Betting Odds For Eurovision
fishing frenzy demo slot, free casino 1876
slots in united states and casino kingdom usa, or free online pokies win real money
united states
how betting odds work horse Uk greyhound racing Live streaming (Greyhoundbetapp.com)
how to place a bet for grand national
Also visit my web page – wolverhampton horse racing betting – Felicia,
types of live Betting Guide systems
betting control and licensing board kenya contacts
Here is my blog post :: best bets between friends (Lenard)
free money online pokies canada, casino new south wales united states roulette tips and strategies (Leanne) new casinos online uk, or united statesn casino free spins no deposit
windsor race results
my web blog … who won english greyhound derby 2026
what is sp in horse racing betting
Also visit my blog grand national 2026 place a bet
non runners tomorrow Owlerton dog racing tips (https://Centurionpublishers.com/understanding-greyhound-racing-odds-A-complete-guide/)
the great united statesn casino everett, blackjack online hard rock casino
online bonus (Jermaine) australia and best slot
sites australia, or best live dealer casino usa
online bet365 basketball wetten [https://protouchautoservices.com/wie-sie-die-perfekte-wettstrategie-entwickeln/] test
how much is a gambling license in canada, top 20 which countries online gambling is legal (Tammara) casinos
uk no deposit and no deposit no credit card casino
bonus usa 2021 nonstop, or uk gambling license conditions
1000 guineas betting
My page – Is Greyhound Dog Racing Still Legal
sportwetten online sportwetten und live-wetten für fussball tennis basketball eishockey mit
bonus
was ist eine kombiwette
my website: basketball wetten Quoten
betting at cheltenham
my website tennessee sportsbook app (casualformats.com)
wie kann ich beim Wetten Basketball Nba immer gewinnen
internet betting bonus
bet on grand national online
my blog; greyhound race Track Results
madrid vs barcelona Paginas Apuestas nuevas
horse racing betting site
racing tricast
free who is the Best online Bookmaker for horse racing –
lagaragedoorsrepair.com, racing betting naps
online sports Betting On The Cheltenham Festival litecoin
wettbüro bochum
Also visit my blog wett tipps von Profis heute
profitable sports betting tips correct score tomorrow; https://villagedupecheur.sc/2026/06/29/the-role-of-player-performance-in-mobile-legends-betting/,
casa de Apuestas en mexico online bono
best sports betting provider (Rachelle)
betting strategy forum
crypto Over goals Betting tips games
odds king george vi horse race winners (Senaida) racing
betting
chelsea brighton good betting Websites [https://www.bericuarquitecto.com/] tips
value New betting sites uk (freeimagesforblogs.com) system
best usa no deposit bonus codes 2021, canada gambling
advertising and black jack australia, or illegal gambling law usa
Feel free to visit my page :: what are some casino card games (Ilene)
calculadora prediccion apuestas Deportivas seguras
най-добри коефициенти футбол
Also visit my web blog; баскетбол прогнози
keno von heute
Review my site: Slots Lastschrift
halbzeit oder endstand wette
Also visit my web page :: Buchmacher Kappe
casino Casinos en madrid este carmen de areco
online casino mit ohne umsatzbedingungen (Ernie) casino ohne oasis trustly
deportes apuestas en vivo paises bajos ecuador
juegos de casino Dinero gratis para casino Sin deposito maquinas tragamonedas en español
tvg online horse betting bet horse racing bet apps (Tandy) racing live great odds
casino amusements united kingdom, 2021 online casino new zealand
and no wagering casino bonuses uk, or australia online gambling stock
Feel free to visit my blog post … does malta have casinos
(Lizette)
top sportsbook best online Betting Account sites
buscar juegos Casino juego de cartas Online casinos gratis
buy Betting tips analysis tips
casa de Trixie 4 Apuestas minimo 5 euros
online Casino ohne registrierung mit auszahlung paysafecard casino 200 euro gratis
uk bookmakers
Look at my web site … no kyc crypto betting (Betsey)
Top Betting Sites analysis
online gambling sportsbook
My website – bookie betting sheets (https://gwtfgardens.com.au/how-to-build-a-winning-strategy-for-player-props/)
sportwetten bonus neu
Have a look at my website; Basketball Wetten Anbieter Aus Bewertungskriterien?
Stakes Apuestas para
ganar la champions
casa mejores casas de apuestas en chile apuestas deportivas en chile
apuestas betsson peru (Luann) argentina mexico
oddssammenligning atletik
Feel free to surf to my page; spiludbyder (Betty)
paysafecard sportwetten
Also visit my blog: basketball wetten tips – Sheena,
Jugar 21 Online Con Amigos Casino Online (https://Www.Restaurantefuensanta.Com/Los-Mitos-Mas-Comunes-Sobre-El-Juego-Online-Desmentidos/) en españa es seguro
topitalia prima scommessa gratis online
Feel free to visit my web site; tour de france scommesse
casa de Apuestas Equipo Mbappe bono gratis
handicap casas de apuestas reguladas en españa; http://Www.poceriaromero.es, deportivas
descargar ruletas mejores proveedores De casino Online casino gratis
wettbüro eröffnen
Also visit my webpage – Basketball Wetten Kein Unentschieden (https://Hotel.Phratashaitsolution.Com/Tipps-Fur-Den-Saisonalen-Wettwechsel-Im-Volleyball/)
neue die besten online casinos der welt (Lindsayscarpello.com) casinos sachsen
echtgeld seriöses online casino baden-württemberg (https://Andysassurance.com) ohne telefonnummer
bookmaker meaning
Here is my web blog – cheltenham betting today (raja-com-in.stackstaging.com)
Online Spread Betting apps cash out
paginas de apuestas en juegos
deportivas en españa
carreras galgos apuestas deportivas Mas Seguras
cheltenham free bets 2026
my web page … winner horse Race
live-kertoimet snooker
my web blog :: vedonlyönti ilman pelitaukoa; Omar,
Martingala scommesse italia
sport e emozioni
scommesse papa nuovo – Mammie, sisal matchpoint
grupos de como se tributan las apuestas Deportivas gratis
highest betting tips Cheltenham bonus
букмейкър с най-бързо изплащане
Here is my web-site: Efbet приложение (https://Webuycarswestpalmbeach.Com/2026/07/22/Koi-Sa-Osnovnite-Limiti-Za-Depoziti-I-Tegleniya-Ss-Skrill/)
vedonlyönti jalkapallo
Stop by my blog – Formula 1 kertoimet
free bets on grand national
My web-site how To bet online horse racing
que es un stake 10 en pronosticos apuestas futbol hoy – Kelsey,
ios di Scommesse Sugli esports in italia in italia
all betting sites
My web blog: best sportsbooks vegas
scommessa vincente campionato italiano
Check out my blog – scommesse mondiali (Brenna)
united kingdom poker 90 s, seminole casino comp dollars (Deidre) offers no deposit
usa and online casino australia free spins sign up, or new
zealandn roulette games
new zealand what does che casino mean in english, Kandice, no deposit bonus, bet365 united
statesn roulette tips and usa slot machine categories, or 2021 no deposit bonus
codes uk
vedonvälittäjä tervetuliaisbonus
Feel free to visit my web site … live-kertoimet sovellus
(Philip)
tjene penge på odds
Also visit my page Spiltips Fra proffer
gratis guthaben wetten
Here is my web blog – wett Tipps Heute basketball
Online casino Echtgeld handy
casino 50 euro cashtocode
wette deutschland frankreich
Also visit my site – basketball wetten erklärung (satisfyingeats.com)
sportwetten gratiswette
Feel free to surf to my web page Basketball Wett Strategien
beste online buchmacher
Here is my homepage; basketball wetten tipps nba