
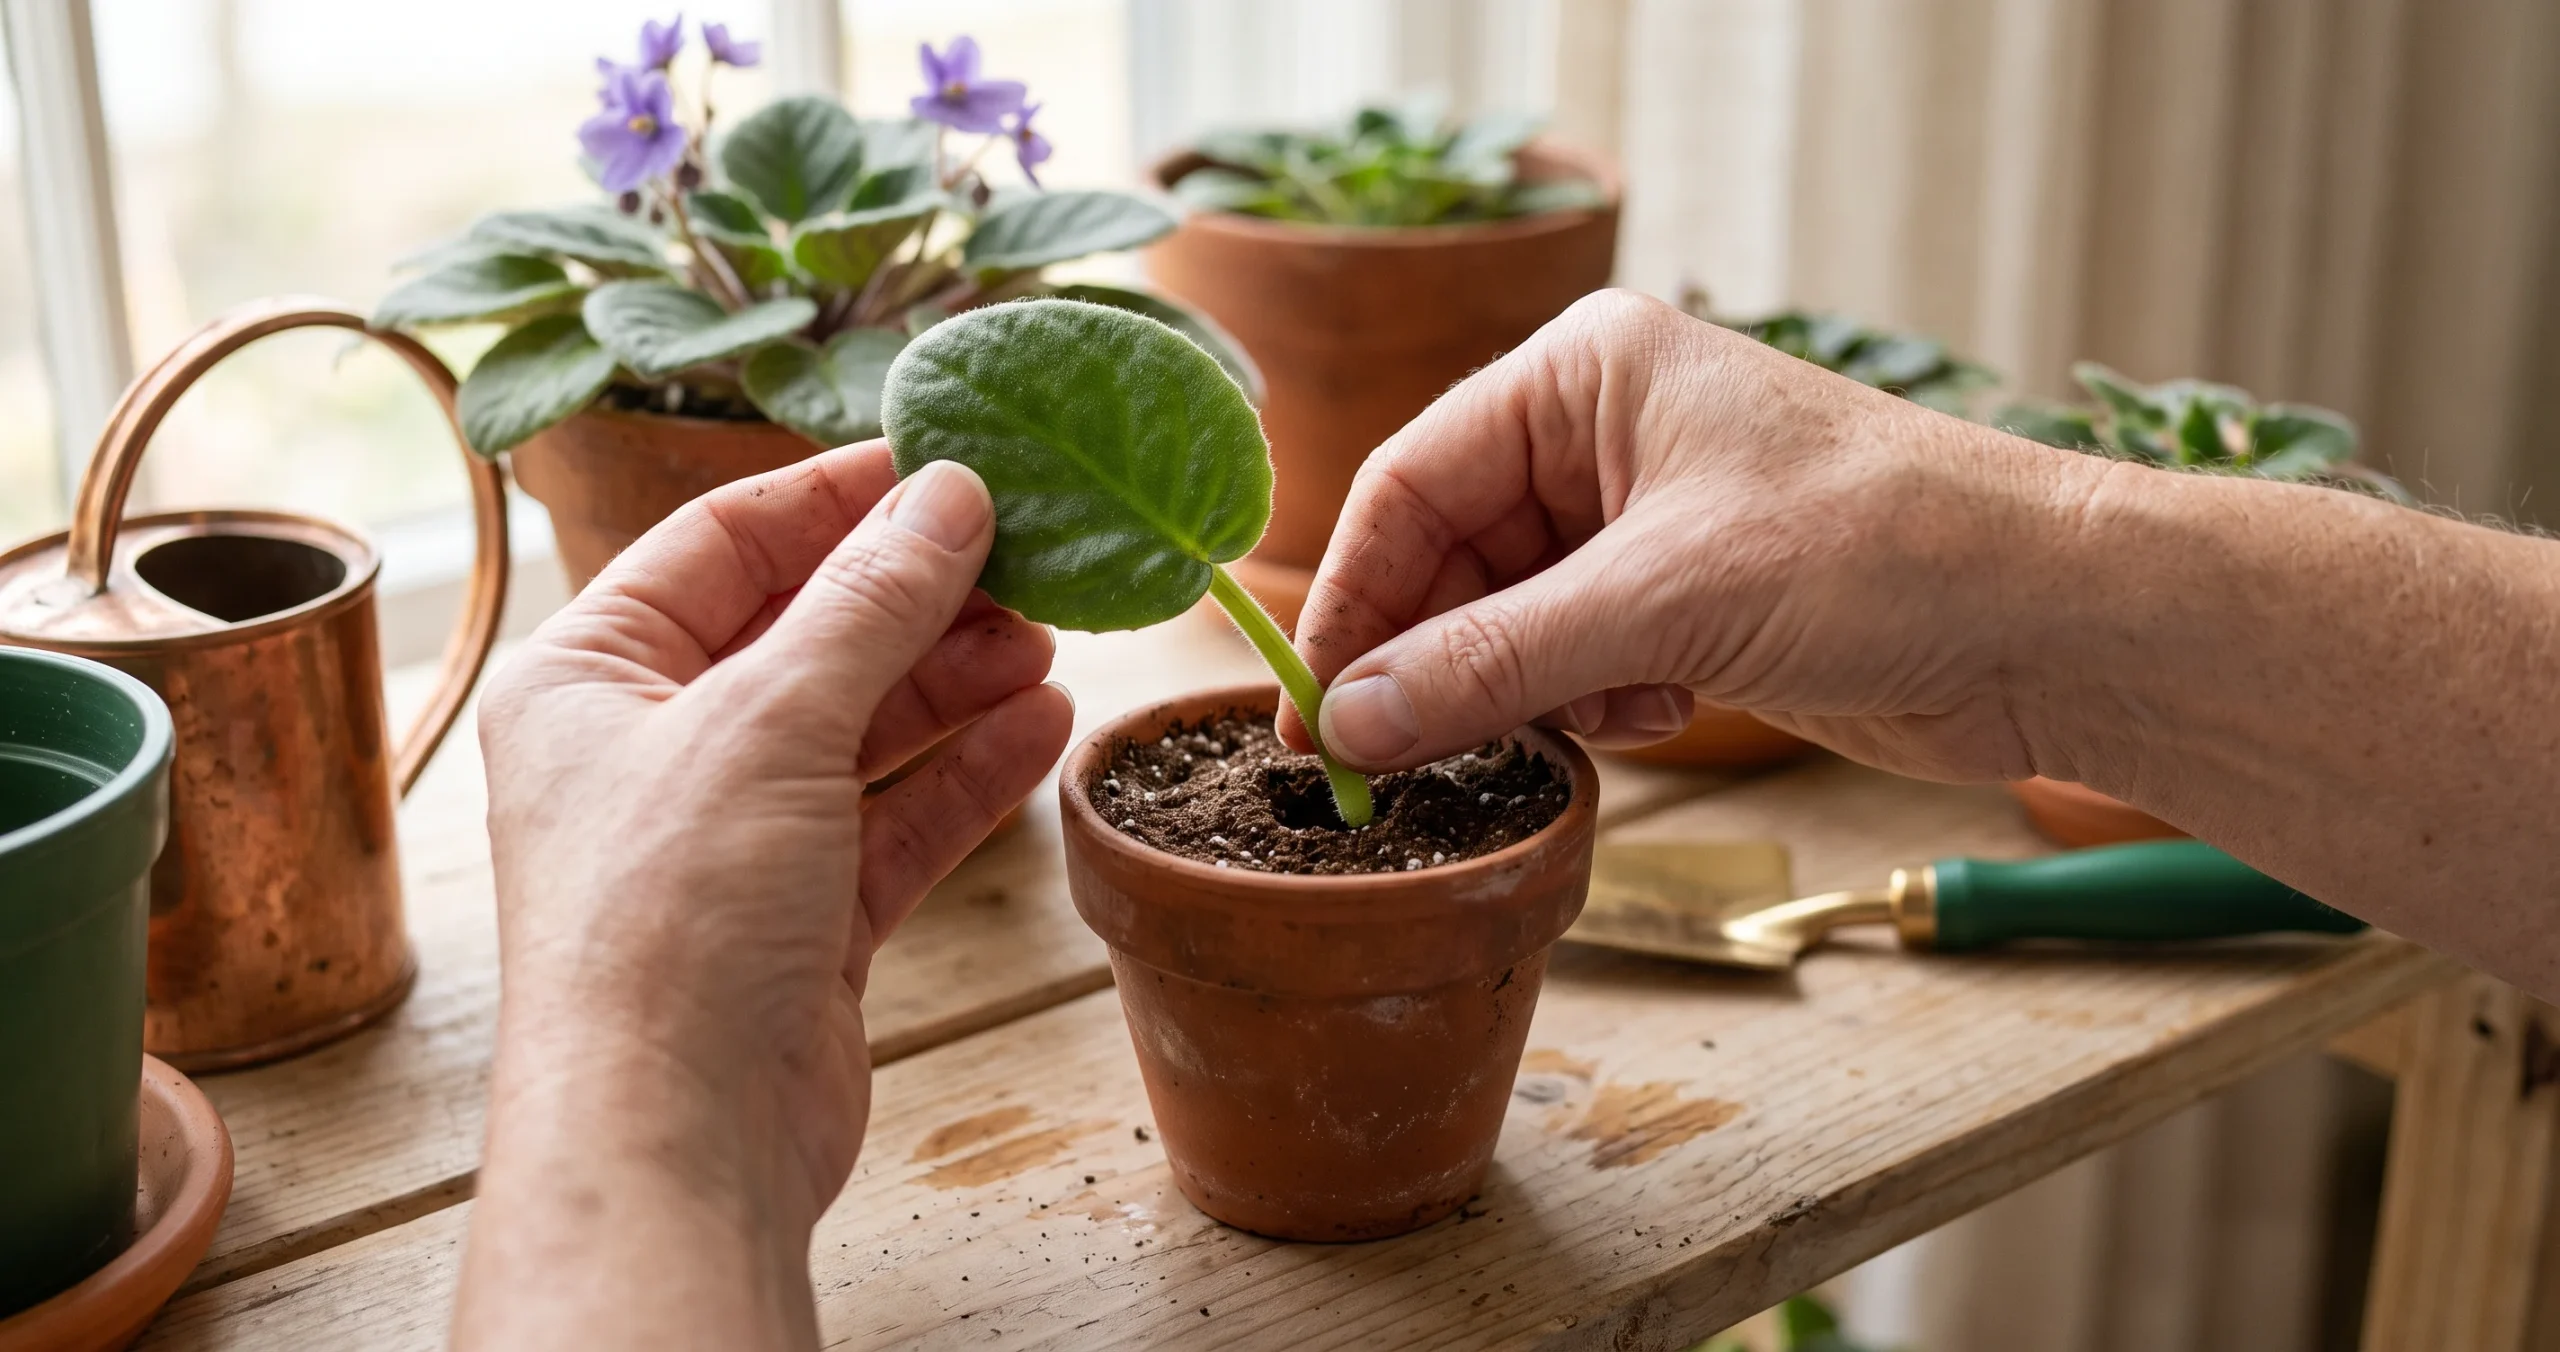
African violets are among the most rewarding houseplants to multiply at home because an entire cluster of young plants can develop from a single healthy leaf. African violet leaf propagation requires very little equipment, and when moisture, light, and drainage are managed correctly, even beginners can achieve reliable results.
Unlike many houseplants that need a piece of stem containing a node, African violets can produce new roots and plantlets from a leaf blade with its attached petiole. The process is slow enough to teach patience but fast enough that you can usually see meaningful progress within a couple of months.
Table of Contents
- Why African Violets Are So Easy to Propagate
- Best Time to Propagate African Violets
- Choosing the Right Leaf
- Preparing the Leaf Cutting
- African Violet Leaf Propagation in Soil
- Propagating an African Violet Leaf in Water
- How Long Until Plantlets Appear?
- Separating and Potting the New Plantlets
- Common Mistakes That Cause Rot
- Common African Violet Propagation Myths
- Frequently Asked Questions
- Conclusion
Why African Violets Are So Easy to Propagate
African violets, commonly grown from plants in the genus Streptocarpus section Saintpaulia, have an impressive capacity for vegetative reproduction. A healthy leaf and its petiole contain living tissues capable of producing adventitious roots and eventually new shoots.
That means you do not need seeds or a long piece of stem. When the petiole is placed in favorable conditions, roots develop around its buried base, followed later by tiny plantlets.
Iowa State University Extension describes African violets as easy to propagate from leaf cuttings and notes that several new plants may form around the base of a single petiole.
This makes African violet leaf propagation useful for expanding a collection, sharing favorite plants, or preserving a cultivar when an older parent plant is declining.
Because vegetative propagation produces plants genetically derived from the parent, leaf cuttings generally preserve the characteristics of ordinary cultivars. However, some chimeral African violets may not reproduce their flower pattern reliably from leaf cuttings.
When Is the Best Time for African Violet Leaf Propagation?
African violets grown indoors can potentially be propagated throughout the year when conditions are favorable. However, spring into early summer is especially convenient because increasing natural light and active growth can support faster establishment.
Iowa State Extension recommends early spring as an ideal period for leaf-petiole propagation while noting that most houseplants can still be successfully propagated at other times of year.
Winter propagation is therefore possible. Expect the process to take longer if your home is cooler or provides substantially less light.
Bright indirect light is preferable to intense direct sun. Strong sunlight can overheat a covered propagation container and stress a leaf before it develops roots.
Start With the Right Leaf
The success of African violet leaf propagation begins before the cutting ever touches soil.
Choose a firm, healthy, fully developed leaf from a vigorous parent plant. Avoid yellowing, damaged, spotted, unusually soft, or pest-infested foliage.
A mature leaf from the middle portion of the rosette is often a practical choice. Very old outer leaves may be less vigorous, while the tiny leaves in the center are better left on the parent plant to support continued growth.
Whenever possible, water the parent plant appropriately before taking cuttings so the leaf is fully hydrated. Iowa State Extension specifically recommends beginning propagation with hydrated plant material because an unrooted cutting cannot yet replace water efficiently through roots.
Use a clean, sharp knife or razor rather than tearing the leaf away.
How to Prepare the Leaf and Petiole
Remove the selected leaf while retaining roughly 1 to 1½ inches of petiole. This is the narrow stalk connecting the leaf blade to the crown of the parent plant.
Iowa State Extension recommends this approximate petiole length for African violet cuttings.
Make a clean cut rather than crushing the tissue. Damaged, ragged tissue provides more opportunity for deterioration before rooting occurs.
You will sometimes see growers recommending a 45-degree cut at the bottom of the petiole. A clean angled cut is perfectly acceptable, but the success of the cutting depends far more on healthy tissue, sanitation, aeration, moisture, warmth, and suitable light than on achieving one exact cutting angle.
The more important 45-degree recommendation from Iowa State concerns inserting the petiole into the rooting medium at approximately that angle.
African Violet Leaf Propagation in Soil: Step by Step
For most home growers, starting the cutting directly in a porous rooting medium is an efficient approach because the new roots develop in a soil-like environment from the beginning.
1. Prepare a Small Container
Choose a clean, small pot or propagation cup with drainage holes.
Oversized containers are unnecessary and can hold a large volume of wet growing medium around a very small cutting.
2. Prepare an Airy Rooting Medium
The growing medium needs to retain some moisture without becoming waterlogged.
Iowa State recommends a moistened mixture of equal parts vermiculite and coarse sand for African violet leaf cuttings. Other porous propagation mixes incorporating materials such as perlite, vermiculite, or peat-based components can also provide the necessary balance of air and moisture.
African violets have fine roots and perform well in loose, well-drained, soilless media. The University of Minnesota Extension similarly recommends well-drained soilless potting mixes for established African violets.
3. Moisten Before Planting
Moisten the propagation medium evenly before inserting the cutting.
It should feel damp but not saturated. If water can easily be squeezed from the mixture, it is wetter than necessary.
4. Make a Planting Hole
Use a pencil, chopstick, or similar clean object to make a small hole.
This prevents the delicate cut surface from being scraped as you push it into the medium.
5. Insert the Petiole
Place the petiole into the hole at approximately a 45-degree angle and gently firm the medium around it.
Keep the leaf blade above the growing medium. Burying large portions of the leaf unnecessarily increases contact between moist material and leaf tissue.
6. Provide Humidity
An unrooted leaf loses moisture but cannot yet replace it efficiently.
Place a clear plastic bag or transparent propagation dome over the container to maintain higher humidity. Keep plastic from pressing against the leaf and allow some air exchange rather than creating a permanently airtight, soaking-wet environment.
Iowa State notes that maintaining high humidity reduces water loss while the cutting develops roots. Iowa State University Extension’s leaf-petiole propagation guide
7. Provide Bright, Indirect Light
Keep the cutting in bright, indirect light and normal comfortable indoor temperatures.
Avoid a hot, sunny windowsill inside a sealed plastic bag. The miniature greenhouse effect can rapidly raise temperatures.
Propagating an African Violet Leaf in Water
Water propagation is popular because it lets you watch the roots develop.
Start with the same type of healthy leaf and clean petiole. Place only the lower part of the petiole in clean water while keeping the leaf blade above the surface.
A narrow-necked container can help support the leaf. Alternatively, stretch plastic wrap or foil over a small container and make a hole just large enough for the petiole.
Place the cutting in bright indirect light and monitor the water level. Refresh the water regularly rather than allowing it to become cloudy or stagnant.
Iowa State Extension recommends changing propagation water once or twice per week and transferring water-rooted cuttings when roots are about an inch long.
Soil vs. Water: Which Method Is Better?
Both can work, but they are not identical.
Direct propagation in a porous medium eliminates the need to move newly formed roots from water into potting mix. The roots produced in water tend to be coarser and are not as well adapted to growing in potting medium, so some temporary transplant stress can occur after the cutting is moved to soil.
Water propagation has one major practical advantage: visibility. Watching roots emerge makes it easier for beginners to understand what is happening below the surface.
If simplicity is your priority, direct rooting in an airy medium is an excellent choice. If observing root development is part of the enjoyment, water propagation is also reasonable.
How Long Does African Violet Leaf Propagation Take?
Patience matters here.
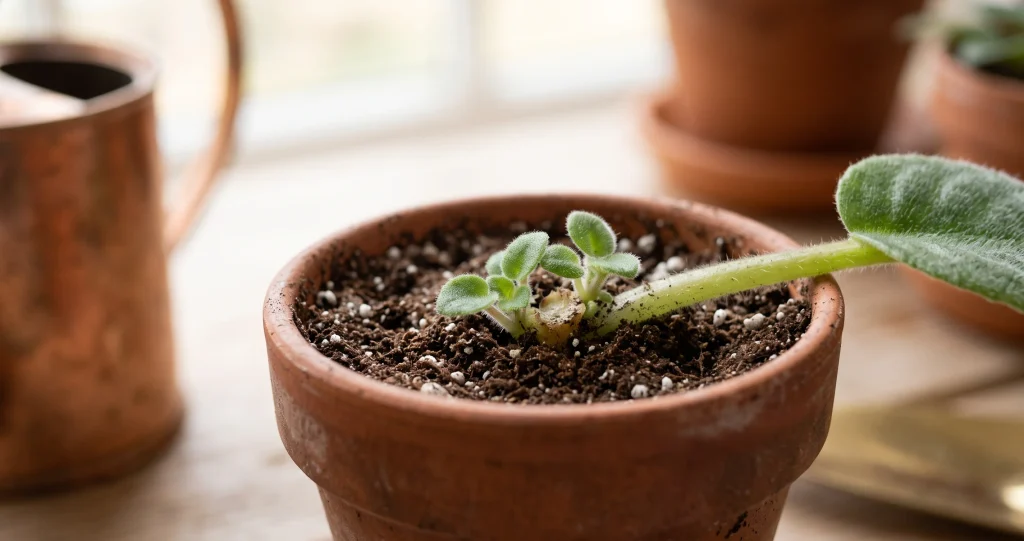
Under favorable conditions, roots commonly begin forming in approximately three to four weeks. New leaves or plantlets generally become visible around six to eight weeks after the cutting is started.
These are guidelines rather than deadlines.
Temperature, light, cultivar, leaf health, season, and moisture all influence development. A cutting that remains firm and healthy may simply need additional time.
The first plantlets are tiny. They usually emerge around the base of the original petiole and gradually develop their own leaves and root systems.
One mother leaf can produce several plantlets rather than just one.
When to Separate African Violet Plantlets
Do not rush this stage.
Allow the babies to develop enough leaves and roots that they can survive independently. Iowa State recommends separating them once adequate roots have formed; its more recent African violet guidance suggests waiting until the young plants are several inches tall before separating and potting them individually.
Remove the cluster carefully from its container and gently loosen the growing medium.
Look for natural divisions between individual crowns. Separate the plantlets carefully with your fingers or a clean blade while preserving as many roots as possible.
Plant each baby into a small container filled with a loose, well-draining African violet or houseplant mix.
After transplanting, keep the young plants in bright indirect light and maintain appropriate moisture while their root systems establish.
If you grow other indoor plants, understanding how roots function can prevent unnecessary cutting and repotting. Our guide to Monstera aerial roots and what they actually do provides another useful look at how specialized roots help houseplants grow.
Common Mistakes That Cause Rot Instead of Roots
Rot is one of the most common failures in African violet leaf propagation, but it usually has an identifiable cause.
Keeping the Medium Saturated
Moist does not mean waterlogged.
Roots require oxygen as well as water. Constantly saturated growing medium reduces aeration and encourages tissue deterioration.
Established African violets are also vulnerable to root and crown rot when their root zone stays excessively wet.
Using Dense Garden Soil
Outdoor garden soil is inappropriate for a tiny indoor propagation container.
It can compact, drain poorly, and remain wet for too long. Use a clean, porous propagation medium instead.
Starting With a Weak Leaf
Propagation cannot transform diseased or severely stressed tissue into a strong cutting.
Start with a firm leaf from a healthy parent plant. Avoid propagating material from plants showing active disease or serious pest problems.
Burying the Leaf Too Deeply
The petiole needs contact with the rooting medium, not the entire leaf blade.
Deep planting can expose more tissue to persistent moisture and makes emerging plantlets work farther to reach light.
Too Much Direct Sun
A propagation chamber can become surprisingly hot in direct sunlight.
Provide bright indirect light rather than intense sun, particularly when the cutting is enclosed.
Constantly Pulling the Cutting to Check for Roots
New roots are delicate.
Repeatedly removing a cutting to inspect it can break emerging roots and disturb the moist environment around the base. Let the leaf’s condition and eventual new growth tell you how the process is progressing.
Common Myths About African Violet Leaf Propagation
Myth: Rooting Hormone Is Required
African violets naturally root readily from healthy leaf-petiole cuttings.
Rooting hormone can be used, but successful propagation does not depend on it. Healthy material and suitable growing conditions are more important.
Myth: The Leaf Must Be Placed in Water First
It does not.
African violet leaves can root directly in a suitable propagation medium. Water is an alternative method, not a required preliminary stage.
Myth: More Water Produces Roots Faster
Usually, excess moisture increases risk rather than speed.
The goal is to provide enough moisture to prevent the cutting from dehydrating while maintaining oxygen around the developing roots.
Myth: A Leaf That Has Not Produced Babies After a Month Has Failed
Not necessarily.
Roots may be developing before any new foliage becomes visible. Since plantlets commonly appear around six to eight weeks, a healthy-looking cutting deserves more time.
Myth: Every Cutting Produces Exactly One New Violet
A single African violet leaf can produce multiple plantlets.
These can eventually be separated and grown as individual plants.
Frequently Asked Questions
Can you grow an African violet from just one leaf?
Yes. A healthy leaf with an attached petiole can form adventitious roots followed by one or more plantlets.
How long does African violet leaf propagation take?
Roots commonly develop in about three to four weeks, while new plantlets may become visible after approximately six to eight weeks. Environmental conditions can make the process faster or slower.
Is soil or water better for propagating African violets?
Both methods can succeed. Direct rooting in a porous medium avoids the transition from water-grown roots to soil, while water propagation allows you to observe root development.
How long should the leaf stem be?
Leaving approximately 1 to 1½ inches of petiole is a practical guideline supported by Iowa State University Extension.
Why is my African violet cutting rotting?
Excess moisture, poor drainage, dense growing medium, damaged plant material, or contaminated tools can contribute to failure.
If the petiole becomes brown and mushy, remove the decayed tissue with a clean blade. If enough healthy petiole and leaf remain, you can sometimes make a fresh cut and restart the propagation process in clean medium.
Should I fertilize an African violet cutting?
A fresh cutting does not need heavy fertilization.
Focus first on rooting, humidity, appropriate moisture, and light. Once the young plantlets are established, a regular African violet care routine can gradually begin.
Can I propagate African violets in winter?
Yes, especially indoors where temperature and light can be controlled.
Development may simply be slower during darker months unless supplemental lighting provides consistent growing conditions.
When can I remove the original mother leaf?
There is no need to remove it immediately.
Iowa State Extension notes that the original leaf can be removed once it browns or after the new plant is fully established.
Conclusion
African violet leaf propagation turns one healthy leaf into one or sometimes several new plants with surprisingly little equipment. Start with vigorous plant material, retain a short petiole, place it in a porous moist medium or clean water, and provide bright indirect light while you wait for roots and plantlets to develop.
The most important skill is moisture control. A cutting needs enough humidity and moisture to remain hydrated, but its developing roots also need air. Keeping the medium continually soggy is far more likely to encourage rot than faster growth.
Expect roots to begin forming within several weeks and visible plantlets somewhat later. Once the babies have developed adequate roots and several leaves of their own, they can be separated into individual pots.
With patience and careful watering, a single African violet leaf can become the beginning of an entirely new collection.
External Sources: