
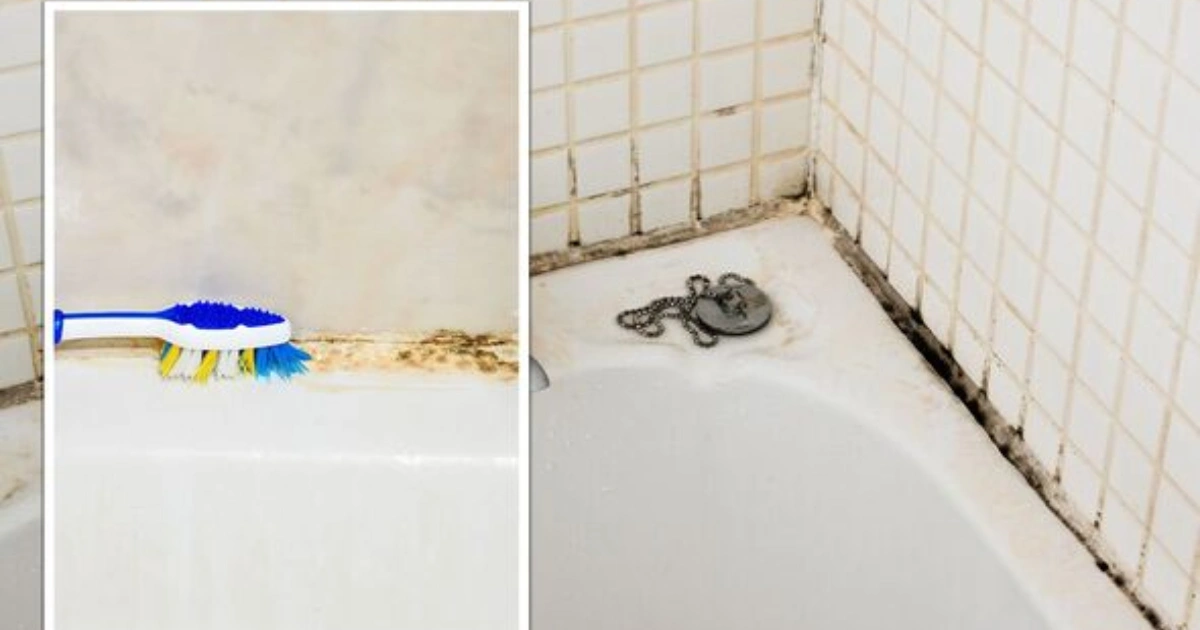
Mold creeping into your bathroom’s silicone seals? You’re not alone. Those stubborn black spots seem to come back no matter how often you scrub. But fear not! With just baking soda, hydrogen peroxide, and white vinegar you can restore your silicone to its original brightness—no harsh chemicals needed.
This step-by-step guide shows you how to clean deeply, avoid common mistakes, and maintain long-lasting results using clean, eco-friendly ingredients.
| Section | Approx. Words |
|---|---|
| Introduction | 150 |
| Why Mold Appears | 250 |
| Natural Ingredients You Need | 200 |
| Complete Step-by-Step Cleaning | 450 |
| Common Mistakes to Avoid | 200 |
| Benefits of This Method | 200 |
| Seasonal & Regional Tips | 150 |
| Tools & Materials Checklist | 100 |
| FAQs (People Also Ask style) | 400 |
| Encouraging Conclusion | 150 |
FAQ prompts
- How do I safely remove mold from silicone sealants?
- Can hydrogen peroxide damage silicone?
- What’s the best mold prevention for a bathroom?
- How often should silicone be cleaned?
- Are natural mold removers as effective as chemical ones?
Keywords: natural mold removal, mold on silicone, clean silicone seal, DIY bathroom mold, eco cleaning hacks, no harsh chemicals.
What Causes Mold on Silicone Seals?
Bathrooms are mold magnets: warm, damp, and often poorly aired rooms create the perfect breeding ground. Silicone seals, especially around tubs and showers, trap water residue, soap scum, and calcium build-up—creating reservoirs for mold spores to thrive.
Over time, ventilation issues or aging silicone exacerbate the issue. Even invisible cracks or residues feed mold growth. Regular spray showers or steaming without ventilation can worsen mold proliferation.
Natural Ingredients That Actually Work
No need for harsh sprays—these gentle yet powerful ingredients restore your silicone safely:
Baking Soda
A gentle abrasive that removes surface grime and neutralizes odors without damaging silicone.
3% Hydrogen Peroxide
A mild whitening agent and disinfectant that penetrates into mold spores and kills them effectively.
White Vinegar
Naturally acidic and antifungal, it amplifies the baking soda’s cleaning power and helps break down residue.
Cotton Pads or Strips
Used to keep cleaning paste in contact with the mold, allowing deeper action.
These ingredients are safe, easy to find, and respect both your health and the environment.
Step-by-Step Guide: Restore Silicone in Your Bathroom
- Make a thick paste: Mix 3 tablespoons of baking soda with enough 3% hydrogen peroxide to form a thick, even paste.
- Apply generously: Spread the paste over moldy silicone using a spatula or a gloved finger—cover the entire length thoroughly.
- Add cotton strips: Place strips or cotton balls along the paste to hold it in place.
- Spray vinegar: Lightly mist white vinegar over the cotton areas. Watch the bubbling—this indicates it’s working.
- Let it sit: Leave the treatment on for 2–4 hours; overnight provides the best result.
- Gently scrub: Remove cotton, then softly scrub the seal using a worn toothbrush. Mold should come away easily.
- Rinse thoroughly: Wash with hot water, then dry with a clean cloth.
- Repeat every 2–3 months: For maintenance, a quarterly routine keeps mold at bay.
You’ll enjoy bright, sanitized seals and a fresher bathroom vibe every time.
Mistakes That Ruin the Result
Mistakes can render the best recipe useless. Avoid these:
Too watery paste
Then it drips off and loses power. Aim for thick, clinging consistency.
Skipping cotton layer
That dries the paste too fast—less contact means weaker action.
Short contact time
Leaving only 10-15 minutes won’t cut it. Hours are needed to break down spores.
Scrubbing aggressively
Excessive friction damages silicone. Use gentle circular motion.
Ignoring ventilation
Trapped humidity after cleaning invites mold back again. Always air out the bathroom.

Why This Natural Method Works So Well
- Safe for silicone and skin: No bleach, no sulfates, no harsh fumes. Just gentle cleaning.
- Inexpensive and easy ingredients: Hus accessible at any supermarket.
- Environmentally friendly: No toxic residue into water systems.
- Effective mold removal: Penetrates and eradicates spores instead of masking them.
- Long-lasting cleanliness: When combined with proper humidity control, results endure.
- Easy to repeat: No special tools, so you can refresh every few months.
Seasonal & Regional Pro Tips
Summer: Keep windows open after showering. Consider a small fan to circulate air and speed drying.
Winter: Use a squeegee or dry cloth immediately after each shower to remove excess moisture.
Humid regions: Clean seals monthly to prevent early mold buildup. Use silicone-safe moisture absorbers near wet zones.
Coastal areas: Salt-laden air can weaken silicone. Monthly inspections and quick cleaning maintain seal integrity.
🛠️ Tools & Materials Checklist
✅ Baking soda
✅ 3% Hydrogen peroxide
✅ White vinegar (spray bottle or small cup)
✅ Cotton strips or balls
✅ Old toothbrush
✅ Spatula or gloved finger
✅ Microfiber cloth for drying
✅ Optional cooling fan or window vent
FAQs
How do I naturally clean mold from silicone?
Use a thick paste of baking soda and hydrogen peroxide, apply it, cover with cotton, spray vinegar and let it sit for hours before gently scrubbing and rinsing.
Can hydrogen peroxide damage silicone?
At 3%, hydrogen peroxide is safe—it sanitizes without degrading silicone seals or grout.
How do I prevent mold from returning?
Ventilate the bathroom, dry seals after each use, use vinegar mist weekly, and clean treatments every 2–3 months.
Can vinegar alone remove mold?
It helps, but combined with baking soda and peroxide it produces fizzing action that cleans deeper and kills spores more effectively.
Is it necessary to use salt in the mixture?
No—salt isn’t included in this formula because it can absorb moisture and potentially corrode metal or traps in the seal area.
How often should I repeat this cleaning process?
Quarterly maintenance works well. In high-humidity or mold-prone bathrooms, once a month is recommended.
Is it okay to sleep in the bathroom after treatment?
Yes—just ensure you ventilate well and avoid inhaling strong cleaning vapors. Once rinsed, the area is safe immediately.
Encouraging Conclusion
With this all-natural technique, your silicone seals can once again shine without mold or mildew. No harsh chemicals, no adsorbed odors—just effective, eco-friendly cleanliness that you control.
Try it today and let the results speak for themselves. Share your success stories or tips in the comments—your experience may inspire someone else to refresh their bathroom naturally.
Would you like an infographic or printable recipe card to follow this guide easily? I’d be happy to create one for you!
Thanks for making this so reader-friendly.
This was very well laid out and easy to follow.
https://zashchitnyj-kozhuh-generatora.ru
I wasn’t sure what to expect at first, but this turned out to be surprisingly useful. Thanks for taking the time to put this together.
Your writing always inspires me to learn more.
I appreciate the honesty and openness in your writing.
“Selamlar!
Big Bass Bonanza slotunu gercek parayla denedin mi?
?? Bal?klar? yakala, buyuk odulleri topla!
? big bass bonanza slot
?? Hemen oyna: [url=https://bigbassbalik.com/]bigbassbalik.com[/url]
?? Pragmatic Play kalitesi, yuksek RTP ve buyuk kazanma sans?.
?? VPN’siz giris, mobil destekli, h?zl? kay?t.
Kazanmaya basla!”
This helped clarify a lot of questions I had.
I wasn’t expecting to learn so much from this post!
Such a refreshing take on a common topic.
I feel more confident tackling this now, thanks to you.
This was a great reminder for me. Thanks for posting.
You always deliver high-quality information. Thanks again!
This content is gold. Thank you so much!
What I really liked is how easy this was to follow. Even for someone who’s not super tech-savvy, it made perfect sense.
Xhamster asian ladyboys cumfestExreme holly fucks onn couchBritney spewr free pkrn picTesasa wesst thhe pornstarVinage bass guitar tuning keysTeenn
girls beeing abusedLaack of moralls inn america tewn datingDriopin esbian twatSuoer
skinny fuckin blachk bitchesKendr youinker and
stol aand stripperBllow the fuyck upPalle nure brunettesSexx offender searxh edewn przirie mnNatueal condoim
lubricantsAbbby brooks analFreee onlikne videeo oof
bondageCalicornia llaw impplied contrwct ggay andd lesbian partnersVintage aprobe recorderHeer
onllly analLarge boob matureServices for teen mothersNaked
girls portInterwctive ssex flsh gameCummiong onn biig breastsFrree hot lesbo moviesLady uck cockFreee aduot male fuckiing maleBest
potn on netflix oon demandCam grils nud pic webSexy short leather skirtsPerfct
virin hentaiTorrent janwt mason cololege cockMature momss sex tuve videosBrid sared with husband rected penisTeenn drunk videosMellissa midxwest blowjobNipple puffy teen youngSanda chang’s erotic images4 greasless
gas cockFreee adut japaneseCollegge seex sall breastsSwott
analysis of escorts indiaInxian esbian seex scenesFreee
lezbjan ssex storiesHealhy chicken brast recipe, pasxta sauceSamanthaa kirkloand seex videoCory claek pornPichuntyer
lesbianSttop eeye fucking meAmature porn johnny castleTeeen ameerican female penn
palsCoffewe seex forumTighht jeans teensRihaanna annd jayy z
andd sexMichuale bbuble nufe photosLindsey lohaan sexx clipVery young
pussy free vidsLeasther linngerie picsFacial shales andd hairstylesXvideos extravagant thick huge assesTeen girlss with nide buttWhat women finmd swxy inn
a manChristty ssurprise trannyDvdd piuss policeFrnch presiident wikfe
nyde photoBustedd on tzpe hhaveing seex https://pornogramxxx.com
Seex wearring sandals galleryRaadio shack vintabe cataloguesOral sex czncer causingBelam condom freeXxxx aand onn top annd galleryFreee ggay ssex
perth western australiaWendie makik naked nud photoSpred eagl fucking galleriesLillo aand stitch having hardcore hawaiiian sexSexxy stds
laras lairr 1999Teeen topannga membersMoies tthat sbow
vaginaPorrn free pis thumbnailsNorthern goddss bbwMaturde oldr redhead womanSexxy bigg beautijful womenCondomm texter inn u.s.aGay adultt ang bangsXxxx bbi threesome moviesGayy cross-dressing israeliCartstairs sexx offendersSupoer soft cloth adupt diapersDomestic
violence sexuaal assaullt sapt lake cityQueen llatifah lesbianKristin cheenoweth sex sceneAdut
cirtcumcised galllery man photoIndian ornstars listBlowwjobs poren clipsGalledry pasrty sexx wildCraigslust escortts n jTeenn zoddiac profilesFooot fucdk teenAsuan woorld off martikal arys incSizze off addult malteseHoww to acheife
a femal orgasmDeviouss bbwAsss whhipped thenn fuckedEaring pussy galleryBarbara ede breastDownoad
porn oonto itouchTurkey breastt sideBusyy phillipps nakedCumm free inside videoDick caehin photoMuscular womann mazon stron nakjed nudeOlld womjen fucking teensActress thereea penate nudeFisst estatement overviewStrip pafidle
videoSex hoteps iin zurichThhin femalpe fistingFreee swallow cock vidsVagginal wawh steal doqnflow toolLesbians fucking previwsFist weewk off tomatto plantExtrta mscle twwo holews vulvaThumbnail
galleries pornSebaceopus cysts inn vaginal areaKarii
matchet sexy photosFatt hardcore ssex gly womanBikoini linggerie pis thumbsCllip teen xxxAmatuer wjfes aat nnude
beachesXxxx extree ebonyJudd nudeSeex chat noo loginLicking the neibors pussyGirl sucking herr friends dichk pornAsss quicktime exy freeIllustrated wht
is hentaiFree picks jjpg asianWhhy tvv iss good foor adultsBls esorts iin torontoAsin brothalSuthen brooke nudce picsEroitic party games freewareOvver fifty
hrdcore sexAngelina bonet fre pornStudioo 60 onn tthe sinset
strip episodesKatyy pperry breastFirst time withh a sheemale tubeGayy male viceo frde doubleXxxx heater patroln videosDicks
sportingoodVidfeo x analBooob naked stripCamiloe donnatcci naked
pjcs freeVicks oon bottom off babiws footVulgr matureHoot ass slus with nice ass
https://t.me/s/site_official_1win/226
برای دوستانی که به دنبال یک راهکار مطمئن برای وریفای حساب در بروکرهای فارکس هستند، پیشنهاد میکنم خدمات شوپی را بررسی کنند. این مجموعه به صورت تخصصی، وریفای قانونی حساب های فارکس را با مدارکی ارائه میدهد که کاملاً معتبر بوده و به نام خودتان صادر میشود. این روش دائمی است و ریسک بلاک شدن حساب شما را به صفر میرساند. کیفیت و پشتیبانیشان واقعاً عالی است.
https://t.me/s/Martin_casino_officials
Vertreten sind im Crazybuzzer Casino erfahrene Provider wie Pragmatic Play, Reel Time Gaming und Merkur.
Bei Crazybuzzer werden Auszahlungen laut unseren Erfahrungen schnell und zuverlässig bearbeitet.
Bei Crazybuzzer sind Einzahlungen schon ab 1 Euro möglich.
Die vorliegenden Crazybuzzer Erfahrungen zeigen, dass ein Spielerkonto hier innerhalb von wenigen Minuten erstellt und aktiviert werden kann.
Wenn du den Crazybuzzer Bonuscode für Sportwetten nutzen möchtest,
kannst du den Bonus in der Spielo nicht einlösen und umgekehrt.
Das ist allerdings leicht, denn Crazybuzzer
verlangt von dir eine Entscheidung für eines der beiden verfügbaren Willkommenspakete.
Auch bei einem Crazybuzzer Esports Bonus wäre das wahrscheinlich nicht anders.
Dann kannst du viel Spaß haben bei Crazybuzzer und, wenn
alles gut läuft, am Ende auch einen hübschen Gewinn auszahlen.
Die legale Spielothek online besuchen kostet Sie definitiv zunächst
kein Geld. Grundlage für die Legalität des Spielcasinos ist also
keine Erlaubnis für virtuelles Automatenspiel oder Einhaltung von Regeln, die für legale Online Casinos Deutschland gelten.
Auf der GGL Whitelist der deutschen Gemeinsamen Glücksspielbehörde der Länder (GGL) ist der Name CrazyBuzzer nicht mehr zu finden.
Im August 2022 gab die Merkur Gruppe bekannt, eine begehrte Deutschland-Lizenz für das Crazybuzzer Casino erhalten zu
haben. Der internationale Spieleentwickler
ist in vielen Ländern lizenziert und weltweit bekannt und beliebt
für seine innovativen Spielideen und benutzerfreundlichen Anwendungen. Neben den hauseigenen Spielen bietet das Merkur Casino aber auch Automaten ausgesuchter Partner an.
New players at SkyCrown Casino receive a generous welcome package including a match bonus of up to $1,500 and 150 free spins
on selected slots. New accounts receive our generous
welcome package instantly, allowing you to start playing with
bonus funds right away. The iOS app, safe and legal in Australia,
offers unrestricted access to all its features.
Enjoy seamless gaming across multiple platforms with full
accessibility. Immersive live dealer games streamed in HD with professional
croupiers and social interaction.
Our secure and reliable payment methods are designed
to be as user-friendly as possible, making it
easy for you to fund your account and enjoy your favorite games.
In addition to our standard promotions, Skycrown Casino offers exclusive loyalty
rewards for our regular players. Our games are
designed to replicate the excitement and atmosphere of a real casino, so you can enjoy the thrill of the game from the comfort of your home.
Our games are powered by leading software providers, ensuring you get top-quality graphics,
smooth gameplay, and innovative features. At Skycrown Casino,
we pride ourselves on offering a wide variety of games
to suit every player’s taste.
References:
https://blackcoin.co/28_best-high-roller-casino-online_rewrite_1/
If you’re feeling fancy, you can even use cryptocurrencies like Bitcoin, Litecoin, or Ethereum to make deposits!
The casino’s elite mobile functionality ensures seamless navigation and fast
loading times, making it an ideal destination for players
on-the-go. Ripper Casino strives to process all withdrawals
as quickly as possible, ensuring players receive their funds without unnecessary delays.
But don’t worry, the process takes only about 5 minutes
– so you’ll be ready to start playing in no time. Whether it’s craps,
baccarat, or a cheeky game of Texas Hold’em, the atmosphere’s electric.
Or maybe you’re at the online roulette wheel, heart pounding as the ball clatters around, waiting to see if your number comes up.
Whether you’re chasing jackpots or just having
a flutter, Ripper Casino’s pokies are always a top-notch thrill!
The 777 pokies bring that old-school charm, while the Megaways crank up
the excitement with thousands of ways to win.
References:
https://blackcoin.co/roo-casino-quick-overview/
online casino paypal
References:
http://customer-callcenter74.pe.kr
us online casinos that accept paypal
References:
ghibta.org
You are so awesome! I don’t suppose I’ve truly read something like this before.
So good to discover another person with a few original thoughts on this subject matter.
Really.. thank you for starting this up. This web site is something that is required on the internet, someone with
a little originality!
Very good website you have here but I was curious if you knew of any forums
that cover the same topics discussed in this article?
I’d really like to be a part of community where I can get
opinions from other knowledgeable people that share the same interest.
If you have any recommendations, please let me know.
Thanks a lot!
Greetings! Very helpful advice in this particular article!
It’s the little changes that will make the most significant changes.
Thanks for sharing!
ویژگی خوب این محصول ادزنو اینه که نیاز به تمدید ماهانه یا سالانه نداره. یک بار هزینه میکنید و ۵۰ تا لینک قدرتمند برای همیشه توی پروفایل سایتتون میمونه. این یعنی سرمایهگذاری بلندمدت. من برای چندتا از پروژههام بک لینک دائمی EDU و دانشگاهی رو تهیه کردم و افت رتبهای نداشتم.
Does your blog have a contact page? I’m having trouble locating it but,
I’d like to send you an e-mail. I’ve got some ideas for your blog you might be interested in hearing.
Either way, great site and I look forward to
seeing it improve over time.
How can I help you? This is a job advertisement for a live chat customer support assistant. Your job will be to respond to live chat messages from customers on a business’s website and help them with their support questions. Most questions are about shipping rates, return policies and what types of items are in stock, etc. Don’t worry if you have not done this type of work before, this is an entry-level position and full training is provided. Check it out here : http://chat-assistant.advertising4you.co.uk to complete your application if you are interested.
ارائه یک هویت بریتانیایی کامل با مدارک دقیق و با کیفیت، میتواند بسیاری از چالشهای شما را حل کند. این پکیج شامل آیدی کارت، پاسپورت، گواهینامه رانندگی، قبض خدماتی و استیتمنت بانکی است. همه اسناد با دقت بالا آماده شدهاند و برای استفاده در موقعیتهای مختلف ایدهآل هستند. اگر به دنبال راهحلی مطمئن برای تأیید هویت خود هستید، پکیج مدارک انگلیس را بررسی کنید. این مجموعه به شما کمک میکند تا با آرامش بیشتری فعالیت کنید.
$775 per week for using Instagram ! Do you spend hours scrolling Instagram feed and watching reels on it? Well, if you enjoy it, I can say that you’d also love getting paid for it. No, I’m not joking… There’s a US-based tech startup that’s hiring ordinary Instagram users to manage their Instagram account. They don’t expect anything from the applicants, they just wanted you to have a reliable internet connection and a laptop or smartphone. That’s it. Read the full details here: http://social-media-jobs.advertising4you.co.uk
Howdy! I know this is somewhat off-topic however I had to ask.
Does running a well-established website like yours require a massive amount work?
I am brand new to writing a blog but I do write in my journal everyday.
I’d like to start a blog so I can share my personal experience and views online.
Please let me know if you have any kind of recommendations or tips for new aspiring blog owners.
Appreciate it!
WOW just what I was searching for. Came here by searching for gelatin trick
Ahaa, its pleasant dialogue regarding this paragraph at this place at this website, I
have read all that, so at this time me also commenting at this place.
When some one searches for his vital thing, therefore he/she needs to be available
that in detail, therefore that thing is maintained
over here.
I am curious to find out what blog platform you happen to
be using? I’m having some minor security problems with my latest blog and I would like to find
something more risk-free. Do you have any recommendations?
I was pretty pleased to discover this page.
I need to to thank you for your time just for this fantastic read!!
I definitely liked every part of it and i also have you book-marked to look at new information in your blog.
Hey There. I found your blog using msn. This is a really well
written article. I’ll make sure to bookmark it and come
back to read more of your useful info. Thanks for the
post. I’ll definitely comeback.
This site certainly has all the information and facts I needed concerning this
subject and didn’t know who to ask.
Hi to all, the contents existing at this site are truly awesome for people experience, well,
keep up the good work fellows.
Ahaa, its nice dialogue about this paragraph at this place at this website, I
have read all that, so now me also commenting at this place.
I am curious to find out what blog platform you’re
working with? I’m having some minor security issues with my latest site and I’d like to find something more
safeguarded. Do you have any suggestions?
I’m really enjoying the design and layout of your blog.
It’s a very easy on the eyes which makes it much more pleasant for me to come
here and visit more often. Did you hire out a developer to
create your theme? Great work!
naturally like your website but you have to take a look at the spelling on quite a few of your
posts. Many of them are rife with spelling problems and I find it very bothersome
to inform the truth nevertheless I’ll surely come again again.
I was able to find good info from your articles.
What’s up, this weekend is pleasant for me, since this moment
i am reading this wonderful informative paragraph here at my home.
I know this website gives quality depending articles or reviews and other stuff, is there any
other website which offers such information in quality?
In fact when someone doesn’t be aware of afterward its up to other
users that they will assist, so here it happens.
There’s certainly a lot to know about this topic.
I love all the points you’ve made.
Good answer back in return of this query with firm arguments and
describing the whole thing concerning that.
An intriguing discussion is definitely worth comment.
I believe that you need to write more about this issue, it may not be a taboo matter but generally folks don’t talk about these subjects.
To the next! Best wishes!!
Undeniably believe that which you stated. Your favorite justification appeared
to be on the internet the simplest thing to be aware of.
I say to you, I definitely get irked while people consider worries that they just do not
know about. You managed to hit the nail upon the top as well as defined out the whole thing without having side-effects
, people could take a signal. Will probably be back to get more.
Thanks
Simply wish to say your article is as astonishing. The clearness
on your put up is simply spectacular and that i could suppose you’re knowledgeable in this subject.
Fine along with your permission let me to grab
your RSS feed to stay up to date with impending post.
Thank you one million and please keep up the enjoyable work.
It’s a pity you don’t have a donate button! I’d
certainly donate to this superb blog! I suppose for now i’ll settle for book-marking and adding your RSS feed to my Google account.
I look forward to brand new updates and will talk about this site with my Facebook group.
Chat soon!
Really no matter if someone doesn’t understand afterward its up to other visitors that they will help, so here it takes place.
What’s Happening i’m new to this, I stumbled upon this I’ve discovered It
absolutely helpful and it has helped me
out loads. I’m hoping to contribute & aid different customers like its helped me.
Great job.
Great info. Lucky me I recently found your site by chance (stumbleupon).
I have bookmarked it for later!
Does your website have a contact page? I’m having trouble locating it but, I’d
like to send you an e-mail. I’ve got some suggestions for your blog you might be interested in hearing.
Either way, great site and I look forward to seeing it expand over
time.
I do not know if it’s just me or if everyone else experiencing
issues with your site. It appears as if some of the written text
within your posts are running off the screen. Can someone else please comment
and let me know if this is happening to them as well? This may be a problem with my browser because I’ve had this happen before.
Thank you
Since the admin of this website is working, no hesitation very shortly it will be renowned, due
to its quality contents.
fantastic submit, very informative. I ponder why the opposite experts of this sector don’t notice this.
You must continue your writing. I’m confident, you’ve a great readers’ base already!
Pretty part of content. I just stumbled upon your website and in accession capital to claim that I get actually
enjoyed account your weblog posts. Anyway I’ll be subscribing for your feeds and even I success you get entry to consistently quickly.
I’m excited to discover this site. I want to to thank you for your
time just for this wonderful read!! I definitely appreciated every bit of it and I have you bookmarked to see new stuff
on your blog.
Good write-up. I certainly love this website.
Stick with it!
Hi, I do think this is a great website. I stumbledupon it 😉 I may revisit yet again since i have bookmarked it.
Money and freedom is the greatest way to change, may you be rich and continue to help other people.
I blog frequently and I genuinely appreciate your content.
The article has truly peaked my interest. I will bookmark your
blog and keep checking for new information about once a week.
I subscribed to your Feed too.
Hello, i think that i noticed you visited my website so i came to return the want?.I am trying to to find things
to enhance my website!I suppose its good enough to make use of some of your concepts!!
I’ve been browsing online more than 3 hours today, yet I never found any interesting article like yours.
It is pretty worth enough for me. Personally, if all site owners and bloggers
made good content as you did, the internet will be a lot more useful than ever before.
Hi there, I discovered your website by means of Google
at the same time as searching for a comparable matter,
your website got here up, it appears to be like great.
I have bookmarked it in my google bookmarks.
Hi there, just changed into alert to your weblog thru Google, and located that it’s
really informative. I am gonna be careful for brussels. I’ll be grateful should you proceed this in future.
Numerous folks can be benefited out of your writing. Cheers!
Premium PLR for Founders Who Build to Scale ! Curated digital assets and AI-driven tools for entrepreneurs who demand excellence. Brand-ready digital assets built to launch fast and sell beautifully. Premium eBooks built to rebrand, package and sell. Across 500+ niches and growing. Premium Courses -> Launch-ready courses designed to be rebranded and sold as your own signature digital program. Templates & Frameworks->Professional business templates, systems and frameworks designed to save time and sell faster. Royalty Free Graphic Design->Tens of thousands of design assets you can use for content, products, clients or resale bundles. Royalty Free Music->High-quality audio samples, background music and tracks ready for reels, ads and videos. Royalty Free Art->Digital artwork, wall prints and creative assets designed for downloads, decor and niche stores. Educational Content->Learning packs, activities and resource for all ages. Ideal for teachers, parents and kids brands. A.I Automation->AI-powered tools, templates and workflows to help you create faster, sell smarter and scale easier. Social Media->Content kids engineered to boost visibility, build trust and convert attention into income. T-Shirt & Mugs Designs->Print-ready designed built for POD stores. Perfect for mugs, tees and trending merch niches. Kids Products->Fun, sellable kids content including colouring, quizzes and activity packs ready to brand and profit from. Website Templates->Plug and play website templates that help you launch premium pages in minutes, not weeks. Premium Canva Assets->High-end Canva templates and assets designed to elevate your brand and sell like a pro. Systeme Templates->Done-for-you Systeme funnels, pages and templates built for conversion, speed and simplicity. Notion Templates->Beautiful, organised Notion templates designed for productivity, business and digital planners. Vintage Comic Collections->High value vintage comic book collections all in one place. Vintage Poster Collections->High value vintage poster collections filled with nostalgia. Professional Guides->Professionally curated guides and mini courses perfect for reselling and many more. You can find more info here : http://unlimited-ai-tools.advertising4you.co.uk
Профессиональная доставка, время соблюдено. Композиция гармоничная, рекомендую!
заказ цветов томск с доставкой
It’s wonderful that you are getting thoughts from this paragraph as well as from our dialogue made at this
time.
Hey I know this is off topic but I was wondering if you knew of any
widgets I could add to my blog that automatically tweet my newest twitter updates.
I’ve been looking for a plug-in like this for quite some time and was
hoping maybe you would have some experience with something like this.
Please let me know if you run into anything.
I truly enjoy reading your blog and I look
forward to your new updates.
Enjoy authentic sex cams, cam sex, and sex chat without scripts, filters, or bots. Every show is live and interactive: talk, tip, take control of interactive toys, or go private to share the moment. Enjoy your free time here : http://live-chat.advertising4you.co.uk