
Introduction
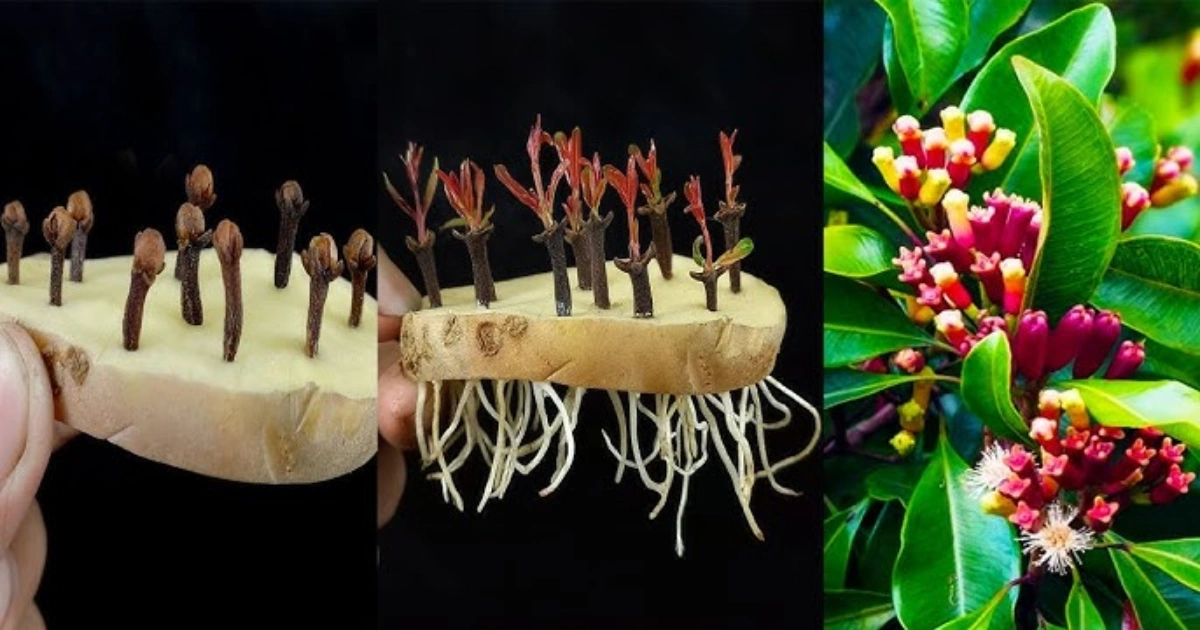
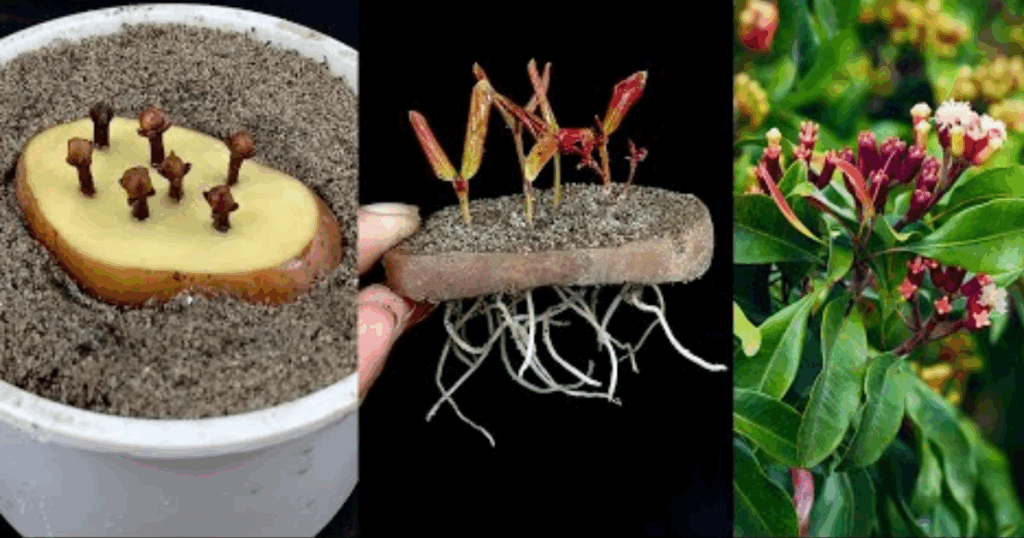
Growing your own clove plant (Syzygium aromaticum) at home is an exciting and rewarding endeavor. Cloves are not only a valuable spice but also a beautiful addition to your indoor or outdoor garden. While traditional methods of propagation involve seeds or cuttings, there’s a lesser-known technique that utilizes everyday household items—potatoes and aloe vera. This method is simple, natural, and effective, making it perfect for both novice and experienced gardeners.
Understanding the Potato and Aloe Vera Method
This innovative propagation technique involves using a potato as a nutrient-rich base and aloe vera gel to stimulate root growth. The potato provides essential nutrients and moisture, while the aloe vera gel promotes healthy root development. Together, they create an ideal environment for clove seeds to germinate and grow.
Materials Needed
- Fresh, firm potato
- Aloe vera gel (preferably fresh)
- Clove seeds (whole, not ground)
- Sharp knife or scissors
- Small container or tray
- Plastic wrap or a clear plastic bag
- Watering can or spray bottle
Step-by-Step Guide
- Prepare the Potato Base
- Select a healthy, firm potato without any signs of rot or disease.
- Cut the potato into thick slices, approximately 1 to 2 inches wide.
- Ensure each slice has at least one “eye” (the small indentations where sprouts emerge).
- Apply Aloe Vera Gel
- Extract fresh aloe vera gel from a mature leaf.
- Using a clean knife or spoon, apply a generous amount of gel to the cut surface of each potato slice.
- The aloe vera gel acts as a natural rooting hormone, encouraging the clove seeds to sprout.
- Insert Clove Seeds
- Place one or two whole clove seeds into the center of each potato slice.
- Gently press them into the potato to ensure good contact with the aloe vera gel.
- Create a Humid Environment
- Place the prepared potato slices in a shallow tray or container.
- Cover the container with plastic wrap or a clear plastic bag to retain moisture.
- Place the setup in a warm, bright location, but out of direct sunlight.
- Maintain Moisture and Temperature
- Check the potato slices daily to ensure they remain moist but not waterlogged.
- Mist with water as needed to maintain humidity.
- The ideal temperature range for germination is between 70°F and 80°F (21°C to 27°C).
- Observe Germination
- Within a few weeks, you should begin to see small roots emerging from the clove seeds.
- Once the roots are well-developed and the seedlings have a few leaves, they are ready to be transplanted into soil.
Benefits of This Method
- Cost-Effective: Utilizes common household items, reducing the need for specialized equipment.
- Natural Growth Stimulus: Aloe vera gel is a natural rooting hormone, promoting healthy root development.
- Easy to Monitor: The transparent covering allows you to observe the germination process without disturbing the seeds.
- Suitable for Beginners: This method is straightforward and ideal for those new to gardening.
Common Mistakes to Avoid
- Using Ground Cloves: Only whole, unground clove seeds will germinate. Ground cloves lack viable seeds.
- Excessive Watering: While moisture is essential, overwatering can lead to mold growth and seed rot.
- Direct Sunlight: Placing the setup in direct sunlight can cause overheating and dehydration.
- Lack of Ventilation: Ensure the container has some airflow to prevent fungal growth.
Transplanting Your Clove Seedlings
- Prepare the Soil: Choose a well-draining potting mix enriched with organic matter.
- Select a Suitable Pot: Use a pot with drainage holes to prevent waterlogging.
- Transplant Carefully: Gently remove the seedlings from the potato slices, being careful not to damage the roots.
- Acclimate Gradually: If transplanting outdoors, gradually acclimate the seedlings to outdoor conditions over a week.
Seasonal Tips for Clove Plant Care
- Spring Planting: Spring is the ideal time to start clove seeds, as the warmer temperatures promote faster germination.
- Winter Care: If growing indoors during winter, ensure the plants receive adequate light, either through natural sunlight or grow lights.
- Humidity Management: Clove plants thrive in humid environments. Regular misting or using a humidity tray can help maintain optimal conditions.
Tools & Materials Checklist
- 🥔 Fresh potato
- 🌿 Aloe vera gel
- 🌱 Whole clove seeds
- 🔪 Sharp knife or scissors
- 🧴 Watering can or spray bottle
- 🧼 Clean container or tray
- 🧻 Plastic wrap or clear plastic bag
FAQs
- Can I use this method for other spices?
- Yes, this technique can be adapted for other spices like cinnamon or nutmeg, provided you have viable seeds.
- How long does it take for clove seeds to germinate?
- Germination typically occurs within 2 to 4 weeks, depending on environmental conditions.
- Can I grow clove plants indoors year-round?
- Yes, with proper care, clove plants can thrive indoors throughout the year.
- Do clove plants require a lot of sunlight?
- Clove plants prefer bright, indirect sunlight. Avoid direct sunlight, which can scorch the leaves.
- How often should I water my clove plant?
- Water when the top inch of soil feels dry. Ensure the pot has good drainage to prevent root rot.
Conclusion
Growing clove plants at home using potatoes and aloe vera is a simple, natural, and effective method suitable for gardeners of all levels. By following the steps outlined above, you can successfully propagate clove plants and enjoy the satisfaction of cultivating your own spice. Remember to provide consistent care, monitor environmental conditions, and be patient as your clove seedlings develop into healthy, thriving plants.
Call to Action
Have you tried propagating clove plants using the potato and aloe vera method? Share your experiences and tips in the comments below. If you found this guide helpful, don’t forget to share it with fellow gardening enthusiasts!
Hi, i feel that i noticed you visited my blog so i got here to “go back the favor”.I’m trying to in finding things to enhance my site!I assume its ok to make use of a few of your ideas!!
Hi, i think that i saw you visited my web site thus i came to “return the favor”.I’m attempting to find things to improve my website!I suppose its ok to use some of your ideas!!
Definitely, what a splendid blog and instructive posts, I surely will bookmark your website.Have an awsome day!
I am so happy to read this. This is the kind of manual that needs to be given and not the random misinformation that is at the other blogs. Appreciate your sharing this best doc.
You got a very great website, Sword lily I found it through yahoo.
Thank you for your own effort on this web site. My mom really loves conducting research and it’s simple to grasp why. We all know all relating to the compelling tactic you present precious thoughts through the website and cause response from people about this concern so our girl is learning a whole lot. Enjoy the rest of the new year. You’re the one conducting a wonderful job.
I¦ll immediately snatch your rss feed as I can not to find your e-mail subscription hyperlink or newsletter service. Do you have any? Kindly permit me recognize in order that I may just subscribe. Thanks.
Hello.This article was extremely fascinating, especially because I was searching for thoughts on this matter last Friday.
https://t.me/site_official_1win/729
Fantastic blog! Do you have any tips and hints for aspiring writers? I’m hoping to start my own blog soon but I’m a little lost on everything. Would you advise starting with a free platform like WordPress or go for a paid option? There are so many options out there that I’m totally confused .. Any tips? Thanks!
https://t.me/s/iGaming_live/4866
F*ckin’ tremendous issues here. I am very glad to peer your article. Thanks so much and i’m taking a look forward to contact you. Will you please drop me a mail?
https://t.me/s/iGaming_live/4875
Beliebte ältere Spiele werden jedoch gegenwärtig häufig
mit neueren Technologien überarbeitet, sodass einige Spiele, die Sie derzeit nicht über mobile Geräte spielen können,
möglicherweise in der Zukunft doch verfügbar sein werden. Nicht
alle Versionen von kostenlosem Roulette-Spielen, die in unserer Datenbank vorhanden sind, können auch von mobilen Geräten aus gespielt werden. Sie sollten also immer wenn es verfügbar ist, europäisches Roulette spielen, denn Ihre Gewinnchancen sind bei dieser Roulette-Art viel höher.
Das bringt uns nun zu den unterschiedlichen Arten von Roulette, die Sie spielen können. Wenn Sie jemals Roulette um echtes Geld spielen werden, so sollten Sie sich definitiv von dieser Wette fernhalten und idealerweise auch generell vom amerikanischen Roulette.
Regelmäßiges Spielen hilft Ihnen nicht nur dabei,
Ihre Fähigkeiten zu verbessern, sondern sorgt auch dafür, dass Sie mit
den neuesten Entwicklungen in der Welt der Casinospiele Schritt halten. Da es sich um
eine Casinospiele Demo handelt und kein echtes Geld im Spiel ist, können Sie ganz unbesorgt experimentieren. Die meisten Plattformen ermöglichen einen sofortigen Zugriff auf die kostenlosen Spiele.
Es ist wichtig zu beachten, dass die Verfügbarkeit kostenloser Spiele je nach Online-Casino variieren kann und
einige lediglich in einer Demo-Version angeboten werden.
Sie können das plinko free game so lange spielen, wie Sie möchten. Das ermöglicht es Ihnen,
rein zum Spaß oder zum Üben zu spielen. Durch das Angebot eines unterhaltsamen und zugänglichen Formats bietet die plinko ball
demo eine risikoarme Möglichkeit, sich mit dem Spiel zu beschäftigen – besonders für Neulinge im Bereich der Online-Casinospiele.
Darüber hinaus unterscheidet sich der plinko simulator von anderen Casinospielen, da
er stark auf Zufall statt auf komplexe Strategien setzt, was ihn einfach, aber unvorhersehbar macht.
Ein großer Vorteil der plinko test Version ist, dass
Spieler plinko free spielen können. Eines der beliebtesten Demospiele ist die plinko casino free Demo, die sowohl neue als auch erfahrene Spieler gleichermaßen begeistert.
References:
https://online-spielhallen.de/nomini-casino-bonus-code-ihr-weg-zu-spannenden-angeboten/
Insert and play with your Vantage Rewards card into compatible electronic gaming machines.
Explore the many advantages of Vantage Rewards. Currency on compatibleelectronic gaming.
A relaxing overnightstay in our resort. Every time you play, stay and dine with us, you’ll earn Vantage Points
that you can redeem for Vantage Dollars to use
anytime you visit.
High stakes games are the norm here, appealing to those who prefer gambling with higher risks and potentially higher
rewards. This technology simplifies betting for both seasoned punters and newcomers, providing a convenient platform to place bets on a
wide range of sporting events at any time of the day.
These terminals allow players to engage in a variety of virtual games,
from simulated horse races to strategic sports
betting. At jupiters Casino Townsville, the electronic betting terminals represent
the forefront of modern gambling technology, blending traditional gaming methods with advanced digital interfaces.
These games not only provide the thrill of betting and winning but also foster social interactions,
making them a favorite among those who enjoy
playing alongside others in a vibrant casino atmosphere.
You can review your choices and withdraw your
consent at any time by clicking the ’Privacy Preferences’ link in the
page side navigation. This service may include material from
Agence France-Presse (AFP), APTN, Reuters, AAP,
CNN and the BBC World Service which is copyright and cannot be reproduced.
Your home of Australian stories, conversations and events that shape our nation. The casino said it had
recently improved its program to mitigate money laundering and terrorism financing.
“The Ville Resort-Casino takes its obligations as a responsible casino operator incredibly seriously, particularly in relation to its key responsibilities in detecting and preventing financial crime,” a spokesperson said.
It follows major action by AUSTRAC against other casino
operators in recent years, including Crown Resorts, Sky
City, and The Star and online bookmakers, Entain, Sportsbet and Bet 365.
References:
https://blackcoin.co/online-slots/
Site’s pretty slick and deposits hit my account fast.
Dealer kept the game lively, but one round froze
for about 10 seconds. Started the evening with a small e-wallet deposit and jumped into live blackjack.
I had a question about my bonus, and support answered within minutes.
The games load fast, and everything works without glitches.
The variety of available slots is a plus for many reviewers.However, some users have reported issues with payment processing, specifically delays in withdrawals.
Rocket Casino Australia offers an unparalleled online gaming experience, providing everything from top-quality online slots and casino games to sports betting options and lucrative promotions.
The site’s sports betting platform is user-friendly and
offers real-time odds, ensuring that players can place bets during live
events and adjust their wagers based on the ongoing action. One of the standout
features of Rocket Casino Australia is its array
of promotions and bonuses that help players maximize their bankroll and enhance
their gaming experience. Whether you’re passionate
about spinning the reels on exciting online slots or testing
your luck with live casino games and sports betting, Rocket Casino has
something for every type of player.
For this, the casino uses a specially developed SSL encryption technology, which allows
users to keep personal and banking information completely safe.
This is a world-class gambling operator that ensures the transparency and legitimacy of the site.
The bonus is valid for 30 days from the moment of accrual.
References:
https://blackcoin.co/stay-casino-login-australia-quick-access-to-your-account/
gamble online with paypal
References:
https://jobbridge4you.com/
casino sites that accept paypal
References:
https://cyprusjobs.com.cy
Way cool, some valid points! I appreciate you making this article available, the rest of the site is also high quality. Have a fun.
В лабиринте игр, где всякий площадка норовит заманить обещаниями легких выигрышей, все казино онлайн рейтинги лучших
становится той самой ориентиром, что направляет мимо ловушки рисков. Тем хайроллеров и новичков, что надоел из-за ложных обещаний, такой помощник, дабы ощутить подлинную отдачу, будто тяжесть выигрышной ставки на пальцах. Без лишней ерунды, только проверенные площадки, в которых rtp не только цифра, а конкретная удача.Собрано по поисковых запросов, словно паутина, что захватывает топовые актуальные тренды в рунете. В нём минуя пространства про клише трюков, каждый элемент как карта на столе, где подвох проявляется мгновенно. Профи знают: в рунете тон речи и иронией, где сарказм маскируется как намёк, помогает избежать обмана.В https://ilde.upf.edu/pg/lds/tree/441867 данный рейтинг лежит словно открытая раздача, готовый к раздаче. Посмотри, коли хочешь почувствовать пульс подлинной азарта, обходя обмана и провалов. Для тех ценит ощущение удачи, он словно взять фишки у пальцах, а не глядеть по экран.
Wow! Thank you! I continually needed to write on my website something like that. Can I take a portion of your post to my blog?
It’s hard to find knowledgeable people on this topic, but you sound like you know what you’re talking about! Thanks