

Want to bring more charm and greenery into your garden without using precious ground space? Cascading bucket planters are a fun and stylish DIY project that lets you grow vertically, upcycle containers, and create eye-catching displays. Ideal for small yards, patios, or even balconies.
These structures look as if buckets are magically tipping over and spilling flowers. They’re perfect for vertical gardening with a whimsical twist—and provide excellent drainage and sunlight exposure on each level. This guide covers everything you need to build one, avoid common mistakes, adapt it by season, and reap the full benefits.
For more creative garden inspiration, peek at the article on DIY vertical planter towers at Secrets of the Green Garden, where similar upcycling techniques shine.
Part 1: What It Is, How It Works & Why It Matters
1. What Are Cascading Bucket Planters? (~250 words)
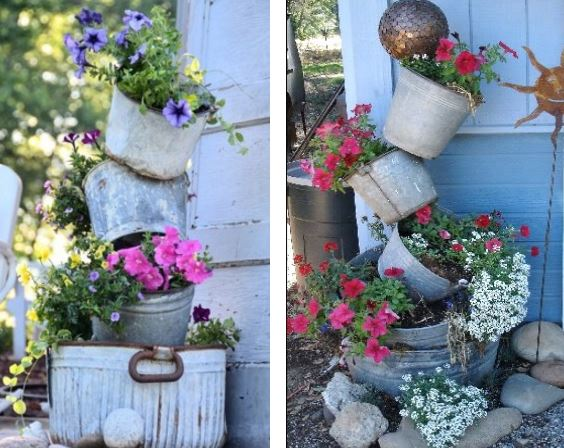
These are vertical garden installations made by stacking galvanized buckets or metal tubs on a central metal rod. Tilted at alternating angles, each container seems to spill its blooms into the next—creating a whimsical waterfall of color.
Unlike standard planters, this setup maximizes vertical space and adds a sculptural element to your garden. Every level gets better airflow and sunlight, helping plants thrive. You can plant flowers, herbs, strawberries, or trailing vines like petunias and ivy.
2. How the Design Works (~250 words)
- Secure a strong metal rod or stake into the base container (like a large tub or heavy pot).
- Drill drainage holes in each stacking bucket.
- Slide buckets down the rod, angling each slightly for a “pouring” look.
- Fill with soil, compost, and your choice of plants.
- Water from the top—gravity helps the water spread downward.
This gravity-fed system simplifies watering and promotes healthy plant growth. Containers naturally drain, reducing root rot, and you can adjust heights or styles as needed.
Explore other smart container garden setups like raised wicking beds and self-watering pots in the garden section at Secrets of the Green Garden.
3. Origins, Popularity & Vertical Gardening Trends (~200 words)
This creative planter style emerged as part of the upcycling and vertical gardening movement. Many DIY gardeners repurpose old buckets, tubs, or watering cans into tall, leaning plant sculptures. These projects became especially popular during times of limited space or elevated environmental awareness.
Pairing flexibility with decorative flair, this design has become a favorite at craft fairs, thrifted garden spaces, and modern rustic outdoor rooms. It’s a growing trend among small-space gardeners looking for eye-catching, sustainable garden decor.
A similar vertical innovation is the stackable pot systems made with support rods and garden stakes—seen in viral DIY clips and affordable builds from garden creators who highlight space savings and creative reuse.
4. Benefits of Cascading Bucket Planters (~200 words)
- Space-saving: Grow upwards instead of using more ground area.
- Upcycling: Gives new life to old metal buckets and watering cans.
- Better drainage: Each level drains naturally, reducing overwatering risks.
- Visual impact: Cascading layers bring color and movement.
- Easy care: Refill soil near the top; gravity helps water lower levels.
- Versatile planting: Mix flowers, herbs, succulents, or trailing plants.
This type of planters offers both aesthetic appeal and functionality in gardens of all sizes.
Part 2: Build Guide, Mistakes, Tips & Seasonal Ideas
5. Step-by-Step Assembly Guide (~400 words)
1️⃣ Gather materials
You need: galvanized buckets or tubs of graduated sizes, a metal rod or rebar, drill, soil mix, and gardening gloves.
2️⃣ Prepare the base
Place the largest container into your desired location. Secure a sturdy metal rod into soil or weighted base center.
3️⃣ Drill drain holes
Use a drill to make multiple drainage holes in the bottom of every bucket. If your containers already had holes, ensure good drainage.
4️⃣ Slide buckets onto the rod
Start with the smallest or narrow bucket. Tilt each slightly as you slide it down. Angle variation creates the waterfall effect.
5️⃣ Fill with soil and plants
Add well-draining potting mix or homemade compost mixture. Plant flowers or herbs suited to your climate and container depth.
6️⃣ Water from the top
Pour gently into the top bucket—water trickles downward, hydrating each level. Gravity does the work.
7️⃣ Fine-tune placement
Adjust tilt angles or spacing for better balance and sun exposure. Make sure the structure remains stable and secure.
Week one: water daily, then reduce as roots grow and soil settles. Top-dress mid-season with compost for extra nutrients.
6. Common Mistakes & How to Avoid Them (~200 words)
- Using containers of the same size: tiered heights create the effect.
- No drainage holes: roots may rot.
- Weak central rod: must support loaded buckets—use sturdy rebar or thick metal.
- Unbalanced stack: heavier buckets should go lower for stability.
- Soil-filled buckets inside frame: lining with plastic or adding gravel can reduce rot and weight.
Testing the structure before planting ensures safe, stable setup. Adjust the base or tilt if wobbly.
7. Benefits Recap & Garden Impact (~200 words)
- Boosts vertical gardening without walls or shelves.
- Supports companion planting—herbs atop, trailing blooms below.
- Improves airflow and sunlight to each plant.
- Enhances curb appeal or accentuates garden focal points.
- Creates sculptural interest and usable planting space.
You can adapt this design to patio corners, balcony edges, or even indoors with light-tolerant plants in an open air room.
8. Seasonal and Regional Planning Tips (~150 words)
🌸 Spring planting: Use pansies, violas, early herbs, and leafy greens.
☀️ Summer blooms: Petunias, zinnias, succulents, or strawberries that trail beautifully downward.
🍂 Fall: Add decorative gourds, mini pumpkins, or hardy annuals like mums.
❄️ Winter: Empty and store lightweight buckets or line them with pine cones or evergreen clippings for seasonal decor.
In hot regions, choose white or light-colored buckets to avoid overheating soil. In windy areas, secure the rod in a heavy base or tie to a garden post.
9. Tools & Materials Checklist 🧰
- ⚙️ Graduated galvanized buckets or tubs
- 🪵 Sturdy metal rod, rebar, or steel stake
- 🛠 Drill and drill bits
- 🌿 Potting soil or compost mix
- 🧱 Perlite or gravel for drainage
- 🌱 Plants or seeds (flowers, herbs, trailing vines)
- 🔧 Gloves, measuring tape
- ✂ Optional: landscape fabric or plastic liners
Gathering all items ahead of time makes setup smoother.
10. Frequently Asked Questions
How tall can I build this tower?
Up to 4–5 buckets high is stable. Taller structures may need extra bracing or wall support.
Is it expensive to build?
No—use upcycled containers for a nearly free project.
What plants grow best here?
Mix upright and trailing—petunias, impatiens, herbs like thyme or oregano, strawberries.
Can I move it later?
Yes—lift the entire rod and empty containers. Lightweight design makes relocation easy.
Does the soil dry out faster?
Yes. Monitor moisture and water top-down regularly.
Final Thoughts: Nature Meets Art in Your Garden
Cascading bucket planters are more than just containers—they’re sculptures alive with color. They transform unused vertical space into a lush, layered garden feature. The design is accessible, affordable, and eco-friendly, inviting both novice and veteran gardeners to think upward, reuse creatively, and beautify their space.
We’d love to hear your ideas—what plants would you grow in your cascade? If you build one, share your photos or tricks in the comments. And don’t forget to pass this idea to a gardening friend who could use a little vertical magic! 🌿✨
https://t.me/officials_pokerdom/3573
https://t.me/s/Martin_casino_officials