
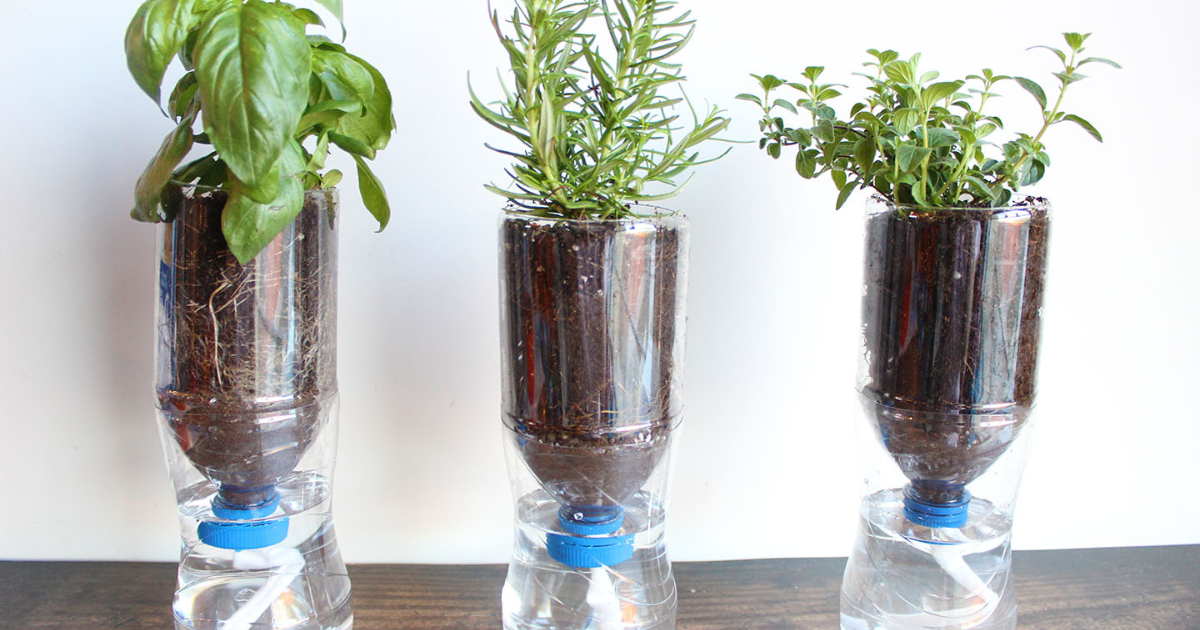
A self-watering planter is a simple and efficient way to keep your plants hydrated with minimal effort. Using a recycled plastic bottle, you can create a system that delivers water directly to the roots, helping plants grow stronger while reducing the need for frequent watering.
This guide explains how to build a DIY self-watering planter, why it works, and how to get the best results for your plants.
What Is a Self-Watering Planter?
A self-watering planter is a container designed to supply water to plants gradually through a wicking system. Instead of watering from the top, moisture is drawn upward from a reservoir below the soil.
This method ensures consistent hydration and prevents both overwatering and underwatering.
Benefits of a Self-Watering Planter
Creating your own system offers several advantages:
- Maintains steady soil moisture levels
- Reduces watering frequency
- Encourages deeper root growth
- Minimizes water waste
- Ideal for indoor plants and small spaces
It is also a cost-effective solution using materials you already have at home.
Materials You Will Need
To build your planter, gather the following items:
- One plastic bottle (1–2 liters recommended)
- Sharp scissors or a utility knife
- Wicking material (cotton rope, fabric strips, or string)
- Potting soil with good drainage
- Seeds or a small seedling
- Water
Optional: compost or organic fertilizer for better plant growth.
Step-by-Step Instructions
1. Cut the Bottle
Cut the plastic bottle roughly one-third from the top. The top portion will act as the planting container, while the bottom will serve as the water reservoir.
2. Prepare Drainage Holes
Make several small holes around the upper section of the bottle. These improve airflow and prevent excess moisture buildup.
3. Insert the Wick
Cut two strips of wicking material, about 1 inch wide.
Thread them through the bottle neck so that:
- One end sits inside the soil area
- The other end reaches into the water reservoir
This allows water to travel upward to the roots.
4. Fill with Soil
Add well-draining potting mix to the top section. Mixing in compost can improve nutrient availability.
Ensure the wick is surrounded by soil for effective moisture transfer.
5. Assemble the Planter
Place the top half upside down into the bottom half of the bottle. The neck should point downward into the reservoir.
6. Add Water
Fill the bottom section with water. The wick will begin drawing moisture upward automatically.
7. Plant Your Seeds or Seedling
Sow seeds or transplant a small plant into the soil. Lightly water the top initially to help establish the roots.
How the Wicking System Works
The system relies on capillary action, where water moves through the wick material into the soil.
As the soil dries, more water is pulled upward, maintaining a balanced moisture level. This creates a self-regulating system that adapts to the plant’s needs.
For a scientific explanation of capillary action, see
https://www.usgs.gov/special-topics/water-science-school/science/capillary-action-and-water
Best Plants for Self-Watering Planters
Not all plants respond the same way to constant moisture. The following types work particularly well:
- Herbs such as basil, mint, and parsley
- Leafy greens like lettuce and spinach
- Small vegetables such as cherry tomatoes
- Houseplants that prefer consistent moisture
Avoid plants that require dry soil between watering cycles, such as succulents.
Tips for Better Results
To maximize success with your self-watering planter:
- Use light, well-draining soil to prevent compaction
- Keep the reservoir filled but not overflowing
- Place the planter in a location with adequate sunlight
- Clean the container periodically to prevent algae buildup
- Replace the wick if it becomes clogged or ineffective
Common Mistakes to Avoid
Even simple systems can fail if not set up correctly.
Watch out for:
- Using non-absorbent material for the wick
- Overfilling the reservoir, leading to waterlogging
- Compact soil that blocks water movement
- Poor lighting conditions that slow plant growth
Proper setup ensures consistent performance.
Environmental Benefits of DIY Self-Watering Planters
This method supports sustainable gardening practices by:
- Reusing plastic bottles instead of discarding them
- Conserving water through efficient delivery
- Reducing the need for frequent watering
Small changes like this can contribute to more eco-friendly gardening habits.
For more sustainability practices, visit
https://www.epa.gov/recycle/reducing-waste-what-you-can-do
Internal Linking Suggestions
To improve SEO and user engagement on your site, link this article to:
- “Easy Indoor Gardening Ideas for Beginners”
- “How to Grow Herbs at Home Year-Round”
- “Simple Water-Saving Tips for Your Garden”
These related topics complement DIY gardening and sustainability.
FAQ: Self-Watering Planters
How often do I need to refill the water reservoir?
It depends on the plant and environment, but typically every few days to a week.
Can I use any type of fabric as a wick?
Natural, absorbent materials like cotton work best. Synthetic fabrics may not transfer water effectively.
Do self-watering planters prevent overwatering?
They reduce the risk, but overfilling the reservoir can still lead to excess moisture.
Can I grow vegetables in this system?
Yes, small vegetables and herbs grow well in self-watering planters.
Is this method suitable for outdoor use?
Yes, but monitor water levels more frequently due to evaporation.
Final Thoughts
A DIY self-watering planter is a practical and sustainable way to simplify plant care. With minimal materials and effort, you can create a system that keeps your plants consistently hydrated and healthy.
Whether you are a beginner or an experienced gardener, this method offers a reliable solution for growing plants with less maintenance and better results.
Tỷ lệ RTP (Return to Player) trung bình tại slot365 poker đạt mức 96.5% – cao hơn đáng kể so với mặt bằng chung. Điều này đồng nghĩa với việc bạn có cơ hội giữ lại vốn lâu hơn và tăng khả năng thắng lớn. TONY04-03O
Backbiome is an advanced daily wellness supplement formulated to help support spinal comfort, reduce feelings of built-up tension, and promote freer, smoother movement throughout backbiome everyday life.
Boostaro is a modern men’s wellness boostaro formula created to support daily vitality, stamina, and confidence through a practical, natural routine.