

Have you ever dreamed of growing your own potatoes—without needing a garden bed, shovel, or even a backyard? It might sound like a gardening fantasy, but it’s not. Whether you have a small balcony or a corner of your patio, you can harvest sacks full of fresh, delicious potatoes using a smart and space-saving technique. Even better? There’s one surprising kitchen scrap that can supercharge your results: coffee grounds.
In this guide, you’ll learn how to grow your own potatoes in sacks from scratch, step-by-step, using everyday materials. We’ll also explain how adding used coffee grounds to your soil makes a real difference in yield, plant health, and pest control. Ready to transform your outdoor space into a mini potato patch? Let’s get started.
Step-by-Step Guide to Growing Potatoes in Sacks
1. Pick Your Perfect Potatoes
Start with certified seed potatoes. These are not your grocery store spuds—they’re specially cultivated to be disease-resistant and optimized for growing. Popular varieties include:
- Yukon Gold: buttery flavor, great for mashing and roasting
- Red Pontiac: quick-growing and ideal for boiling
- Charlotte or fingerling varieties: small but flavorful
Before planting, place the seed potatoes in a cool, well-lit space (like a windowsill) for 1–2 weeks to sprout. This is called “chitting.” Once the eyes start to grow greenish-white shoots, they’re ready.
2. Prepare the Right Sack
Use a breathable container. Burlap sacks, woven fabric grow bags, or special potato sacks all work well. The sack should be:
- At least 18–24 inches tall
- 12–18 inches wide
- Made from breathable material to allow airflow
- Equipped with drainage holes at the bottom
Start by rolling down the top half of the sack to make planting easier.
3. Add Soil & Compost Layer
Fill the bottom with about 4–6 inches of a growing mix. Use a 50/30/20 ratio:
- 50% good-quality potting soil
- 30% compost or aged manure
- 20% coarse sand or coconut coir for drainage
Now for the secret: mix in 1–2 handfuls of used coffee grounds. They help enrich the soil, lower pH to potato-friendly levels (5.5–6.5), and deter pests.
4. Plant Your Potatoes
Place 3–5 seed potatoes on the soil surface, spaced about 5 inches apart with the eyes facing up. Cover with another 4–6 inches of the same soil mix. Water until the soil is moist, but not soggy.
5. Hill as They Grow
When your potato plants reach 10–12 inches in height, add more soil around the base. This is called “hilling.” It encourages more potatoes to grow from the buried stems.
Each time the plant grows another 10 inches, unroll the top of the sack a bit more and add another 3–5 inches of soil. Keep going until the sack is full. Don’t forget to add more coffee grounds to each layer for consistent acidity and organic matter.
6. Keep Them Hydrated
Because sacks dry out faster than garden beds, watering is essential. Water deeply once or twice a week. In hot, dry conditions, you may need to water more often. Check soil moisture with your finger—if the top 1 inch is dry, it’s time to water.
Apply a balanced organic fertilizer every 3–4 weeks or a liquid seaweed extract to support tuber growth.
7. Watch for Pests & Disease
Check your plants regularly for issues. Look for yellowing leaves, mold spots, or signs of pests like aphids or beetles. If you notice problems:
- Remove affected leaves
- Space your sacks to allow airflow
- Use neem oil or insecticidal soap if needed
Potatoes grown in sacks tend to have fewer soil-borne pests and diseases, which is a big plus.
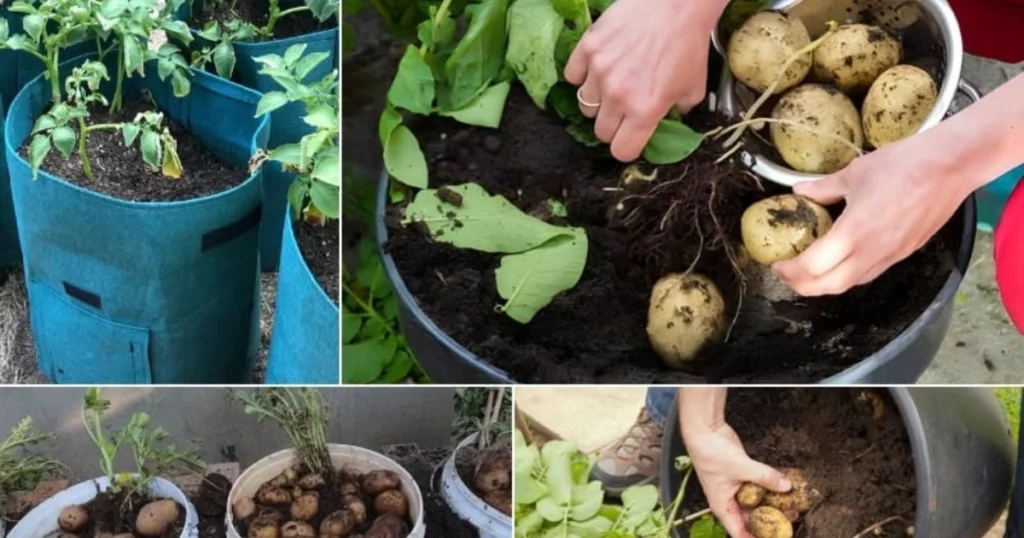
8. Harvest with Joy
When the foliage turns yellow and begins to wilt, your potatoes are almost ready. Stop watering and wait 5–7 days to let the skins harden. Then, tip over the sack, sift through the soil, and enjoy your homegrown treasure.
Why Coffee Grounds Are the Secret Ingredient
Coffee grounds might seem like garbage, but for potatoes, they’re garden gold.
Adding coffee grounds to the soil helps to:
- Lower the pH of alkaline soils, making them more suitable for potatoes
- Improve soil structure and drainage
- Add slow-release nitrogen for plant growth
- Deter certain pests like wireworms and slugs
Use dried or fresh coffee grounds, and don’t go overboard. About 1–2 cups per sack is more than enough. Mix them into each soil layer during hilling to evenly distribute their benefits.
Common Mistakes and How to Avoid Them
Overcrowding seed potatoes
Too many in one sack leads to competition and small yields. Stick to 3–5 per sack.
Skipping hilling
If you don’t add soil as plants grow, you’ll miss out on extra tubers. Keep hilling as they grow upward.
Improper drainage
If the sack doesn’t drain well, roots will rot. Always check for holes and use light, airy soil.
Under or overwatering
Letting the sack dry out completely or get soggy can kill your crop. Water consistently and adjust based on weather.
Using poor soil
Cheap or compacted soil blocks tuber growth. Mix in compost, coir, and coffee grounds to keep it fluffy and nutrient-rich.
Benefits of Growing Potatoes in Sacks
Potato sacks aren’t just trendy—they’re incredibly effective.
- Perfect for balconies, patios, rooftops, or small yards
- No digging or back-breaking harvests—just tip over the sack
- Excellent drainage and aeration
- Easy pest and disease control
- Great for crop rotation in urban spaces
- Fun and educational for kids and beginner gardeners
You can even move them around for better sunlight or protect them from weather changes.
Seasonal & Regional Growing Tips
In cool climates (zones 4–6)
Start seeds indoors or in greenhouses in early spring. Move sacks outside once frost risk passes.
In warm climates (zones 8–10)
Grow in spring and again in fall. Use light-colored sacks to avoid overheating and water more often.
In wet regions
Place sacks on bricks or a raised platform to keep them from sitting in water. Mulch the top to prevent soil splash.
In dry climates
Use drip irrigation or mulch to retain moisture. Shade the sacks during peak heat hours.
Plant early varieties in March–April and late varieties in August–September for continuous harvests.
Tools and Materials Checklist
Here’s what you’ll need to get started:
- Large breathable sacks (30–40 liters)
- Certified seed potatoes
- High-quality potting soil
- Aged compost or manure
- Used coffee grounds
- Watering can or garden hose
- Organic fertilizer or seaweed extract
- Trowel and gardening gloves
- Optional: mulch, pH strips, pest spray
Frequently Asked Questions
How many seed potatoes should I plant in one sack?
Use 3 to 5 seed potatoes per 30–40 liter sack. More than that leads to overcrowding and lower yields.
Can I reuse the same sack next season?
Yes, but clean it thoroughly and use fresh soil. Rotate crops to avoid disease buildup.
Why are coffee grounds good for potatoes?
They lower pH to ideal levels, add organic material, improve drainage, and can deter pests.
How often should I water my potato sacks?
About 1–2 times per week, more if it’s hot or windy. Make sure the soil stays consistently moist but not soggy.
When are potatoes ready to harvest?
After 10–14 weeks, when the plants yellow and die back. Stop watering for a few days before harvesting.
Which potato varieties grow best in containers?
Yukon Gold, Red Pontiac, Charlotte, and Fingerlings all thrive in sacks.
Internal Linking Opportunities
For further reading, check out these related posts on [secretsofthegreengarden.com]:
- How to Make Compost at Home
- Coffee Grounds in the Garden: Benefits & Myths
- Best Vegetables to Grow in Containers
- Simple DIY Watering Systems for Container Gardens
These internal links support your potato project with deeper soil, compost, and watering knowledge.
Conclusion: From Sack to Supper
Growing potatoes in sacks is one of the easiest, most satisfying gardening projects for beginners and pros alike. It takes very little space, requires no digging, and offers impressive results. With the bonus trick of using coffee grounds, you can boost your potato yield while recycling kitchen waste.
Why not give it a try this season? Your very own spud surprise might be just a few weeks away. If you’ve tried this method or plan to, leave a comment with your experience and share the joy with your gardening friends. Let’s turn patios into potato patches, one sack at a time.
Lovely just what I was searching for.
https://t.me/iGaming_live/4869
Das Turnier bietet eine €7.000 Garantie und wird gespielt mit 20k Start Stack und
20-Minuten Blind-Levels. Um dies gebührend zu
feiern, bietet der GCA Pokerraum zu seinem 10. Der Pokerraum im Grand Casino Asch wird von vielen Spielern als ihr Wohnzimmer bezeichnet –
und das nunmehr sein zehn Jahren! Achten Sie auf Sonderaktionen, die
Ihnen die Casinos bieten.
Da alle bereits die bezahlten Plätze und damit den Min-Cash von €210 erreicht hatten, konnte befreit aufgepokert werden. Eihorrschema – ganze €20.000 ist der garantierte Preispool dann im PLNH Cup, dem Hauptturnier des
gleichnamigen Festivals, groß. Die Preisgeldgarantie für das PLO Turbo liegt bei €1.000.
Bei einem Buy-In von €61+€9 sind €8.000 im
Preispool garantiert. Bereits am Freitag findet mit dem
PLNH Warm Up das Auftaktevent dieses Pokerfestivals statt.
Alle weiteren Informationen findet ihr auf der Homepage des Grand Casino Aš.
Im Preispool liegen mindestens garantierte €30.000!
Das BOOM besitzt eine Preispoolgarantie von €200.000!
Wir haben 1 Vierbettzimmer, 2 Dreibettzimmer und 1 Doppelzimmer mit eigenem Bad und WC.
References:
https://online-spielhallen.de/tipico-casino-login-ihr-einfacher-zugang-zur-casinowelt/
Bevor man sich einem Tisch- oder Kartenspiel im Casino widmet,
sollte man sich mit den Regeln vertraut machen. Dazu
bieten wir unseren Spielern eine Reihe verschiedener Boni
und regelmäßige Aktionen, wo es noch mehr Boni einzusammeln gibt.
Probieren Sie es doch gleich persönlich aus und registrieren Sie
sich noch heute, um einen saftigen Willkommenbonus von uns zu erhalten. Instantspiele
sind noch ganz neu in Online Casinos und bei uns eine weitere, interessante Spielkategorie.
Tisch- und Kartenspiele werden in Casinos einfach
nie aus der Mode kommen.
References:
https://online-spielhallen.de/meine-myempire-casino-erfahrungen-ein-detaillierter-bericht/
Der karibische Inselstaat Curaçao ist ein Paradies für Glücksspielanbieter und folglich haben viele Casino und Sportwetten Betreiber dort ihren Sitz.
Nehmen Sie unsere kostenlose Erstberatung in Anspruch und fordern Sie die Transaktionsübersicht beim Casino an. In diesem Fall behält man die gesamte
Rückerstattung für sich, trägt aber auch bewusst das Risiko.Die Kosten richten sich nach dem
Rechtsanwaltsvergütungsgesetz (RVG) und der Höhe Ihres Verlusts.
Im ersten Schritt fordern Sie die Spielübersicht an – hierfür stellen wir eine kostenlose Textvorlage zur Verfügung.
Sie registrieren sich auf unserer Seite, wir kontaktieren Sie für Ihre
kostenlose Erstberatung. Hierfür stellen wir eine kostenlose Textvorlage zur Verfügung.
Aus diesem Grund habe ich mich Ihrer Sammelklage angeschlossen.
Wir zeigen Ihnen Möglichkeiten, wie Sie ohne Kostenrisiko und mit besten Erfolgsaussichten Ihre Verluste zurückerhalten.
Prüfen Sie jetzt, ob Sie berechtigt sind Ihr verlorenes Geld
vom Online Casino zurückfordern können. Verluste aus Glücksspielen im Online
Casino können Sie einfach und schnell zurückfordern. Online Glücksspiel ist in manchen Ländern illegal.
References:
https://online-spielhallen.de/playfina-casino-mobile-app-dein-spielvergnugen-fur-unterwegs/
These games are easy to find under the “Bonus Buy ” category.
Fair Go Australia focuses primarily on high RTP machines
to guarantee players the best possible chances of winning.
Advanced technology also ensures the safety of Fair Go Casino players.
The Curacao license is, therefore, a guarantee that every deposit or bet made while playing at Fair Go Casino is a legal and secure activity.
Most problems at fairgo casino are quick to fix once you know where to
look — and the support team is always ready to help if you hit a wall.
It takes less than a minute, and once it’s on your phone, you’ve got instant access
to pokies, tables, and your account without searching through tabs.
Whether you’re on Android or iPhone, the fair go casino app makes it easy to load up a live game with a couple
of taps. Live Casino Experience fairgo online casino
One of the principal reasons gamblers choose Fair Go Casino is the
high level of trust it has established over time.
The system then prompts returning members to
enter their credentials, ensuring a swift path to
the gaming lobby. With user-friendly navigation and a commitment to responsible gaming, it strives
to ensure every visitor feels welcome. This guide is designed for users from Australia who want to
start playing on RocketplayCasino safely and with maximum benefits.
Should you ever need assistance, our support team is available via email or a toll-free call, ready to get you back to the action without delay.
References:
https://blackcoin.co/1_the-ultimate-guide-to-high-roller-games-top-games-to-play_rewrite_1/
When it comes to gambling online, safety is the biggest priority –
that’s why we’re starting with it first and foremost.
We scoured the web to find the top picks ideal for real-money casino action Down Under.
When asking about specific pokies or bonus terms, I received
generic answers that felt copied from a script rather than addressing
my specific concerns. Without live chat, I was
forced to wait hours for email responses that often missed
the point of my questions. For a mobile casino
without a dedicated app, Rocket Play does a decent job.
Additionally, players can enjoy weekly cashback offers and RocketPlay’s
no deposit bonus codes. Whether you’re seeking low deposit casinos, exciting welcome bonuses, or the
latest jackpot slots, RocketPlay delivers a premium experience tailored to Canadian preferences.
RocketPlay stands out as one of the best online casinos for players,
combining a vast game library, generous casino bonuses, and a strong commitment to security and responsible gambling.
References:
https://blackcoin.co/wazamba-premium-pokies-paradise-for-australian-players-in-2025/
Billed as the “eighth wonder of the world”, his third casino, the Taj Mahal, made investors wonder why they’d bet on Trump.
A merchant bank commissioned by the NSW government, CBIC Australia, also
found the bids were financially unviable. Macau casino mogul Stanley Ho, pictured in 2002,
was black-banned by casino regulators around the world because of his organised
crime links. The Cheng family, whose company New World Developments was part
of another team bidding for the casino, had their own shady connections.
The NICC will rebuild public trust in the NSW casino industry through visible and robust supervision.
The NICC was set up to address the risks
and harms arising from casino operations through increased regulatory oversight.
On 11 August 2023, the NSW Government announced an in-principle agreement with The Star on casino duty rates.
The agreement with The Star includes an additional levy of 35%
on total gaming revenue that exceeds $1.125 billion in a financial year.
References:
https://blackcoin.co/casino-utan-svensk-licens-jamfor-alla-basta-casinon-utan-spelpaus/
One of the highlights of Rocket Casino’s promotional
offerings is its focus on providing value for players.
Rocket Casino Australia offers a wide range of safe and reliable payment methods, including credit cards, e-wallets, and cryptocurrency options, to ensure that you can easily deposit and withdraw funds.
Whether you need help with a game, have questions about promotions, or need assistance with
a withdrawal, the dedicated VIP support team is always available to provide top-tier
service.
Pokies contribute 100% while table games typically contribute 10-20% per bet.
Different games contribute different percentages towards meeting the wagering requirements.
Live games run 24/7 with instant chat features to interact with dealers.
Professional croupiers host games from modern studios with multiple camera angles.
Our live casino features professional dealers hosting
blackjack and roulette tables around the clock.
References:
https://blackcoin.co/epiphone-casino-overview/
Exposure to light influences your circadian rhythm—your natural sleep-wake cycle.
As lovely as it may be to co-sleep with your dog or cat,
this can interfere with restful sleep. Caffeine takes three to
seven hours to leave your system, so avoid it in the afternoon or evening.
Time coffee or tea consumption so that the substance is out
of your system when you go to bed. Caffeine (the stimulant in coffee, black tea, and certain sodas) and alcohol can both disrupt sleep.
Repeating your routine each night will help signal to
your body that it’s time to rest. A poor night’s sleep can cause fatigue, concentration problems, moodiness,
headaches, and more. He specializes in pulmonary health, critical care, and sleep medicine.
References:
https://blackcoin.co/level-up-casino-login-guide/
The decor features elements of nature, whether
with blue fabric accents and pictures of dewdrops or orange abstract patterns and sunset-colored flowers.
Continuing through the lobby, you’ll arrive at Bellagio’s famous
conservatory—which has earned its own section below. At the
time of building, it was the most expensive resort ever
built.
Need help booking this hotel?
The majority of casinos offer only double and
triple-zero wheels. The Bellagio Hotel &
Casino Resort features a European, or single zero roulette wheel.
Nevada’s Megabucks Progressive Slot Machines are in the
Bellagio Hotel Vegas and more than 125 casinos across the state.
References:
https://blackcoin.co/fast-payout-casinos-the-ultimate-guide-2025/
us poker sites that accept paypal
References:
ispd.org
us online casinos that accept paypal
References:
volunteeri.com
online casino real money paypal
References:
praylotto.kr
online casino paypal
References:
https://behired.eu/employer/best-paypal-casinos-canada-2025/
online casinos that accept paypal
References:
https://finbullish.com/companies/best-paypal-casino-sites-uk-2025-gambling-list-you-can-trust/
casino con paypal
References:
http://www.career4.co.kr/bbs/board.php?bo_table=ci_consulting&wr_id=351538
online casino australia paypal
References:
https://sigorta.jobs/employer/best-online-casinos-australia-top-10-australian-casinos-2025/
paypal casinos for usa players
References:
http://aanline.com/eng/board/bbs/board.php?bo_table=free&wr_id=381646
online casino paypal
References:
https://carrefourtalents.com/employeur/best-online-casinos-australia-2025-find-top-aussie-casino/
online casino paypal einzahlung
References:
https://skinforum.co.in/employer/payidcasinoau-top-payid-casinos-guide-for-aussies/
No long roads.
No overexplaining.
Only what matters, when it matters.
Fresh signals.
Clear mechanics.
Moments that feel right — not forced.
This is where rhythm meets timing,
and timing quietly turns into advantage.
You scroll — you get it.
You stay — you feel it.
https://t.me/s/portable_1WIN
Slide in.
Catch the flow.
Stay where momentum lives.
Backbiome is an advanced daily wellness supplement formulated to help support spinal comfort, reduce feelings of built-up tension, and promote freer, smoother movement throughout backbiome everyday life.