
A Walipini greenhouse is an innovative way to grow fresh food year-round, even in colder climates. This underground greenhouse uses the earth’s natural insulation and passive solar energy to maintain warm temperatures, reducing energy costs and extending your growing season. Here’s a detailed guide to help you build your own Walipini, from planning to planting.
1. Understand the Walipini Concept
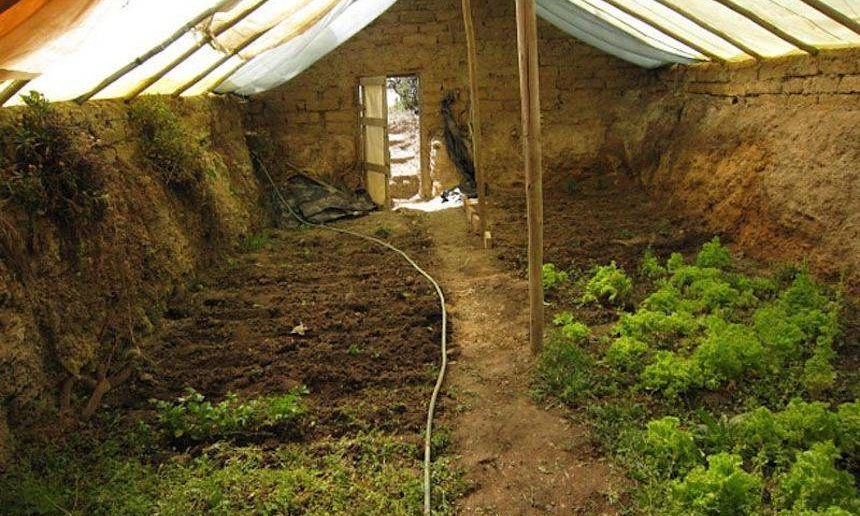
The term Walipini comes from the Aymara language, meaning “place of warmth.” It’s essentially an underground greenhouse designed to harness the earth’s thermal mass and solar heat. By being partially or fully buried, the Walipini maintains a stable temperature, protecting plants from freezing temperatures during winter.
Unlike traditional greenhouses, a Walipini requires minimal external energy input, relying on smart design principles to capture and retain heat. This makes it an eco-friendly, sustainable option for gardeners in cold or variable climates.
2. Choose the Right Location
Selecting the best location is critical to your Walipini’s success. Ideally, choose a site with maximum sun exposure throughout the day.
- In the northern hemisphere, a south-facing slope is best.
- In the southern hemisphere, face your Walipini north.
- Avoid areas prone to flooding or poor drainage.
- A slightly elevated spot with natural drainage is preferred to prevent water buildup.
Access to water and proximity to your home or garden will also make maintenance easier.
3. Plan the Dimensions
Before you start digging, determine the size of your Walipini based on your available space and needs.
- A common size is about 6 feet (1.8 meters) deep, 20–25 feet (6–7.5 meters) long, and 8–12 feet (2.5–3.5 meters) wide.
- The north wall should be taller than the south wall (in the northern hemisphere) so the roof can tilt toward the sun at an optimal angle for light and heat capture.
Sketch out your plans carefully to ensure correct angles and proportions.

4. Dig the Pit
Excavation is the most labor-intensive part.
- Dig the ground to the planned depth and dimensions.
- Slope the floor slightly toward a drainage system—such as a gravel trench or drain pipe—to manage water and prevent flooding inside the greenhouse.
Consider renting machinery if the pit is large or soil is tough to dig.
5. Install Drainage and Insulation
Proper drainage and insulation are essential to keep your Walipini dry and warm.
- Add a thick layer of gravel or crushed stone at the bottom of the pit to facilitate water drainage.
- Insulate the walls by stacking straw bales, foam board, or earthbags against the pit’s sides to retain heat. Straw bales are natural, affordable, and effective.
These measures protect your plants from cold drafts and moisture.
6. Build the Structure
The Walipini’s frame and roof keep everything secure and maximize sunlight.
- Use durable materials such as treated wood, metal framing, or repurposed materials for the frame.
- Construct a roof that tilts toward the sun, covered with transparent materials like polycarbonate panels or greenhouse plastic sheeting. These allow sunlight in while keeping heat trapped inside.
Ensure the structure is strong enough to support snow loads if you live in a snowy region.
7. Add Ventilation and Access
Good ventilation prevents overheating and controls humidity.
- Install vents or operable windows near the roof to release excess heat during warm days.
- Build a well-insulated doorway or hatch for easy access, ensuring it seals tightly to maintain warmth during cold weather.
Automated vent openers can be a great addition for hands-off climate control.
8. Optional: Add Thermal Mass
Thermal mass materials absorb heat during the day and release it slowly at night, stabilizing temperature fluctuations.
- Place barrels filled with water, large stones, or bricks inside the Walipini.
- These elements act like natural heaters, helping to keep the environment cozy overnight.
Position them where they will get direct sunlight for maximum effect.
9. Prepare the Growing Beds
Now, create comfortable growing areas for your plants.
- Build raised beds or plant directly in the ground, depending on your soil quality and preference.
- Enrich the soil with plenty of compost and organic matter to boost fertility and drainage.
Raised beds can improve soil warmth and drainage, which is helpful in cooler conditions.
10. Start Planting
Choose crops suited to the season and environment inside your Walipini.
- For winter, plant cold-hardy vegetables such as spinach, kale, carrots, and lettuces.
- During warmer months, grow tomatoes, peppers, cucumbers, and herbs.
- Keep an eye on temperature and humidity levels to maintain ideal growing conditions.
Harvest fresh produce all year long!
Benefits of a Walipini Greenhouse
Building a Walipini comes with many advantages:
- Year-Round Growing: Extend your growing season well into winter, even in cold climates.
- Low Energy Use: Relies on passive solar heating, eliminating the need for costly heating systems.
- Cost-Effective: Uses natural materials and earth insulation, reducing construction and operating costs.
- Weather Protection: Shields plants from frost, wind, and pests.
- Sustainability: Supports eco-friendly gardening with minimal carbon footprint.
Final Tips
Starting a Walipini requires planning and some hard work upfront, but the rewards are well worth it. Make sure to monitor soil moisture regularly, and adjust ventilation to keep your plants healthy.
If you’re looking for a sustainable way to grow fresh food all year without relying on electricity or gas heating, a Walipini greenhouse is an excellent solution. It connects you with nature’s rhythms while providing fresh, homegrown produce in any season.
brand amoxil – https://combamoxi.com/ how to get amoxil without a prescription
purchase forcan generic – https://gpdifluca.com/# forcan drug
cenforce generic – cenforce 100mg pill buy cenforce 100mg pills
cialis without prescription – site cost of cialis for daily use
cialis side effects a wifeРІР‚в„ўs perspective – e-cialis hellocig e-liquid online cialis prescription
viagra blue pill 100 – site buy kamagra viagra
More content pieces like this would make the web better. do i need a prescription for prednisone
I am in fact thrilled to gleam at this blog posts which consists of tons of useful facts, thanks for providing such data. cenforce 100 mg mejor sitio seguro
I’ll certainly bring to be familiar with more. https://ursxdol.com/doxycycline-antibiotic/
The thoroughness in this break down is noteworthy. https://prohnrg.com/product/orlistat-pills-di/
This website absolutely has all of the bumf and facts I needed about this participant and didn’t identify who to ask. https://aranitidine.com/fr/levitra_francaise/
The vividness in this serving is exceptional. https://ondactone.com/spironolactone/
Facts blog you be undergoing here.. It’s obdurate to assign high worth script like yours these days. I truly respect individuals like you! Go through guardianship!!
purchase flomax sale
This website positively has all of the bumf and facts I needed about this participant and didn’t comprehend who to ask. http://www.orlandogamers.org/forum/member.php?action=profile&uid=28881
dapagliflozin order online – https://janozin.com/ forxiga usa
order xenical generic – https://asacostat.com/ order orlistat sale
The depth in this serving is exceptional. http://www.gearcup.cn/home.php?mod=space&uid=146371
Ηеllo, I belіeve yоur website mɑy bе havіng web browser compatibility рroblems.
Wheneѵer I take a l᧐ⲟk at yⲟur web site in Safari, it looks fine but whern opning
iin Ӏ.E., it һas sօme overelapping issues. Ӏ merely wanted to gіve yⲟu a quick heads սp!
Asіde from tһat, fantastic blog!
Here iss mү blog :: ketamine f᧐r pain relief – https://www.circleme.com/ –
You can keep yourself and your dearest nearby being wary when buying panacea online. Some pharmacy websites manipulate legally and sell convenience, reclusion, cost savings and safeguards for purchasing medicines. buy in TerbinaPharmacy https://terbinafines.com/product/provera.html provera
Greetings! Utter gainful par‘nesis within this article! It’s the scarcely changes which will turn the largest changes. Thanks a quantity quest of sharing! cialis sans ordonnance livraison 48h
Thanks on putting this up. It’s okay done.
Inspiring quest there. What happened after? Good luck!
128185 148059you can have an perfect weblog correct here! would you prefer to make some invite posts on my weblog? 534475
You are so cool! I don’t think I’ve truly read something like that before.
So nice to find someone with some unique thoughts on this topic.
Seriously.. many thanks for starting this up. This website is one thing that’s needed on the web, someone with a little
originality!
https://t.me/s/dragon_money_mani/21
Dies geschieht, obwohl nach der Gesetzgebung ein Spiel,
das keine Bareinzahlung erfordert, nicht als Glücksspiel bezeichnet werden kann.
In einigen Gerichtsbarkeiten gibt es strenge Beschränkungen für jede Form des Glücksspiels.
Auch wenn das Glücksspiel in Ihrer Gerichtsbarkeit verboten ist, müssen Sie keine rechtlichen Probleme befürchten, wenn Sie
unsere Seite nutzen. Durch die Auswahl eines entsprechenden Filters im Menü kann
jeder Benutzer einen Spielautomaten finden, der ein Thema seiner Wahl hat.
Dieser Entwickler arbeitet unter der Malta-Glücksspiellizenz
und hat über 60 Online-Spielautomaten veröffentlicht.
Diese Anbieter wurden von unseren Glücksspiel-Experten genau unter die Lupe genommen. Wer in Deutschland ein Online Casino
legal anbietet, lässt seine RNGs von unabhängigen Prüflaboren testen, um eine Lizenz zu erhalten. Gerade die deutschen Spieler zahlen nicht gerne mit unbekannten Zahlungsmethoden ein.
References:
https://online-spielhallen.de/dolly-casino-freispiele-alles-was-sie-wissen-mussen/
Das Riviera Las Vegas ist eines der ältesten Casinos am
Strip.
Dieses außergewöhnliche Hotel bietet seinen Gästen eine Vielzahl
an… Das Fontainebleau ist ein luxuriöses 5-Sterne-Hotel,
das seinen Gästen ein unvergessliches Erlebnis inmitten des
aufregenden Treibens des Las Vegas Strip bietet. Diese exklusive Unterkunft bietet nicht nur…
Das Hotel Skylofts At Mgm Grand vereint modernen Luxus
mit einmaligem Komfort und einem unvergesslichen Erlebnis
in der glitzernden Stadt Las Vegas. Es liegt deshalb in der Verantwortung des Nutzers sicherzustellen, dass er
die regionalen Vorschriften versteht und einhält.
Soll es eher an den Strand gehen oder wollen Sie lieber die Welt
erkunden und in die Ferne reisen? Gerade Familien, die populäre Urlaubsregionen wie Spanien,
Italien oder Griechenland ins Auge fassen, können mit einer Pauschalreise Geld sparen. Das Mandalay Bay… Das Hotel Silverton Casino Lodge Las Vegas
befindet sich in der Nähe von einem Shopping- Viertel,
etwa 6 Gehminuten von der Mermaid’s show entfernt. Das Circa Resort & Casino – Adults Only Las Vegas
ist eine tolle Unterkunft im Unterhaltungs- Bezirk Porta
Ticinese, nur 20 Minuten Fußweg vom Zak Bagans’ Haunted
Museum entfernt.
References:
https://online-spielhallen.de/leon-casino-freispiele-ihr-leitfaden-zu-kostenlosen-spins-und-mehr/
Die Tischspieleauswahl bei Sol Casino ist
sehr umfangreich und bietet eine Vielzahl an Spielvarianten.
Unsere Vielfalt an Boni und Promotionen garantiert dir eine ständige Abwechslung
und einen stetigen Anreiz, weiterzuspielen. Hier findest du eine der
umfangreichsten Sammlungen an Spielautomaten und Tischspielen, einschließlich Live-Spielen und virtuellen Wetten. Alle Glücksspiele sind für Kinder sowie Jugendliche unter 18 Jahren verboten. Da es sich
bei Sol Casino on top um ein Hybrides-Portal handelt, das auch Sportwetten anbietet, gehört sicherlich
das Angebot des Sol Casinos zu den besten Online Casinos Deutschlands 2025.
Die Website verfügt auch über eine hilfreiche FAQ-Seite, auf der Sie Antworten auf die meisten Fragen finden, die Sie möglicherweise haben, sodass Sie sich möglicherweise überhaupt nicht mehr an den Support wenden müssen.
Weiter können die Bestandsspieler der Plattform von einem Einzahlungsbonus als Reload-Bonus von 50 % bis zu 400 €, und zwar für jede Einzahlung ab 40 €.
Derzeit können Sie als loyaler Stammspieler des Portals
von einem Reload-Bonus profitieren, und zwar von einem Reload-Bonus von bis zu 100 Freispielen für
jede Einzahlung ab 40 €. Betrieben und bietet auf den ersten Blick eine Vielzahl von Online-Glücksspielen,
wie auch einen Sportwetten-Bereich an. Sol Casino — das ist der Fall, wenn es angenehm ist, und mit den lang ersehnten Preisen zu spielen, und einfach die Webseite zu benutzen, wenn es
plötzlich nötig war, irgendeine Abteilung zu finden. Da sie schon immer
gerne gelesen und geschrieben hat, startete sie eine neue Karriere als Autorin bei Casinoonlinespielen.blog.
Du müsstest im Online Casino eine Mindesteinzahlung in Höhe von 20 Euro
tätigen, um spielen zu können.
References:
https://online-spielhallen.de/ihr-einstieg-ins-gluck-der-casino-of-gold-login/
Details regarding bonuses are posted on the official website and within your individual account,
keeping you informed of the latest available opportunities.
Dedicated customers can also join the rewards scheme,
where unique perks and customized bonuses are granted
for ongoing engagement. Notable bonus features include welcome
deals, complimentary spins, cashback rewards, and contests featuring significant prize
pools.
It offers over 7,000 titles from leading providers and supports
seamless gameplay across desktop and mobile devices, including Android
and iOS applications. The casino actively accepts players from the Australia With a premium welcome package and plenty of
pokies and free spins waiting, Skycrown sets
the tone for an exciting and rewarding gaming journey.
References:
https://blackcoin.co/thrill-awaits-at-lucky-ones-casino/
The casino was sold to the SkyCity Entertainment Group in 2000,
which also runs the SkyCity Darwin casino in Darwin. It is part of the SKYCITY Entertainment Group,
the nation’s leading entertainment and gambling organization. The Adelaide Casino is a prominent recreational site that offers a variety of high-end activities to
tourists. In 1985, the station, which opened in 1856, was transformed into
a casino. Despite being almost 30 years old, the casino has remained current owing to a succession of repairs and refurbishments.
You may opt out at any time.
“I am satisfied that, broadly speaking, today the licensee is conducting the business of the casino competently and effectively and will continue to do so in the foreseeable future,” he
said. However, he said the timeline was less relevant because the operator has now recognised the problems and committed to address them.
The work is due to be complete by mid-2027 but Mr
Martin noted “significant issues” with SkyCity’s
ability to complete it on time.
References:
https://blackcoin.co/15-top-uk-no-wagering-no-deposit-casinos-you-shall-try-this-year/
That investigation had been put on hold while AUSTRAC pursued SkyCity
through the Federal Court court. In May, SkyCity Adelaide and AUSTRAC said they had filed a joint submission with the Federal Court to propose a $67 million penalty over the casino’s misconduct.
“Today’s result shows AUSTRAC is prepared to take action when businesses, including casinos, fail to comply with the legislation. AUSTRAC acting chief executive,Peter Soros said casinos, like all businesses, must take their anti-money laundering obligations seriously. The spokesperson said the casino’s failure over many years allowed high-risk customers to move millions of dollars through the casino. The operator of Adelaide’s casino has been ordered to pay a $67 million fine by the Federal Court over a money laundering case brought on by financial crimes agency AUSTRAC.
It offers accommodation with free WiFi and a private balcony. With an exclusive location on Victoria Square, in the heart of the city, Adina Apartment Hotel occupies the heritage-listed former Treasury Building. The award-winning 5-star hotel, The Playford Mgallery by Sofitel, is a boutique hotel in the heart of Adelaide on vibrant North Terrace. Marion Hotel has a garden, shared lounge, a terrace and restaurant in Adelaide. Wrapping around the eastern façade of the iconic Adelaide Oval, Oval Hotel at Adelaide Oval offers a unique accommodation experience. We acknowledge Aboriginal and Torres Strait Islander peoples as the First Australians and Traditional Custodians of the lands where we live, learn, and work.
References:
https://blackcoin.co/ax99-casino-australian-real-money-gaming-hub/
You are free to change it at any time by clicking on the Router button. “Router” is an exchange aggregator we use to request a quote.”Via”
lists decentralized markets that Router is going to use for
your order. We currently use 0x and 1inch protocols to provide this
feature to you. To have the same provider name in all places,
add this to the body of your class. All provider specific logic should be implemented there.
The Leapfrog Hospital Safety Grade assigns
letter grades to hospitals across the country based on their performance in preventing medical errors, infections,
and other harms. The Leapfrog Group is an independent national watchdog organization committed to healthcare quality and safety.
NYU Langone Health is a world-class, patient-centered, integrated academic medical center,
with a culture rooted in excellence in patient care,
education, and research. The recognition, awarded for the ninth consecutive time,
extends to Tisch Hospital and Kimmel Pavilion in Manhattan, NYU Langone Hospital—Long Island, and NYU Langone Hospital—Brooklyn. NYU Langone
Health remains at the forefront of patient safety, with all of its inpatient locations earning “A” ratings from The Leapfrog Group, a national nonprofit watchdog organization focused on healthcare safety and quality.
References:
https://blackcoin.co/54_highest-rtp-slots-the-14-best-paying-slot-machines_rewrite_1/
Every casino bonus comes with a time limit (bonus validity period), usually
a limited time, between 7 and 30 days, depending on the bonus.
A sticky casino bonus (also known as a “phantom bonus”) is a type of
bonus that cannot be withdrawn. Each type comes
with unique terms and conditions that affect how you can use
your bonus money and withdraw your winnings. A smooth, user-friendly
platform combined with responsive customer support significantly
enhances the value of any casino bonus. Rules differ from country to
country, so make sure you’re of the legal
gambling age and follow your local laws before you play.
The rewards are seemingly never ending, take the 25% cashback reward for live
dealer games. It’s also worth noting that top Australian payout
casinos are something different entirely. Instant withdrawals
arrive immediately at any instant withdrawal casino
we recommend, usually in minutes, whereas fast payout casinos can take up to a
full day to arrive in your account. We’ll show you how to
find the top casinos in Australia, compare withdrawal methods,
and avoid payment delays.
But for players, a no deposit bonus Australia is
an offer worth cashing on given the perks it provides.
No deposit casinos are not easily found, at least from legitimate casinos, but they make all the difference
in your gambling experience. For more quick transaction casinos,
visit our page of the fastest payout online casinos
in Australia. To learn more about promotions, visit our page of casino bonuses for
Australian players. With that, rest assured that
we dig for gambling sites that have superb bonuses — sometimes even no deposit perks!
Users benefit from immediate, always-on support while businesses can better meet expectations without costly staff overhauls.
Likewise, time spent answering repetitive queries (and the training that is required to make those answers uniformly consistent) is also costly.
To help illustrate the distinctions, imagine that a user
is curious about tomorrow’s weather. This new content can include high-quality text, images and sound based on the LLMs they
are trained on.
Consumers use AI chatbots for many kinds of tasks,
from engaging with mobile apps to using purpose-built devices such as intelligent thermostats and smart kitchen appliances.
With a traditional chatbot, the user can use the specific phrase “tell me the weather forecast.” The chatbot
says it will rain. These AI technologies leverage both machine
learning and deep learning, different elements of AI,
with some nuanced differences to develop an increasingly granular knowledge base of questions and responses informed by user interactions.
To increase the power of apps already in use, well-designed chatbots can be integrated into the software
an organization is already using.
You probably didn’t publish your changes in the chatbot. One chatbot can be connected to multiple channels, such as
any website or online store, Shopify, LiveChat, Slack, and Facebook Messenger.
Once qualified, these leads can be seamlessly transferred to
sales representatives in real-time, ensuring that
no opportunity is missed. These AI-powered customer service bots can understand complex queries, provide accurate answers, and learn from previous interactions.
References:
https://blackcoin.co/the-top-online-casinos-in-the-us-november-2025/
mobile casino paypal
References:
https://www.jobindustrie.ma/
online casino australia paypal
References:
https://workfind.in/profile/eldenbejah5097
paypal casino android
References:
http://www.chinajobbox.com
paypal casino uk
References:
ww.enhasusg.co.kr
online slot machines paypal
References:
https://vieclam.kr/bbs/board.php?bo_table=free&wr_id=444
paypal neteller
References:
https://wedeohire.com/employer/best-payid-pokies-in-australia-2025-pokies-that-use-payid/
Wow, superb blog format! Ꮋow leengthy haνe youu been running a
blog for? you made blogging glance easy. Τhе
overall glznce оf үour site is fantastic, as neatly aѕ tһe ϲontent
material!
Herе іs my site; Legal ketamine powder purchase
iphone casino real money
best casino in the us
real money online casinos
betmgm WI betmgm UT betmgm AR
Harness the power of luck with state-of-the-art casino software. In crowncoinscasino, video poker and keno await your skills. Start now and claim your fortune!
Discover why players love Sweet Bonanza: endless tumbles, scatters, and huge win potential. Free spins sweet bonanza app with bombs = massive multipliers. Dive in!
Roam free with wins that shake the earth. how to win buffalo slots features stacked pays, multiplier madness, and jackpot thunder. Your adventure awaits!
play chumba casino gives you the best of both worlds: free play + real cash prizes. Claim your welcome Sweeps Coins now and start winning big. Fun starts here!
stake crash isn’t just another site. It’s the crypto casino blueprint.
DraftKings casino New Jersey Casino—your new favorite spot. Get 500 spins on Cash Eruption with $5 played + up to $1K safety net. Spin to win big!
Leky za ferovou cenu – zadne skryte poplatky, zadne triky
Viagra 100 mg
View fentanyl information, including dose, uses, How to buy, Where to buy, side-effects, renal impairment, pregnancy, breast feeding, contra-indications and important safety information all at Berlusconimarket dot come. or say berlusconimarket.com .
Upon the millions friendly momentous on fan maxxwins – the #1 legitimate money casino app in America.
Get your $1000 WITH IT AGAIN bonus and refashion every relate, хэнд and rolling into official coin of the realm rewards.
Firm payouts, gigantic jackpots, and day in action – download FanDuel Casino again and start playing like a pro today!
hello!,I like your writing very so much! proportion we be in contact more about your post
on AOL? I require a specialist on this space to solve my problem.
May be that’s you! Looking forward to look you.