
Are you a flower lover dreaming of a lush, fragrant rose garden? Or perhaps you’ve come across roses sold without roots and wondered, “Can I plant these and still enjoy beautiful blooms?” The good news is — yes! With the right method, you can successfully plant and grow roses without roots, transforming any space into a vibrant, scented paradise.
In this article, we’ll walk you through a step-by-step process to clone and grow roses from cuttings. This method is straightforward, highly effective, and can be performed by both seasoned gardeners and beginners alike. Whether you’re aiming to grow roses for their incredible colors, enchanting perfumes, or symbolic meanings, this technique opens up new gardening possibilities for everyone.
Why Plant Roses Without Roots?
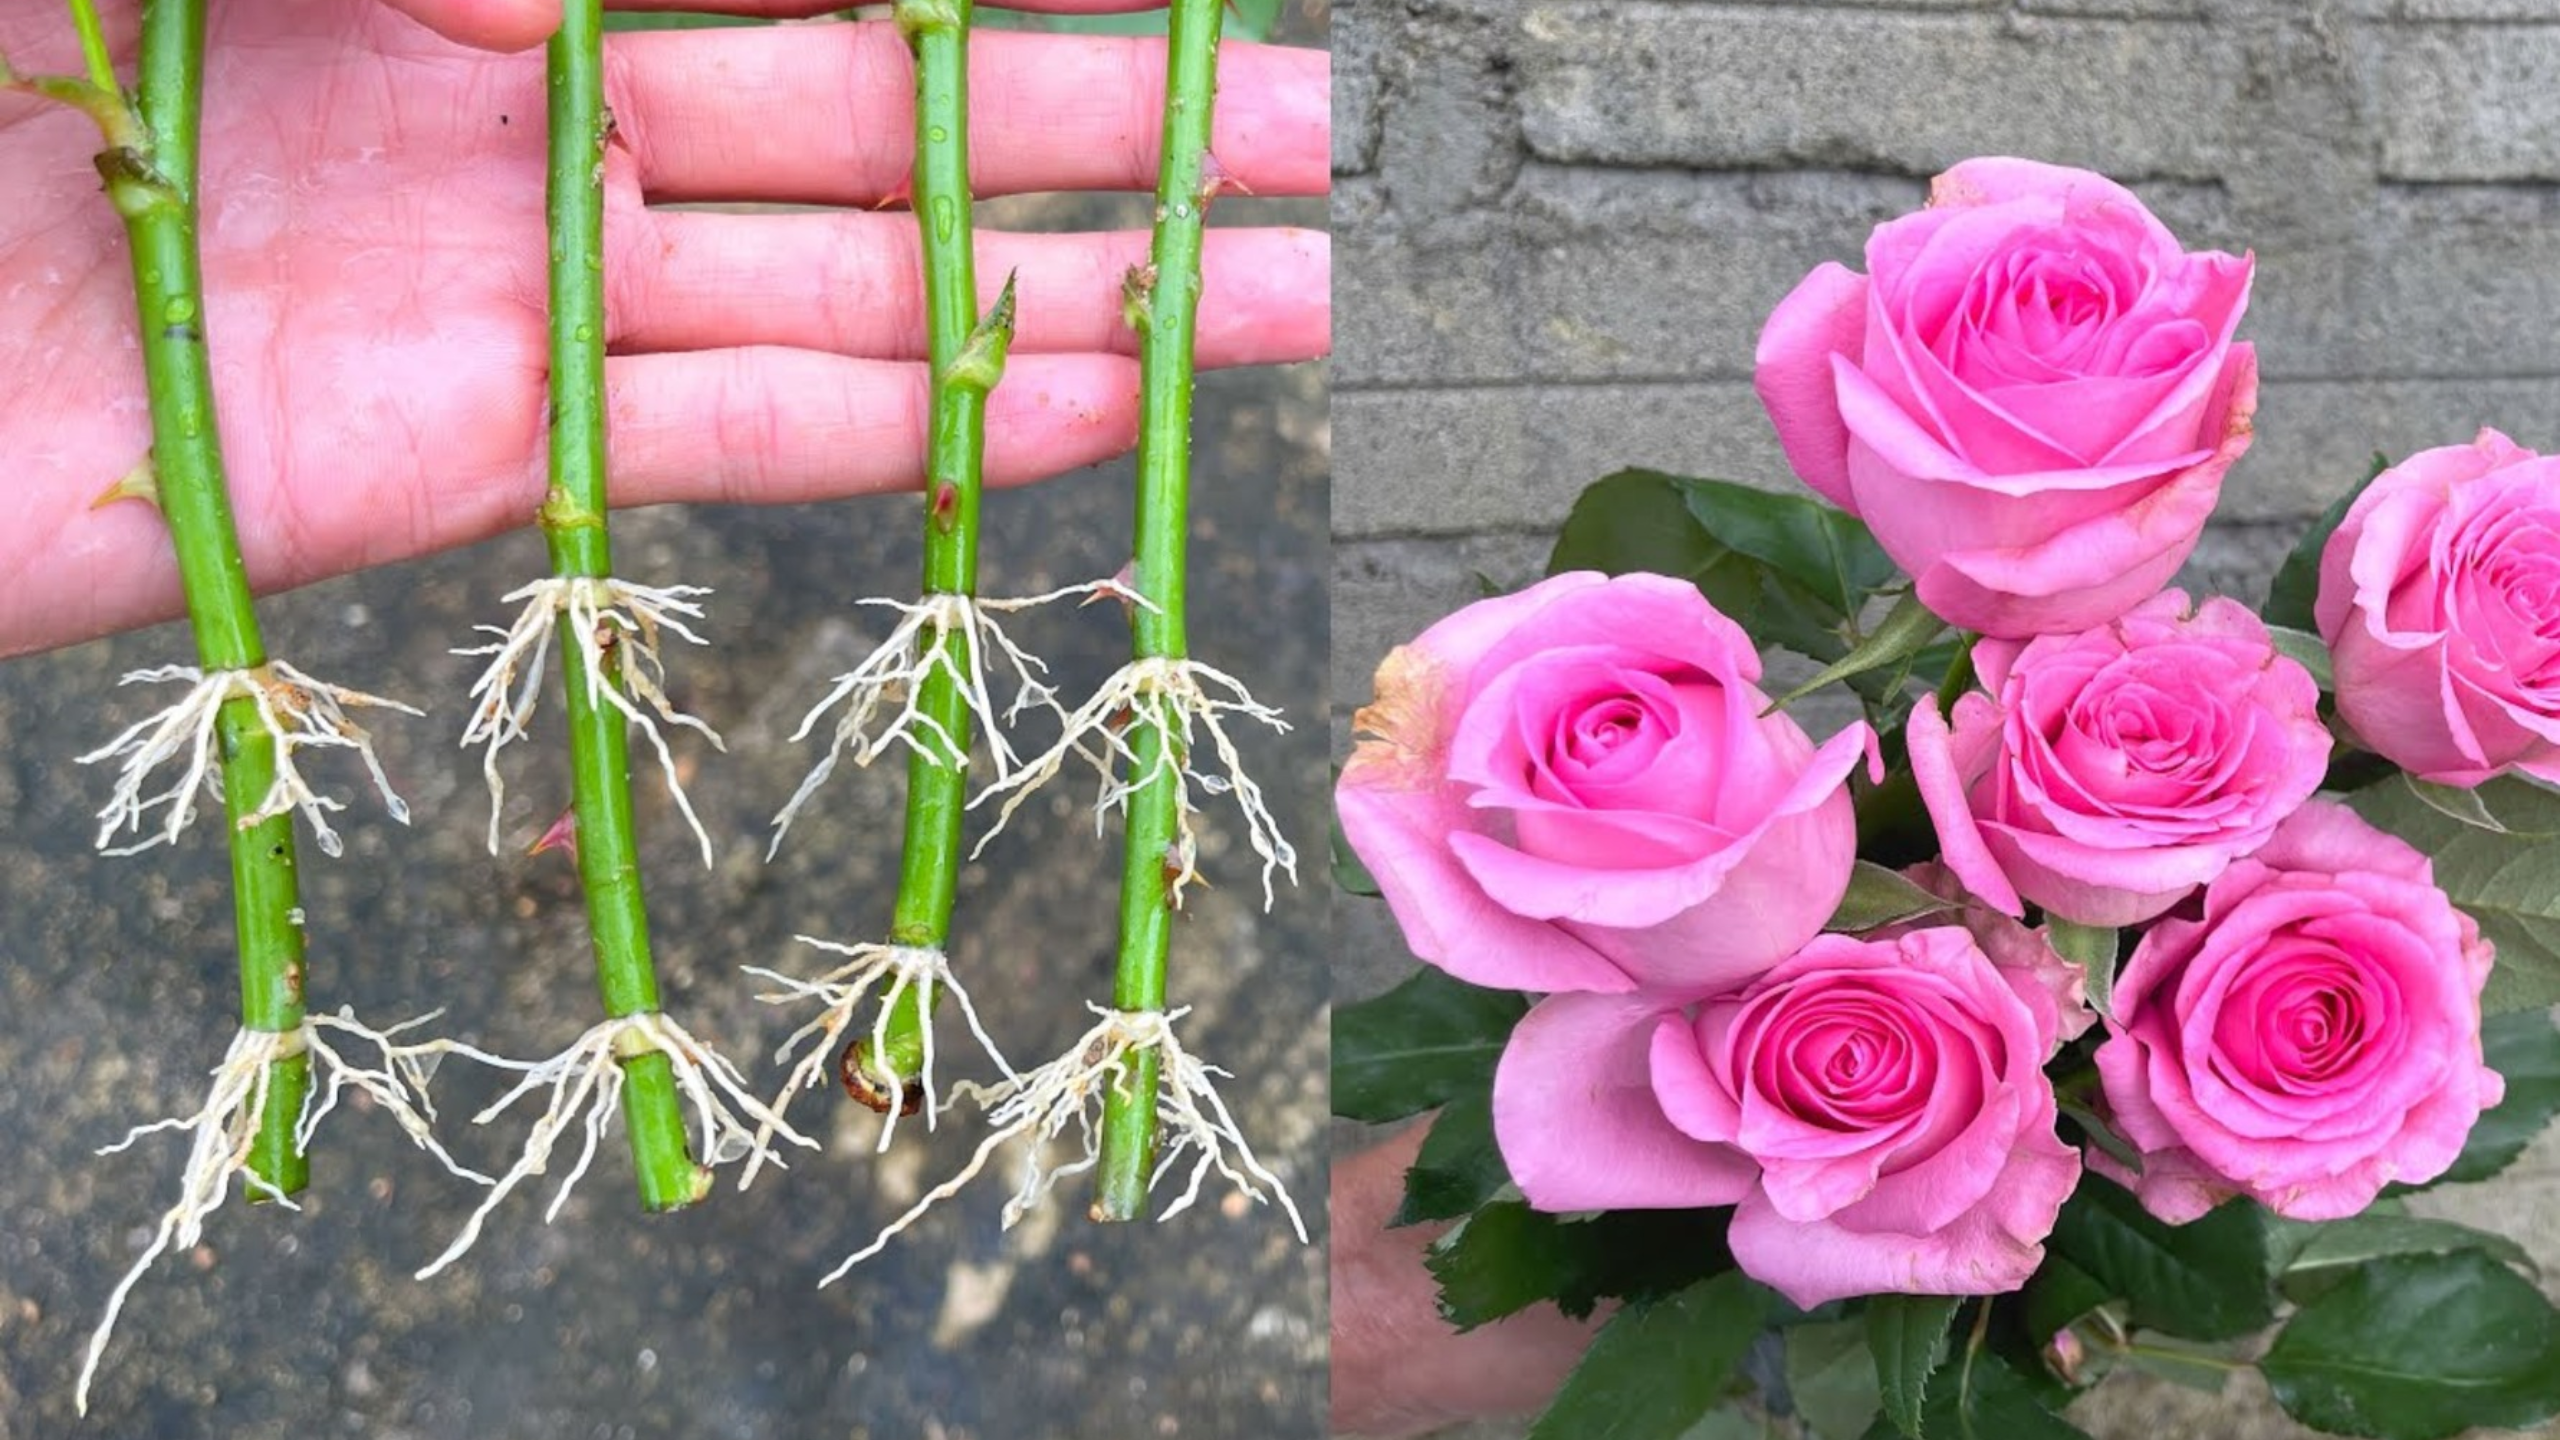
Roses without roots are usually sold as cuttings or stems, often used as a quick way to propagate the plant. Buying unrooted cuttings can be more affordable and convenient. The challenge, however, is ensuring they develop strong roots and grow into healthy plants.
The benefit of this approach is that it allows you to clone your favorite varieties directly from existing plants, ensuring consistency in color, scent, and shape. Plus, it’s a rewarding experience — seeing a tiny cutting turn into a lush bush with vibrant flowers.
What You’ll Need to Get Started
Before we dive into the step-by-step process, gather the essentials:
- Healthy rose cutting (preferably from an existing rose plant, with a stem about the thickness of a pencil)
- Sharp pruning shears or scissors
- Clean pair of pliers or tweezers (for removing thorns)
- A boric or natural rooting hormone (optional but recommended)
- A transparent plastic bottle or small greenhouse frame
- Coconut fiber or sphagnum moss
- Aloe vera gel (natural root enhancer)
- Water and a spray bottle
- A shaded, sheltered spot for rooting
Step 1: Prepare Your Rose Cuttings

The first crucial step is selecting the right stem. Choose a healthy, disease-free branch from your rose plant, preferably one that has recently bloomed or is about to bloom. It should be about 15-20 cm long (roughly the size of a pencil).
Using sharp scissors, make a clean diagonal cut just below a node (that’s where the leaves attach). This angle helps the cutting absorb water more effectively. Remove all the leaves from the lower part of the stem to prevent rot, but leave a few at the top for photosynthesis.
Next, carefully remove any thorns using pliers or tweezers — this makes planting easier and reduces damage when inserting into the soil or medium.
Tip: For added success, dip the cut end in a natural rooting hormone powder to stimulate root development.
Step 2: Rooting the Cutting in Water
Once your cutting is prepared, place it in a glass of clean water. Ensure the lower part of the stem is submerged, but leaves remain dry to prevent rotting. Keep the glass in a warm, shaded spot.
Within 10-14 days, you’ll start to see tiny white roots emerging — a sign that your cutting is taking hold.
Question: What if I want to speed up the rooting process?
Answer: Using a rooting hormone or pre-treating the cutting with aloe vera gel can enhance root growth.
Step 3: Creating a Miniature Greenhouse (The “Estufa” Method)
While water rooting is effective, many gardeners prefer to create a mini-greenhouse environment for better root development in soil. Here’s how:
- Take a 5-liter plastic bottle and cut it about 7 cm from the bottom.
- Slightly open the top to create a small door that can be sealed with tape or a clip.
- Fill the bottom with a mix of coconut fiber or sphagnum moss, both excellent for retaining moisture.
- Soak the medium lightly to keep it moist but not soggy.
Optional: For natural plant strengthening, rub a small piece of aloe vera gel on the cut end before planting. Aloe not only acts as an antiseptic but also promotes healthy root development.
Insert the rooted cutting (from the water stage) into the prepared medium, ensuring it’s stable and upright. Cover the opening nicely to trap humidity, creating a warm, humid environment similar to a greenhouse.
Step 4: Patience and Proper Care
Place your mini-greenhouse in a shaded, sheltered area. Direct sunlight can heat up the environment too much, damaging the delicate new roots.
Mist the cutting lightly every day to keep the medium moist. After about 12-15 days, check for signs of new growth and root development by gently tugging on the stem. If you feel resistance, roots are forming.
Remember, patience is key here. Some varieties may root faster than others, but consistent care pays off in the end.
Tips for Success and Troubleshooting
- Always use healthy, disease-free cuttings to get the best results.
- Keep the rooting environment humid but well-ventilated to prevent mold.
- Avoid overwatering; excess moisture can cause rot.
- You can transplant your rooted rose cuttings into a larger pot or garden once they develop a good root system—usually after 4-6 weeks.
Why This Method Works
This approach combines simple techniques—like water rooting and creating mini-greenhouses—that are tried-and-true among master gardeners. The addition of aloe vera enhances root growth naturally, making the process even more successful.
By following these steps, you are essentially cloning your favorite roses without the need for mature root systems. It’s an excellent way for beginners to start their rose journey or for seasoned gardeners looking to expand their collection affordably.
Final Thoughts
Planting roses without roots may seem challenging at first, but with patience and proper technique, it’s entirely achievable. Whether you’re aiming to grow a garden filled with fragrant red roses or colorful hybrid varieties, this method opens up exciting possibilities.
Now, are you ready to give it a try? Gather your cuttings, prepare your mini-greenhouse, and watch your garden flourish with beautiful, resilient roses!
Gerade der Live Chat ist eigentlich sehr wichtig und ein online Casino sollte auf solch ein Angebot nicht verzichten. Konnten Sie
Ihr Problem hingegen im Kundencenter nicht finden,
können Sie sich auch direkt mit dem Kundendienst in Verbindung setzen. Im Kundencenter vom LeoVegas Casino finden Sie Antworten auf
Ihre Fragen. Alternativ steht noch einige weitere Möglichkeiten zur Verfügung, wie zum Beispiel auch Postident.
Egal, ob Sie ein Gelegenheitsspieler oder ein erfahrener Wettender
sind, es wartet ein Willkommensbonus darauf, Ihre
ersten Einzahlungen zu verbessern und Ihnen zusätzliche Spannung zu bieten. Eine Online Spielothek ist eine
virtuelle Glücksspielplattform, auf der man Slots online spielen kann.
Registriere dich bei LeoVegas und sichere dir unseren königlichen Neukundenbonus mit
bis zu 100€ Echtgeldbonus und 100 Freispielen! Dementsprechend erfüllt die online Spielhalle
alle Anforderungen aus dem Glücksspielstaatsvertrag und ist somit eine
sichere Internetplattform für alle Spielfreunde. Für deutsche Spieler, die gerne unterwegs spielen, bietet diese Plattform ein unvergleichliches
mobiles Erlebnis. Wenn Sie online spielen, sind Vertrauen und Sicherheit von größter Bedeutung.
References:
https://online-spielhallen.de/verde-casino-50-freispiele-sichern-angebot-details/
Erwarten Sie für jedes fortgeschrittene Level verbessertes
Cashback, Freispiele und kuratierte Eventeinladungen.
Dadurch erhalten Sie sofortigen Zugriff auf exklusive Prämien, höhere Auszahlungslimits und persönliche
Betreuung, die nur geschätzten Gästen zur Verfügung steht.
Auf jeder Promo-Seite des Weekly Seven Casino werden jederzeit die Regeln,
Mindesteinzahlungen und Preiswerte angezeigt.
Preise –einschließlich Freispiele, Bargeld oder exklusive Vergünstigungen– werden innerhalb von 24 Stunden nach Turnierabschluss vergeben.
Unser engagiertes Kundensupport-Team steht Ihnen rund um die Uhr zur
Verfügung und hilft bei allen Fragen oder Problemen. Lucky7even Casino fördert verantwortungsvolles Spielen und
stellt Ihnen alle notwendigen Tools zur Verfügung, damit Sie
stets die Kontrolle über Ihr Spielverhalten behalten. Wir sind der Meinung, dass Spielen Spaß machen,
sicher und kontrolliert sein sollte.
References:
https://online-spielhallen.de/netbet-casino-login-ihr-tor-zur-unterhaltung/
I’ve seen a lot of online casinos come and go.
We fully understand how frustrating delays can be, particularly when fast payouts were one of the main reasons
you chose to play with us.Please be assured that
this is not the experience we aim to provide. We are truly sorry
to hear that your recent withdrawals took longer than expected, especially after becoming
a VIP member. Dear Lou,Thank you for taking the time to
share your experience with us. I get promised faster priority withdrawals
but they are now slower – doesn’t make sense
to me. The last 2 withdrawals took days and since becoming a VIP I am meant to
get faster withdrawals which seem to only get slower
and longer.
The free spins are given in batches of 20 during five consecutive days and you can play them at Wacky Panda.
But if you decided to claim the full offer, SkyCrown will increase your account
balance up to $600. SkyCrown kicks things off with 100% match-up bonus up to $300 and 100 free spins.
Well we’re certainly off to a good start when looking at the absolutely humongous welcome bonus.
But will SkyCrown Casino be even better than its sister casinos?
References:
https://blackcoin.co/2025-best-league-players/
Cetus connects to many different trading pools on Sui
and Aptos to make sure users always get the best deal when they trade their crypto.
Cetus is also one of the best crypto DEX aggregators that helps
users find the best prices when swapping tokens.
CoW Swap is a meta-DEX aggregator that offers the most competitive trading
rates of any AMM or DEX aggregator with a user-friendly experience.
In this article, we’ll walk you through the best DEX aggregators of 2025 and what makes them stand out to help you make smart trading
choices. These platforms have become popular in 2025
because they save time, offer better prices, and make trading
easier.
Health considerations, long distances to the nearest casino,
lack of time or transportation, and above all, the sheer convenience
of playing from your mobile device make online gambling an attractive option. While we advocate for visiting physical
casinos in Minnesota, we understand that there are times when playing at an online casino may be more convenient.
Playing in a land based casino definitely has it’s advantages compared to online casinos, most notably the physical presence of fellow players and the companionship they provide.
The search algorithm handles phrases and strings of words quite well,
so for example if you want words that are related to lol and rofl
you can type in lol rofl and it should give you a pile of related
slang terms. These indexes are then used to find usage correlations between slang terms.
The Urban Thesaurus was created by indexing millions of different
slang terms which are defined on sites like Urban Dictionary.
Hopefully the related words and synonyms for “MetaDAO+aggregator” are a little tamer than average.
Note that due to the nature of the algorithm, some results returned by your
query may only be concepts, ideas or words that are
related to “MetaDAO+aggregator” (perhaps tenuously).
References:
https://blackcoin.co/casumo-casino-review-rewards-slots-and-payments-how-is-customer-service/
Crown Casino Sydney accommodation has a downloadable app, but
there is no option to select a game there. For this reason, players are not allowed to
play more than 12 hours a day and more than 48 hours a week.
In fact, the number of benefits of the casino is impressive.
Here, players are welcomed by a delightful atmosphere and have the
opportunity to get quite generous winnings. Crown Casino Sydney is one of the largest casinos that are part of
the entertainment complex within Australia. To unlock each
tier’s benefits, you’ll need to earn the required number of
status points during the membership cycle to qualify.
Points can also be used to pay for events and conferences, or redeemed for
casino bets. You can apply for Crown Casino Membership online by clicking the Casino Membership button on the official website, or in person at the casino lounge.
This membership is independent of your Crown Rewards membership and requires a
simple application process that is governed by separate membership criteria.
In October 2012, Premier O’Farrell announced that the NSW Cabinet
had reviewed the proposal and decided that the government would enter into
detailed negotiations with Crown Resorts for the establishment of a
casino and hotel complex at Barangaroo. It was developed by Crown Resorts, primarily comprising a hotel and residential apartments, while a casino and other hospitality venues make up the rest of its floorspace.
If you’d prefer to get outside Crown also boasts
Sydney city’s only infinity pool, which almost blends
into the harbour, boasting secluded cabanas and poolside dining.
Luckily for you Crown is one of the best places to stay in Sydney, with
hundreds of plush rooms, most of which boast panoramic views across the harbour.
Visit and you’ll discover a high-end luxury hotel and
some of Sydney’s best restaurants and bars. Crown Sydney is a jewel on Barangaroo’s coastline, with panoramic harbour views.
References:
https://blackcoin.co/ripper-casino-bonus-codes-november-2025/
Richard Online Casino features a huge selection of
table games, catering to fans of classic casino favorites.
Players can test these games in demo mode without signing up, which is
a great way to explore the collection before wagering
real money. Players can also explore slots with free spins,
cascading wins, mini-games, and additional features to gameplay.
Richard Casino offers a wide range of convenient
deposit and withdrawal methods for Australian players.
Players can begin participating by creating an account and playing their favourite games.
The minimum deposit required to start playing is 20 A$,
making it accessible for players with various budgets.
Richard Casino has become rather well-known in the Australian online gaming
scene with its big game collection, appealing discounts, and commitment to a safe gaming environment.
Which is ok if you add there bonuses though
I didn’t I played my money just to have them clear my account and tell me it was over because of a bonus.
Not only does resolution have to happen, but other gamers must
be forewarned before sinking their first or future deposits into this casino.
References:
https://blackcoin.co/the-best-high-roller-lounges-in-australia/
online casino for us players paypal
References:
https://jobotel.com/
online casino australia paypal
References:
atpo.ca
online betting with paypal winnersbet
References:
http://www.annunciogratis.net
casino online paypal
References:
http://www.findinall.com
paypal online casinos
References:
oromiajobs.com
online betting with paypal winnersbet
References:
https://www.chdlrrhd.site/
Многих интересует, сколько стоит прогон хрумером https://www.olx.ua/d/uk/obyavlenie/progon-hrumerom-dr-50-po-ahrefs-uvelichu-reyting-domena-IDXnHrG.html, ведь цены зависят от объема работы.