
Mint is one of the easiest and most rewarding herbs to grow at home. Whether you’re brewing a fresh cup of mint tea, garnishing dishes, or making homemade remedies, having a steady supply of mint can be a real game-changer. Even better, you don’t need a garden or special gardening tools to grow it. With a simple trick using plastic bottles, you can grow mint all year round, even if you have limited space.
In this guide, you’ll learn how to transform a recycled plastic bottle into an efficient, low-maintenance, self-watering planter that will keep your mint thriving. It’s a great eco-friendly and space-saving solution, perfect for small apartments, city living, or those looking to reuse everyday materials. Plus, it’s simple and fun!
What You’ll Need
Before you start, gather these materials to make your self-watering mint planter:

- One 2-liter plastic bottle (or a similar size)
- Mint cuttings or seeds
- Organic potting soil (preferably with compost)
- A sharp knife or scissors
- A drill or nail (for creating drainage holes)
- A cotton wick (optional, for self-watering)
- Watering can or spray bottle
Step-by-Step Guide to Growing Mint in Plastic Bottles
1. Preparing the Plastic Bottle
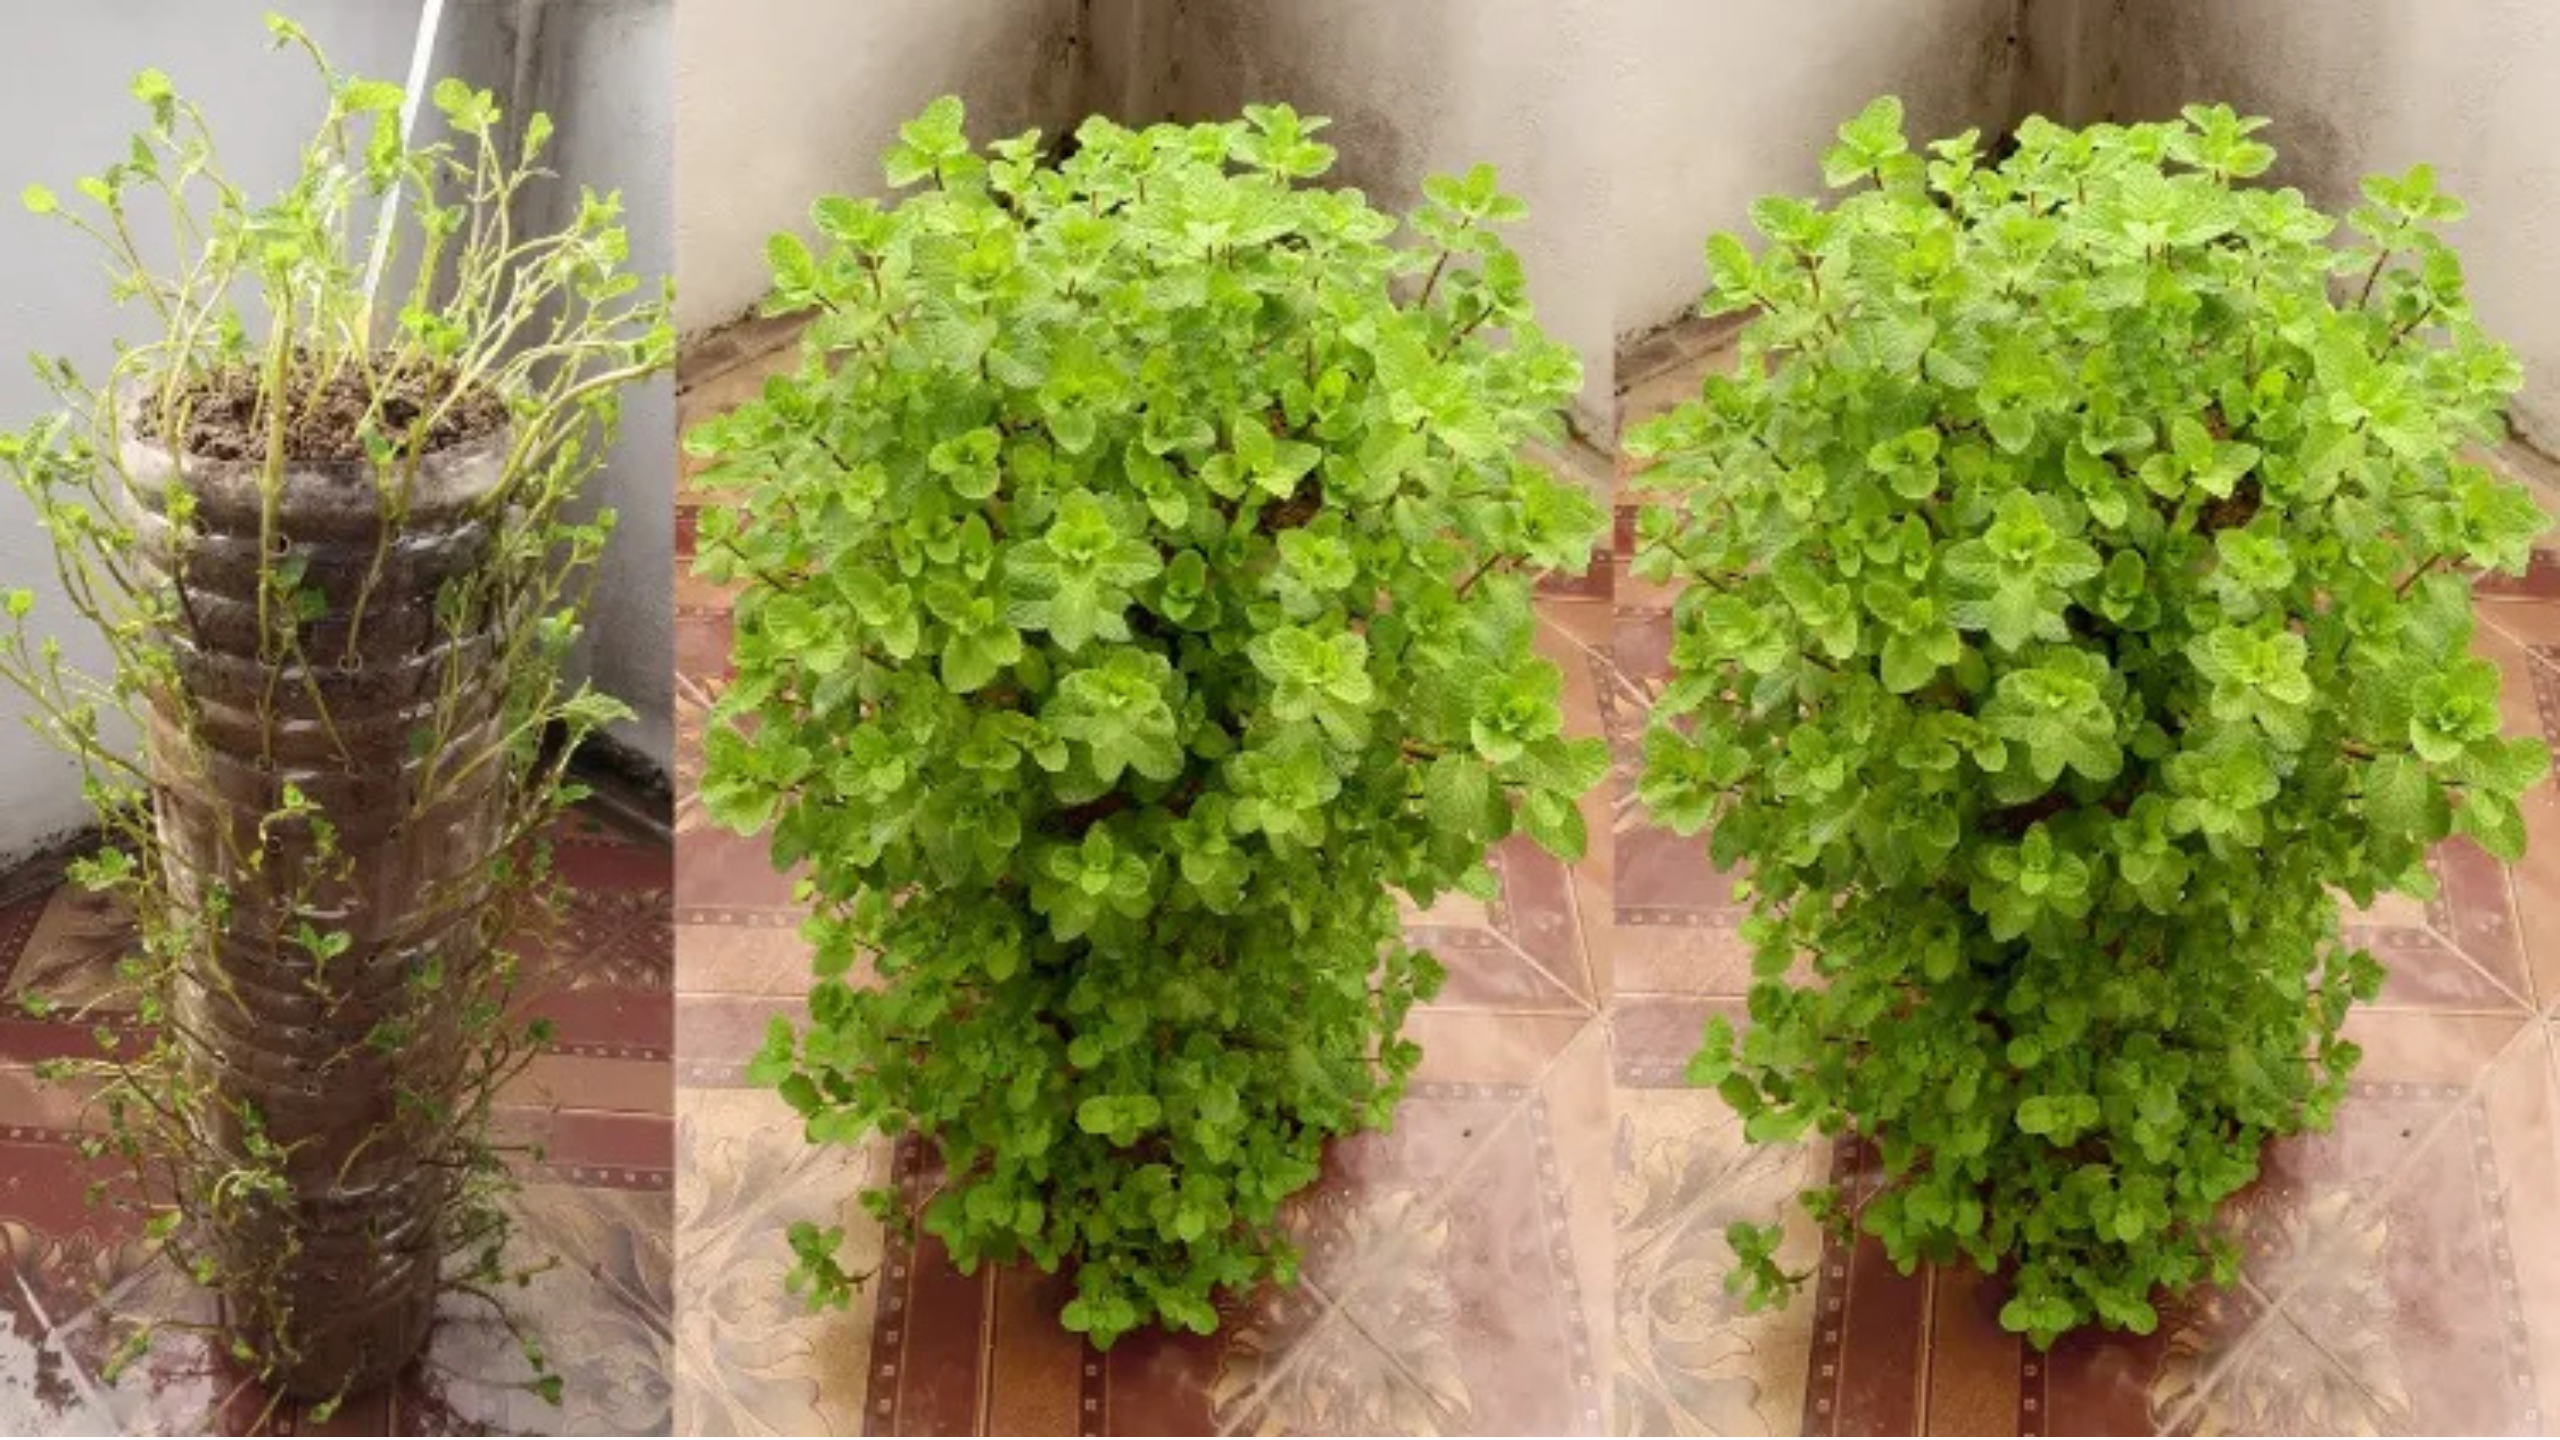
The first step is to prepare your plastic bottle. Start by washing it thoroughly to remove any labels and residual chemicals. Then, use a sharp knife or scissors to cut the bottle in half. The top half will hold the soil and mint, while the bottom half will serve as the water reservoir.
Once you’ve cut the bottle, use a drill or nail to poke small holes in the bottom of the top half for drainage. This ensures excess water can escape and prevents root rot. If you’re setting up a self-watering system, make a small hole in the bottle cap and thread a cotton wick through it. The wick will help draw water from the bottom reservoir to the soil.
2. Preparing the Soil
Mint thrives in well-draining, nutrient-rich soil. Organic potting soil mixed with compost is ideal, as it provides the plant with the nutrients it needs for healthy growth. Before planting, slightly moisten the soil so it’s damp but not soggy. Fill the top half of your bottle with the prepared soil, leaving about an inch of space from the top.
3. Planting the Mint
You can start your mint from cuttings or seeds:
- Using Mint Cuttings: Trim the lower leaves from your mint cutting and place the stem in water. After about 4-7 days, you should see roots starting to develop. Once rooted, gently plant the cutting in the soil, pressing down lightly around the base.
- Using Seeds: Sprinkle mint seeds on top of the soil and cover them with about ¼ inch of soil. Keep the soil moist while waiting for the seeds to germinate. This process can take up to two weeks, so be patient!
Place your plastic bottle planter in a sunny spot, such as a windowsill or balcony, where it can get 4-6 hours of sunlight a day. Mint loves sunlight, and this will help it grow strong and healthy.
4. Creating a Self-Watering System (Optional)
For a self-watering system, fill the bottom half of the bottle with water. Then, insert the top half (with the soil and mint) upside down into the bottom half. Make sure the cotton wick reaches into the water reservoir below. This setup will allow the plant to absorb water as needed, reducing the need for frequent watering.
5. Watering and Maintenance
Even with a self-watering system, you’ll need to check on your mint regularly. Water it deeply when the top inch of soil feels dry. If you’re growing mint indoors, consider misting the leaves occasionally to maintain humidity and discourage pests.
If you’re not using the self-watering system, simply water the plant directly from the top using a spray bottle or watering can, ensuring the soil remains moist but not soggy.
6. Fertilizing for Healthy Growth
Mint is a fast-growing herb, so it will benefit from occasional feeding. You can use organic fertilizers like diluted fish emulsion or compost tea. Fertilize every 3-4 weeks for optimal growth, but avoid over-fertilizing, as too many nutrients can cause the plant to grow too quickly and lose flavor.
7. Managing Pests and Diseases
Mint is generally low-maintenance, but like all plants, it can fall victim to pests or diseases. Keep an eye out for:
- Aphids or Spider Mites: Treat them with neem oil or a gentle soap solution.
- Fungal Issues: Ensure proper airflow around your mint, and avoid overwatering, which can lead to fungal growth.
- Slugs and Snails: Protect your plant by sprinkling crushed eggshells around the base.
8. Harvesting Mint
Once your mint plant has several sets of leaves, you can begin harvesting. Regular harvesting encourages new growth, so don’t be shy about snipping off leaves. To keep the plant healthy and productive, remove flower buds when they appear to prevent the plant from flowering. This will keep the flavor strong and the focus on leaf production.
Final Thoughts
Growing mint in a plastic bottle is an easy, sustainable, and space-saving solution for gardeners of all experience levels. Whether you’re living in an apartment, a small house, or simply want to grow herbs indoors, this method ensures you have a fresh supply of mint all year round. Not only is it eco-friendly, but it’s also a great way to reduce plastic waste while enjoying homegrown herbs.
So why not give it a try? Start your own mint-growing project today and enjoy the fresh, aromatic leaves anytime you need them!
By following these steps, you can create a simple yet effective self-watering system that keeps your mint thriving year-round. Try it out, and you might find that mint is just the beginning—there are plenty of other herbs you can grow in plastic bottles too! Happy gardening!
Please let me know if you’re looking for a author for your
site. You have some really great articles and I feel I would
be a good asset. If you ever want to take some of the load off,
I’d really like to write some articles for your blog in exchange for a link back
to mine. Please blast me an email if interested.
Thank you!
Wonderful beat ! I wish to apprentice at the same time as you amend your website, how can i subscribe
for a weblog web site? The account helped me a applicable deal.
I have been a little bit familiar of this your broadcast provided
shiny clear idea
Looking to maximize your DeFi game? Explore Balancer, the ultimate platform for smart liquidity and optimized portfolios. With advanced Balancer features like Balancer Swap, Balancer stable pools, and Balancer Boost, it’s built for efficiency and control. Curious about Balancer token vesting or Balancer DAO vesting? The Balancer guide has it all. Plus, with Balancer security and top-notch Balancer governance, your assets are in good hands. Visit https://bccgame.org and experience the future of DeFi today!
Say hello to Juice Finance—your DeFi edge starts here! Tap into the power of Juice Finance yield farming and Juice Finance leverage, all backed by Juice Finance Security and verified Juice Finance Audits. The JUICE token drives the ecosystem, while the trusted Juice Finance Team keeps innovation flowing. Questions? Juice Finance Support is always here to help. Learn what is Juice Finance and explore the future of finance. Juice Finance app is ready—start now at https://juice.ac !
You’re so awesome! I do not believe I’ve read through anything
like that before. So wonderful to discover another
person with a few original thoughts on this subject matter.
Seriously.. thanks for starting this up. This site is something that is
required on the web, someone with some originality!
Топ антистрес играчек 2025 года.
Антистрес фиджет играчки https://www.antistres-igrachki.com/ .
Реалистичные куклы бебета для развития чувств.
Интерактивни бебета кукли Интерактивни бебета кукли .
TEMANSLOT
944212 185897wonderful post. Neer knew this, thanks for letting me know. 278497
https://t.me/s/Irwin_officials
Während unserer Cadoola Online Casino Erfahrungen testen wir, ob es sich hier um eines der besten deutschen Online Casinos 2025 auf dem Markt
handelt. Sie können europäisches Roulette mit einer einzelnen Null, Blackjack mit einer Auszahlung von 3 bis 2 oder
Baccarat mit einer niedrigen Provision an einem Live-Tisch spielen. So können Sie
schnell und sicher auf Telefonen und Tablets spielen.
Deutsche Spieler erhalten 75% Bonus plus 50 Freispiele auf beliebten deutschen Spielautomaten wie “Book of Dead” oder
“Legacy of Dead”. Das wöchentliche Programm strukturiert sich nach deutschen Arbeitsmustern mit Wochenendbonus-Aktivierungen und
werktäglichen Spezialaktionen. Unser Bonussystem orientiert sich an deutschen Spielerpräferenzen und
bietet strukturierte Belohnungen für neue und bestehende Kunden. Melden Sie sich jetzt
an und sichern Sie sich unser unglaubliches Willkommensbonuspaket von 800 EUR + 300 Freispielen! Neukunden profitieren von einem Willkommenspaket
bis zu 500 € und 200 Freispielen. Cadoola Casino überzeugt Spieler in Österreich durch seine erstklassige Auswahl an Casinospielen, sichere Lizenzierung und eine
benutzerfreundliche Webseite.
Hier ist die Auswahl an Live Spiele im Online Casino
groß und bei allen Live Dealern sitzt ihr mit echten Mitspielern und
Croupiers am Tisch. Die Freispiele werden auf einmal gutgeschrieben und ihr müsst nicht warten, um an den Slots Ancient Egypt bei der ersten Einzahlung und Fire
Strike bei der dritten Einzahlung gratis zu spielen. Die Bonusbedingungen vom Cadoola Online Casino Bonus für neue Kundinnen und Kunden sind bei diesem Casino Bonus mit Echtgeld mit 35x
beim Bonusgeld und 40x bei den Freispielen angesetzt. Extreme Spannung gibt es
außerdem im Cadoola Live Casino, wo ihr mit echten Croupiers spielen dürft.
References:
https://online-spielhallen.de/marvel-casino-login-ihr-zugang-zum-superhelden-glucksspiel/
Da dieser Staat nämlich zu den Niederlanden gehört, darf
diese Behörde Lizenzen für den europäischen Raum ausstellen. Diese
Lizenzierung ermächtigt die Betreiber dazu, ihr Angebot
im europäischen Markt zu unterbreiten. Durch
die Legalisierung einiger Online Casinos sollen nicht nur wichtige Steuereinnahmen eingeholt werden, sondern auch Regulierungen erfolgen, die dem Spielerschutz dienen. Im Roulette Online
Casino und im Blackjack Online Casino wird das Spielgeschehen live im HD-Stream ins heimische Wohnzimmer übertragen.
Spieler aus Deutschland können sich bei jedem der empfohlenen Casinos
anmelden und ihre bevorzugten Casinospiele ohne Verschärfungen genießen. Wenn du in einem Casino ohne deutsche
Lizenz spielst, solltest du keine sensiblen Daten wie deine Sozialversicherungsnummer oder Bankdaten weitergeben. Diese Boni könnten eine Falle sein, die dich dazu verleiten soll, auf
einer unlauteren Seite zu spielen und letztendlich zu verlieren. Gemäß
eines Casino ohne deutsche Lizenz Test ködern Spieler
mit unrealistischen Bonusangeboten und niedrigen Einsatzanforderungen. Einzahlungslimits festzulegen und sich daran zu halten, ist in jedem
Casino wichtig, aber besonders in einem Casino ohne
deutsche Lizenz. Vermeide es, sensible Informationen wie deine Sozialversicherungsnummer oder Bankdaten an ein Casino ohne deutsche Lizenz weiterzugeben.
Alle Anbieter mit einer gültigen EU-Lizenz unterliegen dem europäischen Recht,
auf das sich deutsche Spieler bei Auszahlungsproblemen oder anderen Problemen berufen können.
Ohne deutsche Lizenz wird bis Juli geduldet, aber nicht
kontrolliert. Glücksspiellizenzen werden innerhalb der Europäischen Union von unterschiedlichen Institutionen aus verschiedenen Ländern vergeben. Hier dürfen auch deutsche Spieler völlig legal das Angebot nutzen, ohne dass sie strafrechtlich verfolgt werden. Daher wird es für ein Casino
keine deutsche Lizenz geben.
References:
https://online-spielhallen.de/lemon-casino-erfahrungen-ein-umfassender-uberblick/
https://t.me/kazino_s_minimalnym_depozitom/2
YOUR FIRST JOURNEY.The bonus is issued after successful claim
of all bonuses from the Welcome Package (or completed first 3 deposits).
1) Missions are availble for players with at least 1 sucessfull deposit.
The bonus can be activated in the player’s account.
6) A lottery ticket is credited into the player account after depositing AU$30 or more during the promotional period.
1) Only players who have deposited at least one time on previous
day will receive this offer. The specific welcome bonuses and their corresponding terms will
be presented to the player in the Bonuses and Account sections.
4) Maximum allowed bet when wagering a bonus is AU$7.5 or the
equivalent in other currency per game/spin.
20) The player accepts this agreement and all of its clauses.
The winnings do not affect the RTP of the qualifying games.
The winner must activate the bonus within 7 days after delivery.7.2.
21Bit reserves the right not to notify about the addition and/or removal of
qualifying games from the list. Games can be added or removed from the
qualifying games list.5.3.
References:
https://blackcoin.co/richard-casino-review/
This will bring daily bonuses, 25% cashback, premium support, and a personal manager.
The majority of Australians find their gambling experience at this site valuable because it features 500 top games and frequent game additions.
The responsiveness of the support team is paramount;
players need assistance promptly, especially when dealing with urgent issues.
Assessing customer support efficiency is crucial when choosing
an online casino. Players using both Android and iOS devices can access
the casino directly through their mobile browsers.
These promotions come with specific wagering requirements and terms that players should review before claiming.
Each game comes with different betting limits and rule variations to
suit casual players and high rollers alike. The table games section houses over 40 classic casino games including multiple variants of blackjack, roulette, baccarat, and
poker. Ozwin casino includes approximately 15 crash games that combine
skill-based timing with luck-based outcomes. The slots section features over 300 titles ranging from classic three-reel games
to modern video slots with progressive jackpots.
Our support team is trained to recognize signs
of problematic gaming behavior and can connect players with appropriate resources and
support organizations. We provide tools and resources to help players
maintain control over their gaming activities, including deposit
limits, session timers, and self-exclusion options.
Many highlight our mobile platform’s quality and
the excitement of our progressive jackpot games. Our player community consistently raves
about Ozwin Casino’s generous bonuses, game variety, and responsive customer service.
References:
https://blackcoin.co/free-bets-how-to-play-for-free-in-online-casino-and-poker-rooms/
Independent testing laboratories audit our games monthly to verify fairness.
We offer an extensive selection of games powered by certified RNG technology and top-tier software providers.
Make sure you comply with legal age and regional requirements before playing.
And for those who like a punt on something different,
21bit Casino also offers sports betting options. Here, real dealers host games in real-time, streamed directly to
your screen. These are just a few samples of the kind of quality and popular games you can expect, ensuring your pokie sessions are always engaging and full of potential.
So, which of those thousands of pokies should you be checking out when you land at 21bit?
Larger bets may lead to confiscation of the bonus assets, free spins and possible winnings made
with bonus money. 4) The maximum bet with an active bonus is €5/US$5/C$7,5/NZ$7,5,
AU$7,5. 2) Any winnings made from cash bonus are subject to 45x wagering.
References:
https://blackcoin.co/casino-hotels-on-the-gold-coast/
Keep reading to learn more details about the main offers
of the platform and the nuances of receiving them!
Get a 100% bonus on your first deposit along with 100 free spins.
These bonuses will allow users to get additional benefits from gambling and increase their initial balance.
Among them, you can find Winspirit no deposit bonus Australia, Winspirit welcome bonus, and many others.
Always confirm you are on the official winspiritau.net pages before entering credentials.
Winspirit Casino offers all its registered users to participate in its Loyalty program.
These are considered to be high-intensity games. These games feature progressive jackpots
that grow with every bet placed. They present thousands of ways to win.
The max winning amount is AUD, with the prize pool being AUD.
References:
https://blackcoin.co/sign-in-your-gateway-to-online-casino-action/
online casino paypal einzahlung
References:
rank.sudapeople.tv
online casinos paypal
References:
https://westorebd.com/employer/best-paypal-casinos-usa-%E1%90%88-top-real-money-paypal-casinos/
paypal casinos online that accept
References:
https://jobsharmony.com/companies/how-to-deposit-and-withdraw-using-paypal/
online casino that accepts paypal
References:
https://cybernetshell.com/employer/best-paypal-online-casinos-real-money-deposits-withdrawals-al-com/
paypal casinos online that accept
References:
https://gizemarket.com/companies/top-10-online-casinos-in-australia-2025/
online pokies australia paypal
References:
http://bukgu.net/bbs/board.php?bo_table=free&wr_id=3482
В джунглях ставок, где всякий сайт пытается заманить обещаниями простых выигрышей, рейтинг интернет казино
превращается именно той путеводителем, которая проводит через заросли рисков. Тем профи и новичков, что пресытился из-за пустых посулов, такой помощник, чтоб почувствовать подлинную выплату, как тяжесть золотой монеты у ладони. Минус лишней болтовни, лишь проверенные сайты, в которых rtp не только показатель, но реальная удача.Составлено по поисковых поисков, словно сеть, что ловит самые свежие тренды на рунете. Тут минуя пространства для шаблонных приёмов, любой момент словно ставка в покере, в котором блеф выявляется немедленно. Игроки видят: на стране стиль письма с иронией, в котором сарказм маскируется словно рекомендацию, помогает избежать ловушек.На https://www.don8play.ru/ данный топ находится словно открытая карта, готовый на игре. Посмотри, если нужно увидеть ритм реальной азарта, обходя мифов да провалов. Тем кто ценит вес приза, это словно иметь карты на ладонях, минуя глядеть по дисплей.
**mitolyn**
Mitolyn is a carefully developed, plant-based formula created to help support metabolic efficiency and encourage healthy, lasting weight management.