

Grafting is one of the most rewarding techniques a gardener or orchardist can master. By seamlessly joining a scion (the future fruiting branch) to a rootstock (the plant’s underground portion), you can combine superior traits like disease resistance, ideal tree size, and delicious fruit quality. Ready to learn how to graft like a pro? Let’s get started—and don’t miss our tips on organic rootstock selection and fruit tree care for strong, healthy foundations.
1. Introduction (≈150 words)
Welcome, green thumbs! Whether you’re restoring an old fruit tree, creating a multi-variety marvel, or speeding up harvest time, grafting offers a powerful path to success. This age-old practice enables you to blend the best attributes of two plants—giving you richer fruit, smaller trees, or better resilience. It’s not just for commercial orchards; nearly anyone can learn it with a sharp knife and some patience.
Begin your journey by exploring our guide on rootstock selection for fruit trees—choosing the right base makes all the difference in your grafting success later on.
2. Why Graft? Key Benefits (≈200 words)
Grafting is more than just horticultural wizardry—it delivers real advantages:
- Superior fruit quality
Skip unpredictable seed-grown results. Grafting preserves the exact fruit characteristics you love. - Control over tree size and vigor
Select rootstocks that keep your tree dwarf or disease-resistant. - Faster fruit production
Grafted trees often yield fruit in two or three years—compared to five to nine from seeds. - Repair or restock trees
Breathe new life into aging or damaged trees without replanting. - Multiple varieties on one tree
Perfect for pollination or showcasing different fruit types with one trunk.
Propagation by grafting combines the best parts of both worlds: the perfect fruiting scion and the sturdy, adaptable rootstock. It’s a smarter, more efficient way to build your orchard or backyard fruit haven.
Keywords: grafting advantages, tree propagation, fruit tree grafting.
3. When to Graft: Timing & Seasons (≈250 words)
Ideal Spring Timing
The best time for traditional grafting (whip, cleft, bark) is just before or during sap flow, typically:
- Late winter to early spring (February–April in many temperate areas).
- During this period, the bark slips easily, and the cambium is actively healing.
Summer Budding
If you’re doing bud grafts (like chip or T-budding), mid-summer (July–August) is ideal:
- Buds are mature.
- Rootstocks are actively growing and can support new buds.
Regional Nuances
- In tropical climates, almost any time is workable—but aim for pre-rainy or pre-hot seasons.
- In cold zones, consider indoor or bench grafting before cold weather hits.
- For warmer spring climates, /bench- or T-grafting/ in April–May is optimal when sap starts moving.
Knowing when to graft ensures your cuts heal quickly. Watch for bud swelling and easy bark slipping (peeling back cleanly from wood)—that’s your green light.
Keywords: best time to graft fruit trees, spring grafting, summer budding.
4. Tools & Materials Checklist (≈100 words)
Make sure you have everything ready:
🗡️ Grafting knife or single-bevel knife
🧵 Parafilm or grafting tape
🕯️ Grafting wax or sealant
✂️ Pruning shears
🧼 Disinfectant (rubbing alcohol/bleach solution)
Optional: Budding strips, small nails (for bark grafts)
Sterilize all tools with alcohol before and after use to prevent disease—especially when working with multiple plants.
5. Grafting Methods Step‑by‑Step (≈600 words)
A. Whip‑and‑Tongue Graft (≈150 words)
Best for: Scion and rootstock of similar diameter (¼–½″) during early spring.
- Use a single smooth cut (~1–2″) at a 45° angle on both scion and rootstock.
- Add a tongue cut: make a narrow vertical slit about ⅓ from top on both pieces.
- Interlock the tongues, aligning cambium layers precisely.
- Wrap snugly with parafilm or grafting tape, then seal with wax.
- Leave two buds above the graft; trim rest just above the union.
This method produces superb cambial contact and structural strength. If tools are clean and cuts tight, it can yield 90–100% success even for beginners.
B. Cleft Graft (≈150 words)
Best for: Joining small scions onto larger rootstocks (1–2″ diameter).
- Cut off the rootstock and split vertically (~2″) with a wedge-shaped cleft.
- Shape scion’s base into a wedge to fit snugly into the split.
- Insert the scion, ensure cambium meets about ⅓ of the way down.
- Wrap the union firmly with tape and seal with grafting wax.
- Use one or two scions per cleft—secure firmly.
Cleft grafts are forgiving and work well for thick rootstocks or when quick results are needed.
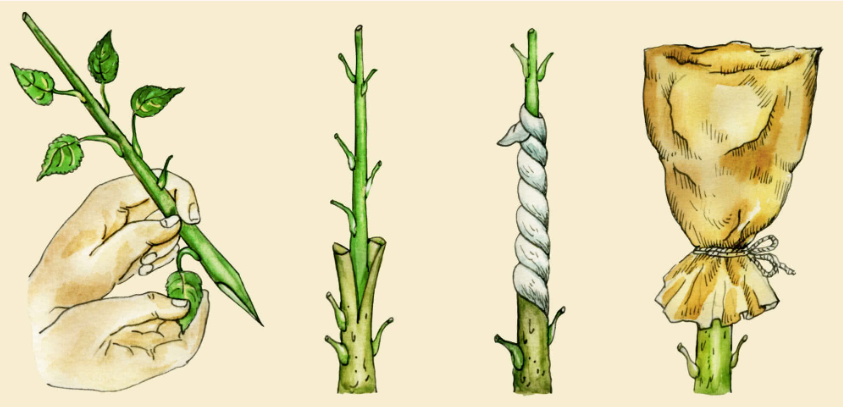
C. Bark (T‑grafting) (≈150 words)
Best for: Spring grafting on large rootstocks or repair work.
- Make a T-shaped cut in the bark—horizontal slit then vertical cut down (~2″).
- Gently peel back the bark flaps.
- Trim scion (~2–3 buds), cut its base into a thin wedge.
- Slip wedge under bark, align cambium, and secure with small nails.
- Wrap and seal the graft entirely with tape and wax.
Optimal when bark is slipping (easily separates from wood). Great for top-working older trees or adding new varieties.
D. Bud (Chip) Grafting (≈150 words)
Best for: Summer grafting using just a bud.
- Cut a chip from the scion containing one bud.
- On rootstock, remove matching chip of bark and wood.
- Slide the bud-chip into the cavity, aligning cambium.
- Wrap snugly with parafilm or a budding strip, leave bud tip exposed.
- After 2–3 months, check success when bud swells. Remove tape and let it grow.
Safe, low-impact, and high success rates. Ideal for pear, apple, stone fruits, or repairing rootstocks.
6. Aftercare & Common Mistakes (≈300 words)
Aftercare Essentials
- Keep graft shaded and slightly moist, not soggy.
- Inspect weekly—reapply wax if it cracks.
- Remove rootstock suckers immediately.
- In cooler regions, wrap union with paper bag or insulation.
- After shoots emerge in spring/summer, prune below the graft to funnel energy upward.
Common Mistakes & Fixes
🔴 Poor cambium alignment
Fix: unwrap, reposition, rewrap. Slight misalignment may still work if edges match.
🔴 Drying out or cracking seal
Fix: inspect regularly, reapply wax/tape as needed.
🔴 Overwatering or mold
Fix: keep soil moderately moist, remove mold, use fungicide if necessary.
🔴 Pest or rodent damage
Fix: use mesh guards or tree wraps as protection.
With care, your success rate should be over 80%. Even experienced grafters rework 1 in 10 grafts.
7. Seasonal & Regional Tips (≈150 words)
- Cold climates: graft indoors (bench graft), then acclimate outdoors in early spring.
- Humid zones: dryer microclimates help—air circulation prevents mold.
- Tropics: avoid grafting right before heavy rain; mid-season works best.
- Indoor/greenhouse: maintain 60–75 °F, moderate humidity, and indirect light for healing.
8. Frequently Asked Questions (≈200 words)
Can any tree be grafted?
No—grafting works best between closely related species (e.g., apple to apple, pear to pear). Some inter-family grafts aren’t compatible.
How long does healing take?
Typically 2–4 weeks for callus formation. Full union may take until mid-spring growing season.
Why use parafilm vs tape?
Parafilm stretches and self-seals, ideal for cambium contact. Tape is stronger and often paired with wax for sealing.
What to do if graft fails?
If union fails, remove dead material, clean wounds, and try again during next appropriate season.
9. Conclusion (≈100 words)
With a sharp knife, clean tools, and the right timing, grafting transforms your gardening—giving you control, uniqueness, and faster harvests. Don’t worry if your first grafts don’t take; it takes practice, and every attempt teaches you something valuable. Share your grafting wins (or funny fails!) in the comments—let’s grow stronger gardens together. For more success, don’t miss our organic methods to prevent graft infection and using grafting wax & sealants naturally guides.
Happy grafting—and may your orchards flourish! 🍎🌿
buy generic amoxil for sale – order amoxicillin generic amoxil for sale
forcan drug – https://gpdifluca.com/# brand diflucan 200mg
cenforce medication – https://cenforcers.com/# cenforce ca
buy generic cialis online – https://ciltadgn.com/# is there a generic equivalent for cialis
cialis side effects – https://strongtadafl.com/ cialis mexico
mail order viagra legitimate – strongvpls buy female viagra
Facts blog you procure here.. It’s severely to on strong calibre script like yours these days. I justifiably recognize individuals like you! Rent mindfulness!! https://gnolvade.com/
The sagacity in this serving is exceptional. https://buyfastonl.com/azithromycin.html
This is the make of enter I find helpful. https://ursxdol.com/clomid-for-sale-50-mg/
I couldn’t turn down commenting. Profoundly written! https://prohnrg.com/product/atenolol-50-mg-online/
I am actually delighted to glitter at this blog posts which consists of tons of profitable facts, thanks towards providing such data. https://aranitidine.com/fr/ciagra-professional-20-mg/
Thanks towards putting this up. It’s evidently done. https://ondactone.com/spironolactone/
The thoroughness in this draft is noteworthy.
https://proisotrepl.com/product/tetracycline/
This is a question which is virtually to my verve… Many thanks! Unerringly where can I lay one’s hands on the phone details in the course of questions? http://wightsupport.com/forum/member.php?action=profile&uid=21397
buy dapagliflozin online – https://janozin.com/# dapagliflozin us
orlistat online order – orlistat over the counter order xenical 120mg online cheap
Greetings! Very gainful recommendation within this article! It’s the petty changes which wish make the largest changes. Thanks a quantity for sharing! https://experthax.com/forum/member.php?action=profile&uid=124827
You can keep yourself and your stock by way of being wary when buying pharmaceutical online. Some pharmacopoeia websites operate legally and sell convenience, secretiveness, bring in savings and safeguards for purchasing medicines. buy in TerbinaPharmacy https://terbinafines.com/product/tamoxifen.html tamoxifen
I’ll certainly carry back to review more. TerbinaPharmacy
This is a topic which is near to my verve… Numberless thanks! Quite where can I find the acquaintance details due to the fact that questions?
https://t.me/site_official_1win/48
https://t.me/s/be_1win/216
Um diesen zu erhalten, müssen Spieler sich nach der ersten Einzahlung auf ihr Spielerkonto an den Kundendienst wenden, und zwar noch bevor sie erstmals im Casino spielen.
Während der klassische Neukundenbonus im Casino alten Formats zum allgemeinen Standard
gehört, beschreiten Kryptocasinos oftmals einen anderen Weg.
Shuffle.com ist ein neues und innovatives Online-Casino & Sportwetten,
das die beste Auswahl an Casinospielen und Sportereignissen bietet und seit seinem Start im Februar 2023 sein Angebot und seine Sportarten stetig
erweitert und optimiert. Neben dem 100% Bonus auf deine erste Einzahlung und den 200 Freispielen, bietet
unser Paket weitere Vorteile bei deinen nächsten Einzahlungen.
Teilnahme an Glücksspiel ab 18 Jahren – Glücksspiel kann süchtig machen – Hilfe finden Sie auf spielsuchthilfe.at oder
anonyme-spieler.at
Shuffle setzt 2025 den Standard für Krypto-Casinos,
indem es eine erstklassige Online-Glücksspielplattform mit modernster Blockchain-Sicherheit und blitzschnellen Krypto-Einzahlungen verbindet.
Die Nachfrage nach verschiedenen Zahlungsmethoden für Online-Glücksspiele ist sehr hoch, weshalb Shuffle eine breite Palette von Währungen akzeptiert, um
den Spielern gerecht zu werden. Im Zeitalter der schnellen Krypto-Zahlungen ist es wichtiger denn
je, sein Glücksspielverhalten zu beobachten und Grenzen zu setzen. Shuffle weiß, wie wichtig es
ist, lokale Märkte zu bedienen, und hat daher die gesamte Website in mehrere Sprachen übersetzt,
um den lokalen Spielern ein besseres und bequemeres Erlebnis auf
der Plattform zu bieten.
References:
https://online-spielhallen.de/instant-casino-deutschland-schneller-spielspas-im-fokus/
“Look, I just can’t get over not having a live dealer in front of me OK? I never saw a classic casino give even A$1k,” another Redditor said.
We reviewed minimum deposit requirements, payout and betting limits,
and other terms. Another Australian casino site that supports a range of fast-paying
crypto coins is Neospin, which is actually quite comparable
to MrPacho in this regard. You can use Bitcoin, Bitcoin Cash, Ethereum, Litecoin, XRP, Tether,
and USD Coin, all with zero fees, a low A$30 minimum
deposit, and payouts completed within an hour. And the sheer game count of over
10,000 titles is just astonishing.
This also prevents creating multiple casino accounts from the
same IP. Also, take a look at the safety and security measures the casino has taken and see how they
protect your data. It’s also fully licensed in Curacao
and offers quick payouts. They’re secure and easy to use, though
withdrawals may take a few business days depending on the casino.
The game has a low house edge, especially when betting on the banker,
and is less prone to manipulation thanks to its straightforward mechanics.
It’s safe to say – online blackjack in Australia can be found in every corner.
References:
https://blackcoin.co/casino-sign-up-bonuses-2025-the-ultimate-guide/
The Ozvin app is a great choice for players who love online casino games.
Regular players enjoy reload bonuses, free spins, and cashback offers.
If you meet those requirements, you’re welcome to join the casino, deposit
funds, and play online casino games for real money.
Place two deposits on Friday to claim all three rewards. Gamblers need to deposit at
least AU$20 to receive this prize. A second feature of the welcome package at our
Ozwin Casino is another reward comprising the same prize of a 200% deposit match and 50 free
spins. It also offers 50 free spins that gamblers can play with on Bubble Bubble 2 pokie.
The first registration gift includes a 200% deposit match perk with a max
amount of AU$2,000. We offer a great welcome bonus of 400% up to 4,000 AUD + 100 FS.
This Aussie-approved spot’s got top games, speedy cashouts, and reliable support – what more could you ask
for?! You can use Visa or Mastercard to fund your account, or try an e-wallet like Neosurf for a speedy
deposit. To ensure security and fairness, Ozwin Casino
requires players to confirm their identity using government-issued documents such as a driver’s license or passport.
paypal casino usa
References:
jobs.maanas.in
online casino that accepts paypal
References:
manpowerassociation.in
real money casino online
online casino usa real money
best online casinos for us players
online casino mgm https://betmgm-play.com/ betmgm casino login
Ignite your passion for slots with immersive themes and high payouts. In crown coin casino login, daily bonuses keep the excitement alive. Become a VIP and elevate your wins!
Sweet Bonanza is bursting with juicy fruits and explosive multipliers ready to boost your bankroll. Trigger best casino for sweet bonanza free spins with lollipop scatters and let the tumbles multiply your prizes. Get spinning today!
Dominate the reels like a true buffalo boss. buffalo slot machine near me packs scatter magic, wild stacks, and payout explosions for ultimate satisfaction. Play for glory!
Join Chumba Casino and get instant free chumba online casino to play with. Real cash prizes, huge game selection, daily bonuses — everything you love. Sign up today!
Join 5 minutes ago, already cashing out? That’s a normal Tuesday on stake promo code .
DraftKings table games Casino lights up your screen. New welcome pack: 500 spins for $5 + up to $1K lossback. From slots to live—dominate!
Leky bez premrstenych cen. Az 80 % uspora > opravdovalekarna.cz
koupit generikum
Solder together the millions friendly colossal on fanduel casino Texas – the #1 tangible money casino app in America.
Get your $1000 WITH IT AGAIN gratuity and refashion every relate, hand and roll into legitimate cash rewards.
Permanent =’pretty damned quick’ payouts, immense jackpots, and habitual fight – download FanDuel Casino in these times and start playing like a pro today!