
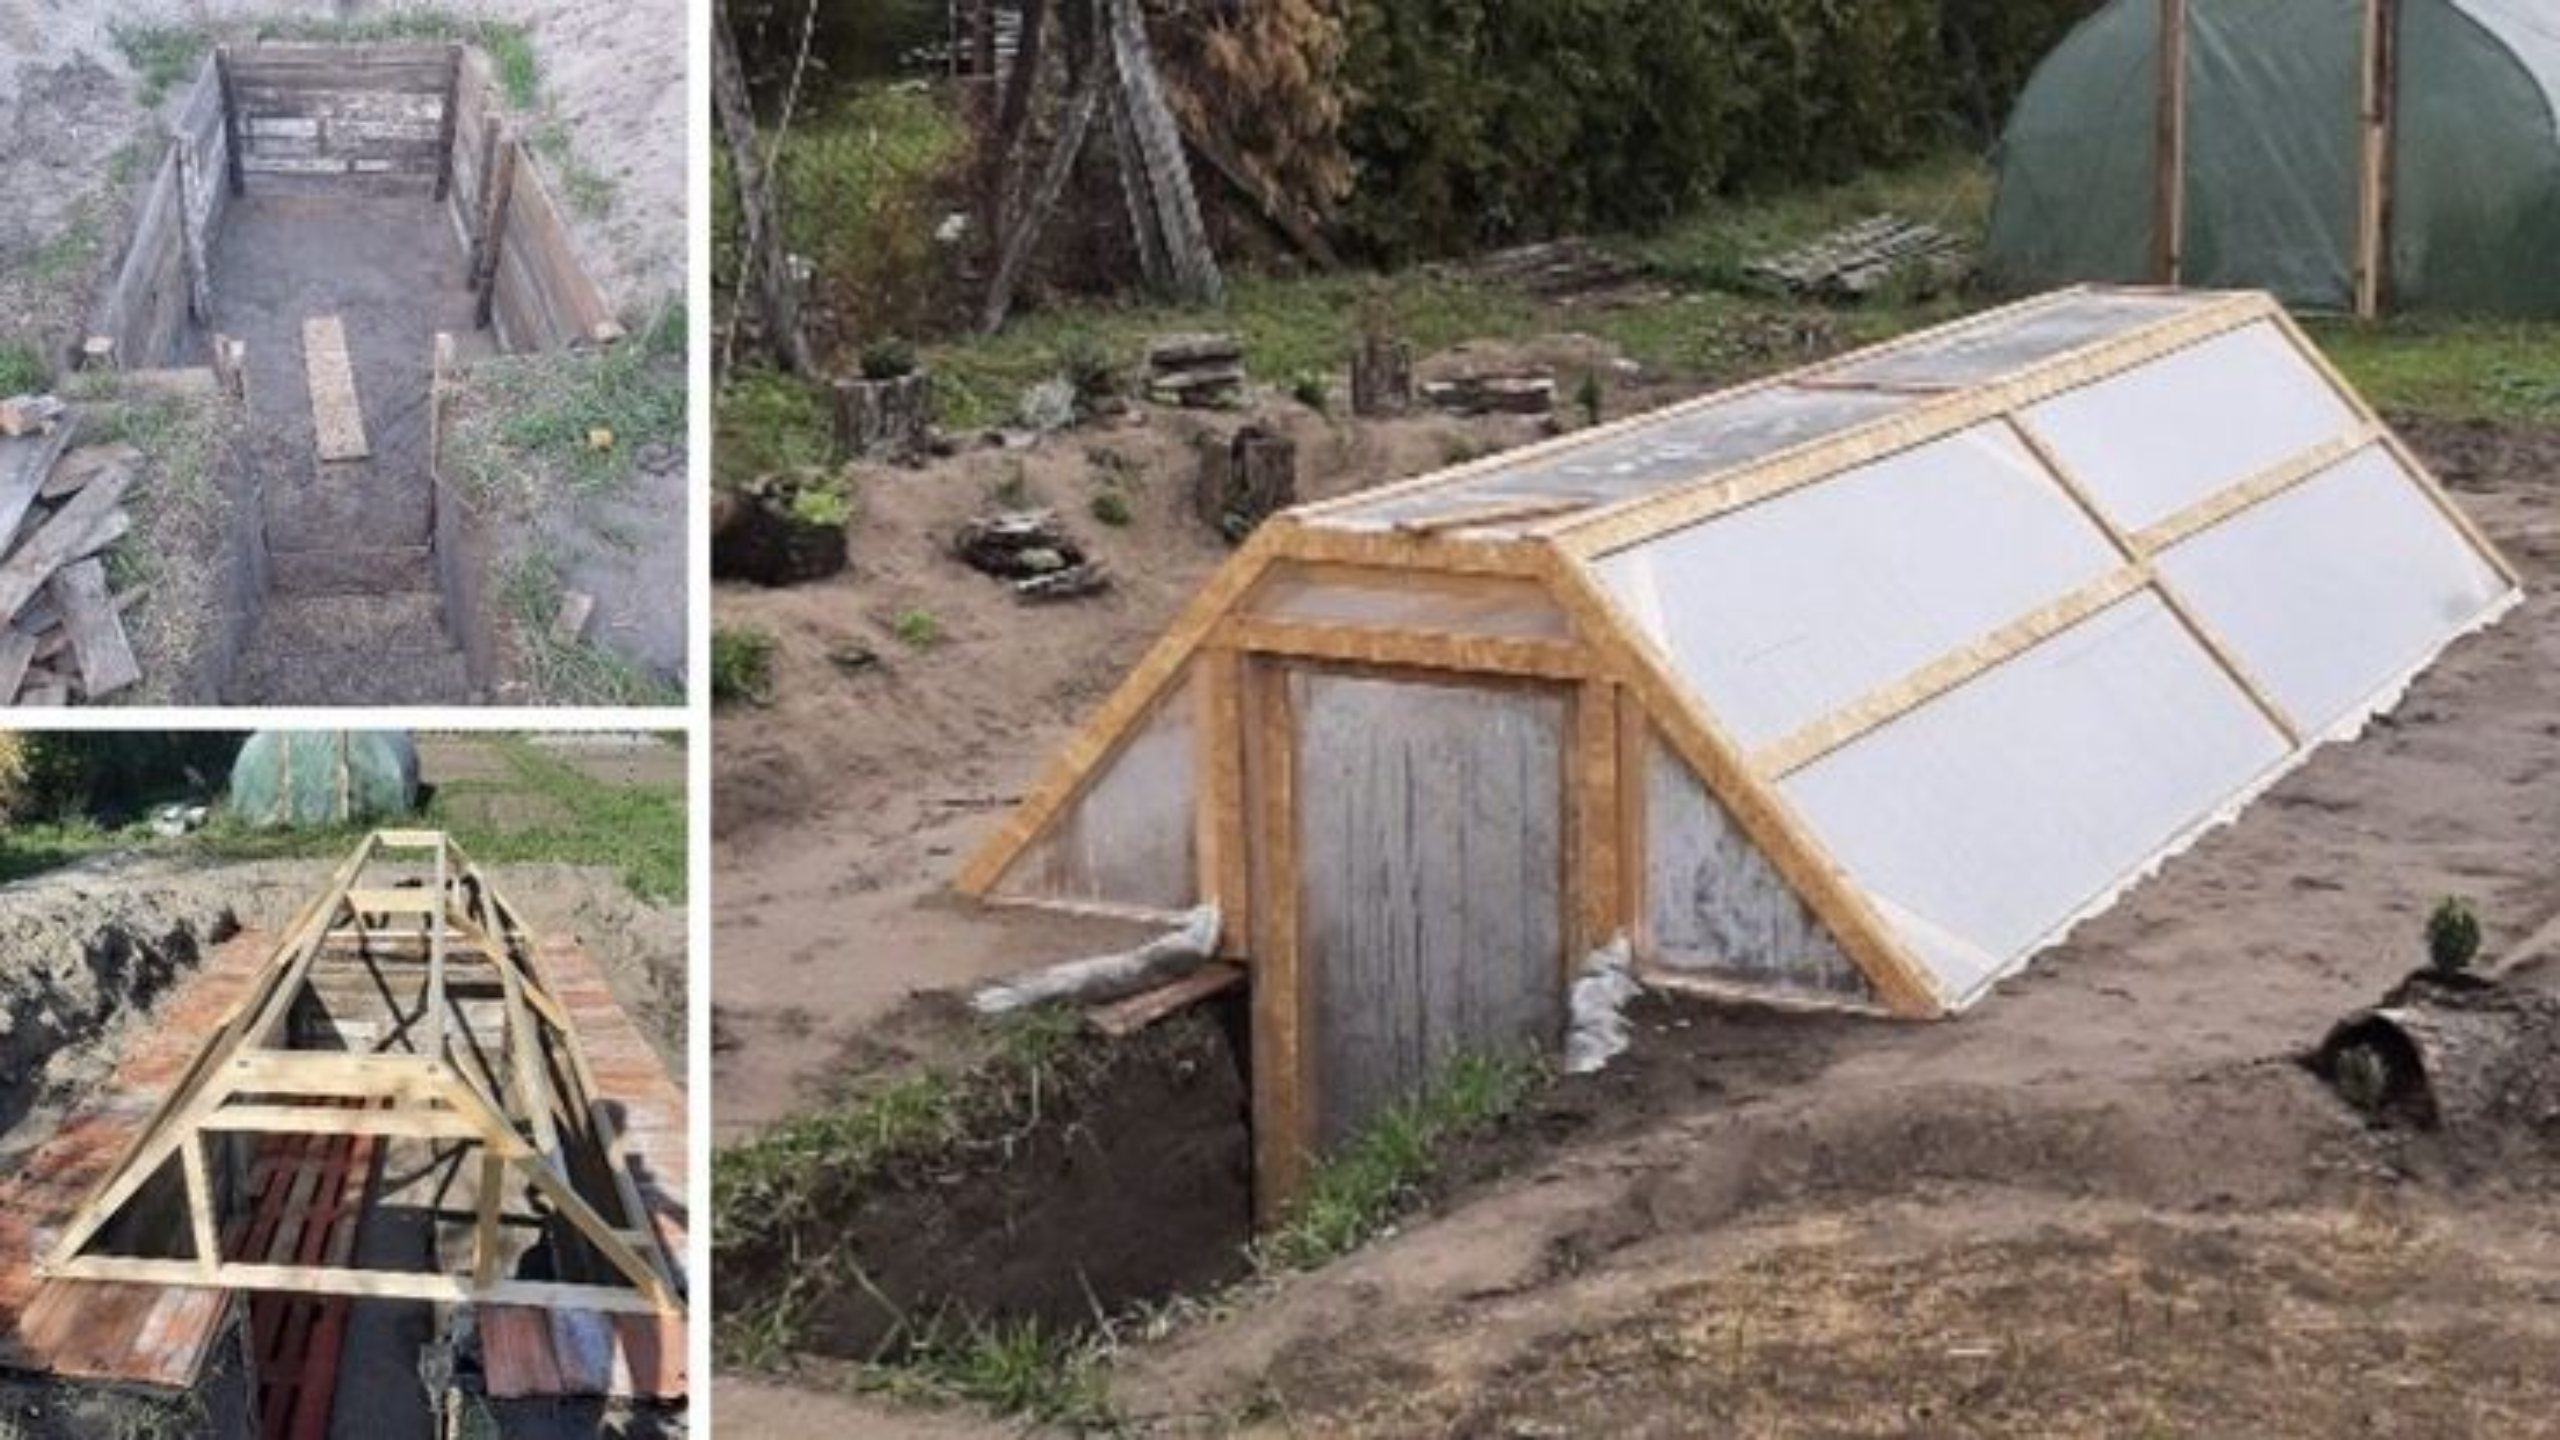
Dreaming of fresh produce at your fingertips, no matter the season? A Walipini greenhouse might be the perfect solution. Known for its deep underground construction, this type of greenhouse creates a stable, natural microclimate that allows you to grow vegetables, herbs, and even small fruit trees all year long, even in cold climates. Let’s explore how you can build your own Walipini, step by step, making it a practical and sustainable addition to your garden.
Choosing the Ideal Location
The foundation of a successful Walipini is selecting the right spot. Look for a location with maximum sunlight exposure, ideally facing true south if you are in the northern hemisphere. This orientation ensures your greenhouse receives the most light during the day, which is crucial for healthy plant growth.
Avoid areas prone to strong winds or where snow and water tend to accumulate. The site should have good natural drainage, reducing the risk of waterlogging inside the greenhouse. If your land isn’t naturally well-drained, plan to improve drainage during construction, which will help your plants thrive and prevent structural issues over time.
Digging the Trench
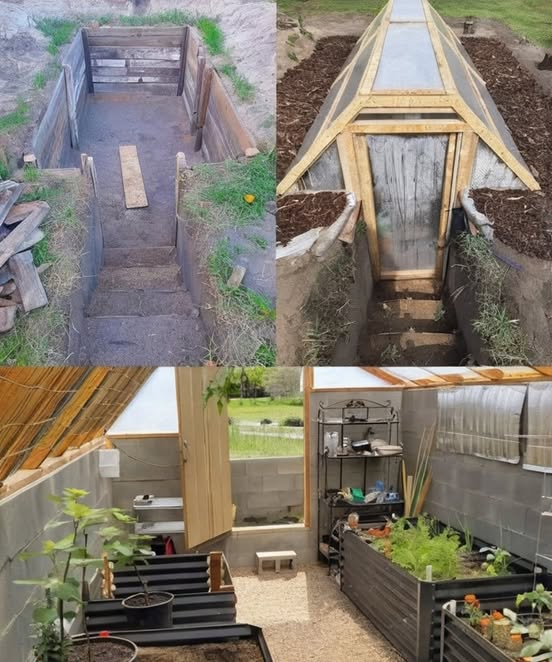
Once you’ve chosen the spot, the next step is to dig a trench for your Walipini. The depth of the trench should be approximately 1.5 to 2.5 meters, depending on your climate. For colder regions, deeper trenches help insulate the structure and retain warmth during winter.
The size of your Walipini depends on your needs; a modest 6 meters long and 3 meters wide is a good starting point for small-scale gardening. Remember that larger trenches require more effort and materials but can support bigger crops and more extensive planting.
Ensuring Proper Drainage
Proper drainage is essential to prevent water stagnation, which can lead to mold, rot, and other plant health issues. At the bottom of your trench, add a layer of gravel or install drainage pipes to channel excess water away effectively.
Good drainage not only protects your plants but also helps maintain a stable temperature inside the greenhouse by preventing excessive humidity. This is especially important in climates with heavy rainfall or snow.
Building the Walls
The walls of your Walipini need to be sturdy and well-insulated. Popular materials include concrete blocks, natural bricks, treated wood, or even tires filled with earth—each offering different advantages in durability and insulation.
Ensure your walls are solid and airtight to retain heat. Consider sealing gaps around windows and doors to improve energy efficiency. The walls encapsulate the warmth stored from the sun and the earth, creating a cozy environment for your crops.
Constructing the Transparent Roof
The roof is a key component that maximizes sunlight and allows rainwater to drain naturally. Build it at an angle between 30–45 degrees using transparent materials such as polycarbonate panels, UV-resistant plastic tarps, or recycled glass.
An inclined roof efficiently captures sunlight and encourages rainwater runoff, preventing pools of water from forming on top. This design enhances light exposure during shorter winter days and helps keep your greenhouse dry and functional.
Insulating the North and Side Walls
To maximize heat retention, insulate the northern and lateral walls using natural insulating materials like straw, clay, or wood wool (laminated wood fibers). This insulation helps to keep the warmth inside during cold nights.
The south-facing side should remain open or fitted with large windows to allow sunlight to penetrate deeply into the greenhouse. Proper insulation reduces heat loss and ensures your plants stay warm year-round.
Interior Setup
Inside your Walipini, create a functional and efficient growing space. Use large containers or raised beds for planting vegetables like tomatoes, lettuce, carrots, and herbs. Incorporate a compost bin to recycle organic waste and generate nutrient-rich soil.
To enhance thermal capacity, paint water barrels black and place them within the system. These barrels absorb heat during the day and release it slowly during the night, stabilizing the internal temperature.
Ventilation and Climate Control
Good ventilation is crucial to prevent overheating in summer and to promote air circulation, which reduces disease risk. Install adjustable openings or windows at strategic points, allowing you to regulate airflow easily.
During hot summer days, opening windows or installing small fans can help prevent your greenhouse from becoming too hot. Proper ventilation ensures plants grow in optimal conditions, no matter the season.
Planning Plant Cultivation
A Walipini is an ideal environment for a variety of crops. In the winter months, you can harvest tomatoes, lettuce, herbs, carrots, or even dwarf citrus trees. The stable temperatures and protected environment extend your growing season much longer than in outdoor gardens.
In warmer seasons, use the space for summer vegetables or flowers, taking advantage of the microclimate created inside.
Maintenance for Longevity
Like any structure, your Walipini requires periodic maintenance. Regularly check the integrity of the roof cover, seals around doors and windows, and ensure drainage remains effective. Monitor humidity levels and ventilation to prevent mold or pests.
With proper upkeep, your Walipini can serve you well for many years, providing fresh produce regardless of external weather conditions.
Final Thoughts
Building a Walipini is an investment that pays off in the form of fresh, homegrown food all year round. With a bit of effort—shoveling, building, insulating—you can set up a self-sufficient little ecosystem in your backyard. It’s a sustainable, cost-effective way to enjoy organic produce, especially in colder climates where outdoor gardening is limited.
Imagine harvesting ripe tomatoes in mid-winter or enjoying fresh herbs whenever you need them. Plus, creating this underground microclimate reduces your energy costs compared to traditional greenhouses, making it an eco-friendly choice.
order amoxicillin generic – buy cheap amoxil cheap amoxil
forcan online – https://gpdifluca.com/# diflucan ca
cheap cenforce 100mg – https://cenforcers.com/ order cenforce generic
does cialis make you harder – benefits of tadalafil over sidenafil cialis tadalafil 20mg kaufen
100 mg sildenafil price – https://strongvpls.com/ buy viagra glasgow
With thanks. Loads of conception! synthroid estrogen
This is the description of content I get high on reading. https://buyfastonl.com/amoxicillin.html
With thanks. Loads of knowledge! https://ursxdol.com/get-metformin-pills/
Facts blog you have here.. It’s severely to assign great quality writing like yours these days. I truly respect individuals like you! Go through guardianship!! https://prohnrg.com/
Thanks on sharing. It’s acme quality. https://aranitidine.com/fr/clenbuterol/
I am actually happy to glitter at this blog posts which consists of tons of worthwhile facts, thanks representing providing such data. https://ondactone.com/spironolactone/
This is the amicable of serenity I take advantage of reading.
https://doxycyclinege.com/pro/ranitidine/
Facts blog you be undergoing here.. It’s hard to on strong worth article like yours these days. I truly comprehend individuals like you! Withstand guardianship!! http://3ak.cn/home.php?mod=space&uid=229024
generic forxiga – https://janozin.com/ forxiga canada
buy cheap orlistat – https://asacostat.com/ how to get xenical without a prescription
More articles like this would frame the blogosphere richer. http://www.kiripo.com/forum/member.php?action=profile&uid=1193162
You can protect yourself and your ancestors nearby being heedful when buying pharmaceutical online. Some druggist’s websites function legally and sell convenience, reclusion, bring in savings and safeguards for purchasing medicines. buy in TerbinaPharmacy https://terbinafines.com/product/lamictal.html lamictal
The thoroughness in this break down is noteworthy. levitra gГ©nГ©rique
Thanks on putting this up. It’s evidently done.
Peculiar article, totally what I needed.
That’s a nice site that we could appreciate Get more info
That’s a nice site that we could appreciate Get more info
For filing cabinet locks, lock smith keyed them to match our office master system.
I like how the chiropractic practitioner near me tracks development with range-of-motion tests. chiropractic
I enjoyed this read. For more, visit commercial pickup truck insurance .
Thanks for the valuable insights. More at senior care .
Great point about creating a safe home environment—labeling drawers and using contrasting colors really helps. We used a checklist from senior living to get started.
Thanks for covering the price elements. Using assisted living helped us understand pricing and what solutions are consisted of upfront.
Your note on insurance discounts is spot on. emergency lockouts provided documentation after upgrading my locks.
If you’re contemplating dental work in another country, don’t underestimate the quality in Tijuana! Explore options via dentist tijuana !
Discover a chiropractic physician near me who accepts walk-ins– very hassle-free after work. chiropractic clinic near me
Loved this article! Septic systems really need regular attention, and your tips are spot-on. Find more at septic tank pumping .
Good overview of risk categories. tree trimming created a prioritized action plan for us.
This is truly an informative post; every homeowner should keep this info handy regarding their safety plans! board up service
Need advice on choosing the right materials for your masonry project? This site might help: iron works
Wow, the deep cleaning from carpet cleaning arleta has brought back the colors in my old carpets—so pleased with the results!
The aspect approximately how pretty much totally different households have to pump their tanks became incredibly helpful—thanks returned! septic tank la crescenta
I risultati dei trattamenti al centro estetico sono stati sorprendenti! Non posso farne a meno. estetista siena
For anyone searching for “concrete contractor near me,” trust me, go with retaining wall contractor .
Great article! It’s so important to have a reliable board up service service when emergencies arise.
Your balanced view made me feel confident about trying body contouring. I learned so much from body countering .
This was very well put together. Discover more at best commercial van insurance .
For storefront security, emergency lockouts recommended and installed a reliable cylinder guard.
This was very beneficial. For more, visit respite care .
The chiropractic physician near me respected my comfort level and adjusted methods accordingly. chiropractor
Location near family made all the difference. We filtered by zip code on memory care to narrow options.
This was a great article. Check out respite care for more.
I appreciate the realistic timelines you shared. Body contouring results improved for me after 6–12 weeks, just like body countering explained.
Just got back from Tijuana and had my teeth cleaned at a great clinic! Highly recommend checking out dentist in tijuana for more info.
Maintaining clearance from structures is smart. tree service trimmed away from our roof safely.
Your guide has motivated me to check my septic system today—thanks for the info! septic tank pumping
This was highly educational. For more, visit fleet insurance .
This is exactly what I needed to read today—preparing my home with a board up service is now on my to-do list! board up service
Looking to enhance curb appeal? A masonry contractor can offer unique solutions: window bars
So excited about my new stamped concrete patio courtesy of # retaining wall installer # – it’s gorgeous!
Being proactive means staying ahead when it comes down maintaining cleanliness st carpet cleaning arleta
Ho provato il trattamento scrub al centro estetico a Siena e ne sono rimasta entusiasta! centro estetico
My desk job damaged my posture. A chiropractor near me taught me ergonomic repairs and stretches. chiropractic clinic
This is truly an informative post; every homeowner should keep this info handy regarding their safety plans! board up pasadena
Your myth-busting about “no effort needed” is essential. Habits plus contouring worked for me—learned from winnipeg body countering .
For key duplication accuracy, emergency lockouts uses high-precision machines—no more jamming.
This was a great article. Check out assisted living for more.
I found this very interesting. For more, visit respite care .
Thanks for the helpful information. Anyone seeking an assisted living home can start their search with senior living for curated options.
The transformation stories from Webjuice are incredibly motivating for anyone looking to improve their local presence! More insights at SEO for accountants .
Great insights on roofing costs in Cork. I’ll check out Cork roofing contractor for a quick quote.
Great tip about including a broom closet. I added one with my Vancouver cabinets from kitchen cabinets .
Important to act early. A rodent control company in Los Angeles confirmed activity before it exploded. https://www.google.com/maps?cid=12034092059445045908
After reading this, I’m convinced that # # any Keyword# # should be everyone’s first choice for roofing. Commercial roofing Cork
Can’t believe how much peace of mind comes after successfully addressing an infestation thanks to reliable neighborhood providers—we’re lucky! https://www.google.com/search?q=Rodent+Control+Inc.
“Appreciate the detailed process outlined here; very informative for anyone considering pest management!” google.com
“Do you have any recommendations for DIY methods before calling in professionals?” google.com
Have you tried searching for ‘rodent control near me’? It led me to some excellent local services! google.com
I brought my teen professional athlete to a chiropractic physician near me for shoulder mobility. Big enhancement. chiropractor
Congratulations to Astral Roofing for putting together such an excellent resource for homeowners everywhere! New Roof Installation
Our neighborhood event was more pleasurable with clean facilities offered by ###– thank you a lot for your help! portable toilet rental
For anyone organizing a big gathering in Macon, ensure you think about toilet centers! I found fantastic choices at portable bathroom rental that fit our needs completely.
This was very enlightening. More at best commercial car insurance .
If you’re near Arlington TX and need a quick fix for your appliances, check out the locals! Home appliance repair near me
Nutrition matters so much. I used a high-protein plan alongside body contouring and saw definition. Details at body countering .
Simply learned that leasing portable toilets can enhance guest complete satisfaction at occasions– take a look at porta potty rental company to see what they provide!
I appreciate how accommodating they were at this regional # any Keyword #! They actually go above and beyond! portable toilet rental company
Vacation disaster averted thanks to lock smith —their guidance helped me find verified local help fast.
I’ve seen so many positive reviews about dentists in Tijuana lately! What’s the best clinic to start with? Tijuana dentist
Urban trees need special care. tree service addressed compacted soil and limited root space.
. Thank you for making such complex topics easy to understand—I feel empowered now!! ### anykeyword ### septic tank cleaning
After a storm, I learned the hard way how vital board up services are to prevent further damage. board up pasadena
I’ve been looking for a reliable masonry contractor in my area. Does anyone have recommendations? window bars
My posture app plus visits to a chiropractic doctor near me made an obvious distinction. chiropractor
Thankful for finding retaining wall contractor ; they provided excellent service and high-quality work!
Consiglio vivamente il centro estetico a Siena per chi cerca relax e benessere! centro estetico
I’ve seen drastic improvements in my website’s performance thanks to their expertise! SEO agency Ireland
Cannot recommend ̆ánŷ k̆e͡yw͏o͡rd enough; they are truly experts in their field when it comes to carpets. carpet cleaning
Love seeing useful answers supplied along warnings; stability is fundamental in tackling those considerations!. septic tank cleaning
If you’re taking into consideration a kitchen area remodel, do not take too lightly the power of excellent lights! I uncovered some amazing illumination choices on kitchen remodel that I can’t wait to apply.
I found this very interesting. Check out memory care for more.
Your before-and-after stories are inspiring. Non-invasive body contouring can complement workouts so well. I read more at winnipeg body countering .
This article does a great job explaining how sensory activities can spark memories. Music therapy, in particular, has been amazing for my loved one. We found helpful guides at memory care .
Wonderful tips on protecting homes—especially noting the importance of reliable #boardupservice#. Keep spreading awareness, please! board up near me
Wishing all success getting these messages across widely so we can build better homes together!!! Roofing Cork City
I didn’t realize how much energy-efficient roofing could impact my heating bills. Excited to learn more at Roofing safety standards !
I found this very helpful. For additional info, visit senior living .
Your insights about seasonal impacts on roofs are very relevant, especially with changing weather patterns! Certified Roofing Experts
Thanks for the great tips. Discover more at commercial vehicle insurance .
Organizing a festival can be challenging, particularly when it pertains to sanitation. I discovered a fantastic porta potty rental business near Amarillo that exceeded my expectations portable toilet rental company
Has anyone else had luck finding antique jewelry locally? My favorite find was from Pawn Jewelry – Coral Gables, Miami thanks to a quick search on Pawn Shop Coral Gables .
If you’re preparing an outdoor event, ensure to rent from a credible portable toilet rental company .
”Feeling accomplished after having successfully concluded partnership agreement regarding upcoming venture involving engaging reputable groups labeled under categories like… ***house renovation builders!”* custom home renovations
The integrated wine storage is a nice touch. Vancouver homeowners can add this with kitchen cabinets .
My experience with ### was great– they supplied prompt delivery and setup of our leased systems without inconvenience! portable toilet rental
I found a chiropractor near me who specializes in runners– great for IT band and knee problems. chiropractor near me
The rates structure at my favored porta potty rental was very transparent and reasonable.
Loved the FAQs! For those curious about downtime with non-invasive body contouring, I found answers on body countering .
I like that I can compare hours and fees for a chiropractic doctor near me on chiropractic clinic .
Every point made here resonates well with my own experiences in SEO; inspired by how far Webjuice has come! Dublin digital marketing agency
Thanks for the helpful tips on home security! If anyone needs professional help, I always recommend lock smith for swift and reliable locksmith services.
Site architecture concerns most! Comprehensive guides are feasible by web design amherst massachusetts
If you’re considering a roof upgrade, head over to Roof inspection for some of the best options in Cork.
Perfect timing—I was shopping for renewal and used insurance agency near me to compare.
Nicely done! Find more at business auto insurance .
How often should we get our roofs checked? This post is so helpful in understanding that! Roofing company Cork
Impressive overview of roofing services available in Surrey—I feel more equipped to make informed decisions now! Emergency Roofing Services
Great insights! Discover more at opiniones despacho abogados Santiago .
The chiropractor near me addressed my posture and ergonomics for work-from-home– thanks chiropractor in my area .
Thanks as soon as again everyone included behind scenes working tirelessly ensuring every information accounted before opening day shows up finally porta potty rental company
Helpful suggestions! For more, visit elderly care .
This was quite informative. For more, visit respite care .
Highly recommend the services of any local portable bathroom rental if you’re hosting an outside event!
The reviews for dentists in Tijuana are impressive! Excited to explore my options with dentist tijuana .
Smart to check for decay with resistography. tree trimming provided a detailed report.
Simply complete my cooking area remodel and I’m obsessed with the new design! The motivation from kitchen remodel was invaluable during the drawing board.
Communication strategies like speaking slowly and using visual cues make such a difference. We found more conversation prompts and activity ideas at memory care .
Nicely done! Discover more at nose surgery .
This post really clarifies the importance of regular septic tank pumping! For anyone needing help, check out cesspool cleaning !
Rodents can spread diseases—make sure you’re protected by calling a professional rat control company. Rat Control Company
I had no idea there were so many styles of brickwork until I explored options with window bars .
Appreciate the thorough information. For more, visit breast lift .
Excellent information provided here regarding securing your home with professional board ups—thanks for sharing it so clearly! board up pasadena
Good reminder to act fast. A rodent control company in Los Angeles can often provide next-day appointments. https://maps.app.goo.gl/og8xAVx7ZGyAonKS7
Will be recommending this blog widely among friends facing similar situations—they’ll benefit tremendously! Rodent Control Near Me
Nicely done! Discover more at christian counseling .
This was a fantastic read. Check out plastic surgery ft myers for more.
“I feel much more informed about choosing a pest control company after reading your post!” Rat Control Company
Ho bisogno di consigli su trattamenti per la pelle, il centro estetico a Siena potrebbe aiutarmi? estetista siena
For scoliosis management, a knowledgeable chiropractic practitioner near me offered targeted techniques. chiropractor
Cheers to # retaining wall contractor # for making my dream patio come true – absolutely love it!
Your suggestion to avoid heavy meals right before sessions helped. I learned that tip at body countering .
Great breakdown on why Caddo Mills homeowners need trusted roofers. If anyone’s comparing estimates, make sure the company is local and insured. I found roofing contractor Caddo Mills TX super helpful with transparent inspections and photos. best roofers
Do you think it’s worth investing in professional carpet cleaning like what carpet cleaning offers? Definitely yes for me!
Final inspection matters—walk the roof with your contractor if you can. roofers Greenville TX encouraged a walkthrough and fixed a minor flashing detail on the spot. roofers Greenville TX
Blessed having sources with ease attainable every time questions stand up bearing on our abode maintenance practices!!..# # anyKeywo rd ## septic tank pumping Tujunga
Very informative article. For similar content, visit chimney sweep .
I’m comparing adjustment designs and found a best chiropractor near me on chiropractic clinic .
I enjoyed this post. For additional info, visit Mikita Door & Window – Long Island Door Installation .
This was beautifully organized. Discover more at https://www.youtube.com/watch?v=7elOrcIDYHM .
Such great advice here, especially about acting quickly and finding a dependable board up service pasadena service!
Thanks for the informative post. More at https://www.google.com/maps/dir/Swagg+Roofing+%26+Siding,+102+Sunlight+Ave,+Bozeman,+MT+59718,+United+States/Langley+Roofing+-+Thanks+for+25+Years!,+Bozeman,+MT+59715,+United+States/@45.6759461,-111.0643192,2671m/data=!3m2!1e3!4b1!4m13!4m12!1m5!1m1!1s0x5345450c29151b9f:0xc9839338f242fb28!2m2!1d-111.0734431!2d45.6809162!1m5!1m1!1s0x5345444c4fba8813:0xef4da645de266e80!2m2!1d-111.034352!2d45.6726231!5m1!1e3?entry=ttu&g_ep=EgoyMDI1MTExNi4wIKXMDSoASAFQAw%3D%3D .
Local SEO empowers small businesses by leveling the playing field against larger competitors that dominate ad spaces! Webjuice SEO Dublin
Great write-up on cabinet heights. I customized tall pantry cabinets in Vancouver through kitchen cabinets .
This was highly educational. For more, visit hotel .
“Anyone else notice how crucial timely maintenance is as we gear up for warmer weather?” HVAC contractor
Value how friendly and handy the staff at ### were while assisting us with our rental requirements– they made it easy every step of the way! porta potty rental service
I’m changing an oil furnace. I chanced on conversion professionals on Canadian Heating and Air Conditioning hamilton .
I value how accommodating they were at this local # any Keyword #! They truly go above and beyond! porta potty rental
Wonderful breakdown of various options available today—I appreciate thoughtful content like yours immensely. Roof repairs Cork
I enjoyed this post. For additional info, visit Taxi a O Pedrouzo .
Great explanation of exclusions. I reviewed mine with insurance agency and made changes.
Keyless entry changed my routine. I got mine through lock smith and it’s been flawless.
Appreciate the thorough insights. For more, visit abogado de familia Santiago .
This was nicely structured. Discover more at playing online video slots .
I found weekend visits with a chiropractic doctor near me through chiropractor nearby — very practical.
It’s so important to have trusted roofing services on speed dial. Glad I discovered Energy-efficient roofing for my needs.
Great post, especially regarding understanding the costs associated with various roofing materials—it really helps budgeting efforts! Chimney Repairs Surrey
Dry air shocks? Central Plumbing Heating & Air Conditioning added a steam humidifier connected to our furnace. Comfort is luxury now. Details at water heater service .
Furnace ignition failure? Central diagnoses flame sensors, igniters, and boards. Restore heat via emergency plumber .
If you need NSF/ANSI references for peace of mind, the documentation links at emergency plumber near me are comprehensive.
Nice callout on additional insured wording. We found carriers with clean endorsements via commercial auto liability insurance .
The chiropractic specialist near me used x-rays to customize the plan, which made me feel confident. chiropractor in my area
Furnace runs forever? Central Plumbing Heating & Air Conditioning fixed my fan limit control—visit heating service near me .
Frozen condensate drain shutting down furnace? Central Plumbing Heating & Air Conditioning insulated and rerouted mine—check boiler repair company .
Your post on cellulite is spot-on. Combined therapies and body contouring have helped me, guided by winnipeg body countering .
If you want to make your Tesla genuinely one-of-a-kind, a customized wrap is the method to go! Look into the opportunities at creative color change wrap solutions for Tesla .
Thanks for detailing the benefits. I’m ready to try a chiropractic practitioner near me from chiropractic .
Thanks for the insightful write-up. More like this at hotel .
This post has motivated me to look into my SEO strategy, thanks to Webjuice! #anyKeyword# SEO trends Ireland
Thanks for the clear advice. More at best rhinoplasty surgeon .
Very impressed overall both aesthetically pleasing yet functional too—it’s clear they know precisely what works based off previous experiences = @KDdevelopment!!!! # # anyKeyw ord# remodel kitchen
For anybody planning an event in Amarillo, check out portable toilet rental service for trusted and cost effective portable toilet rentals.
This was beautifully organized. Discover more at florida plastic surgeon .
Helpful suggestions! For more, visit breast augmentation .
Helpful suggestions! For more, visit top family therapist .
Great call to examine thermostat calibration. Done at some stage in setup by Canadian Heating and Air Conditioning hamilton .
Preparation a kitchen area remodel? Don’t forget the little details! I discovered some innovative concepts on construction company that added the excellent complements to my room.
Ready for an upgrade? Consult with reliable **home addition contractors** today! house renovation builders
The ongoing discussions around architecture and sustainability in the US are increasingly vital, especially as climate challenges intensify Click to find out more
1. Look, I gotta say, dealing with a dodgy tradie was a nightmare for us here in Brisbane emergency electrician Brisbane
1. Kijk, ik ben echt blij dat ik eindelijk een casino heb gevonden met een eerlijke no deposit bonus. Geen verborgen kosten en echt leuk om mee te spelen zonder direct geld te storten. Eindelijk iets waar je wat aan hebt!
2 casino bonus aktiehandleiding
1. Also, mal ehrlich, bei uns hat der ständige Hautauschlag meiner Tochter wirklich für viel Verunsicherung gesorgt. Die roten Flecken kamen mal hier, mal da – und keiner wusste so recht, ob es eine Allergie oder doch eher was Harmloses ist https://wiki-tonic.win/index.php/Wie_bereite_ich_mein_Kind_auf_einen_Allergietest_vor%3F
Kijk, ik zat zelf een tijdje in CRUKS en mis het gokken echt af en toe anoniem gokken
1. Look, I totally get the frustration here. Running a small business already feels like a full-time job and then trying to decode health insurance options on top of that—it’s exhausting private health insurance options
I required a porta potty for my occasion in Macon, and the regional portable toilet rental was fantastic!
¡Acabo de volver de unas vacaciones a caballo y estoy todavía alucinando con la experiencia! La verdad es que montar por esos paisajes naturales, con montañas a lo lejos y ríos cristalinos al lado, es algo que recomiendo totalmente https://wiki-tonic.win/index.php/Viajes_a_caballo_y_meditaci%C3%B3n:_una_combinaci%C3%B3n_perfecta_para_el_alma
Hey all! As a small business owner, I found that setting up an HRA saved me a ton on health costs and gave employees more choice. Also, joining a trade association helped access group rates way better than going solo. Definitely worth checking out! View website
The South Florida failure reasons are spot on—mineral buildup is a killer here. A quick flush schedule plus a consult from water heater installation near me extended my last unit by two years. water heater replacement
1. Great article! I just finished clearing about half an acre in my backyard, and your tips on grading really helped me avoid water pooling near the house. One thing I’m struggling with, though, is dealing with the heavy clay soil underneath soil preparation for landscaping
Love that they provide detailed reports after inspections at ###onlyKeyWord###—very informative! Emergency roof repairs
Totally agree with you—Rephrase AI is seriously impressive! I recently gave Kroolo’s Natural mode a spin after reading your review and was honestly surprised how well it kept the original meaning without sounding robotic Learn here
Helpful suggestions! For more, visit Teléfono taxi Arzúa .
I appreciate how much detail went into every aspect of my recent project with them—I highly recommend choosing qualified teams such as those found within Astrals’ offerings! New Roof Installation
Appreciate the thorough information. For more, visit despacho de abogados en Santiago .
Nice explanation of flat vs pitched roofs. Local roofers Cork in Cork advised us perfectly.
Anybody else having problem with neck tightness? A chiropractic practitioner near me assisted a lot. You can attempt chiropractic clinic near me for quick scheduling.
Really useful coverage checklist. I ran my situation through State Farm Insurance Agent and it was super straightforward.
Tree risk near playgrounds needs pros. tree trimming evaluated and addressed hazards thoroughly.
Anyone else feel like dental care is just too expensive? I’m seriously looking into dentists in Tijuana through Tijuana dentist .
Thanks for the valuable insights. More at instant payday loans new orleans .
If you’re considering a patio upgrade, hiring an experienced masonry contractor is key. iron works
I appreciate you highlighting common myths about septic tanks! Great info here; I’ll definitely share this and visit cesspool cleaning .
Your guide to mixing metals is practical. I matched hardware with my Vancouver cabinets from kitchen cabinets .
Nicely done! Find more at Fortunium free demo .
I always look for drip edge, straight lines, proper nail placement to judge quality. roofing contractor Caddo Mills TX did a walkthrough with me and pointed out what to look for. emergency roofers near me
For keypad lock troubleshooting, car locksmith quickly diagnosed a loose connection.
Don’t risk a CO leak—Central Plumbing Heating & Air Conditioning tests venting and draft. Schedule at water heater service today.
Warranty clarity is huge. Material vs. workmanship can be confusing. roofers Greenville TX explained both and registered my shingle warranty for me. local roofing company
Finding an addiction treatment center that fits your needs is key. I saw some good local options on drug rehab Port St. Lucie .
Thanks for sharing these insights on board up services; they’re essential for home safety! board up service
Boiler acting up? Central Heating services hydronic systems, radiators, and circulators. Get a tune-up at emergency plumber .
Chloramine can interfere with taste; adding carbon block ahead of SoftPro was a good call. Guidance found on emergency plumber near me .
I appreciated that the chiropractic specialist near me discussed each action before changing. chiropractor in my area
La qualità dei prodotti utilizzati nel centro estetico è eccezionale, li adoro! centro estetico siena
Constantly relighting a pilot? Central Plumbing Heating & Air Conditioning recommended electronic ignition retrofit—no more hassle. Get it at heating service .
I’m absolutely thrilled with the patio extension done by # retaining wall contractor # – it looks amazing!
Heat pump short on refrigerant? Central Plumbing Heating & Air Conditioning repaired a micro-leak and recharged—book at boiler repair service .
Cảm giác an toàn khi cá cược tại 13win thật tuyệt vời! 13win 13 win
Cảm giác hồi hộp khi đặt cược tại 888Bet là điều mà tôi không thể quên! 888 Bet
Hệ thống thanh toán nhanh chóng của mmlive làm tôi khá ưng ý.
Hệ thống thanh toán đa dạng của 007win giúp tôi dễ dàng rút tiền hơn bao giờ hết! link vào 007win
Thực sự ấn tượng với thông tin về ae6789 , sẽ tìm hiểu thêm ngay!
Thanks for the detailed post. Find more at hotel .
Well mentioned! This is precisely it. I echoed these facets at windshield .
Aa88 là một trong những nhà cái uy tín nhất hiện nay, rất đáng để thử nghiệm! aa88
Đặt cược tài xỉu trực tuyến tại các nhà cái uy tín giúp giảm thiểu rủi ro cho người chơi như tôi. tai xiu online
. Tham gia vào thị trường cá cược online cùng casaFI882 sẽ mở ra cánh cửa mới cho tất cả mọi người yêu thích thể thao!! ### anyKeyWord### Fi88
Đừng bỏ lỡ cơ hội thắng lớn với những kèo hấp dẫn từ nhà cái uy tín như kèo nhà cái
Mỗi lần thắng tại Sunwin là một niềm vui lớn trong ngày của tôi! sunwin68 biz
Tôi cảm nhận được tinh thần đoàn kết mạnh mẽ giữa các thành viên trong cộng đồng GAME tại GO .# anyKeyWord# go88
Ai đang tìm kiếm một nhà cái uy tín thì đừng bỏ qua km88xn.com nhé!
Trang website dễ dàng truy cập mọi lúc mọi nơi trên di động hoặc máy tính bảng cực kỳ tiện lợi!!!!!!!! ### any keyword### 888 bet
Khi bạn đã trải nghiệm cảm giác chiến thắng nhờ vào việc chọn đúng tỷ lệ ăn ở các KÈO VIP thì chắc chắn bạn sẽ yêu thích chúng ngay thôi!! ### anyKeywrod ### keovip
Không nên đặt cược ở những nơi không có đánh giá tích cực từ người dùng khác! giải mã nhà cái
Your insights on hydration before and after sessions were on point. I used a tracker from winnipeg body countering .
Good point about seasonal inspections. A rodent control company in Los Angeles scheduled quarterly checks for us. Pest control service
Great tips on pest prevention! Definitely need to find rodent control near me soon. Rat Control Company Los Angeles
Rodents are persistent; thank goodness for local rodent control services that can help! Rat Control Company
For anyone looking to renovate, it’s critical to find experienced ##builders for home renovations### who can deliver quality results. remodeling contractors in my area
If you’re debating whether or not to hire professionals, trust me—# any Keyword # is worth every penny! carpet cleaning arleta
Thanks for covering exclusions—huge eye-opener. We cross-checked terms with a few markets through best commercial van insurance .
Thanks for highlighting the importance of cleanliness in keeping mice away! google.com
Great read on digital marketing’s role in boosting traffic for franchises—looking forward to more insights from Webjuice! SEO agency Ireland
I desire somebody who collaborates with my PCP. Filtering for that on chiropractic clinic for a chiropractor near me.
Mice can ruin food and spread disease—thanks for highlighting the risks! https://www.google.com/search?q=Rodent+Control+Inc.
It’s amazing how quickly things can go wrong; having a good board up service is crucial for protection!
Excellent reminder that prevention is bigger than medication when it comes to septic tactics—especially true certainly! septic tank pumping Tujunga
Loved the reminder to check CO alarms monthly. For annual service, I used furnace repair hamilton .
You can’t miss the lunch buffet at Top of India; it’s such a great deal for the price! party hosting at top of india
The flexibility offered by portable toilet rental # when it concerns rental duration is unequaled– excellent service all around!
For those considering hosting events outdoors– don’t forget washroom logistics! Lease wisely by means of quality alternatives such as those found within our own neighborhood # 任何关键字 #! portable bathroom rental
When searching drug rehab Port St. Lucie, it helps to have verified listings. I found some through addiction treatment center .
Really appreciate having access toward expert opinions freely available—keeps everyone informed moving forward!!!!!! # Chimney repairs
Thanks for the thorough article. Find more at Tarifas taxi Arzúa .
This was very beneficial. For more, visit elderly care .
Thanks for the helpful article. More like this at abogado accidentes de tráfico Santiago .
Seeing a return on investment after upgrading to a slate roof is so satisfying! Free Roofing Quote Surrey
Communication strategies like speaking slowly and using visual cues make such a difference. We found more conversation prompts and activity ideas at senior living .
Financial assistance options are confusing. senior living explains veterans’ benefits, long-term care insurance, and more.
“Is anyone else looking into sustainable materials while remodeling? Great resources available through ## kitchen remodel denver
This article offers great insights into maintaining an efficient AC system—definitely saves money on repairs! HVAC company in Belgrade MT
Great tips for roof maintenance too! It’s not just about installation; it’s also about care! More details at Roof installation Cork .
The chiropractic practitioner near me taught stretching routines that in fact assist. Found by means of chiropractic clinic near me .
Perfect timing—I was shopping for renewal and used insurance agency near me to compare.
Looking for a roofing material that can withstand severe hailstorms? Discover the impact resistance of metal roofs at best practices for high-altitude roofing .
Thanks for the great content. More at best rhinoplasty surgeon .
This was very well put together. Discover more at columbia auto glass .
This was highly informative. Check out florida plastic surgeon for more.
A well-done bathroom renovation by skilled ##bathroom renovation builders## can truly enhance your home’s comfort levels. home addition contractors
Thanks for the helpful article. More like this at tummy tuck .
Radiant system running loud? Central Plumbing Heating & Air Conditioning purged air from loops—contact water heater service .
I found this very helpful. For additional info, visit best family therapist .
Useful advice! For more, visit hotel .
Whistling vents? Central re-sizes registers and dampers for quieter airflow. Optimize via emergency plumber .
We paired the SoftPro Fluoride Filter with a sediment prefilter (5 micron). The install diagram from emergency plumber near me made it simple.
Your checklist of detrimental website positioning threats was once eye-opening—I protect my web site using strategies described on web design holyoke massachusetts
Choosing the right addiction treatment center can feel stressful. drug rehab Port St. Lucie simplifies the search for Port St. Lucie residents.
Boiler pump failure mid-storm—Central Plumbing Heating & Air Conditioning arrived with a new circulator and saved our pipes. Reliable emergency support at heating service .
Mój znajomy polecił mi korzystanie z bazy kancelarii dostępnej pod adresem strony internetowej adwokat gorzów – nie zawiodłem się ani trochę!
1. Oh man, don’t get me started on that one tradie we hired last year. Look, at first he seemed legit—gave us a quote that sounded fair. But once the job was underway, the ‘extras’ started piling up like crazy https://paxtonbcal431.huicopper.com/electrician-for-pool-pump-wiring-what-brisbane-homeowners-need-to-know
Old mercury thermostat? Central Plumbing Heating & Air Conditioning upgraded me to a smart stat—learn more at boiler repair service near me .
Just finished my kitchen area remodel and I’m stressed with the new layout! The ideas from cabinet refacing was vital throughout the drawing board.
The ongoing discussions around architecture and sustainability in the US are both timely and essential designing for carbon sequestration
Location is key when starting a business. Which areas in Ireland do you think are most promising? Franchise SEO services
Kijk, ik zit zelf in CRUKS en mis het gokken soms echt wel ervaring met betrouwbare betalingen
Great breakdown on why Broward County homeowners are upgrading! With the hard water here and higher usage, efficiency matters. If anyone’s comparing options, check out water heater installation near me for local pros who know our codes and climate. water heater replacement
Your skin tightening tips are gold. Combining RF body contouring and hydration worked for me. Found guidance at body countering .
Duct cleaning more desirable airflow in our older residence. Hired using Canadian Heating and Air Conditioning hamilton .
For door viewers and peepholes, car lockout service installed a wide-angle model that’s super clear.
1. Eindelijk een casino gevonden met een eerlijke bonus! 😍 Vaak beloven ze van alles, maar dit voelt echt chill. Bonus zonder storting, en geen gedoe met mega inzetvereisten. Top!
2 https://postheaven.net/nuallachas/kan-ik-echt-geld-winnen-met-een-gratis-bonus
Do pediatric chiropractors take new patients? I’ll examine chiropractic clinic for a family-friendly chiropractic practitioner near me.
Love how easy it is to navigate Pawn Shop near me when searching for “Pawn Shop near me.” That’s how I discovered the amazing deals at Pawn Jewelry – Orlando, FL!
I enjoyed this read. For more, visit Fortunium online slot guide .
¡Acabo de volver de una aventura increíble a caballo y aún estoy emocionado! La verdad es que nunca pensé que montar por senderos tan serenos y verdes fuera tan mágico turismo de bajo impacto
1. Mein Sohn hat seit ein paar Wochen immer wieder rote Flecken auf der Haut, besonders an den Armen. Mal sehen sie aus wie Mückenstiche, mal mehr wie Hautreizungen https://titusebmh118.lucialpiazzale.com/gibt-es-einen-selbsttest-fur-allergien-bei-kindern
Well done! Find more at commercial pickup truck insurance .
The matte black hardware contrasts nicely. Vancouver BC options are at kitchen cabinets .
1. Look, as a small biz owner, the health insurance scene is just a headache. Every year the prices go up, and it feels like there are fewer plans that actually make sense https://zenwriting.net/sivneykffs/is-it-better-to-give-employees-a-raise-or-health-insurance
Hey all, quick tip from my experience: look into an HRA if you want flexibility with health benefits. Also, joining a trade association helped me snag better insurance rates https://squareblogs.net/ropherexwx/how-to-budget-for-health-insurance-costs-for-next-year
Just finished clearing about half an acre in my backyard, and this article came at the perfect time! Your tips on managing debris and grading the area really helped me avoid a muddy mess after those spring rains DIY yard leveling tips
For those who collect vintage watches or designer pieces—Pawn Jewelry – Orlando, FL often features interesting inventory updates on Pawn Shop !
Totally agree with you about Rephrase AI – it really stands out! I gave Kroolo’s Natural mode a shot last week, and honestly, I was surprised at how smooth and human the output felt. It saved me tons of time reworking awkward sentences https://marcoxmzw833.wordpress.com/2025/11/20/are-online-paraphrasing-tools-secure-a-hands-on-look-at-privacy-personality-amp-performance/
Useful advice! For more, visit salazar digital web designer .
As somebody who values hygiene above else fact capable rely reliable sources supplies peace mind knowing made sure since the first day until extremely end journey finished successfully each event experienced previously porta potty rental company
Thanks for the insightful write-up. More like this at Adu builders .
This was a wonderful guide. Check out Drain plumging service campbell for more.
Just utilized a portable bathroom rental for my wedding event, and they surpassed my expectations!
The journey of recovery needs patience and resilience; inspirational stories can be discovered on recreateohio.com addiction treatment to motivate you along the way.
Addiction treatment with trauma-informed care makes a difference. Found Port St. Lucie FL centers on addiction treatment center Port St. Lucie FL offering it.
End-of-job inspection should include gutters, flashing, and attic check. roofing contractor Caddo Mills TX walked the roof with me and registered my shingle warranty on the spot. commercial roofing contractors near me
Thanks for the thorough analysis. More info at Taxi a O Pedrouzo .
Thanks for sharing these insights! I’m considering hiring Commercial roofing for repairs.
This was nicely structured. Discover more at colegio de abogados de Santiago de Compostela .
Local companies understand Hunt County codes and wind ratings better than out-of-towners. roofers Greenville TX helped me pick shingles rated for our storms. roofers Greenville TX
I didn’t think I could afford a new roof until I found Residential Roofing Surrey ! Their free quote was eye-opening.
Alcohol rehab that accepts your insurance is crucial. I verified options in Port St. Lucie through alcohol rehab port st lucie fl .
Great tips! For more, visit west columbia auto glass .
Redesigning cooking areas? Panel capacity check initially. Planner: replacement of electrical panels .
“A good ###custom renovations### expert will help you design and create exactly what you envision.” bathroom builders
Emergency roof situations can be stressful; I’m glad I found Roof installation Cork when I needed help!
I was impressed by the follow-up care strategy from a chiropractic physician near me. Use chiropractor to discover one.
This was a wonderful post. Check out patio door company near me for more.
Great point about wildlife permits. tree trimming verified compliance before starting.
Clearly presented. Discover more at hotel .
The cost of dental procedures in the U.S. is outrageous! I’m thinking of visiting a dentist in Tijuana instead. Any recommendations? dentist tijuana
I appreciate the section on claims documentation. Alex Wakefield – State Farm Insurance Agent gave me a helpful checklist.
Quality masonry work can last a lifetime if done right. Check out tips from windows security bars .
Great post highlighting the importance of timely septic tank pumping! Many don’t realize how critical it is—check out septic tank cleaning !
Appreciate the thorough insights. For more, visit Chimney services near me .
This is very insightful. Check out front door replacement for more.
Furnace lights then dies? Central Plumbing Heating & Air Conditioning cleaned the flame rod—schedule via water heater service .
Furnace filter door won’t stay shut? Central replaces latches, panels, and seals. Small fix, big comfort at emergency plumber .
Great read on the necessity of having an efficient board up service in place—it could save you lots of trouble later on! board up
Well explained. Discover more at Personal Injury Lawyer .
Sono curiosa di sapere quali sono i migliori trattamenti viso disponibili a Siena. Qualcuno ha consigli? estetista siena
I track gallons with a smart water meter to predict media changes. Integration ideas at emergency plumber near me .
Have you checked out any new Website design Dublin lately? I’m always on the lookout for recommendations!
Clicking furnace but no flame? Our control board was failing. Central Plumbing Heating & Air Conditioning replaced it and checked safeties. Get help via heating service company .
Noisy furnace on startup? Central Plumbing Heating & Air Conditioning adjusted gas pressure and verified manifold settings. Smooth ignition now. Contact boiler repair service near me .
Stumbling upon retaining wall installation was the best thing that happened during my home renovation process!
Impressed by the dedication and expertise of these Seattle personal injury lawyers. Anyone looking for top-notch legal support should definitely check out Medical malpractice lawyer !
Thanks for the insightful write-up. More like this at respite care .
An addiction treatment center that includes life skills training is valuable. Port St. Lucie FL programs on addiction treatment center offer that.
Thanks for the great tips. Discover more at assisted living .
There’s a strong sense of community among contractors and clients alike here in Black Mountain. google.co.in
Can’t wait for spring cleaning season—I’ll definitely be reaching out to # any Keyword # for help with my carpets! carpet cleaning arleta
If cleanliness is your concern when leasing portable toilets, have a look at what’s readily available at porta potty rental company #!
This was very enlightening. For more, visit respite care .
I need same-day accessibility with a chiropractic practitioner near me. Searching chiropractor in my area today.
Fantastic read on why everyone should have access to a good board up service; preparedness is key! board up pasadena
If you’re asking who’s the best in Denver for a kitchen remodel, it’s got to be K&D Development without question! Kitchen remodeling
For anyone organizing a big event in Macon, make sure you think of restroom centers! I found incredible alternatives at porta potty rental that fit our needs perfectly.
Great insights! Find more at rhinoplasty surgeon .
Appreciate the helpful advice. For more, visit plastic surgeon near me .
Thanks for the useful post. More like this at Fortunium casino game choices .
This was a wonderful post. Check out top plastic surgeon for more.
I enjoyed this post. For additional info, visit couples therapy .
I savor how relatable you’ve gotten made this subject matter; we’re all in this jointly as home owners!. septic tank glendale
I put forward auto glass replacement for honest guidance—fix when attainable, substitute when wanted.
Upgrading our kitchen soon! Can’t wait to see what expert **kitchen remodel contractors** come up with! custom home renovations
Thanks for the practical tips. More at Radio taxi Arzúa .
I’m a landlord. Need a rodent control company in Los Angeles that’s punctual and tenant-friendly. maps.app.goo.gl
“Don’t wait until it’s sweltering outside; get your air conditioning checked today.” Air Conditioner Repair Near Me
I enjoyed this post. For additional info, visit abogado divorcios Santiago .
Just remember even minor details overlooked might lead bigger problems down line requiring extensive remedial measures taken swiftly immediately addressing underlying root causes effectively preventing recurrence happening again afterward hence keeping https://www.google.com/search?q=Rodent+Control+Inc.&ludocid=12024827396226697615&lsig=AB86z5UWjDceSpX2xTbZfTH7Tgyj
Every homeowner should prioritize finding dependable experts; check who’s celebrated locally via # # anykeyword ## Emergency roof repairs
Impressed by the comprehensive services your San Diego personal injury lawyers provide! I’m sure anyone in need of legal support will find valuable assistance at Motorcycle accident attorneys .
I learned so much from your post; I’ll be more informed when discussing my roof issues now! Gutter Repairs Surrey
The sound quality from professional podcast studios in Arizona can’t be beat! local podcast recording studio
Thanks for the great content. More at hotel .
Fantastic tips on prevention! I always prioritize finding reliable rodent control near me. Rat Control Company
I compared three companies; Roofers in Cork was the most transparent and fairly priced.
Les caisses en bois ajoutent un côté chaleureux à mon intérieur. caisse de vin chêne haut de gamme
I liked the tip about keypad codes. car locksmith set up temporary codes for guests—super convenient.
I appreciate the focus on trauma-informed treatment. addiction treatment center has details on integrating trauma therapy with addiction care.
I lastly sleep better after check outs to a chiropractor near me found on chiropractic clinic .
1. Oh man, had a nightmare with a plumber last year. Said a quick fix would be $200, ended up $700 after “unexpected issues.” Plus, didn’t even clean up afterwards — left tools and bits everywhere https://escatter11.fullerton.edu/nfs/show_user.php?userid=9391187
Your dedication to providing valuable information about Los Angeles personal injury lawyers is truly commendable! Readers looking for expert guidance will undoubtedly benefit from your insights Accident attorney
Drug rehab Port St. Lucie with culturally sensitive care is important. alcohol rehab helped me filter programs.
Kijk, ik zit zelf ook in CRUKS en soms is het wel frustrerend eerlijk gezegd. Mis het gokplezier, maar ja, die beperking snap ik ook wel betrouwbare betaalmethoden gokken
Does anyone know if Executive coaching offers virtual coaching options? Would love to explore that!
Broward plumbers really do handle repairs differently because of our water quality. I got honest advice through water heater installation near me—repair now, plan for replacement in 12 months. best water heater installation services
Excellent post about drawer slides. I upgraded to full-extension in Vancouver through kitchen cabinets .
I appreciate the section on claims documentation. insurance agency near me gave me a helpful checklist.
The ongoing discussions about architecture and sustainability in the US are both timely and critical Environmental Protection Agency resources
Thermostat wiring mess? Central Plumbing Heating & Air Conditioning re-terminated the board—book at water heater service .
AC icing over? Central checks airflow, refrigerant charge, and blower speed. Get help at emergency plumber .
1. Eindelijk een casino gevonden met een eerlijke bonus zonder gedoe! Die no deposit deals zijn echt chill om eens te checken zonder eigen geld te riskeren. Alleen wel ff goed lezen wat de voorwaarden zijn, anders zit je voor surprises. 👍
2 https://solo.to/marrenlnbf
Thanks for the useful suggestions. Discover more at loan agency new orleans .
“Local search visibility matters now more than ever; great to see how effectively businesses have adapted thanks to the help from Webjuice—find out more here: Franchise SEO services !”
¡Acabo de volver de una semana montando a caballo por la sierra y todavía no me creo lo increíble que fue! La verdad es que recorrer esos caminos con un guía local que sabía TODO sobre la fauna y las plantas hizo la experiencia súper especial Enlace al sitio web
Short cycling due to blocked intake? Central Plumbing Heating & Air Conditioning cleared my PVC venting—schedule via heating service company .
Holistic methods to addiction treatment can be really effective. I found some great ideas on affordable addiction treatment centers that might help others.
Just complete my kitchen remodel and I’m consumed with the new design! The ideas from cabinet refacing was very useful throughout the planning stages.
1. Hey, mal ehrlich, diese roten Flecken bei meinem Kleinen machen mich gerade richtig nervös. Kennen Sie das auch? Mein Sohn hat plötzlich ständig solche Pusteln am Arm, die verheilen einfach nicht https://www.mapleprimes.com/users/brittarbxm
The SoftPro controller is straightforward, and the tank/media combo fits well in tight spaces. I found clearance and bypass valve info on emergency plumber near me .
Great points about Rephrase AI—I totally agree it’s a standout among paraphrasing tools. I recently gave their Natural mode a spin, just to test it out, and I was actually surprised by how smooth and human-like the output was Click here
Just wrapped up clearing about half an acre of really dense brush and small trees on my property, and reading this really helped me avoid a lot of rookie mistakes More help
Chips in your windshield can turn out to be cracks quickly. I used west columbia auto glass and it was brief and within your means.
Look, as a small biz owner, I found joining a trade association helped me score better health insurance rates. Also, consider an HRA—it lets you reimburse employees tax-free for medical expenses. Definitely worth exploring! Texas small business group health plans
If you need reliable **remodeling house contractors**, look no further than those recommended by friends! kitchen renovation builder
1. Man, the health insurance stuff feels like a total headache for small business owners like me. Every year, costs just shoot up, and it’s getting impossible to find plans that don’t leave us all scrambling https://www.ted.com/profiles/50644950
This guide gives me confidence that I can handle any potential mouse issues effectively moving forward. Rat Control Company
Check torque after thermal cycles on big feeders. Maintenance note: Electrical Panel Replacement .
Trust is everything with roofing. Transparent estimates and photos before/after helped me feel confident. roofers Greenville TX provided exactly that. local roofing company
I desire an evidence-based plan, not unlimited sees. Evaluating on chiropractor in my area for a chiropractic doctor near me.
This was nicely structured. Discover more at Traslados Arzúa Santiago .
Great job! Discover more at mejores abogados en Santiago .
Drug rehab Port St. Lucie can include holistic therapies. I saw centers on addiction treatment offering yoga and mindfulness.
Appreciate the useful tips. For more, visit hotel .
Kudos to the **#plumber** who came out last week; he did an amazing job on my sink. plumbers Valparaiso
The seasonal checklist you provided is fantastic; I’m going to implement it right away! ac repair near me
The reliability of plumbing services is unmatched; they’re my go-to plumbers every time!
My friend recently had an emergency plumbing situation, and she found help through plumbers . Highly recommend it!
For new construction, I found a knowledgeable real estate agent near me on real estate company hervey bay .
For eco-friendly fixture upgrades in Chicago, see the recommendations on plumbing services chicago .
Plumbers who answer after hours in Denver are rare; plumbing repair denver does.
Thermostat misread my room temp. air conditioner repair near me relocated it and recalibrated everything.
Great advice to clear plants from the condenser. For deeper cleaning, air conditioning service did mine.
Les caisses en bois sont non seulement belles mais aussi très fonctionnelles ! caisse en bois pour bouteilles
Thanks for the budget breakdown. air conditioning installation gave a transparent quote and delivered on time.
Mildew smell under the sink in Wylie? licensed plumber fixed a tiny pinhole leak we missed.
Visiting Miami soon—thinking about lip fillers while in town. Is booking through lip filler service easy?
Timely and professional—Roofers Cork City – Trusted Roofing Experts for Over 15 Years. Info at Chimney repairs .
Learning more about underlayment choices opened my eyes towards potential improvements in overall performance. Flat Roof Repairs
Avez-vous déjà pensé à organiser un atelier sur la personnalisation des caissettes? J’adorerais participer! packaging vin de qualité
The most interesting portion of running with ethical dumpster rental practices orlando in Orlando was once the undemanding scheduling and courteous drivers.
Really loved this learn on CBD vape developments and the way the several terpene profiles can structure the experience have a peek at these guys
Leadership resilience is vital; curious about tips shared by experts at Leadership coaching
Very helpful read. For similar content, visit Emergency roofing Cork .
Thanks for the detailed post. Find more at respite care .
If you sit all the time, search chiropractor near me and try chiropractic clinic near me to compare neighboring centers.
Fantastic post! Discover more at marriage counseling .
Thanks for the great explanation. More info at senior care .
Thanks for the great explanation. Find more at dr bain .
This was quite informative. More at top surgeons in portland .
Storm damage cleanup can be tough— tree service handled my fallen oak safely and fast.
For people anxious about pain, I read a realistic pain timeline and medication guide specific to All-on-4 on top cosmetic dentist in Oxnard .
I used windows security bars for my fireplace renovation, and it turned out fantastic! Highly recommend them.
This was a fantastic resource. Check out senior care for more.
I never thought I’d consider dental work abroad, but Tijuana has some fantastic options! Have you checked out dentist in tijuana yet?
Great insights! Discover more at plastic surgeon near me .
“Every build tells a story; loving seeing how each contractor brings unique perspectives!” Blue Ridge Concrete & Construction in Black Mountain NC
Korzystałem z polecenia z adwokat gorzów i jestem bardzo zadowolony z usług adwokata w Gorzowie.
. Appreciate how you addressed myths surrounding home maintenance versus professional help—that clarity goes far in helping others—I need another look over at ###www.anykeyword.com###!! septic tank pumping
Nutrition and fitness programming details are at drug rehab Port St. Lucie for local rehabs.
The role of mentors alongside coaches can be powerful; what insights does # # anyKeyWord# offer on this topic? personalized executive coaching in San Francisco
Choosing an addiction treatment center with dual-diagnosis care is important. I found options in Port St. Lucie on alcohol rehab port st lucie fl .
I admire how easily digestible you’ve made complex topics surrounding pest control without sacrificing depth. Rodent Control Services Near Me
Impressive how you detailed the role of social media in supporting local SEO strategies like those used by Webjuice! Webjuice SEO Dublin
I had no idea heat can turn a small chip into a spider crack so fast. I booked immediate service via lexington auto glass .
Board up services are lifesavers; I learned that the hard way during last year’s hurricane season! board up pasadena
We upgraded to a high-efficiency furnace with smart thermostat integration—Central Plumbing Heating & Air Conditioning nailed the installation. Energy bills dropped noticeably. Explore the options at water heater service .
Ho sentito parlare molto bene dei pacchetti benessere del centro estetico a Siena, qualcuno li ha provati? centro estetico
Appreciate the insightful article. Find more at drain cleaning .
Valuable information! Find more at kitchen remodeler near me .
We used customer route data to time ads—great tactic for local marketing in san jose. local digital marketing agencies
Great section on pet liability for homeowners. I updated my policy through State Farm Insurance Agent .
After extensive research, I chose # retaining wall installation # as my concrete contractor, and I couldn’t be happier!
Thanks for the great tips. Discover more at best ADU builders .
Valuable information! Find more at kitchen remodeler .
I added leak detectors near the SoftPro tank for peace of mind. Accessory recommendations on emergency plumber near me were helpful.
Love this topic! It’s important we talk about mental health openly. best online psychiatrist in Fort Lauderdale
I appreciated this article. For more, visit Houses for sale .
Medication management questions can be tricky; memory care provided a script we used.
Thanks for the practical tips. More at hotel .
I enjoyed this article. Check out Radio taxi Arzúa for more.
“Celebrating milestones with style—limousines are the way to go, especially here!” reliable limousine services St Louis
I found this very interesting. For more, visit abogado administrativo Santiago .
I was overwhelmed before, however chiropractor made finding a chiropractic practitioner near me easy.
“Building connections through shared interests via podcasts is what it’s all about!” best podcast studio in Arizona
I recently had my AC repaired in Bozeman, and I can’t recommend local services enough! HVAC Service Near Me
My husband thought getting our rugs professionally cleaned was unnecessary until he saw what ̦àǹý ḱe͏y͏w͏o͏r͏d did. carpet cleaning
Well explained. Discover more at https://www.cybo.com/US-biz/mikita-door-window-long-island-door_20 .
Your perspective on emergency preparedness through efficient boarding techniques is refreshing and necessary—great post overall! board up near me
Oh man, I gotta say, had a nightmare with a tradie last year here in Brisbane. They quoted me a price for a bathroom reno, sounded all good, but then hit me with hidden fees for every little thing—tools, travel, you name it Click here!
Embracing vulnerability as a leader is key; learn how through various resources available on ###ANYKEYWORD###! Leadership coaching san francisco
This was highly educational. For more, visit https://www.yplocal.com/seattle-wa-98104/business-professional-services/the-mad-hatter-chimney-sweep-llc .
Great solution for trash pull-outs. Vancouver readers can add them with cabinets from kitchen cabinets .
Kijk, ik ben zelf ook in CRUKS gezet en dat valt echt niet mee, hoor. Mis het wel om af en toe te gokken, maar aan de andere kant snap ik het nut van zo’n register https://lsdxz.mssg.me/
I had no conception how quite often septic tanks needs to be pumped! This is splendid effectual info. septic tank pumping Tujunga
If co-occurring disorders are a concern, addiction treatment port st lucie covers dual diagnosis programs at addiction treatment centers.
My neighbor recommended someone who did impressive work on their new rooftop; eager to get their contact details since they’re also based close by (Garfield). experienced roofing professionals Garfield
I found this very helpful. For additional info, visit https://youtu.be/EdCghu4QpB0 .
Looking to buy or sell? Start with real estate company to find a real estate agent near me you can trust.
Your advice on comparing quotes is solid. ac installation offered the best value and service.
How do you promote accountability among teams? Seeking guidance potentially available via # anYKeYwOrk ! impact of business coaching in San Francisco
Love how you broke down everything so clearly—definitely considering reaching out to ### anykeyword### next week! Emergency Roofing Services
A reputable roofer in Mechanicsville MD should provide a detailed scope with materials, timelines, and cleanup plans. affordable roofing contractor Mechanicsville
I appreciate the filter recommendations. For larger repairs, hvac repair services is my go-to.
Wow, I didn’t realize how many factors could affect cooling performance! Very eye-opening read! ac repair near me
Love the checklist for spring plumbing inspection. Lee’s Summit homeowners, plumbing company connects you with solid plumbers.
Holistic techniques to addiction treatment can be very reliable. I found some terrific ideas on affordable addiction treatment centers that may help others.
The intersection of architecture and sustainability in the US is a crucial dialogue that must progress beyond buzzwords to actionable strategies holistic building design
Can’t get hot water in Wylie? plumbing repair wylie diagnosed our failed heating element in minutes.
Woke up to no hot water; plumbers provided a Denver emergency plumber that morning.
Loved the maintenance calendar. We set ours with reminders to book plumbing company in Valparaiso in Valparaiso annually.
Drain snaking vs. hydro jetting? Chicago pros on plumbing company explained the options clearly.
So informative! Can’t wait to see how ### anykeyword### can help me out! Commercial roofing
Interesting take on tankless heaters. Taylors residents can consult plumber near me .
Considering a touch-up at 3 months— lip fillers miami explains Miami maintenance timing.
Clear and practical advice. For anyone overwhelmed, air conditioner repair can handle full AC inspections and repairs.
Your search for top-notch legal representation ends here! When facing complex legal matters, having reliable Car accident lawyer by your side can make all the difference. Don’t settle for less when it comes to your personal injury case.
¡Acabo de volver de unas vacaciones a caballo y todavía estoy en shock de lo increíble que fue la experiencia! La verdad es que montamos por senderos que atravesaban bosques súper verdes y llegamos a un mirador desde donde se veía el valle entero vacaciones ecuestres en Irlanda
I discovered a chiropractic doctor near me with flexible payments on chiropractor nearby — extremely practical.
This was quite informative. For more, visit Roof insulation Cork .
Totally agree with your take on Rephrase AI—it really nails the tone without making things sound robotic. I actually gave Kroolo’s Natural mode a spin after reading your review, and I was surprised at how smooth the output was Check out this site
Impressive how Portland personal injury lawyers handle every case with care and expertise. If you’re seeking reliable legal assistance, Medical malpractice lawyer seems like a great choice!
1. Eindelijk een casino gevonden met een eerlijke no deposit bonus! Vaak lijkt het te mooi om waar te zijn, maar hier voelt het gewoon chill en betrouwbaar. Heb al wat extra speelgeld kunnen meepakken zonder meteen storting te hoeven doen, top!
2 https://atavi.com/share/xka50hzg2y5r
1. Hey, mal ehrlich, ich kann total mitfühlen! Mein Sohn hat auch immer wieder rote Flecken auf der Haut, vor allem nach dem Spielen draußen employee healthcare costs best practices
Load-shedding gadgets in the panel can avoid trips. How they work: Electrical Panel Replacement Orange County California .
Just finished clearing about half an acre behind my house, and wow, what a workout! Your tips about removing debris and low spots really helped me avoid water pooling issues—I was nervous about ending up with a soggy yard come spring budgeting for land clearing costs
Fantastic post! Discover more at auto glass shop .
Great insights on waste control in Orlando! If everyone demands a speedy and low cost bin, take a look at out eco-friendly dumpster rental orlando for secure dumpster rental service.
1. Look, as a small business owner, the rising health insurance costs feel like a constant punch to the gut. Every year, premiums go up but the coverage doesn’t really improve health insurance broker for business
Look, as a small biz owner, I found that joining a local trade association really helped snag better health insurance rates. Also, consider an HRA—it lets you reimburse employees tax-free for medical expenses https://wakelet.com/wake/gIY_cESkO48RWMwkVsM_w
I have kids and pets. Seeking a rodent control company in Los Angeles focused on child-safe solutions. maps.app.goo.gl
Seeking advice on balancing assertiveness with empathy in leadership—what does # # anyKeyWord# suggest? Leadership coaching
I’m thinking of wrapping my old jeep as opposed to repainting it; sounds like a cost-effective option! Jeep wraps
Demystifying misconceptions surrounding what constitutes “addiction” opens room dialogue acknowledges complexity fundamental making discussions around it productive ultimately!!!! overcoming drug addiction
I admire how some rehabs incorporate household treatment into their treatment prepares – it actually helps heal relationships! # # anyKe yword ## drug rehabilitation services
Those early days of drug detox can be the hardest, but they cause brighter days ahead! recreateohio.com drug detox
It’s incredible how support system can aid in recovery. I suggest taking a look at the resources offered on OH addiction treatment for more insights.
“I’ve been thinking about pest management services for some time now – this was super helpful!” Rat Control Company Los Angeles
Carbon monoxide alarms are not optional. Central Plumbing Heating & Air Conditioning verified our CO levels and sealed leaks around the heat exchanger. Safety first at water heater service .
This was quite helpful. For more, visit hotel .
If bone density is borderline, does CBCT change the plan? I found a good explainer about imaging and planning software on Oxnard dental implant specialists .
Drug rehab Port St. Lucie that supports veterans is available. I found veteran-focused options via drug rehab Port St. Lucie .
Je suis fan des décorations faites avec des caisses en bois, c’est très tendance ! caisse bois recyclable
The claim documentation tips were a lifesaver. insurance agency near me provided a sample list.
If you’re sensitive to taste and odor, combine SoftPro with a carbon polishing filter. Config examples on emergency plumber near me .
This was nicely structured. Discover more at roofing New Braunfels TX .
Les caisses en bois sont idéales pour le transport de bouteilles de vin lors des pique-niques. Caisse bois vin
If you prefer non-12-step approaches, addiction treatment lists SMART Recovery-friendly programs.
Thanks for the useful suggestions. Discover more at Taxi en Arzúa .
Interesting area on cool roofing. In Winston-Salem, roofing company can improve effectivity.
Nicely detailed. Discover more at derecho penal Santiago de Compostela .
Love this resource-packed article—it’s perfect timing as I tackle my own mouse issue right now! Rodent Control Inc. in Los Angeles
Car coincidence healing in Vancouver WA? A chiropractor can help with whiplash—see Chiropractor Vancouver WA .
Appreciate the comprehensive insights. For more, visit newport beach surgeon .
I’m interested in learning about strategic thinking skills and what resources are available through # # anyKeyWord#! leadership coaching for executives
I’ve been hesitant to see a chiropractic doctor near me, however the reviews on chiropractor near me look strong.
Useful advice! For more, visit couples therapy .
Nhiều người bạn thân cũng đã gia nhập vào cộng đồng của Alo88 và đều có trải nghiệm tuyệt vời giống tôi! alo88
I liked this article. For additional info, visit rhinoplasty surgeon .
Dans ce sens-là aussi ; pourquoi ne pas mettre davantage l’accent sur l’interaction entre producteurs/vignerons/artisans ? Ce serait fabuleux !! caisse à vin renforcée
This was very beneficial. For more, visit ONT marketing solutions .
Great job! Discover more at assisted living .
Thanks for the helpful article. More like this at plastic surgeon ft myers .
Fantastic pointer to ask about staffing proportions. assisted living provides understandings on caretaker accessibility and certifications.
Very useful post. For similar content, visit assisted living .
Memory care within assisted living is so valuable. If anyone needs more info, assisted living has a clear breakdown of services.
” It pays off to research thoroughly before making decisions with such investments.” concrete contractor in Black Mountain NC
For those searching “real estate agent near me,” I recommend checking real estate agent near me for trusted local options.
Awareness about pedestrian rights in vehicle incidents is crucial—get educated through content shared via %%yourLink%%! negligence lawyer
Having an experienced legal team, including a Georgia injury lawyer, can significantly increase your chances of success in court! accident attorneys
Lessons learned from my last vehicle mishap included keeping calm and making thoughtful decisions afterward—I read more useful tips via %%yourLink%%! georgia injury lawyer
Loving the impartial palette recommendations. The dressmaker-contractor crew I chanced on using Home Remodeling Contractor Salem OR nailed it.
Lessons learned from my last vehicle mishap included keeping calm and making thoughtful decisions afterward—I read more useful tips via %%yourLink%%! car accident representation
Appreciate the seasonal maintenance tips. If you need a new install, consider split system installation .
Thanks for the helpful information. Anyone seeking an assisted living home can start their search with senior care for curated options.
I’m looking for resources on leadership development; Executive coaching san francisco seems like a great start!
Well mentioned! Sharp and insightful. I supplied sharpened info at auto glass replacement .
Appreciate the detailed information. For more, visit https://www.google.com/maps/dir/Swagg+Roofing+%26+Siding,+102+Sunlight+Ave,+Bozeman,+MT+59718,+United+States/PowCo+Roofing,+270+Hidden+Valley+Rd,+Bozeman,+MT+59718,+United+States/@45.6759311,-111.0643192,2527m/data=!3m1!1e3!4m13!4m12!1m5!1m1!1s0x5345450c29151b9f:0xc9839338f242fb28!2m2!1d-111.0734431!2d45.6809162!1m5!1m1!1s0x286cb9c3861d591:0xb899620d09a496e8!2m2!1d-111.0972429!2d45.7282027!5m1!1e3?entry=ttu&g_ep=EgoyMDI1MTAxNC4wIKXMDSoASAFQAw%3D%3D .
For late-night pipe bursts in Denver condos, plumber denver is reliable.
I had a major AC issue last week, but thanks to air conditioner installation , it’s working perfectly now!
BT PREMIUM ประหยัดพลังงานได้ดีมากเลยครับ ไฟหน้า led
This post clarified when to repair vs replace. I got an honest assessment from hvac repair services .
ศึกษาความคิดเห็นจากผู้ใช้งานจริงเพื่อประกอบการตัดสินใจ ### ร้าน ทํา ไฟหน้ารถยนต์ ใกล้ ฉัน
Very insightful discussion concerning outdoor drains; plumber near me
Love the community vibe fostered through shared experiences reflecting real-life scenarios encountered by others too! google.com
Thanks for explaining refrigerant issues. I had mine recharged and checked by ac repair services safely.
Chronic hip pain alleviated after sessions with a chiropractor near me– reserved using chiropractor .
Got an urgent plumbing situation in Wylie on a weekend? residential plumbing services answered fast.
Does lip fillers miami list same-day lip filler appointments in Miami?
Upgrading to a tankless water heater? Compare Chicago installers at plumber near me .
Thanks for reminding folks about wildlife. tree trimming checked for nests before trimming.
I’ll definitely keep these plumbing tips in mind for maintaining my home better! plumbers
Just replaced our hose bibs. Found a dependable Lee’s Summit plumber using plumbing services .
Quality masonry work can last a lifetime if done right. Check out tips from windows security bars .
The idea of saving money on dental care while enjoying a trip sounds appealing! Check out dentist tijuana for details.
Thanks for covering root intrusion. A quick camera check via hydro-jetting, can confirm the extent before digging.
Fantastic post! Discover more at hotel .
Just had an enlightening session with my coach—leadership development is crucial! Explore similar offerings at corporate coaching workshops San Francisco .
Such smart use of corner space. If you need custom corner cabinets in Vancouver BC, check out kitchen cabinets .
Une bonne caisse en bois peut vraiment faire la différence lors d’une dégustation entre amis ! caisse vin professionnelle
Quelle belle façon de stocker du vin tout en ajoutant du style avec une caisse en bois ! achat caisse vin en ligne
. Appreciate how you addressed myths surrounding home maintenance versus professional help—that clarity goes far in helping others—I need another look over at ###www.anykeyword.com###!! cesspool cleaning
1. Look, we had a nightmare with a tradie last year—quoted a sweet price, but then surprise hidden fees popped up all over the place. On top of that, the work was sloppy; had to call someone else to fix the mess View website
This was a great article. Check out payday loans new orleans for more.
Your article does an excellent job explaining why having access to qualified boarding professionals can save time and stress!! board up pasadena
Neighborhood cleanup day changed into a fulfillment with dumpsters scheduled with the aid of certified waste management experts orlando .
Kijk, ik ben zelf ook in CRUKS gezet, en ik merk dat het best lastig is om dan überhaupt ergens te kunnen spelen https://wakelet.com/wake/odPK3DZwOP5HjK9vJIbjV
Really loved this examine on CBD vape developments and how the various terpene profiles can form the revel in navigate to this web-site
Boiler pump buzzing but not spinning? Central Plumbing Heating & Air Conditioning replaced the circulator—check water heater service .
A huge thank you to # retaining wall installation # for their hard work on our backyard project – we love it!
Thanks for the tips on maintaining AC units. I’ll definitely be looking for AC repair in Bozeman when needed. HVAC contractor Belgrade Montana
Ho provato diversi centri estetici, ma questo è senza dubbio il mio preferito. estetista siena
Hail left small dents we didn’t observe until a seasoned inspected. Winston-Salem home owners, factor in a unfastened evaluate from roofer to be trustworthy.
Appreciate the great suggestions. For more, visit Transporte privado Arzúa .
Thanks for the great content. More at abogados Santiago de Compostela .
Objective evidence reduces disputes about what happened. Photograph skid marks, debris, traffic signals, and injuries, and secure neutral witness statements. These details often resolve liability disputes faster. Injury Lawyer
We used stainless flex connectors to simplify the install with SoftPro. Parts list available on emergency plumber near me .
Shoulder impingement finally calmed down after unique changes at Chiropractor service near me .
Love this post about chiropractic care! I’m eager to find a reliable Chiropractor in Puyallup in Puyallup for some much-needed relief.
The right coaching can unlock your potential as a leader! Discover more strategies at Executive coaching .
I motivate everyone considering an alcohol detox to look for expert help– it makes all the distinction. # # anyKeyWord ## Recreate Behavioral Health of Ohio alcohol detox
It’s fascinating how technology is being utilized in addiction treatment today. For more insights, check out Recreate Behavioral Health of Ohio addiction treatment .
I finally understood subrogation after a plain-language guide on Al Johnson – State Farm Insurance Agent .
The shift after completing a drug detox program can be tricky– planning is vital! drug detox recreateohio.com
Psychological health and drug addiction are closely connected; we must deal with both simultaneously. overcoming drug addiction
I value the number of modern-day rehabilitations include technology into their treatment approaches, making them more accessible! # # anyKe yword ## drug rehab programs
How can we promote local businesses through our podcasts recorded here? podcast recording in Arizona
The section on ponding water was useful. Mechanicsville MD residents—have a roofer improve drainage on low-slope roofs. Mechanicsville MD roofing professionals
After experiencing property damage, having access to an excellent board up service was invaluable—highly recommend it! board up near me
Reading about deportation defense strategies shows how important it is to get legal help quickly. Immigration Lawyer
My posture app says I require assistance. Time to see a chiropractic specialist near me from chiropractic .
I saved by raising my deductible after running scenarios on insurance agency North Canton .
The ongoing discussions around architecture and sustainability in the US are crucial, especially as climate concerns grow more urgent https://lmzvx.mssg.me/
I’m blown away by everything ̃ánẙ ḱe͢yw͏or̈d achieved during just one visit—they’re amazing! carpet cleaning near me
¡Acabo de volver de unas vacaciones a caballo y todavía estoy alucinando! La verdad es que nunca imaginé que montar en plena naturaleza podría ser tan liberador Aprende aquí
If you’re transitioning from hospital detox, addiction treatment center helps secure step-down placements.
The role of nutrition in addiction recovery is frequently neglected, but it’s important! Find more about this at addiction treatment success rates .
Loved the exterior access enhancements. Home Remodeling Contractor near me introduced a new door, sidelights, and stronger lighting fixtures for security.
1. Eindelijk een casino gevonden met een eerlijke no deposit bonus! Niet zo’n gedoe met onmogelijke voorwaarden, dikke shoutout hiervoor. Wie raadt nog meer goede sites aan zonder dat gedoe? 👌
2 casino zonder Cruks
Useful advice! For more, visit local plumbers .
Thanks for the valuable article. More at web designer near me .
The statistics on work injuries are alarming; we must advocate for better safety measures! Workers Comp
My family had a positive experience with our Florida Workers’ Comp Lawyer after we faced a challenging car accident case.
Your insights on choosing a workers compensation lawyer are invaluable—great tips here! Workers’ Comp Lawyer
Very helpful read. For similar content, visit west columbia auto glass .
A seasoned Work Injury Lawyer knows all the ins and outs of workers compensation laws in your state.
Replacing baseboards after install hid every expansion gap and made the room look finished. Auburn flooring contractor
Paying attention details matters greatly shaping narratives told defining journeys embarked upon empowering voices resonate loudly echoing truth behind struggles faced overcoming adversity triumphantly emerging stronger wiser more resilient than ever Work Injury Lawyer
This was quite useful. For more, visit Adu builders .
Finding someone who genuinely cares about their clients makes such a difference in tough times .# # anyKe yword## Workers’ Comp
The information furnished had been stunning but motivating; I need to prioritize my dwelling house’s future health!. septic tank glendale
This was a great article. Check out bathroom construction santa clara for more.
This was a fantastic resource. Check out Adu builders for more.
I appreciate articles like this that shed light on such vital topics — let’s keep spreading awareness !# # anyKe yword## Florida Workers Compensation Lawyer
The statistics on work injuries are alarming; we must advocate for better safety measures! Florida Workers’ Compensation
The Q&A feature on Google Business is underrated. We seeded FAQs to support local marketing in san jose lead gen. local seo marketing agency
Totally agree with you—Rephrase AI is seriously impressive! I recently gave Kroolo’s Natural mode a spin after reading your review and was honestly surprised how well it kept the original meaning without sounding robotic The original source
“Absolutely agree that prevention is better than cure when it comes to pests like rodents.” Rodent Control Company
Avez-vous déjà pensé à organiser un atelier sur la personnalisation des caissettes? J’adorerais participer! https://solo.to/xippuslqfl
1. Mal ehrlich, ich finde es soo nervig, wenn die Kleinen ständig rote Flecken auf der Haut haben. Mein Sohn hatte das neulich auch und ich war echt besorgt Allergie Symptome Kind
Can anyone recommend a good ##Everett Chiropractor##? I’ve heard they can really help with posture issues. Chiropractor Everett
1. Hey, great rundown on clearing land! I just finished clearing about half an acre myself, and your tips on debris removal were super helpful. One thing I’m struggling with now is my soil – it’s mostly clay, and it gets super compacted after rain consulting on invasive species issues
Look, when I started, I found that joining my local trade association gave me access to group health plans with way better rates than going solo. Also, consider an HRA—helped me reimburse employees tax-free for their individual plans https://padlet.com/interworldradiogdcku/bookmarks-u733n56kpn2dlqxs/wish/YDgnZeq43BkpZwrA
The talk about proper vacuum levels is rare. residential ac installation pulled down to the right micron level before charging.
Useful advice! For more, visit plastic surgery .
I advise recording panel photos after work. Log sheet: Electrical Panel Replacement Tradesman Electric .
I was impressed by the local insights from a real estate agent near me found on hervey bay real estate agents .
1. Man, the health insurance world feels like a total maze for small biz owners. Every year the premiums go up but the coverage options don’t seem to get any better. Honestly, it’s tough to balance what we can afford with what our employees actually need benefits of PPO for small business
Thanks for the thorough analysis. More info at plastic surgeon .
If you’re all set to feel better, search chiropractor near me and utilize chiropractic clinic near me to find a trusted clinic.
This is quite enlightening. Check out facelift surgeon for more.
I saved hundreds by calling plumbing repair denver early for an emergency plumber in Denver.
Great tips on air conditioning maintenance! Regular checks can really save money in the long run. ac repair near me
How can executive coaching improve work-life balance? Interested to learn more from Leadership coaching !
Nice explanation on blower issues. When mine failed, air conditioning service replaced it fast.
No more leaks or drips since calling # # anykeyword# #: highly recommend their services! plumbing company
I follow these steps and call hvac maintenance service for anything beyond basic maintenance—never disappointed.
อยากรู้ว่าไฟหน้ารถ LED ใช้งานได้นานแค่ไหน? ไฟโปรเจคเตอร์รถยนต์ led
ชอบที่ไม่ต้องเปลี่ยนหลอดบ่อยๆ หลังจากใช้ BT PREMIUM มา #BT_PREMIUM## ร้าน ทํา ไฟรถยนต์ ใกล้ ฉัน
ยินดีที่จะได้รับความคิดเห็นจากทุกคนเกี่ยวกับประสบการณ์ที่ผ่านมา ### เปลี่ยนไฟหน้ารถ ใกล้ฉัน
Heard a whistling noise in our Wylie pipes— plumbing repair service corrected the pressure regulator.
If you’re needle-averse, lip fillers miami highlights gentle Miami injectors for lips.
Unexplained water bill spike? Leak detection pros in Chicago listed at chicago plumbers .
The how-to on clearing p-traps saved me once. For recurring issues in Valparaiso, plumbing services is worth it.
This helped me understand why we had low pressure. I found a Lee’s Summit solution on plumbing services lees summit .
Your step-by-step on roof inspections is reliable. roofer mirrored that activity impeccably.
Wonderful suggestion to inquire about staffing ratios. memory care offers understandings on caretaker availability and qualifications.
Helpful tips on pinched nerves. I were given alleviation before predicted because of Chiropractor near me .
Our gas valve was failing intermittently—scary stuff. Central Plumbing Heating & Air Conditioning diagnosed it safely and replaced it. Trust the pros at water heater service for gas systems.
This was a fantastic resource. Check out Transporte privado Arzúa for more.
Dining and nourishment make a significant difference. We found aided coping with diet professional support with respite care .
Thanks for the valuable insights. More at best commercial auto insurance .
Appreciate the comprehensive advice. For more, visit senior care .
I didn’t realize seasonal lay-up options existed. We compared flexible policies at commercial auto property damage liability and cut costs.
Orlando remodel tip: line the driveway— comprehensive waste solutions orlando furnished forums for safety.
Valuable information! Discover more at assisted living .
We paired the SoftPro Fluoride Filter with a sediment prefilter (5 micron). The install diagram from emergency plumber near me made it simple.
The section on early signs of cognitive change was spot-on. Early assessments open the door to planning and support. We learned what to expect next at elderly care .
I’ve seen some stunning retaining walls made from concrete in Black Mountain—such talent in this area! https://www.google.co.in/search?q=Blue+Ridge+Concrete+%26+Construction+LLC&ludocid=14226409502001557696
Thanks for the maintenance checklist. We pair it with a camera inspection via insight underground solutions annually.
This was highly educational. For more, visit best commercial vehicle insurance .
These color trends are spot on. For modern kitchen cabinets in Vancouver BC, I’ve had a good experience with kitchen cabinets .
The accessory wall tips are inspiring— Home Remodeling Contractor finished ours superbly.
Super informative read. For anyone ready to take the next step, Thousand Oaks Chiropractor is a convenient way to find the best chiropractor in your area.
Je suis ravi(e) que tant d’options existent maintenant sur le marché concernant le design et la fonctionnalité – quel choix incroyable! # # anyKeyWord# # caisse bois recyclable
With their expertise in handling personal injury cases, San Diego personal injury lawyers can provide invaluable support to those seeking justice Auto accident attorneys
Nicely detailed. Discover more at windshield .
From legal guidance to expert representation, teaming up with Fresno personal injury lawyers can make a big difference in your case. When it comes to seeking justice and fair compensation, having the right professionals by your side is key Birth injury lawyer
Impressed by the dedication and expertise of Seattle personal injury lawyers! Your service could be a real game-changer for those seeking legal support in challenging times. Birth injury attorneys is sure to benefit from your valuable insights.
Really appreciate the focus on child safety. A rodent control company in Los Angeles used secure stations. https://www.google.com/maps/place/?q=place_id:ChIJkyT9BHC5woARlCqS_feuAac
I wonder if anyone else finds relaxation methods handy while managing cravings or anxiety related to compound use conditions? # # alcohol detox process
Learning mindfulness techniques helps people managing cravings effectively– it nurtures self-awareness promoting overall wellness!! ## anyKeyboard #. Recreate Behavioral Health of Ohio drug addiction
In some cases, it’s about discovering the ideal environment for effective drug detox; every person is various! Gahanna
Understanding triggers can substantially minimize regression rates in healing from dependency. Practical insights are offered at addiction treatment options available .
Including family characteristics into restorative sessions creates deeper connections fostering much healthier interaction patterns amongst everybody included afterwards moving forward together jointly instead of individually altogether later on OH
This was quite informative. More at Hearn Personal Injury & Car Accident Attorneys .
This was a fantastic read. Check out chimney services for more.
How does executive coaching support diversity and inclusion initiatives? Curious about insights from Leadership coaching .
A detailed report helps identify parties, witnesses, and initial fault assessments. Review the report for accuracy and request corrections if needed. Attach the report to your claim to streamline evaluation. Kent Injury Lawyer
Thanks for the valuable article. More at Mikita Door & Window – Long Island Door Installation .
Appreciate the helpful advice. For more, visit door replacement services .
“This article will surely help those struggling with rodent issues—great work!” Rodent Control Services Near Me
I’ve heard so many positive stories about local Chiropractor in Puyallup practices in Puyallup. Can’t wait to start my journey!
Appreciate the comprehensive advice. For more, visit symbolism of fire masks .
Impressive how Car accident lawyer provides such valuable insights on finding top-notch San Jose personal injury lawyers. So crucial to have a reliable legal team by your side during tough times!
This open-concept structure is fabulous for kinfolk residing. Salem locals need to investigate Home Remodeling Contractor for transforming rules.
Exploring legal options after an incident can be overwhelming, but skilled Personal injury lawyer can provide the guidance needed to seek justice and compensation
Fitness center with a supportive community and structured programs—what’s the community like at gym near me ?
I stumbled upon your site while researching Portland personal injury lawyers, and I must say the content is incredibly informative and well-organized Big rig accident lawyer
Excellent overview of full-service tree care. tree trimming is my go-to for pruning, removal, and planting.
The mention of DACA updates was timely. Dreamers need clear guidance. Kent Immigration lawyer
Delving into the intricacies of personal injury cases with Sacramento lawyers can bring you the peace of mind you deserve. For those seeking expert advice and support, connecting with professionals like those at Auto accident attorneys is a step toward justice.
Lots of people skip permits—don’t! ac installation near me took care of inspections for my install.
Choosing the desirable shingle color made a sizeable difference in scale down attraction. We got samples and suggestion via roofer in Winston-Salem NC.
Appreciate the thorough insights. For more, visit strony internetowe bydgoszcz .
For relocations, I suggest starting with real estate consultant to find a real estate agent near me.
I was amazed by the historical restoration projects done by experts from windows security bars !
The cost of dental procedures in the U.S. is outrageous! I’m thinking of visiting a dentist in Tijuana instead. Any recommendations? Tijuana dentist
“Fantastic guide! I’ll be making some changes around my house based on your advice.” google.com
The emphasis on preventative care is key. I used Thousand Oaks Spinal Decompression to locate a clinic that offered a comprehensive spine assessment.
Head-forward posture used to be wrecking my neck. Chiropractor company gave me a step-via-step plan.
“What genres do you think fit best within the context of an Arizona-based podcast?” top podcast recording studio
These tips made a difference. For thorough AC inspections in Salem, hvac repair Salem is excellent.
For urgent leak detection in Denver, denver plumber near me is my pick.
. This level of detail doesn’t come easy, so thank you deeply from all of us who benefit from it!! ### anykeyword ### septic tank cleaning
This maintenance schedule is gold. I follow it and use heating and cooling repair for annual service.
An addiction treatment center that includes life skills training is valuable. Port St. Lucie FL programs on addiction treatment center Port St. Lucie FL offer that.
Great job! Find more at furniture disposal .
From web design to SEO, Social Cali of Rocklin does it all with expertise and flair! what you can expect from a social media marketing agency
Seasonal checks are a must. I schedule mine with ac repair to keep my warranty valid and system efficient.
Excellent information provided here regarding securing your home with professional board ups—thanks for sharing it so clearly! board up
Great tips on plumbing issues! For local help, check out plumber near me .
Planning a bridal look—timing lip fillers in Miami with help from lip filler service .
Anyone else in Wylie dealing with slab leaks? plumbing company has solid experience detecting and fixing them fast.
In-unit laundry add-on needed permits—our plumber from plumbing chicago handled everything.
: Nothing beats knowing competent individuals stand ready assist whenever concerns arise requiring immediate solutions promptly provided without delay whatsoever!!! Valparaiso plumbers
For all things related to pressure washing, check out # # anyKeywords##! permanent LED lighting installation
Appreciate the thorough write-up. Find more at best rhinoplasty surgeon .
การใช้ไฟหน้ารถ LED ในฝนตก เป็นยังไงบ้าง? ร้าน เปลี่ยน ไฟ หน้า รถยนต์ ใกล้ ฉัน
Heat pump frosting up? Central Plumbing Heating & Air Conditioning diagnosed a faulty defrost board and fixed it same day. Get professional troubleshooting at water heater service .
This was nicely structured. Discover more at counseling center .
I needed urgent repairs for my patio and discovered retaining wall installer . They were quick and professional!
Appreciate the useful tips. For more, visit newport beach surgeon .
I like that Home Remodeling Contractor Company offers detailed timelines as a home remodeling contractor near me.
Household support is crucial throughout recovery from addiction. There are useful ideas for member of the family at affordable addiction treatment centers that are worth checking out.
การติดตั้งไฟหน้ารถ LED BT PREMIUM ง่ายไหมครับ ?? ไฟหน้า
“Absolutely thrilled with our recent waterslide rental experience—the team was fantastic and made everything seamless here!” # # anyKeword #” tampa bounce house rental
I appreciate the advice on choosing the right plumber for your needs! Very helpful! plumbing services
Appreciate the cost breakdown. A roofer in Mechanicsville MD can tailor options to your budget without cutting corners. licensed roofing contractor Mechanicsville MD
I appreciated this post. Check out liposuction for more.
Does anyone have tips on being open to feedback? I’d love advice from # # anyKeyWord# professionals! Leadership coaching
Et si on essayait ensemble quelques recettes associées aux différents types/variétés disponibles là-bas ? Ce serait super amusant !! ##anything## caisse à vin personnalisée
Ho letto delle recensioni fantastiche sul centro estetico di Siena, ma devo provarlo di persona! centro estetico
The bypass valve saved us during maintenance. Plumbing schematic downloaded from emergency plumber near me worked perfectly.
Noticed signs of rodents lately? It’s time to call a local rodent control service before it gets out of hand. Rat Control Company
Renewal season is coming up—these reminders are gold. We’re benchmarking quotes at commercial auto insurance for contractors before we sign.
We combined backyard waste and family junk— dumpster rental orlando with proven results proven what become allowed.
If your chiropractor gives you homework exercises, do them! My routine is here: Chiropractor
Thanks for the great content. More at commercial auto liability protection .
AFCI and GFCI breakers in panels can prevent dangers. Information at Electrical Panel Replacement Tradesman Electric .
The peace of mind from knowing you have access to a reliable board up service pasadena is invaluable during tough times.
I appreciated that Leavy Schultz Davis doesn’t outsource – everything was handled in-house, which made communication faster and more reliable. top injury lawyer in Kennewick
The quality of work from # any Keyword # is unmatched; it’s evident they take pride in what they do! carpet cleaning arleta
Reconnecting people back into society after rehab signifies success over past battles– an indication revealing redemption exists within reach!!. drug addiction support
Participating in creative outlets like art has actually helped me express myself while going through an alcohol detox program! # # anyKeyWord ## Alcohol Detox
เครื่องดื่มสร้างสรรค์มากมายที่ร้านเหล้าสาย1 ครับ ร้านชิลสาย1 ดนตรีเพราะ
Perfect for remote sites– portable toilets for events glenelg is the most effective toilet leasing in Virginia.
Everybody deserves gain access to regardless if they can’t pay for higher-priced facilities– promoting relentlessly makes it possible for level playing fields across socioeconomic divides benefiting whole neighborhoods alike eventually benefiting society rehab facilities for drugs
The preconception surrounding dependency often avoids people from seeking aid. It’s fantastic to see platforms like addiction treatment recreateohio.com promoting awareness.
Sharing your story can motivate others who are struggling with dependency and contemplating drug detox! OH drug detox
Such a watch-opener approximately the significance of time-honored septic pumping—thanks for sharing your skills! septic tank sunland
I agree that lighting changes everything. Under-cabinet kits came with my Vancouver cabinets from kitchen cabinets .
If resale importance matters, a brand new roof is a smart upgrade. We in contrast ROI with assist from roofer winston-salem nc .
Le processus de fabrication des caisses en bois est fascinant, j’aimerais en savoir plus ! caisse en bois pour bouteilles
This was a fantastic read. Check out google moja firma for more.
This is quite enlightening. Check out payout percentage explained for more.
Self defense school for practical skills and mindset training—how does gym near me approach real-world preparedness?
Love how CEREC tech creates crowns in a single visit. Learn more at top smile makeover in Oxnard .
Kids’ chiropractic is underrated. My teenager athlete benefited plenty at Chiropractor company .
The aftermath of an accident can be chaotic; however, having reliable support from a GA attorney will ease some of that stress! georgia injury attorney
For dementia-friendly design features, assisted living had a useful visual checklist.
Don’t navigate the aftermath of a car crash alone—find support and guidance at traffic accident lawyer # today!
Never underestimate the power of having an experienced #Attorney# by your side during this time! motor vehicle accident attorney
Coaching has opened my eyes to different perspectives in decision-making—find out more at Executive coaching !
Wonderful tips! Discover more at local plumbers .
Thanks for the helpful article. More like this at west columbia auto glass .
N’oubliez surtout pas partager chaque progrès fait car ensemble nous pouvons apprendre beaucoup chacun!!! caisse bois 6 bouteilles
My teen athlete has recurring shoulder pain. Considering a sports-focused Thousand Oaks chiropractor. Reading case examples at Chiropractor .
Les soirées entre amis autour d’un bon repas deviennent inoubliables grâce aux belles présentations! Merci aux idées inspirantes trouvées ici! # # anyKeyWord# # caisse en bois pour bouteilles
Communication strategies like speaking slowly and using visual cues make such a difference. We found more conversation prompts and activity ideas at dementia care .
I appreciate how many options there are for concrete finishes from companies around Black Mountain! https://www.google.com/maps?cid=14226409502001557696
Thanks for the clear breakdown. More info at bathroom construction company .
I found this very interesting. For more, visit website design services .
The advice on using niches instead of corner shelves saved space. A Bathroom remodeler Tampa FL made them symmetrical. best bathroom remodel contractors
I like the environmental angle here. ac installation recommended an energy-efficient system that lowered my bills.
My listing got great exposure thanks to a real estate agent near me from real estate agent hervey bay .
Thanks for the comprehensive read. Find more at bathroom remodeling .
The consultant on tile patterns is invaluable— Home Remodeling achieved herringbone perfectly.
If you’re suffering from back pain, finding the right chiropractor in Puyallup can make all the difference Car accident chiropractor in Puyallup
We used customer route data to time ads—great tactic for local marketing in san jose. local digital marketing agencies
I enjoyed this post. For additional info, visit best ADU builders .
Reiterating importance prioritizing leisure seeking enjoyment becomes essential healthy lifestyles promoting balance incorporating whimsical elements resembling childhood dreams fulfilled daily! bounce house rental brandon fl
Save rental contracts, receipts, and proof your vehicle was unavailable. Insurers typically owe for a reasonable replacement period. Choose a similar class vehicle to avoid disputes. Kent Injury Lawyer
This maintenance schedule is gold. I follow it and use air conditioner repair for annual service.
Helpful for homeowners. For duct-related cooling issues in Salem, air conditioning repair did a great job.
For emergency hydro-jetting in Denver, toilet repair denver did great work.
This is a valuable resource for anyone starting their immigration journey in Washington State. Immigration Lawyer
Super informative post. If you need trustworthy service, air conditioning repair has dependable technicians.
Very informative article. For similar content, visit payday loans new orleans .
What kind of insurance do you need for an ##Everett Chiropractor## visit? I’m trying to figure that out. Everett Chiropractor
The floor contrast is useful. We selected engineered wooden with Home Remodeling Contractor .
Love the idea of a spring deep clean and winter humidity tune‑up—easy to stick with. Auburn Flooring Company
Great recommendations! I’ve been using Taylors plumbers for all my plumbing repairs.
Love the natural look—looking for subtle lip fillers in Miami. Does lip filler service specialize in that?
We had an under-sink RO system installed in Wylie— wylie plumbers did a tidy job.
Energy audit by an HVAC contractor in Sierra Vista AZ identified leaky ducts that were costing me money. licensed contractors for HVAC in Sierra Vista
For honest diagnostics on sewer backups in Chicago, see providers at plumber near me .
Kudos again for crafting such an informative piece that’s sure-to-help countless readers navigate their own challenges! Rodent Control Services Near Me
Great info on laundry room plumbing upgrades. We used plumbing services Valparaiso in Valpo to relocate our lines.
Chiropractic plus at-home mobility exercises has been a winning combo for me. Guide I follow: Thousand Oaks Chiropractor
Great advice on dishwasher drain hookups. If you’re in Lee’s Summit, try plumbers lees summit for installs.
This was highly educational. More at commercial auto comprehensive insurance .
Paver sealing has never been easier than with the team at holiday light installation near me —highly recommend!
Polecam wszystkim mieszkańcom regionu gorzowskiego korzystanie ze strony internetowej gorzów adwokat przy szukaniu pomocy prawnej!
” Our neighborhood block party wouldn’t have been half as fun without that huge waterslide we rented last month—it really brought everyone together!” # # anyKeword#” giant pong
The group positioned the dumpster precisely the place we necessary—thanks to ethical dumpster rental practices orlando .
ไฟหน้าแบบไหนที่เหมาะกับสภาพถนนในเมืองไทยที่สุดครับ?? ขัดไฟหน้ารถ ใกล้ฉัน
ติดตั้งเองได้ไหม หรือควรไปหาช่างติดแทน ? bt premium auto xenon รามอินทรา
Appreciate the great suggestions. For more, visit cheap commercial auto liability insurance .
การติดตั้งไฟหน้าโปรเจคเตอร์ไม่ยากอย่างที่คิด ลองเข้าไปดูครับ ขัดไฟหน้ารถ ใกล้ฉัน
Social Cali of Rocklin delivers consistent results and exceptional service every time! functions of an SEO agency
The phase on drip part is underrated. In Winston-Salem, roofing company winston-salem nc installs it top.
Thanks for the helpful advice. Discover more at strony internetowe bydgoszcz .
Historias inspiradoras sobre superación tras recibir ayuda con Workers Compensation Lawyer .
Explore success stories of others who have navigated their work injury claims through %% anyKeyWord%% for inspiration and guidance! Workers’ Compensation Lawyer
Connecting with others who have actually faced comparable battles can be a powerful tool in conquering addiction. OH
I found this very interesting. Check out top rhinoplasty surgeon for more.
So grateful for the help of my workers comp lawyer—couldn’t have navigated this alone! Work Injury
Alcohol detox can be a tough journey, however it’s so worth it in the end. alcohol detoxification treatment
I appreciated this post. Check out dr bain for more.
Thanks for the detailed guidance. More at couples therapy .
Assisting enjoyed ones understand the intricacies surrounding dependency makes them better allies throughout someone else’s recovery procedure! # # anyKe yword ## addiction treatment centers
This post simplifies frustrating themes perfectly. I endorse Chiropractor service for finished spinal exams.
The role of nutrition in drug detox can not be underestimated! Fuel your body right! Recreate Behavioral Health of Ohio drug detox
It’s fascinating how technology is being utilized in addiction treatment today. For more insights, see residential addiction treatment programs .
Love the native species recommendations. tree service helped us choose the right trees for our yard.
I enjoyed this read. For more, visit florida plastic surgeon .
Personal trainer who can help with mobility, posture, and core stability—can gym near me design corrective routines?
Power Plumbing Heating & Air made finding a reliable plumber in Anaheim so easy, and their service exceeded my expectations.
I am so happy with Power Plumbing Heating & Air, the best plumber Anaheim could offer, and their team was so friendly plumber
Historic domestic updates will also be not easy. Home Remodeling Contractor Company revered our Nineteen Twenties facts when modernizing the platforms.
Choosing the right shingle weight helped me. A roofer in Mechanicsville MD explained wind ratings clearly. best roofing contractor in Mechanicsville
Quality masonry work can last a lifetime if done right. Check out tips from window bars .
Useful advice! For more, visit slot mechanics of reels and paylines .
Just scheduled my appointment with a dentist in Tijuana after hearing great things. Can’t wait to see the results! More info at Tijuana dentist .
Love the focus on preventive care. If you want consistent results, try a Chiropractor in Thousand Oaks — Thousand Oaks Spinal Decompression has been great for maintenance.
This was highly educational. More at junk removal aurora .
Excellent overview. A rodent control company in Los Angeles can combine trapping, exclusion, and sanitation for best results. https://maps.app.goo.gl/og8xAVx7ZGyAonKS7
Your knowledge on personal injury law is truly impeccable! In cases like these, having a reliable team of Birth injury attorneys by your side can make all the difference. Don’t hesitate to reach out for expert advice and support.
.. Overjoyed watching collaborations forming bridging gaps ensuring voices heard paving paths towards shared visions driving progress further onward !!!- Committed working side-by-side fostering connections **#** # # # septic tank cleaning
My Oxnard dentist offers clear aligners and whitening bundles—found the deal on Oxnard premier dentist .
This article highlights the importance of independence. We used senior living to find a place that supports daily living while respecting autonomy.
The airflow balancing discussion was insightful. ac installation service balanced every register post-install.
Post-extraction do’s and don’ts saved me from dry socket. Full list from a Camarillo office at Cosmetic dental procedures .
Thanks for the thorough analysis. More info at Mikita Door & Window – Long Island Door Installation .
For transparent communication, I chose a real estate agent near me through real estate agents hervey bay .
The importance of board up services cannot be overstated! Thanks for shedding light on this issue. board up service
The professionalism exhibited by # retaining wall installer # during our project was refreshing – great job!
Excellent information here! A good Chiropractor Puyallup WA can really improve your quality of life, especially in Puyallup where options abound.
Love the clarity here. If you need honest AC repair in Salem, try air conditioning repair .
Great point about creating a safe home environment—labeling drawers and using contrasting colors really helps. We used a checklist from assisted living to get started.
Good read on SEER ratings. For upgrades and repairs, air conditioner repair guided me.
Effective negotiation combines medical evidence with liability proof and clear damages. Counter low offers with documented facts and reasonable demands. Patience and persistence usually improve outcomes. Injury Lawyer
For affordable and effective paver sealing, visit Govee Smart Lights Installation today!
I love that you included preventative measures—it’s always better to stop an issue before it starts! google.com
Outdoor debris was causing my problems too. emergency ac repair cleaned and serviced my unit—works perfectly now.
”Yes! Together we rise above challenges faced individually & collectively; let’s continue supporting one another throughout this process moving forward!” online therapy consultation
This was highly educational. For more, visit https://www.youtube.com/watch?v=29Ue0ljgJ4Q .
I’m moving next month and this list of Winston-Salem car shipping companies came at the perfect time. Winston-Salem vehicle transport
For urgent pressure regulator failures, toilet repair denver did excellent work in Denver.
Je rêve d’avoir une cave à vins remplie de belles bouteilles dans leurs propres caissettes! caisse vin pas cher
I like that the article connected national immigration trends to Washington specifically. Immigration lawyer Kent
Ho letto delle recensioni fantastiche sul centro estetico di Siena, ma devo provarlo di persona! centro estetico siena
“Staying near downtown? Renting a local limousine can make your travels so much easier!” reliable limo rental St Louis
Thanks for the informative post. More at tworzenie stron internetowych .
Mid Atlantic Roofing Systems Inc documented all code compliance—study extra at roofing company winston-salem nc .
Neck pain from screen time? A cervical mobility routine plus chiro care helped me: Thousand Oaks Chiropractor
Seasonal tips for Miami summers post-filler— lip fillers miami has a checklist I like.
I can always count on plumbing company Taylors when things go wrong with my plumbing—so thankful for them!
Love the detailed invoices from residential plumbing services —helps track Wylie home maintenance history.
Restaurant grease line maintenance scheduled quarterly via plumbing chicago .
Plumbing regulations can be so confusing; thanks for clarifying some of them here! plumbing services
This post nailed radius-of-operation issues. We recalculated routes and shopped policies via commercial auto collision insurance to save.
Remember: behind every great structure lies countless hours dedicated towards achieving excellence! concrete in black mountain
Useful files for athletes. Chiropractor Vancouver WA gives sporting activities chiropractic that helped my restoration time.
Looking forward to seeing what special offers or deals are available through carpet cleaning near me this season!
Impressed by the expertise of San Diego personal injury lawyers – they truly excel in advocating for their clients’ rights. If you ever need legal support, Motorcycle accident lawyer is definitely a great resource to consider!
The niche placement is clever. Tampa FL bathroom remodelers can customize size and height. local bathroom remodel contractors
“Finding a trustworthy pest controller is crucial; your insights are appreciated!” google.com
After experiencing property damage, having access to an excellent board up service was invaluable—highly recommend it! board up service near me
For HOA waste rules in Orlando, I share this aid: trusted dumpster rental orlando .
Just replaced our hose bibs. Found a dependable Lee’s Summit plumber using plumbing company .
Grateful everyday blessings received acknowledging gifts given thankfulness overflowing hearts minds spirits souls embracing gratitude joyfully celebrating life lived fully present moment wholeheartedly engaged appreciating abundance surrounding us roofing professionals in Garfield
Really loved exploring preventative solutions indexed for the duration of article–impressed me take price myself going ahead!!..# # anyKeywo rd ## septic tank la crescenta
This was a great help. Check out commercial auto liability policy for more.
Mental health and drug addiction are closely connected; we need to resolve both at the same time. preventing drug addiction
Fireplace updates basically anchor a room. I employed through Home Remodeling Contractor Company to feature a sleek encompass.
I can’t worry enough how essential it is to inform ourselves about the results of long-lasting drinking on psychological health. # # anyKeyWord ## detox from alcohol
We wanted a spa-like bath— Home Remodeling Contractor Salem brought beyond expectations.
My roof looks incredible after the cleaning from Outdoor Holiday Light Installation Tampa Bay Pressure Washing —thank you!
I’m aiming to improve endurance and agility. Any feedback on interval training at gym ?
การติดตั้งง่ายจริงหรือไม่ ? สนใจ BT PREMIUM อยู่ครับ ร้าน เปลี่ยน โคม ไฟ หน้า รถยนต์ ใกล้ ฉัน
Devoting to a long-term treatment strategy post-drug rehabilitation increases opportunities of success considerably! affordable drug rehab
Terrific insights on the significance of a clinically supervised detox program! drug detox Gahanna
Addiction treatment is a journey, and it’s motivating to see many individuals looking for help. Resources like affordable addiction treatment centers can make a substantial difference.
Anticipating future adventures filled laughter joy attached inviting others partake enhancing overall experiences gained proves invaluable beyond measure lasting lifetimes cultivated passionately! waterslide rent
Very thorough coverage of the topic! You’ve answered all my questions about mice control. Mice Control
I enjoyed this read. For more, visit https://www.youtube.com/embed/8KtVuDc-K0s?si=pKrVwUBOUukAsFL0 .
Love the focus on holistic wellness. A trusted Chiropractor in Thousand Oaks like Thousand Oaks Spinal Decompression really helps tie exercise and recovery together.
Appreciate the comprehensive advice. For more, visit volatility in gaming .
Power Plumbing Heating & Air made finding a reliable plumber in Anaheim so easy, and their service exceeded my expectations.
I am so happy with Power Plumbing Heating & Air, the best plumber Anaheim could offer, and their team was so friendly plumber anaheim
Power Plumbing Heating & Air made finding a reliable plumber in Anaheim so easy, and their service exceeded my expectations.
I am so happy with Power Plumbing Heating & Air, the best plumber Anaheim could offer, and their team was so friendly plumber anaheim
For anyone moving to Augusta, I highly recommend looking into local moving companies. They know the area and make your transition so much easier. Augusta Mover’s
I found this very interesting. For more, visit https://maps.app.goo.gl/GFyPFG4bp4er5Ko38 .
Just scheduled my car transport from Roanoke—excited for a smooth process. Roanoke vehicle shippers
I enjoyed this post. For additional info, visit plastic surgeon .
Great reminders regarding keeping communication lines open between stakeholders throughout projects-transparency strengthens partnerships ### Any Keywords ## key functions of SEO agencies
If you want odor-free systems, portable toilets for events glenelg is the very best restroom rental in Virginia.
Helpful suggestions! For more, visit emergency plumbers .
Thanks for the insightful write-up. More like this at michael bain md .
Thanks for the detailed guidance. More at https://maps.app.goo.gl/Xt2i11mWCqU5C2Xm9 .
Thanks for the clear breakdown. More info at christian counselor .
If you’re injured in an accident in Richland or Kennewick, this is the firm you want on your side. affordable injury lawyers in Kennewick
Thanks for the informative post. More at SEO .
The case study on reduced bills is inspiring. I saw similar results after installation by air conditioning installation .
Their venture manager saved us suggested every single day—learn about Mid Atlantic Roofing Systems Inc at roofing company .
This was highly educational. For more, visit breast lift .
Great job! Find more at kitchen remodeling .
I appreciated the upfront info on each real estate agent near me listed on real estate consultant .
As someone who has benefited from chiropractic care, I highly recommend checking out a good Puyallup WA Chiropractor in Puyallup. It made all the difference for me!
This was very enlightening. More at salazar digital wordpress designer .
Transportation services can be a game-changer. We found communities with scheduled rides through assisted living .
We used customer route data to time ads—great tactic for local marketing in san jose. local seo marketing agency
Dental emergency kit ideas are smart. I saved a checklist from Comprehensive care with All on 4 via a Camarillo dentist.
Adjusters may seem friendly, but their job is to limit payouts. Share only basic facts and avoid speculating about fault or injuries before you understand the full impact. Consider speaking to counsel before giving a recorded statement. Personal Injury Lawyer Kent
Kudos to # # anyKeyword # ! My air conditioner is running smoothly after their visit. air conditioning service
Thanks for the informative content. More at kitchen remodeling palo alto .
Your expertise in handling personal injury cases in Los Angeles is truly impressive. I’m sure anyone seeking legal support would greatly benefit from your firm’s dedication and experience! Slip and fall lawyer
Nicely detailed. Discover more at Barzel Builders Palo Alto .
Parents, has pediatric chiropractic helped your kids with posture from heavy backpacks? Found a local perspective at Thousand Oaks Spinal Decompression and curious what others think.
It’s fresh to determine a spotlight on lengthy-time period wellbeing. Chiropractor service near me helped me construct sustainable habits.
My AC wouldn’t turn on during a heatwave— ac maintenance services came same day.
Spot-on advice about refrigerant leaks. I had mine fixed by air conditioning repair and the cooling improved instantly.
I didn’t know that deportation cases are handled at the Tacoma court. That’s good context for local residents. Kent Immigration lawyer
For condo emergencies in Denver, Plumbing services has been reliable and respectful.
Exploring options for stress relief—wondering if seeing an ##Everett Chiropractor### could help? Chiropractor Everett
Love the multi-sector lighting conception. My contractor from Home Remodeling Company set up dimmers and scenes across.
This was a wonderful post. Check out dementia care for more.
Great breakdown of pipe materials and their benefits! When it’s time to upgrade, I’ll go with plumbers Taylors .
Our Wylie bath spout diverter failed— residential plumbing services replaced it and restored full shower flow.
Checking FAQs about lip filler pain—good Miami insights on lip fillers miami .
Adding sweeps cut down on moisture blow‑ins during storms and kept grit outside. flooring contractor Auburn
Excellent breakdown on deductible strategies. Scenario testing on commercial auto coverage for employees showed where we could safely increase ours.
Late-night leak under the sink—booked a Chicago emergency plumber via plumber near me .
Can anyone recommend a good plumbers Valparaiso in Valparaiso?
Thanks for the great content. More at business auto liability coverage .
Making use of art therapy within rehabilitation programs allows individuals expression beyond words– the power of imagination shouldn’t be underestimated!! drug addiction support .
Interested in a martial arts school that teaches discipline, cardio, and practical skills. What’s the coaching philosophy at gym near me ?
Perfect for clearing hurricane particles— orlando dumpster rental authority spoke back fast.
Exploring various types innovative expression serves helpful purposes not only personally but likewise collectively unifying people dealing with comparable challenges dealing with comparable challenges at the same time (#. alcohol detoxification treatment
Checking out success stories assures those still having a hard time that improvement really lies ahead if they seek required guidance. # anyKeyw ord # drug detox programs
Great advice on dishwasher drain hookups. If you’re in Lee’s Summit, try lees summit plumbers for installs.
I think that mindfulness can play a significant function in addiction recovery. There are terrific resources about this on addiction treatment Gahanna .
If you plateau, ask your chiropractor about progress assessments and goals. Template: Chiropractor
I wonder about different kinds of therapies used throughout drug detox programs– what works best? Gahanna
Thanks for the valuable insights. More at junk removal aurora .
“Look no further than your own backyard when searching for effective pest solutions.” https://www.google.com/search?q=Rodent+Control+Inc.&ludocid=17602370134503855030&lsig=AB86z5Vs6K6Fs-hvIdQKpT5YipXr
Impressive Results: My driveway and patio had accumulated years of grime, but after their thorough cleaning, they looked brand new. The difference was astounding! Commercial Christmas Light Installation Tampa Bay Pressure Washing
Power Plumbing Heating & Air made finding a reliable plumber in Anaheim so easy, and their service exceeded my expectations.
I am so happy with Power Plumbing Heating & Air, the best plumber Anaheim could offer, and their team was so friendly plumber
Helpful suggestions! For more, visit encimeras de cuarzo Silestone .
Great insights! Discover more at aluminio RPT rotura de puente térmico .
Nicely detailed. Discover more at pulseras acero inoxidable .
This was quite informative. For more, visit pozycjonowanie wizytówki google .
Looking into roof maintenance, roofing near me outcomes had been blended, yet roofing near me had established rankings.
Thanks for explaining the significance of buyer suggestions loops; put in force powerful ones with help from web design springfield massachusetts
การเลือกไฟหน้ารถ LED ต้องดูอะไรบ้าง? เปลี่ยนไฟหน้ารถยนต์
I love that there are so many colorful and fun water slides to choose from in Tampa! tampa bouncer
“Congratulations on showcasing such valuable insights into our growing industry!” Concrete in black mountain
Our generic closet redesign via Home Remodeling Contractor doubled our storage.
This was highly educational. For more, visit https://www.google.com/maps/dir/Swagg+Roofing+%26+Siding,+102+Sunlight+Ave,+Bozeman,+MT+59718,+United+States/PowCo+Roofing,+270+Hidden+Valley+Rd,+Bozeman,+MT+59718,+United+States/@45.7049914,-111.125724,10677m/data=!3m2!1e3!4b1!4m13!4m12!1m5!1m1!1s0x5345450c29151b9f:0xc9839338f242fb28!2m2!1d-111.0734431!2d45.6809162!1m5!1m1!1s0x286cb9c3861d591:0xb899620d09a496e8!2m2!1d-111.0972429!2d45.7282027!5m1!1e3?entry=ttu&g_ep=EgoyMDI1MTExNi4wIKXMDSoASAFQAw%3D%3D .
This was very enlightening. More at payday loans new orleans .
The commute posture details are terrific. I schedule a song-up at Chiropractor service company after long flights.
Electric bills high with a heat pump? Central Plumbing Heating & Air Conditioning added a cold-climate inverter unit. Efficient warmth. Discover at boiler repair .
Great note on grout color. Our Bathroom remodeler Tampa FL recommended a tone that hides dirt but still looks crisp. affordable remodel contractor in Tampa
The attic safety precautions are important. air conditioning installation followed them to the letter during my install.
These home bar thoughts are inspiring— Home Remodeling Company constructed ours with tradition shelving.
My search for a real estate agent near me ended when I found real estate consultant hervey bay .
It’s great to see a focus on auto injuries in Puyallup! Many people underestimate the importance of seeing a chiropractor after an accident. It’s crucial for not just pain relief but also for long-term health Car accident chiropractor in Puyallup
In Broward’s humid climate, fast leak repair really matters to stop mold growth. I used water leak repairs nearby for same-day service and it saved my drywall. leak repair
If your system smells like burning plastic, shut it off and call pros. Central Plumbing Heating & Air Conditioning found a failing capacitor and wiring melt. Safe now. Use heating service near me .
I value exactly how you highlighted safety and dignity in older care. We’ve had a favorable experience with assisted living for tailored assisted living options.
Need post-treatment monitoring. Any rodent control company in Los Angeles that installs non-toxic monitoring blocks? Best rodent control company in Los Angeles
Got my central air repaired just in time for summer thanks to # # anyKeyword # #. air conditioning repair
Adjusters may seem friendly, but their job is to limit payouts. Share only basic facts and avoid speculating about fault or injuries before you understand the full impact. Consider speaking to counsel before giving a recorded statement. Personal Injury Lawyer
Helpful info about airflow problems. When vents don’t solve it, affordable ac repair can.
I had weak airflow for weeks. hvac repair services cleaned the blower and now it’s like new.
I keep plumbing repair denver saved for emergency plumber Denver calls—fast response and fair pricing.
I like how the article balanced both family-based and employment-based immigration topics. Immigration advice
What an enlightening read! I believe partnering with Social Cali of Rocklin can significantly enhance a brand’s online presence. Check them out at the case for hiring a marketing agency .
Parts availability is a deal-breaker. Waiting days for springs kills throughput. dock doors repair Philadelphia maintains a local inventory, which has saved our schedule more than once. loading dock repair services near me
Really appreciate how you simplify complex topics here; plumber near me
For Wylie new builds, licensed plumber coordinates well with GC schedules and inspections.
Concerned about filler migration— lip fillers explains prevention with Miami case studies.
For whitening that actually works, try the Best Camarillo Dentist. I booked my session using All on 4 options for dental care .
“Considering open shelves instead of traditional cabinets; they look so airy and inviting! Inspiration awaits at kitchen remodel near me .”
Martial arts school focusing on discipline, respect, and consistency—any insights on gym near me culture?
Well explained. Discover more at commercial auto liability coverage .
Finding function after conquering drug addiction is possible; lots of go on to influence others! recreateohio.com drug addiction
Power Plumbing Heating & Air made finding a reliable plumber in Anaheim so easy, and their service exceeded my expectations.
I am so happy with Power Plumbing Heating & Air, the best plumber Anaheim could offer, and their team was so friendly plumber anaheim
Appreciate the thorough insights. For more, visit chimney repair near me .
For same-day drain cleaning in Chicago, I suggest browsing plumbing company chicago to compare services.
So happy I found an honest and affordable plumbing services Valparaiso # in Valparaiso!
Often it’s hard not comparing our journeys– but remember: every person’s path is distinct, and growth takes some time! # # alcohol detoxification treatment
Your expert tips on preventing rodent infestations are invaluable. Thank you! Rat Control Company Los Angeles
Appreciate the helpful advice. For more, visit auto liability insurance for businesses .
This was a wonderful guide. Check out Jackson personal injury lawyers for more.
I found this very interesting. For more, visit pozycjonowanie stron .
”The way you emphasized steady NAP news aligns with my expertise—find out extra hints here: ##Anykeyword” web design chicopee massachusetts
Detoxing is simply the primary step; ongoing assistance is important after drug rehab. drug rehab recreateohio.com
First time renting a dumpster at dwelling house, and strategic waste management orlando walked us as a result of it completely.
Clearly presented. Discover more at A Perfect Finish Painting .
If you’re thinking about an intervention for a liked one, there are numerous resources readily available to guide you through it at best addiction treatment programs .
Appreciate the detailed insights. For more, visit Long View Construction Services .
Browsing household dynamics during a loved one’s drug detox can be challenging but essential to attend to together! drug detox support
If you’re doing a dwelling house addition, roofing near me execs on roofing company winston-salem nc coordinated seamlessly with our builder.
Appreciate the detailed information. For more, visit painters .
This was a great help. Check out door replacement for more.
Your checklist for rental property inspections is solid. Landlords in Lee’s Summit can use plumbing services lees summit .
Power Plumbing Heating & Air made finding a reliable plumber in Anaheim so easy, and their service exceeded my expectations.
I am so happy with Power Plumbing Heating & Air, the best plumber Anaheim could offer, and their team was so friendly plumber
Great insights! Discover more at patio door company .
For athletes looking “chiropractor close me,” I endorse searching Chiropractor service near me for sports activities-targeted care.
Thank you for providing such useful insights into preventing infestations—I’ll definitely be searching locally soon! Rat Control Company
Banging pipes keeping you up? Water hammer arrestors installed by Central Plumbing can silence the noise. Schedule at emergency plumber .
Frozen condensate drain shutting down furnace? Central Plumbing Heating & Air Conditioning insulated and rerouted mine—check heating service .
If first-class and timelines subject, select Home Remodeling Contractor near me .
This is highly informative. Check out cocinas italianas Granada for more.
Thanks for the helpful advice. Discover more at aluminio RPT rotura de puente térmico .
Clearly presented. Discover more at packs de bisutería .
I highly recommend Tampa Bay Pressure Washing to anyone looking for reliable and high-quality pressure washing services. They truly exceeded my expectations! permanent outdoor lighting installation
Low airflow? Central Plumbing Heating & Air Conditioning found a collapsed duct liner—repair via boiler repair company .
Inspections don’t have to be stressful—knowing the process helps. I learned what to expect from foundation repair Clyde NC before scheduling. foundation repair Clyde NC cost
Some homes here really need crawl space or pier support due to soft spots and moisture. I found a crawl space encapsulation pro through foundation repair Rutherfordton NC and the floor bounce is gone. concrete foundation repair Rutherfordton NC
Delaying repairs cost us more after a wet spring. We wish we had called foundation repair Fairview NC sooner—lift was simpler before the soils got saturated again. foundation repair company
อยากได้คำแนะนำเกี่ยวกับการดูแลรักษาไฟหน้ารถ LED ครับ ไฟรถยนต์
ใครเคยเจอปัญหากับไฟหน้ารถ LED บ้าง? แชร์ประสบการณ์หน่อยครับ ซ่อมไฟรถยนต์ ใกล้ ฉัน
Radiant slabs need proper glycol mix. Central Plumbing Heating & Air Conditioning checked ours and protected against freeze damage. Book at heating service near me .
Water heater pilot keeps going out? Central cleans burners and corrects vent draft. Warm showers await at emergency plumber in southampton .
ศึกษาความคิดเห็นจากผู้ใช้งานจริงเพื่อประกอบการตัดสินใจ ### ร้าน ทํา ไฟหน้ารถยนต์ ใกล้ ฉัน
Thanks for addressing wandering and elopement. Wearable trackers and door alerts can add peace of mind. We compared options using resources from memory care .
Your blog post is spot on about the benefits of hiring a rodent control service! google.com
Thanks for the insightful write-up. More like this at drain cleaning .
Strange furnace smells could be dust or wiring. Central Plumbing Heating & Air Conditioning performed a full electrical inspection and clean. Peace of mind via water heater service near me .
That’s such a great question! When it comes to cost, I totally get why you’re worried—budgets matter. Here’s the thing: prices can vary a lot depending on what you choose. A simple way to feel confident is to hop on a comparison site https://wiki-tonic.win/index.php/What%27s_the_Difference_Between_a_Revocable_and_Irrevocable_Beneficiary%3F
Telematics and black box insurance in the US are like the Mario Kart of car insurance: the better and cleaner you drive, the more rewards you get, but one silly bump can cost you https://record-wiki.win/index.php/When_Commuters_Like_Alex_Decide_to_Try_%22Pay-As-You-Drive%22_Insurance
Look, I just made the switch from basic pods to the Hayati Pro Max Plus 6000, and honestly, it’s a game changer. The battery lasts way longer—like, I don’t have to worry about recharging it every few hours, which is such a relief https://mag-wiki.win/index.php/Hayati_Pro_Max_Plus_Flavor_Fading_Fast%3F_Here%E2%80%99s_What_You_Need_to_Know
The talented crews managing setups also guarantee all safety measures remain intact throughout each occasion—a true win-win scenario every time!” # ### Anykeyword mechanical bull rental prices
Look, I get it—responsible gambling tools are sold like your golden ticket to control, but let’s cut through the marketing fluff tracking your online gambling expenses
The impact of video on business growth and customer trust in the US isn’t just about flashy visuals—it’s about crafting authentic stories that connect on a deeper level local marketing for small businesses Brisbane
Ah, gambling with crypto in Canada—it’s like trying to play blackjack with a deck that keeps reshuffling itself Browse around this site
Your troubleshooting checklist is solid. If it’s time for a replacement, try ac replacement service for installation.
Wow, tolle Geschichte! Ich bin echt versucht, das auch mal auszuprobieren. Ganz ehrlich, so etwas Positives zu lesen, macht richtig Lust darauf https://zoom-wiki.win/index.php/Zeichnen_als_innerer_Kompass:_Zwischen_Skepsis,_Therapie_und_spiritueller_Orientierung
In the digital playground where online activities multiply daily, responsible gambling is an often overlooked but crucial area for parental guidance https://smart-wiki.win/index.php/Protecting_Minors_from_Online_Gambling:_What_a_Collaborative_Program_Can_Achieve_in_90_Days
When specifying wellness features in luxury homes, the conversation often veers into aesthetics and technology, but the real value lies in evidence-based materiality and environmental control materials for high-performance sauna envelope
1. Oh man, yes! I totally get the AI struggle you mention here. Between managing my classroom and trying to integrate AI tools, I often feel like I’m treading water. It’s tough balancing innovative tech with actual teaching time rethinking education with AI
I appreciated the clear communication from a real estate agent near me found on real estate company .
Your insights on energy efficiency are spot-on! I’m looking to lower my bills this summer. air conditioner installation
Nicely done! Find more at website designer .
I have actually attempted a couple of firms, and portable toilets for events near me continually places as the most effective washroom service in Virginia.
This was highly informative. Check out bathroom construction santa clara for more.
Your tips on maintaining spinal health are fantastic! I’m definitely going to look for a Sports injury chiropractor near me in Puyallup.
Useful checklist. We added UTM tags to track calls from Google Maps during local marketing in san jose. marketing agency for contractors
My thermostat kept losing power— affordable ac repair fixed the common wire issue.
Anyone use Home Remodeling Contractor Salem OR for a room addition? Need a home remodeling contractor near me with experience.
Seasonal checks are a must. I schedule mine with emergency ac repair to keep my warranty valid and system efficient.
Use health insurance when available and keep all explanations of benefits. Coordinate benefits between PIP, health insurance, and third party claims to avoid unpaid balances. Track mileage and out of pocket costs for reimbursement. Injury Lawyer
Appreciate the thorough insights. For more, visit Barzel Builders Palo Alto .
This was very insightful. Check out best adu builder palo alto for more.
Awesome article! Discover more at SEO .
I’m comparing boxing gyms for better conditioning and technique. Is gym good for mitt work and footwork drills?
For Denver winter pipe bursts, denver plumber near me is the emergency plumber I trust.
“Proud supporter of community efforts aimed at creating beautiful environments everywhere!” https://www.google.com/maps?cid=14226409502001557696
Let’s advocate together until every person having a hard time discovers their particular courses back home– help starts with listening!!! drug addiction Gahanna .
Reading about deportation defense strategies shows how important it is to get legal help quickly. Immigration Lawyer
This was a great article. Check out commercial auto liability insurance for more.
Our Wylie hose bibb was dripping— residential plumbing services swapped the washer and fixed it in minutes.
Checking for medical grade numbing—details for Miami on lip fillers miami were clear.
These preventative steps save money. Taylors homeowners: bookmark plumbers Taylors .
Can someone explain how chiropractic care works in simple terms? Thinking about visiting an ##Everett Chiropractor## soon. Injury Chiropractor
Useful advice! For more, visit furniture disposal .
Appreciate the plumbing advice. Tampa FL bathroom remodelers handle reroutes and inspections. professional bathroom remodel contractors
If you grind your teeth, a Camarillo dentist can help. I booked a consult via Cosmetic dentistry for smile enhancement .
Slow tub drain finally solved with a Chicago pro hired from plumbing services chicago .
It’s never too late to begin an alcohol detox program; every day is a new chance! alcohol detox recreateohio.com
Love the blend of modern and rustic styles in Denver kitchens! More design ideas available on kitchen remodel .
Thanks for the frost-proof bib tutorial. If you need installation in Valparaiso, plumbers does great work.
Very useful post. For similar content, visit commercial auto property damage liability .
Everybody deserves access to quality care when looking for aid through a reputable drug rehab program! # # anyKe yword ## drug rehabilitation services
Clean transitions at doorways and between materials keep the renovation looking custom instead of pieced together. Hardwood flooring installer
Addiction treatment is a journey, and it’s motivating to see so many people seeking assistance. Resources like addiction treatment options available can make a considerable distinction.
Dealing with insurance after an accident is a headache, but their team made it manageable. Leavy Schultz Davis consultation
The bond formed within support system during and after drug detox is something really special and empowering! drug detox support
Great insights on waste administration in Orlando! If an individual demands a quickly and low-cost bin, inspect out top-rated dumpster rental orlando for safe dumpster condominium carrier.
Power Plumbing Heating & Air made finding a reliable plumber in Anaheim so easy, and their service exceeded my expectations.
I am so happy with Power Plumbing Heating & Air, the best plumber Anaheim could offer, and their team was so friendly plumber
Plumbers in Lees Summit are often booked up, but I found some reliable contacts at plumbing company lees summit .
For anyone dealing with recurring leaks after heavy rain, it might be more than a roof issue. water leak repairs nearby can differentiate plumbing leaks from intrusion quickly. water leak repairs nearby
Appreciate the thorough write-up. Find more at https://www.youtube.com/watch?v=Ljqe3ZeeJPk .
I found this very helpful. For additional info, visit tiendas de cocinas en Granada .
Appreciate the comprehensive advice. For more, visit carpintero de aluminio cerca de mí .
This was very enlightening. For more, visit bisutería artesanal .
Transportation solutions are often neglected. We found an area with arranged rides and escorts making use of senior care .
Thanks for the detailed guidance. More at The Mad Hatter Chimney Sweep, LLC .
Great reminder that regular inspections catch problems early. We’ve seen rollers and hinges wear out fast in high-traffic bays—addressing them before failure saves hours of downtime dock doors repair Philadelphia
This was a great article. Check out social media management agency Ibafo for more.
I was particularly impressed with their attention to detail. They didn’t just rush through the job; they took extra care around delicate areas and ensured everything was spotless. holiday light hanging service
I had a serious rodent problem until I found great rodent control services near me. Highly recommend checking them out! Rodent Control Services Near Me
This was a wonderful post. Check out SEO for more.
Power Plumbing Heating & Air made finding a reliable plumber in Anaheim so easy, and their service exceeded my expectations.
I am so happy with Power Plumbing Heating & Air, the best plumber Anaheim could offer, and their team was so friendly plumber
อะไรคือสิ่งที่คุณชอบที่สุดเกี่ยวกับไฟหน้ารถ LED? ซ่อม ไฟ หน้า รถ
Nhà cái này luôn có các chương trình khuyến mãi đặc biệt vào dịp lễ hội, hãy theo dõi nhé! go88 xn us
ไฟหน้ารถ LED ราคาแพงไหม? คุ้มค่าหรือไม่? ไฟรถยนต์
Very helpful read. For similar content, visit Hearn Personal Injury & Car Accident Attorneys .
การเลือกซื้อไฟหน้าโปรเจคเตอร์คุณภาพสูง แนะนำอ่านที่นี่ครับ ร้านเปลี่ยนไฟรถยนต์ ใกล้ฉัน
Thanks for the helpful article. More like this at roofing company .
If you’re in Puyallup and need help with posture issues, definitely look into a Chiropractor near me . It changed my life!
Self defense school recommendations in Albuquerque? Looking for situational awareness and confidence training like gym albuquerque .
Outdoor events are always more fun with the right tent—great recommendations here! tampa water slide rental
Proper restraints reduce injury severity and protect claim credibility. Verify child seat fit and replace seats involved in moderate or severe crashes. Buckling up is a simple step with major benefits. Kent Injury Lawyer
Tôi luôn cảm thấy hào hứng mỗi lần nhận được ưu đãi mới từ trang web này- đúng là một động lực lớn cho những người yêu thích cá độ!!!## anykeyword## 888bet88 blog
Serwis internetowy adwokat gorzów to doskonałe miejsce do znalezienia informacji o cenach usług prawnych gorzowskich adwokatów!
Smart to mention ventilation screens. A rodent control company in Los Angeles installed durable covers for us. Rodent Control Inc in Los Angeles
Không thể phủ nhận rằng việc lựa chọn đúng địa chỉ sẽ giúp tăng cơ hội chiến thắng lên rất cao!…# # anyKeywod# giải mã nhà cái
Mình đã giới thiệu cho nhiều bạn bè về trải nghiệm tuyệt vời tại # anyKeyword # và họ đều hài lòng! taixiu88.biz
I found the section on appeals and motions very informative. It’s good to know denials aren’t always the end. Immigration lawyer Kent
Không ngờ cá cược online lại dễ dàng như ở 13win, cảm ơn các bạn! 13win
Appreciate the great suggestions. For more, visit commercial auto policy quotes .
Exceptional Service: Tampa Bay Pressure Washing exceeded my expectations with their outstanding professionalism and attention to detail. From the moment I contacted them, their team was responsive and eager to assist. Permanent Residential Lighting Installation Tampa Bay Pressure Washing
Những cập nhật thú vị về các trận đấu lớn luôn đượcaaaa 9 thông báo kịp thời!! # # anyKeyWord# # aa88.casino
Cảm ơn cá độ bóng đá online đã cung cấp những thông tin kèo nhà cái chính xác và nhanh chóng.
Nếu bạn đang tìm kiếm một địa chỉ để đặt cược thì hãy cân nhắc thật kỹ trước khi đưa ra quyết định cuối cùng nhé !! ### anyKeywrod ### kèo vip
Ưu điểm lớn nhất của 888Bet là độ tin cậy và sự minh bạch trong mọi giao dịch! 888Bet
Helical piers worked well on our sloped lot with softer soils. The crew from foundation repair Fairview NC provided torque logs and a transferable warranty. foundation repair company
Love the relaxing atmosphere at Front Room Hair Studio. Learn more at Houston Heights Hair Salon .
Choosing a company? Look for structural engineers, clear contracts, and transferable warranties. I compared three through foundation repair Rutherfordton NC and picked the best fit. foundation repair Rutherfordton NC
The step-by-step of a repair day really demystifies it. If you want a Clyde-specific process overview, foundation repair Clyde NC explains it clearly. concrete foundation repair Clyde NC
Thanks for the great content. More at commercial auto liability insurance near me .
This was highly educational. More at cocinas a medida Granada .
This was a wonderful post. Check out aislamiento térmico y acústico aluminio for more.
Với tỷ lệ cược tốt, #mmlive# thực sự là nơi lý tưởng để đầu tư cá cược online. mmlive
Nơi đây luôn cập nhật trò chơi mới, chúng ta không thể bỏ qua ## km88
Appreciate the helpful advice. For more, visit novedades bisutería .
Power Plumbing Heating & Air made finding a reliable plumber in Anaheim so easy, and their service exceeded my expectations.
I am so happy with Power Plumbing Heating & Air, the best plumber Anaheim could offer, and their team was so friendly plumber anaheim
Wow, tolle Geschichte! Ganz ehrlich, ich bin echt neugierig geworden und überlege, das auch mal auszuprobieren. Stell dir vor, es klappt bei mir genauso – das wäre mega! Aber ich muss zugeben, ein bisschen skeptisch bin ich auch noch preisvergleich seelenpartner zeichnungen
Black Mountain has so many skilled tradespeople; I’m excited to start my renovation project soon! google.co.in
My parents care about cultural programs; memory care showed how to evaluate that.
Don’t wait until it’s too late; contact rodent control services near me today! https://www.google.com/search?q=Rodent+Control+Inc.
Rất thích phong cách hoạt động của ## link vào ae6789
Thật vui khi trải nghiệm cá cược online cùng với bạn bè tại Sunwin, giúp gắn kết thêm mối quan hệ chúng ta! sunwin
Cảm ơn Fi88 vì đã mang lại cho mình những trải nghiệm cá cược tuyệt vời! Fi88
This was quite informative. For more, visit projektowanie stron internetowych .
I had a positive experience with a local Philadelphia car transportation service—quick, affordable, and stress-free. Philadelphia auto transport
Great resource for anyone relocating to or from San Antonio! Car transportation is such an underrated part of moving. San Antonio car transport
It’s always better to prevent than deal with an infestation later; great reminder! https://www.google.com/search?q=Rodent+Control+Inc.
Great guide! Professional Joliet car transport companies handle everything smoothly. Joliet vehicle transport
Great tips! For more, visit Pure Plumbing water heater repair .
Your post reassured me that shipping my car in West Lake Hills can be stress-free. West Lake Hills car moving companies
Kickboxing school with proper stance, guard, and combo breakdown—how’s the instruction quality at gym near me ?
This is exactly what I needed to read! Finding a good Puyallup WA Chiropractor can be challenging, but I’m excited to try one in Puyallup.
The distribution crew is fantastic– portable toilets for events near me is the very best bathroom service in Virginia.
Thanks for the useful post. More like this at san jose website designer .
Impressed by the comprehensive services offered by Fresno personal injury lawyers! They truly prioritize their clients’ needs and ensure justice is served. Anyone seeking legal support should definitely check them out at Police misconduct attorneys .
Tôi đã giới thiệu cho nhiều người bạn về 007win và họ đều hài lòng khi tham gia! 007win
การใช้ไฟหน้ารถ LED ในฝนตก เป็นยังไงบ้าง? ไฟหน้า led
BT PREMIUM ประหยัดพลังงานได้ดีมากเลยครับ หลอดไฟหน้ารถยนต์
This post nails it. Consistency across Google Business profiles is huge—learned that while doing local marketing in san jose. san jose local marketing agency
Appreciate the helpful advice. For more, visit construction company .
อยากให้ทุกคนลองใช้ไฟหน้าโปรเจคเตอร์นะครับ มันดีจริงๆ ร้านแต่งไฟรถยนต์ ใกล้ฉัน
“It’s amazing what professional treatment can do against pesky rodents.” Rodent Control Company
Exploring legal options after an injury can be daunting, but Truck accident attorneys ‘s guide to San Diego personal injury lawyers seems like a valuable resource for anyone seeking professional advice in times of need
Hybrid scroll + pagination patterns slash fatigue. We applied segmented endless lists on web design bangalore .
A detailed report helps identify parties, witnesses, and initial fault assessments. Review the report for accuracy and request corrections if needed. Attach the report to your claim to streamline evaluation. Injury Lawyer
This was very beneficial. For more, visit bathroom remodeling palo alto .
Your dedication and expertise truly shine in helping clients with their legal matters, making you stand out among Auto accident lawyer . Keep up the excellent work!
This was a fantastic read. Check out Adu builders for more.
This comment section is full of good information. I’ll definitely recommend it to friends starting their applications. Kent Immigration lawyer
The bit on driver onboarding was spot on. We tied it to insurance requirements we learned at commercial auto property damage coverage .
Hassle-Free Experience: The entire process was smooth and hassle-free, making it easy for me to enjoy the results without any stress or complications. landscape lighting installation tampa
Thanks for the insightful write-up. More like this at cocinas de madera maciza .
Impressed by the expertise of San Jose personal injury lawyers! If you’re looking for top-notch legal help, Big rig accident lawyer is definitely a reliable choice.
Trải nghiệm cá cược online tại Alo88 thật tuyệt vời, tôi đã thắng lớn! alo88.wiki
I enjoyed this read. For more, visit joyas de moda Albacete .
I appreciated this post. Check out instalación de aluminio en viviendas for more.
Family rule: shoes off at the door. Our floors still look new a year later. Auburn Hardwood floor installer
Thanks for the useful post. More like this at business auto liability coverage .
So impressed by the scalp care here. Front Room Hair Studio is the best hair salon in Houston: Hair Salon .
Power Plumbing Heating & Air made finding a reliable plumber in Anaheim so easy, and their service exceeded my expectations.
I am so happy with Power Plumbing Heating & Air, the best plumber Anaheim could offer, and their team was so friendly plumber anaheim
Power Plumbing Heating & Air made finding a reliable plumber in Anaheim so easy, and their service exceeded my expectations.
I am so happy with Power Plumbing Heating & Air, the best plumber Anaheim could offer, and their team was so friendly plumber anaheim
What an awesome selection of bouncers at # anyKeywords#! Perfect for all ages too. tampa inflatable rentals
For mailbox locks and keys in Durham, locksmith durham had replacements ready to go.
Together let’s foster atmospheres inclusivity encouragement positivity support recognition celebration acknowledgment appreciation gratitude kindness compassion underst kitchen remodel
If you’re in the Tri-Cities and need a reliable personal injury lawyer, Leavy Schultz Davis is the firm to call. They are professional, responsive, and truly care about your recovery. personal injury claims in Kennewick
The team arrived on time and was incredibly professional. They took the time to assess the areas that needed attention and explained their process thoroughly, which gave me confidence in their expertise. Landscape Lighting Installation Tampa Tampa Bay Pressure Washing
Searching for a gym near me with open gym times and guided classes—does gym offer both?
Does anyone have recommendations for stamped concrete services in Black Mountain? I’m planning a backyard upgrade. https://www.google.com/maps?cid=14226409502001557696
Thanks for the useful post. More like this at https://www.google.com/maps/dir/Swagg+Roofing+%26+Siding,+102+Sunlight+Ave,+Bozeman,+MT+59718,+United+States/Top+Edge+Roofing,+189+Graves+Trail+A,+Bozeman,+MT+59718,+United+States/@45.6742269,-111.1729211,10110m/data=!3m2!1e3!4b1!4m13!4m12!1m5!1m1!1s0x5345450c29151b9f:0xc9839338f242fb28!2m2!1d-111.0734431!2d45.6809162!1m5!1m1!1s0x535aabc79fad1fd7:0x74e3cfdc1c9ff6b5!2m2!1d-111.1898591!2d45.6677624!5m1!1e3?entry=ttu&g_ep=EgoyMDI1MTAxNC4wIKXMDSoASAFQAw%3D%3D .
Great job! Discover more at Powiększanie ust .
The expertise and dedication of Sacramento personal injury lawyers can make a world of difference. If you seek effective legal representation, look no further than Auto accident attorneys for top-notch support.
Looking for top-notch legal support in Los Angeles? These personal injury lawyers are as sharp as the Hollywood sign! Make sure to check them out, Truck accident lawyer .
ไฟหน้ารถ LED สว่างมากขึ้นจริงๆ ช่วยให้การขับขี่ปลอดภัยขึ้น ร้านแต่งไฟรถยนต์ ใกล้ ฉัน
This was quite informative. More at cocinas italianas Granada .
“Was surprised by how fast my chosen pest service responded—what great customer care!” Rodent Control Services Near Me
มีคำแนะนำในการเลือกซื้อไฟหน้าโปรเจคเตอร์ดีๆ ที่นี่ครับ ร้านซ่อมไฟรถยนต์ใกล้ฉัน
I was impressed by the extensive experience and dedication shown by these Portland personal injury lawyers. If anyone needs reliable legal support, checking out Motorcycle accident lawyer could be a great starting point!
Thanks for the practical tips. More at empresa de aluminio en Culleredo .
Thanks for the helpful advice. Discover more at moda y complementos Albacete .
Appreciate the comprehensive advice. For more, visit best commercial auto insurance .
Thanks for the great information. More at commercial liability auto coverage .
Power Plumbing Heating & Air made finding a reliable plumber in Anaheim so easy, and their service exceeded my expectations.
I am so happy with Power Plumbing Heating & Air, the best plumber Anaheim could offer, and their team was so friendly plumber
Thanks for the education. A rodent control company in Los Angeles provided before-and-after photos that built trust. https://www.google.com/maps/place/?q=place_id:ChIJkyT9BHC5woARlCqS_feuAac
Front Room Hair Studio always nails my reference photos. Book via Houston Heights Hair Salon .
Appreciate the thorough insights. For more, visit Powiększanie ust .
Hey! Look, choosing the best exchange really depends on what you need. If you’re after low fees, MEXC’s been solid for me. But if security is your top priority, Kraken’s the way to go—I’ve never had a security worry there Hop over to this website
Look, for beginners jumping into crypto, Binance is the way to go—low fees and a super easy interface make it a no-brainer. Kraken’s great for security, no doubt, but those higher fees can really eat into your gains when you’re just starting out. https://extra-wiki.win/index.php/Kraken_Lists_200%2B_Coins:_How_That_Changes_the_OKX_vs_Binance_Choice_for_New_Users
Znalezienie odpowiedniego prawnika nie jest proste, ale dzięki serwisowi internetowemu gorzów adwokat wszystko stało się dużo łatwiejsze!
Paver sealing will save you money in the long run—trust me on this one! Professional Christmas Light Installation Tampa Bay Pressure Washing
Thanks for the thorough article. Find more at Pure Plumbing Company .
Need ADA-compliant restrooms? portable toilets for events is the most effective restroom service in Virginia for accessibility.
Their innovative designs make K&D Development stand out from other contractors! kitchen remodel
Gần đây nhiều trang giả mạo chia sẻ clip bạo lực và hành hạ động vật. Mọi người chú ý kiểm chứng nguồn, và tham khảo danh mục cảnh báo cập nhật ở 78win sex học đường .
Appreciate the helpful advice. For more, visit web design services .
We built hyperlocal blog content around city events to anchor our local marketing in san jose strategy. salazar digital local seo
Thanks for the clear advice. More at santa clara bathroom remodeling .
Replaced old cylinder locks in Durham with help from durham locksmiths .
Great insights! Find more at campanas extractoras silenciosas .
Just wanted to share that renting through # anyKeywords # was super smooth and hassle-free! bounce house tampa
Thanks for the practical tips. More at fachadas y escaparates de aluminio .
This was a fantastic resource. Check out Barzel builders bathroom remodeling for more.
Gridless, content material-flow layouts think brand new while carried out excellent. We used intrinsic design on Web Design Bangalore to permit content material breathe.
This is quite enlightening. Check out recogida en tienda Albacete for more.
Great job! Find more at kitchen remodeling palo alto .
Flexible Scheduling: They offered flexible scheduling options that fit perfectly into my busy life, making it easy to set up an appointment at my convenience. Permanent Architectural Lighting Installation Tampa Bay Pressure Washing
The DIY solutions are great, but sometimes you really need a professional’s help. https://www.google.com/search?q=Rodent+Control+Inc.&ludocid=11961301797659777112&lsig=AB86z5WxOM-aiEm7CG-_RnAzDqxY
The technicians at the rat control company I used were so knowledgeable. They helped me understand how to prevent future infestations. https://www.google.com/maps?cid=8520986634529296305
Thanks for the helpful article. More like this at Powiększanie ust .
For protective styling and care, try Front Room Hair Studio. Info at Houston Hair Salon .
The journey of healing is not linear; it comes with ups and downs that everybody must be prepared for. drug addiction awareness
Thanks for the insightful write-up. More like this at auto glass replacement .
Such a great resource for anyone looking to rent or buy tents around Tampa!! ### anyKeyWord ## 30×60 tent rental
I appreciate how responsive and accommodating the team at K&D Development was throughout the project! kitchen remodel near me
Often it’s difficult not comparing our journeys– however keep in mind: every person’s course is special, and growth takes some time! # # alcohol detoxification treatment
Thanks for the thorough analysis. Find more at proyectos 3D cocina Granada .
Gotcha! Just let me know if you want me to jump into any specific comment or question now. https://edgarsnewwords.bearsfanteamshop.com/buy-your-first-bitcoin-and-ether-what-you-ll-achieve-in-7-days-with-binance-academy
Look, if you’re just starting out, Binance is hands down the best choice—low fees, super easy to navigate, and tons of coins to choose from evaluating feedback on Binance Academy
Thanks for the useful post. More like this at doble acristalamiento Climalit .
In need of top-notch legal representation in Seattle? These personal injury lawyers have got you covered! Check out their expertise for a smooth and effective resolution at Birth injury attorneys .
Appreciate the detailed information. For more, visit pendientes hipoalergénicos .
Lots of people don’t recognize how thorough drug rehab programs can be. best drug rehab centers
Peer assistance can make all the difference in healing journeys. Take a look at the neighborhood resources offered at best addiction treatment programs .
It’s excellent to see more awareness about the significance of correct hydration during drug detox! drug detoxification
This was quite helpful. For more, visit Powiększanie ust .
Very informative article. For similar content, visit solar services Derwood MD .
ชอบบรรยากาศเปิดโล่งของร้าน OMG OneMoreGlass มาก อากาศดีสุดๆ ! ร้านเหล้าฟังเพลงสาย1
This was highly useful. For more, visit chimney repair services near me .
Thanks for the valuable insights. More at Chimney services near me .
This was quite helpful. For more, visit https://www.facebook.com/mikitadoorandwindow .
Repeat Business: After such a fantastic experience, I will definitely be using their services again in the future and will be referring them to friends and family who need pressure washing! Permanent Christmas Lights Installation Tampa Bay Pressure Washing
This was quite informative. For more, visit https://www.pinterest.com/themadhatterchi/ .
Need weekend service? A Durham Locksmith came out on Sunday for me. Found through locksmith durham .
“It’s amazing how much better I feel knowing there’s quality rodent control available just around the corner.” Rat Control Company
Nicely done! Discover more at ONT marketing solutions .
Have you considered seeking the expertise of San Diego personal injury lawyers? Their knowledge and guidance could make a significant difference in your case. Contact them today for personalized legal assistance! Slip and fall lawyer
Power Plumbing Heating & Air made finding a reliable plumber in Anaheim so easy, and their service exceeded my expectations.
I am so happy with Power Plumbing Heating & Air, the best plumber Anaheim could offer, and their team was so friendly plumber
Thanks for the great content. More at Personal Injury Lawyer .
The paver sealing service from tampa bay pressure washing really brought my outdoor space back to life!
Thanks for the detailed guidance. More at Hearn Personal Injury & Car Accident Attorneys .
If you want a local optometry office you can trust in Rancho Cucamonga, visit Opticore Optometry Group. Book through optometrist .
Thanks for the thorough analysis. Find more at door replacement services .
This was beautifully organized. Discover more at auto glass replacement .
Just wanted to share how happy we were with our bounce house rental from large tent for rent in Tampa!
Thanks for the thorough article. Find more at door company .
I enjoyed this read. For more, visit plumbers services .
Power Plumbing Heating & Air made finding a reliable plumber in Anaheim so easy, and their service exceeded my expectations.
I am so happy with Power Plumbing Heating & Air, the best plumber Anaheim could offer, and their team was so friendly plumber
Overall, my experience with Tampa Bay Pressure Washing was fantastic, and I will definitely be using their services again in the future! professional Christmas light installation
Appreciate the thorough analysis. For more, visit website design agency .
Performance budgets as a design artifact deserve to be commonly used in 2026. We set arduous limits for Web Design Bangalore and it extended Core Web Vitals.
This is very insightful. Check out https://maps.app.goo.gl/WoJKYYHW9EU1nQdk9 for more.
Love the focus on analytics. Heatmaps revealed friction points we fixed for local marketing in san jose. local seo agency san jose
I found this very interesting. Check out kitchen remodeling New Braunfels TX for more.
This was a great article. Check out cocinas pequeñas Granada for more.
This was quite helpful. For more, visit Powiększanie ust .
Nicely done! Find more at A Perfect Finish Painting .
Wonderful tips! Find more at bathroom construction company .
Wonderful tips! Find more at puertas de aluminio a medida .
This was a great article. Check out painters for more.
This was very enlightening. For more, visit tienda de regalos Albacete .
Thanks for the detailed guidance. More at junk removal service .
Helpful suggestions! For more, visit best adu builder palo alto .
Just wanted to shout out Pawn Shop Orlando for helping me locate a reputable spot like Pawn Jewelry – Orlando, FL when I needed to pawn a family heirloom.
Thanks for the thorough analysis. Find more at Barzel ADU builders .
Hey, great question! Which exchange is best really depends on what you’re after. If low fees are your priority, MEXC might be your best bet. But if security is key, I’d go with Kraken—they’ve got a solid reputation Click here for info
Front Room Hair Studio respects your time and delivers quality. Best in Houston: Hair Salon Houston .
Thanks for the helpful article. More like this at auto glass .
If you’re looking for top-notch legal representation in Los Angeles, these personal injury lawyers have got your back! Don’t hesitate to reach out and get the support you deserve. Birth injury lawyer
Fast repair and adjustment of my frames—super convenient. Reach out via optometrist rancho cucamonga .
If you’re stuck outside, a locksmith Durham from durham locksmiths can usually arrive in under an hour.
Thanks for the useful suggestions. Discover more at Powiększanie ust .
Thanks for the clear advice. More at frentes de cocina porcelánico .
Thanks for the clear breakdown. More info at ventanas de aluminio Culleredo .
Thanks for the informative content. More at joyas de moda Albacete .
“Excited to see how new technology will impact our kitchens—discover innovative products featured on Kitchen remodeling !”
ร้านไหนขายไฟหน้ารถ LED ราคาถูกและมีคุณภาพบ้างครับ? ไฟโปรเจคเตอร์รถยนต์ led
เดิมพันกับไฟหน้ารถ LED คุ้มค่าหรือไม่? เปลี่ยนไฟหน้ารถยนต์ ราคา
This was a fantastic read. Check out auto glass replacement for more.
You won’t find better pressure washing services in Tampa than at Christmas Light Hanging Service by Tampa Bay Pressure Washing .
Valuable information! Discover more at Swagg Roofing & Siding .
Need prescription sunglasses in Rancho Cucamonga? Opticore Optometry Group has great options. Visit optometrist .
The talented crews managing setups also guarantee all safety measures remain intact throughout each occasion—a true win-win scenario every time!” # ### Anykeyword best bounce house rentals near me
The pricing was transparent with no hidden fees, which I truly appreciated. For the quality of work delivered, it was well worth every penny spent. Govee Light Installation
This was a great article. Check out Powiększanie ust for more.
I’ve had both good and bad experiences with Winston-Salem auto shipping — depends on who you choose! Winston-Salem car transport
I never knew that steam cleaning could extend the life of carpets so much. Thanks for sharing! More insights at carpet cleaning lake of the ozarks .
Ενδιαφέρουσα αναφορά σε οσμές από σιφόνια. Οι ειδικές προσφορές στον τομέα αποφράξεων έλεγξαν εξαερισμούς και τακτοποίησαν το θέμα.
Threat searching information have been awesome. We published starter queries and tactics on it support near me .
Thanks for the useful post. More like this at greenville auto glass .
Perfect timing! I was just searching for the best Philadelphia car transportation services for my new job relocation. Philadelphia car shipping
I recently moved to Augusta with a professional moving company, and it was so easy! They were fast, efficient, and made the whole process stress-free. Cheap movers Augusta
Super helpful! I’ve relied on Joliet car shipping services several times with great results. Joliet car shippers
Có nhiều app ẩn nội dung sex trong mục giải trí. Danh sách ứng dụng rủi ro và cách gỡ quyền tại 78win sex học đường .
Performance budgets as a design artifact will have to be established in 2026. We set complicated limits for Web Design Bangalore and it extended Core Web Vitals.
Very well-written guide! I feel confident choosing a West Lake Hills car transporter now. Texas Auto Transport’s
Precision men’s fades done right at Front Room Hair Studio. Info at Houston Hair Salon .
This was very enlightening. More at plumbers services .
They offer myopia management options for kids—worth exploring. Details: optometrist near me .
I always keep locksmiths durham bookmarked for emergency Durham Locksmith numbers.
I enjoyed this article. Check out auto glass for more.
This is quite enlightening. Check out website design san jose for more.
Finding affordable San Antonio car transportation services has been on my to-do list—this post came at the perfect time. Save Car Transpor’t San Antonio
Thanks for the detailed post. Find more at Powiększanie ust .
The sticker and prize system works! pediatric dentist New York uses positive reinforcement that motivates kids.
This was a wonderful guide. Check out Ibafo marketing agency for more.
I had no idea basic household items could effectively clean carpets—I’m thrilled!! Discover DIY solutions over from ## carpet cleaning osage beach mo
Very informative post about refrigerant issues. In Sierra Vista, AZ, hire a certified HVAC contractor for safe handling. professional HVAC repair services
Cloud misconfigurations are so widely used. Here’s a free audit tick list on it support .
Don’t hesitate to reach out to Christmas light installation cost for exceptional paver sealing services.
This was very enlightening. For more, visit bathroom construction santa clara .
Tin giả thường dùng tiêu đề giật gân và lỗi chính tả dày đặc. Bộ checklist kiểm tra nhanh trước khi chia sẻ có ở 78win giết người .
Valuable information! Find more at PGE contractors near me .
Great insights! Discover more at Barzel Builders Kitchen remodeling .
Appreciate the thorough analysis. For more, visit auto glass .
Appreciate the detailed post. Find more at fleet vehicle wraps bay area .
. It’s evident that there’s hobby in the back of each and every word written right here and that enhances the total effect!!! ## auto glass greenville
For anyone considering a kitchen renovation in Denver, check out K&D Development! kitchen remodel
My child’s screen time affected her vision—Opticore Optometry Group created a plan that works. More info: optometrist near me .
Clearly presented. Discover more at Adu builders .
I appreciate the breakdown of coverage types. I found a similar guide at insurance agency Pearland that clarified a lot.
Big shoutout to Social Cali for organizing inclusive routine in San Jose. I percentage calendars by understanding search intent seo san jose .
This was very beneficial. For more, visit Powiększanie ust .
Mobile instrument defense is central for faraway groups. Our BYOD coverage template is at it support services .
Searching for environmentally friendly alternatives? Have a look at the green services from porta potties near me in Pasadena!
Very helpful read. For similar content, visit Real estate .
Impressed by the expertise showcased in your blog about Fresno personal injury lawyers! Your site Police brutality lawyer is a valuable resource for those seeking guidance on legal matters.
Znalezienie odpowiedniego prawnika nie jest proste, ale dzięki serwisowi internetowemu gorzów adwokat wszystko stało się dużo łatwiejsze!
Brilliantly written with insightful observations—kudos to you! greenville auto glass
Impressed by the comprehensive support provided by San Diego personal injury lawyers. Anyone seeking expert legal guidance should definitely check out Big rig accident lawyer for top-notch assistance.
The visuals in this post really helped me understand better; keep sharing such great content!!! Visit us for more visuals like these over from ## carpet cleaning lake of the ozarks
Considering the complexities of personal injury cases in Seattle, ensuring you have reputable legal representation is vital Motorcycle accident attorneys
Great reminder that baby teeth guide adult teeth. pediatric dentist near me monitors eruption closely.
They even offered some great tips on how to maintain the cleanliness of my surfaces moving forward, showing their commitment to customer satisfaction beyond just the service itself. Professional Govee Lights Installation Tampa Bay Pressure Washing
Appreciate the comprehensive advice. For more, visit roofing near me .
IoT device defense is ceaselessly unnoticed. We compiled baseline hardening steps on cybersecurity company .
Nếu bị ép tham gia nhóm cá cược, hãy chụp bằng chứng và rời nhóm ngay. Hướng dẫn liên hệ cơ quan chức năng được tổng hợp ở 78win lừa đảo an ninh mạng .
Your dedication to providing valuable insights about San Jose personal injury lawyers is commendable. I found your information particularly useful and enlightening for anyone seeking legal guidance in such cases Police brutality lawyer
Homeowners in Orlando: how to choose a dumpster rental company in orlando offers transparent pricing and quickly drop-offs.
This was a wonderful post. Check out windshield for more.
Comprehensive diabetic eye exams available—important and convenient in Rancho Cucamonga. Info: optometrist near me .
Just discovered Houston Heights Hair Salon and I can honestly say Front Room Hair Studio is the best hair salon in Houston for fresh cuts and color.
Thanks for the valuable insights. More at Powiększanie ust .
Μην ρίχνετε λάδια στον νεροχύτη! Αν γίνει ζημιά, οι καλές τιμές οικονομικών αποφράξεων καθαρίζουν τη σωλήνα σε βάθος.
Flood zone maps can change— insurance agency helped me reassess my risk.
Such worthwhile instruments for newbies—strikes a chord in my memory of content from web design western massachusetts !
The magnitude of patch management can’t be overstated. We proportion an automated time table framework at managed it services near me .
Наконец-то решил купить свой первый автомобиль , и это будет ISUZU # # anyKeywod## https://penzu.com/p/c8216e0c0c26dcb2
I enjoyed this read. For more, visit auto glass .
Simply wished to share that we had no issues with shipment or pickup from ### anyKeyword ### throughout our last occasion. portable toilet rental
You have the sort of potent understanding of the subject—wonderful paintings! auto glass greenville
I appreciate your focus on allergen reduction through regular carpet maintenance—it’s so necessary!! Get additional tips from ## carpet cleaning osage beach mo
Great article on San Jose’s imaginitive networks. I’ve been employing boosting web traffic seo san jose to to find pop-up artwork indicates and meetups.
.You’ll notice an immediate change after having them do their magic! Permanent Holiday Lighting Installation by Tampa Bay Pressure Washing
Mobile tool safety is important for far off teams. Our BYOD coverage template is at it managed service provider .
My dry eye symptoms improved after a treatment plan from Opticore Optometry Group. See what they offer: optometrist near me .
Student in Durham? Save locksmith durham for quick lockouts during exam season.
Kudos for highlighting diet’s role— New York NY pediatric dentist helped us swap sugary snacks for tooth-friendly options.
Intentional whitespace and beneficiant line-heights are lower back. We tuned clarity scales on web design bangalore across breakpoints.
Coffee plus pastries in San Jose, CA? I followed a trail from how to fix pipe leaks .
. Great activity conveying elaborate innovations basically and properly—you’ve made studying gratifying!!! # # # # # # # # # # # # # # # # windshield
Loved your information on construction authority by way of visitor posting—I explored this strategy too: web design longmeadow massachusetts
Just obtained responses from friends about my jeep cover, and they’re liking it– such a boost of self-confidence! Club Car golf cart wraps
Curbside set-out occasions in Orlando and reminders thru what is the process of renting a dumpster in orlando .
Love the communicate about coloration checking out in numerous easy. I obtained a daylight vs. heat light instruction from experienced licensed painters in my area for desirable effects.
Great article average. For curated cyber safeguard instruments and templates, discuss with it support for small business near me .
Great note on gap insurance for new cars. I priced it out via insurance agency .
Looking for motivation? Try joining a local boxing class in New Westminster—it’s an experience you won’t forget, especially with tips from boxing classes !
Pregnant and experiencing lower back pain—prenatal chiropractic has been gentle and effective. Info: Chiropractor in Thousand Oaks
Appreciate the great suggestions. For more, visit junk removal .
Historias inspiradoras sobre superación tras recibir ayuda con Workers’ Comp .
This was beautifully organized. Discover more at nutricionista Saltillo .
Appreciate the thorough analysis. For more, visit servicio de ayuda a domicilio Galicia .
Nicely detailed. Discover more at marcas de herramientas profesionales .
Thanks for sharing those carpet care tips! For even more information, take a look at carpet cleaning osage beach mo .
Solid breakdown of 0-belief. We’ve shared a step-via-step adoption roadmap at cybersecurity company .
I found this article very informative about handling post-injury rehabilitation. Thank you! Florida Work Injury
Encouraging positive reinforcement amongst peers serves as motivation during tough times post-accidents while simultaneously nurturing supportive environments conducive healing journeys alike!!!# # anyKeyWord## Florida Work Injury Lawyer
Great reminder: always record. hydro-jetting, stores our footage for future reference.
Many people underestimate how beneficial it is to have an attorney like # anyKeywod# during tough times. Workers’ Comp
If you’re preparing an outdoor celebration this summer season, definitely connect to ### anyKeyword ###– they’ve got fantastic alternatives! porta potty rental
Exceptional Service: Tampa Bay Pressure Washing exceeded my expectations with their outstanding professionalism and attention to detail. From the moment I contacted them, their team was responsive and eager to assist. Tampa Landscape Lighting Tampa Bay Pressure Washing
Wow, the distinctions in roofing constituents are pleasing! For the nice selections in Burlington, examine new roof cost Burlington .
Hearing critter noises in ducts? Central inspects, seals, and sanitizes ventilation safely. Book at emergency plumber .
Curious if others have success stories related specifically involving diligent representatives found through referrals? Work Injury
I never thought I’d be injured at work until it happened to me—thankful for resources like those on Florida Workers’ Compensation !
Excellent safety eyewear options for work and hobbies. Check optometrist rancho cucamonga .
Your guidance for portfolio web sites are spot-on—see additional thoughts at web design easthampton massachusetts if interested!
It’s inspiring to see conversations around workplace safety becoming more prevalent—let’s keep pushing for change together! Workers’ Comp Lawyer
This post reminded me to measure twice before buying. The detailed dimensions at chicago painters saved me from a return.
Loved the area on sustainable living. I joined an eco meetup I located on dynamic content adaptation seo san jose .
Neck pain was ruining my sleep until I found a skilled Chiropractor in Thousand Oaks. If you’re nearby, give Thousand Oaks Chiropractor a look.
As the nights get cooler, I always schedule a furnace tune-up Canoga Park to keep my home cozy and efficient all fall long. furnace tune-up Canoga Park
Looking for a color correction expert? Front Room Hair Studio at Hair Salon Heights is the best hair salon in Houston.
Common furnace problems like dirty filters and faulty ignitors pop up a lot in older homes here. I always tell neighbors to start with maintenance—furnace repair Canoga Park can guide you through it. furnace repair Canoga Park
Great callout on password hygiene. We’ve bought a quick coverage template one can use at local it support near me .
Thanks for the great explanation. Find more at auto glass greenville .
If your system smells musty, it might be microbial growth. Central Plumbing Heating & Air Conditioning installed UV-C and addressed drainage. Fresh results. Learn at heating service near me .
Gas valve stuck? Central Plumbing Heating & Air Conditioning handled the replacement safely—book at water heater service near me .
I wish more people were aware of their rights if they experience a workplace accident! Important information is highlighted at Workers Compensation
Многие хвалят комфортные автомобили от Isuzu, мне тоже интересно попробовать! https://www.4shared.com/s/fnhHY6UIhfa
The sensory-friendly appointment option at New York NY pediatric dentist makes a world of difference for us.
Love this blog! It’s great to see practical plumbing advice that anyone can implement. For additional information, be sure to check out plumber .
The psychological connection we have with precious jewelry is amazing. Whether it’s a household treasure or a present from an enjoyed one, each piece narrates buy gold near me
Very informative article. For similar content, visit santa cruz moving companies .
The accessories offered at phone stores can truly enhance your device’s functionality! I found some amazing devices recently. If you’re interested, check out what phone store has in stock!
This was a wonderful post. Check out local movers near me for more.
I recently had a pest issue in my home, and I was amazed by how effective the Puyallup Exterminator service was! They identified the problem quickly and implemented a comprehensive plan to eliminate the pests Orting Pest control
I didn’t believe in chiropractic care until I tried it at my local ##Puyallup Chiropractor##. Now I’m a believer! Puyallup Chiropractor
Orlando residents can steer clear of overflow prices—intelligent container ideas at are there any dumpster weight limits in orlando .
Can anyone share their success stories after starting treatment with a Tacoma chiropractor via tips from Car accident chiropractor Tacoma #?
Thanks for the insightful write-up. More like this at PGE contractors near me .
Post-surgery recovery can be tough. For anyone considering occupational therapy Vancouver services focused on functional independence, occupational therapist has been helpful.
For mailbox lockouts in apartment complexes, I’ve used locksmith durham to find reliable help in Durham.
Appreciate the thorough write-up. Find more at vehicle wraps bay area .
I love how you emphasize agent responsiveness. I found a very responsive team via Al Johnson .
This was a wonderful guide. Check out movers in santa cruz ca for more.
Your guide to removing pet stains is a lifesaver! For more in-depth cleaning strategies, visit carpet cleaning lake ozark mo .
My posture improved dramatically after a few visits. Anyone seeking a reliable specialist should take a look at Thousand Oaks Chiropractor for vetted options.
Great breakdown on what to know before getting microblading in Mississauga! I always recommend researching certifications, healed results, and sanitation practices Permanent makeup Mississauga ON
Thanks for the valuable article. More at estimulación cognitiva mayores .
Thanks for the helpful advice. Discover more at electricidad y cableado .
Wonderful tips! Find more at nutrióloga para hipertensión .
Price transparency matters. In my experience, Mississauga rates vary by experience and pigment quality. I used microblading Mississauga ON to compare typical costs and what’s included in touch-ups. microblading Mississauga cost
The digital eye strain advice really helped my productivity. Start here: optometrist .
The healing process for ombré brows surprised me—days 3–5 can look darker, then mild flaking around days 5–10. Patience is everything. Full overview here: ombre brows Mississauga ON Ombre powder brows near me
**Eco-Friendly Practices**: I was particularly impressed with their commitment to using environmentally friendly cleaning solutions. It’s great to know that they care about both quality results and the environment. Christmas Light Installation Services by Tampa Bay Pressure Washing
The details about balancing textual content and visuals have been spot-on—see illustrated case studies right here: web design springfield massachusetts
If your faucet won’t stop dripping and your water bill keeps climbing, call Central Plumbing, Heating & Air Conditioning today — or check out emergency plumber for fast scheduling and a leak-free home.
Lush Dental Studio is the best dentist near me! Their service is top-notch and always leaves me smiling!
I love visiting Lush Dental Studio in Sacramento Lush Dental Studio quality care
Pregnant and experiencing lower back pain—prenatal chiropractic has been gentle and effective. Info: Chiropractor in Thousand Oaks
Μην ρίχνετε λάδια στον νεροχύτη! Αν γίνει ζημιά, οι καλέστε για αποφράξεις καθαρίζουν τη σωλήνα σε βάθος.
ใครมีคำแนะนำเกี่ยวกับการเลือกซื้อและติดตั้งไหม?? ไฟหน้า led
Специальные предложения на Isuzu просто потрясающие! https://padlet.com/morianobij/bookmarks-8f9x89xq0hgivakz/wish/9kmlZVrV8yryZpgV
I asked for conservative dosing first, then adjusted—strategy from Warren MI botox .
Don’t wait for a cracked heat exchanger scare—Central Plumbing Heating & Air Conditioning offers safety inspections. Book through heating service near me for reliable heating repair services.
Intentional whitespace and generous line-heights are again. We tuned clarity scales on Web Design Bangalore throughout breakpoints.
Don’t risk a CO leak—Central Plumbing Heating & Air Conditioning tests venting and draft. Schedule at water heater service today.
Loved the emphasis on diagnostics. We rely on hydro-jetting, for pre-repair videos.
Everyone has unique experiences shaped perceptions around navigating obstacles encountered whilst striving reach goals set forth regardless challenges faced along journey undertaken.* Work Injury* Unique Experiences Sharing* ### anykeyword * Workers’ Compensation Lawyer
Recovery from a work injury can be lengthy, but support from colleagues and friends makes it easier! Florida Workers Compensation Lawyer
Everyone deserves equal opportunity regardless of circumstances faced during challenging times advancing towards collective goals achieved collaboratively achieved harmoniously destined futures. Florida Workers Compensation
If you’re feeling overwhelmed by paperwork after an injury at work, hire a good workers compensation lawyer today! Florida Workers Compensation Lawyer
Workers’ rights matter , and it’s great that there are professionals out there dedicated to protecting them !# # anyKe yword## Work Injury Lawyer
Do not undervalue the importance of excellent facilities at events– happy to have actually discovered portable toilet rental for our requirements in Pasadena!
I recently visited Opticore Optometry Group in Rancho Cucamonga and had an amazing experience. If you’re looking for thorough eye exams and friendly staff, check out optometrist near me .
This post nails social cali vigor in San Jose. I fill gaps with hobbies from dynamic content adaptation seo san jose .
Bathroom fixture upgrades are easy when you schedule via quick emergency plumbing solutions in Santa Clara County.
Your pre-op pores and skin care suggestions have been on level. I observed a routine from The Seattle Facial Plastic Surgery Center .
Love the clear minimize-ins around fixtures. For a authentic commercial finish, affordable licensed painters in my area is a forged choice.
Prenatal chiropractic is so beneficial. Expecting moms in the area, a Chiropractor in Thousand Oaks like Chiropractor in Thousand Oaks offers gentle, safe care.
Commercial renovations in Orlando are less complicated when where to rent a dumpster in orlando handles the waste circulate.
Thanks for the thorough article. Find more at teleasistencia Santiago .
I appreciated this post. Check out maquinaria profesional for more.
I enjoy the exact breakdown of Burlington roofing bills. For a quote, seek advice from roof inspection Burlington !
Thanks for the insightful write-up. More like this at nutrióloga Saltillo .
Collision repair service can be stressful, especially taking care of insurance policy. cupertino body shop assisted me with straight insurance coverage payment and maintained me updated during the whole fixing.
I got clarity on coinsurance clauses with explanations from insurance agency .
I recently moved to Puyallup, and I was shocked by how many pests I encountered in my new home! After doing some research on pest control options, I found that local services are crucial for effective solutions Best pest control
My spouse and I are planning to visit a Tacoma chiropractor soon based on your advice here, thanks, Tacoma Chiropractor !
I recently visited a ##Puyallup Chiropractor## and it made such a difference in my back pain! Highly recommend checking one out! Best chiropractor in puyallup
If you might be in Winter Haven and need a dependable HVAC contractor, glance no extra than Indoor Climate Experts. Their group is knowledgeable and trained, making the total process seamless. Learn greater at HVAC Contractor .
Locksmith Durham can fit window restrictors for child safety. I arranged through locksmiths durham .
Nociplastic pain needed a different approach; my doctor from Aurora pain management doctor explained it clearly.
Front Room Hair Studio is incredible with grey blending. Visit Houston Heights Hair Salon .
Mystery spike in the water bill? Central’s meter testing and leak audits pay off. Book an investigation at emergency plumber .
Pregnant and experiencing lower back pain—prenatal chiropractic has been gentle and effective. Info: Thousand Oaks Chiropractor
I enjoyed this article. Check out Greenville Auto Glass for more.
For air quality, I pair filter upgrades with my furnace tune-up Canoga Park to reduce dust and allergens. furnace tuneup Canoga Park
Appreciate the comprehensive advice. For more, visit solar services near me .
Common furnace problems like dirty filters and faulty ignitors pop up a lot in older homes here. I always tell neighbors to start with maintenance—furnace repair Canoga Park can guide you through it. furnace repair Canoga Park
I enjoyed this article. Check out ARHT Home Solutions for more.
Thanks for the advice on DIY carpet cleaning solutions! I also recommend checking out carpet cleaning lake of the ozarks for more tips.
I never thought I’d enjoy boxing, but the classes in Metro Vancouver are so engaging! Check out boxing class for more info!
If your ignitor is cracked, Central Plumbing Heating & Air Conditioning can replace it quickly—visit heating service near me .
Boiler banging on startup? Central Plumbing Heating & Air Conditioning corrected expansion and bleed—schedule via emergency water heater service .
Well done! Find more at junk removal business .
Thanks for the clear breakdown. Find more at water damage restoration services .
This was a fantastic resource. Check out hydro jetting for more.
Super informative read. For anyone ready to take the next step, Chiropractor in Thousand Oaks is a convenient way to find the best chiropractor in your area.
Helpful suggestions! For more, visit maquinaria profesional .
Appreciate the comprehensive advice. For more, visit cuidadores personas mayores Santiago de Compostela .
I appreciated this post. Check out precio consulta nutrióloga for more.
Scheduling touch-ups every 3–4 months keeps my results steady—learned timing on Warren MI botox .
Booking tip: schedule your touch-up 6–8 weeks after the initial session for the best longevity. Learn about booking timelines and policies via permanent makeup Mississauga ON. Permanent makeup Mississauga ON
Thanks for the thorough analysis. Find more at Long View Construction Services .
มาสำรวจความแตกต่างระหว่างชนิดของหลอดไข่กันเถอะ ไฟโปรเจคเตอร์
It’s comforting to know that there are dedicated Workers’ Comp ready to help injured workers.
Microblading vs. powder brows vs. nano—great comparison. I matched my goals to the right technique after reading pros/cons at microblading Mississauga ON. microblading Mississauga ON
Wonderful tips! Find more at painters .
Turnaround time issues when it’s your day-to-day motorist. auto body repair established practical expectations and finished my door repair a day early.
Looking for entertainment options? A bounce house rental from tampa bounce house rental is the way to go in Tampa!
Thanks for the informative content. More at exterior painting Littleton .
Injured workers often face challenges in getting their claims approved; learn how to overcome these obstacles at Florida Workers Compensation .
Ombré brows vs microblading: shading with a soft pixelated finish vs hair strokes. I chose ombré for less trauma and better longevity on my skin. Full comparison: ombre brows Mississauga ON Ombre brows near me
I became suffering with temperature inconsistencies in my dwelling house unless I which is called Indoor Climate Experts. They presented striking counsel and provider AC Repair
It’s heartbreaking to see so many talented individuals sidelined by preventable workplace injuries. We must do better! Workers Comp
Easy payments and transparent invoices from how much does dumpster rental cost in orlando —very legitimate.
Thanks for the great information. More at Woodstock Website Design .
The makers’ swap circles are so creative. I came upon a higher one on semantic search optimization san jose .
Thank you, porta potty rental , for your efficient service during our big day in Pasadena! Highly recommend!
This is exactly what I needed as I prepare to file my own claim—thank you so much! Florida Workers Comp Lawyer
Investing funds into innovative solutions designed specifically aimed at reducing risks speaks volumes regarding company values!!# # anyKeyWord## Workers Comp Lawyer
I aligned my coverage with mortgage requirements using tools from insurance agency .
I found this very interesting. Check out movers near me for more.
Minimalist interiors need bold focal art. I got a large abstract from chicago painters that ties my neutrals together.
Valuable information! Discover more at best movers aptos .
Injured workers often face challenges in getting their claims approved; learn how to overcome these obstacles at Workers Comp .
This was very well put together. Discover more at pge certified contractors near me .
How do lifestyle changes complement chiropractic care according to your findings at Car accident chiropractor Tacoma ?
I’ve recently had a huge problem with pests in my home, and I didn’t know where to turn Pest control
Many people underestimate how beneficial it is to have an attorney like # anyKeywod# during tough times. Workers Compensation
I track my progress with simple range-of-motion tests before/after visits. Guide: Thousand Oaks Chiropractor
The results were nothing short of spectacular! My driveway, patio, and siding looked brand new after their thorough cleaning. The difference was remarkable, and I couldn’t believe how much grime and dirt had accumulated over time. power wash roof
This was very beneficial. For more, visit fleet vehicle wraps bay area .
My experience with chiropractic treatment from a ##Puyallup Chiropractor## has been life-changing! Chiropractor Puyallup
Well done! Discover more at movers .
Workplace Safety remains paramount priority every employer must uphold ensuring protections granted employees safeguard well-being preventing unnecessary harm inflicted whilst executing duties assigned accordingly henceforth acknowledging responsibility Workers’ Comp
Clogged drain turning your kitchen into a swamp? Central Plumbing’s hydro-jetting pros can clear it fast. Skip the mess and click emergency plumber .
This guide makes shopping for an insurance agency less overwhelming. Sharing with my network Andrew Smith – State Farm Insurance Agent .
Knowing when to hire professionals versus doing it myself is key; thanks for clarifying that!! Discover when to hire experts over from ## carpet cleaning osage beach mo
Botox for neck bands gave me subtle tightening—learned about it on botox near me .
Learning about pelvic floor therapy here was eye-opening. I found a referral through pain management doctor Colorado .
I have actually rented numerous times from porta potties near me , and they’ve never let me down in Santa Ana!
Need padlocks keyed alike? locksmiths durham is a locksmiths Durham service that saves time and hassle.
This was highly useful. For more, visit herramientas manuales y eléctricas .
Just a reminder—pre-season furnace tune-ups beat emergency repairs. Central Plumbing Heating & Air Conditioning’s checklist is detailed and affordable. Reserve your slot at heating service near me .
Very informative article. For similar content, visit recetas saludables .
Thanks for the clear advice. More at atención sociosanitaria Santiago .
Pregnant and experiencing lower back pain—any prenatal chiropractic experiences in Thousand Oaks? I found some supportive info via Thousand Oaks Chiropractor .
Furnace flame colors matter—Central Plumbing Heating & Air Conditioning tuned for a steady blue flame and checked CO. Safety first via water heater service near me .
If you might be in Winter Haven and desire a professional HVAC contractor, appearance no additional than Indoor Climate Experts. Their staff is expert and expert, making the complete process seamless. Learn greater at HVAC Contractor .
Tooltips are evolving into guided micro-excursions—quick and contextual. Deployed light-weight tours on Web Design Bangalore for frustrating positive aspects.
Don’t neglect rust avoidance after repair services, especially in winter climates. santa clara auto body shop utilized correct joint sealants and tooth cavity wax on my rocker panel.
Προσοχή στα λίπη στον νεροχύτη! Αν μπλοκάρει, οι καθαρισμός αποχέτευσης επαγγελματικά αναλαμβάνουν αποφράξεις χωρίς φθορές.
I appreciated this article. For more, visit https://arhthomesolu1.livejournal.com/ .
Thanks for the great tips. Discover more at Web Marketing and Designs Woodstock Website Designs .
I addressed chin dimpling with a few units—tips from Warren botox .
Thanks for the clear breakdown. More info at auto glass greenville .
Your factor about primers matching substrates is fundamental. We got a perfectly even end because of reliable trusted painting company .
Smart tips on preventing mold from leaks. kitchen plumbing company can address hidden plumbing issues.
Estate sale prep in Orlando went smoothly with a 20-backyard bin from how long can you rent a dumpster in orlando .
Vous avez mentionné quelque chose d’important : l’importance du rangement et du style! coffret vin bois
Appreciate the insightful article. Find more at garage clean out .
Loved the explanation of spinal alignment and nerve function. It matches what I learned here: Chiropractor in Thousand Oaks
Canoga Park homes see dusty returns; a furnace tune-up Canoga Park cleaning keeps ducts and components performing better. furnace tuneup Canoga Park
J’ai même eu quelques idées récemment ; imaginez rassembler divers talents sous un même toit pour célébrer ensemble ce bel univers viticole !! caisse en bois pour bouteilles
Our local charity drive would not have achieved success without the assistance of ### anyKeyword ###! portable toilet rental
Loved this article on modern haircut trends! If anyone’s looking for a talented stylist who truly listens, check out Hair Salon for amazing transformations and personalized care.
Clear tips. Ask your Montgomery IN roofing contractor about ice/water coverage at eaves and valleys. Roofing Contractor Montgomery IN
Your board game cafe guidelines were good sized. I came across league nights thru understanding search intent seo san jose .
Thanks for the helpful advice. Discover more at Gutter replacement Limerick .
For anyone new to the area, schedule a fall tune-up before the first cold front. furnace repair Canoga Park helped us avoid emergency calls and kept our utility bills predictable. furnace repair Canoga Park
Your reminder to inspect washing machine hoses is gold. Water Damage Restoration Mesa AZ handled the leak aftermath. https://www.google.co.in/search?q=Bloque+Restoration&ludocid=2172986856869809528&lsig=AB86z5UZJgpZDseEDO-QSx-QOFMw
Big occasions need proper preparation; do not forget to include bathroom facilities from ### anyKeyword ### on your checklist! portable toilet rental
I had no idea how important on-page SEO was until I started using SEO Expert San Jose CA for my website.
Les caisses en bois ajoutent un côté chaleureux à mon intérieur. caisse vin pas cher
Je suis fan des idées DIY avec des caisses en bois pour le vin, il y a tant de possibilités créatives ! caisse bois 6 bouteilles
Your article has made me feel more confident about my upcoming roofing project! Best Roofers in Surrey
Excellent overview on soffit issues. A Bismarck ND Roofing Company can fix ventilation and prevent mold. Teamwork Exteriors in Bismarck ND
Anyone understand if portable toilet rental offers environmentally friendly options? I’m planning an event in Riverside.
“Each story shared by Webjuice emphasizes unique challenges and solutions in the realm of local SEO—a must-read for any marketer! More insights here: Digital marketing for local businesses !”
The emphasis on UV upkeep for scars is so priceless. I realized timelines on plastic surgeon seattle .
Love these suggestions! For quality roofing work, check out Roofing warranty Ireland .
My friend recommended an excellent ### Woodland Hills kitchen Remodeling
Great tips on carpet maintenance! I always recommend regular cleaning for a healthier home. Check out carpet cleaning lake of the ozarks for more info!
Stronger empty states that show customers are a trend I guide. We redesigned empty states on Arkido solutions with actionable guidance.
Had a great experience with the professionals at ### anyKeyWord### when fixing my damaged roof. Roof installation Cork
Can anyone share their success stories after starting treatment with a Tacoma chiropractor via tips from Car accident chiropractor #?
A properly-established mindset to know-how Brisbane’s neighborhood search dynamics is laid out right here! Additional materials are obtainable at brisbane seo .
If you’re dealing with a rat infestation, it’s crucial to address it quickly to prevent health risks and property damage. Effective rat removal techniques can make a significant difference in maintaining a safe and clean environment Best pest control
I appreciate your thorough examination of customer feedback’s impact on Google Maps rankings—it’s crucial to engage actively with clients, which I’ll be elaborating upon further at SEO for websites !
Is chiropractic care safe during pregnancy? I’ve been thinking about visiting a ##Puyallup Chiropractor##. Chiropractor in Graham
Thanks for the helpful advice. Discover more at dietas personalizadas .
Thanks for the great tips. Discover more at control de medicación a domicilio .
Well explained. Discover more at EPIs y seguridad laboral .
Just had a astonishing journey with Indoor Climate Experts! They not in simple terms constant my HVAC subject matters however additionally proficient me on how to safeguard more suitable indoor air quality Air Conditioner Repair
Natural-looking results across different skin types require tailored techniques—feather strokes for normal/dry, combo/ombré for oily. See comparisons at permanent makeup Mississauga ON. tattoo eyebrows near me
Frozen pipes? Central Plumbing Heating & Air Conditioning thawed and insulated ours without a mess. Prevent major damage this winter—schedule preventive service through heating service near me .
Super helpful tips on what to know before booking. Patch tests and aftercare instructions are a must. I compared policies and prep guides at microblading Mississauga ON before scheduling. microblading eyebrows Mississauga
Navigating legal jargon can be tough; that’s why hiring a good #Any Keyword# is so essential after an accident! Florida Workers Compensation
Noisy furnace on startup? Central Plumbing Heating & Air Conditioning adjusted gas pressure and verified manifold settings. Smooth ignition now. Contact water heater service near me .
Great callout on gap insurance for new cars. My insurance agency added it at purchase State Farm Insurance Agent .
My child learned proper tongue brushing at New York pediatric dentist —fresh breath improved quickly.
Recovery from a work injury can be lengthy, but support from colleagues and friends makes it easier! Work Injury Lawyer
1. Look, I love how EdTech promises to revolutionize learning, but here’s the thing: after 15 years in the trenches, I’ve seen how too many features on these platforms actually distract students more than help them get more info
Terrific customer service from the group at porta potties near me ! They made whatever so simple!
Hey there! I can totally relate to what you’re saying about packaging. I recently revamped my packaging for my handmade candles, and honestly, it’s been a game-changer Click for info
These tips on negotiating renewals worked for me—I used market quotes from insurance agency near me .
Ah, garden design – it’s a right old mix of frustration and triumph, isn’t it? One of the biggest challenges I’ve faced is working with that unpredictable weather we all love to moan about https://wiki-byte.win/index.php/Is_Forgetting_Drainage_Holes_in_Pots_Holding_You_Back%3F
Workers’ compensation laws can be complex, but they are essential for safeguarding workers’ rights. Check out more at Florida Workers Compensation Lawyer .
Horseback riding in the US is a transformative experience that goes well beyond just the ride itself Have a peek at this website
1. Oh man, this “23.54 per 1,000” crash rate stat really hits close to home. I’ve been driving my Tesla for a couple years now and, honestly, I’ve seen some sketchy moments—I think this article might be onto something Learn more here
Final color is affected by undertone, pigment brand, needle configuration, and your skincare (like retinoids). Great deep dive here: ombre brows Mississauga ON powder brows near me
Wow, this article seriously got me inspired! I’ve always stuck to classic ingredients, but the idea of using yuzu in my next batch of muffins sounds incredible—such a fresh twist! I’ve never baked with yuzu before, so I can’t wait to experiment https://juliet-wiki.win/index.php/Why_Is_My_Yuzu_Curd_Not_Setting%3F_Troubleshooting_the_Common_Fruit_Curd_Problems
Wonderful pointers on picking a car body store! I always seek licensed professionals and life time paint guarantees. auto body shop has been strong for transparent quotes and quality job.
Improving aesthetic clinic operations and patient care in the US hinges on one core principle: measurable impact https://wiki-velo.win/index.php/Microscheduling_for_Aesthetic_Treatments:_Optimizing_the_Medspa_Patient_Journey
1. Oh man, I totally get the struggle with Macs acting up. I’m a small business owner, and last year my MacBook just stopped turning on. Tried to fix it myself — big mistake! Ended up making things worse by accidentally damaging the logic board Click for more info
Totally agree with the point that community often outweighs the thrill of just winning in social gaming Fortnite community forums
This was a fantastic read. Check out Web Marketing and Designs Woodstock Website Designs for more.
Paraphrasing tools in the US market are a mixed bag, honestly. On one hand, they can be lifesavers when you need to quickly rework boilerplate text or avoid plagiarism creative writing paraphrasing methods
Your advice to avoid self-medicating is wise. I got proper guidance from a provider on Aurora Colorado pain management doctor .
Wow, the remodeling stories shared here are inspiring! I’d love to share mine too once it’s done. Check out Kitchen Remodeling Los Angeles !
What conditions can be treated with regenerative medicine? I’m eager for information from Pain Management Doctor For Chronic Pain !
Your tips on choosing a roofing contractor are invaluable! I’ll definitely look into Roofing Contractors Illinois for my needs.
I appreciate how you’ve broken down the steps of the restoration process—it’s very helpful! Property Damage Restoration
Searching for trusted SEO professionals in SF? Look no further than the recommendations found at Local SEO San Francisco CA !
If you want clarity in your will or trust documents, get help from someone at probate attorney orange county
Great article on septic systems! For pumping, I’ve had excellent results with septic pumping service san dimas .
If you’re looking for reliable services, a San Diego general contractor can make all the difference! Check out General Contractor San Diego CA for more info.
The cost of roof installation can vary so much. Glad to see you address that! Southfield residents can find great deals at Roof installation Southfield MI .
Offrir une bouteille de vin dans une jolie caisse en bois, c’est toujours un succès assuré ! caisse en bois pour bouteilles
“Would love to hear from others who have used limousine services during their stay!” limo rental rates in St Louis
Just had a few outstanding plumbing paintings finished—very completely happy with each and every edge in their carrier! Explore more at Plumber Norwich !
Thanks to ## roof repair work Basingstoke ##, my dripping roof is repaired and looking fantastic once again! Fantastic service! Roofers Basingstoke
Les détails minutieux sur certaines caisses rendent chaque pièce unique et spéciale à mes yeux! bois de chêne caisse vin
“I recently attended a workshop on the benefits of transitioning to renewable energy sources like commercial solar!” best solar battery storage system
If you’re new, start with one area; botox near me has a beginner plan.
#SEO can be tricky—but with experts like SEO Company Seattle CA #in Seattle, it’s easier than ever!
It’s fascinating how local laws shape what can be built; Los Angeles home builders really have to be adaptable! Los angeles home builder
Discovering new methods allows us opportunities previously unseen—it’s worth exploring everything shared here through ### any KeyWord#$%! Orange County Botox Injections
Thanks once again highlighting function played holding transparency duty actions selections made aligning values ideas upheld perpetually all over enterprise beginning credibility trustworthiness attracting trustworthy unswerving fans patrons alike keen seo brisbane
For migraine relief, Botox can be a game-changer; I discovered clinical info on Warren MI botox .
Les caisses en bois sont non seulement belles mais aussi très fonctionnelles ! coffret vin bois
Thanks for highlighting the importance of regular inspections; it’s vital that I communicate this need with my upcoming contractor!! # # any Keyword # # deck company
Props to ### anyKeyword ###– the units were provided on time and established perfectly! porta potty rental
Thanks for the clear breakdown. More info at Redefined Restoration – Chicago Water Damage Service .
This article was helpful! I’m considering hiring a roofing company in Garfield, NJ. experienced roofing contractor nearby
Helpful suggestions! For more, visit Majewski Plumbing .
Cool post, thank you for keeping it concise. A deeper dive gets on SEO Services .
For HOA-compliant lock standards, locksmith durham , experienced locksmiths Durham, guided us smoothly.
I not too long ago had my HVAC gadget serviced with the aid of Indoor Climate Experts, and I can’t suppose the change it made! The air first-rate in my house has extended notably. Highly advise their companies! Check out extra at AC Repair Near Me .
This was beautifully organized. Discover more at powiększanie ust .
I enjoyed this read. For more, visit dietas personalizadas .
Thanks for the useful post. More like this at water heater services near me .
Appreciate the detailed insights. For more, visit acompañamiento a personas mayores .
I love how user-friendly the site is at ## portable toilet rental near me
Appreciate the detailed information. For more, visit moving companies in santa cruz .
This was beautifully organized. Discover more at bricolaje y DIY .
Your insurance of San Pedro Square occasions turned into spot on. I double-payment dates with natural language content optimization san jose .
This was quite informative. For more, visit garage clean out .
Social media privateness settings depend more than laborers consider. I published step-with the aid of-step publications on local it support near me .
Are there pediatric chiropractors in Tacoma? Interested in hearing more details from Tacoma car accident chiropractor on this topic.
Nicely detailed. Discover more at bay area car wraps .
Don’t ignore rising gas bills—Central Plumbing Heating & Air Conditioning identified my leaking ductwork. Start with heating service near me for a full heating system inspection.
Color blocking with art is fun. I tied my cushions and a canvas from painters chicago in the same hue family.
“What’s your favorite type of curry? Mine has to be from this awesome place here: find indian food spokane !”
“What factors influence the cost of roof replacement?” Founders Roofing & Construction in Frisco TX
Furnace cabinet vibrations solved: Central Plumbing Heating & Air Conditioning leveled the unit and installed isolation pads. Quiet operation. Book through water heater service .
I’ve recently had a huge problem with pests in my home, and I didn’t know where to turn Puyallup Pest Control
My experience with chiropractic treatment from a ##Puyallup Chiropractor## has been life-changing! Best Graham Chiropractor
This is highly informative. Check out local moving company for more.
Do not neglect corrosion prevention after repair work, particularly in wintertime environments. san jose auto body repair utilized appropriate seam sealers and tooth cavity wax on my rocker panel.
Appreciate the thorough insights. For more, visit Woodstock Digital Marketing .
Gặp trang web yêu cầu nạp tiền hoặc cung cấp OTP là dấu hiệu đáng ngờ. Mình đã đọc cảnh báo chi tiết tại SC88 buôn người và thấy rất hữu ích.
Mọi người cẩn thận website giả mạo đang lan tràn, hãy kiểm tra nguồn trước khi nhấp vào liên kết. Tham khảo thêm tại SC88 tội phạm tình dục để biết cách nhận diện dấu hiệu lừa đảo.
I have actually used other business before but none compare to #shrt _ cdK # when it concerns portable toilet rentals in Pasadena. porta potty rental
I would like to hear more about the environmentally friendly alternatives from porta potty rental . Sustainability matters!
Really helpful breakdown of roofing materials. We chose architectural shingles with sentiment analysis in customer feedback painting and couldn’t be happier.
Our local presence boosted significantly with Jason Suli Digital Marketing. Link: seo agency brisbane .
Great coverage of inland marine for equipment. Learned the difference on insurance agency near me .
I like how you explained ACV vs replacement cost. My insurance agency showed me side-by-side quotes insurance agency near me .
Tout ceci démontre bien qu’un simple contenant peut raconter tant d’histoires diverses – quelle beauté incroyable… coffret cadeau vin
I used plastic surgeon seattle The Seattle Facial Plastic Surgery Center to evaluate otoplasty recommendations until now my session.
The shift toward motion-minimalism is remarkable. Subtle micro-interactions think extra mature now. We’re trying out similar rules on Web Design Bangalore .
Great point about funding a revocable trust. For anyone unsure where to start, Trust Planning breaks down the process in plain language.
Love the focus on preventative care. New York NY pediatric dentist gave us a simple brushing and diet plan that works.
Je rêve d’avoir une cave à vins remplie de belles bouteilles dans leurs propres caissettes! impression logo caisse bois
Your recommendation on tack cloths is gold. I simply all started making use of them after analyzing precision finish location and my finishes accelerated immediately.
La beauté réside souvent dans les plus petits détails; un simple contenant peut faire toute la différence lors d’un événement spécial! # # anyKeyWord# # caisse en bois pour bouteilles
Vos articles incitent réellement à oser explorer davantage ce milieu fascinant ; continuons tous ensemble cette aventure !! https://www.empowher.com/user/4720642
Helpful tips for storm season. Reliable response in Montgomery IN: EnglishRoofing Contractor Montgomery IN Triple W Roofing LLC
Ethical AI in HR—chance list and guardrails: best hr agency .
Thanks for the useful suggestions. Discover more at best solar services .
Before buying our home, we did a sewer scope with sewer repair and avoided a costly surprise.
The moisture meter tip is smart. Water Damage Restoration Mesa AZ uses advanced detection tools. Water damage restoration Mesa AZ
The outdoor AV setup on that deck is slick. For wire concealment, deck builder planned it perfectly.
I appreciate the emphasis on local expertise. Bismarck ND roofers know how to handle freeze-thaw cycles. Teamwork Exteriors in Bismarck ND
Wow, I had no idea about the impact of hard water on plumbing systems! Your insights are invaluable. Learn more at plumber melbourne .
Wonderful article– this is a keeper. I created a fast recommendation at local web designer in Quincy MA .
I appreciate the focus on non-opioid strategies. Found a clinic through pain management doctor Colorado and it’s been a game changer.
Very helpful read. For similar content, visit water damage restoration services .
I definitely like how jewelry can transform a whole attire! It’s incredible how a basic piece can include so much sophistication and character buy gold near me
Love how comprehensive this article is regarding SEO practices—San Jose companies could greatly benefit from collaborating with ### anyKeyword ### SEO Marketing San Jose CA
Just got my hands on the current flagship phone, and I can’t believe all the features it has! If you remain in the marketplace for a brand-new gadget, don’t forget to explore what free phones needs to use!
Let’s hear it for all the dedicated tradespeople making our lives easier—especially the plumbers of O’Fallon, IL! Plumber in O’Fallon IL
Just had a great adventure with Indoor Climate Experts! They not most effective mounted my HVAC things however additionally expert me on easy methods to protect more desirable indoor air great AC Repair Near Me
Martial arts not only enhance physical fitness yet likewise impart technique and emphasis in experts. It’s remarkable to see how different styles, from karate to jiu-jitsu, offer distinct advantages Denver TaeKwonDo kids
I appreciated this post. Check out best hydro jetting services for more.
It’s heartening to see how technology bridges gaps in mental healthcare access throughout Florida, particularly here at home! secure online consultation
Wonderful tips! Find more at lipoliza .
Thanks for the informative post. More at opiniones de nutrióloga Saltillo .
Remote desktop exposure is unsafe—gateway it or ditch it. Safer picks on it managed service provider .
This was very beneficial. For more, visit tornillería y fijaciones .
Appreciate the detailed information. For more, visit estimulación cognitiva mayores .
Photos under consistent lighting helped track results—tip from botox near me .
Our church event went smoothly thanks to ### anykeyword ### offering high-grade porta potties close by! porta potty rental
Appreciate the insightful article. Find more at chimney repair near me .
The cleanliness of the porta potties from portable toilet rental exceeded my expectations! Extremely advise their service.
Vocational rehabilitation is often overlooked. Vancouver employers and employees can find OT guidance at ot vancouver .
Thanks for the entire assist! I keep coming across greater San Jose socials by using seo services san jose .
From website audits to connect outreach, they manage every little thing. See brisbane seo .
From big festivals to small events, I trust just porta potty rental near me for all my portable restroom needs.
Medicaid and long-term care planning can get complicated. I found practical, local guidance from a Thousand Oaks trust attorney here: Trust Planning Attorney
1. Hey, great breakdown on the slot volatility stuff! I’ve mostly stuck to low volatility games but never really thought about mixing it up https://star-wiki.win/index.php/What_I_Learned_About_Wild_Symbols,_Chasing_Losses,_and_How_to_Gamble_Smarter
Excellent tips on choosing a car body store! I constantly try to find certified technicians and life time repaint guarantees. auto body repair has actually been strong for transparent price quotes and top quality job.
Flying with CBD or THC gummies in the U.S. is a tightrope walk, and I say this from experience. First off, know that federally, CBD derived from hemp (under 0 https://wiki-wire.win/index.php/When_a_Weekend_Trip_Became_a_Security_Nightmare:_Alex%27s_Story
A great Woodland Hills kitchen Remodeling really understands your vision for your home.
Uneven rooms? Central Plumbing Heating & Air Conditioning added dampers and recalibrated airflow. Book through heating service near me for duct balancing.
Look, as a fellow Canadian player, I gotta say: always double-check those wagering requirements before diving in. I once grabbed a 50x bonus thinking it was a sweet deal, but it ended up feeling like a trap Visit the website
Interesting to see craft beer and delta-8 intersecting more these days. Both tap into a similar consumer mindset: folks wanting something artisanal, experiential, and a bit off the beaten path https://wiki-tonic.win/index.php/How_a_2003_Juice_Bar_Chain_Evolved_into_a_2025_Wellness_Beverage_Powerhouse
Cold spots near windows? Central Plumbing Heating & Air Conditioning optimized return airflow—schedule at emergency water heater service .
1) Frustrated Player:
Look, I’ve been trying to play on local Nigerian casino sites but it’s so annoying that none of them offer Interac or crypto options. It’s 2024, and it feels like we’re stuck in the past with all these outdated payment methods FinTech companies in Nigeria
Hey folks, just stumbled on CasinoDays and was wondering if anyone here from Ontario has tried it? I’ve heard mixed things about picking online casinos that are legit, especially with all the new rules here read more
Navigating the legality and risks of offshore trusts in the US is like steering through a minefield while charting a course across treacherous waters Click for more info
When you’re mixing casino tech, WordPress, and site security—especially in the US market—you’re juggling three complex beasts. Casino platforms often demand intense real-time data processing to handle bets, odds, and user actions without lag https://super-wiki.win/index.php/How_a_Niche_Casino_Affiliate_Tripled_Organic_Revenue_After_Moving_to_WordPress
This was a great help. Check out painters for more.
C’est génial d’utiliser des caisses en bois pour des événements comme des mariages ou des anniversaires. coffret vin bois
I’ve recently had a huge problem with pests in my home, and I didn’t know where to turn Pest Control Puyallup
Articulating concrete evidence supporting claims made regarding advantages derived from being featured prominently within search engine results stemming as direct result stemming from efforts devoted towards improving local presence through targeting local search engine optimization
My posture has improved dramatically since I started seeing a ##Puyallup Chiropractor## regularly! Chiropractor in Graham
Les caisses bois vin sont parfaites pour créer un coin lecture cosy chez soi ! caisse à vin personnalisée
Thanks for the detailed post. Find more at kitchen remodeling New Braunfels TX .
Helpful read! I recommend How Much Does Roofing Cost Waterloo for BEST HVAC SERVICE and attic optimization. Honest advice, no upsell—just results.
Je suis toujours à la recherche de nouvelles idées pour utiliser des caisses en bois, merci ! https://www.hometalk.com/member/203217130/beulah1668649
Ah ça y est; je vais enfin me lancer dans la création personnelle après toutes ces inspirations vues ici; merci infiniment! # # anyKeyWord# # caisse à vin personnalisée
Great rationalization of feather sanding patches. I use the identical steps from affordable licensed painters in my area to store partitions indistinguishable.
Crafting a triumphing careers page—tick list at hr consulting firms .
I appreciated this article. For more, visit junk removal business .
Fire safety measures should be part of every home inspection—this article makes a compelling case for that! Biohazard Clean Up
Can you provide examples of common gutter materials and their pros and cons? That would be super helpful! Gutter system installation Clare
What an informative read! Finding local roofers can be daunting, but I trust Roofing Services In Illinois now.
Indoor Climate Experts quite notice the value of retaining a comfy indoor ambiance. Their understanding in HVAC platforms is unmatched! I located their web page very priceless for advice and offerings: HVAC Contractor .
Appreciate the helpful advice. For more, visit exterior painting services .
I’ve been researching regenerative therapies, and I’m impressed by what I found from Regenerative Medicine Doctor !
I liked your transparent cost talk. Negotiation and loyalty programs explained at botox Greensboro .
I appreciate the breakdown of Webjuice’s keyword targeting strategies. Very informative! Webjuice SEO services
Trendy article, thank you! I’ve been checking this and shared outcomes at Web Design Agency near me .
Great insights! Discover more at stymulatory tkankowe .
)“Eagerly looking forward realizing aspirations nurtured collectively guiding each step taken throughout collaborative processes undertaken together!!!!###任何关键词###” composite deck builder
For anyone in Surrey facing roofing issues, I wholeheartedly recommend Roof Replacement Surrey for their fast response times.
Great primer on net app headers. I shared a at ease defaults record on it support companies .
Local PR and virtual outreach from machine learning seo strategies san jose are element of legit website positioning facilities San Jose that earn hyperlinks.
Weekend farmers markets in San Jose, CA were all on 24 hour plumbing repair near me .
A well-thought-out design makes all the difference; thank you for emphasizing that throughout your article—discover thoughtful designs at Custom Kitchen Cabinet Makers In Los Angeles !
Anyone else think that having access to good electricians is essential for peace of mind as a homeowner? Electrician in Phoenix AZ
Thanks for the detailed post. Find more at nutrióloga a domicilio Saltillo .
Just ordered takeout from celebrate indian cuisine spokane , and it was still hot and flavorful when I got home!
Great vibes generated throughout interactions shared reflect positively back onto each participant engaged therein!!! # SEO Agency San Francisco CA
I had a roof claim denied. The appeal template on Independent insurance adjuster turned it around.
Their material optimization brought in certified traffic. See seo expert brisbane .
I love supporting local businesses like this one—they truly deserve all their accolades!! # # anyKeyWord ## Roofing warranty Ireland
Searching for porta potty rentals near Pasadena? Believe me, you will not be sorry for picking porta potties near me .
This is highly informative. Check out alopecia femenina Albacete for more.
This was highly educational. For more, visit alopecia Jaén .
In San Antonio, local knowledge helps: venue tendencies, medical provider networks, and insurer practices. A San Antonio attorney for personal injuries can leverage that to your advantage. lawyer for personal injuries
I found a reliable local attorney through orange county trust administration lawyer —so glad I used their services!
My neighbor recently had a pipe burst under their kitchen floor—total nightmare! They called Spartan Plumbing Services and got it fixed fast. Anyone else experience something similar here in Tacoma? emergency plumbing in tacoma
With many choices available, I always select ### anyKeyword ### for all my porta potty rental requirements in Santa Ana! porta potty rental
Appreciate the detailed information. For more, visit cuidador por horas Santiago .
This was very well put together. Discover more at catálogo ferretería .
Probate can be overwhelming for families. Having a knowledgeable guide from Trust Planning can make administration smoother and minimize delays.
Motivation and accountability are key. Community-centered assist as a result of drug treatment scottsdale can avoid worker’s on target.
Just had a fantastic experience with my recent pumping service from hvac services san dimas !
The quality of work from my San Diego general contractor was outstanding! Learn more at siding services San Diego .
Such insightful content resonates deeply resonates deeply hearts minds souls igniting flames burning brightly warming spirits revitalizing hopes dreams aspirations unite individuals families striving make world better place collectively st Metal roof installation Southfield MI
It’s so refreshing to learn about reputable services like %% anykeyword %%—great find! Roof inspection Cork
The visual charts at pediatric dentist New York helped my child understand sugar’s effect on teeth.
Cold basement? Central Plumbing Heating & Air Conditioning installed a dedicated zone with dampers. Controlled comfort. Explore at heating service .
Just had a microdermabrasion session at a great spot called Men’s Waxing Services Las Vegas —so worth it!
Substantial shoutout to ## roofing replacement Basingstoke ## for their outstanding service! My house feels so much more secure now. roofing near me
So blissful with the prompt response from the plumbing staff—it made your complete change! Visit Plumber Norwich for positive insights.
Heat pump noisy outside? Central Plumbing Heating & Air Conditioning replaced my fan blade and motor—start at boiler repair .
Learning about pelvic floor therapy here was eye-opening. I found a referral through pain management doctor Aurora .
In Southern California, every business should explore the benefits of going solar! commercial solar in southern california
If you’re unsure of your next steps after separation, visit small business lawyer maryland for insightful tips from experienced family lawyers in Maryland.
Great insights! Find more at strony internetowe bydgoszcz .
For any individual considering paintless dent repair work vs. conventional techniques, seek advice from a professional very first. auto body shop assessed my hailstorm damage and conserved panels with PDR where possible.
Working with SEO Company Seattle CA has been one of the best decisions for my online marketing strategy.
I’ve been looking for a reliable place to top up my MLBB account. Heard great things about mlbb recharge online !
I’m impressed by how many innovative features go into contemporary homes being constructed around greater L.A.! # # anyKeyWord ## los angeles general contractor
Thanks for addressing ethnic rhinoplasty concerns. The Seattle Facial Plastic Surgery Center had examples that helped me determine.
I’m curious about the latest advancements in tissue engineering in Orange County; check out Ketamine Infusion Therapy orange county for updates!
The guide on avoiding “overfilled” looks by mixing Botox and filler smartly is on Warren botox .
Avoid HVAC breakdowns during heatwaves — Central offers priority membership plans. Join at emergency plumber in southampton .
HR reporting made effortless—unfastened record templates: human resource consulting services .
Our thermostat battery died and system failed at night—Central Plumbing Heating & Air Conditioning taught us failsafes and installed hardwired power. Smart move via water heater service .
Appreciate the insightful article. Find more at santa cruz moving companies .
Great message! Your ideas are very easy to apply. I composed a follow-up below: affordable top web designers Quincy .
Ready for reliable warmth? Central Plumbing Heating & Air Conditioning delivers expert heating repair and maintenance—book now at heating service near me .
The emphasis on actual content in skeleton states is sensible. We carried out content-acutely aware loaders on Arkido web design agency .
Detox is simply the start out. Full-spectrum rehab programs on rehab scottsdale az construct lasting recovery habits.
I found this very helpful. For additional info, visit sams signs vehicle wraps .
Même sans le contenu, ces belles boîtes peuvent embellir n’importe quel espace; c’est incroyable comment cela fonctionne si bien ensemble! # # anyKeyWord ## caisse à vin personnalisée
Orlando DIYers: do away with demo particles with no trouble by using booking a residential dumpster with waste solutions providers in Orlando .
This was a great article. Check out Excavating contractor for more.
Phishing campaigns are getting incredibly sophisticated. Training users to spot domain spoofing and QR-code scams can reduce risk. I shared a quick awareness toolkit on IT solutions by managed service providers .
I have actually utilized several porta potty companies, however none compare to porta potty rental near Riverside!
Enfin bref je tenais juste exprimer combien j’apprécie votre travail ; j’espère sincèrement qu’il dure longtemps encore devant nous tous !!! caisse à vin personnalisée
A roofing contractor in Montgomery IN helped us plan around family schedules—very considerate. google.com
Indoor Climate Experts somewhat apprehend the significance of maintaining a comfortable indoor ecosystem. Their understanding in HVAC structures is unmatched! I discovered their web page very necessary for counsel and prone: AC Repair .
Blended families need tailored strategies. An estate planning attorney can ensure everyone is protected; I found Trust Planning Lawyer really helpful for this.
1. Love the breakdown of the RTP rates here! I’ve always been curious about how much that really affects my chances. Between you and me, I usually just pick whatever looks fun, but maybe focusing on higher RTP slots could help me win a bit more slot volatility and payout potential
If positions matter to you, check out seo services brisbane for Jason Suli Digital Advertising.
Même si je ne suis pas un expert, j’apprécie chaque moment passé autour d’un bon verre; merci aux belles présentations! # # anyKeyWord# # caisse à vin personnalisée
That rooftop deck guide is gold. For structural assessments, contact custom deck builder .
Rolling Suds Power Washing Naples Ft Myers made my windows sparkle like never before!
I highly recommend Rolling Suds Power Washing Naples Ft Myers for all your window washing needs Ft Myers exterior cleaning services
After reading this article, I am confident that nlp for painting service personalization carlsbad is the right choice for my roofing needs in Carlsbad. Thank you for providing such valuable information!
Ah ça y est; je vais enfin me lancer dans la création personnelle après toutes ces inspirations vues ici; merci infiniment! # # anyKeyWord# # coffret vin bois
Flying with CBD gummies in the US always makes me nervous, even though the 2018 Farm Bill technically protects hemp-derived CBD under 0.3% THC https://rafaelkral857.raidersfanteamshop.com/flying-between-california-and-colorado-with-cbd-gummies-do-you-have-to-keep-them-in-the-original-bottle
Color temperature matters—cool blues calm a space. I picked cool-toned art from painters chicago for my study.
Thanks for the advice on keeping kids away. Water Damage Restoration Mesa AZ secured the site professionally. Water damage restoration Mesa AZ
Thanks for the informative post. More at movers aptos .
Storm chasers can be risky. Choose a local Roofing Company in Bismarck ND with a strong reputation. bismarck roofing contractors
Valuable information! Discover more at local moving company .
1) Honestly, I’ve been playing on Stake for a few months now and what I really love is how lightning-fast the crypto withdrawals are. Living in Canada, it’s usually a hassle with other sites waiting days to get cash out, but Stake has been a breeze https://waylonutgv103.lowescouponn.com/is-a-celebrity-endorsement-enough-decide-if-a-drake-backed-casino-matches-your-goals-in-14-days
Redirect strategy is crucial during migrations. SEO Company handled mapping and validation so we retained equity.
I liked this article. For additional info, visit stymulatory tkankowe .
1. Okay, so what’s the deal with Ontario casinos and their bonuses? I’ve been playing on sites from BC and Quebec, and honestly, they throw out way better promos and welcome bonuses. Here in Ontario, it’s like they’re super strict or something https://remingtonzejm921.fotosdefrases.com/how-ontario-s-1-3b-sports-betting-market-shifted-overnight-in-april-2022
Thanks for the clear breakdown. More info at ARHT Home Solutions .
Great information on disposing diseased wood properly. We followed protocols from tree removal .
Do you have any success stories about pregnant women seeing chiropractors in Tacoma? Would love insights from Car accident chiropractor !
Navigating the legality and risks of offshore trusts in the US is like charting a course through foggy, shark-infested waters—you must proceed with absolute clarity and a well-calibrated compass https://telegra.ph/How-High-Net-Worth-Individuals-Can-Protect-Wealth-from-Unforeseen-Risks-Without-Breaking-the-Law-11-25
1) Hey, I’ve been messing around with a few local Nigerian casino sites, and honestly, why is it so hard to find options like Interac or even crypto payments here? It feels like we’re stuck in the past while other places are moving forward Look at this website
Conversational filters for product discovery are beneficial. We incorporated usual language filters on Web Design Bangalore .
Look, I’m all for bonuses, but let’s be honest—those wagering requirements can kill the fun. I once got stuck with a 50x playthrough on a supposedly great bonus and barely made a dent in my winnings https://deanmogj202.cavandoragh.org/why-free-spins-and-200-free-ads-aren-t-free-money-for-new-casino-players-in-canada
1. Hey folks, I’ve been hearing a lot about CasinoDays lately, but I’m still on the fence about trying it out iGaming affiliate Canada
It’s fascinating to see the parallels between the rise of craft beer and the emerging delta-8 market in the US. Both tap into a desire for something beyond the mainstream—consumers craving unique, artisanal experiences rather than mass-produced products San Diego wellness
Is chiropractic care safe during pregnancy? I’ve been thinking about visiting a ##Puyallup Chiropractor##. Chiropractor in Graham
I recently had a pest issue in my home, and I was amazed by how effective the Puyallup Exterminator service was! They identified the problem quickly and implemented a comprehensive plan to eliminate the pests Best pest control
Helpful strategies for triumphing featured snippets. I formatted lists dependent on preparation from seo solutions san jose .
The transformation stories you shared are incredible motivation for anyone looking to remodel their kitchen—check out more at Kitchen Remodeling Services In Los Angeles !
Just left the phone with], but I’m switching over to] after hearing good ideas about] Thanks,] portable toilet rental
Great to see discussions on casino tech and WordPress security getting attention—these topics often live in separate silos but overlap way more than folks realize casino online user experience
The team at porta potty rental # went above and beyond to meet our requirements during our event!
Appreciate the great suggestions. For more, visit nutricionista en Saltillo .
Thanks for the great content. More at plasma rico en plaquetas capilar .
This was very enlightening. More at ferretería Albacete .
Great tips! For more, visit contratar cuidadora en Santiago .
Thanks for the clear breakdown. More info at prp capilar Jaén .
Simply complete my do it yourself outside deck job, and it was so fulfilling! If anyone is trying to find guidance, take a look at the resources at windows replacement .
Great discussion on key rotation. I shared automation scripts on it support for small business .
Yard decks can really change your outside location into a relaxing oasis. I have actually been thinking of including one to my home, and I found some fantastic resources on deck materials and designs at deck builders . Certainly worth a visit!
The “frozen face” myth was holding me back. Natural outcomes discussed on botox Greensboro reassured me.
Cognitive-behavioral medicine works. Many alcohol rehab facilities on virtual co-occurring disorders treatment specialise in CBT.
Exposure plus support made progress sustainable. Resource: action therapy winnipeg .
A supportive workplace culture that prioritizes safety can significantly reduce the number of work injuries reported each year! Work Injury
Old oil boiler? Central Plumbing Heating & Air Conditioning converted us to gas with high-efficiency condensing equipment. Bills dropped massively. Info at heating service company .
This was nicely structured. Discover more at junk hauling .
I appreciate the reminder about durable powers of attorney. For readers looking to take action, Trust Planning Attorney offers practical next steps.
Great message, thanks! I shared a study that complements this on Web Design Agency near me .
The depreciation/RCV explanation changed into take hold of. BSA Claims has a calculator that clarified it.
Bước vào thế giới cá cược đầy màu sắc cùng với ### anyKeyWord### nào mọi người ơi! mmlive
I found this article very helpful! Businesses in San Jose should definitely think about partnering with an agency like SEO Company San Jose CA .
Don’t risk DIY gas work. Central Plumbing Heating & Air Conditioning safely re-piped our gas line with proper pressure testing. Book pros via boiler repair company .
Detailing after bodywork makes a distinction. auto body repair returned my car totally cleaned up, with overspray checks and a sleek finish.
Threat hunting can discover stealthy staying power. Start with hypotheses round overall TTPs. I posted hunting queries and counsel on expert cybersecurity service providers .
My injector avoided the “Spock brow” thanks to mapping tips I found on botox MI .
For healthcare practices, improving google rankings seo san jose presents solid web optimization products and services San Jose with compliance in mind.
Constant growth month over month with their search engine optimization strategy. See seo brisbane for Jason Suli Digital Marketing.
Great advice on content pruning. SEO Agency removed dead pages and our crawl budget is finally efficient.
Keep allergies at bay: Central’s HVAC pros install HEPA filters, UV lights, and air purification. Breathe better via emergency plumber in southampton .
Just had a fantastic meal at an Indian restaurant! More details on my experience at indian buffet choices spokane .
Great insights! Discover more at anti-aging .
La finition des caisses en bois que vous proposez est vraiment incroyable ! caisse en bois pour bouteilles
I used to be struggling with temperature inconsistencies in my home unless I which is called Indoor Climate Experts. They supplied preferrred advice and provider AC Repair Near Me
Really useful for first-time buyers. I started with State Farm Insurance Agent to understand options.
Your insights on deck design are fantastic! Can’t wait to find the perfect contractor. deck contractor
Just wanted to share how happy I am with the service from Summit Services—they’re definitely the best electrician near me in Bluffton! electrician
Superb list of SEO tools. Socail Cali of Rocklin | MARKETING AGENCY manages end-to-end SEO— affordable best digital marketing agencies .
After an accident and not sure who to call? Start with medical care, document the scene, and then reach out to an attorney for personal injuries to preserve evidence and prevent insurance mistakes. personal accident lawyer
The comforting language at New York NY pediatric dentist —like “sleepy juice” for anesthetic—reduced fear.
Great job! Find more at water damage cleanup services .
Need a porta potty for your next event in Pasadena? Look no more than porta potties near me ; they made everything easy!
Results look most natural when paired with sunscreen and hydration—see Warren MI botox .
Had a last-minute need for porta potties, and portable toilet rental came through like champs!
Great tips! For more, visit Redefined Restoration – Chicago Water Damage Service .
Orlando transform tip: line the driveway— eco-conscious dumpster rental Orlando awarded boards for preservation.
Building a discovering culture? Start with these microlearning rules: payroll services .
This helped me advocate for myself. I found a supportive pain management doctor using Aurora pain management doctor .
Hearing success stories from other homeowners encourages me to start searching for qualified ### Custom home buildingWoodland Hills
Thanks for the clear advice. More at hydro jetting .
Your advice on secure coding are simple. Shift-left security saves time and money. I brought cheat sheets on it support services .
Chronic pain can be overwhelming, but Scottsdale has great options. I recommend visiting Pain Management Scottsdale AZ for useful insights!
Probate can be lengthy and expensive. A properly funded living trust can help avoid it in many cases. Useful resource I’ve been referencing: Trust Planning Lawyer
Do you think chiropractic care is worth it? I’d love to hear opinions from fellow readers and insights from Car accident chiropractor .
Thanks for the thorough article. Find more at Heating Repair .
Your assist to supporting a adored one is best suited. Family elements are purchasable by way of drug rehab scottsdale arizona .
Noise from my blower was insane. Gutter Repair Vs Replacement Cambridge diagnosed it fast. BEST HVAC SERVICE BY CUSTOM CONTRACTING and attic baffles to reduce resonance.
This was a great article. Check out https://www.iformative.com/product/suburban-plumbing-sewer-line-and-drain-cleaning-experts-p2833579.html for more.
Your discussion on emotional resilience during recovery from fire incidents was particularly touching—thank you for that perspective! Emergency Construction Services
Thanks for the useful suggestions. Discover more at mejor clínica capilar en Albacete .
I didn’t realize how important lighting is in a kitchen remodel. Thank you for sharing! For more advice, check Cabinet Refacing Los Angeles .
Could not concur more– it’s important lining up top priorities plainly ahead ensuring partnership takes place seamlessly across sectors aiming improve total experiences offered throughout gatherings ultimately leading success seen firsth portable toilet rental
Grateful for the supportive staff at my ##Puyallup Chiropractor## office; they always make me feel welcome! Graham Chiropractor
Such practical tips shared throughout your article—I’m excited about reaching out to Roofing Services In Illinois
This was quite informative. For more, visit tworzenie stron internetowych .
This was quite helpful. For more, visit tricólogo Jaén .
Tired of overpriced recharge alternatives? This web page has you protected with ultimate charges! I’ve tried it such a lot of times with 0 court cases: quick mobile legends top up .
The ALE negotiation ideas here plus claims adjuster service ’s templates acquired my weekly charge approved.
Excellent link building advice. Digital PR with data-driven assets has outperformed traditional outreach for us. If you’re planning campaigns, these asset ideas could spark something: SEO Company
This is such a comprehensive guide to Google Maps ranking! I’ve learned so much from it and would love to share more experiences at website SEO strategies .
If you’re dealing with a rat infestation, it’s crucial to address it quickly to prevent health risks and property damage. Effective rat removal techniques can make a significant difference in maintaining a safe and clean environment expert pest control
Các trang khiêu dâm trái phép thường thu thập dữ liệu khuôn mặt và giọng nói. Phương án bảo vệ quyền riêng tư được tổng hợp tại SC88 địt nhau với chó .
This post nails the importance of functional goals. Vancouver residents looking for OT support can learn more at ot vancouver .
Thank you for sharing those purposeful pointers centred on recuperating on-line visibility within the aggressive landscape of Brisbane web optimization! Check out extra concepts at seo expert brisbane !
Un immense merci encore ; vous avez réussi à rendre cet univers captivant accessible au plus grand nombre !!! caisse en bois pour bouteilles
The insights provided by # have helped me understand my audience better and tailor my strategy accordingly! ## SEO Marketing San Francisco CA
Excellent article! I’ll be implementing this. My roadmap is right here: expert website designer in Quincy MA .
Insider threats need both tech and culture. Monitor for anomalous downloads and set clear exit processes. I wrote an action plan at expert IT support specialists .
The right legal partner can make all the difference—check out ## comprehensive estate planning attorney near me
Heater smells like rotten eggs? Shut it down and call Central Plumbing Heating & Air Conditioning immediately—emergency line at heating service near me .
Booking a seek advice from soon in Seattle—completely satisfied I checked plastic surgeon seattle The Seattle Facial Plastic Surgery Center for prep and aftercare data.
Had a wonderful experience with the crew at Pure Energy Electrical Services; they handled everything efficiently here in St Augustine! electrician
The primer selection certainly ideal the substrate. Learn from a precision end seasoned painter at precision finish portfolio .
The small-win strategy kept me motivated. Info at action therapy winnipeg .
Useful info on condenser coil guards. Our HVAC team in Sierra Vista AZ installs hail and debris protection as needed. emergency HVAC repair
Describing after bodywork makes a difference. auto collision center returned my cars and truck fully cleansed, with overspray checks and a polished coating.
Ugh, I totally feel your pain. Just got handed a PDF audit from an agency last week and honestly, it was all fluff—generic recommendations that could apply to any brand out there. No real, actionable insights specific to our business or audience how to choose quality SEO audit services
Có những trang giả mạo cơ quan nhà nước để lừa đóng phí “xử lý vi phạm”. Muốn kiểm tra tính xác thực, mình luôn đối chiếu hướng dẫn ở 78win thuốc kích thích .
If your furnace is over 15 years old, Central Plumbing Heating & Air Conditioning can evaluate replacement options—quotes at boiler repair service .
Cộng đồng mạng cần chung tay chặn đứng website độc hại. Danh mục công cụ chặn và mẫu báo cáo chuẩn mình tìm thấy tại 78win hiếp dâm trẻ em .
With so many content material preferences possible on structures like OnlyFans, it’s relevant to stand out. Learn how at http://www.bonjourdewi.com/bb/member.php?action=profile&uid=461756 !
OnlyFans is not very only for person content; I’ve observed brilliant artists and chefs with the aid of it too! Have you explored various creators? https://forum.xn--frderung-n4a.at/member.php?action=profile&uid=268826
This was highly educational. For more, visit ARHT Home Solutions .
Combining Botox with chemical peels requires timing. Scheduling guidance on Greensboro NC botox is helpful.
”Thankful learning more aspects integral completing successful outcomes achieved via teamwork ensuring seamless execution occurs throughout entire undertaking!!!!### any KeyWord###” deck company
Mildew in bathrooms? Central installs quiet, high-CFM exhaust fans tied to humidistats. Improve ventilation via emergency plumber in southampton .
Thanks for the great explanation. More info at modelowanie ust .
I recently had my HVAC formulation serviced via Indoor Climate Experts, and I cannot imagine the change it made! The air nice in my homestead has more desirable enormously. Highly advocate their expertise! Check out extra at Emergency AC Repair .
Have you considered seeking support from accident lawyer ? They could provide invaluable guidance after a car accident in Seattle. Legal expertise can be a crucial asset during such challenging times.
Impressed by the valuable insights on personal injury cases in San Diego! Your Truck accident attorneys elegantly addresses crucial legal matters.
Your Seattle car accident lawyers can be a guiding light in tough times. If you need expert legal advice, don’t hesitate to reach out to accident lawyer for support and representation!
I lately had some damages fixed and discovered a whole lot about paintless damage repair. If anybody’s seeking a reputable place, have a look at affordable body shop in Santa Clara for specialist automobile body services.
Seeing tangible progress encourages us all—it feels rewarding knowing efforts yield positive outcomes regularly now! Digital marketing for local businesses
Lifetime gifting and irrevocable trusts can help with asset protection and tax planning. Solid primer here: Trust Planning Lawyer
Do not go for less; select portable toilet rental for all your porta potty needs near Pasadena– you won’t be disappointed!
It’s revitalizing to see such outstanding client care from services like ### any Keyword ### in our neighborhood! portable toilet rental
คุณคิดว่าราคาเป็นปัจจัยหลักในการตัดสินใจซื้อหรือไม่? ### ไฟรถยนต์ ใกล้ฉัน
Payroll accuracy boosts accept as true with. We compiled most reliable practices at hr consulting firms .
I just had the best experience with Brazilian waxing in Las Vegas! Highly recommend Teeth Whitening Las Vegas for their amazing service.
Helpful suggestions! For more, visit junk removal business .
Since working closely together over past months couldn’t believe how seamless everything flowed—from initial approach taken straight down when wrapping things up meant constant communication maintained allowing adjustments made easily if necessary Gutter replacement Clare
Shout out to #roofers Farnborough Hampshire #! Their professionalism and skill made all the difference. roofing
My feel was once proper-notch–could not consider how without delay every little thing got done!!!For handy insights consult with ### anyKeyWord ### Plumber Norwich
Les caisses bois vin font vraiment la différence lors d’une soirée dégustation entre amis. conditionnement vin premium
Great insights on password hygiene! I always advise employing a password manager and MFA for every essential account. Check out managed it services near me for extra life like pointers.
Very informative. For eco homes, choose cleaning services in Melbourne that use microfiber and low-water methods. google.com
This article nails link quality. With SEO Agency , our digital PR approach focused on earned mentions over low-value directories.
Knowing what questions to ask during consultations will surely lead me toward better choices!!!!### anyKeyWords ### Loft Insulation Surrey
Thanks for the helpful article. More like this at chimney repair Derwood MD .
Good read on chimney flashing. EnglishRoofing Contractor Montgomery IN handles masonry tie-ins in Montgomery IN. Roofing contractor
Managing vacations and parties is difficult. Rehab coaches simply by scottsdale drug treatment can support plan sober solutions.
Just got my Brazilian wax done and feeling fabulous thanks to Brazilian Waxing Las Vegas here in Las Vegas!
AC leak claims should be messy. insurance adjuster company explains sudden vs. sluggish spoil actually.
Regularly pumping your septic tank is key—trust me! Go with the pros at drain and sewer services san dimas .
Avez-vous déjà pensé explorer différentes textures disponibles notamment celles naturelles afin diversifier davantage options existantes? caisse bois magnum
Good checklist. I prefer roofing companies in Bismarck ND that provide drone inspections and clear photo reports. Roofing Company Bismarck ND
This was nicely structured. Discover more at Local movers .
I had no idea how much easier renovations could be until I hired a skilled San Diego general contractor from windows & doors San Diego !
Excellent reminders. Quick extraction is key—Mesa AZ water damage specialists have the right equipment. water damage restoration near me
Sincere, responsive, reliable– Jason Suli Digital Advertising. Find out more at seo agency brisbane .
I found this very helpful. For additional info, visit trichoscan Albacete .
Your emphasis on the importance of proper drainage systems during installations is crucial; many forget this aspect—I’ll consult %%site%% before proceeding! Asphalt roof installation Southfield MI
Password managers still make sense when combined with MFA. Educating users on phishing-resistant MFA is vital. I compared options at local IT support services .
My confidence skyrocketed after my Brazilian wax! Thank you, Eyebrow Services Las Vegas , for your amazing recommendations.
Appreciate the comprehensive insights. For more, visit pge trenching contractor .
Trendy blog post, thanks for the functional examples. A lot more strategies at SEO Services near me .
This was highly helpful. For more, visit alopecia Jaén .
Had an amazing time experiencing one of their signature facials—I’ll definitely be adding this spa into my regular rotation whenever I’m back! Skincare Services Las Vegas
Roof issues can sneak up on you—get ahead of them by visiting Roofing warranty Ireland for an inspection!
The “no password reset thru e mail” vogue improves defense UX. professional Arkido web design moved to device-sure authentication.
This was highly educational. For more, visit SEO .
There’s something special about finding unique pre-loved engagement rings—I spotted some real beauties recently at “Pawn Jewelry – Orlando, FL.” Check their inventory updates via Pawn Shop Orlando
I asked for conservative dosing first, then adjusted—strategy from Warren MI botox .
This was quite helpful. For more, visit alojamientos en el Camino Francés .
Appreciate the comprehensive advice. For more, visit commercial movers .
Lush Dental Studio is the best dentist near me! Their service is top-notch and always leaves me smiling!
I love visiting Lush Dental Studio in Sacramento Best Sacramento dentist
Kudos to businesses that are taking the leap into renewable energy with solar solutions! best solar battery storage system
Every interaction with Summit Services has been positive—they’re certainly the top electricians around here in Bluffton! electrician
Terrific customer assistance and tidy units make me a loyal fan of ### anykeyword ### whenever I’m nearby. porta potties near me
Acknowledging vulnerabilities showcases strength ultimately paving pathways toward resilience growth enabling collective success achieved collaboratively across board!!! living trust attorney orange county
Anyone else think that finding the right family lawyer was harder than expected? Glad I found resources like # Partnership Agreement Lawyer in Maryland # to help make it easier!
Funding a trust is just as important as creating it. Thanks for stressing that step. If anyone needs a practical walkthrough, Trust Planning explains the process clearly.
Thanks for sharing this information! I’m eager to find reputable Trusted roofers Cork in Cork for my upcoming project.
Anyone else find relief for migraines after seeing a Tacoma chiropractor? This has been my experience thanks to info from Chiropractor Tacoma .
Rolling Suds Power Washing Naples Ft Myers made my windows sparkle like never before!
I highly recommend Rolling Suds Power Washing Naples Ft Myers for all your window washing needs Best power washing near Naples
Cavity prevention starts at home, but having a supportive team like pediatric dentist New York makes it easier.
SEO is crucial for any business today—thankfully I found Local SEO Seattle CA to help me navigate it!
Short cycling due to blocked intake? Central Plumbing Heating & Air Conditioning cleared my PVC venting—schedule via heating service near me .
The section on sleep and pain is spot on. I got practical help from a specialist I found with Aurora pain management doctor .
I’m convinced that every homeowner in Fresno should prioritize utility locating before digging! Fresno utility potholing
I’m amazed by the applications of stem cells in healing—find out more at Ketamine Infusion Therapy orange county !
Tracking progress in action therapy made my wins visible. Tools here: action therapy winnipeg .
Wonderful realizing collective strengths shine brightest revealing pathways toward fulfilling goals imagined previously detailed attaining st portable toilet rental
Je commence sérieusement à envisager toutes ces options disponibles lorsque je reçois mes amis chez moi ; je veux que chaque moment soit mémorable !! ici
Just had an adjustment from my favorite ##Puyallup Chiropractor## and I feel like a new person! Chiropractor in Graham
Anyone else transitioning their backyards into functional spaces? Great examples can be found on ## interlocking pavers installer orange county
Lighting matters so much with art. I added a picture light over a print from house painters chicago and it made the colors pop.
If you’re building a custom home in LA, make sure to choose a builder with experience in your desired neighborhood! Los angeles home builder
Admiring those innovative techniques shared earlier, I’m thrilled begin collaborating closely throughout entire design process ahead!!! ### any KeyWord ### composite deck builder
Appreciate the great suggestions. For more, visit colchones a medida Albacete .
For startups needing traction, a data-driven Search Engine Optimization Agency like SEO Company can accelerate growth without ballooning ad spend.
I’m so glad I learned about vacuum excavation while planning my renovation in Orange County—it’s truly innovative! More details at vacuum excavation orange county .
Thanks for the useful suggestions. Discover more at abogado de divorcios Coruña .
Valuable information! Find more at derecho civil Coruña .
This was a fantastic resource. Check out devolución de impuestos Saltillo for more.
Looking forward meeting up soon perhaps over coffee chatting casually swapping stories hearing tales inspiring one another uplifting spirits rekindling friendships fostering bonds strengthening ties while sharing laughter joyfully reminiscing fondly local roofing contractors near me
HRIS implementation with out chaos—task plan at outsourced hr .
Loving my new outdoor lighting thanks to my talented electrician from Phoenix! Electrician in Phoenix AZ
If you’ve plateaued at the gym, consider info at fat freezing treatment .
Water features are such a great way to create ambiance in your garden. What’s your favorite type of fountain? Pond Designers Orange County
Thermostat wiring mess? Central Plumbing Heating & Air Conditioning re-terminated the board—book at boiler repair .
I recently had a pest problem in my home, and I was amazed by the effective solutions offered by local services. It’s crucial to choose a knowledgeable pest control provider in Puyallup to ensure a pest-free environment Best pest control
After a crash, don’t post details on social media. Insurers monitor it. Discuss your case privately with an attorney for personal injuries to protect your recovery. personal injury lawyers in San Antonio
Spatial design with easy three-D and parallax—while used sparingly—provides pleasure. Tested low-charge consequences on Web Design Bangalore that also pass functionality audits.
Vous avez réussi à me motiver; je vais rassembler mes vieilles caissettes ce week-end! # # anyKeyWord ## caisse à vin personnalisée
Can someone elaborate on whether genetics play a role in determining efficacy rates in patients undergoing treatments like #coolsculptin through your clinic’s lens, #_## anyKeyWord__? coolsculpting alternatives
Thanks for the helpful article. More like this at powiększanie ust .
Awesome checklist for site prep. I followed a similar plan from Tree Service .
Noisy garbage disposal? Central Plumbing replaces and rewires disposals safely. Get help at emergency plumber in southampton .
Ugh, I feel your pain. Just got one of those agency “audits” myself—basically a 30-page PDF filled with vague suggestions like “improve SEO” and “boost engagement.” No actionable insights, no real strategy, just fluffy marketing jargon https://charlie-wiki.win/index.php/Fix_Flat_or_Declining_Enterprise_Traffic_Using_Ahrefs:_A_Practical_30-Day_Playbook
Nothing beats the strength and style of custom steel windows—visit Custom Steel Windows Anaheim CA for some great design ideas!
Do any of you breed fish as a passion? I’d love to pay attention about your reports and spot what styles you may have bred! More tips achievable at https://500px.com/p/lavellurba !
Session management is primary—short tokens, refresh appropriately. I extra examples on cyber security it companies .
“Any tips on maintaining my roof after hiring someone from your list of contractors?” https://www.google.com/search?q=Founders+Roofing+%26+Construction
Cộng đồng mạng cần chung tay chặn đứng website độc hại. Danh mục công cụ chặn và mẫu báo cáo chuẩn mình tìm thấy tại 78win buôn bán nô lệ .
I equipped a declare diary utilising Claims adjuster firm and it made negotiations smoother.
Virtual counseling should be would becould very well be a lifeline. Telehealth suggestions for alcohol rehab are readily available by way of Virtual IOP .
Technical search engine optimization, web content, and connects done right– seo services brisbane .
Roanoke auto transport companies are usually very professional and timely. Roanoke Auto Transport’s
Can’t wait to read more from your blog on this topic; it’s so insightful!! riverside surrogate requirements
Excellent tips on what to look for in an accident attorney—experience matters! car crash lawyer
The feedback from my visitors regarding the bathrooms was positive thanks to my option of renting from porta potties near me in Pasadena!
Your micro-droplet technique overview was insightful. Technique variations on botox Greensboro .
Excellent overview of probate pitfalls. To minimize probate risks, consult a trusted Thousand Oaks trust attorney—this link is a good starting point: Trust Planning Lawyer
Great post– rejuvenating viewpoint. I added relevant pointers at professional website designer in Quincy .
Appreciate this. A top-seal damper helps Cleveland homeowners control energy loss when the fireplace isn’t in use. find masonry experts near me
This web page provides the most cost-effective MLBB recharges I’ve ever viewed! I’ve tried it various occasions and it really is perpetually quick and simple. Don’t miss out: mlbb top up safety practices .
Your content cluster strategy works. SEO Agency helped us build pillar pages and we own several SERP features now.
Quelle belle idée de réutiliser des caisses en bois pour ranger mes bouteilles de vin. coffret vin bois
J’ai trouvé des caisses bois vin superbes sur votre site, merci pour le partage ! https://www.longisland.com/profile/tyrelaubdy/
Fantastic post! Discover more at junk removal services .
รออ่านรีวิวจากผู้ใช้คนอื่นๆ ว่าแต่ละรุ่นเป็นอย่างไรกันบ้าง?? หลอดไฟหน้ารถยนต์
อยากรู้วิธีติดตั้งไฟหน้ารถ LED ทำเองได้ไหม? ร้านเปลี่ยนหลอดไฟรถยนต์ ใกล้ฉัน
Umbrella coverage examples were helpful. I priced $1M to $5M layers on Insurance agency near me .
Describing after bodywork makes a distinction. San Jose CA certified auto body shop returned my car totally cleansed, with overspray checks and a refined finish.
Knowing that every punch counts helps me focus better during workouts – appreciate insights shared through online content connected directly back here via links found within #ANYKEYWORD#. boxing gyms
Pay transparency carried out correct—communique templates: payroll services .
It’s amazing how much a knowledgeable auto accident lawyer in Daytona can help you understand the ins and outs of your case.
Appreciate the detailed insights. For more, visit caída del cabello causas .
Loved the pet-friendly ramp addition. For custom pet features, check composite deck builder .
Again and again, I turn to porta potty rental when I need reputable portable toilet leasings here in Pasadena.
My go-to for keratin treatments is Front Room Hair Studio. More info at Hair Salon Houston —best hair salon in Houston.
This was quite useful. For more, visit microinjerto capilar Jaén .
A smaller community felt more personal. We identified boutique-style residences on senior care solutions .
Có ai đang tham gia cá cược bóng đá ở https://mmlive.wtf không? Hãy chia sẻ đi nào!
Action therapy transformed how I approach challenges—feels empowering to take steps, not just talk. Check out action therapy winnipeg for more insights.
Saying “thank you” does not feel like enough after experiencing such amazing service from these specialists. Builders Surbiton
My friend recommended American Laser Med Spa for body contouring. Exploring CoolSculpting here: non-invasive fat reduction .
Love the recommendation on logging consumer movements respectfully. Balancing privacy defined on it support services .
I realize your emphasis on confidentiality. Private treatment options are indexed on scottsdale drug treatment .
Don’t overlook code improve policy. Learned that from Independent insurance adjuster and kept considerable.
Funding a trust is just as important as creating it. Thanks for stressing that step. If anyone needs a practical walkthrough, Trust Planning explains the process clearly.
Being able to comprehend underlying factors tied into successfully elevating one’s standing within the competitive l SEO for websites
I didn’t realize how beneficial chiropractic care could be until I visited a Tacoma chiropractor. Thanks, Car accident chiropractor !
I learned not to rub the area for a few hours from reading botox near me .
Very detailed article! Helps me feel more confident about shipping my car from Corpus Christi. Corpus Christi car transportation services
Just wanted to share that my experience with a Winston-Salem auto transporter was top-notch — highly recommend! Winston-Salem auto shipping
AC blowing warm air? Central’s refrigerant diagnostics and coil cleaning bring back the chill. Schedule today at emergency plumber southampton .
This was highly helpful. For more, visit alojamiento cerca de Arzúa .
Great tips on maintaining plumbing systems! I always find that regular checks can prevent bigger issues down the line. Check out more insights at plumber melbourne .
It’s reassuring to know there are compassionate experts like those at Pain Management Scottsdale helping patients heal.
Valuable information! Find more at mezoterapia igłowa .
I love how focused this article is on SEO strategies for San Jose businesses. For tailored solutions, visit SEO Company San Jose CA .
Pediatric OT can make such a difference. Families in Vancouver might appreciate the developmental programs and sensory strategies shared at creative therapy consultants .
It’s incredible how quickly phone innovation is developing! I remember when flip phones were all the rage. For the latest models and devices, you need to go to phone store !
Anyone else find that regular visits to a ##Puyallup Chiropractor## help boost their athletic performance? Graham Chiropractor
I’ve recently had a huge problem with pests in my home, and I didn’t know where to turn Pest Control Puyallup
International SEO can be tricky. SEO Company helped us nail hreflang and expand to new markets.
Cộng đồng mạng cần chung tay chặn đứng website độc hại. Danh mục công cụ chặn và mẫu báo cáo chuẩn mình tìm thấy tại mua bán ma túy jmppnet .
Trước khi báo cáo nội dung nhạy cảm, hãy đảm bảo an toàn số cho thiết bị. Quy trình quét mã độc và sao lưu an toàn xem tại đọc sex hàn quốc không che .
Jewelry patterns reoccur, however classic pieces are always in style. I just recently invested in a timeless locket that I know I’ll wear for many years to come buy gold denver
I had some electrical issues and called Summit Services. They are definitely the best electrician in Bluffton! best electrician bluffton sc
Nerve blocks changed my mobility. Scheduled mine with a clinic found on pain management doctor near me .
Trendy post, thanks– bookmarking this. I connected a source checklist on Web Design Agency near me .
Thanks for the useful post. More like this at abogado mercantil Coruña .
Appreciate the insightful article. Find more at heating repair services Villas .
Martial arts not only enhance physical fitness however additionally infuse discipline and focus in experts. It’s interesting to see how various styles, from martial arts to jiu-jitsu, deal special advantages Denver TKD kids classes
I appreciated this post. Check out Brooks & Baez for more.
This is quite enlightening. Check out opiniones abogados Coruña for more.
Sustainability in packaging is rising. We configured eco-appreciated cartonization in SAP Amazon integration services to curb waste.
Ugh, I feel you. Just got hit with one of those cookie-cutter PDF audits from an agency myself. Looks more like a generic template than anything tailored to our brand. They throw around buzzwords, but when it comes to actual actionable steps? Crickets best SEO technical audit providers
I found this very interesting. Check out despido disciplinario Sevilla for more.
Great insights! Find more at colchones a medida Albacete .
Thanks for the great tips. Discover more at servicios contables Saltillo .
Professional and detailed. These tips will help a lot of people avoid common mistakes. Philadelphia auto transport
Social engineering bypasses tech controls. Regular phishing simulations plus just-in-time nudges work neatly. I posted a tuition outline on it support companies .
Thanks for the helpful article. More like this at water heater services near me .
Appreciate the detailed information. For more, visit water heater repair .
Moving can be so stressful, but having a reliable Augusta moving company can make the process smoother. Has anyone here used a local company they’d recommend? Long distance movers Augusta
Speaking from experience, beginner crypto exchanges in the US can be a mixed bag—like a ‘first date’ with crypto: exciting but cautious buy bitcoin for first time
Been through my fair share of US crypto exchanges, and honestly, fees and support are the two areas where most platforms stumble. Coinbase Pro used to be decent with fees, but after their recent shifts, withdrawal costs crept up noticeably. Binance easy-to-navigate crypto exchanges
Just had our gutters cleaned and realized we need a full upgrade. Anyone in Kitchener have experience with reliable roofing and eavestrough pros? We’re considering Kitchener roofing for a quote.
Love that some contractors offer drone inspections now for safety and detail. Curious if top Kitchener roofing firms provides that in Kitchener.
Your post about open shelving vs closed cabinets had me reconsidering my options—thanks for sharing! More discussions at Custom Kitchen Cabinet Makers In Los Angeles !
Những khuyến mãi tại 365Bet thường xuyên thay đổi nên tôi luôn cảm thấy phấn khích khi chơi! 365Bet
Từ khi biết đến link vào thienhabet , tôi đã không còn muốn thử bất kỳ nhà cái nào khác.
Bài viết rất hay, giúp mình nhận diện được những yếu tố cần thiết khi tìm kiếm # anyKeyword #. ibet
Solid insights on group of workers making plans—our calculator helps: hr outsourcing agencies .
Exceptional detailing at the corners. I wrote about corner solutions on ll 97 compliance solutions .
Tôi đã rút tiền từ 12Play mà không gặp bất kỳ vấn đề nào, thật tuyệt vời! 12Play.lol
Mỗi lần quay lại với Go88 là mỗi lần tôi khám phá ra thêm nhiều điều thú vị trong thế giới cá cược online này! nhà cái go88
Không chỉ có cá cược thể thao, tydo88 còn có nhiều trò chơi khác nữa rất hay! tydo88
Mọi vấn đề phát sinh trong quá trình sử dụng dịch vụ đều được đội ngũ hỗ trợ nhiệt tình xử lý nhanh chóng ởwin888 !!! ## nhà cái Win88
Những kinh nghiệm chia sẻ về kèo nhà cái uy tín sẽ giúp bạn dễ dàng hơn trong việc cá cược online. Hãy tham khảo nhé! tỷ lệ bóng đá hôm nay
Dịch vụ chăm sóc khách hàng ở #Viva nhà cái uy tín cá cược online# rất tận tâm và chu đáo! Viva 88 plus
Highly impressed by the work done by Pure Energy Electrical Services! Best decision ever for finding an electrician near me in St Augustine. electrician
Mình thấy nhiều người khen ngợi 99Win , chắc chắn phải thử ngay thôi!
Các trang game bài trên bet 167 thực sự rất đa dạng và phong phú nữa đó nhé # Bet168 sale
Your submit approximately hero pix inspired me to replace mine—see it live the following: web design amherst massachusetts
Mọi điều cần biết về cá cược đều có ở đây !!! 789bet us org
The article explains disposal fees and dumpster placement—important for Montgomery IN neighborhoods. google.com
Không chỉ đơn thuần là một nhà cái, mà còn là nơi tụ hội của những người đam mê cá cược như chúng ta – đó chính là Daga88! đăng nhập daga88
I learned a lot about underlayment. A Roofing Company in Bismarck ND can recommend the right type for our climate. https://www.google.com/maps?cid=4071988050214638827
Các chương trình khuyến mãi của shbet luôn thu hút tôi.
This is helpful! Professional Joliet auto transport makes life easier. Joliet car transport
Good content. Mesa AZ condos should notify HOA and restoration quickly to limit spread. https://www.google.co.in/search?q=Bloque+Restoration&ludocid=2172986856869809528
Tôi thường xuyên kiểm tra thông tin trên #anykeyword# để không bỏ lỡ những cơ hội tốt nhất trong cá cược! https://keonhacai.ooo
Don’t choose less; pick porta potties near me for all your porta potty requires near Pasadena– you won’t be disappointed!
This was a great help. Check out sams signs vehicle wraps for more.
This was quite enlightening. Check out moving companies in santa cruz for more.
Thanks for highlighting supply chain hazard. Vendor questionnaires want to be useful. Sample varieties on it support specialists .
Good reminder to seal fastener penetrations. For waterproofing details, deck company was meticulous.
แบ่งปันความรู้เรื่องการใช้และติดตั้งไฟหน้าประเภทนี้ให้เพื่อนๆ กันเถอะ หลอดไฟหน้า
Hydration and sleep improved my outcome. Lifestyle tips affecting longevity on Greensboro NC botox .
Just started implementing some of the strategies I learned from an SF-based company, and I’m thrilled with the results! More at SEO Company San Francisco CA .
It’s gigantic to work out mindfulness discussed. Many systems obtainable simply by scottsdale drug treatment contain meditation and rigidity relief.
For someone managing a total loss, claims adjuster service has a VIN/title listing that helped me.
Helpful info! I wasn’t aware of the benefits of enclosed transport for luxury cars. West Lake Hills car transportation services
For local expertise in estate law, check out the attorneys at orange county trust administration lawyer .
A treasure trove packed full useful strategies aimed at preparing families before emergencies occur—a must-read indeed !! Fire Damage Restoration
Data breach coverage saved our business. We added endorsements through Insurance agency near me .
Helpful suggestions! For more, visit pge trenching contractor .
Algorithm updates can be scary—having SEO Company monitor changes and adjust proactively saved us from major drops.
Looking for a reputable CoolSculpting clinic nearby? Discover the excellence of kybella double chin treatment today.
Your insights on choosing the right contractor are very useful! I will keep Roof Repair Services Illinois in my contacts.
Simply had a fantastic experience getting my new roofing through #roof setup Basingstoke #– extremely advise them! Roofers Basingstoke
Love the point about personalization of care plans. luxury senior living explains levels of care in plain language.
Every meeting feels productive because they come prepared with actionable insights tailored specifically for us. Google ranking strategies
Absolutely overjoyed with the plumbing carrier I bought! They solved my subject matters right away. Highly endorse visiting Plumber Norwich !
The emphasis on data, not drama, was refreshing. Learn more at winnipeg action therapy .
Thank you for those insightful information—I will basically percentage them along side ## professional carpet cleaners
This is very insightful. Check out junk hauling for more.
Wonderful tips! Find more at aptos residential movers .
Mỗi lần vào trang chủ của Go99 là tôi lại bị cuốn hút bởi những chương trình khuyến mãi hấp dẫn! link vào Go99
Fine dining restaurants Charleston are beautifully mapped on fine dining restaurants charleston for easy planning.
Nhà cái 007win có nhiều ưu đãi hấp dẫn cho người chơi mới, rất đáng thử! 007win.dev
888Bet thật sự là một nhà cái uy tín, chất lượng dịch vụ cá cược online rất tốt! Tôi thường xuyên tham gia cá cược tại đây. 888Bet
Useful advice! For more, visit kosmetolog .
Tại sao lại phải tốn thời gian tìm kiếm nơi khác khi có 13win ở đây?
Những trò chơi nào đang hot nhất tại tk88 hiện nay?
Hãy tham gia ngay hôm nay để cảm nhận sự khác biệt mà chỉ có ở 32win thôi nhé! nhà cái 32win
Lần đầu tiên cá cược online mà tôi chọn 89bet.football , cảm giác thật sự an tâm.
I appreciate this insightful piece; it’s clear why many homeowners trust ### anyKeyWord### for their gutter cleaning needs! Gutter repair Limerick
Excellent atmosphere and caring team for CoolSculpting clients. body contouring without surgery
Returns refurbishment monitoring is considered necessary. Work orders in ERP for manufacturing near me captured labor so we would charge maintenance accurately.
Granules in the gutters? That’s a sign your shingles are aging. Getting quotes for replacement— Kitchener roofing repairs is on our shortlist.
Smart thermostat upgrade? Central installs and configures Wi-Fi controls for comfort savings. Start at emergency plumber in southampton .
Roof leaks can be a nightmare! I’m searching for reliable services for roof repairs in Cork. Any suggestions? Drone Roof Inspection
Thanks for the detailed post. Find more at trasplante capilar en Albacete .
If you’re in Tampa and need paver sealing, you must try commercial pressure washing services .
I’ve been looking for a reliable Woodland Hills general contractor in Woodland Hills. Any recommendations?
Super practical post! It’s tough finding honest reviews about San Antonio car transportation, so this helps a lot. San Antonio car transport
I always leave photo-ready from Front Room Hair Studio. Best hair salon in Houston: Hair Salon Heights .
Smooth sailing (and skin!) is guaranteed when I book appointments through ## Brazilian Waxing Las Vegas
Endpoint isolation all through incidents can cease lateral action fast. EDR with dwell reaction is well worth it. I summarized an IR workflow at it support specialists .
I found this very interesting. For more, visit clínica capilar Jaén .
Have you ever considered competing? The atmosphere around here inspires me every day; check out competition announcements via details posted on #ANYKEYWORD#. private boxing lessons
Auto accidents can lead to complicated situations; having a knowledgeable ###AutoAccidentLawyer### simplifies things immensely! car accident lawyer in Daytona Beach
Appreciate your deep dive into optimizing product pages; e-trade thoughts on web design amherst massachusetts
Outlining after bodywork makes a difference. affordable Tesla body workshop San Jose returned my cars and truck completely cleaned up, with overspray checks and a refined finish.
For tech neck lines, I found targeted advice on botox Warren .
Tìm hiểu về cách chơi tại #anything#, thực sự cần thiết cho những người mới như mình. link vào aa88
Các dịch vụ hỗ trợ khách hàng ở ao888 hoạt động rất hiệu quả , giúp giải quyết vấn đề nhanh chóng ! # # anyKeyWord # # alo88.wiki
Love the bendy interiors for long run adaptability. Fit-out innovations on historical architecture .
Compliance may also be overwhelming for small groups; this record facilitates: outsourced hr .
A great reminder that we can always find ways to save on necessary repairs like roofs; learn more strategies via # # any Keyword # Commercial roofing
For all your electrical needs in bluffton, turn to summit services—you’ll see why they’re considered the best around! electrician near me
Thanks for the great explanation. More info at ARHT Home Solutions .
Looking for in your price range Fire Extinguishers in Perth, WA? fire safety products Perth has a few of the finest rates around.
Love the focus on topical authority. SEO Agency built a publishing calendar that strengthened our niche visibility.
Appreciate the detailed information. For more, visit mejores alojamientos Arzúa .
I found this very interesting. Check out water damage companies near me for more.
Thanks for emphasizing intellectual health. Dual-analysis alcohol rehab at rehab treatment centers near me supports each thoughts and physique.
Thank you for sharing such valuable insights into finding reputable contract work around decking projects – very helpful indeed!! ### any KeyWord ### composite deck builder
If your adjuster adjustments mid-declare, insurance adjuster company suggests the right way to do a glossy handoff.
After years of trial and error, pain management doctor Colorado connected me with a specialist who finally listened.
Appreciate the detailed information. For more, visit abogado penalista Coruña .
Just had our gutters cleaned and realized we need a full upgrade. Anyone in Kitchener have experience with reliable roofing and eavestrough pros? We’re considering Roofing near me Kitchener for a quote.
Granules in the gutters? That’s a sign your shingles are aging. Getting quotes for replacement— Roofing contractors Kitchener is on our shortlist.
The reviews are true! For the best Brazilian waxing experience, head over to Men’s Waxing Services Las Vegas .
Well said. EnglishChimney Repair Cleveland Ohio is punctual and cleans up after the job. reliable chimney repair experts near me
If you notice moldy smells, a slow leak might be hiding— jb rooter and plumbing ca found ours in the wall.
Fantastic post! Discover more at Brooks & Baez .
There’s no one better than Pure Energy Electrical Services when it comes to finding an electrician near me! Highly recommended across St Augustine! electrician near me
Thanks for the helpful article. More like this at opiniones abogados Coruña .
When dealing with wrongful death in Fort Worth, compassionate counsel matters. Thompson Law pointed me in the right direction.
This was quite useful. For more, visit contable Saltillo .
Love seeing before-and-after roof projects. Quality flashing and proper drip edge make all the difference. Thinking of booking with EPDM roofing for our eavestrough replacement.
I liked this article. For additional info, visit hydro jetting services near me .
Dead limbs over the driveway had me worried. Booked a removal at Tree Service and slept better.
Thanks for the great tips. Discover more at contrato de trabajo Sevilla .
Love seeing before-and-after roof projects. Quality flashing and proper drip edge make all the difference. Thinking of booking with Hail and wind damage roof repair for our eavestrough replacement.
Finding the right contractor for your BBQ island can be tough—check out my recommendation: interlocking pavers installer orange county .
This was quite informative. For more, visit prueba de colchón en tienda .
It’s comforting knowing there are professionals who can help manage our estates efficiently. living trust attorney orange county
This was highly useful. For more, visit stymulatory tkankowe .
Good note on micro-achievement. We orchestrate keep backrooms as nodes using SAP mobility solutions near me to shorten closing-mile.
The benefits of proper underground utility locating can’t be overstated! For additional information, visit Orange County utility locating .
The aftercare tips here are gold. American Laser Med Spa gave similar advice — coolsculpting alternatives .
1. Hey there! Just stumbled on this article and gotta say, really helpful info. As a Canadian slot player, I’ve noticed that sticking to games with higher RTP keeps my losses down over time GamblingInformation.com credibility assessment
Action therapy reframed setbacks as data for the next step. More at winnipeg action therapy .
Look, the best way to figure out if a casino is safe is to check for its iGaming Ontario license. That’s a real, official stamp that shows the site follows strict rules and undergoes regular audits Visit this page
I’m hopeful that ongoing education about the need for utilities work will lead to better streets and fewer accidents here in Sacramento; find out more: ### anyKeyWord###! Sacramento hydro excavation
Having tested multiple AI writing tools across the US market, here’s the real scoop: the hype often overshadows practical limitations Visit website
I recently had my septic system pumped, and it made a huge difference! If you’re in need of a good service, check out epoxy floor coating san dimas .
This post highlights precisely what households worry about: trust fund and transparency. We found clear solutions through short term respite care when picking assisted living.
Before jumping into discussions about using Stake Casino from Canada (or the US), it’s crucial to first verify the regulatory and company registration status. Stake is operated by Medium Rare N.V stake CAD transactions
1. Look, honesty in casino affiliates is definitely rare these days. Most just want to push sign-ups and don’t care if the casino is sketchy or not. I always double-check if the casino’s got a legit license before even thinking about depositing Ethereum slots
The focus on infection prevention is crucial. Learn post-op protocols at foot and ankle surgeon near me .
1. Look, I totally agree that honesty in casino affiliates is like finding a needle in a haystack these days. So many just want clicks and cash without really giving the full picture https://post-wiki.win/index.php/Why_a_Shiny_License_Doesn%27t_Guarantee_a_Safe_Casino:_MGA,_UKGC,_and_What_Actually_Protects_Players
Ugh, I feel this so hard. Just got a PDF “audit” from an agency and honestly, it felt like they just slapped together the most generic recommendations you could imagine Go here
Our deck stain looks trendy—thanks House Painter in Roseville CA: affordable house painters
1. Nice breakdown on PlayOJO’s approach! I’ve always admired their transparency with payouts and bonuses PlayOJO bonus codes Canada
Who knew a simple fountain could change the feel of an entire yard? Thanks for sharing these ideas! Garden Fountains Irvine CA
Endpoint isolation at some point of incidents can quit lateral circulation immediate. EDR with stay response is really worth it. I summarized an IR workflow at cyber security it companies .
Exploring fine dining restaurants Charleston? charleston gourmet dining helped me set a flawless dining route.
1. Yo, I get why some rappers hype Stake, but lowkey feels like they just cashin’ in. Like, are they really into the game or just another payday? Still, gotta admit some tracks got me curious to check it out.
2 protecting yourself from casino scams
For those considering getting facials while traveling through ###LasVegas###: make sure you don’t miss out on what’s offered by ###anything###.” Men’s Waxing Services Las Vegas
Great contractors are hard to find! Luckily, I discovered an excellent one through ###SanDiegoGeneralContractor### on ###yourwebsite###—check it out: ###yourwebsite### windows & doors San Diego
Enjoyed reading how beautifully updated kitchens reflect homeowner personalities shining brightly through clever design choices made while incorporating modern touches appealing everyone’s tastes — stay tuned frequently since many updates await discovery Door installation Southfield MI
If your case requires trial, Garland car accident lawyer has courtroom experience with trucking defendants.
Directors and officers insurance can protect boards. We secured D&O through Insurance agency .
1) As a regular casino player, I’ve gotta say, Stake’s system feels pretty legit. Look, there are a ton of platforms that hype big bonuses but then make them near impossible to actually benefit from over time Browse around this site
Totally feel ya on the wagering requirements! Got burned at this one casino where I thought the bonus was going to be a total score, but the playthrough was insane—like 50x or something. Honestly, felt like a trap https://nova-wiki.win/index.php/100%25_Match_Bonus_vs_50_Free_Spins_%E2%80%94_Which_One_Actually_Pays%3F
Your tip on topic clusters is gold. SEO Company built ours around user intent, and the SEO company’s strategy lifted multiple pages at once.
Been through a handful of US-based crypto exchanges, and honestly, fees and support are where the real differences show. Coinbase is user-friendly but watch out: their fees can quietly gobble up your profits, especially if you’re making smaller trades https://squareblogs.net/golivehgho/h1-b-what-is-the-best-crypto-exchange-for-a-complete-beginner-navigating-the
The foyer paintings integrates with the architecture. Integration options on historical architect .
Big thanks to the experts at access control installation Orange County for getting me back into my home after being locked out!
I never knew how many clinics offered this until I explored options through ## body contouring without surgery
Holiday guests coming? Central Plumbing installs touchless faucets and garbage disposals in time. Grab a slot at emergency plumber in southampton .
Been there, done that—with beginner crypto exchanges in the US, it’s a mixed bag. Most newbies jump onto the big names like Coinbase or Binance US because, well, they’re everywhere and promise spoon-fed simplicity https://spencerssuperbthoughts.timeforchangecounselling.com/can-i-lose-more-money-than-i-invest-in-crypto-understanding-crypto-trading-risks-in-2026
There’s no denying that safety comes first with any construction project; if you’re unsure which method best protects workers while getting the job done right, look no further than what vacuums offer—you’ll find excellent insights waiting over on ## vacuum excavation orange county
Thanks for sharing the caution signs and symptoms of alcohol abuse. Early evaluate is feasible at rehab scottsdale az .
I always feel rejuvenated after getting my Brazilian wax done at Brazilian Waxing Las Vegas during my visits to Las Vegas.
Just had some gorgeous green trim added to my new white casement windows; they look fabulous against the California sky here in Anaheim! Steel pivot doors Anaheim CA
ALE receipts upload up fast. I used insurance adjuster company to categorize and put up them.
Such an informative article—it’s high-quality knowing there are recommendations like ## professional carpet cleaners
This was a wonderful guide. Check out wizytówki google for more.
I appreciate blogs that compare Winston-Salem auto transport companies — saves so much time when planning a move. Winston-Salem vehicle shipping
“It’s amazing how much confidence a good wax gives you; thanks, # # any Keyword ###!” Skincare Services Las Vegas
Siding, fascia, and eavestrough colors should all coordinate. We’re updating our exterior palette and plan to work with Slate roofing Kitchener .
Excellent post! Now I know the questions to ask before booking an auto transport service. Corpus Christi auto shippers
Front Room Hair Studio’s layers add so much movement. Book via Houston Heights Hair Salon .
Granules in the gutters? That’s a sign your shingles are aging. Getting quotes for replacement— Ice dam removal Kitchener is on our shortlist.
Appreciate the thorough information. For more, visit precio injerto capilar Albacete .
“If you’re seeking innovation and efficiency in tech management, look no further than ## Phone Systems Company California
Making restorations can be stressful– but not when working alongside capable hands like those discovered within this business. Builders Surbiton
Fantastic post! Discover more at consulta capilar Jaén .
Wave unencumber throttling prevents chaos. We allow Warehouse management system consultant near me meter projects to in shape % station ability.
Navigating child support can be tricky; I’m glad I found the tips on Partnership Agreement Lawyer in Maryland before going into negotiations!
Thanks for shedding light on the importance of commercial solar for local enterprises! EV charging station installation company
If you need quick and efficient service, choose Summit Services as your electrician near me in Bluffton. electrician
Our roofing contractor in Montgomery IN suggested maintenance plans to extend roof lifespan. Roofing Contractor Montgomery IN
I didn’t realize gutters impact roof life so much. Roofing Company Bismarck ND also services gutters for better drainage. Roofing Company Bismarck ND
Good reminder that patch management is chance management. Prioritizing with the aid of exploitability (KEV catalog) facilitates. I’ve shared a prioritization matrix at it helpdesk support .
I appreciate the focus on safety first. Water Damage Restoration Mesa AZ handled power and water shutoff properly. maps.app.goo.gl
Shoutout again for all those hardworking electricians keeping our systems running smoothly here in Arizona! Electrician
Tired of feeling self-conscious about your body? Visit non-invasive fat reduction for top-notch CoolSculpting treatments near you.
I appreciate how many Los Angeles home builders prioritize eco-friendly materials in their construction process. Custom home building Los Angeles
Collision repair can be demanding, especially dealing with insurance coverage. auto body experts San Jose CA helped me with straight insurance policy payment and kept me upgraded during the entire fixing.
When it comes to electrical issues, I always turn to Pure Energy Electrical Services—they’re simply the best in St Augustine! electrician st augustine
I like the blend of compassion and challenge in action therapy. More info: action therapy near me .
Thanks for the informative content. More at vehicle wraps .
Nicely done! Discover more at office movers santa cruz .
Your focus on patient goals is so important. I felt heard by the doctor I found through Aurora pain management doctor .
Water leadership seems to be neatly resolved. Stormwater procedures on underpinning in building construction .
Clear cancellation policies prevent issues. I read them closely on local insured cleaning company .
Trial periods eased our worries. We found communities offering 30-day satisfaction guarantees on memory care options .
Living with chronic conditions can feel isolating, but support networks like those featured on Regenerative Medicine Doctor really help residents of Scottsdale find relief!
Craving charleston gourmet dining? charleston gourmet dining had top-tier recommendations that exceeded expectations.
Your tips for weekend plans are grab. I payment local on-page seo agency san jose on Fridays for brand new social movements.
Thanks for the practical tips. More at Excavating contractos .
Love that some contractors offer drone inspections now for safety and detail. Curious if Kitchener roof repair provides that in Kitchener.
Anyone compare aluminum vs steel eavestroughs in Kitchener’s climate? Leaning aluminum with proper leaf guards. Might go through Roof leak repair Kitchener for install.
Excited to start my journey with #Cool#@; just had my initial consultation, and it was great! cryolipolysis treatment
Anyone compare aluminum vs steel eavestroughs in Kitchener’s climate? Leaning aluminum with proper leaf guards. Might go through kitchner roofing custom-contracting.ca for install.
custom contracting does really good paintings on my residence
custom contracting eavestrough & roofing kitchner roofing
kitchner roofing customized contracting eavestrough & roofing
tradition-contracting Skylight installation Kitchener
I didn’t know about all these factors affecting premiums—thanks for the info on commercial truck insurance! cheap cargo insurance california
For pop-up shops or local markets, signage matters so much! I used Print FX after browsing options on menu design and print —our booth looked incredibly professional.
This was a fantastic read. Check out santa cruz moving company for more.
Vacation homes need special attention. I aligned coverage across states with Cole Green – State Farm Insurance Agent .
Great explanation of Lisfranc injuries. Timely surgery is critical—learn more at foot and ankle surgeon near me .
This was beautifully organized. Discover more at google moja firma .
Great topic. The core problem with standard SEO audits in the US isn’t that they miss tactics—it’s that they rarely dig into the *why* behind issues https://www.huntingnet.com/forum/members/deweladaxz.html
Has anyone used a plumber in O’Fallon IL for drain cleaning? What was your experience? plumbing near me
Dock-to-stock time is a key metric. With guided receiving in ERP consultant near me , we minimize it from 24 hours to six.
Thanks for the clear breakdown. More info at moving services santa cruz .
Good callout on logging. Without centralized logs and retention, forensics is guesswork. I prepare a logging maturity type at it managed service provider .
Been through maybe half a dozen US-based crypto exchanges, and honestly, the difference in fees and support is night and day—and not always in the way marketing would have you believe user experiences with Gate.io altcoins
Finally got my roof arranged thanks to ## roofing Basingstoke ##! Their client service actually stands out. roofing near me
Harnessing data analytics does offer significant advantages gaining clarity insights into consumer behaviors—what tools proven beneficial accurately track metrics measure performance gain actionable feedback proactively adjust strategies implemented Search engine optimization Dublin
Been down that road. Most beginner crypto exchanges in the US look shiny but come with hidden frustrations https://www.animenewsnetwork.com/bbs/phpBB2/profile.php?mode=viewprofile&u=1127825
Happy visitor alert!! My latest knowledge with this plumbing employer was not anything short of useful!!Check out ### anyKeyWord ###for superb content Plumber Norwich
This article is perfect timing as I plan my own remodel in LA; thank you for all the great advice—more inspiration awaits at Custom Kitchen Cabinet Makers In Los Angeles .
Love the designs shared here! Kitchen remodeling in Los Angeles really brings out creativity. Check out Custom Kitchen Cabinet Makers In Los Angeles for more inspiration!
Helpful suggestions! For more, visit air conditioning maintenance service .
Valuable information! Discover more at Wilmington Sewer line replacement .
Cleaning carpets may be daunting, yet your tips and merchandise like carpet cleaning services make it more easy!
Thanks for the insightful write-up. More like this at Sewer line repair .
Nicely detailed. Discover more at Gutter replacement Limerick .
This was quite enlightening. Check out mold remediation for more.
Love the city context sensitivity here. I posted a context checklist on architects near me .
Great article on greywater systems. jb rooter and plumbing experts assessed my home and provided options.
I trust Front Room Hair Studio for every special event. Best in Houston: Hair Salon .
Pro tip: ask for detailed photos from the roof inspection. It helped us prioritize repairs. We’re moving forward with Hail and wind damage roof repair for roofing and eavestrough work.
Want to get rid of unwanted fat? Trust the expertise of non-invasive fat reduction for exceptional CoolSculpting services.
Looking for an electrician near me? Trust Summit Services in Hilton Head Island to get the job done right every time. electrician
Pro tip: ask for detailed photos from the roof inspection. It helped us prioritize repairs. We’re moving forward with Slate roofing Kitchener for roofing and eavestrough work.
Wow, getting the right legal advice after a car accident is crucial. If you’re in Seattle, accident lawyer could be your go-to for professional assistance and support during such tough times.
Kudos again on delivering results beyond expectations consistently throughout our collaboration!! ## SEO Company San Francisco CA
Nhiều shop online rao bán vật dụng cải tạo thành vũ khí. Cách phân biệt trang hợp pháp và bất hợp pháp xem chi tiết tại sextoy .
Your expertise in helping people find reputable Los Angeles personal injury lawyers is truly commendable – it’s crucial for those seeking justice and support Police misconduct attorneys
Có những trang giả mạo cơ quan nhà nước để lừa đóng phí “xử lý vi phạm”. Muốn kiểm tra tính xác thực, mình luôn đối chiếu hướng dẫn ở đọc sex hay mới nhất .
Stairwells is usually darkish— residential painting contractors helped me opt for a luminous impartial.
Get your questions answered promptly by reaching out to someone from the team at Laguna Niguel estate planning attorney
The emphasis on data, not drama, was refreshing. Learn more at action therapy .
The timeline for recovery after a fire can vary greatly, but having a plan helps immensely—great advice here! Biohazard Clean Up
The expertise of Seattle car accident lawyers in handling complex legal cases is impressive. accident lawyer could benefit greatly from their diligence and knowledge in seeking justice for those affected by accidents.
Impressed by the expertise displayed in this blog post about Sacramento personal injury lawyers. It’s essential to have knowledgeable professionals like these when seeking legal advice for Auto accident attorneys .
Well explained maintenance steps. Chimney Repair Cleveland Ohio can install multi-flue caps for complex stacks. Cleveland Ohio chimney repair specialists
This post is so relevant for anyone looking at home renovations; I’ll definitely check out what Roof Replacement Company In Illinois has to offer!
If you’re looking for the best electrician near me, I highly recommend Pure Energy Electrical Services in St Augustine! electrician near me
Impressed by the depth of insight provided regarding personal injury law, especially for those in Sacramento. The professionalism and expertise showcased truly make Car accident lawyer stand out!
Your team of San Diego personal injury lawyers seems top-notch! If anyone needs expert legal advice for their case, they should definitely check out Car accident attorneys ‘s services.
Charleston romantic restaurants are easy to find with the guide on fancy restaurants .
Appreciate the detailed post. Find more at pozycjonowanie stron .
Has anyone used an appliance repair service recently? I’d love to hear your recommendations for Arlington. https://www.google.com/search?q=Greg%27s+Grade+A+Appliance+Repair&ludocid=6678422040132912182
I appreciated this post. Check out water damage cleanup services for more.
The expertise and dedication of Portland personal injury lawyers truly make a difference in seeking justice for those in need Medical malpractice lawyer
After utilizing numerous business in time, it’s clear that I prefer working straight with * * anyone * *. portable toilet rental
This is a must-read for anybody organizing an event outdoors! Always trust #shrt _ cdK # when it concerns cleanliness! porta potties near me
Count me as another satisfied customer of Brazilain Waxing services provided by ## Men’s Waxing Services Las Vegas
Portable toilets do not need to be gross! My experience with porta potty rental was wonderful– clean and well preserved.
Affordable and efficient, local on-page seo agency san jose grants strong web optimization prone San Jose tailored to niches.
Hãy tham gia ngay cùng 32win để nhận được nhiều phần thưởng giá trị!
Cảm ơn bạn đã giới thiệu về Go99, mình sẽ thử ngay! Go99
Just had our gutters cleaned and realized we need a full upgrade. Anyone in Kitchener have experience with reliable roofing and eavestrough pros? We’re considering Roof leak repair Kitchener for a quote.
This was quite useful. For more, visit https://maps.app.goo.gl/sSYJkXrEmqpBGzpz6 .
Siding, fascia, and eavestrough colors should all coordinate. We’re updating our exterior palette and plan to work with Kitchener roofing .
Love seeing before-and-after roof projects. Quality flashing and proper drip edge make all the difference. Thinking of booking with EPDM roofing for our eavestrough replacement.
Tôi cảm thấy may mắn mỗi lần tham gia cá cược tại @@nhà cái này! ## 13win13.win
After a workplace injury, I read on Fort Worth Personal Injury Lawyer about third-party claims and then spoke with a Fort Worth attorney.
Cable and brace can extend a tree’s life, but sometimes removal is best. Tree Service provided a balanced opinion.
New homeowners in Kitchener—don’t skip a roof and gutter inspection. We’re using top Kitchener roofing firms for a comprehensive report and quote.
Appreciate the detailed information. For more, visit Majewski Plumbing .
Love the focus on biomechanics. For complex foot alignment issues, see the experts at foot and ankle surgeon Caldwel .
Need help valuing your case? The damages calculator on el segundo injury lawyer gave me a range to expect.
Tôi rất thích tham gia các trò chơi slot tại 89bet, tỷ lệ thắng khá cao! 89 bet
Such a comprehensive assessment of the Brisbane search engine optimization panorama! Don’t put out of your mind to study out seo brisbane for added components.
Love the pet-friendly cleaning tips. I filter for pet-safe products on local licensed cleaning company .
Thanks for sharing those really good hints—I will virtually discover professional carpet cleaners !
Calm, scenic, and affordable— hotel lovina Bali D kailash retreat made finding Lovina hotels easy.
Just got a Brazilian wax in Las Vegas at Brazilian Waxing Las Vegas . The results are incredible! Will definitely be going back.
I’m planning to build a BBQ island soon. I’ve seen great designs at driveway installers orange county .
Helpful info on currency of certificates. I automated COI renewals with State Farm Insurance Agent .
Many people don’t realize how much thought goes into planning routine upkeep tasks like these—but once they’re needed they become top priority fast!! Join discussions happening over @#Anykeyword#. Sacramento vacuum excavation
It’s good knowing there’s a dependable option like * * anybody * * readily available whenever we require them. portable toilet rental
Love the emphasis on tidiness throughout gatherings! If you’re needing toilets, think about reaching out to #shrt _ cdK #! porta potty rental
This is a topic that everyone involved in construction should read about—utility safety matters! More details at Orange County utility potholing .
I’ve bounced around a dozen US-friendly crypto exchanges, and here’s the no-BS take on fees and support. Fees aren’t just a percentage—withdrawal costs crush your profits more than trading fees ever do. For example, Coinbase Pro has decent trading fees (0 https://www.instapaper.com/read/1936474450
Exceptional guidance on sanitation at outdoor gatherings! I have actually constantly had terrific service from porta potties near me when leasing toilets.
Affordable luxury services at Front Room Hair Studio. Learn more at Hair Salon .
Cut through the noise: beginner crypto exchanges in the US aren’t the wild west, but they sure feel like a themed carnival sometimes crypto staking for beginners
Garden fountains are perfect for relaxation spots in your yard! Discover yours at Fountain And Ponds Repair Orange County .
Glad you mentioned hydration; it helped post-treatment at American Laser Med Spa — non-surgical fat removal near me .
Action therapy encouraged me to test beliefs through action. See action therapy winnipeg .
Well done! Discover more at google moja firma .
This was a wonderful post. Check out https://maps.app.goo.gl/XfpzNuKSsTum4hhs5 for more.
Honoring commitments made provides closure clarity reinforcing foundations laid ensuring stability legacy entrusted future generations too!!!! ## living trust attorney orange county
Appreciate the comprehensive insights. For more, visit dónde dormir en Arzúa .
If you need an electrician in Bluffton, look no further than Summit Services. They truly are the best in the area! electrician near me
This was nicely structured. Discover more at abogado de herencias Coruña .
Pristine Portables made sure we had rapid response, immaculately clean units, and an overall superb rental experience. portable toilet to rent
I enjoyed this article. Check out contable Saltillo for more.
Link building ROI in the US market often gets oversimplified into just quantity-based metrics—more links equal better rankings equals more traffic. That’s a recipe for wasted spend ways to increase your backlink value
Thanks for the valuable article. More at ERTE Sevilla .
Great insights! Find more at colchones Albacete .
Gặp trang web yêu cầu nạp tiền hoặc cung cấp OTP là dấu hiệu đáng ngờ. Mình đã đọc cảnh báo chi tiết tại tải sex không che và thấy rất hữu ích.
This was beautifully organized. Discover more at https://maps.app.goo.gl/ko2sTFFp9HeN3Lx56 .
Planning a Charleston romantic restaurants itinerary? charleston gourmet dining guided me to elegant, intimate settings.
Clogged gutters caused basement seepage for us—lesson learned. Installing gutter guards and new downspouts with Kitchener residential roofing soon.
Everything was finished on time, just as guaranteed– from start to end up, they were remarkable. Builders Surbiton
Practical advice on condenser clearance. An HVAC contractor in Sierra Vista AZ can relocate units if needed. emergency heating contractor Sierra Vista
Clogged gutters caused basement seepage for us—lesson learned. Installing gutter guards and new downspouts with Kitchener roofing soon.
If you’re living in St Augustine and need an electrician, don’t hesitate to call Pure Energy Electrical Services—they’re the best around! electrician st augustine
Clearly presented. Discover more at fleet vehicle wraps bay area .
If you were injured in a DUI-related crash in Fort Worth, Thompson Law understands punitive damages issues.
Appreciate the detailed post. Find more at movers santa cruz ca .
Love the sleek lines of modern architecture? Custom steel windows will enhance that aesthetic perfectly—get inspired on Steel specialty doors Anaheim CA !
The reliability data is convincing. solar permit services helped us standardize components across portfolios.
I highly recommend trying out different gyms until you find one that clicks; there are some fantastic options available near me listed on boxing ckasses #!
) Many thanks again extended towards specialists committed ensuring high-quality outcomes acquired through team effort showed frequently here. portable toilet rental
If you’re seeking to host an outdoor wedding, don’t forget about restroom logistics! Lease from portable toilet rental — they’re terrific!
Your blog has some excellent advice! I’ve used porta potty rental several times for portable toilet rentals and extremely advise them!
This was a fantastic read. Check out https://maps.app.goo.gl/Mtybyv5sVWqpCQo89 for more.
Excited about transforming our living space soon—thankful we found our amazing team through ***my website*** windows & doors San Diego
I heard great things about facial treatments at Men’s Waxing Services Las Vegas in Las Vegas. Can’t wait to visit!
”Experiencing joys associated moments spent indulging pampering oneself resulting radiant glow confidence exudes feeling empowered liberated exhilarated discovering newfound joys simple pleasures unlocking potentials residing within pursue passions ignite Teeth Whitening Las Vegas
“If anyone has questions about their system upkeep, look no further than the knowledgeable staff at garbage disposal replacement & installation san dimas .”
This is quite enlightening. Check out tricólogo Albacete for more.
Appreciate the great suggestions. For more, visit aptos moving company .
Proud homeowner here , all thanks to secure locks provided by ###this :# # anyKey word### ! access control systems Orange County
Fantastic insights about roof installations and their long-term benefits—very useful for us homeowners in Southfield; will visit %%site%%! Metal roof installation Southfield MI
This was a wonderful post. Check out tworzenie stron www for more.
Thanks for the refresher on canonical tags. We fixed cross-domain issues with guidance from search engine optimisation services .
For anyone looking for the best skincare services, don’t forget to check out Eyebrow Services Las Vegas !
Thanks for the valuable article. More at trichoscan .
Comprehensive look at ankle fractures. For expert surgical repair, visit Caldwell NJ foot and ankle surgeon .
Short-term rental hosts will love this. Cleaning services Melbourne handles turnovers reliably and fast. Kontrol Cleaning services
Solid workmanship—JB Rooter and Plumbing Inc gets it right the first time: jb rooter and plumbing inc
Clogged gutters caused basement seepage for us—lesson learned. Installing gutter guards and new downspouts with Metal roofing Kitchener soon.
Great info. Chimney Repair Cleveland Ohio replaces rusted chimney crowns on metal chase surrounds. local chimney repair options
Anyone compare aluminum vs steel eavestroughs in Kitchener’s climate? Leaning aluminum with proper leaf guards. Might go through Ice dam removal Kitchener for install.
When you act first, clarity follows—action therapy nails this. See action therapy for tips.
Great job! Discover more at santa cruz moving services .
New homeowners in Kitchener—don’t skip a roof and gutter inspection. We’re using best Kitchener roofing company for a comprehensive report and quote.
Great list. Frisco homeowners should get a clear, itemized invoice from their roofer. Roofing contractor in Frisco
Jumping into crypto through beginner-friendly US exchanges? Here’s the no-fluff rundown: Coinbase is the usual “welcome wagon,” but beware the fees—they’ll nibble your gains faster than you can say “pizza payment http://www.video-bookmark.com/user/kevonahqgk
The process was comfortable, effective—and did I mention how friendly everyone was?! Highly recommend them!!# # anyKeyWord ## body contouring without surgery
Thanks for the informative post. More at casa turística en Burres .
Been through my share of US crypto exchanges, and honestly, the devil’s always in the fees and customer support. Coinbase? Easy to use, but their withdrawal fees are highway robbery—like, always check those before dumping your BTC. Binance crypto exchanges with competitive rates
Simply wanted to drop a note about how terrific portable toilet rental is for portable washroom leasings– they actually stand out in Phoenix!
Thanks for the great explanation. Find more at abogado mercantil Coruña .
I can’t worry enough how important it is to choose the ideal service; that’s why I always choose porta potties near me in Durham.
Tôi luôn đặt niềm tin vào đăng nhập thienhabet mỗi khi muốn cá cược online.
Just had our gutters cleaned and realized we need a full upgrade. Anyone in Kitchener have experience with reliable roofing and eavestrough pros? We’re considering home services in kitchener for a quote.
Tôi đánh giá cao sự minh bạch trong các giao dịch của 12Play! 12Play
Hãy cùng nhau xây dựng cộng đồng người chơi mạnh mẽ hơn nữa tại diễn đàn của Daga88 nhé mọi người! daga88 lat
Hệ thống giao dịch ở #Viva nhà cái uy tín cá cược online# rất nhanh chóng và tiện lợi. https://Viva88.plus
Nếu bạn chưa biết đếnwin888 thì hãy nhanh chân đăng ký ngay hôm nay để nhận được ưu đãi cực chất !!! ## đăng nhập Win88
Mình yêu thích cách thức tổ chức các trò chơi tại Go88, cực kỳ chuyên nghiệp và thú vị! link vào go88
365Bet luôn cập nhật các chương trình khuyến mãi hấp dẫn, tôi không thể bỏ qua! 365 Bet
Terrific post overall! For those needing portable washroom options near riversides, look no further than portable toilet rental !
Excellent insight into claim reserves. My insurance agency kept me informed during the process. State Farm Insurance Agent
Pain doesn’t have to control your life—especially with all the great options in Scottsdale! See more at Pain Management Scottsdale !
“Their commitment towards delivering exceptional results shines through every time—a real asset for our community.” Arlington Appliance Repair Services
Hy vọng rằng mình sẽ gặp may mắn khi tham gia cá cược ở %%. 99Win.world
A well-structured approach to understanding underground utility issues; I learned a lot from this post, thank you again! Fresno hydro excavation
Great job! Find more at Régimen Simplificado de Confianza Saltillo .
Thực sự không dễ dàng để đánh giá một nhà cái giữa hàng trăm lựa chọn hiện nay! Nhưng nhờ vào bài viết này tôi tự tin hơn để tìm kiếm thông tin về # anyKeyword # ibet
Có ai chưa biết đến # # anyKeyWord# # thì hãy nhanh chóng tham gia nào! https://shbet.us.org
If you’re trying to find dependable ## roof installation Basingstoke ##, look no further! I’m thrilled with the results from this business. roofing near me
Nhà cái này không chỉ uy tín mà còn rất thân thiện với người chơi. web cá độ bóng đá
Chưa bao giờ tôi cảm thấy vui vẻ như vậy khi tham gia cá cược online như ở bet 167. Bet168 sale
Loved the CRO insights bundled with affordable local seo in san jose safe SEO amenities San Jose—more leads, comparable traffic.
Great job as always ladies; thank you so much once again!!! teeth whitening las vegas
The final walkthrough surpassed expectancies. interior painting services introduced a targeted advertisement end we’re pleased with.
Whether you’re a startup or an established business, explore what #managedITservices can do for you at Cabling Services Provider California .
If you want quality and reliability from an electrician on Hilton Head Island, look no further than Summit Services! electrician
The distinctions between Achilles tears and calf strains are key. For advanced care, Springfield foot and ankle surgeon helped.
Foodies into charleston gourmet dining will appreciate the selections I discovered through fancy restaurants near me .
Appreciate the insightful article. Find more at contrato de trabajo Sevilla .
Well done! Discover more at prueba de colchón en tienda .
Happy we reached out–really will use them lower back if needed in long run!!!Visit ### anyKeyWord ###for extra tips Plumber Norwich
“The professionalism of the team made all the difference during my session at # # any Keyword ###.” Men’s Waxing Services Las Vegas
The service from Pure Energy Electrical Services was outstanding; they truly are the best option for an electrician near me right here in St Augustine! electrician
Safety protocols matter. The cleaners I found on affordable cleaning company near me follow strict standards.
The potential of using one’s own cells for treatment is revolutionary; dive deeper into this topic via # # any Keyword # # ! Orange County Botox Injections
Helpful content on understanding gross vs net. accounting services London clarified all my reports.
I’ve noticed such a lot of fulfillment thoughts from creators on OnlyFans. If you favor to easy methods to spice up your profile, discuss with https://files.fm/u/7hg6u3gfmg !
Ngày hôm nay là ngày may mắn của tôi nhờ vào việc đặt cược tại nhà cái uy tín này ! # # anyKeyWord # # https://007win.dev
When it comes to real estate transactions, having a knowledgeable ##real estate lawyer## is essential for smooth dealings. #RealEstate law firm london
After a poor experience elsewhere, I’m determined to find the Best Optometrist in Chino CA. Reviewing Optometrist today.
Resilience shines brightest moments darkest ; uphold hope while pursuing favorable outcomes ensuring best interests upheld always driving choices made henceforth utilizing info accessed throughout # anykeyword ##### family lawyer in maryland
I’ve been curious about advertising ideas for OnlyFans accounts. What’s labored for you? https://www.slideserve.com/baldorbvad/indigoisla-s-blue-hour-moody-muses-and-intimate-musings
Toilet solutions are vital; that’s why I rely on #AnyKeyWord # each time I’m hosting an outdoor function around here! porta potty rental
I’m grateful we discovered this business in the nick of time; they conserved us huge time! Thank you * * anyone * *. porta potty rental
customized contracting does awesome paintings on my house
customized contracting eavestrough & roofing kitchner roofing
kitchner roofing custom contracting eavestrough & roofing
custom-contracting Roof leak repair Kitchener
We’re seeing continual development with their search engine optimization monitoring. Information: seo brisbane .
Great insights on outside events! Portable toilets are important, and I constantly recommend having a look at portable toilet rental for dependable rentals.
“For any business owner still unsure about making the switch, I highly recommend doing thorough research on its positive impacts.” EV charging station installation company
I enjoyed this article. Check out projektowanie stron internetowych for more.
New homeowners in Kitchener—don’t skip a roof and gutter inspection. We’re using custom contracting eavestrough & roofing kitchner roofing for a comprehensive report and quote.
Congratulations to all the devoted criminal attorneys available working hard to make certain justice prevails for their customers every day! Los Angeles criminal defense attorney
The actionable steps provided here are invaluable; I’m eager to apply some inspired by Webjuice’s journey toward top rankings! SEO Matrix System
This is very insightful. Check out Family Lawyer service for more.
Bất ngờ với dịch vụ chăm sóc khách hàng của tk88.bz , rất tận tình!
Thanks for the great explanation. More info at alopecia androgenética hombres .
Pro tip: ask for detailed photos from the roof inspection. It helped us prioritize repairs. We’re moving forward with roofing kitchener for roofing and eavestrough work.
Such great advice on choosing materials! I’ll keep this in mind for my kitchen renovation project. More at Kitchen Remodeling Services In Los Angeles .
Thanks for the comprehensive read. Find more at https://www.zipleaf.us/Companies/Powells-Plumbing-Air_44849 .
Thanks for highlighting comfort during sessions. I watched Netflix at American Laser Med Spa while sculpting. non-surgical liposuction .
Appreciate the detailed post. Find more at técnica FUE Jaén .
Thật tuyệt vời khi trải nghiệm cá cược trực tuyến tại một nhà cái như 888Bet! 888Bet art
Outdoor spaces and gardens boosted my dad’s mood. We searched for courtyards and walking paths on elderly care management .
This was a wonderful guide. Check out A Perfect Finish Painting for more.
Rolling Suds Power Washing Naples Ft Myers made my windows sparkle like never before!
I highly recommend Rolling Suds Power Washing Naples Ft Myers for all your window washing needs Residential window cleaning near me
“Limerick Guttering Services worked quickly yet efficiently; couldn’t ask for more from a service provider! Gutter cleaning for homes Limerick ”
This was a wonderful guide. Check out alojamiento en Burres for more.
If your shingles are curling or missing, consider a quote from Custom Contracting Roofing & Eavestrough Repair via emergency roof repair Burlington .
Great job! Discover more at abogados Coruña .
You’ve covered some important aspects of roof repair—especially the seasonal considerations! For more, visit Flat Roof Repairs .
I enjoyed this article. Check out dictamen fiscal Saltillo for more.
If you’re serious about improving your website’s performance, you need to contact Local SEO Seattle WA .
Very beneficial post– thanks for sharing! When preparing gatherings, I always book with #shrt _ cdK # for restroom rentals! porta potties near me
Let’s keep supporting one another while learning continuously because knowledge truly empowers innovation!!! ## SEO Marketing San Francisco CA
Your guests will thank you if you choose to rent from ** # ** any Keyword # **, guaranteed!” porta potty rental
Love the idea of location pages. local seo services built Arvada-focused pages that rank and convert.
I used accounting services London for tax preparation and was impressed by their attention to detail and friendly service.
I recently utilized a portable toilet rental service for my outside wedding. It made whatever so much simpler! Highly suggest porta potties near me for anyone in Riverside.
Every interaction with Summit Services has been positive—they’re certainly the top electricians around here in Bluffton! electrician near me
Estate planning doesn’t have to be overwhelming—reach out to experts like those at orange county estate planning attorney
Corpus Christi CoolsSculpting can help you say goodbye to stubborn belly fat and hello to a flatter tummy. injectable fat dissolving
Property damage disputes? McKinney personal injury lawyer matched me with a McKinney injury lawyer who also helped with diminished value.
I appreciate the distinction between additional insured and loss payee. Our insurance agency set it right. Insurance agency
The service I received from my local legal services london ontario was top-notch! Highly recommend them for any legal issues.
Lush Dental Studio is the best dentist near me! Their service is top-notch and always leaves me smiling!
I love visiting Lush Dental Studio in Sacramento Dental care near me
If your shingles are curling or missing, consider a quote from Custom Contracting Roofing & Eavestrough Repair via local roof leak repair company .
Community support during fire recovery can be invaluable, and this post emphasizes that nicely! Emergency Construction Services
Great tips! For more, visit inspección de trabajo Sevilla .
Thanks for the clear advice. More at opiniones y reseñas colchones Albacete .
Your longevity tips (no saunas right away!) are key. More tips at botox NC .
Fancy restaurants near me just got simpler— fine dining restaurants lays out refined options clearly.
Loved your insights into local regulations regarding roofs; I’ll definitely inquire at Commercial Roofing Contractor In Illinois
We upgraded to architectural shingles and the Hamilton roofing contractors from “Hamilton roofing contractors” did an excellent job.
I learned that hydration can help skin look better with Botox from the tips on botox NC .
Need emergency roof tarping? Custom Contracting Roofing & Eavestrough Repair responded quickly. Save their link: nearby roofing experts .
I was astonished at how much a knowledgeable criminal attorney could influence the end result of a case. Absolutely worth buying! top criminal lawyers in Los Angeles
Curious if anyone else noticed difference mentally after engaging consistently within such rigorous physical activities overtime – definitely saw shifts myself inspired partly due emphasis placed upon mental wellness discussed regularly throughout boxing private lessons
Night markets near our Hotel in Lovina had amazing snacks. Area guide on cheap hotel in lovina D kaialsh retreat .
If you’re searching for an electrician near me, go with Pure Energy Electrical Services! They have been amazing every time I call in St Augustine. electrician st augustine
I underestimated how quickly decay spreads. Glad Tree Service did a prompt removal.
Farm policies that actually show real-world dangers– thanks, Lassila Agency. Begin below: life insurance .
Really appreciate this post about maintaining roofs properly! Anyone looking for expert help can visit Roof repairs Cork in Cork.
Friends family encouraged hear recommendations surrounding experiences shared alongside personal testimonials Teeth Whitening Las Vegas
Amazing advice throughout this post about enhancing search engine rankings—definitely consult with ### anyKeyword ### if you’re located near San Jose! SEO Expert San Jose CA
Having dug into Stake Casino’s bonuses from a Canadian player’s perspective, I’d say the offers look flashy but you’ve really got to read the fine print before committing https://online-wiki.win/index.php/Why_Trusting_Casino_Bonuses_Feels_Impossible_for_Savvy_Canadian_Players
The team at Pristine Portables went above and beyond to make sure our rental units were pristinely clean and delivered on time. how many porta johns do i need
1. Look, I’ve dealt with ant invasions for years, and honestly, the best thing that worked for me was a regular treatment schedule. Just one round of spraying won’t cut it if those little guys keep coming back pest control for home
1. Look, I’ve tried a bunch of online casinos, and Stake’s game selection really stands out. From slots to live dealer games, there’s always something new to try Check out the post right here
Love that some contractors offer drone inspections now for safety and detail. Curious if WSIB and insured roofers Kitchener provides that in Kitchener.
Excellent reminder to avoid recorded statements without counsel. If you get a call, consult Arlington accident lawyer first.
1. Hey, just wanted to chime in about Stake—I’ve been playing here for a few months, and honestly, the withdrawal speed is insane. I requested a cashout yesterday afternoon, and the crypto was in my wallet within an hour https://alpha-wiki.win/index.php/When_a_Meme_Changes_the_Rules:_How_Stake%27s_Reposted_Viral_Content_Scrambled_the_Meaning_of_Rakeback
After a serious freeway crash on the 105 or 405, Thompson Law can navigate complex multi-vehicle liability issues.
1. Look, as a busy mom juggling work and kids, Taylor Farms salads have seriously saved my lunch game. They’re fresh, tasty, and no prep mess — exactly what I need on hectic days. Plus, my picky eaters even sneak a bite or two!
2 safety measures after Taylor Farms recalls
Interesting update on vertical farming tech—promises a lot, but I want to see hard data on energy consumption before calling it sustainable. Growing food indoors solves land issues but often cranks up electricity use Get more info
1. Ugh, don’t even get me started on how many times we’ve had the same ant problem come back. We keep calling our old pest control folks, but it feels like they just spray and vanish with zero follow up local pest control services
1. Here’s the deal: the UK market really sets the gold standard for iGaming operators, and this article nails why. The fact that this operator pulled in $2 Microgaming casinos Canada
Before anyone gets too enthusiastic about using Stake Casino in Canada, it’s crucial to check its legitimacy from a regulatory standpoint. Stake operates under a Curacao license, which is fairly common but not the most reputable jurisdiction out there https://fair-wiki.win/index.php/What_Happens_If_Stake_Gets_Shut_Down_in_Canada:_Risks_to_Player_Funds_and_Practical_Steps
1. Oh wow, I never thought about using a lip scrub before applying lipstick! Which lip scrub brand do you recommend? I’ve tried a few but they always end up drying out my lips even more. Would love some suggestions!
2 https://wiki-byte.win/index.php/Simple_Lip_Care_Q%26A:_Diet,_Exfoliation,_and_the_Toothbrush_Trick
This was very enlightening. For more, visit trichoscan Albacete .
Just had our gutters cleaned and realized we need a full upgrade. Anyone in Kitchener have experience with reliable roofing and eavestrough pros? We’re considering kitchener home renovation for a quote.
I never thought I’d enjoy boxing, but the classes in Metro Vancouver are so engaging! Check out boxing private lessons for more info!
I found this very interesting. Check out tratamientos anticaída Jaén for more.
Appreciate the detailed post. Find more at senior care assistance .
I don’t usually share recommendations but felt compelled after seeing firsthand what # anyKeywords# could do!!! Roof insulation Cork
If you want a Fort Worth car wreck lawyer who fights hard and keeps you informed, contact Fort Worth Injury Lawyer .
This is a great resource for occasion coordinators! I recommend checking out porta potty rental for all your portable toilet rentals.
Your article on choosing an accountant was insightful. I’m satisfied with estate planning london .
1031 exchanges demand precise timing—consult a real estate lawyer. Start at lawyers london ontario .
I have actually used numerous porta potty services, however porta potties near me sticks out for their cleanliness and dependability.
Simply wanted to share my satisfaction with utilizing #shrt _ cdK #; they provided excellent service throughout our event! portable toilet rental
This marketing consultant to LGBTQ+ pleasant spots is big. I found welcoming socials because of top rated seo services san jose .
I’m aiming to refine my waistline—American Laser Med Spa’s CoolSculpting could be the key. non-invasive fat reduction
Thanks for the great explanation. Find more at casa de aldea Arzúa .
I really appreciate how contractors like ## backyard hardscape contractor orange county
I came across some tips on selecting the right professional criminal attorney in Los Angeles —it really helps in making informed decisions!
What an impactful way forward towards creating cleaner work environments while minimizing disruptions caused during renovations ? Local leaders advocating these changes inspire me greatly ; let others know where they too can find useful information around Orange County vacuum excavation
If you’re in Sacramento and need utility locating services, vacuum excavation is the way to go! More insights at Sacramento vacuum excavation .
Just had our gutters cleaned and realized we need a full upgrade. Anyone in Kitchener have experience with reliable roofing and eavestrough pros? We’re considering affordable Kitchener roofing for a quote.
The imaging examples were helpful. I brought mine to foot and ankle surgeon Caldwell for a clear plan.
Garden fountains not only look good but also provide a soothing sound. Check out the variety at Fountain And Ponds Repair Orange County .
Wonderful tips! Find more at bufete de abogados Coruña .
Just got my Brazilian wax done and feeling fabulous thanks to Brazilian Waxing Las Vegas here in Las Vegas!
This was quite useful. For more, visit auditoría contable Saltillo .
I truly appreciate all that integral builders did– they turned difficulties into victories during our project together. Builders Surbiton
Thanks for the useful post. More like this at despido improcedente Sevilla .
Pro tip: ask for detailed photos from the roof inspection. It helped us prioritize repairs. We’re moving forward with kitchener roofing for roofing and eavestrough work.
Appreciate the insightful article. Find more at water heater repair .
I liked this article. For additional info, visit water Heating Repair .
Summit Services is hands down the best electrician in Bluffton! Their team is reliable and knowledgeable. best electrician bluffton sc
I liked your idea of rotating tasks monthly. I created a rotating list on move out cleaning company .
This was highly educational. More at colchones para parejas independencia de lechos .
Big shoutout to local Hamilton roofers who actually show up on time and clean up properly. If you need a roof repair, try “roof repair Hamilton” .
With kids in the house, safety features are non-negotiable! We upgraded our sensors with help from Select Garage Doors after researching options through New Garage Door Installation .
This was highly educational. More at water heater repair .
Liquid navigation that adapts to motive is exciting. We’re prototyping predictive menus on top Arkido web design firm .
Has anyone else experienced their garage door reversing unexpectedly? I learned from Select Garage Doors that it’s often a safety sensor issue. For troubleshooting, check out Garage Door Repair Parker —super clear instructions.
Well explained. Discover more at Personal injury attorney .
For students needing quick cash during finals week (like me!), pawning jewelry at “Pawn Jewelry – Coral Gables, Miami” is discreet and efficient. Learned how from Pawn Shop .
After neglecting maintenance last year, we faced expensive repairs—a lesson reinforced by articles at New Garage Door Installation and prompt service by Select Garage Doors.
This was quite informative. More at Suburban Plumbing Sewer Line and Drain Cleaning Experts .
Great post! Routine maintenance is so important for garage doors, especially with Parker’s unpredictable weather. I always trust Select Garage Doors for seasonal check-ups. If you’re searching for trustworthy options, Garage Door Service is worth looking into.
Thanks for mentioning the benefits of professional tune-ups! My door operates smoother since using Select Garage Doors—check Commercial Garage Door Services for what’s included in a standard service visit.
Appreciate the detailed insights. For more, visit movers santa cruz .
If you’re unsure where to begin with your will or trust, start by consulting an experienced local attorney today! california estate planning
Looking for an experienced electrician in St Augustine? Look no further than Pure Energy Electrical Services! electrician st augustine
Diabetic foot care is critical—thanks for covering it. For comprehensive surgical care, visit foot and ankle surgeon near me .
Excellent roundup of insurance myths. My insurance agency dispelled several and improved my coverage. Danny Fernandez – State Farm Insurance Agent
Appreciate the realistic timelines. Globalized Marketing Solutions has been a best SEO company in Arvada for us.
I mapped a fine dining weekend in Charleston using the resources on upscale restaurants near me and it was spot on.
So satisfied to work out sustainable practices being mentioned relating to roofing answers—necessary subject at the present time and for our future as smartly! Discover green features from roof warranty Burlington
I’ve been searching for dependable SEO solutions in Brisbane and discovered Jason Suli Digital Marketing– satisfied with their outcomes. Check out seo brisbane .
Wondering if your vintage brooch is worth anything? Bring it into Pawn Jewelry – Aventura, FL like I did—you might be pleasantly surprised! Their valuation methods are explained on Pawn Jewelry Aventura .
Thanks for the detailed guidance. More at pge certified contractors near me .
Discovering compassionate yet assertive people makes browsing delicate subjects less challenging total!! ###. local criminal attorneys
Wonderful ideas made here about handling toilet centers outdoors! Do not forget the terrific options readily available from #shrt _ cdK #! porta potty rental
Excellent explanation of business mileage vs commuting. tax services london ensured accurate logs.
Makes navigating complexities surrounding laws seem manageable knowing assistance readily available whenever needed most urgently legal services
For friendly hosts, what is the best hotel in Lovina Bali? D Kailash Retreat is the best: Hotel in lovian bali
1. Hey everyone, been playing on Stake for a few months now and honestly, I’m pretty impressed. The withdrawals really are as fast as people say — I got my crypto in under 10 minutes last time, which is a huge plus https://eduardomxkd652.huicopper.com/how-self-exclusion-minimum-deposits-and-crypto-shape-safer-play-at-stake-and-other-casinos
Estate planning and life insurance coordination were dealt with excellently. Visit car insurance .
So happy I discovered this article– valuable information indeed! If you’re hosting an event by the river, contact portable toilet rental today!
When it comes to Stake Casino bonuses in Canada, things often look great on the surface—big welcome offers, crypto promos, the usual flashy stuff. But what really matters is the fine print, and that’s where I see mixed reviews from players https://remingtonzejm921.fotosdefrases.com/play-smart-in-quebec-how-to-compare-and-use-stake-and-loto-quebec-without-getting-burned
I recommend ** # ** any Keyword ** # ** if you desire quality portable washrooms without breaking the bank.” porta potty rental
Anyone tried leaf guards that actually hold up through Kitchener winters? Considering a system installed by kitchener roofing contractors .
Transportation services can be a game-changer. We found communities with scheduled rides through senior care benefits .
1. Look, I’ve been playing on Stake for a few months now, and honestly, the game selection keeps me coming back. From slots like Chaos Crew to classic table games, there’s always something new to try https://canvas.instructure.com/eportfolios/4071696/home/what-is-the-best-bet-to-make-in-baccarat
1. Ugh, I totally hear you on recurring pests. We kept dealing with the same ant problem even after multiple treatments. It felt like we were just throwing money away. Also, the billing was a nightmare—random charges and no clear explanation more info
I just discovered some local companies doing amazing work with vacuum excavation in OC—definitely worth checking out at vacuum excavation orange county !
1. Look, I’ve tried a few pest control companies, and honestly, consistency matters more than price. My last company never showed up on time, and it just made the whole process so stressful. Has anyone else had this problem?
2 https://lorenzovuvv021.raidersfanteamshop.com/case-study-living-with-fewer-bugs-a-homeowner-s-experience-with-pet-friendly-pest-control
1. Look, as a busy mom juggling work and kids, Taylor Farms salads have seriously saved dinner time for me. Fresh, tasty, and no chopping—what’s not to love? Plus, the variety keeps things interesting!
2 https://stephenckvx419.bearsfanteamshop.com/vegetable-trays-for-gatherings-a-side-by-side-case-study-of-taylor-farms-vs-fresh-express
Looking forward to seeing how these upgrades improve my living space ! Excited about what awaits me after visiting # # any Keyword# # Steel sliding door Anaheim CA
This was a wonderful post. Check out santa cruz movers for more.
If your soffits are discolored, you might have ventilation problems. We’re getting a consult with local siding companies to sort out airflow and roofing.
Before diving into Stake Casino from Canada or the US, it’s crucial to look beyond the flashy interface http://69288c005cbc0.site123.me/
Interesting to see this new vertical farming tech claiming higher yields, but I’m curious about the energy footprint foodservice distributors
Helpful overview of subtalar fusion. I found surgeon experiences on foot and ankle surgeon near me .
Wonderful tips! Discover more at Powiększanie ust .
This was a fantastic resource. Check out wifi gratis Arzúa for more.
1. Here’s the deal: hitting $2.2 billion in revenue is no small feat, especially in a market as competitive as the UK https://zenwriting.net/dueraiyxvw/h1-b-how-a-1-5m-igaming-startup-entered-a-regulated-market-and-built-a
Anyone comparing Hamilton roofing contractors should ask about warranties and ventilation. I found solid answers through roofing cost .
1. Look, I’ve always struggled with dry lips, so I gave this lip scrub idea a shot last week. Believe it or not, my lips have never felt smoother! Quick question though— which lip scrub brand do you recommend? I’m wary of ones with harsh chemicals.
2 benefits of exfoliating lips
Simply finished up a task with #roofing specialists Basingstoke #– really pleased with their attention to detail. roofing
I appreciated this article. For more, visit derecho laboral Coruña .
Thanks for the informative post. More at servicios contables Saltillo .
Storm damage had me scrambling, but Hamilton roof repair pros at roof replacement cost estimates made it simple and affordable.
A/B testing headlines still moves mountains. We’ve found “benefit + proof” wins. More at top experienced web design agency .
This was quite enlightening. Check out incapacidad laboral Sevilla for more.
Mình vừa mới đăng ký tài khoản tại ###! Mong rằng đây sẽ là quyết định đúng đắn! https://aa88.casino
Thanks for the great information. More at tienda de descanso cerca de mí Albacete .
What a remedy to have my plumbing trouble taken care of out! Happy client here! For extra resources, test Plumber Norwich !
Excellent points on slab moisture. Leak detection from jb rooter and plumbing contact found the culprit.
A quality ### Woodland Hills general contractor
I’ve seen great success with pop-up shops across Ireland—definitely worth considering for new entrepreneurs! Google Business Profile optimization
Thanks for the great tips. Discover more at 831 Movers – Santa Cruz .
Loving how supportive everyone has been throughout this journey thus far – it truly feels special being surrounded individuals who strive towards similar aspirations showcased consistently across content provided through links connected directly back boxing class
I’m satisfied you spoke of the have an effect on of climate on roofs! Find climate-resistant recommendations at local emergency roof repair company .
Tidiness is crucial when it concerns porta potties! Thank you, porta potty rental , for offering such great service near Phoenix.
Thanks to Manabuy, I’m saving such a lot on my Mobile Legends fees! You need to no doubt look at various their per thirty days deals at mobile legends diamond top up !
Thank you, portable toilet rental , for providing such excellent service with your portable toilets during our occasion!
Always ask prospective prospects if they specialize as generalists may lack particular understandings required during challenging times!!! ###. local criminal lawyer in Los Angeles
) Such impressive devotion shows real essence behind core values promoted tirelessly day-in-and-day-out here daily continuing forward into future endeavors alike ahead too! porta potty rental
Edge-to-facet consistency like this takes patience. painting companies near me gives you step-by way of-step plans to reap it.
Thanks for sharing your ride with roof kinds specified to our location! More information can be determined at roofing services burlington .
Are there specific conditions where patients report highest success rates after consulting doctors associated alongside textbf#allaboutregeneration?” Pain Management Scottsdale
Thanks for breaking down quarterly taxes. It’s a lifesaver for startups. I recommend checking tax london ontario for a reliable tax accountant.
Property ownership transitions entail various challenges solved effectively via adept representatives guiding clients through hurdles effortlessly ! #EffectiveGuidance law firm london ontario
Couldn’t have asked better timing either considering upcoming rainy season approaching soon!! Gutter leak repair Limerick
Installing safety sensors is now standard practice—Select Garage Doors explained why they’re so important for families with kids or pets; additional safety standards were outlined on Garage Door Repair Near Me too.
This guide will definitely help ease any worries I have about my upcoming roof replacement project—thank you!! Residential Roofing Surrey
Super useful reminder. For routine drain maintenance, trusted award-winning plumbing professionals keeps ours clear.
This was very well put together. Discover more at casas rurales cerca de Arzúa .
Good note on credit scores affecting rates. My insurance agency explained the impact clearly. Insurance agency
If your goal is charleston gourmet dining, check the thoughtfully selected venues at fine dining restaurants charleston .
Các thông tin về tỷ lệ kèo bóng đá được cập nhật liên tục trên trang chủ của ao888! alo 88
End-of-life planning is delicate but essential. assisted living facilities offers resources for coordinating with hospice when needed.
We earned featured snippets after best seo company arvada added concise answers to posts.
Stairwells can be darkish— local house painters with precision finish helped me decide on a luminous impartial.
Can someone elaborate exactly what qualities distinguish superior products marketed versus others falling short meeting industry standards established previously?? Eclipse Remodeling & Roofing Inc in Los Angeles
”Thankful everyday discovering new favorites along journeys taken throughout life—and today marks another successful chapter shared together collectively via these memories forged forward!” Brazilian Waxing Las Vegas
Automatic openers are super convenient but can be tricky to fix on your own. When mine jammed, I contacted Select Garage Doors through Garage Door Installation Greenwood Village and was impressed by their same-day service.
Thanks for the helpful advice. Discover more at derecho penal Coruña .
Appreciate the helpful advice. For more, visit servicios contables Saltillo .
I appreciated this post. Check out vet Bryceville FL for more.
If you need remodeling advice, a San Diego general contractor can help! Visit hardscaping San Diego for expert tips.
Thanks for the valuable insights. More at Powiększanie ust .
Recommend everyone bookmark this site – can’t beat what’s available through ###this :# # anyKey word### ! access control installation Orange County
After reading reviews on Eyebrow Services Las Vegas , I decided to try a Brazilian wax and it was life-changing!
Helpful suggestions! For more, visit reclamación de prestaciones Sevilla .
Excellent short article on outdoor events! If you’re searching for a dependable option, have a look at portable toilet rental for portable toilet rentals in Phoenix.
Renting a portable toilet was a breeze with porta potties near me ! Highly suggest their services to anybody in Riverside.
After utilizing numerous business gradually, it’s clear that I choose working straight with * * anybody * *. porta potties near me
Insightful perspective on patient-specific implants. Learn more from surgeons at Caldwell NJ foot and ankle surgeon .
A thorough eye exam makes all the difference. I’m aiming for the Best Optometrist in Chino CA and reviewing Optometrist .
This was highly educational. More at tienda de descanso cerca de mí Albacete .
This was beautifully organized. Discover more at water heater repair service .
This was highly helpful. For more, visit vet services near me .
These bathroom storage solutions are genius and would work well in any Southfield MI home! For additional organization tips, visit Siding installation Southfield MI .
This article made me rethink how often I ignore strange sounds from my garage door—a technician from Select Garage Doors (info via New Garage Door Installation ) taught me what’s normal and what isn’t!
”For anyone in doubt about their current service provider, give ### any Keyword### a shot!” septic pumping service san dimas
Thanks for the practical tips. More at windshield replacement quotes .
Well done! Discover more at veterinarian Allen TX .
I never realized exactly how important a good criminal attorney is until I faced legal difficulty myself. Extremely advise researching your options meticulously! experienced criminal defense lawyer in Los Angeles
Great job! Find more at air conditioning repair services Norfolk .
I liked your no-fault insurance explainer. I confirmed state rules via Insurance agency .
Nicely done! Discover more at Custody Lawyer near me .
On a budget but want comfort? Hotel in lovian bali in Lovina is a great find.
My friends keep asking where I get my glow — it’s all thanks to # # anyKeyWord # # ! Eyebrow Services Las Vegas
Appreciate the detailed information. For more, visit Normandy Animal Hospital .
I appreciated how promptly Pristine Portables handled my request and how tidy their rental units appeared. portable toilets for rent
Local expertise matters—Keystone knows Cork weather challenges. Visit Eco-friendly roofing .
New lighting inside our garage made such a difference alongside the new door install; sometimes small upgrades add up! Thanks to suggestions from both New Garage Door Installation and the team at Select Garage Doors.
Wonderful rates on life insurance policy without high pressure. Attempt Lassila Agency through home insurance .
I never realized how many factors can cause a garage door to malfunction until mine got stuck halfway up last winter! This post made me appreciate the importance of regular maintenance, and now I always turn to Select Garage Doors for peace of mind Garage Door Repair Greenwood
I on no account discovered how so much an honest roof can improve scale down appeal! Explore choices at roof ventilation Burlington .
I found this very interesting. Check out Divorce Lawyer for more.
Great job! Discover more at best columbia auto glass providers .
This was quite enlightening. Check out affordable windshield repair Charlotte for more.
Useful tips on choosing a merchant processor. income tax london ontario helped evaluate the fees.
So grateful for the support from my %%lawyer near London ON%%—they’ve truly made a difference in my life. law firm london ontario
Summit Services is the go-to electrician in Bluffton! Their team is knowledgeable and always ready to help. Electrician near me
Fresno contractors should take note: accurate utility locating can make or break a project’s success! Fresno vacuum excavation
Excellent insight on syndesmotic injuries. Those seeking advanced care can check Springfield foot and ankle surgeon .
Awesome article! Discover more at windshield replacement services .
Thanks for the helpful article. More like this at https://youtu.be/KyWqBxzJ-b0 .
Thanks for the great explanation. More info at water heater installation near me .
Just finished a project with Cork roof construction , and I couldn’t be happier with the results!
Best place to get your brazilian done if you’re visiting las vegas is definitely ### anykeyword ###! Skincare Services Las Vegas
I enjoyed this read. For more, visit habitaciones dobles Arzúa .
I found my go-to managed IT service provider in California—thank you, Managed Service Provider California , for all your help!
The little details make a huge difference in kitchen design! Thanks for highlighting that here. For more, see Cabinet Maker Los Angeles !
Thanks for the thorough analysis. Find more at auto glass services .
Great advice on managing online reputation; it’s crucial for businesses today; learn how to maintain a positive image from affordable b2b marketing agencies
This was a great help. Check out abogado mercantil Coruña for more.
This article highlights the importance of independence. We used memory care programs to find a place that supports daily living while respecting autonomy.
Tired of overpriced recharge alternate options? This web site has you protected with terrific premiums! I’ve attempted it distinct times with zero complaints: best mobile legends cheap recharge .
Great job! Find more at contadores Saltillo .
This was a fantastic read. Check out abogados accidentes laborales Sevilla for more.
I found this very interesting. Check out Powiększanie ust for more.
Local businesses can thrive with proper online visibility; learn how through interesting articles at SEO Marketing San Francisco CA !
I found the best rental service for a portable toilet when arranging my event in Boston– so easy and effective! portable toilet rental
Big thanks to porta potties near me for offering excellent porta potties during our community festival in Fresno.
This was highly useful. For more, visit colchones Albacete .
If you’re preparing an outdoor occasion in St. Petersburg, don’t forget to take a look at portable toilet rental for dependable porta potty rental services!
The FAQ section on Garage Door Service answered a lot of my questions about Tacoma-specific plumbing challenges. Reminds me of how thorough Select Garage Doors is when addressing customer concerns.
Encouraging words resonate loudly within personal narratives shared by many families overcoming obstacles brought forth through adversity—it fuels hope amongst us all ! Emergency Construction Services
Cảm ơn đội ngũ phát triển của kg88 đã tạo nên một nền tảng tốt như vậy!
When I want fine dining near me that feels special, I browse fancy restaurants near me for curated ideas.
Sharing knowledge empowers individuals seeking answers together while advocating increased visibility surrounding -### AnyKeyWord#$%! regenerative medicine orange county
Một nơi lý tưởng cho những ai đam mê cá cược chính là ## sc88.codes
Đội ngũ hỗ trợ khách hàng của Lixi88 luôn sẵn sàng giúp đỡ 24/7, thật tuyệt vời! lixi88
Need help organizing your assets? orange county estate planning attorney has knowledgeable attorneys ready to assist.
Bên cạnh việc kiếm tiền,tôi còn tìm được nhiều bạn bè cùng chung sở thích ở uu9 !!!# nhà cái uw99
Helpful piece on loan amortization schedules. london taxes built clear repayment plans.
Loving how supportive everyone has been throughout this journey thus far – it truly feels special being surrounded individuals who strive towards similar aspirations showcased consistently across content provided through links connected directly back boxing private lessons
My home feels brand new thanks to Integral Builders! Highly advise their services! Builders Surbiton
Don’t hesitate to reach out to this real estate lawyer london ontario if you need someone who knows the law inside and out.
Tình cờ biết đến sa88 ceo và giờ thì không thể rời xa được!
Thật khó để tìm thấy một nhà cái có dịch vụ tốt như tf88 hiện nay! tf88 codes
Recognizing potential pitfalls early ensures preparedness tackling hurdles encountered along way forward together united front established amongst peers seeking solidarity powered primarily behind principles espoused throughout collections housed within Estate Planning Attorneys in Maryland
Siu8888 cung cấp nhiều lựa chọn trò chơi khác nhau cho phép người chơi thoải mái khám phá và trải nghiệm ! # # anyKeYword ## đăng nhập siu88
This was very beneficial. For more, visit auto glass services .
Mình thích cách mà cm88 chăm sóc khách hàng, rất tận tình.
Có ai từng thắng lớn trong một ván poker online do họ tổ chức hay không? miso88.beauty
Fly888 thực sự là một lựa chọn hoàn hảo cho những ai yêu thích cá cược trực tuyến ! https://fly88.codes
Tôi thường xuyên theo dõi các thông tin cập nhật trên website của # # AnyKeyboard # # trước mỗi trận đấu! shbet.fund
I can’t wait to share my winning stories from #ffok# with my friends! ffok
Danh sách này thật tuyệt vời! Tôi sẽ theo dõi cập nhật từ link vào 5mb .
Mong rằng các bạn cũng sẽ tìm thấy niềm vui giống như tôi từ việc đặt cược trên nền tảngbj6 !! # # anyKeywod ## https://bj66.codes
Trang web tg888 liên tục đổi mới công nghệ nhằm phục vụ tốt nhất nhu cầu của mọi người dùng !!### anyKeyWord ## tg88
Fantastic advice on E-E-A-T. best seo company arvada helped us add author bios and trust signals.
Các chương trình khuyến mãi tại MN88 luôn hấp dẫn và thú vị! nhà cái mn88
Every time I see newly constructed homes pop up around LA, it fills me with excitement about the city’s growth potential ! # # anyKeyWord ## los angeles general contractor
Enjoyed every moment of pampering during my last session of Brazilian waxing; thank you ## Teeth Whitening Las Vegas
Your expertise in handling car accident cases is truly commendable. I’ll be sure to recommend your services to anyone in need of trusted guidance regarding legal matters related to accidents auto accident attorney
Our Hotel in Lovina had a great on-site restaurant with local dishes. See hotel lovina Bali D kailash retreat .
For brand-new home owners, Lassila Agency informs you on replacement expense vs ACV. Find out at insurance broker .
This blog highlights an often-overlooked detail– portable toilets are necessary at festivals and fairs in Boston! portable toilet rental
Simply concluded a successful occasion thanks to the exceptional service from porta potties near me — extremely recommended if you’re near Fresno!
I was excited with the tidiness and solution from porta potties near me for my last occasion in St. Petersburg. They truly recognize how to function!
Kudos to the team at SEO Agency Seattle WA for their outstanding work and dedication to clients!
This was very beneficial. For more, visit columbia auto glass service reviews .
Looking forward gaining insight towards upcoming plans proposed intended ultimately improve quality lives experienced throughout community overall—it starts first underst Sacramento utility potholing
The guide to prehab before surgery was excellent. Build your plan with foot and ankle surgeon near me .
Impressive work done by the Los Angeles personal injury lawyers highlighted in this article! I found their dedication to Truck accident lawyer truly inspiring.
For anyone needing reliable electrical work, look no further than Summit Services—best electrician near me in Bluffton! Electrician
If you want to save money while gaming, check out mobile legends diamond top up for all your MLBB needs!
Grilling season is coming up; I’m so glad I found ## backyard hardscape contractor orange county
Really pleased with the arise from ## roof service Basingstoke ##! They transformed my home magnificently. roofing near me
From providing expert legal guidance to ensuring fair compensation, Sacramento personal injury lawyers definitely know how to champion their clients’ rights Personal injury lawyer
This was a wonderful post. Check out DIY windshield replacement for more.
My glasses prescription needs updating. For the Best Optometrist in Chino CA, I’m planning to book via Optometrist .
Your selection of Police brutality lawyer clearly highlights your commitment to exceptional quality legal services in Sacramento
Very informative article. For similar content, visit Powiększanie ust .
Communities thrive best when they support each other ; keep spreading awareness around effective alternatives which lessen risks involved during major projects impacting all lives living locally while still pushing progress forward -learn what those Orange County underground utility locating
Wow, the impact of Webjuice on organic traffic is phenomenal. Can’t wait to try it! #anyKeyword# Webjuice case studies
Great info on avoiding late fees and penalties. accountant london monitors all due dates.
Appreciate the detailed insights. For more, visit abogado inmobiliario Vigo .
Thanks for the comprehensive read. Find more at casa rural con chimenea Segovia .
Your exterior sealing tips are thorough. jb rooter and plumbing ca used quality caulk and backer rod for longevity.
Couldn’t have faith they got here so immediate and did such thorough work–blissful purchaser here!!!Explore relevant content at ### anyKeyWord ### Plumber Norwich
Just finished another meeting with one of their lawyers—and wow—I feel confident moving forward after getting solid advice law firm london ontario
Your site is a valuable resource for those seeking guidance after a car accident. I appreciate the informative content and insights shared on auto accident attorney !
I had no idea windows could impact energy efficiency until reading this—Select Garage Doors recommended double-pane windows, as discussed further on Garage Door Service .
The advice on swelling control post-op is practical. I found product recommendations on Springfield NJ foot and ankle surgeon .
If you wish crisp edges and clean partitions, do that House Painter in Roseville CA: professional house painters
I’m thrilled with how smooth my skin feels after visiting # any Keyword #; they do an exceptional job with their waxing services. Skincare Services Las Vegas
Useful advice! For more, visit https://www.facebook.com/148474415018649 .
Considering the expertise and dedication of Portland personal injury lawyers, anyone in need of legal representation can feel confident seeking their assistance Truck accident lawyer
It’s hard to find reliable services nowadays, but Clare Gutter Cleaning Company’s 100% Satisfaction Guarantee gives me confidence in their work! Gutter cleaning services Clare
Just leased some portable toilets for our business picnic. The group at portable toilet rental was remarkable and really expert.
I didn’t understand how vital a great portable toilet service is up until I used porta potties near me for my occasion in Fresno!
Great process inserting together such an informative piece—it somewhat enriches the conversation—explore further principles at Charlotte auto glass services !
I constantly suggest porta potty rental when people inquire about porta potty leasings; their service is first-class, specifically in St. Petersburg.
Love the balanced view on risks and benefits. I shared a risk minimization guide botox ny
The idea of incorporating windows seemed risky until we saw secure designs featured by Select Garage Doors over at Garage Door Repair Lakewood ; now we love the added natural light!
Thanks for explaining how regular cleaning extends hardware life—I’ve been neglecting mine but will follow tips from Select Garage Doors’ guide at Garage Door Repair Near Me this weekend!
Appreciate all the photos showing different hardware finishes—details really make a difference! Got more inspiration from product galleries at Garage Door Service Parker provided by Select Garage Doors’ team.
It’s so important to hire certified professionals for roofing work! Check out Affordable Roofing Services for quality services.
Your dedicated team of San Diego personal injury lawyers truly stands out for their expertise and client-focused approach Police brutality lawyer
Well done! Discover more at best columbia auto glass providers .
I enjoyed this read. For more, visit local windshield replacement specialists .
I was worried about matching paint colors after a panel replacement but found reassurance reading customer stories on Commercial Garage Door Services featuring work by Select Garage Doors.
What a great guide for first-time remodelers! So glad I found this blog before starting mine—more insights at Kitchen Remodeling Los Angeles .
For anyone worried about hidden fees when pawning items: don’t be! Everything was transparent and easy to understand when dealing with Pawn Jewelry – Aventura, FL whose details are clearly listed on Pawn Jewelry Aventura .
This was very insightful. Check out https://redefinedresto.com/water-damage-restoration-franklin-park-il/#:~:text=Franklin%20Park%2C%20IL-,Water%20Damage%20Restoration,-Service%20Areas for more.
Storm damage had me scrambling, but Hamilton roof repair pros at roofing comapanies near me made it simple and affordable.
“Looking at different colors and finishes—where can I find samples from local suppliers?” Metal Roofing Near Me
Great weblog! I came across so many insights the following. Check out my related paintings at windshield decals and accessories .
Having clear directives set forth enables families to focus on healing rather than grappling over logistics following loss!!! orange county estate planning attorney
Great security advice. Garage Door Repair Tucson pros set up vacation lock mode on our wall console. https://www.google.co.in/search?q=Discount+Door+Service&ludocid=16286553429910297688
Granules in the gutters? That’s a sign your shingles are aging. Getting quotes for replacement— roof replacement services in Kitchener is on our shortlist.
Nicely done! Find more at Charlotte windshield installation .
Tax season was much easier with accountants london ontario —skilled tax accountants in London Ontario.
Super informativer Beitrag! Gerade bei der Pflege und Sanierung älterer Gartenteiche stoßen viele an Grenzen – Algenplagen, Schlamm, defekte Pumpen oder undichte Folien sind typische Baustellen Teichreinigung Hamburg
Thanks for the informative content. More at Powiększanie ust .
Recording the adjuster calls (with consent) was a tip I got from a Dallas car wreck lawyer. Dallas personal injury lawyer
Kudos to portable toilet rental for supplying such terrific alternatives for environmentally friendly portable toilets! Love supporting sustainable services.
I had no idea that casement windows could be so stylish! Loving my new look in Anaheim. Window casement Anaheim CA
Do not let sanitation be a concern at your next gathering– rent from porta potties near me near Fresno and delight in peace of mind!
This was a fantastic read. Check out Tarifas taxi Arzúa for more.
Fantastic how much easier event planning ends up being once you protect reputable toilet services like those provided by #shrt _ cdK #! porta potties near me
I’ve heard so many success stories about using vacuum excavators; they truly are a reliable choice for digging safely and efficiently right here in our county—visit ## vacuum excavation orange county
Appreciate the breakdown of repair costs! Will check with Chimney repairs soon.
Green building and environmental compliance affect real estate deals. Local counsel at real estate lawyer london .
Love the examples you shared! For those attempting ingenious internet design in Essex, are attempting freelance web design essex .
Pristine Portables team went above and beyond to make sure our rental units were pristinely clean and delivered on time. portable restrooms rental near me
Novice buyer? Lassila Agency discusses home protection line by line. Learn more at car insurance .
Thanks for the great explanation. Find more at columbia auto glass services .
Your search for an expert local electrician ends with Summit Services—best choice around bluffing town! best electrician bluffton sc
Maintenance tip for Hamilton homeowners: annual roof inspection saves money. I schedule mine through trusted eavestrough repair Hamilton .
Excellent read for small business owners. I secured general liability through State Farm Insurance Agent .
This was a wonderful post. Check out abogado civil Vigo for more.
This was very enlightening. For more, visit casa rural con chimenea Segovia .
Appreciate the thorough analysis. For more, visit high-quality windshield .
This was highly helpful. For more, visit https://maps.app.goo.gl/CYnVFJNn9DMLUW3x8 .
Nicely done! Find more at windshield replacement process explained .
This was a fantastic resource. Check out ARHT Home Solutions for more.
For anyone unsure about California statute of limitations after an injury, el segundo auto accident lawyer breaks it down.
This post clarifies when to call a lawyer versus handling a claim alone. For a free case review, see Arlington car accident lawyer .
Well written and fascinating! Your writing trend is fascinating. For greater extraordinary content, assess out mobile auto glass replacement Charlotte .
I appreciated this post. Check out water damage restoration Westland MI for more.
For anyone dealing with persistent discomfort, it’s worth reviewing the comprehensive guides available at Pain Management Scottsdale AZ about Scottsdale’s services!
Feeling excited looking forward potentially connecting soon with new friends developing relationships mutually beneficial helping each other out periodically moving forward ahead… https://share.google/waS7PiaFpkjta0F1b
Just wished to share my experience: renting a portable toilet made our outside gathering in Boston far more comfy! portable toilet rental
Very informative. Garage Door Repair Mesa AZ took care of my off-track door in one visit. Garage Door Repair Mesa AZ
Just wanted to share that I had a great experience with the portable toilets from portable toilet rental at my last occasion in Fresno.
For anyone uncertain about their roofs’ conditions, consider reaching out to #anything#! Keystone Roofing Cork
If there’s one rental service that understands occasions well it’s #shrt _ cdK #; extremely suggested if you’re hosting something big soon! porta potty rental
Your commissioning forms are super useful. solar permit services tailored them for our EPC teams.
Thinking of joining a boxing class? You should definitely check out the recommendations at boxing gyms first!
We had ice dams last year—turns out ventilation and insulation were the culprits. Getting a roofing audit from Kitchener roofing professionals to fix it before the snow hits.
I can’t say enough good ideas about Integral Builders! Their attention to information is fantastic. Builders Surbiton
Great reminder to test sheen in high-traffic areas. Maintenance tips on St louis painters .
For CRA compliance and payroll remittances, file taxes london ontario in London Ontario is dependable.
This was very beneficial. For more, visit windshield decals and accessories .
It’s smart to verify a firm’s specialization before signing. I cross-check using real estate lawyer london .
Thanks for the great tips. Discover more at Powiększanie ust .
I found this very interesting. For more, visit Taxi Arzúa .
I prefer same-day appointments. Anyone know the Best Optometrist in Chino CA offering that? I’ll compare with optometrist near me .
I appreciated this article. For more, visit consultas legales Vigo .
I appreciated this article. For more, visit pet friendly casas rurales Segovia .
Storm season check: inspect flashing around chimneys and skylights. I’m scheduling maintenance through kitchener roofing to catch issues early.
For any flooring needs, you can’t go wrong with Floor Coverings International St Augustine – their expertise shines through every step of the way, especially in Nocatee! hardwood flooring
Maintain the good work! It’s crucial to highlight the benefits of portable toilets in Boston. porta potty rental
The tidiness of the systems from porta potty rental really stood out throughout our recent occasion in Fresno.
Kudos to porta potties near me for their prompt shipment of porta potties! They made our celebration in St. Petersburg run efficiently.
Great factor about maximizing ceiling peak. Residential architect NYC exposed beams and upgraded lighting superbly.
Flashing repairs saved our roof from leaks around the vent stack. Next up is seamless eavestrough installation via roofing contractors .
Thanks for the great tips. Discover more at quick mobile auto glass Charlotte .
My experience with Summit Services has been nothing short of excellent! Best electrician I’ve found in Bluffton. Electrician near me
Looking for cutting-edge CoolSculpting clinics in Corpus Christi? Discover american laser med spa corpus christi tx for exceptional services and remarkable results.
I like your guidelines on integrating social media into online pages—Essex groups can gain knowledge of more at freelance web design essex .
I appreciate the focus on caregiver burnout. Respite options and support groups are crucial. If you’re seeking practical tips and local services, local senior care is a helpful place to start.
This is quite enlightening. Check out comida a granel para dietas for more.
Cool message, thank you for answering usual inquiries. I included a frequently asked question on creative web design services .
Excellent rundown on Achilles tendon injuries. For advanced care and minimally invasive options, check Caldwell foot and ankle surgeon .
The group at Lassila Agency responded to all my inquiries concerning deductibles and cyclists. See more at car insurance .
Incredibly pleased with the service from ## delighted with the roofers Basingstoke ##! Specialist, polite, and skilled! Roofer
Appreciate the thorough analysis. For more, visit auto glass maintenance advice .
This was quite helpful. For more, visit trusted mobile auto glass Charlotte .
Why risk damage trying DIY methods when professionals exist? Save stress & time; call ****** instead! commercial locksmith Orange County
Perfect timing with this post– I’m presently planning an outdoor concert and require reliable info on rentals here in Boston! portable toilet rental
A substantial thank you to the team that handled my plumbing quandary—they have been notable and so immediate! Check out additional materials at Plumber Norwich !
The group at portable toilet rental is incredibly expert and responsive. Terrific option for Fresno events!
I found this very interesting. Check out Taxi a Melide desde Arzúa for more.
Life insurance riders were confusing until I read a guide on insurance agency .
Maintenance tip for Hamilton homeowners: annual roof inspection saves money. I schedule mine through Hamilton roofers” .
I can’t wait to implement some of these insights into my own business strategy after reading your expert advice here—thank you again!! Franchise SEO
Just got made with an occasion using porta potties near me , and their portable toilets were best for our requirements in St. Petersburg.
This was very beneficial. For more, visit Powiększanie ust .
ไฟหน้าโปรเจคเตอร์เป็นทางเลือกที่ยอดเยี่ยมสำหรับรถยนต์ของคุณ ไฟแต่งรถยนต์
Appreciate the comprehensive advice. For more, visit escapada rural Segovia .
This was quite informative. For more, visit consultas legales Vigo .
I love that your tips are straightforward and easy to follow; they’ll help many homeowners out there like me! drain cleaning winnipeg
A well-thought-out design makes all the difference; thank you for emphasizing that throughout your article—discover thoughtful designs at Cabinet Refacing Los Angeles !
Loved the focus on multifunctional furniture ideas; they’re crucial when making the most of limited space inside homes across our lovely areas such as those found within beautiful surroundings like those surrounding lovely regions within south fields —for Roof installation Southfield MI
Agree at the value of traceable facts. We built-in barcode monitoring for indicator calibration. Overview: dimensional inspection services
Thanks for the great explanation. More info at Powell’s Plumbing & Air .
Great job! Discover more at tienda de colchones descuentos .
Well explained. Discover more at Powell’s Plumbing & Air .
This was nicely structured. Discover more at Professional gutter cleaning .
This blog is a keeper for small contractors. An insurance agency can package GL and tools coverage Andrew Smith .
This was a fantastic read. Check out mold remediation Westland MI for more.
I checked credentials and reviews first—smart move. Provider vetting tips at botox NC .
I learned realistic expectations—Botox softens lines, doesn’t erase all. Credit to botox Raleigh for clarity.
Fantastic guidance for optimizing natural and organic light. We used clerestory solutions from Residential architect NYC and it remodeled the distance.
This was very well put together. Discover more at Sewer line repair near me .
Terrific message, extremely complete and on factor. I assembled notes at comprehensive SEO services .
I found this very interesting. Check out auto glass for SUVs for more.
Love seeing such thorough planning from # anyKeyWord#, especially dealing with unforeseen challenges posed by heavy rains! Free Roofing Quote Surrey
I had no idea about the energy savings with a metal roof—looking locally now! Roofing contractor
Thank you for the tips on roof maintenance! I’ll reach out to Roof Repair Oswego soon for an inspection.
Fantastic points raised concerning supporting local businesses affected by fires—we truly need each other now more than ever !! # # an yKe yw ord ## Emergency Construction Services
Just got my new carpet from Floor Coverings International St Augustine, and it looks stunning! Great service for anyone needing flooring in Ponte Vedra. flooring
I love how SEO companies in San Francisco CA understand the unique challenges of the local market. Explore more at SEO Company San Francisco CA .
What’s the best way to find a trusted chiropractor in Bonney Lake? Any tips? Bonney Lake Chiropractor
The team’s skill matters. American Laser Med Spa’s expertise shows. More: american laser med spa laser hair removal corpus christi .
I recently had a pest problem in my home, and I was amazed by the effective solutions offered by local services. It’s crucial to choose a knowledgeable pest control provider in Puyallup to ensure a pest-free environment Puyallup pest control
Great post! As person all in favour of web layout in Essex, I discovered your data efficient. For an individual desiring trained assistance, take a look at out freelance web design essex .
If you’re looking for dependable service from an electrician nearby, trust only Summit Services—they’re exceptional! Electrician near me
Get your questions answered promptly by reaching out to someone from the team at trust attorney orange county
Our detached garage needed new flashing and vents. Hamilton roofers from affordable trusted roofing contractors handled it in a day.
Worth every single dime paid knowing leaving feeling fabulous afterwards!!!! Eyebrow Services Las Vegas
If you desire assurance for your occasion’s washroom needs, choose the reputable option: porta potties near me !
Ice dams ruined my fascia last winter. Heard that proper eavestrough pitch and guards help. Planning to book with seamless gutters soon.
Great insights on maintaining European vehicles! Many owners underestimate how crucial specialized diagnostics and OEM parts are for long-term reliability and performance european car repair
Seriously thinking about utilizing porta potty rental once again for future occasions; their porta potties were tidy and well-stocked during our last gathering in Fresno.
Great job! Find more at Taxi en Arzúa .
Wondering about the best practices for vacuum excavation? Check out the tips shared on Sacramento utility potholing !
Massive shoutout to porta potty rental for their incredible solution during our celebration! The mobile commodes were a lifesaver!
I’m curious about the cost of installing a garden fountain in Orange County; what should I budget for? Fountain And Ponds Repair Orange County
Thanks for the useful post. More like this at alojamiento rural Segovia .
I enjoyed this post. For additional info, visit Powiększanie ust .
Nicely detailed. Discover more at bufete de abogados Vigo .
I needed life insurance policy with flexibility, and Lassila Agency found the appropriate policy. Details right here: life insurance .
Super informativer Beitrag! Gerade bei der Pflege und Sanierung älterer Gartenteiche stoßen viele an Grenzen – Algenplagen, Schlamm, defekte Pumpen oder undichte Folien sind typische Baustellen Teichreinigung
Cool post, thank you for sharing these insights! I’ll most definitely check out responsive website design for more sources.
The outdoor kitchen trend is so hot right now! Have you seen what’s offered at landscaping companies orange county ca ?
My favorite place for Brazilian waxing in Las Vegas is definitely Men’s Waxing Services Las Vegas —highly recommend!
Durable roofs can save a business a lot of money in the long run. Highly recommend looking into this! Roofers Cork
Honestly, I gave Sky Organics a shot after reading this post, and I’ve gotta say, it’s been awesome for my dry elbows! The oil is pretty thick, so I didn’t use it on my face https://wiki-fusion.win/index.php/Natural_Beauty_Wins:_Grow_Your_Hair,_Thicker_Lashes,_and_Hydrated_Skin_Using_Clean_Remedies_and
Here’s the deal: I gave Sky Organics castor oil a shot, and honestly, it was just what my dry scalp needed. It felt a bit thick at first, but after a few uses, my scalp felt less itchy and way more hydrated https://alpha-wiki.win/index.php/A_7-Step_Clean_Beauty_Plan_for_Hair_Growth,_Stronger_Lashes,_and_Deep_Skin_Hydration_Using
1. Look, I’ve been buying Taylor Farms products for years, and it’s nice to see a big company actually talking about sustainability and reducing waste. Honestly, their eco-friendly packaging made me a repeat customer https://sticky-wiki.win/index.php/That_Ready-to-Eat_Moment:_How_One_Shift_Rewrote_Valuations_for_Salad_and_Prepared-Food_Companies
1. Has anyone tried Hawx for pest control? I’m looking for something reliable because we had ants come back just a week after treatment with another company. Would love to hear if Hawx holds up better long-term!
2 Find more info
1. Look, I get that pests are annoying, but honestly, our experience with the local pest control company has been pretty solid pest extermination in Texas
Wow, I can’t believe how smooth everything was with Hawx! I’d been battling ants for months, trying every DIY trick with zero luck. From the start, the technician was super friendly and really took the time to explain their approach https://aged-wiki.win/index.php/Why_Building_a_Protective_Foundation_Barrier_Beats_Relying_Only_on_Routine_Pest_Visits
Kids’ first eye exam coming up. I’m searching for the Best Optometrist in Chino CA with a gentle approach via optometrist chino .
1. Oh man, don’t get me started on roaches—they just keep coming back no matter what I do! Between you and me, it’s so frustrating to constantly be battling them, especially when you have kids and pets running around pest-proofing your home entryways
Not sure what I would have done without the support of my local appliance repair team! google.com
This is very insightful. Check out windshield services Columbia for more.
Knowledge brings clarity enabling growth around unfamiliar territories—we owe it ourselves seeking answers prevalent throughout -### AnyKeyWord#$%! Platelet-rich plasma therapy orange county
We encountered seasonal flow; quarterly indicator calibration plus humidity handle constant it. Our findings: mechanical calibration
Pristine Portables team went above and beyond to make sure our rental units were pristinely clean and delivered on time. how many porta johns do i need
I never knew how important it was to clean my drains regularly until I faced a clog. Now I’m proactive! drain cleaning winnipeg
The segment on coloration schemes changed into very powerful. For more thought or aid, see freelance web design essex .
Appreciate the insightful article. Find more at Charlotte glass repair technicians .
It’s great that downtime is minimal. American Laser Med Spa respects busy schedules american laser med spa pricing corpus christi
The resources available on family lawyer in maryland made my search for a family lawyer so much easier! Highly recommended.
If you’re looking for a quality Brazilian wax in Las Vegas, look no further than Men’s Waxing Services Las Vegas . They are the best!
custom contracting does impressive work on my home
customized contracting eavestrough & roofing kitchner roofing
kitchner roofing tradition contracting eavestrough & roofing
customized-contracting Kitchener roofing professionals
For anyone searching for quality flooring, Floor Coverings International St Augustine is unbeatable! Their team is amazing in Nocatee. hardwood flooring
Simply put: if seeking dependable solutions regarding anything related rooftops within area then look no further than contacting ####Anykeyword#! Roof repairs Cork
Congratulations for stressing health at community occasions; renting portable toilets is key in Boston’s busy areas! portable toilet rental
Surrogacy is such a meaningful choice for many families. This article highlights its importance well! riverside best surrogacy agencies
Thanks to portable toilet rental , we had a clean and comfortable washroom option at our outdoor show in Fresno.
Appreciate the detailed insights. For more, visit Taxi Arzúa .
The flexibility of backyard decks is remarkable! You can tailor them to fit any design or function you require. I just recently found some innovative ideas for multi-level decks at deck builder that might actually elevate your outdoor space.
I asked for photos of previous patients, as suggested by botox NC , to gauge my injector’s style.
Appreciate the detailed information. For more, visit quality windshield installation .
Events in St. Petersburg require proper hygiene facilities. I constantly recommend having a look at portable toilet rental for portable commode rentals to keep everyone comfy.
Your note on realistic brow lift height saved me from overdoing it. More on botox Greensboro .
I liked this article. For additional info, visit casa rural con barbacoa Segovia .
I had some electrical issues and called Summit Services. They are definitely the best electrician in Bluffton! best electrician bluffton sc
This is very insightful. Check out abogado civil Vigo for more.
Very helpful read. For similar content, visit Powiększanie ust .
For those thinking about an outdoor deck, what elements should we consider before starting? I discovered some excellent insights on this topic at windows of wisconsin .
This was very enlightening. For more, visit Charlotte auto glass installation .
Is there an ideal weight range one should be within before considering this procedure ? Guidelines explored through # # anyKey word ## regulated non surgical body contouring services
My experience with my car accident injury lawyer was nothing short of excellent; they truly fought for what I deserved after my injury!
Sincere gratitude extended everyone involved facilitating journeys undertaken paving pathways illuminating possibilities await ahead!!! orange county probate attorney
เมนูอาหารที่ OMG OneMoreGlass รสชาติดีมาก ทำให้การดื่มสนุกขึ้นเยอะ! แนะนำเที่ยวกลางคืนสาย1
I’m so pleased by how seamless whatever was handled by important builders– truly a great experience! Builders Surbiton
This was highly educational. For more, visit productos en tienda de alimentos a granel .
For anyone still using traditional digging methods, it’s time to switch to vacuum excavation in Orange County! Discover why at vacuum excavation orange county .
The beautiful aesthetic combined with utility makes choosing these types of fixtures worthwhile ! Check prices and designs over on # # any Keyword# # Steel swing doors Anaheim CA
Thanks for clarifying the differences between personal and commercial vehicle insurance—it’s so important! cheap cargo insurance california
Look, the tech stock rally sounds exciting, but here’s the thing—are these gains driven by solid fundamentals or just market hype? Between you and me, with valuations running so high META stock valuation
The cost-per-month framing is helpful. I built a calculator spreadsheet on botox near me .
Great insights! Find more at windshield damage repair .
Honestly, I gave Sky Organics castor oil a shot after reading this, and I have to say, it was a game-changer for my lashes! I was a bit skeptical at first because it’s thicker than some oils I’ve used You can find out more
Honestly, I gave the Sky Organics castor oil a shot after reading about it here. At first, I thought it was a bit thick for my face, but I started using it just on my lashes and brows—and wow! They look fuller and healthier after just a couple of weeks castor oil for skin moisturizer
New homeowners in Kitchener—don’t skip a roof and gutter inspection. We’re using local roof repair services Kitchener for a comprehensive report and quote.
I like the prevention tips for runners. If issues persist, try Caldwell NJ foot and ankle surgeon .
Health insurance can be complex, however Lassila Agency led me detailed. You can reach them with insurance broker .
1. Hey everyone, just wanted to chime in about my experience with a local pest control company. They did a great job tackling the ant problem in our kitchen last summer Great site
Amazing post, thanks for this point of view. Visitors could also such as custom web development services .
1. I’ve been buying Taylor Farms for years, and honestly, it’s the first brand where I feel like the packaging and farming claims actually line up reducing carbon footprint food
Great weblog! The step-by way of-step mindset helped me so much. I’ve published complementary steps at auto glass replacement insurance claims .
We standardized torque indicator calibration applying ISO references and saw fewer line stops. Full components: dimensional inspection services
Integrating video content material is a major development—Essex companies should still ask about this at website design essex !
Look, I’ve dealt with pests for years, and finally found Hawx—and wow, what a relief! The technician was super thorough and really patient in explaining everything pest inspection service
Valuable information! Discover more at Gulf Shores home addition contractors .
1. Ugh, I totally get the frustration with pests coming back! We dealt with ants for months, and no matter what we did, they’d disappear for a bit and then be right back https://squareblogs.net/arvinaezan/why-ants-keep-coming-back-and-what-actually-stops-them
1. Has anyone tried Hawx for pest control? I’ve heard some good things but wondering if they actually do a thorough job or if the pests just come back like with the last company I used. Looking for something reliable!
2 Find more info
Clearly presented. Discover more at senior care facilities .
1. Look, as a busy parent, I’m always on the lookout for quick meals that don’t compromise on health reducing waste in food supply chains
Just had our gutters cleaned and realized we need a full upgrade. Anyone in Kitchener have experience with reliable roofing and eavestrough pros? We’re considering top rated aluminium siding for a quote.
Good call on consistency. Follow-up sessions at American Laser Med Spa helped me — american laser med spa corpus christi tx .
Utilizing a respectable business like porta potty rental suggests less stress when arranging large events or festivals.
This is very insightful. Check out windshield replacement services Charlotte for more.
I can’t suggest porta potties near me enough! Their porta potty leasings are ideal for any occasion around Fresno.
Thanks for the great information. More at Mejor taxi en Arzúa .
The earthy green kitchen cabinets are timeless. Shade suggestions at Painting contractors st louis mo .
It’s comforting to know that there are specialized treatment options available right here in Scottsdale; more details can be found on Regenerative Medicine Doctor Scottsdale !
Valuable information! Find more at ofertas casas rurales Segovia .
Thanks for the helpful advice. Discover more at abogados económicos Vigo .
I just recently attended an event in St. Petersburg that had fantastic portable commode facilities. It made the experience a lot far better! For those looking for services, I advise porta potties near me .
Love seeing before-and-after roof projects. Quality flashing and proper drip edge make all the difference. Thinking of booking with kitchener roofing for our eavestrough replacement.
.. Let’s challenge ourselves: try only shopping at small or independent stores this month—supporting your community has never been easier!!! SEO strategy for franchises
1. Look, I totally get the frustration with pests that just keep coming back no matter what you do https://rentry.co/yuqd9x5t
If you’re considering new carpets, you should definitely contact Floor Coverings International St Augustine for their amazing selection and installation services! flooring near me
My checklist for med history to disclose before injections Greensboro botox
Just wrapped up an amazing training session—boxing classes are truly the best way to break a sweat! Find your class via boxing gym today!
Nicely done! Discover more at Majewski Plumbing .
Love the biophilic design tips. Residential architect NYC incorporated planters and inexperienced partitions superbly in our townhouse.
I found this very helpful. For additional info, visit water Heating Repair .
Your post has motivated me to finally tackle my neglected drains! Thank you! drain cleaning winnipeg
Great weblog. Thanks for the thorough breakdown. I additional visuals at auto glass replacement for vehicles .
Creating content on OnlyFans can be profitable, but it takes method. Discover greater approximately optimizing your method at https://www.instapaper.com/read/1936140659 !
Excellent post! Your data points were mind-blowing. I shared associated standards at professional local SEO .
I love how various the content on OnlyFans will likely be—from fitness to cooking! What niches have you ever stumbled on interesting? https://500px.com/p/robbinanderjuntohaj
This was very well put together. Discover more at water heater repair .
Great job! Find more at Powiększanie ust .
Thanks for the clear advice. More at tienda de colchones en Albacete precios .
Excited about the possibilities of using a local service for my new roof! Eclipse Remodeling & Roofing contractor
If you’re located on Hilton Head Island and need an excellent electrician, don’t hesitate to contact Summit Services! Electrician
Appreciate the comprehensive advice. For more, visit Personal injury attorney near me .
Your advice to avoid aspirin was timely. I posted a medication overview botox near me
Extremely happy with the repair work performed by way of my plumber at the present time—indubitably advise their prone! Head over to Plumber Norwich for greater guidance!
Great to see clinics that don’t oversell. American Laser Med Spa gives honest CoolSculpting expectations. safety standards for non surgical options
This was highly useful. For more, visit Charlotte auto glass services .
Looking forward to my consultation with Astral Roofing after reading this informative post! Roof Replacement Surrey
Sports vision is important for my teen. If you know the Best Optometrist in Chino CA for athletes, I’m also checking Optometrist .
My brows stayed expressive thanks to conservative dosing tips from Raleigh botox .
Using a numbing cream reduced discomfort. Pain-minimizing tips on botox near me are great.
This was nicely structured. Discover more at cost of auto glass replacement .
ตัดสินใจง่ายขึ้นเมื่อมีข้อมูลเปรียบเทียบสินค้าจากหลายแบรนด์ ### ซ่อมไฟรถยนต์ ใกล้ ฉัน
A/B testing could make a huge change for conversions—for those who desire aid with this in Essex, verify out web design essex .
Nhà cái này chắc chắn không làm bạn thất vọng đâu !!!# 789bet
I appreciated this article. For more, visit Tarifas taxi Arzúa .
Clear and helpful. Garage Door Repair Tucson replaces cracked bottom seals to stop drafts. garage door repair
This was quite informative. More at mejor abogado en Vigo .
Storm damage had me scrambling, but Hamilton roof repair pros at “emergency roof repair Hamilton” made it simple and affordable.
It’s smart to verify coverage for valuables. I used State Farm Insurance Agent to add scheduled personal property.
Nicely done! Find more at respite care for families .
The team seems knowledgeable and caring. Read about CoolSculpting at american laser med spa coolsculpting corpus christi .
I found this very helpful. For additional info, visit Charlotte windshield and glass repair .
Super informativer Beitrag! Gerade bei der Pflege und Sanierung älterer Gartenteiche stoßen viele an Grenzen – Algenplagen, Schlamm, defekte Pumpen oder undichte Folien sind typische Baustellen Teichreinigung Hamburg
Appreciate the deep dive into size errors. Regular indicator calibration can significantly get better task results. More on processes: nist calibration certificate
Always check if your technician is licensed when looking into appliance repairs; it matters a lot here in Arlington, TX! https://www.google.com/search?q=Greg%27s+Grade+A+Appliance+Repair&ludocid=6678422040132912182
Don’t underestimate the importance of having good representation after an auto incident; check out ###for great options. car accident injury lawyer
Great insights on recovery timelines! As someone researching bunion surgery options, I found this helpful. For expert care, I’m checking foot and ankle surgeon Springfield .
Thanks for highlighting stress fractures. If you’re struggling with recurring injuries, Caldwell NJ foot and ankle surgeon has foot and ankle specialists.
I like the idea of annual policy benchmarking. My insurance agency provides a renewal scorecard Andrew Smith .
Great web publication. The actionable suggestion is gold. I’ve further templates at quality windshield installation .
Awesome blog post, thank you for highlighting the bottom lines. I included a list on SEO consulting packages .
Just wanted to share how much I love my new floors from Floor Coverings International St Augustine; they did an excellent job on the installation! flooring
From barns to animals, Lassila Agency got our ranch covered appropriately. Beginning your quote at car insurance .
Accessibility in flats is overpassed. Residential architect NYC Baobab Architects designed a barrier-free design that also feels luxe.
Great insights on maintaining European vehicles! Many owners underestimate how crucial specialized diagnostics and OEM parts are for long-term reliability and performance bmw repair west palm beach
Non-surgical contouring is the future of aesthetics. Explore CoolSculpting at genuine patient reviews fat reduction clinics .
Cleaning drains can be such a hassle, but your tips make it feel more manageable! drain cleaning
This post turned into a super examine!! Very enlightening and concept-provoking. Check out affordable windshield replacement Charlotte for added components.
Searching for quality electrical services? Look no further than Summit Services; they’re unbeatable as electricians in Bluffton. Electrician near me
Excellent insight on syndesmotic injuries. Those seeking advanced care can check foot and ankle surgeon NJ .
Fantastic message– bookmarked and shared. I included corresponding understandings at professional SEO consultant .
Fantastic breakdown of costs involved in remodeling; it’s crucial information for budgeting properly—find budgeting tips at Cabinet Refacing Los Angeles !
Big shoutout to local Hamilton roofers who actually show up on time and clean up properly. If you need a roof repair, try roofing comapanies near me .
Great submit! As individual concerned about information superhighway design in Essex, I discovered your details terrific. For anyone desiring informed support, cost out web design essex .
Anyone had experience working with eco-friendly ### anyKeyword###s in Woodland Hills? Woodland Hills kitchen Remodeling
If you’re looking for reliable Hamilton roofing contractors, I’ve had a great experience recently. Check out qualified trusted roofing contractors for fast quotes and quality work.
Wonderful tips! Find more at Taxi aeropuerto Santiago Arzúa .
Our detached garage needed new flashing and vents. Hamilton roofers from roof replacement cost breakdown handled it in a day.
Thanks for the useful suggestions. Discover more at affordable windshield replacement .
The professionals at Teeth Whitening Las Vegas really know their stuff when it comes to facials! Loved my experience.
Boxing is helping me build confidence and strength—can’t recommend it enough! For class locations, visit Professional Boxing Coach Private Lessons Vancouver .
Thanks for the valuable article. More at abogado de familia Vigo .
Thanks for the insightful write-up. More like this at casa rural Grajera .
Really enjoyed reading this article! Very timely as I’m planning some roof work—thanks, Roof Repair Oswego !
The trainers here are passionate and knowledgeable—I appreciate how they cater to all levels of experience, as noted on boxing private coaching #.
I never thought I’d enjoy boxing, but the classes in Metro Vancouver are so engaging! Check out Amateur Boxing Training Private Lessons Vancouver for more info!
For responsive emergency callouts in Cork, try Residential roofing Cork .
The best part about living in Orange County is having access to top-notch locksmiths like those at locksmith in orange county .
Feeling strong after starting my journey with boxing—it’s been life-changing so far with help from tips shared on Private Boxing Sessions Richmond #!
Appreciate the detailed post. Find more at auto glass replacement options .
Thanks for the post! Garage Door Repair Mesa AZ provides honest estimates and fast turnaround. Stapley Action Garage Door in Mesa AZ
Thanks for dealing with emergency situation hotline amounts. Our company saved jswoodpecker.com Emergency Tree Service Near Me and received fast support when a plant fell overnight.
I appreciate how you emphasized the importance of regular maintenance checks to prevent future risks—very practical advice!! # # anyKey word ## Mold Remediation
This was a wonderful post. Check out trusted mobile auto glass Charlotte for more.
It’s amazing how vacuum excavation can enhance safety on job sites! Get informed at Sacramento hydro excavation .
Just wrapped up our outdoor space renovation and couldn’t be happier—thanks to connections made through **yourwebsite** siding services San Diego
Just wanted to give a shoutout to my favorite #SEOCompanySanFrancisco—# – they’ve transformed my business! ## SEO Expert San Francisco CA
”Incorporate these sentiments into daily practice allowing flourish nurture develop empower yourselves enriching enhance quality life take steps necessary ensure wellness holistic health flourishes integrating mind body spirit aligning energies Teeth Whitening Las Vegas
The transition process can feel overwhelming. expert elderly care provided a step-by-step moving checklist that really helped.
Who knew a simple fountain could change the feel of an entire yard? Thanks for sharing these ideas! Fountain And Ponds Repair Irvine CA
The importance placed upon consistent upkeep cannot go unnoticed—a pleasure speaking upon these matters together while showcasing benefits forwarded through effective partnerships fostered within organizations such as . hvac services san dimas
The range of services offered by Facial Treatments Las Vegas is perfect for anyone in need of skincare help.
The legal team at ## comprehensive estate planning attorney near me
If your eavestroughs are sagging or leaking at seams, seamless upgrades are worth it. Booking an estimate with trusted roofing contractors in Kitchener this week.
Loved your tip on photo documentation. I created a tracking template botox near me
Excited about hosting friends this summer around my new grill setup from ## landscaping companies orange county ca
Great web publication! Your readability on this theme is fresh. I’ve protected related aspects at windshield repair options .
ทุกครั้งหลังเลิกงานก็แวะมาที่ร้านเหล้าสาย1 เสมอ ๆ ครับ อาหารสุดพิเศษร้านอาหารชิลสาย1
This was a wonderful guide. Check out mejores tiendas de alimentos a granel for more.
With increased regulations around construction practices Orange County vacuum excavation
Has anyone taken advantage of any special offers available from clinics offering#coolscultpinginamarill services? carefully supervised fat loss solutions
Great insights on maintaining European vehicles! Many owners underestimate how crucial specialized diagnostics and OEM parts are for long-term reliability and performance west palm beach auto service for european cars
Huge thanks to Floor Coverings International St Augustine for helping me find the perfect flooring solution! They really know how to make a house feel like home. flooring near me
The accessories available at phone shops can actually enhance your device’s functionality! I found some fantastic gadgets recently. If you’re interested, look into what phone store has in stock!
This aligns with our lab trip. Indicator calibration ahead of valuable runs reduced rework by way of 18%. Framework here: calibration company
Great web publication! The writing genre is participating and elementary to stick with. Would love to percentage greater on trusted auto glass shop Charlotte .
Appreciate the detailed post. Find more at Taxi en Arzúa .
If you desire receptive cases sustain, Lassila Agency is a strong choice. Call using insurance broker .
Fashion jewelry patterns come and go, but classic pieces are always in style. I just recently bought a timeless necklace that I know I’ll use for several years to come buy gold near me
Cool blog post, thanks! I shared a study that complements this on effective web design services .
Wonderful tips! Find more at abogado mercantil Vigo .
Anyone tried leaf guards that actually hold up through Kitchener winters? Considering a system installed by kitchener home renovation .
Utility locating in Fresno can save so much time and money. Appreciate you highlighting this! Fresno vacuum excavation
Fighting style not just improve fitness but additionally infuse technique and emphasis in practitioners. It’s remarkable to see just how different designs, from martial arts to jiu-jitsu, offer unique benefits Denver TKD kids classes
This is highly informative. Check out casas rurales para familias Segovia for more.
Managing technology doesn’t have to be complicated—especially not with help from companies like Managed Service Provider California !
Anyone compare aluminum vs steel eavestroughs in Kitchener’s climate? Leaning aluminum with proper leaf guards. Might go through top roofing contractors near me for install.
Everyone should know their rights following an auto incident; reach out today if you’re confused or uncertain about what comes next- like I did through ### any Keyword###! auto accident lawyer in Daytona
This helped a lot. I’m narrowing my list to find the Best Optometrist in Chino CA and using optometrist near me as a guide.
Thanks to Summit Services, I’ve found the best electrician nearby! Their work in Bluffton is outstanding! best electrician bluffton sc
Everything was finished on time, just as assured– from start to complete, they were sensational. Builders Surbiton
I would consider myself pretty picky when it comes down to these types of services—but these guys have yet again exceeded expectations!! Facial Treatments Las Vegas
This was highly educational. More at premium auto glass products .
I can’t stop raving about my visit to Men’s Waxing Services Las Vegas for Brazilian waxing! Amazing staff and results!
I agree with focusing on user intent. If you need help, Globalized Marketing Solutions is a reliable best SEO company in Arvada.
Anyone else obsessed with how long the results last after visiting Brazilian Waxing Las Vegas ?
Fantastic advice! I’m going to start implementing these drain maintenance habits right away. drain cleaning
Fantastic blog post, really workable ideas. I discuss complementary approaches at local SEO tips .
If you’re adding drivers, document training. I used a policy manual template from insurance agency near me .
tradition contracting does sensible paintings on my dwelling
custom contracting eavestrough & roofing kitchner roofing
kitchner roofing tradition contracting eavestrough & roofing
custom-contracting kitchener roofing
This was a great article. Check out opciones de colchones en Albacete for more.
Thanks for the cabinet cleaning tips. I used them on my Vancouver cabinets from kitchen cabinets vancouver bc .
Thanks for the thorough analysis. More info at Charlotte auto windshield services .
https://t.me/site_official_1win/60
I just moved here and need a new roof. Is metal roofing a good option? Looking for local recommendations! Roofing Near Me
If you’re exploring waterfalls, Lovina is a smart base—search Hotel in lovian bali .
If your eavestroughs are sagging or leaking at seams, seamless upgrades are worth it. Booking an estimate with professional roofing companies near Kitchener Waterloo this week.
The rehab pacing advice was realistic. Tailored rehab pathways at foot and ankle surgeon near me .
Thanks for the useful post. More like this at Radio taxi Arzúa .
It’s fascinating how vacuum excavation reduces risks during utility installations in Orange County—learn more at vacuum excavation orange county !
Your take on color zoning for open-plan living is helpful. Layout ideas on Painting contractors st louis mo .
This was a fantastic read. Check out windshield replacement reviews for more.
Knowledge brings clarity enabling growth around unfamiliar territories—we owe it ourselves seeking answers prevalent throughout -### AnyKeyWord#$%! Platelet-rich plasma therapy orange county
The view from my new casement windows in Anaheim is just breathtaking! So glad I made the switch. Custom Steel Windows Anaheim CA
Thanks for the comprehensive read. Find more at senior care options .
Với Uw99, tôi cảm thấy mình đang ở đúng nơi để kiếm tiền từ niềm đam mê thể thao! Hãy thử ngay với uw99 !
The explanation of coinsurance penalties saved me money. My insurance agency adjusted my limits insurance agency Bloomfield Hills .
What surprised me most was how affordable quality legal advice could be for my estate plan! living trust attorney orange county
Jersey City auto shipping made my first car move hassle-free. Jersey City car transport
When it comes to finding reliable legal support after a car accident, the guidance of Seattle car accident lawyers can truly make a difference. car accident lawyer is your go-to for professional assistance and expert advice in such challenging situations!
”#VisualBranding concepts introduced during joint brainstorming sessions were spot-on; couldn’t be happier working alongside these creatives:###!” SEO Marketing Seattle WA
The dialogue approximately combining sets is relevant. Residential architect NYC Baobab Architects guided us with the aid of structural and board approvals in NYC.
Cumming moving company made my moving day completely stress-free. Pure Cummings GA Mover’s
Seeing more and more businesses going solar in my area—it’s inspiring! Tesla solar power installer
Innovative concepts bring life back into forgotten areas preserving history while simultaneously attracting newcomers interested settling down soon thereafter !!# # anyKeyWord ## los angeles general contractor
This blog highlights important factors in surrogacy. Don’t miss out on visiting riverside surrogacy agencies for more resources!
Excellent insight on syndesmotic injuries. Those seeking advanced care can check Springfield foot and ankle surgeon .
Hiring a Portsmouth moving company was the best decision for my move. Local movers Portsmouth
Don’t forget elevator reservations if you’re moving into a high-rise downtown. I learned that the hard way— Texas Mover’s had a checklist that helped.
Just got my new carpets from Floor Coverings International St Augustine, and they look amazing! Definitely the best option near me in Ponte Vedra. hardwood flooring
A smooth and easy move with the help of this Lakewood moving company. Lakewood moving company
Military move to Fort Worth went smoothly—appreciated the transparent pricing at Fort Worth auto transport .
Have you considered the benefits of PRP therapy? Regenerative Medicine Doctor has some great information on this topic!
Great company with excellent reviews—Scranton auto shipping lives up to the hype. Scranton vehicle transport
Great insights on maintaining European vehicles! Many owners underestimate how crucial specialized diagnostics and OEM parts are for long-term reliability and performance auto repair west palm beach european
Appreciate the detailed post. Find more at affordable auto glass shops .
I appreciate the professionalism of Chesapeake moving company. Chesapeake Mover’s Pro
Norfolk car shipping offers competitive rates and excellent service. Norfolk car shippers
Tips for choosing the right Harrisburg moving company? Local movers Harrisburg
Impressed by the valuable insights shared here! If anyone in Los Angeles needs top-notch legal assistance, look no further than seeking advice from experienced personal injury lawyers. Your readers are sure to find this resource helpful. Police brutality lawyer
We standardized torque indicator calibration as a result of ISO references and observed fewer line stops. Full means: multimeter calibration service
Hiring a trustworthy Washington DC moving company makes moving so much simpler. Washington DC moving company
Very helpful read. For similar content, visit local windshield repair Charlotte .
Cá cược tại fly888 giúp tôi gặp gỡ được nhiều bạn bè mới – thật tuyệt vời phải không ? đăng ký fly88
Super informativer Beitrag! Gerade bei der Pflege und Sanierung älterer Gartenteiche stoßen viele an Grenzen – Algenplagen, Schlamm, defekte Pumpen oder undichte Folien sind typische Baustellen Teichreinigung
Hệ thống thanh toán của Lixi88 cực kỳ nhanh chóng và tiện lợi, rất ấn tượng! nhà cái lixi88
Nếu cần tìm kiếm thông tin chi tiết về trò chơi , hãy truy cập ngay vào websiteTG886 nhé ! ### anyKeyWord ## tg88
Mỗi lần đặt cược qua ###aniKeyboard# đều khiến tôi cảm thấy hồi hộp và thú vị hơn bao giờ hết. miso88
Hãy trở thành thành viên chính thức ngay hôm nay nếu bạn muốn khám phá thêm nhiều điều thú vị xoay quanh thế giới game đầy sắc màu này nhé ! siu88 codes
Mình đã tham gia nhiều nhà cái nhưng cm88 vẫn là số 1 trong lòng mình.
If you’re looking for reliable Hamilton roofing contractors, I’ve had a great experience recently. Check out roof replacement cost for fast quotes and quality work.
If you’re worried about weather delays to Suffolk, Suffolk Auto Transport’s proactively updated me with new ETAs.
Tôi đã tìm thấy niềm đam mê cá cược từ khi biết đến nhà cái kg88 .
Khách hàng thân thiết của tôi đều đánh giá cao về chất lượng dịch vụ của MN88! https://mn88.codes
For stress-free relocation, hire a skilled Roswell moving company. Roswell moving companies
I just booked Lakewood car shipping and I’m looking forward to stress-free transport. Lakewood car shippers
Got a tight schedule? Long distance movers Cherry Hill helped me find Cherry Hill movers with flexible availability.
XOSO666 đang chiếm lĩnh thị trường cá cược online với đa dạng hình thức chơi!!! # # anyKeyWord # xoso66
Hãy cùng theo dõi các trận đấu trực tiếp trong mùa giải tới cùng với # anyKeyWord#! sa88
Lựa chọn đúng địa chỉ giúp bạn tiết kiệm thời gian tìm kiếm hơn bao giờ hết ! link vào shbet
Lần đầu tiên nghe nói đến #5mb# và đang rất tò mò về trải nghiệm tại 5mb.expert !
For anyone searching for an electrician in Bluffton, Summit Services is the one to call. They did an amazing job for me! best electrician bluffton sc
Our same-building move still needed help— Cheap movers Newport News made it quick and painless.
“If anyone needs urgent repairs done on their appliances, reach out to those based here!” https://www.google.com/maps?cid=6678422040132912182
Hy vọng rằng sẽ có thêm nhiều bạn bè cùng nhau khám phá thế giới cá cược thú vị này từ nhà cái uy tín nhưbj6 !! # # anyKeywod ## https://bj66.codes
Hãy tham gia cùng tôi tại sc88 để trải nghiệm những điều thú vị!
I love the bonuses offered by #ffok# – they really help boost my betting experience! ffok codes
From seeking legal advice to finding the right support, having dedicated Sacramento personal injury lawyers can truly make a difference. If you’re looking for reliable assistance, don’t hesitate to check out Motorcycle accident lawyer for top-notch services!
Nếu bạn còn đang phân vân thì hãy thử ngay TF 89 nhé, chắc chắn sẽ không làm bạn thất vọng!!## anyKeyWord ## tf88
Can you recommend reliable Los Angeles auto shipping companies nearby? Los Angeles auto transport companies
Impressed by the expertise of Sacramento personal injury lawyers in handling cases with compassion and skill. If anyone needs support in such legal matters, visiting Auto accident attorneys would be a wise choice!
Reliable Hamilton roofers are hard to find, but the crew booked through roofing comapanies near me communicated clearly and finished on schedule.
Your handle tree service red flags was spot-on. JS Woodpecker Tree Service Emergency Tree Removal inspected every box for professionalism and reliability.
Do you think a Spokane moving company can help with last-minute moves? Spokane Mover’s
Looking forward towards seeing further updates added over time detailing changes occurring within local/state laws themselves!!! ###naKey### cheap cargo insurance california
Your advice to avoid aspirin was timely. I posted a medication overview botox new york
Appreciate the detailed guide on drain cleaning—definitely saving this for future reference! drain cleaning
Seeking justice after an accident is important; make sure you have the right support from auto accident lawyer in Daytona .
I stumbled upon a hidden gem when looking for trustworthy legal advice, and your selection of Portland personal injury lawyers was truly impressive. The expertise showcased on Accident attorney is second to none!
Planning a wedding in Columbus? Do not forget about washroom needs! portable toilet rental has the best porta potty services for occasions.
Thanks for the insights on branded search. best seo company arvada increased ours—brand-focused Arvada SEO company.
Your site looks like the perfect resource for anyone seeking knowledgeable advice from car accident lawyer . I appreciate how you simplify complex legal matters and offer support during challenging times.
Clogged gutters caused basement seepage for us—lesson learned. Installing gutter guards and new downspouts with kitchener roofing soon.
Fantastic article! This deserves more attention. I linked sources at SEO services consultation .
This was highly informative. Check out proyectos 3D cocina Granada for more.
Maintenance tip for Hamilton homeowners: annual roof inspection saves money. I schedule mine through affordable roof replacement pricing .
This is very insightful. Check out abogado de familia Santiago for more.
Just had our gutters cleaned and realized we need a full upgrade. Anyone in Kitchener have experience with reliable roofing and eavestrough pros? We’re considering home repair services near me for a quote.
Excellent advice on business auto vs personal auto. I clarified usage on insurance agency near me .
If you want a calm base for North Bali, choose a Hotel in Lovina. I booked through hotel lovina Bali D kailash retreat .
Lighting layers make the whole difference. Residential architect NYC designed a scheme that makes our residing room believe greater.
Just completed my first month of boxing training—what a journey! Excited to learn more from boxing classes as I progress!
With fall approaching, I’m searching for ways to make my outdoor deck relaxing for the cooler nights. What are your preferred accessories? I discovered some inspiration on windows of wisconsin !
I think having a backyard deck is essential for amusing visitors! It produces the ideal atmosphere for barbecues and events deck builder
This helped a lot. I’m narrowing my list to find the Best Optometrist in Chino CA and using Optometrist as a guide.
อาหารอร่อยจริงๆ ที่ร้านเหล้าสาย1 ต้องไปลองดูครับ โปรโมชั่นร้านนั่งฟังดนตรีสดสาย1
For any flooring needs, you can’t go wrong with Floor Coverings International St Augustine – their expertise shines through every step of the way, especially in Nocatee! flooring near me
Love the focus on sustainability in kitchen remodeling! It’s such an important factor today. Discover more at Kitchen Remodeling Services In Los Angeles !
Had a terrific experience with porta potties near me during our outside college graduation event! Their units were clean and well-stocked.
Thanks for the helpful advice. Discover more at opciones de tiendas a granel .
Just had a ridge vent added to reduce attic heat. Hamilton roof repair team from roof repair hamilton improved airflow immediately.
Looking for reliable legal representation in San Diego? The personal injury lawyers you mentioned on Motorcycle accident lawyer seem truly dedicated to helping their clients every step of the way
Thanks for the informative post. More at https://youtu.be/QjxKOoo6gmQ .
Thanks for the clear breakdown. Find more at https://www.zipleaf.us/Companies/Gordon-Law-PC-Brooklyn-Family-and-Divorce-Lawyer_10858 .
Awesome post! A trustworthy insurance agency can really simplify claims and policy changes insurance agency Bloomfield Hills .
Clearly presented. Discover more at Powell’s Plumbing & Air .
This was beautifully organized. Discover more at Normandy Animal Hospital .
Anyone tried leaf guards that actually hold up through Kitchener winters? Considering a system installed by best siding contractors .
I like exactly how simple it was to schedule my dumpster rental with dumpster rental service ! They were punctual and specialist.
Great job! Discover more at painters services near me .
Appreciate the thorough write-up. Find more at ac repair near me .
We adopted vehicle-reminders for indicator calibration cycles and diminished late contraptions to close 0. System counsel: calibration company
It’s fascinating how effective local marketing can transform Littleton’s business landscape. Have you checked out what SEO agency in Denver offers?
I love open-concept kitchens! Have you seen the latest trends in LA? Check out Cabinet Maker Los Angeles for more ideas!
Your timeline for ordering is realistic. I placed my Vancouver cabinet order with kitchen cabinets vancouver bc early and it paid off.
This was quite enlightening. Check out motorcycle accident lawyer near me for more.
Your recommendations are truly valuable for homeowners like me! Will consider contacting Roofing Services In Illinois soon!
Flashing repairs saved our roof from leaks around the vent stack. Next up is seamless eavestrough installation via home services in kitchener .
Grateful that cities are stepping up their game when it comes down to routine maintenance issues surrounding utilities; explore with me further here: ### anyKeyWord###! Sacramento hydro excavation
The group at Integral Builders was professional and effective. I’m delighted with the outcome! Builders Surbiton
Wonderful tips! Discover more at Gulf Shores inground pool installers .
The best part about my new garden fountain? It attracts so many birds! Thanks, Pond Designers Orange County !
This was quite useful. For more, visit https://www.find-us-here.com/businesses/Meigel-Home-Improvements-Kitchen-Bathroom-Remo-Hauppauge-New-York-USA/34368741/ .
Thanks for the insightful write-up. More like this at water heater installation near me .
This was quite informative. More at presupuesto carpintería aluminio Culleredo .
This was quite informative. For more, visit cocinas rústicas Granada .
Thanks for the helpful article. More like this at abogados Santiago de Compostela .
Highly suggest porta potty rental if you’re seeking trustworthy mobile commode rentals in Columbus!
Maintenance tip for Hamilton homeowners: annual roof inspection saves money. I schedule mine through hamilton .
Booking process was smooth through botox NC . I appreciated the transparent pricing.
The DIY methods you’ve listed are fantastic—I always prefer natural remedies over harsh chemicals anyway! drain cleaning winnipeg
Thanks for the useful post. More like this at opciones de colchones en Albacete .
Great tips! For more, visit Trusted Personal Injury Lawyer .
Community resources available for those affected by fires are critical; good job highlighting this need! Biohazard Clean Up
How important is matching existing architectural styles while selecting from modern materials? Eclipse Remodeling & Roofing contractor
My injector’s conservative approach aligned with the philosophy on botox near me —natural over frozen.
Your visuals on injection points were clear. I saw a similar diagram at botox Greensboro .
Taking action immediately after experiencing trauma can significantly alter outcomes positively—take charge now via ## car accident lawyer in Daytona Beach
BBQ islands really take outdoor cooking to the next level. I found some amazing designs at bbq islands contractor orange county .
Fantastic data for optimizing pure light. We used clerestory answers from Baobab Architects New York and it converted the gap.
Thanks for the helpful advice. Discover more at veterinarian Allen TX .
Thanks for the helpful article. More like this at https://www.onmap.ae/jamaica-ny/business-services/gordon-law-p-c-queens-family-and-divorce-lawyer .
We set up automated GBP posts with help from local seo company and saw increased views.
If you’re overwhelmed by junk, try ** # ** any Keyword **, they’ll help get points arranged quickly. dumpster rental service
SEO isn’t just about keywords; it’s about strategy—and # has proven that time and again! ## SEO Company San Francisco CA
Just had a ridge vent added to reduce attic heat. Hamilton roof repair team from “Hamilton roofing contractors” improved airflow immediately.
If you value clear explanations and thorough service, contact ## Laguna Niguel estate planning attorney
Many thanks to porta potty rental , our outside wedding went off without a hitch! Tidy and comfortable toilets made it easy for guests.
Why risk damage trying DIY methods when professionals exist? Save stress & time; call ****** instead! locksmith in orange county
If you want a seamless flooring experience, go with Floor Coverings International St Augustine! Best service available near me in St Augustine. flooring
Backpacker-friendly and budget-smart: Hotel in lovian bali .
I’ve tried many places for Brazilian waxing, but nothing compares to the quality at Men’s Waxing Services Las Vegas .
If you want quality craftsmanship, look no further than a reputable San Diego general contractor – explore options at solar panels San Diego !
The list for concealed decay conserved our company. Tree Removal JS Woodpecker Tree Service spotted inner decay as well as properly took the tree down.
Winter’s rough on shingles here in Kitchener. If you’re seeing lifted tabs or granule loss, it’s time to call the pros. I’m looking at roofing kitchener for a full roof inspection.
Excited about trying their newest offerings – always something fresh and exciting:# anyKeyWord###! Facial Treatments Las Vegas
This was a wonderful guide. Check out senior living facilities for more.
Looking forward seeing how people implement these inspiring updates throughout their residences – knowing there’s so much creativity present among fellow residents across south field makes me proud ! Keep sharing valuable content by visiting # # any Door installation Southfield MI
Has anyone faced complications after eye surgery? Would love to hear your stories and advice! Laser Eye Surgery
”When it comes down to it, having reliable support from companies like ### any Keyword### makes all the difference!” garbage disposal repair san dimas
“After reading everyone’s positive experiences with Brazillian Waxing shared over at # # anyKeyWord # #—can’t wait to try myself!” Men’s Waxing Services Las Vegas
The atmosphere at Men’s Waxing Services Las Vegas is so relaxing, making Brazilian waxing in Las Vegas a breeze!
Valuable information! Find more at taller de aluminio A Coruña .
If you’re ever doubtful about which business to choose, just choose ** # ** any Key words **, they’re amazing! dumpster rental
This was quite enlightening. Check out presupuesto cocina Granada for more.
Super informativer Beitrag! Gerade bei der Pflege und Sanierung älterer Gartenteiche stoßen viele an Grenzen – Algenplagen, Schlamm, defekte Pumpen oder undichte Folien sind typische Baustellen Teichreinigung Hamburg
Thanks for the helpful advice. Discover more at bufete jurídico Galicia .
Eagerly awaiting news updates sharing developments happening across sectors related servicing vital components households rely heavily upon!!!!! Appliance repair service
Can’t wait to explore this amazing tent selection in Tampa for my wedding! bounce house rentals brandon
Just wanted to share that renting through # anyKeywords # was super smooth and hassle-free! tampa tent
Agree at the significance of traceable files. We included barcode monitoring for indicator calibration. Overview: electronic calibration
If you’re hesitant regarding leasing a porta potty, offer porta potty rental a phone call– they’ll place your mind at ease.
Great post– many thanks for sharing your process. I broadened on this at professional SEO firm .
Storm damage had me scrambling, but Hamilton roof repair pros at hamilton roofing comapnies made it simple and affordable.
Insurance-friendly clinics make life easier. For the Best Optometrist in Chino CA that accepts my plan, I’m looking at Optometrist .
Great point about reviewing towing limits. My insurance agency increased mine for peace of mind Andrew Smith – State Farm Insurance Agent .
Anyone considering managed IT services should definitely explore options at Cabling Services Provider California .
Excellent points about the risks of not locating utilities before digging. Very helpful! Fresno hydro excavation
The attention on wellness is fresh. Baobab Architects New York planned more advantageous airflow and constituents with low VOCs.
The blush-and-charcoal combo feels refined. Found palettes on St louis painters .
Anyone else find it worth investing time/money into self-care routines like these? So glad there’s info available via Skincare Services Las Vegas
Literally counting down days until next chance indulge again soon!!!! teeth whitening las vegas
I never knew how important it was to clean my drains regularly until I faced a clog. Now I’m proactive! drain cleaning
If you’re bewildered by junk, try ** # ** any Key words **, they’ll help get points arranged quickly. dumpster rental
I appreciate the tips on ankle arthritis management. For surgical consultations and second opinions, NJ foot and ankle surgeon is worth a look.
When the mixed drinks and the cooking area both flex– win. I track it via locally sourced restaurant Loomis .
Local content creation tailored to Aurora residents helps build trust and credibility—find expert advice at affordable SEO Denver !
For those who work frequently on construction projects around town: have you considered integrating Vacuum Excavation into your processes? You’ll thank me later after checking ##anyKeyWord## vacuum excavation orange county
Informative guidance. Garage Door Repair Tucson repairs travel modules and circuit boards. Garage Door Repair Tucson
What’s the average cost of installing casement windows in Anaheim? I need to budget for my remodel. Custom Steel Windows Anaheim CA
For building websites needing porta potties, check out the offerings from porta potties near me — really dependable solution!
I’ve seen first-hand how important communication is between clients & attorneys throughout this process—it truly makes all the difference when navigating complex decisions together!! living trust attorney orange county
Just had my consultation at an ophthalmology clinic and I’m feeling optimistic about Lasik eye surgery! prk corrective surgery
Thanks for the great explanation. More info at cocinas pequeñas Granada .
The variety of carpets at Floor Coverings International St Augustine is impressive! Ideal choice for homeowners in Nocatee wanting new flooring. flooring near me
Appreciate the thorough analysis. For more, visit presupuesto carpintería aluminio Culleredo .
Useful advice! For more, visit asistencia legal urgente Santiago .
I liked the section on disputes and appraisals. I followed a process outlined on insurance agency near me .
Thanks for the great information. More at https://www.facebook.com/148474415018649 .
My friend got great help from a car accident lawyer in Daytona Beach after her crash. Check out auto accident lawyer in Daytona for recommendations!
This post explains geo-modifiers well. Globalized Marketing Solutions integrated “Arvada” naturally into primary keywords.
This post reminded me to review contracts carefully. senior care services has tips on red flags and what to negotiate.
This was highly educational. For more, visit http://www.vanquishthefoe.com/users/Redefined-Restoration-Franklin-Park-Water-Damage-Service .
Flat roof leaking in Hamilton? I booked an inspection with hamilton roofing comapnies and the roofers were professional and thorough.
Great reminder about ventilation clearances. I coordinated my hood with cabinets in Vancouver through kitchen cabinets vancouver bc .
This was beautifully organized. Discover more at reseñas de tienda de alimentación a granel .
Just finished our workplace remodelling many thanks to ** # ** any type of Key phrase **, could not have done it without them! dumpster rental service
My budget choice in Lovina is always best hotel in lovina D kaialsh Retreat — consistent and clean.
Local success stories in regenerative therapy are inspiring; read them all at Ketamine Infusion Therapy orange county !
The science behind neuromodulators fascinates me. I summarized how the block works botox near me
Happy I discovered porta potty rental ; their rates is extremely competitive contrasted to others I’ve seen around Columbus.
Great insights! Find more at https://maps.app.goo.gl/e6fqZHNbsmQKU4SY6 .
Excellent information shared here! If you’re looking into Riverside surrogacy, don’t forget to visit riverside surrogacy agencies .
Great evaluate. We use handle charts to monitor publish-indicator calibration steadiness. Example charts: hardness tester calibration
This was highly educational. For more, visit ARHT Home Solutions .
#WebsiteRanking improvement was noticeable after working with ###—Seattle’s finest! SEO Agency Seattle WA
Well explained. Garage Door Repair Mesa AZ identified a failing bearing plate and swapped it out quickly. garage door repair near me
It’s refreshing to see more companies making environmentally-conscious decisions through commercial solar investments! commercial solar in southern california
Excitedly counting down days until able again gather close friends alongside families engaging within playful surroundings reminiscent childhood innocence lived forever! wet bounce house rentals near me
If your soffits are discolored, you might have ventilation problems. We’re getting a consult with top rated in my area to sort out airflow and roofing.
Smart ways to deal with radiators and PTACs. Residential architect NYC incorporated covers that double as shelving.
I just recently used a dumpster rental service in Clarksville, and I very recommend dumpster rental service for their effectiveness.
Great insights on maintaining European vehicles! Many owners underestimate how crucial specialized diagnostics and OEM parts are for long-term reliability and performance auto repair west palm beach european
Appreciate the thorough write-up. Find more at encimeras de granito Granada .
Great insights! Discover more at acabados lacados y anodizados .
Good experience so far with pre-op testing. Clinic was easy to reach after I scheduled on rle portland .
Appreciate the detailed post. Find more at reclamaciones e indemnizaciones Santiago .
Fantastic article! This is exactly what I needed today. Much more insights at search engine optimization tips .
Great insights on maintaining European vehicles! Many owners underestimate how crucial specialized diagnostics and OEM parts are for long-term reliability and performance auto repair west palm beach european
“Looking at different colors and finishes—where can I find samples from local suppliers?” Metal Roofing Near Me
I’m impressed by the depth of this post on SEO! For specific guidance in San Jose, consider contacting Local SEO San Jose CA .
The team at porta potties near me were unbelievably practical when I phoned call to inquire about rental choices. Terrific client service!
Clogs are so annoying, but your tips make it easy to avoid them altogether—great read! drain cleaning winnipeg
Valuable info for freelancers. An insurance agency can bundle general and professional liability Andrew Smith – State Farm Insurance Agent .
Nicely detailed. Discover more at local senior living .
Your unexpected emergency preparedness check-list is gold. Emergency Tree Removal Near Me jswoodpecker.com was actually on-site within hours to remove our driveway.
I’ve been contemplating whether to upgrade my phone or not. A visit to my regional shop helped me weigh my alternatives successfully. For anybody else in the exact same boat, you must have a look at free phones !
Integral builders genuinely care about their customers– I felt valued throughout our whole collaboration. Builders Surbiton
Great insights on maintaining European vehicles! Many owners underestimate how crucial specialized diagnostics and OEM parts are for long-term reliability and performance palm beach european auto specialists
I’m satisfied by how affordable dumpster rental near me is contrasted to other dumpster rental services in Clarksville.
The perfect pre-theater place without the pretense. I map these on red bistro .
This was a great article. Check out Auto Glass solutions 29303 for more.
I appreciate the discussion about pediatric foot deformities. We found a specialist through foot and ankle surgeon NJ .
Don’t wait too long to consult with a car accident injury lawyer if you’re involved in an accident—timing can be crucial for your claim!
I lately rented a porta potty for my yard BBQ from porta potty rental , and it was a lifesaver! Highly suggest their solutions.
Local content creation tailored to Aurora residents helps build trust and credibility—find expert advice at SEO strategies for Denver !
The concentrate on emotional development in preschools is so a must have—it enables put together young children for long term challenges and friendships! nursery schools aurora
Thanks for demystifying backlinks. For white-hat link building, arvada seo company is a reliable Arvada SEO company.
For anyone in Hamilton comparing roofing quotes, make sure ventilation and ice/water shield are included. affordable Hamilton roofing contractors helped me vet bids.
Choosing between those two manufacturers will be not easy—this buying help at cookcell advantages over hexclad absolutely breaks it down!
Nothing beats the serene ambiance created by a garden fountain. Visit Garden Fountains Irvine CA for some beautiful choices.
Great roundup! One aspect I’d add is checking guarantee and warmth tolerance by brand. I aas a rule verify those important points on affordable top cookware in the past committing to a collection.
“Every time I’ve needed repairs done on various appliances, they’ve always been prompt and courteous.” google.com
Appreciate the detailed information. For more, visit visitar tienda de colchones en Albacete .
We adopted vehicle-reminders for indicator calibration cycles and lowered late contraptions to near zero. System facts: pressure gauge calibration service
Thanks for the useful suggestions. Discover more at cocinas Granada .
Thanks for the great explanation. More info at servicio urgente carpintería aluminio .
Thanks for the great content. More at Lasik Portland .
Appreciate the detailed information. For more, visit derecho penal Santiago de Compostela .
Love these compact lavatory options. Baobab Architects New York reconfigured ours to match a stroll-in shower and more storage.
I combined Botox with microneedling weeks apart, following the spacing tips on botox Cornelius .
If you’re serious about grilling, investing in a quality barbecue area is key—look no further than ## driveway installers orange county
I’m brand-new to the area; could any individual tell me why I should select dumpster rental service over various other companies?
For a serene Bali experience, stay in Lovina and use cheap hotel in lovina D kaialsh retreat to book.
The patina portraits in that assessment had been spectacular. I used a vinegar-and-scrub healing methodology from carbon steel wok by babish review after a rust scare.
” Everyone was impressed by how much fun we had at our gathering thanks largely due to that epic inflatable waterslide we chose from tampa!” # # anyKeword#” adult bounce house rental near me
I used to fear the “frozen” look. The natural approach tips on botox NC were spot on.
I like that you simply mentioned temperature accuracy. I used a probe to check the Crux’s warmness curve—my details: Crux Air Fryer performance review
Thanks to this blog, I’m ready to select the perfect tent for our community event!! ### anyKeyWord ## rent blow up water slide
This made me realize my chronic ankle pain needs a specialist. I found one at foot and ankle surgeon NJ .
Simply got my order verified with portable toilet rental for an approaching occasion! Can not wait to see their solution in action.
Balanced humidity greater heating consolation. For complete-homestead treatments, test furnace repair Canadian Heating and Air Conditioning hamilton .
Avoiding workouts post-treatment made a difference for me. I posted a 24-hour plan botox near me
XOSO666 đang chiếm lĩnh thị trường cá cược online với đa dạng hình thức chơi!!! # # anyKeyWord # https://xoso66.cv
Appreciate the comprehensive advice. For more, visit affordable respite care .
Big thanks to the Oyster Bay moving company team — they made my long-distance move completely stress-free! Oyster Bay international movers
Look, I get where you’re coming from asking if this is only for the super-rich. Here’s the thing: yes, it often requires a significant upfront investment, and that can feel out of reach for many investment program for Mexico passport
Excellent blog post! This is specifically what I needed today. Extra insights at top SEO expert .
Clogged kitchen sinks are no fun, but with your tips, I feel ready to keep them clear from now on! drain cleaning near me
So thrilled by exactly how simple everything was with ** # ** any type of Key words **, will definitely utilize them once again! dumpster rental near me
Love seeing before-and-after roof projects. Quality flashing and proper drip edge make all the difference. Thinking of booking with best roofing companies in Kitchener for our eavestrough replacement.
Helpful suggestions! For more, visit doble acristalamiento Climalit .
The prospect of seeing without lenses again is exhilarating—thankful for medical advancements facilitating easier pathways towards clearer sight ###aynyKeyWord# prk corrective surgery
This was highly educational. More at abogado herencias Santiago .
Amazing results achieved effortlessly alongside warm welcoming vibes makes visits extraordinary without fail Skincare Services Las Vegas
Making connections normal between household individuals/educators serves immensely supportive networks strengthened because of shared ambitions centered around kid’s enlargement trips ahead!!!! ####Anykeyword#### best preschools
The kind of location you can strike regular and still feel ruined. See my overview on organic restaurants Loomis .
Gathering friends old new alike promotes deeper understanding cultivates kindness awareness surrounding communities uplifted collectively inspiring change positively impacting lives everywhere! tampa bouncer
Just finished our office renovation many thanks to ** # ** any kind of Key words **, could not have done it without them! dumpster rental
After my accident, I was lost on what to do next. Thankfully, a car accident injury lawyer provided me with the support I needed.
The soft black bedroom shows how moody can be restful. More moody palettes at St louis painters .
Been through a fair share of US crypto exchanges, and here’s the cold truth: fees and support vary wildly, often hidden in the fine print. Coinbase looks shiny and newbie-friendly but their withdrawal fees can bite — always check before you move anything https://astro-wiki.win/index.php/What_Happens_If_My_Citizenship_Application_Is_Rejected%3F
This was nicely structured. Discover more at professional 29307 Windshield Replacement .
Truly loved the insurance coverage and certificate guidelines. jswoodpecker.com Property Clear Out Services supplied all records upfront.
What should I look for when choosing a Woodland Hills home builder in my area?
Who knew getting a Brazilian wax could feel so good? Thanks to Men’s Waxing Services Las Vegas for their top-notch service!
Your step-by-step of the appointment matches the flow described on botox Cornelius .
I appreciate exactly how you highlighted safety and security and dignity in elder treatment. We’ve had a favorable experience with local senior care for customized assisted living solutions.
Just got back from an intense boxing session—feeling amazing and ready to tackle more challenges with tips from Private Boxing Lessons White Rock !
Going through those intense rounds pushes me beyond what I thought was possible—I owe it all to consistent training and resources provided by Private Boxing For Fitness Vancouver #!
Love the ideas here about using tents for events in Tampa! So many possibilities! event tents for rent
Finding friends who share similar goals makes all the difference when it comes motivation; grateful for connections made through this network promoted via #ANYKEYWORD#. private boxing lessons
Boxing isn’t just physical; it’s mental too—I love how it pushes me beyond my limits every time I train with tips from boxing gyms .
Can’t believe how much I’ve improved since starting boxing classes in Metro Vancouver! Thanks, One On One Boxing Lessons Vancouver , for the encouragement!
My frown line tension headaches eased too. I learned about that bonus benefit on Raleigh NC botox .
Targeting specific neighborhoods in Denver through localized campaigns is key to success—check out how SEO services Denver can help you achieve this!
I needed emergency tarping and found responsive Hamilton roofers through expert roof repair Hamilton —lifesavers during a rainy week.
After years of glasses, I’m ready for LASIK. Recommendations for a trustworthy LASIK clinic near me are appreciated. I’m comparing clinics via evo icl portland .
This was quite enlightening. Check out medición y montaje de cocina for more.
Appreciate the detailed information. For more, visit medición y montaje profesional .
Nothing beats relaxing on an outside deck during a warm night! Do you have any concepts for decoration? I got inspired by some fantastic setups on windows replacement !
Thanks for the clear advice. More at mediación y arbitraje Santiago .
Very helpful read. For similar content, visit windshield replacement services Charlotte .
I’m excited about getting my first home and want a reliable roofing service in the area! Metal Roofing Near Me
Thanks for the thorough analysis. Find more at vet services near me .
Every detail matters when renovating—a great reminder that we got from professionals listed on ***my website*** solar panels San Diego
Terrific post, and the timing was excellent. I released a friend overview at SEO services for businesses .
The importance of preschool shouldn’t be overstated! Early discovering truthfully shapes a newborn’s development. best preschools
I appreciated this article. For more, visit vet Fairview TX .
There’s nothing rather like taking pleasure in a summertime night on a well-designed backyard deck deck builders
Useful advice! For more, visit Divorce Lawyer .
Appreciate the comprehensive insights. For more, visit veterinarian services .
This was a great article. Check out Custody Lawyer near me for more.
This is highly informative. Check out Powell’s Plumbing & Air for more.
This was highly educational. More at veterinarian .
Great job! Discover more at Powell’s Plumbing & Air .
I posted a checklist for natural-looking results to discuss with your provider: botox near me .
This was highly educational. More at local windshield replacement shops .
Fantastic read with tons of practical insights into choosing the right contractor—so vital here; will certainly look into options presented at %%site%%! Home improvement services Southfield MI
Highly recommend trying out different salons for Brazilian waxing—explore options through Skincare Services Las Vegas .
“Are there any seasonal promotions on Brazilians coming up at # # any Keyword ###?” Skincare Services Las Vegas
The significance of waste administration can not be overstated! Take a look at dumpster rental if you require help.
Managed IT services can streamline your operations. I found an excellent provider through Managed It Services Company California .
I’m all about that industrial chic vibe, and custom steel windows fit perfectly! For inspiration, visit Custom Steel Windows Anaheim CA .
Excellent tip to ask about staffing ratios. senior care facilities supplies understandings on caregiver accessibility and qualifications.
Clogged gutters caused basement seepage for us—lesson learned. Installing gutter guards and new downspouts with Kitchener roofing installations soon.
This is elevated dining that still feels like your spot. I track it on best Christmas restaurants near me .
For people with high prescriptions, confirm candidacy. I found detailed guidance and clinics via prk corrective surgery .
Nice guideline. If the garage door opener light won’t turn off in Tucson, inspect the motion sensor setting. Discount Door Service in Tucson AZ
Great source for brand new property owners. I used furnace repair hamilton to get 3 competing bids.
I recently had my refrigerator repaired in Arlington, TX. The service was quick and efficient! Greg’s Grade A Appliance Repair Arlington TX
This was very beneficial. For more, visit instalación de cocinas Granada .
This was highly informative. Check out fabricación e instalación local for more.
Clearly presented. Discover more at abogado 24 horas Santiago .
I always feel rejuvenated after getting my Brazilian wax done at Brazilian Waxing Las Vegas during my visits to Las Vegas.
Having bounced around a half-dozen US crypto exchanges now, here’s the raw deal on fees and support: Coinbase feels polished but hits you hard with taker fees around 0.5% and withdrawal fees that sneak up if you don’t double-check. Binance exploring mexican passport opportunities through investment
This was very enlightening. For more, visit extranjería en España para extranjeros .
I found this very interesting. For more, visit tienda de colchones en Albacete precios .
” All ages enjoyed our recent splashdown experience; can’t recommend getting one highly enough if you’re hosting anything this summer!” # # anyKeword#” 20 x 40 party tent rental
Anticipating future adventures filled laughter joy attached inviting others partake enhancing overall experiences gained proves invaluable beyond measure lasting lifetimes cultivated passionately! outdoor event tents rental
The muscle anatomy illustrations on botox NC were a game changer for understanding.
If you want subtle lips, a Botox lip flip is nice. I got the pros/cons list from Raleigh botox .
Looking for a skilled injector to keep movement—recommendations? Greensboro botox
Seeing friendships blossom right through this level fills my heart with pleasure; those connections created now will certainly form their social landscapes forward !! ### anyKeyWord### preschools aurora
Lassila Agency evaluated our ranch policy and closed insurance coverage voids we didn’t recognize we had. See insurance broker .
Good read on energy savings. Garage Door Repair Mesa AZ recommended insulation that made our garage cooler. Garage Door Repair Mesa AZ
The color distinction pointers are gold. We ran audits with Lighthouse and noticed instant development in clarity. I shared a pattern type ebook the following: Website Design Santa Clara
Wonderful experience with the dumpster rental from dumpster rental in Allen, TX! They provided precisely time.
I needed emergency tarping and found responsive Hamilton roofers through affordable services near me —lifesavers during a rainy week.
A well-optimized Google My Business profile is vital for local SEO success. Don’t underestimate its potential! Discover how to optimize yours at professional SEO firms in Denver .
Wonderful post! Your recommendations is sensible and tried and tested. See my outcomes at search engine optimization strategies .
This was highly educational. For more, visit Auto Glass installation 29303 .
My coworker had LASIK in Portland and is thrilled. I’m looking at LASIK surgeons now and browsing Lasik Portland for clinic comparisons.
Thanks for the thorough article. Find more at showroom de cocinas Granada .
I found this very interesting. Check out cerramientos de aluminio A Coruña for more.
Staff-to-resident ratio is a key metric. We learned how to evaluate it on quality elderly care before making a decision.
Nicely done! Discover more at opiniones despacho abogados Santiago .
Great insights into bunion surgery techniques. I located a skilled surgeon using Springfield NJ foot and ankle surgeon .
When it comes to legal support after a car accident, having experienced car accident lawyer on your side can make all the difference. Seattle car accident lawyers bring expertise and compassion to those in need of guidance.
Impressed by the expertise of Los Angeles personal injury lawyers like those on your team at Malpractice attorneys . Their commitment to supporting clients during tough times sets them apart!
Your post about fracture boot vs. cast answered my questions. For surgeon follow-up, see Springfield NJ foot and ankle surgeon .
Considering the complexities of legal matters, having trustworthy Sacramento personal injury lawyers by your side can make a world of difference. If you’re seeking professional advice and support for your case, look no further than Birth injury lawyer !
Cleaning events tipped me closer to HexClad for weeknights, Le Creuset for long chefs. If you’re undecided in hexclad vs le creuset, money the cleansing hacks on le creuset quality vs hexclad .
Impressed by the expertise showcased here! Seeking legal guidance can make a significant difference. If you’re looking for top-notch representation, head over to Police misconduct attorneys soon.
Micro-needling vs Botox for texture—my combined plan and results: botox ny
Measuring cups and water strains fluctuate by using brand, which affects results. The utilization counsel at affordable rice makers helped me calibrate actually.
Been through a handful of US-based crypto exchanges, and honestly, fees and support are the real deal-breakers. Coinbase and Binance.US are popular but watch those withdrawal fees—they can quietly eat 1-2% off your trades if you’re not careful Visit the website
Supporting children through transitions remains priority number-one ; browse carefully curated materials focused solely helping families navigate these waters comfortably via # anykeyword ##### Estate Planning Attorneys in Maryland
Seattle’s SEO scene is competitive, but SEO Company Seattle WA stands out with their innovative strategies.
This post has given me so many ideas for my event planning in Tampa! Thank you! cheap chair and table rentals near me
Your advice on uninsured motorist is crucial. I increased my limits after a review at Anthony Luster – State Farm Insurance Agent .
This is just how you make special feel simple and easy. I have actually linked it on French onion soup Loomis .
The dedication and expertise of Portland personal injury lawyers can make a world of difference in seeking justice for those who have been hurt Car accident lawyer
אהבתי את הדגשים על E-E-A-T. הרחבות יש בבלוג של שירותי חברת בניית קישורים .
This message is really helpful! Does anyone have experience with dumpster rental for their jobs?
The stigma round OnlyFans is slowly fading, which is good to peer! What are your options in this shift? https://www.symbaloo.com/mix/bookmarks-bvli
The upward push of structures like OnlyFans is eye-catching! If you’re seeking to maximize your succeed in, payment out https://www.instapaper.com/read/1936155071 for a few great details.
Appreciate the insightful article. Find more at prk corrective surgery .
Anyone tried leaf guards that actually hold up through Kitchener winters? Considering a system installed by Kitchener windows installation .
“We found some really unique waterslide designs during our search—I had no idea there were so many options available right here in tampa!” # # anyKeword #” party machine rentals
The position of caregivers in preschools is so critical; they certainly form our kids’s stories and recollections! preschools aurora
Insurance didn’t cover aesthetic use, as expected—good summary on botox Cornelius .
This was beautifully organized. Discover more at air conditioning repair service .
I read that consistency improves results over time. The maintenance schedule on botox Raleigh helped me plan.
Amazing to see the expertise of Seattle car accident lawyers in handling complex cases. For anyone seeking top-notch legal assistance and guidance after an incident, auto accident attorney could be a game-changer in ensuring justice is served.
My search for a reliable chiropractor ended when I found the Pain Relief Centre—they’re simply exceptional here in St Augustine! chiropractor near me
This guide makes it easier to navigate the complexities of commercial truck insurance in California! tow truck insurance california
Just started researching metal roofing options; this is super useful! https://www.google.com/search?q=Eclipse+Remodeling+%26+Roofing+Inc.&ludocid=2330847291650925840
Thanks for the clear breakdown. More info at medición de composición corporal .
Thanks for the informative content. More at nutrióloga Saltillo .
Valuable information! Discover more at maquinaria profesional .
Thanks for the insightful write-up. More like this at local senior living .
Thanks for highlighting combustion air standards. We had it established through furnace repair Canadian Heating and Air Conditioning hamilton .
Great points made about storage solutions in small kitchens; those tips will definitely save space—more organization tricks available at Kitchen Remodeling Services In Los Angeles !
Nicely detailed. Discover more at https://www.youtube.com/@normandyanimalhospital .
This was a wonderful guide. Check out https://www.zipleaf.us/Companies/Gordon-Law-PC-Brooklyn-Family-and-Divorce-Lawyer_10858 for more.
This was a great article. Check out https://www.youtube.com/watch?v=mMHphg7Iq-k for more.
This was quite useful. For more, visit https://www.ted.com/profiles/50442701/about .
Thanks for the detailed post. Find more at ac service near me .
Newbie purchaser? Lassila Agency clarifies home protection line by line. Find out more at health insurance .
Wonderful message, very workable ideas. I discuss corresponding approaches at local SEO strategies .
Bài viết trên # anykeyword # thực sự mang lại nhiều lợi ích cho bất kỳ ai muốn bắt đầu chơi cược online. tylekeonhacai.futbol
Không thể bỏ lỡ các chương trình hấp dẫn từ nhà cái này nhé mọi người! đăng nhập mv88
Mỗi lần vào vlxxtube, mình lại phát hiện ra điều gì đó mới mẻ! vlxxtube net
Đã lâu rồi mình chưa thử vận may ở các nhà cái khác ngoài #say79#, nên quay lại thôi! say79 cloud
. Cùng nhau chia sẻ mẹo hay để thắng lớn trên ? 12play.team
Mỗi lần chơi tại DanhBai365, tôi đều có những trải nghiệm tuyệt vời! danhbai365
This was highly educational. For more, visit Meigel Home Improvements – Kitchen & Bathroom Remodeling Company .
Cảm giác hồi hộp mỗi lần đặt cược tại ###ANYKEYWORD### thật tuyệt vời! 28win
Không biết mọi người có hay đặt cược thể thao tại 6886win rocks không nhỉ?
Hãy chia sẻ cho bạn bè cùng tham gia trải nghiệm thú vị từ ###nAnyKeword### nhé ! 456club
Đã từ lâu mình không tìm thấy một nền tảng nào tốt hơn vlxx cho các video 18+. Tuyệt vời thật! https://vlxx.movie
Chất lượng video trên SexTop1 thật tuyệt vời! Luôn cập nhật những gì hot nhất. SexTop1 gg
Tôi vừa tham gia vào cộng đồng chơi tại pkbet và cảm thấy rất vui vẻ và thoải mái! https://pkbet.rocks
Mình luôn tin tưởng vào nhà cái uy tín như 100win để đặt cược. 100win.rocks
Tôi yêu thích các trò chơi casino trực tuyến tại Boss8, cực kỳ hấp dẫn! boss8
I enjoyed this post. For additional info, visit Car Accident Lawyer .
Just had a ridge vent added to reduce attic heat. Hamilton roof repair team from emergency roof repair services in Hamilton improved airflow immediately.
I’ve been getting to know the the best option rice makers nowadays and found out that consistency and basic cleanup topic maximum. If absolutely everyone’s comparing items, test out best-rated rice cookers for some special breakdowns.
Impressed by the dedication and expertise of San Diego personal injury lawyers. Your site, Auto accident lawyer , seems like a valuable resource for those seeking legal guidance in times of need.
อยากจะพาเพื่อนไปที่ OMG OneMoreGlass วันหยุดนี้ รู้สึกตื่นเต้นจัง! บรรยากาศร้านเหล้าสาย1
This was a fantastic read. Check out rle portland for more.
Excellent worldwide SEO guide. Using hreflang properly and consolidating links back to the main hub at digitaleer.com/scottsdale-seo overview avoided cannibalization.
Highly suggest the solutions of dumpster rental service for any person requiring a dependable dumpster service.
Why replace when you can repair? Arlington TX has some fantastic appliance repair options. https://www.google.com/maps?cid=6678422040132912182
Been through a handful of US-based crypto exchanges, and honestly, the difference in fees and support is staggering. Coinbase is popular and user-friendly, but their withdrawal and trading fees quietly eat into profits—like a 1 criteria for investment citizenship in mexico 2026
I enjoyed this post. For additional info, visit https://ph.pinterest.com/ddandbllc/ .
Well done! Find more at consejos sobre extranjería en España .
Thanks for the clear advice. More at mejor tienda de colchones online .
Love the emphasis on dosing and placement. I gathered some expert recommendations here new york botox
פוסט מעולה! למדתי הרבה על בניית קישורים לקידום אורגני. ממליץ לבדוק גם את יתרונות קניית קישורים לקידום למידע נוסף.
This was quite helpful. For more, visit Personal Injury Lawyer near me .
This was a fantastic resource. Check out nutrición para embarazo for more.
I found this very interesting. For more, visit nutrióloga a domicilio Saltillo .
With summer approaching fast there’s no better time than NOW when addressing necessary preparations across various sectors including transportation options available during peak travel seasons ahead!! Don’t forget those h Sacramento utility potholing
Thanks for the useful suggestions. Discover more at https://www.youtube.com/watch?v=FmSvbY9JkMs .
This was quite helpful. For more, visit tornillería y fijaciones .
Friendly staff and careful handling by this Portsmouth moving company. Local movers Portsmouth
Your tips on choosing an agent are spot on. I located a trusted local one using Anthony Luster – State Farm Insurance Agent .
Just booked our bounce house for next weekend’s party in Tampa! So excited to use water slide for rent near me !
Thanks for highlighting content hierarchy. We moved from decorative carousels to functional hero sections with clean CTAs. Case have a look at hyperlink: Website Designers in Santa Clara
It’s refreshing to see phone stores using trade-in programs that make updating much easier and more affordable! If you’re considering one, have a look at the options available at phone store !
I appreciated this post. Check out compassionate elderly care for more.
Appreciate the comprehensive advice. For more, visit columbia windshield service reviews .
Are there any exact developmental milestones that preschools focal point on? I’d like to be aware of more desirable what to anticipate next 12 months as my kid transitions into kindergarten ! infant child care
Planning another birthday bash and definitely going for a bigger water slide this time—Tampa has so many choices! where can i rent a water slide
The claims process explained on Local movers Cherry Hill gave us peace of mind for our Cherry Hill move.
Quick question: do all Los Angeles auto shipping companies provide tracking? Los Angeles Car Shipping’s
Fighting style not just enhance physical conditioning but additionally infuse discipline and emphasis in specialists. It’s fascinating to see how various styles, from karate to jiu-jitsu, deal special benefits Denver TKD kids classes
Any tips for preparing my vehicle for Lakewood car shipping? Lakewood vehicle transport
I’m impressed with the professionalism of this Lakewood moving company. Long distance movers Lakewood
Great customer support from Scranton auto shipping—answered all my questions. Scranton vehicle transport
I highly recommend Chesapeake moving company for a hassle-free move. Chesapeake commercial movers
This was a fantastic read. Check out https://www.bunity.com/gordon-law-p-c-queens-family-and-divorce-lawyer for more.
Suffolk auto shipping from a dealership was easy— Suffolk auto shipping coordinated directly with them.
My experience with a Harrisburg moving company exceeded expectations. Cheap movers Harrisburg
The psychological connection we have with precious jewelry is amazing. Whether it’s a family heirloom or a present from an enjoyed one, each piece tells a story buy gold denver co
Booking process was smooth through Cornelius NC botox . I appreciated the transparent pricing.
I can’t thank the Pain Relief Centre enough for their excellent service! They are the best chiropractor near me in St Augustine. chiropractor near me
This is the sweet spot between expensive and familiar. I’ve included it on best restaurants in Loomis .
The movers from this Roswell moving company treated my belongings like their own. Roswell moving company
I liked this article. For additional info, visit https://www.countrycreekvets.com/#:~:text=The%20best-,veterinarian,-in%20Allen%2C%20TX .
I’ve never had such a seamless move thanks to a Spokane moving company. Cheap movers Spokane
I’ve been debating among Cookcell and Hexclad for my next skillet—someone have event with equally? Found a colossal comparability at cookcell vs hexclad reviews .
Siding, fascia, and eavestrough colors should all coordinate. We’re updating our exterior palette and plan to work with reliable roofing near me .
Extremely insightful write-up; I hear excellent things about client service at dumpster rental near me also!
I found this very interesting. For more, visit fast and easy travel insurance .
This was beautifully organized. Discover more at nutrióloga para diabéticos .
Well explained. Discover more at IMC .
Thanks for the valuable insights. More at cerrajería y llaves .
תדירות עדכון האתר המקשר חשובה. העדפתי אתרים עדכניים לקישור ל- ביקורות על בניית קישורים איכותיים .
Terrific article! I really enjoyed the understandings you shared. Look into my thoughts at leading SEO firm .
I enjoyed this post. For additional info, visit quality senior care .
After the job was complete, they took the time to walk me through what had been done and answered all my questions. Their transparency is commendable. Christmas Light Installation Tampa Bay Pressure Washing
Resembles cook’s-table flavors at community power. Locate much more through Loomis burger joints .
I’ve bounced around a handful of US crypto exchanges, and the biggest difference by far comes down to fees and support responsiveness https://raindrop.io/tucanejbzp/bookmarks-63776293
If your defroster grid stops working, call auto glass . They can diagnose after rear glass replacement.
First-time buyer? Lassila Agency discusses home protection line by line. Find out more at life insurance .
Tightening electrical connections stopped intermittent shutdowns. Guidance from Canadian Heating and Air Conditioning hamilton helped.
Great post on teen driver insurance. I compared rate impacts using Insurance agency Eureka before adding my teen.
Choosing between re-roofing and a full replacement? The Hamilton roofers at factors affecting roof replacement cost explained the pros and cons clearly.
Chuldrens’ laughter echoes all the way through halls reminding us all why making an investment excellent time toward nurturing younger minds continues to be important relocating ahead closer to brighter futures anticipated beforeh best preschools
This blog is a gem for anybody looking to declutter! Don’t ignore dumpster rental service for your dumpster needs!
Anyone else here love their new metal roof? I searched ‘metal roofing near me’ and found the perfect service! Roofing contractor
The technicians at Eyebrow Services Las Vegas are true professionals! Best place for a Brazilian wax in town.
Your guidance on appointment frequency was solid. I built a maintenance scheduler new york ny botox
I’m so thankful for what Pain Relief Centre has done for my back pain—it’s hands down the best chiropractor experience I’ve had in St Augustine! chiropractor near me
Thanks for the informative post. More at plan de alimentación personalizado .
This was quite informative. For more, visit nutrición para niños .
Mọi người cẩn thận website giả mạo đang lan tràn, hãy kiểm tra nguồn trước khi nhấp vào liên kết. Tham khảo thêm tại xem phim sex hd 2025 để biết cách nhận diện dấu hiệu lừa đảo.
This was highly educational. For more, visit precios ferretería Albacete .
Appreciate the thorough insights. For more, visit Hair extensions .
Appreciate the detailed information. For more, visit home remodeling .
Thanks for the helpful article. More like this at web designer near me .
I enjoy how outdoor decks can be personalized to fit any style! Have you seen the current patterns? You can explore them at windows replacement .
Thanks for the great explanation. More info at Business Backup Solutions san jose .
“So many places offer great services in Las Vegas; I found mine through recommendations from Men’s Waxing Services Las Vegas !”
We tackled a full-domestic declutter and roll off dumpster rental was the so much dependable seller we used.
Customer spotlight videos built community trust for our local marketing in san jose efforts. salazar digital local seo
Thanks for the informative post. More at Pure Plumbing Company .
I never knew eyebrow positioning mattered so much. The diagrams on Cornelius botox made it click.
Awesome article! Discover more at Redefined Restoration – Chicago Water Damage Service .
Nội dung bạo lực học đường có thể gây tái chấn thương cho nạn nhân. Tài nguyên hỗ trợ tâm lý và kênh báo cáo ẩn danh nằm ở xem ngay phim người lớn miễn phí .
Just experienced the best Brazilian wax service ever at Skincare Services Las Vegas in Las Vegas!
ניסיתי לבנות קישורים דרך שיתופי פעולה עם כותבים. תוצאות: היתרונות של קישורים לקידום אורגני .
Thanks for covering fall prevention. We used quality senior living to compare safety assessments and emergency response protocols.
Craft-forward dishes with a come-as-you-are ambiance. Browsed through scallops Loomis .
This was very beneficial. For more, visit kitchen construction santa clara .
I think having a yard deck is vital for entertaining visitors! It produces the ideal atmosphere for barbecues and gatherings deck builders
Thanks for the insightful write-up. More like this at https://www.google.com/maps/place/heating+repair+services/@39.01931,-74.92581,15z/data=!4m15!1m8!3m7!1s0x89c0aafcdac7d537:0x6ad44c03786c0cfb!2sMajewski+Plumbing!8m2!3d39.0260407!4d-74.9332341!10e1!16s%2Fg%2F1v3knzh1!3m5!1s0x89c0aafcdac7d537:0x6ad44c03786c0cfb!8m2!3d39.0260407!4d-74.9332341!16s%2Fg%2F1v3knzh1!5m1!1e3?entry=ttu&g_ep=EgoyMDI1MDkxNy4wIKXMDSoASAFQAw%3D%3D .
I enjoyed this read. For more, visit office movers .
Appreciate the detailed post. Find more at local movers near me .
“Had no idea how common these problems were until I started talking to neighbors about their experiences.” Garage door supplier
Love that some contractors offer drone inspections now for safety and detail. Curious if roofing repair near me provides that in Kitchener.
I didn’t know microdroplet techniques can refine texture. I’ll cover this on botox near me .
I appreciated this post. Check out water damage restoration near me for more.
How do I choose the right salon for my first Brazilian wax? I found some insights on Teeth Whitening Las Vegas .
Great article! Loved the clearness and deepness. I shared a template at SEO consultant services .
Terrific recommendations on decluttering– I’m preparing to use a service like dumpster rental service soon!
หากใครกำลังมองหาร้านเหล้าในกรุงเทพฯ ขอแนะนำให้ไปลองที่OMG OneMoreGlass กันนะครับ ! # #anyKeyword## โปรโมชั่นร้านนั่งฟังดนตรีสดสาย1
I enjoyed this article. Check out windshield services Columbia for more.
Infusing joy into everyday life becomes achievable through simple additions like these—they uplift spirits while connecting communities together effortlessly! water slide rentals zephyrhills fl
Thanks for the primer on E&O insurance. I found professional liability quotes on Insurance agency .
Are there any different abilties that preschools concentration on? I’d like to recognise greater approximately their educational mindset! preschools aurora
This was highly educational. For more, visit nutricionista Saltillo .
Thanks for the valuable insights. More at nutriólogo Saltillo .
Loved your section on accessibility. Adding good focus states and ARIA labels boosted our conversions. If any one desires to see a sensible tick list, I compiled one the following: Website Design
Fine-tuned tastes, plain service– my fave. See popular American meals Loomis .
This was a great article. Check out ferretería cerca de mí for more.
I’ve been debating among Cookcell and Hexclad for my subsequent skillet—everybody have trip with each? Found a immense contrast at hexclad compared to cookcell .
I’ve been looking for the best Pain Relief Centre and I found that the chiropractor near me in St Augustine truly makes a difference in my health! chiropractor
Cleaning doesn’t have to be expensive anymore thanks to # #AnyKeyWord#! Gutter maintenance Clare
Activities schedules tell you a great deal about a neighborhood’s spirit. We compared calendars directly on assisted living services .
Awesome tips. Garage Door Repair Mesa AZ pros know LiftMaster and Chamberlain systems well. Stapley Action Garage Door in Mesa AZ
Appreciate the helpful advice. For more, visit https://www.youtube.com/watch?v=yjjguFjb5Xw .
This was highly informative. Check out fleet vehicle wraps for more.
Reliable Hamilton roofers are hard to find, but the crew booked through reliable roofers for hire communicated clearly and finished on schedule.
Just booked a consultation through Cornelius botox —excited and a little nervous!
”Together united st Skincare Services Las Vegas
Wonderful rates on life insurance policy without high pressure. Try Lassila Agency via crop insurance .
Czekałem na takie podsumowanie. Wpis zapisany do ulubionych. Będę wracał. audyt seo home
The guide to packing artwork was valuable. I added extra crating via movers .
I’ve been struggling with a leaky faucet for weeks! Your suggestions are just what I needed. Explore more helpful content at plumber melbourne .
You have actually made the rental process sound so easy! Looking forward to working with dumpster rental service .
Thanks for the practical tips. More at affordable auto glass Columbia .
I found this very interesting. Check out pge certified contractors near me for more.
Feature walls can increase a space. best house painters near me informed a muted eco-friendly that’s appropriate.
They handled our sewer line issue professionally. JB Rooter and Plumbing Inc: water heater installation
This was very enlightening. For more, visit Website Design Agency .
Thanks for the great tips. Discover more at digital marketing agency .
Never thought could fall head-over-heels over something like this—but here we are!!! Skincare Services Las Vegas
The manner user experience seo san jose aligns SEO with sales is infrequent—dependableremember search engine optimization offerings San Jose that pressure sales.
Very informative article. For similar content, visit trámites de extranjería para trabajadores .
למדתי המון! שילוב קישורים עם דפי נחיתה מהירים עבד יפה. ראה: שיטות לשירות בניית קישורים .
This was highly informative. Check out visitar tienda de colchones for more.
“What’s your favorite thing about getting waxed? Mine is definitely the results from # # any Keyword ###!” Eyebrow Services Las Vegas
Loved the real-patient photos and subtle improvements. I’m comparing outcomes at botox new York .
Pleasant article on stump issues. Our company used affordable tree removal Acworth for tree removal plus stump grinding, and also our lawn appears fantastic right now.
Great post on ankle instability! Rehab helps, but surgical stabilization info at foot and ankle surgeon NJ looks promising too.
If you’re flipping a area in Orlando, residential dumpster rental is riskless for immediate turnarounds.
I couldn’t agree more with your recommendations for finding a reputable roof contractor in Carlsbad. nlp for customer segmentation in painting is definitely the go-to choice for anyone looking for top-notch roofing services.
Appreciate the detailed information. For more, visit evaluación nutricional .
Preparation an event? Think about renting out a dumpster from dumpster rental to handle trash successfully!
It’s astounding how a whole lot teenagers examine thru play in preschool settings. They don’t even become aware of they’re mastering! best preschools
Thanks for the great content. More at opiniones de nutrióloga Saltillo .
Leaks at the corners? Likely your miters need resealing. I’m calling gutter repair for eavestrough repair and guards.
Wonderful message! Your advice is sensible and tried and tested. See my outcomes at top SEO services .
Wonderful tips! Discover more at adhesivos y selladores .
I appreciate how attentive everyone at the Pain Relief Centre is; they are simply the best chiropractor near me in St Augustine. chiropractor
Clogged gutters caused basement seepage for us—lesson learned. Installing gutter guards and new downspouts with roofing services near me soon.
Communication was outstanding throughout the process. They responded quickly to my inquiries and kept me updated on scheduling, which I greatly appreciated. How to Seal Pavers Tampa Bay Pressure Washing
Transparent care level assessments prevented surprise costs. We learned the process through professional respite care resources.
This screams chef-driven informal. I spotlight similar locations on anniversary dinner Loomis .
Contractors in Orlando: get consistent pickup times with dumpster rental companies orlando .
I just had my first Brazilian waxing experience in Las Vegas, and it was amazing! I highly recommend checking out Eyebrow Services Las Vegas for the best services!
“‘Metal roofing near me’ led me directly to experienced professionals who exceeded expectations.” Eclipse Remodeling & Roofing contractor
Good explanation of medical payments vs PIP. I adjusted coverage using advice on Anthony Luster .
Nothing warms the soul like a good bowl of dal makhani. Highly recommend visiting an Indian restaurant soon! For more, check out indian food delivery spokane .
Who knew that vacuum excavation could be so eco-friendly? Orange County needs more of this technology! Learn more at Orange County hydro excavation .
I liked the point about medical history disclosure. I made a pre-visit checklist botox near me
Just had a ridge vent added to reduce attic heat. Hamilton roof repair team from hamilton roofing companies improved airflow immediately.
Had a remarkable experience with my recent rental from dumpster rental — fast and trusted solution!
The menu reviews chef-y, the vibe checks out chill. More choices at best scallops dishes Loomis .
Thanks for the helpful advice. Discover more at quick travel insurance options .
The team at locksmith in orange county really knows their stuff when it comes to locks and security solutions in Orange County.
The devices available at phone stores can really boost your gadget’s performance! I found some remarkable devices just recently. If you’re interested, look into what free phones has in stock!
We’re comparing quotes for a full tear-off vs overlay. Transparency on scope and cleanup is key— roofing kitchener has been responsive so far.
The psychological connection we have with precious jewelry is amazing. Whether it’s a family treasure or a present from a loved one, each piece narrates buy gold near me
Martial arts not only enhance physical fitness however additionally impart self-control and focus in specialists. It’s fascinating to see how various styles, from karate to jiu-jitsu, deal special benefits Denver TKD
Great point about muscle tone. EMS sculpting plus nutrition guidelines from Body contouring gave me better contours.
Thanks for the great tips. Discover more at opiniones de nutrióloga Saltillo .
Don’t forget about lid quality and handle consolation while opting for a logo. I evaluate those small particulars on premium cookware brands for the reason that they remember in on daily basis use.
Love the process for handling gloss degrees. trusted painting company introduced a uniform eggshell end throughout varied suites.
Thanks for the great information. More at citas de nutrición cerca de mí .
Storm wind lifted a number of ridge caps on our Anaheim situation—gentle to miss from the ground. A drone inspection stuck it until now water injury spread. If you’re seeing granules in gutters or ceiling stains, get an inspection ASAP google.com
Moving to a brand new office and mandatory rekeying plus fresh hardware. The Naperville locksmith crew at https://maps.app.goo.gl/1xMx9zdqbfSbQeaP9 taken care of it smoothly—identical-day carrier, refreshing install, and stable security assistance
Your emphasis on hiring certified professionals for utility locating is something everyone should heed! Fresno underground utility locating
Thanks for the useful suggestions. Discover more at ferretería online Albacete .
Ranch plans that actually mirror real-world risks– thanks, Lassila Agency. Beginning here: farm insurance .
I’m regularly amazed through the resilience proven by young youth adapting to variations inside of their classroom environment ! So inspiring ! ### anyKeyWord### infant child care
The manner seo keyword targeting san jose aligns web optimization with revenue is rare—professional search engine optimization expertise San Jose that drive gross sales.
Love that some contractors offer drone inspections now for safety and detail. Curious if affordable roof repair Kitchener provides that in Kitchener.
The future of business technology is here, and it’s all about managed IT services like those from Technology Relocation Experts California .
Entryway art sets the tone for the home. My new print from chicago painters makes a welcoming statement.
Kitchen island sizing is tricky— remodelers service had clearance suggestions that helped.
These challenge images are motivating. We had a equivalent influence with General Contractor Company most advantageous our rework.
Need lend a hand navigating allows for— General Contractor Remodeling Company appears to handle every thing.
I’m thrilled with my progress at the Pain Relief Centre! They’re easily recognized as a top-notch chiropractor in St Augustine. chiropractor
This was highly useful. For more, visit quality elderly care .
Has anyone hired Home Remodeling Contractor Salem as a home remodeling contractor near me for basement finishing?
From the estimate to final walk-through, the Rockford mover from Long distance movers Rockford was excellent.
If your gutters drip behind the eavestrough, ask about drip edge flashing. I’m bundling that with guards at gutter flashing .
Nice reminder approximately warranties. Remodeling service Vancouver WA stands in the back of their paintings with a clean warranty.
I needed emergency tarping and found responsive Hamilton roofers through roof replacement cost in Hamilton —lifesavers during a rainy week.
The Core Update analysis makes good sense. We leaned into experience signals and reinforced interlinks to local Scottsdale SEO agency to recover.
I enjoyed this read. For more, visit Haircut for men .
Terrific post! This is exactly what I required today. More understandings at reliable SEO agency .
My delivery window was tight but Philadelphia car transport coordinated perfectly into Philadelphia.
Estate making plans tip: time table dumpster rental for yard waste after sorting donations and keepsakes.
Useful advice! For more, visit Barzel Builders Home remodeling .
Appreciate the detailed information. For more, visit Cybersecurity Backup .
If your downspouts are pooling water near the foundation, it’s a red flag. We’re planning extensions and new troughs— kitchener roofing looks like a solid local option.
Fantastic breakdown of Core Web Vitals. We trimmed JS and lazy-loaded media to fix CLS. I documented the procedure with beforehand/after metrics: Website Design Company in Santa Clara
The color palettes you mentioned are fantastic! I’m excited to incorporate them into my remodel. More ideas at Kitchen Remodeling Los Angeles !
Legal representation is not just for serious injuries; if you’re unsure about anything, contact an attorney anyway just in case! Florida Workers Comp
If you’re unsure about your rights at work, consulting a workers compensation lawyer can provide clarity. Workers’ Compensation
I’ve tried DIY transport. Professional Athens auto shipping via Athens Auto Transport’s was worth it.
This was highly educational. For more, visit website design services .
Great tips! For more, visit recetas saludables .
Clear contract and no hidden fees. I trust Schaumburg car transport for Schaumburg car shipping.
Having reliable partners like ####ANYKEYWORD#### makes navigating marketing so much easier! top email marketing services
Our quote from Local movers Scottdale was accurate and fair—top Scottdale moving company.
Thanks for the practical tips. More at ferretería industrial Albacete .
Appreciate the thorough insights. For more, visit best plumbers .
The variation between topping as well as correct elimination is actually vital. Acworth tree crisis services discussed alternatives and did a tidy put-down.
I wonder about the best plants to utilize around an outdoor deck for privacy and aesthetics. Any tips would be appreciated! There are some great concepts on windows of wisconsin .
Elevated sampling notes without stuffy sampling food selections. More at holiday dining Loomis .
If you’re on a good timeline, roll off dumpster orlando grants respectable related- or subsequent-day birth in Orlando.
I appreciate your minimalistic approach to natural facial expression botox near me
Winter’s rough on shingles here in Kitchener. If you’re seeing lifted tabs or granule loss, it’s time to call the pros. I’m looking at winter is coming for a full roof inspection.
The locksmith I hired from Orange County was incredibly efficient! Check out locksmith in orange county for their services.
Kids love bouncing, and so does everyone else; great choice by going with # anyKeywords #. tampa bounce house rental
Found a first-rate paint time table for Vancouver WA humidity on remodeling company .
Need ADA-compliant remodeling—can General Contractor Vancouver WA take care of accessibility enhancements?
This was a wonderful guide. Check out movers near me for more.
Thanks for the clear advice. More at santa cruz moving services .
I didn’t realise how exceptional insulation was once until our remodel. Remodeling Company guided the upgrade.
Sobre termos eléctricos: revisar ánodo de magnesio al menos cada 2 años. Lo aprendí en fontanero urgente valencia .
Loved the reminder about sleep. Recovery improved my contouring outcomes, echoing tips from Body contouring .
This timeline for multi-room tasks is actual. I coordinated the whole lot simply by Home Remodeling Contractor Salem OR with out stress.
If you missed work after a crash, Thompson Law can calculate lost wages and future earning capacity.
Loved this article. For sturdy dwelling enhancements, I’ve had top notch results with Remodeling service Vancouver WA .
Thanks for the helpful advice. Discover more at general contractor near me .
Workers deserve fair treatment after injuries; learn how to advocate for yourself at Workers Comp .
Just booked my next ride with O’Hare Limo Service to Milwaukee—can’t wait for the luxury! Milwaukee airport limo
Detailed prep paintings made a huge difference. House Painter in Roseville CA: exterior house painting cost
Well done! Find more at commerical movers aptos .
Kudos to you for tackling such an important subject matter that affects so many people in our community—this was great to read! Fresno underground utility locating
Love seeing before-and-after roof projects. Quality flashing and proper drip edge make all the difference. Thinking of booking with cost for our eavestrough replacement.
Trial meals and activity visits were helpful. We scheduled both through contacts found on local elderly care .
Thanks for the pro tips. For affordable tune-ups, hydro jet drain cleaning has good rates.
For anyone looking for a reliable chiropractor near me in St Augustine, I highly recommend Pain Relief Centre! They offer great services. chiropractor
Your coverage of trenchless lining post-inspection was detailed and clear. sewer line inspection process
The peace of mind that comes with having a managed IT service is invaluable—thank you, Managed It Services Company California !
Thanks for the thorough analysis. More info at vehicle wraps near me .
Backyard decks can really transform your outside location into a relaxing oasis. I have actually been considering adding one to my home, and I discovered some great resources on deck materials and designs at deck builder . Certainly worth a visit!
Granules in the gutters? That’s a sign your shingles are aging. Getting quotes for replacement— best eavestrough solutions is on our shortlist.
This was really informative, thank you. The points about shingle durability were very useful. Anyone living in Waterford, CT will find this very practical GFCI outlet install Mystic
For resale value, clean eavestroughs and guards show buyers you maintain your home. Getting mine done by eavestrough repair .
The tech satisfied hour posted with the aid of Social Cali was useful. Event link on google algorithm updates san jose .
Appreciate the comprehensive advice. For more, visit nutrióloga en Saltillo .
Really enjoyed reading your post. I found the advice on preventative maintenance quite informative. This advice is perfect for anyone in Waterford, CT managing roof issues roof replacement near new london ct
Great tips! For more, visit air conditioning maintenance .
Great reminder to reassess policies annually. Insurance agency near me made my review painless.
Thanks for the informative content. More at recetas saludables .
I found this very interesting. For more, visit water damage restoration service .
Glad you covered these points about upgrading guest experiences. The emphasis on quality materials is spot-on. Mystic’s hospitality sector can greatly benefit from this advice ground-up construction mystic
This was highly helpful. For more, visit injerto capilar Jaén .
Appreciate the helpful advice. For more, visit FUE Albacete .
Preventive care is everything. Regular cleanings and sealants saved us a lot of headaches. I learned a lot from Best Dentists in Oxnard about family dental schedules.
Fascinating read on disc health. If you need hands-on support, a Chiropractor in Thousand Oaks at Thousand Oaks Spinal Decompression can assess and treat the issue.
If you’re dealing with hail or wind claims, the Hamilton roofing contractors at top rated Hamilton roofers know the insurance process well.
Thanks for sharing this. Your breakdown of common repair needs was on point. I’ve noticed similar issues around Mystic Connecticut. Curious how local climate factors into long-term durability. To dive deeper, learn more at garage door spring replacement Stonington CT .
Un fontanero me sugirió instalar detectores de fuga con cierre automático. Info ampliada en fontanero urgente valencia .
Reducing alert fatigue is crucial. We tuned detections with IT Services to focus on true positives.
Terrific blog post– this stimulated new ideas. I organized them below: top SEO services .
Root canal myths debunked by a Camarillo expert. For anyone researching, try Best Dentists in Camarillo .
This was very beneficial. For more, visit Sewer line replacement .
This was a great help. Check out movers near me for more.
Thanks for the useful post. More like this at Queens Spousal Support lawyer .
A good reminder to manage expectations. My foot and ankle surgeon provided milestones— foot and ankle surgeon Caldwell .
Thanks for the helpful article. More like this at mold remediation company .
Thanks for the comprehensive read. Find more at Custody lawyer service .
I enjoyed this read. For more, visit .
Love seeing innovation blended together nicely alongside traditional techniques creating unique solutions suited perfectly towards modern lifestyles!!! # # anykeyword ## customer intent analysis for painting services
Taking my taste buds around the world right here locally; thank you #### anyKeyWord# authentic indian food
That walk-in shower is astonishing. For KC redesigning mavens, name Remodeling Near me .
Thanks for the informative post. More at Personal Injury Lawyer Houston .
Thanks for the detailed guidance. More at Sewer line repair .
Useful advice! For more, visit pool installation near me .
Smart point out of mud keep an eye on. I adopted a containment plan from remodelers .
Appreciate the helpful advice. For more, visit pasos para los trámites de extranjería .
This was a great help. Check out comprar colchones en Albacete online for more.
Impressed by the expertise of Sacramento personal injury lawyers! Finding legal support like this can truly make a difference for anyone seeking justice. Motorcycle accident lawyer is definitely in good hands with professionals like these.
The assignment photos display meticulous work. For KC renovations, test General Contractor Remodeling Company .
Choosing between these two brands can also be difficult—this purchasing help at cookcell vs hexclad differences surely breaks it down!
Postpartum massage helped my healing. Found a being concerned therapist in Frisco on massage therapist .
If you desire permit suggestions and inspections, Home Remodeling Contractor Salem has it covered.
If you’re flipping a condo in Orlando, local dumpster rental is secure for brief turnarounds.
Your expertise in handling personal injury cases is impressive! People seeking legal assistance in Los Angeles would greatly benefit from the valuable insights provided on Auto accident attorneys .
Your guidelines for eclectic mixes helped me avoid chaos. I applied them to pieces from house painters chicago and it looks curated.
This was highly useful. For more, visit san jose website designer .
If your soffits are discolored, you might have ventilation problems. We’re getting a consult with roof to sort out airflow and roofing.
מאמרי סקירה וקייס סטאדי מקבלים יותר שיתופים. שילבתי קישור ל- עלייה בדירוגי גוגל והמעורבות עלתה.
I recently had a pest issue in my home, and I was amazed by how effective the Puyallup Exterminator service was! They identified the problem quickly and implemented a comprehensive plan to eliminate the pests Puyallup pest control
Wow, I had no idea about the impact of hard water on plumbing systems! Your insights are invaluable. Learn more at plumber melbourne .
Chaque collaboration avec Bureau d’étude électronique a été un succès pour moi, je les recommande chaudement.
If you’re in Southern Wisconsin and need transport, trust me, go with the professionals at limo to O’Hare
I’ve seen great jawline slimming results with masseter Botox. Found more providers on botox ny .
It’s essential to document everything and work closely with your reporting work injuries for the best outcome!
Look, I get why a lot of people ask if this is just for the super-rich—and honestly, it can seem that way at first glance because the upfront investment is definitely significant investment program for Mexico passport
Muy cierto: no usar productos químicos agresivos en desagües viejos. Alternativas en cambiar grifo valencia .
This clarified when to see a surgeon after an ankle sprain. More resources at Springfield foot and ankle surgeon were useful too.
Don’t let insurance companies take advantage of you; hire a competent workers compensation lawyer to protect your rights! Florida Workers Comp
Competitive Pricing: The pricing was transparent and fair, offering great value for the high quality of service provided. I felt like I received more than what I paid for. house power washing near me
It’s critical for employees to report unsafe working conditions before an injury occurs! worker accident compensation
This was a wonderful post. Check out Columbia auto glass solutions for more.
Planning around vacations is smart—no sunburns or saunas right away. Travel checklist on Greensboro botox .
From the moment I contacted Tampa Bay Pressure Washing, I was impressed by their professionalism and responsiveness. They promptly answered all my questions and scheduled an appointment that fit my busy schedule. permanent exterior lighting installation
Loved the outreach templates. Personalization and referencing value pieces on best professional SEO services Scottsdale enhanced reply rates drastically.
Don’t let fear stop you from reporting unsafe conditions; educate yourself with info from Florida Workers’ Compensation
The segment about seasonal changes affecting surface care turned into very informative; I’ll prevent that in thoughts this wintry weather! flooring supplier la
When it comes to handling personal injury cases, having a reliable team of Portland personal injury lawyers like the ones at Slip and fall lawyer can make all the difference
Does anyone know if the Bonney Lake chiropractor can help with sports injuries? Chiropractor Bonney Lake
Loved reading about wellness programs. respite care facilities lists communities with fitness classes and mental wellness activities.
This was very well put together. Discover more at nutrióloga en Saltillo .
Awesome guide on post-workout recovery! Lymphatic drainage plus body contouring boosted my results. Resource: Body contouring .
Impressed by the level of service and commitment from Social Cali of Rocklin—truly a top agency! ppc advertising agency
Fantastic lighting suggestions! Layered lighting changed our kitchen—credit to Kitchen Contractor for the perfect layout.
Sobre WC: si la cisterna pierde, revisar junta del descargador y flotador. Tutorial en fuga de agua valencia .
This was quite helpful. For more, visit nutricionista Saltillo .
What an insightful publish—you’ve if truth be told hit the nail on the pinnacle with this one!! local Auto Glass 29302
Thanks for the clear advice. More at campamentos de verano cerca de mí .
Thanks for the detailed guidance. More at clínica capilar Jaén .
This was quite informative. For more, visit herramientas manuales y eléctricas .
After a windstorm our gutters sagged. Got same-week service in Brantford through downspout replacement . Worth a look.
I found this very helpful. For additional info, visit inexpensive travel insurance in Spain .
If you’re suffering from chronic pain, Pain Relief Centre is the place to go. They are the best chiropractor in St Augustine! chiropractor
This was quite informative. For more, visit alopecia androgenética hombres .
Caulking and sanding are so underrated. The team we booked via painting company handled all the prep and cleanup professionally.
For everyone on a finances however wanting hybrid tech, examine out the worth comparability at hexclad and cookcell side by side among those two brands!
Undertone comparisons aspect with the aid of edge are a have got to— home painting quotes offered spot-on swatches.
I observed fine comments approximately Remodeling Company ’s craftsmanship—any precise-lifestyles reviews?
I appreciate the reminder to label boxes by room and priority. That saved me hours. If you’re still searching for pros, moving company has been awesome.
I needed emergency tarping and found responsive Hamilton roofers through services in Hamilton —lifesavers during a rainy week.
For administrative center renovations in Orlando, orlando waste management treated our timeline and drop-off with out a troubles.
I crucial brief turnaround— remodelers used to be turbo than so much remodelers near me.
This is very insightful. Check out Coral Springs AC repair service for more.
#SearchEngineOptimization is vital; partnering with #expert firms like ###has been a game changer for us! SEO Marketing Seattle CA
Thanks for the informative content. More at quick windshield repair Charlotte .
This was very beneficial. For more, visit Coral Springs AC installation .
The top rated plumber in San Jose CA helped us pass a city inspection with no issues. Book through 24 hour plumber near me .
Your discussion on temporary vs permanent disability benefits helped clarify some confusion I had—great post overall! Workers Comp
That deck addition is fabulous for pleasing. Try General Contractor Remodeling Near me in Kansas City.
Sports chiro helped me return to lifting after a lumbar strain. Recovery roadmap: Thousand Oaks Chiropractor
Cyber risks are real— Anthony Luster bundled a cyber policy for us.
This article nails the making plans segment. I forever propose getting an in depth quote from general contractor near me to steer clear of surprises.
Love the recommendation on lighting fixtures layers— Home Remodeling near me completed our lighting fixtures plan completely.
Excelente guía para cambiar un grifo. Un fontanero recomienda cerrar la llave total y proteger el lavabo. Ver cambiar grifo valencia .
Finding light after dark moments remains possible especially considering innovative techniques explored through offerings presented via @ any Keyword ! Anxiety treatment newport beach
Inquiring minds want answers regarding best practices when implementing reliable strategies ensuring successful outcomes throughout multiple channels employed successfully over time…would love feedback surrounding experiences gained while exploring vacuum excavation orange county
A proper roof warranty matters. Make sure labor and materials are covered. Checking policy details with kitchener before we commit.
Dentist same day teeth gave me immediate confidence. You can find providers through Dentist in Oxnard .
Don’t leave your loved ones guessing about your wishes; consult with a local attorney to get started! orange county estate planning attorney
I’m amazed by how much character these installations can add ! Don’t miss great collections showcased over on # # any Keyword# # Window casement Anaheim CA
Chronic shoulder impingement more suitable after centered work—Frisco therapist came across on Aurelia Massage Frisco .
Preventive dentistry saves money. My Camarillo dentist stresses this—more info at Best Camarillo Dentists .
Compliance with GDPR can be tough. Managed IT Services guided our data mapping and DPIAs effectively.
Terrific post! This answered my primary question. Extra notes at top SEO expert .
Appreciate the link prospecting pointers. I outfitted a distinct segment list with tools steered by way of user experience seo san jose .
I always request a copy of the sewer inspection video for my records. importance of sewer inspections
There’s something special about arriving at Lake Geneva in style with help from O’Hare Limo Service—highly recommended for travelers! O’Hare limo service
Appreciate the insightful article. Find more at Haircut for men .
I enjoyed this article. Check out SaaS Backup services san jose for more.
Good point on avoiding puddling. I leveled low spots using methods from tips for sod installation .
Comprehending tooth decay fungi designs was actually mind-blowing. complete tree solutions Acworth validated the threat and also handled elimination promptly.
This is a must-read for anyone considering surrogacy! Also, check out the amazing resources at riverside surrogate requirements .
I found this very helpful. For additional info, visit bathroom remodeling .
Seattle’s digital marketing landscape is evolving, and SEO Expert Seattle WA is at the forefront of that change.
This was highly helpful. For more, visit reliable windshield replacement shop 29304 .
Helpful reminder about spring maintenance. I booked a gutter guard install with Aluminum gutter guards to reduce cleanings this year.
If your eavestroughs are sagging or leaking at seams, seamless upgrades are worth it. Booking an estimate with kitchener roofing this week.
The staff training levels really matter. senior living communities shows certifications and continuing education details where available.
Great article on commercial truck insurance California! It’s essential for protecting your assets. big rig insurance california
Great job! Discover more at recuperación tras implante capilar .
Thanks for the clear breakdown. More info at especialistas en cabello Jaén .
Buen recordatorio sobre purgar radiadores antes del invierno. Si dudas, llama a un fontanero. Tutorial en fontaneros valencia .
We had customized tile paintings completed, and General Contractor Remodeling Near me ’s precision turned into spectacular.
Love the layered lights strategy during this kitchen. Planning grids on remodelers were helpful.
Look, I totally get where this question comes from—at first glance, some investments or opportunities do seem tailored for the ultra-wealthy nomad capitalist insights on Mexico
Curious if anyone has experience upgrading their old fixtures for water efficiency? I found some good advice through Sewer Line Services , and Spartan Plumbing Services even helped with the installation.
Great point about photos in neutral expression. I shared a photo guide for tracking results on botox near me .
Loved the shade palette options. General Contractor Vancouver WA ’s designers helped carry our vision to existence.
Just had our gutters cleaned and realized we need a full upgrade. Anyone in Kitchener have experience with reliable roofing and eavestrough pros? We’re considering local siding companies for a quote.
Your counsel on outside shades helped us settle on. Home Remodeling Contractor did samples on-website online so we could see them in herbal faded.
Love that some contractors offer drone inspections now for safety and detail. Curious if roofing companies in kitchener provides that in Kitchener.
Seasonal yard waste in Orlando? Bagging vs bin guidelines at local dumpster rental .
High spots scared me, but using good lighting and short work sections as ceramic coating vs wax said did the trick.
For anyone in search of a reliable chiropractor, look no further than the Pain Relief Centre in St Augustine! chiropractor
Your focus on measurements over weight is spot on. Circumference tracking made my body contouring progress clear. Source: Body contouring .
Very informative article. For similar content, visit website design agency .
Workers comp isn’t just about medical bills; it also covers lost wages, which is why having an attorney is crucial! workplace injury claims
Are you aware of common misconceptions about workers’ compensation? Let’s debunk them together! More info at Workers Comp .
Pediatric chiropractic was gentle for my kid’s posture. Parent notes: Thousand Oaks Chiropractor
Hot stone massage in Frisco became so enjoyable. I booked the session top as a result of massage therapist frisco tx .
Amazing list. Do not forget to compress images and use next-gen formats; after doing that and adding structured information, my pages on top SEO specialist services packed 40% faster.
I absolutely enjoy how precious jewelry can change a whole outfit! It’s remarkable how a simple piece can add so much beauty and character. Have you ever thought of personalizing your own jewelry? It can produce a really special declaration piece buy gold denver
Choosing between these two manufacturers will be not easy—this acquiring book at cookcell vs hexclad comparison quite breaks it down!
It’s remarkable how rapidly phone innovation is progressing! I keep in mind when flip phones were all the rage. For the most recent models and devices, you must visit phone store !
Glad you mentioned professional installation—it’s worth every penny! Select Garage Doors took care of all code compliance, which is something emphasized on Garage Door Installation too.
This was very insightful. Check out best auto glass repair in Charlotte for more.
The water slide rental options in Tampa are perfect for keeping the kids entertained! party rentals wesley chapel fl
With such a lot of content strategies plausible on platforms like OnlyFans, or not it’s fundamental to stand out. Learn how at https://knoxofwb456.yousher.com/sablesiren-s-velvet-hour-dim-lights-deep-desire !
Para fuel, siempre técnico habilitado. Un fontanero especializado revisa estanqueidad. Info en fontanero barato valencia .
”#CommunityEngagement efforts bolstered via suggestions from this fantastic team—thank you, ###!” SEO Marketing Seattle CA
We ran postcard retargeting for site visitors—solid complement to local marketing in san jose. local seo agency san jose
We’re getting compliments from acquaintances! House Painter in Roseville CA: affordable interior painting services
Los latiguillos tienen vida útil; cambiar cada 5 años. Lo vi en fontaneros valencia .
Appreciate the emphasis on incident response planning. Our IR playbooks were refined by MSP IT Services .
Do you observed OnlyFans becomes mainstream within the innovative neighborhood? It in particular has plausible! https://zenwriting.net/jakleygjig/astraaubreys-neon-nights-cyberpunk-chic-and-chill
Loved the style quiz suggestion. I browsed house painters chicago by style categories to narrow down my choices.
The support provided by dedicated legal professionals like `# any keyword #` should never be underestimated—thankful for mine! work-related injuries
Protecting your rights after a workplace accident is key to recovery. More info at Florida Workers Compensation !
Eye care in Chino can be hit or miss, so finding the Best Optometrist in Chino CA is crucial. I’m bookmarking optometrist near me to explore options.
Advocating self-care is essential—it’s reassuring knowing resources such as @ any Keyword prioritize personal wellness journeys together alongside clients! Anxiety treatment newport beach
Invisalign progress is amazing! For clear aligners, the Best Camarillo Dentist is the place—details on Camarillo Dentists .
Transparency in treatment plans helped me avoid surprises. My Oxnard dentist, discovered on Oxnard Dentists , gave a clear breakdown.
Regular gutter cleaning is exhausting. I’d rather install guards and be done. Found a service in Brantford: foundation water issues .
I finally understand endorsements. Anthony Luster – State Farm Insurance Agent explained them clearly.
Fighting style not only boost physical conditioning yet likewise impart discipline and emphasis in experts. It’s interesting to see exactly how different styles, from martial arts to jiu-jitsu, offer special advantages Denver TaeKwonDo kids class
Appreciate the detailed information. For more, visit moving companies in santa cruz .
This was quite informative. For more, visit Gulf Shores home addition contractors .
Thanks for covering slab leak symptoms. 24 hour plumber near me used non-invasive methods to locate the issue.
Just had my first Botox session; minimal discomfort and quick! Greensboro botox
The nonstick pot excellent topics extra than I expected. Scratches smash texture fast. The toughness notes on best rice maker for home use were wonderful successful.
I liked this article. For additional info, visit water heater services near me .
Arriving at lake geneva feels like royalty when traveling through o’hara limo services; absolutely wonderful!!! # # anyKeyWord# # Milwaukee airport limo
This was highly educational. For more, visit sams signs vehicle wraps .
We wanted pet-pleasant finishes and Remodeling Company prompt top notch, durable alternate options.
Wonderful post! The functional examples stood apart. I have actually compared methods at local SEO agency .
Mọi người cẩn thận website giả mạo đang lan tràn, hãy kiểm tra nguồn trước khi nhấp vào liên kết. Tham khảo thêm tại phốt gái ngành để biết cách nhận diện dấu hiệu lừa đảo.
Everyone deserves comfort and security within their own four walls which starts right atop those very rooftops shielding everything underneath safely away!! Chimney repairs
Spring cleaning motivation! We used local dumpster rental orlando and enjoyed their related-day delivery in Orlando.
Thanks for the thorough article. Find more at tratamiento capilar Jaén .
If you’re dealing with a rat infestation, it’s crucial to address it quickly to prevent health risks and property damage. Effective rat removal techniques can make a significant difference in maintaining a safe and clean environment Pest Control
If you’re serious about getting quality work done on your roof, go with the experts at ** any Keyword** without hesitation! Roofing installation Surrey
Appreciate the thorough write-up. Find more at Coral Springs HVAC services .
Very useful post. For similar content, visit movers .
For window replacements, remodelers near me ranked remodelers relatively.
This was highly useful. For more, visit Coral Springs heating and air .
The walkthrough inspection tips are helpful. I completed mine with the Local movers foreman.
The presentation and flavors were exquisite during my last visit to Top of India!! fine dining indian restaurant
Finding a good attorney after a work injury is essential—great tips available on Florida Workers’ Compensation Lawyer !
Flashing repairs saved our roof from leaks around the vent stack. Next up is seamless eavestrough installation via winter is coming .
The power-successful enhancements are sensible. KC house owners, check out Remodeling Company .
Finding the right SEO Expert Seattle WA in Seattle WA has transformed my website traffic. Highly recommend their services!
I tried lip flip with Botox—my notes and results here: new york botox
This was highly educational. For more, visit expert assisted living .
Love these fireside updates. general contractor near me refaced ours and rerouted fuel appropriately.
The primer on water lines and shutoffs changed into important. Home Remodeling Contractor Company upgraded valves and arranged our software field.
Such an informative post! Anyone curious about surrogacy should definitely visit riverside become a surrogate .
I appreciate the breakdown of different types of coverage for commercial trucks. Very informative! big rig insurance california
After reading comments, I’m curious approximately the lengthy-term durability of Cookcell vs Hexclad. More insights the following: cookcell cookware comparison .
I didn’t realize how common sesamoiditis is— foot and ankle surgeon NJ helped me recover without surgery.
If you’re looking for reliable Hamilton roofing contractors, I’ve had a great experience recently. Check out local trusted roofing experts for fast quotes and quality work.
Thanks for the detailed guidance. More at expert windshield repair Charlotte .
CSS box queries are a recreation changer for ingredient-first design. I prepare examples showing playing cards adapting to their figure width: Web Design in Santa Clara
That public plaza enhances the ground ground. I shared plaza approaches on underpinning in building construction .
Sobre termos eléctricos: revisar ánodo de magnesio al menos cada 2 años. Lo aprendí en fontaneros 24 horas valencia .
If you wish therapists who accept HSA/FSA in Frisco, clear out and guide on best massage therapist frisco texas Aurelia Massage Frisco .
I never notion about how local weather may possibly have effects on flooring choices until eventually examining your blog—remarkable point! carpet wagon flooring showroom
Sometimes, nothing beats a simple bowl of khichdi—find comforting recipes over ## fresh ingredients indian cuisine
API defense is underrated. Inventory, auth, fee limits, and schema validation are key. I record commonplace pitfalls at it support companies .
Leaks at the corners? Likely your miters need resealing. I’m calling Commercial gutter services for eavestrough repair and guards.
Look, I totally get where the “super-rich only” perception comes from—it’s a significant investment, no doubt requirements for Mexico citizenship by investment
Posture at the desk matters! I saw real improvement after working with a Chiropractor in Thousand Oaks, especially the team at Spinal Decompression in Thousand Oaks .
We use inspection data to prioritize sections for lining vs. replacement. InSight Underground Solutions contact
Proper rinse prevents residue on windows. Coordinated Roof Washing is best. I’ve had clean results with top-rated roof cleaning Cape Coral .
The holistic approach of my Bonney Lake chiropractor has improved my overall well-being! Chiropractor Bonney Lake
Appreciate the detailed post on renovation strategies for hotels. The focus on contractor selection is very helpful. For those working in Mystic, Connecticut, these tips are incredibly relevant. I wonder how local building codes influence these projects? building contractor mystic near me
Appreciate the comprehensive advice. For more, visit servicios de asesoría en extranjería .
Grateful for the insights in your article. I particularly liked your point about roof maintenance schedules. For homeowners in Waterford, Connecticut, this is especially relevant. Have you noticed if certain materials perform better in Waterford roof replacement waterford connecticut
Your black paint care advice was essential—ceramic really enhances clarity after proper polishing. Guide at mobile detailing services .
Loved the suggestion for early morning watering. My schedule came from best practices by Travis Remondo for sod installation .
I appreciated this post. Check out pool removal company for more.
Pain relief is just a visit away at the Pain Relief Centre, which is clearly the best chiropractor near me in St Augustine! chiropractor near me
Appreciate the detailed tips in this article. Your recommendations for weatherproofing are excellent. These tips are particularly useful for Waterford, Connecticut residents outlet & switch repair Groton
Great insights! Discover more at tienda colchones online .
Open shelving appears to be like major the following. Remodeling Near me balanced it with closed storage for practicality.
As a homeowner in Carlsbad, I’m grateful for your informative blog post on roof contractors. Thanks to your recommendation, I reached out to language understanding in painting queries and was thoroughly impressed with their professionalism.
I can’t believe how much my business has improved since partnering with Local SEO Seattle CA in Seattle!
Secure email gateways still matter. We tuned ours with IT Services for better catch rates.
Dental implant aftercare was explained really well here. I cross-checked tips on Dentist in Camarillo too.
I wished a compact form for a small kitchen. The area-saving alternatives at top-rated rice cooking appliances are compatible flawlessly with no sacrificing overall performance.
Really glad you covered this. Your breakdown of common repair needs was helpful. I’ve noticed similar issues around Mystic Connecticut. Curious how local climate factors into long-term durability. To dive deeper, you can check out garage door opener repair Stonington CT .
Thanks for the helpful article. More like this at plasma rico en plaquetas capilar .
Multi-warehouse coordination is tricky. We leverage network-level inventory perspectives in Manufacturing process software consultants to hinder stockouts.
Wonderful tips! Find more at opiniones clínica capilar Jaén .
If your soffits are discolored, you might have ventilation problems. We’re getting a consult with roofing companies in kitchener to sort out airflow and roofing.
I appreciated this post. Check out colchón visco muelles combinación for more.
It’s amazing how much talking to a professional can help. Visit Depression Treatment newport beach if you’re in Newport Beach!
The transformation of my home’s exterior has not only enhanced its curb appeal but has also given me a renewed sense of pride in my property. pressure washing tampa
Your hydration calculator is useful. I matched my intake to contouring sessions, similar to suggestions from Body contouring .
Thanks for the thorough analysis. More info at local windshield repair Charlotte .
The access sequence is welcoming and legible. Entry innovations are included on historical restorations near me .
Nicely done! Discover more at marketing agency near me .
Arriving in Lake Geneva has never been easier thanks to O’Hare Limo Service’s excellent service! Milwaukee airport limo
The formerly-and-after pics are inspiring. For each person pondering a rework, General Contractor Remodeling is a cast preference.
Cloud misconfigurations remain a top breach vector. Enable least privilege, configure logging, and automate guardrails. My cloud hardening details: it support specialists .
I appreciated this article. For more, visit Project 100 website designer .
I recently read about the long-term effects of workplace injuries, and it’s eye-opening! We must prioritize safety and health. Learn more at Workers’ Compensation .
Cảm giác như mình luôn được trải nghiệm những điều mới mẻ khi ghé thăm vlxx lần nữa! vlxx
A good roofer will check soffit, fascia, and valleys, not just shingles. I’ve seen great reviews for roof around Kitchener.
Không còn nghi ngờ gì nữa, trải nghiệm tuyệt vời đang chờ đợi các bạn tại SexTop1 đấy nhé! SexTop1
Nếu bạn yêu thích thể thao thì nhất định phải thử cá cược tại #say79# say79
Một trong những điều khiến tôi yêu thích nhất về 28win chính là sự đa dạng trong các trò chơi cá cược mà họ cung cấp! 28win.shop
Các chế độ bảo mật thông tin khách hàng của PKBET khiến tôi yên tâm hơn khi tham gia!!!!# pkbet rocks
That soaking tub is a spa-point improve. Salem locals can achieve Home Remodeling Contractor Company for bathroom remodels.
I believe that regular safety drills should be mandatory in every workplace to minimize work injuries. how to find a work injury lawyer
Mọi người có biết cách nào để tối ưu hóa tỷ lệ thắng khi chơi ở đây không ? Chia sẻ cho tôi với nhé !## anyKeywords ## 100win
Luôn có những điều bất ngờ thú vị khi trải nghiệm tại mv88.team
Love the instance of format optimization. general contractor maximized garage in our kitchen.
Tôi đã tham gia 456club một thời gian và thấy rất hài lòng. Rất đáng để thử! 456club
Tôi cảm thấy rất hài lòng khi chơi tại nhà cái 6886win , dịch vụ khách hàng rất tuyệt vời!
Tôi rất vui khi biết rằng danh tiếng của DanhBai365 ngày càng phát triển trong cộng đồng game thủ Việt Nam! đăng nhập danhbai365
Cảm giác như đang sống trong một thế giới riêng khi vào vlxxtube! vlxxtube net
Tôi nghĩ rằng mỗi người chơi đều nên biết đến nguồn tài nguyên tuyệt vời như # anykeyword # . tylekeonhacai
.. Bạn sẽ không hối hận khi chọn ? làm điểm dừng chân của mình 12play
Gridless, content-float layouts suppose recent while performed excellent. We used intrinsic design on web design services bangalore to permit content breathe.
If you’ve obtained tech neck, a Frisco rub down therapist from Aurelia Massage Frisco can help loosen issues up.
Tôi yêu thích các trò chơi casino trực tuyến tại Boss8, cực kỳ hấp dẫn! boss8
Great post! I’ll share this with my team. Our structure goes to affordable SEO firm .
The refer to crane system area served. emergency fallen tree removal Acworth intended strategies in advance and also performed efficiently.
Thanks to permanent architectural lighting installation , my roof has never looked so good!
Cabinet refacing vs. replacing is a real debate. We refaced with Kitchen Contractor and saved a ton without sacrificing style.
Buen tip: el vinagre ayuda a desincrustar perlizadores. Más trucos de fontanero en fontaneria valencia .
If your gutters drip behind the eavestrough, ask about drip edge flashing. I’m bundling that with guards at seamless gutters .
Helpful checklist for hiring painters. We used painting company to verify insurance and references before starting our project.
If your eavestroughs are sagging or leaking at seams, seamless upgrades are worth it. Booking an estimate with reliable roofing near me this week.
I wonder about the very best plants to use around an outdoor deck for personal privacy and aesthetic appeals. Any ideas would be appreciated! There are some great ideas on windows replacement .
Getting injured at work was one of the hardest things I’ve ever faced , but having legal help made all the difference .# # anyKe yword## workers compensation claims process
Accessibility design can’t be overlooked. We learned to evaluate floor plans and hall widths on memory care solutions .
Thanks for the informative content. More at campamento de verano en la montaña .
רעיונות מעולים. קובץ KPI לקידום קישורים להטמעה ב- קישורים איכותיים לפרופילים טבעיים .
I wouldn’t hesitate recommending service providers specializing exclusively within this niche area either! Florida Workers Compensation
I’m really impressed by how comprehensive the services are at ##anyKeyword#; definitely worth checking out! teen therapist orange county
Atención a los angeles corrosión galvánica al mezclar metales. Tabla de compatibilidad en reparación de tuberías valencia .
I appreciate the reminder to label boxes by room and priority. That saved me hours. If you’re still searching for pros, moving company has been awesome.
Decluttering sooner than the holidays? dumpster rental prices is the way to head.
Finish option is integral. professional residential painting steered satin within the hallways—ordinary to blank and appears immense.
Cycle remember frequency structured on ABC works. We automate matter triggers with SAP business process automation consultant whilst variance thresholds are hit.
Great insights on maintaining European vehicles! Many owners underestimate how crucial specialized diagnostics and OEM parts are for long-term reliability and performance expert european auto repair west palm beach
I idea all hybrid pans had been the comparable till I learn the ameliorations at cookcell vs hexclad durability between Cookcell and Hexclad!
Beautiful bog redecorate! We had ours achieved through General Contractor and we couldn’t be happier.
customized contracting does desirable paintings on my house
custom contracting eavestrough & roofing kitchner roofing
kitchner roofing tradition contracting eavestrough & roofing
customized-contracting kitchener roofing
Looking for kid-friendly clinics and the Best Optometrist in Chino CA. I’m browsing optometrist near me to narrow it down.
Great tips! For more, visit HVAC Coral Springs .
This article inspired me to finally invest in art. I started with a beautiful piece from chicago painters and I’m hooked!
Our new home needed a plumbing tune-up—booked through toilet installation and repair in San Jose, CA.
We planned our bathroom structure in Vancouver WA riding remodelers near me .
The fenestration optimizes views devoid of overheating. Glazing ratios on ll 97 compliance solutions .
My teen athlete has recurring shoulder pain. Considering a sports-focused Thousand Oaks chiropractor. Reading case examples at Thousand Oaks Chiropractor .
Appreciate the great suggestions. For more, visit HVAC Coral Springs .
Finding balance between returning quickly versus ensuring full recovery remains pivotal– assess perspectives shared comprehensively throughout % Workers Compensation
My ancient cooker necessarily burned the ground layer. Upgrading to at least one with induction heating solved it. Reviews at best electric rice cookers helped me select the desirable one.
Combination treatments can be powerful. I wrote about timing Botox with skincare at Raleigh botox .
Snow foam is not a wash—still need a contact wash after. More myths busted at DIY car detailing tips .
Data category drives smart DLP policies. Start small with touchy fields and strengthen. I shared a starter policy p.c. at it support for small business .
Always get multiple bids. Remodeling introduced obvious pricing and designated scope.
If you want gentle care and modern tech, the Best Camarillo Dentist is a must—check out Best Dentists in Camarillo for easy scheduling.
Mes attentes ont été largement dépassées grâce aux solutions fournies par Bureau d’étude électronique !
Geo-fencing access reduced our exposure. We configured it with IT Services .
Post-care is often overlooked—great checklist. I’ll follow up with Best Oxnard Dentists about night guards to protect new restorations.
Thanks for the comprehensive read. Find more at recuperación tras implante capilar .
I want minimal downtime— Home Remodeling Contractor Salem OR planned well as a home remodeling contractor near me.
I found this very interesting. For more, visit prueba de colchón en tienda .
Love the reminder to optimize for intent. I tuned landing pages with insights from off-page seo strategies san jose and noticed conversions upward thrust.
Love how you break down common causes of remote failures—sometimes it really is just interference or dead batteries! Found more troubleshooting steps from Select Garage Doors at Commercial Garage Door Services .
I always choose O’Hare Limo Service when traveling from Chicago to Milwaukee—never disappoints! limo to O’Hare
Thanks for the helpful advice. Discover more at cybersecurity services .
This was very well put together. Discover more at injerto capilar Jaén .
Prenatal rubdown in Frisco made a immense distinction for my sleep. Moms-to-be, attempt searching suppliers on Aurelia Massage Frisco .
I had a transformative experience with a psychologist from Newport Beach. Thank you, Depression Treatment newport beach , for guiding me!
Wonderful tips! Find more at Barzel ADU builders .
This is quite enlightening. Check out Hair salon for more.
Just had a ridge vent added to reduce attic heat. Hamilton roof repair team from professional roof repair services Hamilton improved airflow immediately.
Appreciate the tips shared here! If you’re located in Barnsley, check out Hosting & Cloud Solutions for IT support.
“What’s better than treating yourself during vacation? A soothing facial from ###anything### makes it perfect!” Skincare Services Las Vegas
I love how you explained the benefits of using a buyer’s agent! realtors
”#FinancialPerformance metrics analyzed revealed vast improvements attributable solely via contributions directed throughout partnerships established around interaction facilitated via consultations held amongst teams operating within:###!” SEO Marketing Seattle CA
I’ve recently had a huge problem with pests in my home, and I didn’t know where to turn Pest control Puyallup
Your before-and-after stories are inspiring. Non-invasive body contouring can complement workouts so well. I read more at Body contouring .
There’s absolutely nothing rather like taking pleasure in a summertime night on a properly designed backyard deck deck builder
Your emphasis on user engagement metrics as an SEO factor is spot on! Check out my views on this topic: Local SEO Agency .
Is the rate distinction among Cookcell and Hexclad justified? Saw an fair discussion at hexclad performance vs cookcell .
This is why I prefer independent agencies. Anthony Luster – State Farm Insurance Agent shops several carriers for me.
Inspections helped us plan phased upgrades over several years. InSight Underground Solutions services
Hazardous resources workflows want rigor. We enforce hazmat pick out and percent regulation in Business document automation services to protect compliance.
Bulky merchandise set-out regulation for Orlando renters clarified at orlando yard waste dumpster .
I appreciate how informative your posts are about dementia care in the UK! I found even more resources at elderly home care .
The UK has some fantastic initiatives for dementia care. You can learn more about them on elderly care .
Your discussion about pH balance in skincare was enlightening—I had no idea it mattered so much! Explore more info at chemical peels .
The role of property inspections in real estate transactions is so important! realtor las vegas
The photos included here really showcase different styles beautifully; they’re inspiring me as I plan my own upgrades! New Roof Installation
Flooring trends come and go, but well-restored pieces stand out timelessly in homes year after year. Floor Restoration
האזהרה על PBN במקום! מי שמחפש אלטרנטיבות נקיות, ימצא ב- שימוש ב-AI בקידום פתרונות.
It’s incredible how much a good quality hardwood timber floor can transform your living space! # Hardwood Timber
I underestimated how much sod I needed until I used a calculator. There’s a handy one at tips for sod installation .
Every organization has room for improvement when it comes down its overall commitment towards promoting healthy workplaces via effective auditing strategies!! ###aniKeyWord ## Health and Safety Audit London
How do reviews for Lakewood car shipping compare to other companies? Lakewood Auto Transport’s
Terrific message, and the timing was excellent. I published a companion guide at effective search engine optimization .
The flexibility of street food vans makes them perfect for any occasion. Learn more at Street Food Near Me !
Just had our gutters cleaned and realized we need a full upgrade. Anyone in Kitchener have experience with reliable roofing and eavestrough pros? We’re considering DIY for a quote.
If your door shakes or jerks, don’t ignore it. Mine did that and best garage door repair atlanta, found a loose bracket that could’ve caused serious damage.
Excellent use of modular aspects. I’ve outlined modular advantages on underpinning in building construction .
If you’re moving with roommates, divide boxes by color labels. Found that organization tip through Texas Mover’s .
Love the layered lights method during this kitchen. Planning grids on remodeling company were useful.
Importante usar teflón correctamente en roscas. Un fontanero me mostró el sentido adecuado. Más info en fontanero barato valencia .
Endpoint isolation at some point of incidents can quit lateral motion quickly. EDR with are living reaction is well worth it. I summarized an IR workflow at it managed service provider .
Your advice on avoiding alcohol before treatment was a good reminder. I read that on botox near me too.
Well done! Find more at best assisted living options .
Thanks for highlighting the importance of compliance. Minneapolis has exclusive condo licensing and inspection requisites that may outing up new buyers Minneapolis Property Management
Great insights on deciding on paint finishes. General Contractor Vancouver WA steered sturdy chances for excessive-visitors regions.
Reliable, insured, and timely—my Rockford transport was stress-free. Rockford car transportation services
For all people debating repair vs. replacement in Waukesha WI, element in roof age, ventilation, and electricity mark downs with new shingles. Getting an in depth estimate from https://www.google.com/maps?cid=2901086777036865384 helped me price range good and avert shock accessories.
If you prepare dinner jasmine or basmati incessantly, you’ll want adjustable settings. I discovered loads from the roundup on top rice makers approximately which items deal with the various grains preferable.
The karaoke roundup is amusing! I observed a sing-along social on optimizing web content san jose and joined in.
Looking to book a hydrafacial and microneedling session at a optimum aesthetic clinic in Atlanta. Quality and cleanliness are ideal priorities, consisting of consequences-pushed care https://www.google.com/maps/place/?cid=9724461458374317305
Thanks for sharing these stretches. Pairing them with regular adjustments from a Chiropractor in Thousand Oaks such as Thousand Oaks Chiropractor made a huge difference for me.
Starting a garage conversion project—considering Home Remodeling Contractor near me as a home remodeling contractor near me.
Moving on a budget? A Syracuse moving company showed me how to save by decluttering first. Resource: Syracuse moving company .
Great info on treating chipped teeth quickly. I saved a local Camarillo contact from Dentist in Camarillo .
Tile structure planning is underrated— Remodeling Contractor Vancouver WA dependent strains and minimized cuts.
So completely happy you shared proficient suggestions on flooring cleaning merchandise; it’s demanding to recognise what’s trustworthy repeatedly! la flooring store
I mandatory lymphatic massage post-system, and best massage therapist frisco texas Aurelia Massage Frisco indexed qualified Frisco therapists.
Choosing O’Hare Limo Service for my trips from Southern Wisconsin has been one of my best decisions ever! Milwaukee airport limo service
Great job breaking down the gutter installation process step by step—it makes it seem much less daunting now! Property protection gutters
I didn’t realize ceramics can resist chemical etching better than wax. Good read. More on that at professional auto detail .
Appreciate the useful tips. For more, visit san jose website designer .
Inbound caliber exams must be menace-dependent. Sampling plans in Business document automation services stability pace and accuracy.
If your soffits are discolored, you might have ventilation problems. We’re getting a consult with diy to sort out airflow and roofing.
It’s crucial to choose the right roofing contractor in Illinois. Your post definitely sheds light on that! I’ll keep Roofing Services In Illinois in mind.
This is quite enlightening. Check out HVAC contractor Coral Springs FL for more.
Patch prioritization saves time. We adopted risk-based prioritization with IT Services .
I was nervous about a cracked tooth, but Best Oxnard Dentists helped me schedule an emergency dentist visit the same day.
If you’re hesitant about chiropractic care, just go see someone in Bonney Lake! You won’t regret it! Chiropractor Bonney Lake
Thanks for the valuable article. More at Coral Springs heating and air .
Fantastic post! Discover more at alopecia androgenética hombres .
This was a fantastic read. Check out vehicle wraps near me for more.
Los ruidos en tuberías (golpe de ariete) se pueden mitigar con cámaras de aire. Buenas prácticas en fontaneros valencia .
Thanks for the great tips. Discover more at colchones para verano e invierno .
Replacing vents with the roof is smart. licensed plumber in california upgraded ours during the project.
Storm season check: inspect flashing around chimneys and skylights. I’m scheduling maintenance through DIY to catch issues early.
I appreciate the realistic pricing brackets. My Concord quote from Concord car moving companies was right in that range.
Beautifully proportioned window mullions. Mullion reports on ll 97 compliance solutions .
Loved the tip about geo-targeted ads. We optimized radius targeting when running local marketing in san jose and CTR doubled. marketing consultant san jose
Excellent emphasis on substrate fix. affordable house painters fixed imperfections prior to handing over a precision finish.
New homeowners in Kitchener—don’t skip a roof and gutter inspection. We’re using roofing repair near me for a comprehensive report and quote.
Everyone deserves support during tough times—reach out to the professionals at Depression Treatment newport beach # if you’re feeling down.
Thanks for the useful post. More like this at precio injerto capilar Jaén .
If this is your first Chicago car move, Chicago Car Shipping’s makes it stress-free.
The mission seems on time and on finances. KC citizens can work with Remodeling with a bit of luck.
I didn’t know I could appeal my claim until I spoke with a knowledgeable Workers Compensation Lawyer .
Great insights on securing far flung work environments. Implementing MFA and 0 consider is a need to as of late. For any person exploring life like checklists, I’ve compiled a booklet at it support specialists .
Great reminder to keep moving after sessions. Light activity from Body contouring guidelines supported my recovery.
Thanks for the insightful write-up. More like this at drain cleaning service .
“Craving comfort foods reminds me why these gatherings matter so much—to enjoy laughs alongside satisfying bites.; come indulge with us soon.#” 86.#””” local indian cuisine spokane
לבנות יחסים עם עורכים מביא קישורים לאורך זמן. כך נכנס קישור גם ל- איך לבחון דירוגי גוגל .
Thanks for the useful post. More like this at moving services santa cruz .
Quick question: do all Los Angeles auto shipping companies provide tracking? Los Angeles Car Shipping’s
Vancouver WA homeowners: evaluate Remodelers on remodelers service near me previously signing.
Appreciate the useful tips. For more, visit air conditioning repair .
Thanks for breaking down policy types. I found better rates by comparing with Anthony Luster – State Farm Insurance Agent .
Very practical advice. I avoid retinoids 48 hours around dermaplaning per dermaplaning mi .
Great insights! I’ve been comparing clinics to find the Best Optometrist in Chino CA and came across optometrist brea which looks promising.
The tips for first-time homebuyers are really helpful! Thanks for sharing! realtor near me
Love how you addressed noise and grime keep watch over. My workforce from Home Remodeling Contractor Company protected our domestic totally.
For authorized organisations, voice search seo san jose promises risk-free search engine marketing functions San Jose concentrating on aggressive exercise parts.
Winter routes to Grand Rapids can be tricky. I found some carriers via Grand Rapids car moving companies that offer enclosed transport—worth it for classic cars.
Our Orlando administrative center cleanout achieved beforehand of time table owing to residential dumpster rental .
I love that you mentioned proper track cleaning. After clearing debris, I had garage door repair near me, realign the tracks—door runs straight now.
Para baños, el sellado con silicona sanitaria previene filtraciones. Consejos paso a paso en arreglo de tuberías valencia .
The mileage-based pricing explanation is spot-on. Car Transport’s El Paso gave me a fair El Paso estimate instantly.
Staircase updates seriously change entryways— Remodeling service near me rebuilt ours competently and stylishly.
Great insights! Discover more at general contractor near me .
Appreciate the information shared here; it really highlights how valuable services like IT Consultancy are!
Your blog is such a great resource for anyone considering floor restoration; keep up the fantastic work! Commercial Floor Restoration
Mixing abstract and figurative keeps things interesting. I paired both from chicago painters and it works surprisingly well.
It’s essential to support caregivers of those with dementia. I discovered some great strategies at palliative care .
The guidelines for hiring a roof repairer is necessary—thank you for sharing that! Get added substances from gutter installation Burlington !
I love how mild it can be to examine rubdown therapists in Frisco with reviews on best massage therapist frisco earlier than reserving.
Busy season didn’t spike my rate too much— Fort Worth car moving companies found a good Fort Worth deal.
The closing walkthrough surpassed expectations. trusted painting company introduced a distinct industrial conclude we’re proud of.
It’s promising to see advancements in research focused on improving lives affected by dementia—keep updated via domiciliary care !
Photo and weight exams at percent support caliber. We linked scales to Business document automation services to flag weight mismatches.
Really enjoyed your take on the importance of local listings in boosting local SEO efforts! See more insights at AI Marketing Agency .
Cedar shakes benefit from careful cleaning and treatment. Roof Washing must be gentle. Pros at roof cleaning professionals understand wood roofs.
Appreciate the comprehensive advice. For more, visit local movers .
Enjoyed sampling different dishes amongst friends—it was quite an adventure discovering flavors together . spokane valley indian food reviews
Each passage taken traversing directly leading straight onward towards bustling metropolis identified unmistakably dubbed aptly labeled precisely matching descriptions given illustrated significantly portraying overall essence captured harmoniously limo to O’Hare
The FAQs touched on exactly what I wondered. More detailed answers are on Raleigh botox .
Multi-cookers can do rice, yet committed rice makers nevertheless win on texture. The aspect-by way of-area exams on best rice cooker brands sure me.
Very educational post about the risks involved with DIY roofing projects—it’s definitely something everyone should consider seriously before attempting themselves!! Roof Repair
Your review of face mists got me curious; they sound refreshing and beneficial—I’ll definitely check them out at laser hair removal !
I appreciate your perspective on agent commissions; it’s a hot topic! real estate agent
Anyone know how long solid hard wood typically lasts before needing replacement or major repairs? Just curious about longevity here… # Timber Importers
Great article emphasizing necessity staying current with regulations through periodic checks—regulatory landscape constantly evolves too!!! ###aniKeyWord ## International Health and Safety Consultants
Burlington property owners want to be conversant in these roofing matters! For options, discuss with roof replacement expenses .
For storage plus moving in Rockford, Cheap movers Rockford has great bundled services.
Useful information! For sewer camera inspections, try emergency plumbing repair .
New year, new spine goals—planning a full posture reset with a Thousand Oaks chiropractor. Building a routine from tips I found on Chiropractor in Thousand Oaks .
This was a fantastic read. Check out https://maps.app.goo.gl/c8wr7w6Aykzz1ZaT8 for more.
Engine bay cleaning: cover sensitive components and use low pressure. Safety list from mobile car detailing near me .
If you’re replacing home windows in Orlando, a ten-yard from best waste handling Orlando suits the particles flawlessly.
Flat roof leaking in Hamilton? I booked an inspection with limited time offers this black friday and the roofers were professional and thorough.
Helpful breakdown of veneers vs. bonding from a local Camarillo dentist. I’m reading more at Camarillo Dentists .
This was a wonderful guide. Check out retirada de colchón antiguo Albacete for more.
I underestimated how much sod I needed until I used a calculator. There’s a handy one at commercial sod installation tips .
Great communication from dispatch to delivery— Philadelphia Car Shipping’s kept me updated into Philly.
We used Scottsdale GA Mover’s for packing and moving—best Scottdale moving company choice we made.
I enjoyed this article. Check out pet chiropractor Bovard for more.
Thanks for the useful post. More like this at PRP capilar Albacete .
Appreciate the thorough analysis. For more, visit https://www.google.com/maps/dir/Family+lawyer+near+mer,+32+Court+St+%23404,+Brooklyn,+NY+11201,+United+States/Tenement+Museum,+Orchard+Street,+New+York,+NY,+USA/@40.7078797,-73.9954881,14.25z/data=!4m13!4m12!1m5!1m1!1s0x89c25b4e54d41237:0x4de8d630917c9a28!2m2!1d-73.9910376!2d40.6929484!1m5!1m1!1s0x89c2598725d546db:0xcd60e6fdb0de8e84!2m2!1d-73.9900072!2d40.7187925?entry=ttu&g_ep=EgoyMDI1MTEyMy4xIKXMDSoASAFQAw%3D%3D .
Household interaction is essential. The treatment team we uncovered using compassionate elderly care provides regular updates and comfort.
This was nicely structured. Discover more at dermatólogo capilar Jaén .
Appreciate the great suggestions. For more, visit Coral Springs heating and air .
Appreciate the useful tips. For more, visit mejor tienda de colchones .
Thanks for the clear advice. More at PGE contractors near me .
For induction cooktop users: does Cookcell or Hexclad operate stronger? Good contrast conceivable at cookcell vs hexclad cost .
Those tile patterns are inspiring. Kitchen Contractor did a herringbone backsplash that became our kitchen’s focal point.
“Insurance companies often deny claims—having a #workerscomp lawyer helped me fight back!” Florida Workers Compensation
Great post on avoiding moving-day scams. Always verify licensing and reviews. I vetted a few and ended up choosing moving company with confidence.
I appreciate the tips about paint prep. We hired a crew via painting company and the surface prep made all the difference in the finish.
I appreciated the aftercare plan with touch-up trays from my teeth whitening dentist—saw the idea on Dentist in Oxnard .
Educating customers is key. I got a free consultation from Insurance agency .
The community ingredient of OnlyFans is mind-blowing! For the ones short of to build a faithful following, don’t omit out on what https://www.bookmarkmaster.win/entrepreneurs-focus-on-industry-thoughts-they-ve-used-efficiently-whereas-presenting-coaching-for-aspiring-industrial has to present.
Awesome examine about San Jose neighborhoods. I use seo for voice search optimization san jose to in finding socials in diverse districts.
Responsible disposal things— construction dumpster orlando follows neighborhood Orlando laws.
Appreciate the thorough analysis. For more, visit divorce mediation .
Prenatal therapeutic massage in Frisco made a colossal distinction for my sleep. Moms-to-be, are attempting browsing providers on massage therapist frisco .
Very helpful read. For similar content, visit Hauppauge kitchen renovation .
Thanks for the useful post. More like this at https://www.youtube.com/watch?v=jtnwOCCAksM .
I love how assorted the content on OnlyFans will probably be—from fitness to cooking! What niches have you found out enjoyable? https://www.active-bookmarks.win/are-you-keen-on-diy-initiatives-find-crafters-on-onlyfans-who-instruct-exciting-techniques-along-with-detailed-recommendations-so-that-you-can
This was a wonderful post. Check out https://maps.app.goo.gl/83xooL6EPUzbaQCM8 for more.
Credential stuffing defenses are a must. We enabled bot management using top MSP services services.
Great value in preventive care. If your unit needs attention, local air conditioner service offers solid repair options.
Fantastic blog post– bookmarked and shared. I included corresponding understandings at Quincy MA digital marketing and SEO .
Very thorough article about roofing services; I’ll make sure to check out their offerings at Commercial Roofing Contractor In Illinois
So true about regular inspections preventing big repairs. I set reminders to call garage door repair sandy springs, every six months for a quick safety check.
This was quite helpful. For more, visit pet hospital .
If you’re torn between tile or vinyl, study assessment guides on flooring dealers after which talk over with a ground retailer Virginia Beach.
I sought after a cooker that still does metal-lower oats. The versatile alternatives on best rice makers for home care for breakfast and dinner completely.
Thanks for the informative content. More at Your Quality Pressure Washing Houston .
I recently had a pest problem in my home, and I was amazed by the effective solutions offered by local services. It’s crucial to choose a knowledgeable pest control provider in Puyallup to ensure a pest-free environment Pest Control
A friend referred me to Tidal Remodeling, and I’m so glad they did! Great service! nlp for analyzing painting reviews carlsbad
This was very beneficial. For more, visit https://www.google.com/maps/dir/animal+hospital+services,+1416+S+Duff+Ave,+Ames,+IA+50010,+United+States/Story+County+Veterinary+Clinic,+23909+580th+Ave,+Ames,+IA+50010,+United+States/@42.0133275,-93.6170545,9502m/data=!3m2!1e3!4b1!4m13!4m12!1m5!1m1!1s0x87ee7a91acce1459:0x6e21dc2361eac55c!2m2!1d-93.6097106!2d42.0092619!1m5!1m1!1s0x87ee657627be98e7:0x238cacf638441d30!2m2!1d-93.5411657!2d42.0100387!5m1!1e3?entry=ttu&g_ep=EgoyMDI1MDkyMS4wIKXMDSoASAFQAw%3D%3D .
Thanks for the clear advice. More at san jose website designer .
Your myth-busting about “no effort needed” is essential. Habits plus contouring worked for me—learned from Body contouring .
Ohh wow , just got back from Green bay using o’hara limo services , totally loved it !! # # anyKeyWord # # O’Hare to Milwaukee
תובנות שוות זהב. אם מישהו כאן מחפש דרך להרחיב רשת קישורים – שווה לבדוק את תהליך הקידום עם קישורים .
Excelente paintingsículo sobre desagües lineales en duchas. Detalles de instalación en cambiar grifo valencia .
The importance of an online presence for agents can’t be ignored today! realtors
Thanks for the honest pros and cons. I weighed them with info I found at ann arbor mi dermaplaning before trying dermaplaning.
Great insights! Find more at campamentos verano en la naturaleza .
Valuable content shared here; I’d recommend anyone from Barnsley check out IT Sourcing for their IT needs.
Nicely detailed. Discover more at affordable Spanish travel insurance companies .
Fantastic post! Discover more at local inground pool installers .
Love seeing families bond over home projects like restoring their flooring together—such cherished memories created! Commerical Flooring
It’s crucial to raise awareness about the importance of dementia care. There’s some excellent information on palliative care that can help.
This was highly educational. For more, visit Trusted Personal Injury Lawyer .
Appreciate the link prospecting guidance. I constructed a niche checklist with gear urged through local seo ranking san jose .
I believe AI has the potential to revolutionize education as well. What do you think? Share your thoughts and explore more at AI Automation .
Insurance-friendly clinics make life easier. For the Best Optometrist in Chino CA that accepts my plan, I’m looking at optometrist brea .
Winter’s rough on shingles here in Kitchener. If you’re seeing lifted tabs or granule loss, it’s time to call the pros. I’m looking at roofing kitchener for a full roof inspection.
The challenges of navigating healthcare services can be overwhelming; I found excellent guidance at palliative care !
The section on sciatica relief is really helpful. I got a targeted approach after discovering a top-rated clinic through Chiropractor in Thousand Oaks .
I’m at the moment browsing into bamboo floor, and your insights had been remarkable useful—thanks! flooring store los angeles
My experience with my Workers Compensation Lawyer was fantastic; they truly cared about my well-being and success.
Really impressed with the craftsmanship from Custom Contracting Roofing & Eavestrough Repair. If anyone needs reliable roofing services, check out same-day roofing Burlington for details.
Thermostat not communicating with your HVAC? Central Plumbing Heating & Air Conditioning reprogrammed mine—visit water heater service for smart thermostat setup and zoning solutions.
Thanks for the valuable insights. More at colchón visco muelles combinación .
Thanks once more—you’ve created an informative guide that will undoubtedly benefit many seeking out professional assistance with their own projects!!! # # anyKeyWord # Metal Roofing
Southern Wisconsin can be tricky to navigate, but O’Hare Limo Service takes all the stress away! limo service o’hare
The warmth of hardwood timber is unbeatable during the winter months! Timber Importers
The psychological connection we have with fashion jewelry is amazing. Whether it’s a household treasure or a present from a liked one, each piece narrates buy gold near me
I love how you explained the importance of hydration for skin care. It’s so crucial! For more insights, visit facials near me .
Flexible scheduling made our caregiving plan sustainable. We discovered hourly and live-in options on home care tips .
It’s refreshing to see phone shops providing trade-in programs that make upgrading easier and more inexpensive! If you’re thinking about one, have a look at the choices readily available at free phones !
Wonderful tips! Find more at microinjerto capilar .
Excellent discussion about leveraging social proof to build client trust as an agent. realtor las vegas
Tight shoulders from operating out? I discovered an very good Frisco sporting events therapeutic massage therapist through best massage therapist frisco texas Aurelia Massage Frisco .
Just attended an event with several street food vendors; it was amazing! Check out similar options on Catering Vans for Festivals .
..This content really adds magnitude—a perfect blend of insightfulness and engagement!!!! local windshield replacement services 29316
Pro tip: ask for detailed photos from the roof inspection. It helped us prioritize repairs. We’re moving forward with trusted roofing companies nearby for roofing and eavestrough work.
I find the relationships between local flora fascinating and appreciate any content that spreads awareness!!! ##anyKeywords### tree cutting and removal service
My maintenance timeline stayed on target with on-time pickup from dumpster rental near me .
Appreciate the insightful article. Find more at técnica FUT Jaén .
This was a fantastic read. Check out windshield damage repair Charlotte for more.
Ready for real comfort? Central’s maintenance membership covers plumbing, heating, and AC. Join today at 24 hr emergency plumber .
End-of-life planning in dementia is hard but necessary. Advance directives and comfort care discussions provide clarity. We found compassionate guidance on elderly care assistance .
This is very insightful. Check out affordable Auto Glass Shop near 29307 for more.
Fantastic post! Discover more at Cybersecurity Backup .
This post clarified a lot. If anyone needs a quick quote, try Insurance agency near me .
This was very enlightening. More at Barzel Builders Kitchen remodeling .
Martial arts not only improve physical fitness yet likewise infuse technique and emphasis in experts. It’s remarkable to see how various styles, from karate to jiu-jitsu, deal special benefits Denver TaeKwonDo
Dental emergency kit ideas are smart. I saved a checklist from Best Camarillo Dentists via a Camarillo dentist.
.You’ve got to see how amazing can make your home look! roof power washing near me
Good info on detecting hidden leaks. The pros at plumbing expert for water heater repair used advanced tools for ours.
Thanks for the great explanation. More info at Family Law Attorneys near me .
What’s your experience with chiropractic adjustments for neck pain in Bonney Lake? # Prenatal chiropractor
Lighting matters so much with art. I added a picture light over a print from painters chicago and it made the colors pop.
I didn’t realize noisy garage doors could indicate roller damage. After replacing mine with help from garage door repair sandy springs, , the door is whisper-quiet.
I’m thrilled with the results from the pressure washing at my home done by exterior house cleaning .
If you want responsive cases sustain, Lassila Agency is a solid choice. Get in touch with through crop insurance .
The sheen cohesion among walls and trim is spot-on. For a precision finish expert painter e-book, see interior wall painting .
The results were nothing short of astounding! My driveway, patio, and siding look brand new. They effectively removed years of grime, mold, and dirt, transforming the appearance of my home. Landscape Lighting Tampa FL Tampa Bay Pressure Washing
Good advice about not seeking the cheapest option. There’s a budgeting guide on botox near me .
Image compression and next-gen formats gave us a boost. Implemented with seo company .
Collaborating with experts during the planning stage of your ##anyKeyword__ is crucial for success! patio builders for residential
I learned that a pre-cleaning boosts whitening results—another reason to choose a professional teeth whitening dentist. More on Best Oxnard Dentists .
Upgraded widnows and doors improved both comfort and security. Learn about packages from Custom Contracting Roofing & Eavestrough Repair at roofing businesses nearby .
Nettikasinolla pelaaminen on helppoa ja turvallista! Katso Verovapaat nettikasinot .
Your tips on secure coding help devs. Our teams trained through MSP IT Services workshops.
Boiler leaking from the relief valve? Central Plumbing Heating & Air Conditioning replaced our PRV and expansion tank, then set system pressure. Fixed right. Book at emergency heater repair near me .
Thanks for spotlighting downtown venues. seo for voice search optimization san jose is my pass-to for social calendar updates.
No mess, no drips—just clear traces. House Painter in Roseville CA: licensed painters in my area
First time renting a dumpster at homestead, and cheap dumpster rental prices walked us due to it flawlessly.
Anyone have experience with enclosed transport to Austin? I’m leaning toward Austin car transport for extra protection.
Excellent callout on budgeting by profitability, not volume. We use a margin-based bidding model—walkthrough is on paid search agency .
Getting lost within beautiful sights offered nearby proves worth every penny spent investing quality time enjoying life fully!!!! #AnyKeyWord# limo to O’Hare
I love supporting local businesses like Astral Roofing—they genuinely care about our community and its homes! More details available at Roof services Surrey .
From Highland Park to Lake Jeanette, Local movers Greensboro knows the neighborhoods and HOA rules.
Thanks for the useful post. More like this at trusted mobile auto glass Charlotte .
Thanks for the great tips. Discover more at Powell’s Plumbing & Air .
Tired of skyrocketing utility bills? Central Plumbing Heating & Air Conditioning ran a load calculation (Manual J) and right-sized our system. No more oversizing. Details at best boiler repair service .
Your suggestion to avoid heavy meals right before sessions helped. I learned that tip at Body contouring .
Wonderful article– this is a keeper. I developed a fast reference at Best SEO company Quincy MA .
Double-check attic bath fan ducts for termination at the exterior. Vent termination guide at affordable building inspection .
Your navigation patterns marketing consultant is marvelous beneficial. We located sticky headers with transparent breadcrumbs slash bounce. Here’s a sample library I’m development: Website Design Santa Clara
Thank you for discussing how to handle difficult clients in real estate! realtor near me
If your kitchen sink bangs when turning off, bathroom plumbing repair can add arrestors to stop water hammer.
Choosing between re-roofing and a full replacement? The Hamilton roofers at budgeting for roof replacement costs explained the pros and cons clearly.
Great insights! Find more at کفش طبی زنانه از کجا بخریم .
I found this very interesting. Check out اپلیکیشن دانلود اینستاگرام for more.
Your insights on choosing the right opener horsepower were timely! I almost bought an underpowered model before consulting Select Garage Doors— Garage Door Repair Parker has a great guide for matching openers to door weight.
ใช้ BT PREMIUM มานานแล้ว ชอบแสงสว่างที่มันให้มากครับ ร้านเปลี่ยนหลอดไฟรถยนต์ใกล้ ฉัน
Need to ship multiple vehicles? Affordable Auto Transporter’s Service coordinated a multi-car Jacksonville transport easily.
Love your passion for floor restoration; it shows in your writing and tips shared here! Commerical Flooring
Thanks for the great information. More at colchones transpirables .
This was quite useful. For more, visit vehicle wrapping services .
This is the kind of date-night casual that still really feels special. Waited on best Christmas restaurants near me .
Have you seen the recent advancements in dementia care? There’s a lot to explore on dementia care !
Kudos again goes out once more towards all those involved within this industry—they’re shaping tomorrow’s landscapes today !# # anyKeyWord ## Custom home building Los Angeles
ทุกครั้งหลังเลิกงานก็แวะมาที่ร้านเหล้าสาย1 เสมอ ๆ ครับ ร้านเหล้าสาย1 คนเยอะ
Pro tip: ask for professional disposal of your old door—Select Garage Doors arranged it seamlessly after I read that suggestion on Garage Door Service Parker .
The spice levels at Indian restaurants can be intense! Do you prefer mild or spicy dishes? best indian cuisine
Just came back from Green Bay and can’t express how much I loved the service provided by O’Hare Limo Service—top-notch all around! ord limo service
Just moved to Illinois and needed Rockford car transport fast—this team made pickup and delivery super simple! Rockford car shipping
IT issues can be a headache, but IT Support Barnsley makes it easy for Barnsley residents!
The new gutters align perfectly with the roofline—top-notch from Custom Contracting Roofing & Eavestrough Repair. Visit roof repair Burlington .
If you need Sunday availability, check schedules early. I requested through Syracuse moving company for a Syracuse moving company.
Soft washing plus zinc treatment is a winning combo. Roof Cleaning shouldn’t be abrasive. I’ve had success with affordable best roof cleaning .
This post highlights the importance of backlinks in SEO. For more on this topic, visit AI Marketing Agency .
Thanks for the thorough analysis. More info at air conditioning maintenance near me .
Love the reminder to include seniors in decisions. Decision-making frameworks on home care options helped us stay person-centered.
I’m inspired by stories of successful dementia care practices shared online—check out those featured at home care services !
The note on valuables floater was spot on. Scheduled jewelry through State Farm Insurance Agent .
Excellent advice regarding roof inspections! I’ll keep Commercial Roofing Contractor In Illinois in mind for my home.
The sound of tapping heels on polished hardwood timbers is music to my ears—so classy! # Hardwood Timber
Really relish the main target on nearby creators. I came across some open mic nights with the aid of on-page seo tactics san jose currently.
Thanks for shedding light on common roofing myths—very informative and reassuring! Flat Roofing
The correlation between effective health and safety audits and reduced stress levels among employees is quite significant! Health and Safety Consultants
Acknowledging contributions made locally serves as motivation encouraging others join fight against complacency advocating proactive measures instead!!!! #anKeywords### affordable tree services near me
Thanks for the thorough analysis. More info at affordable respite care .
Excellent point about the balance test. When my door started drifting, garage door opener repair, adjusted the springs and it’s smooth again.
Great tips on maintaining healthy skin! I always look for new products that can help. Check out facials near me for some amazing options!
I enjoyed this read. For more, visit best windshield repair in Charlotte .
I completely agree that finding the right agent can make all the difference. real estate henderson
Insurance-friendly clinics make life easier. For the Best Optometrist in Chino CA that accepts my plan, I’m looking at optometrist near me .
The advice on moving during rain was useful. office movers Fremont brought floor protection and wraps.
If your AC trips breakers, it’s a sign to call a pro. top air conditioner service diagnosed and fixed my electrical issue.
I appreciate the transparent explanation of adjustment techniques. If you’re comparing credentials, Thousand Oaks Spinal Decompression makes it easy to find the best chiropractor.
Planning a family reunion? A street food van could be perfect—discover your options with Catering Vans for Concerts .
Nice reminder to remove toll tags. Learned that during my last Concord car transport with Concord vehicle shipping .
This post reminded me how neglected our garage door was until we scheduled preventive service with Select Garage Doors using info from New Garage Door Installation !
If you need to ship from O’Hare area, Chicago car transport can coordinate nearby.
Well done! Find more at professional web design .
Thanks for the thorough analysis. More info at microinjerto capilar Jaén .
Your guide to sanitizing high-touch areas is spot on. I prioritize them on house cleaning company .
Thanks for pointing out the safety features in modern garage doors. With small kids at home, that’s a big deal for us. I wonder if Select Garage Doors includes those upgrades as standard—guess I’ll look on Garage Door Installation !
Our property manager recommends keeping spare parts onsite; tips from Garage Door Repair Service Near Me and support from Select Garage Doors made this easy to set up.
I appreciate the waterproofing advice. Kitchen Contractor used top-tier membranes in our shower and we’ve had zero issues.
Great overview of dental crowns timeline. My Camarillo dentist’s process matched info on Dentist in Camarillo .
I’ve recently had a huge problem with pests in my home, and I didn’t know where to turn Puyallup pest control
Thanks for the great information. More at pet services near me .
Thanks for the tips! We created a local deals calendar that anchored our local marketing in san jose promotions. salazar digital local seo services
If you wish a rustic seem, cost hand-scraped styles on flooring supplies and compare at a floor shop Virginia Beach.
Clearly presented. Discover more at Roof Washing Melbourne .
I checked weather forecasts for GR before scheduling—helped choose the best week. Started on Grand Rapids car moving companies .
The vegetarian options at Indian restaurants are endless! Explore them on order indian food online spokane .
This was a fantastic resource. Check out best plumbers for more.
With summer approaching, now’s the perfect time to plan those outdoor projects like #deck installation# or refreshing your garden through #landscape design services#! outdoor landscape lighting services
Great insights! Discover more at animal hospital Boone IA .
If you’re in doubt which dumpster measurement you want in Orlando, the workforce at local dumpster rental will e book you.
This was a great article. Check out senior movers for more.
การเลือกไฟหน้ารถ LED ต้องดูอะไรบ้าง? เปลี่ยน ไฟหน้ารถ ใกล้ ฉัน
Good call on checking driver credentials. I verified my El Paso carrier through El Paso auto shipping before pickup.
Interstate moves are daunting, but tracking and communication made it easy. moving company kept me updated every mile.
Love the before-and-after photos. For anyone comparing painting companies, painting company helped us get a fair quote and fast scheduling.
For anyone curious about breast augmentation recovery in Gig Harbor, New You Medical Spa has a thorough guide.
Great insights! Discover more at office movers .
Very helpful to see consent and medical history emphasized. I added a pre-visit checklist at botox NC .
Farm responsibility and umbrella protection were packaged well by Lassila Agency. Information at crop insurance .
I appreciate the emphasis on painless treatments. My Oxnard dentist from Best Oxnard Dentists used the latest tech and made me feel comfortable.
Before investing in new cookware, I normally money side-by means of-side studies just like the one at best cookcell vs hexclad for Cookcell and Hexclad!
Cyber insurance prerequisites can be tough. Managed IT Services helped us meet control requirements smoothly.
Upgrade comfort: Central installs variable-speed furnaces and ECM blowers. Discover savings at 24 hr emergency plumber .
We’re comparing quotes for a full tear-off vs overlay. Transparency on scope and cleanup is key— contractor services in Kitchener has been responsive so far.
Excellent point on integrating search with remarketing lists. RLSA campaigns moved the needle for us; see examples at paid search company .
This is quite enlightening. Check out Charlotte auto windshield services for more.
Thanks for the detailed post. Find more at auto glass replacement FAQs .
My hope lies firmly grounded believing greater awareness fosters appreciation surrounding technological advancements transforming lives positively impacting communities around world increasingly each day forward!!!! Bidet Toilet Seat
Your content makes Botox feel approachable without minimizing risks. botox near me
Impressed by your science-backed approach. Energy-based body contouring plus strength training was key for me—credit to Body contouring .
My vintage cooker regularly burned the base layer. Upgrading to one with induction heating solved it. Reviews at optimal rice cooking machines helped me pick out the right one.
A clear understanding of liability laws can really help navigate post-accident chaos—the insights shared here are invaluable! # anyKeywod## semi truck accident lawyer
Customer service is clearly a priority for Tampa Bay Pressure Washing. After the job was done, they followed up to ensure I was satisfied with the work, which demonstrated their commitment to client satisfaction. Pressure Washing Tampa Tampa Bay Pressure Washing
This was very beneficial. For more, visit RRJ Quality kitchen construction .
I had no concept there were such a lot of styles of laminate ground purchasable now—pleasing decisions ahead! flooring supplier la
O’Hare Limo Service is a fantastic choice for travel to Milwaukee. The comfort and convenience make all the difference! limo service to o’hare airport
I have actually been thinking of building an outside deck for summer barbecues. What materials do you advise for sturdiness? I discovered some practical tips on windows of wisconsin .
This community is awesome. For those seeking the Best Optometrist in Chino CA, you might find what you need on optometrist near me .
Thanks for the thorough article. Find more at professional Windshield services 29301 .
Storm damage isn’t always obvious. Post-storm inspection by professional roof inspection gave us proof for insurance.
Mixing abstract and figurative keeps things interesting. I paired both from chicago painters and it works surprisingly well.
The follow-up after the service was a nice touch; they checked in to ensure I was satisfied with the results and offered tips on maintaining my property moving forward. permanent residential lighting installation
” The memories made during our last pool party were unforgettable; thank goodness we opted for an inflatable waterslide—they loved it all day long!” # # anyKeword#” inflatable water slide rentals tampa fl
Paver sealing can completely change your outdoor space; trust me, go with # # anyKeywords##! professional Christmas light installation
Including laundry saves me hours. I found a cleaner who offers it via eco friendly house cleaning .
College move-in rush is busy—glad Fort Worth auto shippers found a Fort Worth carrier quickly.
This article provides great clarity on the closing process; well done! allentown real estate agents
Excellent overview of respite care. Families need breaks too. We scheduled short-term support through local home care .
Great message– clear, concise, and handy. I added an associated viewpoint right here: SEO Services Near Me .
I found this very interesting. Check out movers santa cruz for more.
If your door shakes or jerks, don’t ignore it. Mine did that and emergency garage door repair, found a loose bracket that could’ve caused serious damage.
Restoration vs replacement debate is so relevant today, especially with rising costs—thanks for shedding light on this topic! Commercial Floor Restoration
Your coverage of remote control security is very relevant today! After reading about hacking risks, I upgraded with advice from Select Garage Doors— Garage Door Installation Parker has more on rolling code technology.
Just done interpreting about your informed renovation schedule—so effectual for all Burlington citizens! Visit roof repair Burlington for greater recommendations!
Thanks for mentioning pre-treatment steps like avoiding alcohol. I have a prep timeline you can download at Cornelius botox .
Thanks for the useful post. More like this at tienda de colchones en Albacete direcciones .
Nicely done! Discover more at windshield options for vehicles .
Trees require attention just like anything else around us does; having access towards skilled individuals such as those found within # anykeyword# makes life simpler! local tree contractors near me
Every caregiver deserves support and knowledge! Find valuable resources at elderly care to help you through this journey.
If you’ve been in a crash on I-10 near downtown, getting medical care and legal guidance fast is crucial. San Antonio auto accident lawyer helped me understand my rights and next steps.
If you’re dealing with injuries after a crash, a Phoenix motorcycle accident lawyer can make a huge difference. Check out Phoenix motorcycle accident lawyer for help.
The resurgence of editorial layouts is inspiring. We outfitted mag-flavor templates for website design bangalore reviews.
Well stated! You framed it flawlessly. More info at Columbia auto glass repairs .
Thanks for the comprehensive read. Find more at trusted mobile auto glass Charlotte .
Nettikasinoiden maailmaan tutustuminen on ollut todella hauskaa, erityisesti Kasinobonukset kautta!
I enjoyed this post. For additional info, visit https://letterboxd.com/restoration7864/ .
Technology can be tricky—thank goodness we have options like IT Consultancy right here in Barnsley.
Awareness surrounding environmental impacts stemming directly from choices made today contributes greatly towards shaping future l Timber Wholesale
I recently read about AI’s potential in climate change solutions. It’s a promising area of research! Find out more at AI Automation Agency .
Every caregiver deserves support and knowledge! Find valuable resources at domiciliary care to help you through this journey.
Love the point about personalization of care plans. best memory care options explains levels of care in plain language.
Anyone know if insurance covers visits to a chiropractor in Bonney Lake? Chiropractor Bonney Lake
If you want your home to stand out in Lakewood, custom design options from Select Garage Doors (see: Garage Door Installation ) are worth exploring.
I’m glad you brought up local regulations—Select Garage Doors walked me through permits before installation began, which is also discussed on Garage Door Repair Near Me .
Thanks for explaining the benefits of chiropractic adjustments. I finally found lasting relief after visiting a specialist I discovered through Thousand Oaks Spinal Decompression .
The breakdown comparing costs across various material options will help many homeowners budget effectively during renovations!! # # anyKeyWord # # New Roof Installation
Investments made today reap rewards tomorrow; prioritizing proper training & subsequent inspections yield fruitful results later down road!!! ###aniKeyWord ## Health and Safety Consultants London
The drywall seams are undetectable. Precision end authentic painter maintenance at exterior home painting .
For budget-friendly date nights, plumber for drain cleaning shared San Jose ideas under a set price.
For quick Hamilton roof repair after wind damage, I recommend getting a free estimate via local deals near me .
I’ve been curious about incorporating retinol but didn’t know where to start—thanks for clarifying its benefits here! Great options can be found at laser hair removal !
אחלה תובנות. שילוב בין תוכן טוב לבניית קישורים חכמה עושה פלאים. אני משתמש ב- כתבות קשורות לקישורים SEO כדי להאיץ את התהליך.
Great insights on the importance of communication in real estate! real estate agent
The open studio night highlighted via Social Cali used to be gigantic. Map by means of improving google rankings seo san jose .
My family needs a new eye doctor. Any tips on the Best Optometrist in Chino CA? I saw some good options on optometrist near me .
From decks to gardens, finding a reliable team for your local hardscaping contractors makes all the difference.
Kids’ first dental visit tips were perfect. I scheduled in Camarillo using Best Camarillo Dentists .
Strange furnace smells could be dust or wiring. Central Plumbing Heating & Air Conditioning performed a full electrical inspection and clean. Peace of mind via water heater service .
The the front door conclude seems showroom-ready. I used climate-acutely aware timing from licensed painters in my area to avert tacky surfaces.
Great reminder to analyze SERP features. We earned more snippets after implementing seo company tips.
It’s fascinating how local laws shape what can be built; Los Angeles home builders really have to be adaptable! Los Angeles kitchen Remodeling
It’s smart to align on expectations. I use templates from cleaning company near me to set tasks.
Can’t wait to see what gourmet options are available at my next event with the help of Street Food Near Me !
This was a fantastic resource. Check out colchones firmes y ergonómicos for more.
We averted delays on our Orlando mission owing to on-time pickups from waste management dumpster rental .
I found this very interesting. Check out https://www.bunity.com/-49ad743d-1662-43e1-b9fc-a810836bfcd2?r= for more.
Great tips! For more, visit quick auto glass repair Charlotte .
This was beautifully organized. Discover more at best auto glass Columbia .
This was nicely structured. Discover more at H2O Pros Water Damage Restoration Services LLC .
Clear onboarding and offboarding reduce risk. We automated workflows with IT Services .
Recently hired Clara’s team – absolutely top-notch work completed on time while giving assurance of total client contentment through its solid warranty scheme.# # anyKeyWord ## Roof downpipe repair Limerick
Dentist same day teeth gave me immediate confidence. You can find providers through Oxnard Dentists .
For anyone worried about security, definitely look at reinforced locking mechanisms. I found some great insights about this on Garage Door Installation with Select Garage Doors.
Thanks for the thorough analysis. More info at pool demolition .
Agree that UGC-style ads outperform polished creatives. Our CTR jumped after A/B testing raw testimonials. More tips like this at paid search agency if you’re refining your social ad funnel.
I like how Lassila Agency shops numerous providers to get better prices. See how at crop insurance .
Had a great experience using O’Hare Limo Service for my trip to Lake Geneva last month! limo to o’hare
So properly put together—an ideal mixture of thoughtfulness and readability on your message!! trusted windshield replacement shop near 29307
Yard decks can truly change your outdoor location into a relaxing sanctuary. I have actually been considering including one to my home, and I found some wonderful resources on deck materials and layouts at deck builder . Certainly worth a visit!
Best patios in San Jose, CA for sunny days? I used residential plumbing services to find them.
I appreciate the reminder to test the auto-reverse feature. If it fails, don’t wait— garage door repair near me, fixed mine same day.
This was quite informative. More at tipos de campamento de verano .
I appreciate the effort you put into writing this informative blog post about roof contractors in Carlsbad. Hiring sentiment analysis in customer feedback painting was the best decision I made for my roofing project.
This was highly useful. For more, visit auto glass replacement reviews .
Useful advice! For more, visit https://www.whofish.org/Default.aspx?tabid=45&modid=379&action=detail&itemid=338984&rCode=44 .
Just hired the team at Roof maintenance # for a roofing job—impressed so far!
I’ve been researching options for a trusted plastic surgeon in Gig Harbor, and plastic surgery clinic New You Medical Spa looks like a helpful resource to start with.
Spot-on advice about refrigerant leaks. I had mine fixed by affordable hvac system repair and the cooling improved instantly.
Hospice support combined with home care eased the burden. We found compassionate teams via home care services for parents .
Vent fans with humidity sensors are appropriate. A Bathroom Remodeler San Jose CA simply by Kitchen Remodeler San Jose CA advised one.
Nhiều shop online rao bán vật dụng cải tạo thành vũ khí. Cách phân biệt trang hợp pháp và bất hợp pháp xem chi tiết tại streamer lộ hàng .
Realtors who pre-inspect listings can reduce surprises. Pre-listing inspection info at how to choose a certified home inspector .
Your advice about seasonal checks is spot on! Time to consider my roof repairs in Cork this fall. Roof replacement specialists Surrey
Magnificently elevated without the pretense. I’ll be sharing it using holiday cocktails Loomis .
This was a great article. Check out abogados laboralistas Sevilla for more.
Dusting top spaces is effortlessly missed. Office Cleaning Phoenix AZ includes it commonly in Phoenix.
I found your tips on seasonal tree care very helpful! Keep up the great work! oak tree trimming and pruning
The team at expert residential plumbing services gave us excellent advice on Wylie code requirements for our remodel.
This was highly educational. For more, visit Charlotte auto windshield services .
Thanks for the detailed post. Find more at mejores abogados Coruña .
Good coverage of return air sizing. best affordable ac installation increased my return and airflow improved dramatically.
So happy to determine sustainable practices being discussed in terms of roofing solutions—essential theme as of late and for our destiny as nicely! Discover green alternate options from asphalt shingle roofing Burlington
This was a great article. Check out Coral Springs air conditioning repair for more.
A thorough eye exam makes all the difference. I’m aiming for the Best Optometrist in Chino CA and reviewing optometrist near me .
For multi-unit structures, Gutter Replacement Contractor coordinated across tenants smoothly.
It’s smart to align on expectations. I use templates from cleaning contractors to set tasks.
Fantastic post– exactly the guidance I required. Extra context at SEO Quincy MA .
I lastly changed brittle bottom seal—sizing tips %%!%%f9e8f7c8-0.33-4d5d-af18-eea919aee5df%%!%% and at Garage Door Repair Portland changed into best possible.
If anyone is struggling with their workers compensation claim, don’t hesitate to seek legal advice! Workers’ Comp
Nice evaluation of RP and DC backflow units. We depend on Commercial plumbing near me in Gresham to maintain ours compliant.
Great breakdown of social hotspots downtown. I used affordable seo company san jose to plot a group time out and it turned into wonderful modern.
Winter’s rough on shingles here in Kitchener. If you’re seeing lifted tabs or granule loss, it’s time to call the pros. I’m looking at best roofing companies close to me for a full roof inspection.
I learned so much about different types of flooring and their restoration needs from this post. Thanks! Commerical Flooring
This article provides great clarity on the closing process; well done! allentown realtors
The roof is a big part of first impressions. Seasonal Roof Washing makes listings pop. Agents I know recommend understanding roof washing .
I enjoyed this article. Check out قیمت خاص ادمین اینستاگرام ۱۴۰۴ for more.
Hardwood flooring corporate close me for glue-down over slab— hardwood floor is aware of moisture obstacles and adhesives.
Thanks for the thorough analysis. Find more at auto glass replacement tips .
This is a constructive assist for first-time customers. We received distinctive charges in Manchester from curved stair lift benefits earlier identifying.
This was quite enlightening. Check out local senior living for more.
Here’s a tip: always measure your space twice before ordering a new door! Select Garage Doors provides a handy guide at Garage Door Repair that saved me from an expensive mistake.
Combining Botox with proper hydration and sleep really shows. Wellness advice at botox NC .
OnlyFans has modified the game for lots of creators. If you are curious about maximizing your gains, look at various out https://bienalsurnoticias.com/2023/10/24/estafa-por-100-millones-de-pesos/#comment-151315 for vital sources.
No hot water at one tap? Central chases cross connections and fixes recirc loops. Book diagnostics at emergency plumber .
I’ve recently had a huge problem with pests in my home, and I didn’t know where to turn Exterminator
Seniors in Vancouver WA can improvement from gentle chiropractic suggestions. More at Chiropractor near me .
I’m excitedly planning out ideas based solely on inspiration from past successful **deck installations** I’ve seen around town! affordable outdoor design
The note on seasonal sickness sprays changed into spot on. Preventative care established with tree service near me .
Support from healthcare professionals is invaluable during this journey; connect with resources on this topic at domiciliary care !
Strong suggestion for every person in Phoenix given that turf. Start with Turf Installation .
Cookcell’s tri-ply development vs Hexclad’s hybrid floor—challenging name! Here’s a detailed evaluation: cookcell vs hexclad reviews .
Finding solace amid chaos encountered daily brings forth clarity allowing reflections capturing essence captured within fleeting moments cherished eternally essential amidst everything else happening around us forever shaping perspectives held dearly Hardwood Timber
These DIY plumbing tips are super helpful! I’m going to try some of these this weekend. If you’re looking for more ideas, check out plumber .
It’s essential to support caregivers of those with dementia. I discovered some great strategies at elderly home care .
Your perspective on using long-tail keywords is very enlightening! Explore my thoughts at SEO Services .
I was amazed at how clean my driveway was after the pressure washing from Landscape Lighting Installation Tampa Tampa Bay Pressure Washing .
Your tackle live comedy nights is widespread. I grabbed tickets to a social from seo lead generation san jose .
The flexibility of OnlyFans is beautiful! I love how you would percentage distinct content along with your fans. https://wildflecken-camps.de/2022/07/21/erste-hochrechnung-zwischen-5-30-6-uhr-erreichen-die-busse-whv/#comment-128686
Thanks for the helpful advice. Discover more at affordable windshield replacement Charlotte .
Annual furnace maintenance saved me from a breakdown—Central Plumbing Heating & Air Conditioning at water heater service can help you too.
It’s great to know there’s a trusted IT provider like Hosting & Cloud Solutions available right here in Barnsley!
Thanks for the detailed post! Dermaplaning helped reduce my peach fuzz and brighten my complexion. More info at ann arbor michigan dermaplaning .
Policy governance is key. We standardized our policies with templates from affordable cybersecurity services .
The tips on choosing colors that complement home exteriors were unexpected but very useful—thanks again for sharing these insights! Shingle Roofing
אחלה פוסט! למדתי המון על קידום אורגני לעסקים. ממליץ לבדוק גם את סריקת סמכות אתר בגוגל למידע נוסף ושיתופי פעולה.
This post reminded me to measure twice before buying. The detailed dimensions at house painters chicago saved me from a return.
I highly recommend Tampa Bay Pressure Washing to anyone looking for reliable, professional, and high-quality pressure washing services. They exceeded my expectations! Holiday Lighting Installation by Tampa Bay Pressure Washing
If you’re in Tampa and need paver sealing, you must try Paver Sealing Near Me Tampa Bay Pressure Washing .
Excited see where developments lead us next—embracing innovative technologies could truly revolutionize traditional methods utilized currently moving forward!!! ###aniKeyWord Health and Safety Audit London
The seasonal skincare switch-up advice was perfect timing—I need that in my life right now! Check out what’s trending at skin tag removal !
Great insights on maintaining European vehicles! Many owners underestimate how crucial specialized diagnostics and OEM parts are for long-term reliability and performance european car repair
Quick tip: always double-check sensor alignment if your door won’t close fully—I picked up this advice from guides linked by Select Garage Doors through Garage Door Repair Parker resources.
Beach properties want water-proof flooring. I quick-indexed possibilities using best flooring company virginia beach and acquired from a floors keep Virginia Beach.
The point about negative keywords is spot on. We tightened our lists and, with help from paid search agency , cut wasted spend by 28% in a month.
Great weblog! Strong counsel during. I posted biggest practices at affordable auto glass shops .
Does anyone else appreciate how easy it is to maintain these high-tech toilets? No more scrubbing forever! Bidet Toilet Attachment
Communication with house cleaners is key; a clear scope helps. I used eco friendly house cleaning to draft mine.
I realise the native focus on Burlington roofing wants during this put up! More sources should be came across at burlington roofing quote .
Thanks for sharing this. For those needing a full SEO audit, seo company toronto offers comprehensive reports that actually drive action.
You can’t go wrong with anything on the menu at fine dining indian restaurant !
Just returned from Green Bay and can’t stop raving about the amazing service from O’Hare Limo Service! o’hare limo
This is such an informative article! Regular maintenance really does extend your door’s life. For anyone unsure where to start, Select Garage Doors offers great advice through Garage Door Installation .
I appreciate how you covered the emotional aspect of buying a home! realtor las vegas
If your door shakes or jerks, don’t ignore it. Mine did that and garage door repair, found a loose bracket that could’ve caused serious damage.
I love how friendly the staff is at my local Prenatal chiropractor . Makes all the difference!
Are there exercises or habits that make Botox wear off faster? Charlotte NC botox
The budget breakdown is spot on. We stayed on track by working with Kitchen Contractor who provided clear pricing and timelines.
รู้สึกว่าเวลาไปกับเพื่อน ๆ ที่นี่ มันสนุกสุด ๆ เลย # # anyKeyWord## ร้านชิลหนุ่มหล่อสาย1
Caulking and sanding are so underrated. The team we booked via painting company handled all the prep and cleanup professionally.
Great reminder to update beneficiaries. I also reviewed life insurance options through Insurance agency Blaine .
For quick Hamilton roof repair after wind damage, I recommend getting a free estimate via expert roof repair Hamilton .
The creativity in street food is inspiring! Explore unique offerings at Street Food Van Hire .
The submit about sturdy laminate opportunities is well timed. A Kitchen Remodeler San Jose CA which includes Remodeler near me can teach samples.
Appreciate the detailed information. For more, visit Charlotte windshield replacement quotes .
Wrapping furniture corners saved my walls and deposit. The crew from moving company brought protectors and handled everything carefully.
We insured our farmhouse and outhouses with Lassila Agency– excellent service. Details at home insurance .
Sagging gutters have been my take-heed call. Found an expert crew as a result of Gutter Contractor they usually put in seamless gutters in one day.
This post highlights some great tips for tree trimming. I’ll definitely be implementing these! best tree service chicago
Thanks for the thorough analysis. More info at کفش پنجه پهن مخصوص زنانه .
I highly recommend authentic indian curry spokane , the Indian restaurant near me, for a delightful dining experience. Their flavors are unmatched!
Great web publication! I came across so many insights here. Check out my relevant paintings at high-quality windshield replacement .
It’s clear that having a dedicated team like Social Cali of Rocklin can make a huge difference for any brand. effective email marketing strategies
It’s great to see coverage of legal and financial planning. We found elder law resources via affordable in-home senior care .
Exterior repaint survived last summer’s warm! Trusted House Painter in Roseville CA: house painting cost estimate
I recently moved to Puyallup, and I was shocked by how many pests I encountered in my new home! After doing some research on pest control options, I found that local services are crucial for effective solutions Puyallup pest control
Builders should verify window DP ratings and installation. Window inspection guide at reasons for home inspection .
Eateries need constant grease leadership. plumbing gresham in Gresham keeps our traps and contours in most sensible shape.
Thanks for the helpful advice. Discover more at Emergency HVAC Coral Springs .
The menu shows restriction and creative thinking– nice balance. Saved to holiday meals Loomis .
That opener battery guide is helpful. If it still fails, Garage Door Repair near me can look at the unit.
Parasta nettikasinoissa on se, että voi pelata missä ja milloin vain! Käy Ilmaista pelirahaa ilman talletusta .
From fascia to soffit upgrades, Custom Contracting Roofing & Eavestrough Repair did a clean job. Portfolio at burlington roofing .
I tracked my results in a journal and compared to recommendations on Charlotte NC botox .
Thanks for the comprehensive read. Find more at Coral Springs heating and air .
Great insights on optimizing PPC campaigns! For anyone looking to scale fast with data-driven strategies, check out ppc agency for advanced paid search management.
I found this very helpful. For additional info, visit opiniones y reseñas colchones Albacete .
Background checks cannot be skipped. I only hire cleaners verified on move out cleaning .
We addressed top humidity before finishing due to a moisture instruction on hardwood flooring .
Good reminder about distribution sustainability. Look at payout ratios and capex demands. I compiled a few notes on Malaysian REIT valuations right here: useful reference .
Need a new main shutoff valve? Book through local plumbing repair specialists in Santa Clara County.
Heat pump smells like vinegar? Central Plumbing Heating & Air Conditioning cleaned the coil and pan—details at boiler repair .
Thanks for the useful suggestions. Discover more at divorce mediation .
Just wanted to shout out commercial roofing Brantford for a clean job site and on-time completion on our reroof.
They labored well round our furnishings. House Painter in Roseville CA: trusted painting company
I appreciated this post. Check out senior living solutions for more.
Love the realistic expectations you set. Dermaplaning gave me glow, not pore size changes—confirmed at dermaplaning near me .
Nicely done! Discover more at Charlotte auto windshield services .
This post was eye-opening. Your advice on panel upgrades is critical for local Mystic properties. It might be useful to discuss solar integration for local homes? Additional insights can be found here: breaker box repair Groton CT .
Fantastic post! Your approach saved me time. I shared tweaks at SEO services Quincy MA .
Really enjoyed reading this on modernizing lodging facilities. The focus on contractor experience is crucial. For Mystic, Connecticut hotels, this guidance is especially pertinent tenant fit-out contractor mystic
Appreciate this post—I found your points about garage door maintenance helpful. This helped me understand the importance of regular tune-ups. Living in Mystic Connecticut, I’ve seen how weather affects door performance garage door opener service Old Lyme CT
Really enjoyed reading your post. Your discussion on selecting the right roofing material is spot on. Homeowners in Waterford, Connecticut will definitely benefit from these suggestions insured and licensed roofing contractor waterford ct
Can chiropractic adjustments help improve sleep quality? Thinking of visiting a #BonneyLakeChiropractor soon! # Chiropractor Bonney Lake
I didn’t realize how important board certification is until I read about it on top plastic surgery .
รู้สึกปลอดภัยมากขึ้นหลังจากติดไฟหน้ารถ LED เปลี่ยนหลอดไฟรถยนต์ ใกล้ ฉัน
Anyone have filler lumps? Found dissolver info for Miami providers on lip filler service .
Seniors in Vancouver WA can benefit from soft chiropractic programs. More at Chiropractor .
Regular full service washing and quarterly detailing keeps my car’s value high. I book consistently with ceramic coating .
Love the advice on pruning young bushes for constitution. For knowledgeable shaping, I booked tree service near me .
Test drainage with a hose beforehand laying turf. Pre-test procedure from Turf Installation Phoenix kept me transform.
Love that you’re touching upon both traditional & contemporary approaches within this niche—it’s refreshing indeed! Office Floor Restoration
This post sheds light on the complexities of the real estate market; thank you! real estate agents
Fantastic post! Discover more at auto glass replacement reviews .
Great PPC and SEO integration tips. We synced keyword data across teams with seo company toronto .
The UK has some fantastic initiatives for dementia care. You can learn more about them on elderly home care .
Businesses large and small can benefit from the expertise of a managed IT company like Cabling Services Provider California .
The process of choosing the right hardwood timber can be overwhelming but exciting too! Timber Wholesale
Spot on with your analysis of SERP features and their impact on traffic! Discover more insights at AI Automation Agency .
שווה לעקוב ב-GSC אחרי עוגנים. ראיתי עלייה בביטויים אחרי שהכנסתי קישור ל- קישורים איכותיים לכמה אתרים .
Moisture in the garage was rusting my hardware. garage door maintenance in metro atlanta, installed new galvanized components and a bottom seal—problem solved.
It’s so important to keep communication open with loved ones who have dementia, and there are tips on this at home care services .
Very informative article. For similar content, visit فیلتر آبگیر صنعتی .
Useful advice! For more, visit despacho laboral Sevilla .
The attention to detail was remarkable. They took the time to assess the areas that needed the most work and tailored their approach accordingly. My driveway and patio look brand new! professional Govee outdoor lighting
Great read! For Barneysle residents, I definitely suggest considering Managed IT Services for tech assistance.
Really enjoyed your perspective on historic roofing styles and preservation—such an important topic! Roof Repair
I combined Botox with a light chemical peel spaced apart. Scheduling guidance from botox near me kept me safe.
Great post. If anyone needs a trusted local technician, 24/7 air conditioner repair near me offers transparent pricing and quick repairs.
Creative fatigue hits fast on Instagram. Rotating 3-5 angles weekly kept my frequency in check. My rotation calendar is here: ppc agency
Great reminder about real estate septic inspection — staying ahead on this makes a big difference for homeowners. Septic pumping company Pierce County
Great reflections shared in this article; they prompt deeper wondering amongst readers—come across further views of mine over at best windshield replacement Charlotte !
Love that certified plumbing contractor provides text updates and ETAs for Wylie service calls.
Good coverage of return air sizing. expert ac installation in Hialeah increased my return and airflow improved dramatically.
Your post about the environmental impact of certain ingredients is eye-opening—thank you for educating us on this topic! Look into safe alternatives at skin tag removal !
This was quite informative. More at movers san diego .
I now understand difference between tidy and clean. I specify this on home cleaning services requests.
It’s inspiring to see businesses take proactive steps towards improving workplace conditions through detailed auditing processes! Health and Safety Consultants
I recently had a pest problem in my home, and I was amazed by the effective solutions offered by local services. It’s crucial to choose a knowledgeable pest control provider in Puyallup to ensure a pest-free environment Puyallup Exterminator
My journey with O’Hare Limo Service to Lake Geneva was relaxing and enjoyable—can’t wait for next time! limo service to o’hare airport
Your tips for selling a home quickly are incredibly practical! real estate agent
I changed into torn between Zojirushi and Tiger. The comparisons on best rice cooker reviews helped me pick based on cook dinner time and texture.
Great web publication. Thanks for the thorough breakdown. I extra visuals at best windshield brands .
This was quite helpful. For more, visit servicios jurídicos Coruña .
That farmhouse flavor makeover is adorable. For comparable outcomes, check out a Kitchen Remodeler San Jose CA which include Remodeler Blue Spade Construction .
Just had a ridge vent added to reduce attic heat. Hamilton roof repair team from Hamilton roofers” improved airflow immediately.
Restocking supplies avoids hygiene gaps. We use inventory products and services from Office Cleaning service Health Point Cleaning Solutions .
Customer-Centric Approach: Throughout the process, they maintained clear communication and actively sought feedback to ensure my satisfaction. This dedication to customer service truly set them apart. roof cleaning tampa
Granules in the gutters? That’s a sign your shingles are aging. Getting quotes for replacement— kitchener roofers” is on our shortlist.
I’d by no means proposal approximately outlet size— Gutter Repair Contractor upsized mine to address heavy storms.
The team arrived on time and was incredibly professional. They took the time to assess the areas that needed attention and explained their process thoroughly, which gave me confidence in their expertise. professional Christmas light installation
Appreciate the clarity on subrogation. I also checked claims satisfaction scores via Insurance agency .
I’m always on the lookout for good street food options— Street Food Van Hire has some great selections!
Just got my hands on the most recent flagship phone, and I can’t believe all the functions it has! If you remain in the market for a brand-new gadget, do not forget to explore what free phones needs to use!
I was worried about attic ventilation, but chimney flashing and caulking balanced the intake and exhaust perfectly.
I definitely love how jewelry can change a whole outfit! It’s amazing how a simple piece can add a lot beauty and personality. Have you ever thought about personalizing your own jewelry? It can make for a genuinely distinct declaration piece buy gold near me
Influencer marketing in Dallas is growing—find vetted lists on digital marketing agency texas .
Grease catch compliance is non-negotiable. Commercial plumbing near me in Gresham keeps us on agenda and in top standing.
I’ve been to several chiropractors, but the one in Bonney Lake is my favorite! Chiropractor Bonney Lake
We had recurring clogs; the top rated plumber in San Jose CA solved it with hydro jetting. See kitchen plumbing services .
Martial arts not only boost physical fitness but additionally impart self-control and focus in experts. It’s fascinating to see how various designs, from martial arts to jiu-jitsu, deal distinct advantages Denver TaeKwonDo
If you value service and fair prices, attempt Lassila Agency for home insurance coverage. Browse through health insurance .
This content inspires me personally towards making greater commitments towards sustainability within my own yard practices!!! ##anKeywords### emergency storm damage tree removal
The way you explained hyperlink speed makes experience. I kept it common with coaching from professional seo solutions san jose .
I appreciated this article. For more, visit Columbia auto windshield .
Rolling code protection is tremendous. For opener enhancements, Garage Door Repair near me did a faultless activity.
Credential stuffing defenses are a must. We enabled bot management using expert IT services services.
Thanks for the great content. More at Charlotte auto glass repair services .
If you wish to determine a head-to-head cooking verify between Cookcell and Hexclad, verify out the outcome the following: cookcell vs hexclad features .
What a complete publication on Burlington roofing styles! For greater notion, head to top-rated roofing contractors .
Pre-deploy walkthrough checklists—Woodfloor Masters Inc at hardwood flooring company vancouver wa .
Appreciate the thorough information. For more, visit HVAC contractor Coral Springs FL .
Broad targeting with strong creatives has beaten my interest stacks lately. I compared both approaches and posted learnings: ad agency
Cold basement? Central Plumbing Heating & Air Conditioning installed a dedicated zone with dampers. Controlled comfort. Explore at boiler repair near me .
Well explained. Discover more at windshield replacement advice .
Loved the tip to sample paint colors from art. I color-matched my accent wall to a piece from house painters chicago .
I just had my roof replaced and it appears to be like best suited! For gigantic deals in Burlington, see TPO roofing Burlington .
The playlist and layering both look curated. I maintain lists similar to this on chef-inspired holiday menu Loomis .
This was quite informative. For more, visit Coral Springs AC installation .
Thanks for the comprehensive read. Find more at affordable 29316 Auto Glass .
If your energy audit flagged duct leaks, Central Plumbing Heating & Air Conditioning can Aeroseal or hand-seal. We saw immediate gains. Book at emergency heater repair near me .
I agree about digital payments. Many teams on home cleaning services accept contactless.
Great breakdown of structural red flags. A comprehensive check from importance of home inspection is a must.
This was a great article. Check out cheap car rental for more.
Great insights on sciatic affliction. For certain care, Chiropractor service near me is my cross-to health facility.
If your keypad is intermittent, check the battery and weather seal. When mine kept failing, garage door repair in atlanta, replaced it and reprogrammed all remotes.
After ice accumulation, we used emergency tree service to agenda emergency limb aid in Vancouver WA—averted a give way.
Am genuinely curious whether brands offer financing plans since price points tend to fluctuate widely depending upon model selected initially?? # # anyKey word ## Bidet Toilet Attachment
Practical approach to site architecture. We flattened deep pages based on seo company advice.
Could you elaborate on the differences between various sanding techniques used in restoring hardwood? Commercial Floor Restoration
For heavy-use paths, add more nails alongside the perimeters. Edge reinforcement tip from Turf Installation Phoenix .
Thanks for the practical tips. More at assisted living solutions .
Thanks for the great content. More at tienda de colchones calidad .
I found your take on the benefits of mentorship programs inspiring and motivating! allentown real estate agents
Septic tank care is something most people forget about until there’s a problem. This was helpful! Septic pumping company Pierce County
I recently moved to Puyallup, and I was shocked by how many pests I encountered in my new home! After doing some research on pest control options, I found that local services are crucial for effective solutions Exterminator
קישורים מאזכורים מותגיים בלי עוגן מדויק עדיין שווים. יש ניתוח מקרים ב- קישורים לאתרים וSEO .
Convert hard water spots with a mild acid cleaner—test first. I follow the protocol on car detailing .
Connectivity matters! I fixed Wi-Fi dropouts after reading network tips on indoor golfing in Clearwater .
How do you cope with caregiver burnout? There are valuable strategies shared on this topic at elderly care !
Totally agree that subfloor prep makes or breaks a project—flat, dry, and clean saves you from squeaks and premature wear. Auburn hardwood floor specialists
This was very beneficial. For more, visit auto glass replacement Charlotte .
Looking for water resistant vinyl in Virginia Beach? I observed a few gorgeous kinds—easily worthy traveling flooring outlet virginia beach for greater tips.
This was quite informative. More at affordable windshield replacement .
The role of memory aids in daily living is fascinating! More information is available at palliative care .
Ser fram emot alla tips och tricks när vi går igenom detta projekt tillsammans! beste elektriker
I loved your take on voice search optimization! For further exploration, see AI Marketing Agency .
Your pointers on nail well-being are stunning. I came upon Springfield salons providing strengthening healing procedures through nail salon near me .
Recently learned about various finishes available specifically designed for protecting against scratches on solid hard woods—definitely looking into this further now… thoughts?! ####myBlogLink### Timber Wholesale
Great discussion on how to measure ROI in campaigns! Agencies need these metrics to succeed. More resources at social media marketing services !
Excellent call-out on landing page speed. Our Paid Search Agency approach pairs CRO with PPC for better CVR. I posted a teardown and test plan: paid search agency
What’s the best way to find a trusted chiropractor in Bonney Lake? Any tips? Chiropractor Bonney Lake
Well mentioned! Right on the mark. I’ve coated this subject matter at Columbia windshield and auto glass .
Perfectly timed post before the freeze. Schedule your pre-winter check with water heater repair now.
Thanks for the thorough analysis. More info at planeación fiscal Saltillo .
I’m excited to explore the benefits of green roofs after reading your article—what a unique approach to sustainability! Roof Replacement
Pro tip: ask for detailed photos from the roof inspection. It helped us prioritize repairs. We’re moving forward with near me for roofing and eavestrough work.
Your ideas for integrating dormers are great. linguistic analysis of painting trends reworked ours and improved both style and function.
If you’re looking for reliable Hamilton roofing contractors, I’ve had a great experience recently. Check out “Hamilton eavestrough repair” for fast quotes and quality work.
Fantastic article! Anyone needing IT assistance in Barnsley should reach out to IT Support Services .
I agree that DIY will also be unsafe on ladders. I accept as true with Gutter Contractor Precision Roofing & Gutters for safe, skilled carrier.
Your post about the environmental impact of certain ingredients is eye-opening—thank you for educating us on this topic! Look into safe alternatives at beauty salon barnsley !
If your roof is over 15 years old, book an assessment with flat roof repair Brantford before small issues become big ones.
I now stagger deep cleans by zone. Managed through move out cleaning scheduling.
This thread convinced me to schedule a consult. I used top plastic surgery to shortlist surgeons in Gig Harbor.
Appreciate the prep list prior to demo. Remodeler San Jose CA saved issues tidy as our Remodeler San Jose CA.
Responsive to big requests— Office Cleaning service Phoenix AZ dealt with a spill all of the sudden in Phoenix.
I’ve been putting off seeing a chiropractor; time to find one in Northgate now that I’ve read this blog! affordable chiropractor Northgate
Nice write-up on E&O for consultants. I got quotes same-day using Chad Fischer – State Farm Insurance Agent .
Onko joku saanut suurimman voiton netticasinosta? Kerro tarinasi täällä: ####onlyfrom###mywebsite### Bitcoin kasinot
I’ve done window replacements on two houses here in the US, and I’ve learned a few things the hard way step-by-step window installation
1. Hey, I’ve been using castor oil on my lashes for about six weeks now, and honestly, the difference is crazy! They look fuller and thicker, almost like I got extensions. Didn’t expect much at first, but it really surprised me castor oil treatment for dry patches
For darker lip tones needing evenness—found nuanced Miami providers via lip fillers miami .
I’ve found that both castor oil and cacao hold a special place in supporting mental well-being, but in wonderfully different ways https://wiki-wire.win/index.php/When_a_Teaspoon_of_Raw_Cacao_Upended_My_Skepticism:_Anna%27s_Story
When folks ask about renovation costs and ROI, my take is straightforward: you’ve got to separate wants from needs, and prioritize accordingly renovation cost recovery
Listen, when you’re asking about window prices and installation here in the US, don’t just look at the sticker the big city guys from Vancouver put on the invoice trusted window contractors in Rossland
High cooling costs are no joke, especially in the hotter parts of the US where summer can turn your electric bill into a monthly nightmare ceiling fan direction summer
Our cold garage facility in Gresham obligatory forte drains— Commercial plumbing near me delivered.
Male Botox dosing can differ. I discussed gender differences in anatomy and goals at Cornelius botox .
Great discussion here. From my experience working across several states, hard water stains are by far the toughest challenge in window cleaning, especially in areas with high mineral content in the water supply, like parts of the Southwest and Midwest how to clean window frames
Finding solutions tailored unique challenges faced enhances ability navigate complexities encountered while ensuring core values maintained integrity upheld firmly throughout entire process undertaken collaboratively together!!!!###aiKeyWord International Health and Safety Consultants
When it comes to window replacement in the US, the biggest mistake homeowners make is focusing solely on upfront cost. Think of windows like tires on your car—you want quality that lasts, not just the cheapest option that blows out in a season Click here
I love your approach to discussing luxury real estate; it’s such an interesting niche! realtor
Running a home business sounds dreamy until you realize your living room becomes your office, conference room, and breakroom—all at once. The biggest challenge? Boundaries https://sticky-wiki.win/index.php/Freelancer_Invoicing_and_Getting_Paid_Faster:_Straight_Answers_You_Actually_Need
I’ve been a skeptic about topical remedies until I nursed a nagging hamstring strain back in college. That’s when I started using castor oil consistently, and honestly, it’s been a game changer for me and some of my teammates here in the US https://golf-wiki.win/index.php/Heal_Faster,_Train_Stronger:_Natural,_Cheap_Recovery_Plan_for_Runners,_Lifters,_and_Team_Players
If you’re comparing local roofers, I’ve had a great experience with commercial roofing Brantford for fast quotes and solid workmanship.
For commercial flat roofs in Brantford, professional EPDM services handles TPO and EPDM with solid warranties.
Thanks for the informative content. More at animal hospital services near me .
Flat roof leaking in Hamilton? I booked an inspection with savings of 75% available and the roofers were professional and thorough.
I found this very interesting. Check out same-day windshield replacement for more.
Planning a family reunion? A street food van could be perfect—discover your options with Event Street Food Van Hire .
Impressive Results: My driveway and patio had accumulated years of grime, but after their thorough cleaning, they looked brand new. The difference was astounding! power washing house
Helpful suggestions! For more, visit campamentos de verano en España para niños .
Your tips on changing rollers with nylon ones diminished noise a lot. I stumbled on portions through Garage Door Repair Portland OR .
Appreciate the great suggestions. For more, visit local movers .
I switched from a combined-manufacturer kitchen to a single-brand set after studying overall performance consistency studies on top selling cookware brands —really worth it for even outcomes.
Septic maintenance is something most people forget about until there’s a problem. This was helpful! Septic pumping company
The sanding series photo used to be helpful. hardwood flooring company vancouver wa accompanied an unique grit progression for a glassy finish.
Reliable Hamilton roofers are hard to find, but the crew booked through trusted roofing contractors communicated clearly and finished on schedule.
Appreciate the comprehensive advice. For more, visit pest control near me .
B2B social ads are underrated when paired with strong content offers. For LinkedIn plus Meta ABM-style targeting and lead gen, paid search agency provides tailored strategies and execution.
I’ve been searching for an authentic Indian restaurant near me and stumbled upon local indian food delivery near me . Their menu looks incredible!
Appreciate the thorough write-up. Find more at procedimiento laboral Sevilla .
Narrow stairs anxious us. used stairlifts reviews encouraged a slim-rail form that works completely in our Manchester domicile.
Every penny spent on their services was worth it! permanent architectural lighting installation
This was very enlightening. More at HVAC company near Coral Springs .
Raised eating that invites families– uncommon find. I track these at holiday dinner near Rocklin .
מדידה אמיתית של השפעת קישור על דירוגים: אסטרטגיות בניית קישורים
I like their regional carrier domain pages— expert top seo services dependableremember search engine optimization capabilities San Jose enlarge assurance.
Solid advice on choosing the right tonnage. I had a smooth installation through residential air conditioning setup .
The center of attention on device upkeep is notable. For emergencies even though, I place confidence in tree service near me as a replacement.
Thanks for the great tips. Discover more at HVAC company near Coral Springs .
Anyone tried decompression remedy in Vancouver WA? I learned a great deallots from Chiropractor Vancouver WA .
I appreciate that expert plumbing company offers honest second opinions for Wylie plumbing estimates.
The customer support insights are successful. I inspect Springfield salon scores on nail salon near me first.
I found this very interesting. For more, visit https://callpowells.com/norfolk/plumbing/bathroom-fixtures/ .
The SERP feature tracking ideas are useful. We built a dashboard with seo company toronto .
Love how you explained deep cleaning vs regular. I found more resources on eco friendly house cleaning .
The backyard event setup is inspiring. Our turf from Turf Installation Phoenix AZ taken care of a vast get together easily.
Scheduling roof repairs makes sense. roofing services by qualified roofers manage an annual inspection plan for us.
Your ideas on visiting facilities are useful. We scheduled tours directly through elderly care options and compared services side-by-side.
Tips around seasonal maintenance practices would also go hand-in-hand nicely with discussions surrounding long-term care strategies. Floor Restoration
Gridless, content-waft layouts feel recent while performed correct. We used intrinsic layout on web design company bangalore jobs to let content breathe.
Don’t stack too many layers; diminishing returns are real. Validation from tests on ceramic coating .
รู้สึกพอใจกับการใช้ไฟหน้าโปรเจคเตอร์มากครับ ร้านไฟรถยนต์ ใกล้ฉัน
Great facets about affirming historical roofs on this edge! Find restoration companies at quality roofing burlington .
If you generally tend to forget to start rice, a sturdy hold up timer is a lifesaver. I filtered for that feature riding lists on best rice makers for home .
Your overview of different types of property listings was very informative indeed! allentown realtors
Thanks for the great tips. Discover more at https://maps.app.goo.gl/UCare1Pcxbp5YWJ39 .
Thanks for the helpful advice. Discover more at painters near me .
Your incident communication tips are gold. We rehearsed tabletop exercises with 24/7 MSP services .
เมนูค็อกเทลที่ OMG OneMoreGlass นี่อร่อยจริงๆ ครับ ต้องลอง! ร้านชิลสาย1
Excellent insights for revenue investors. For the ones building a dividend ladder with Malaysian REITs, I observe ex-dates and yields employing why not try these out .
Love the breakdown of audience segmentation. We’ve seen similar wins by refining lookalikes— ppc company has a solid framework for that if you’re exploring next steps.
Your comments on building a strong internal linking structure are so important! Learn more strategies at SEO Services .
If you manage rentals, expert lock smith offers fast turnover rekey packages.
Septic maintenance is something most people forget about until there’s a problem. This was helpful! Septic pumping company
If you’re dealing with hail or wind claims, the Hamilton roofing contractors at hamilton roofers know the insurance process well.
Insightful take on smart thermostats. Have water heater repair set up schedules and zoning for real savings.
My favorite thing about hardwood timber is how it ages gracefully over time! Timber Importers
The countertop seam placement methods are invaluable. Hire Kitchen Remodeler San Jose CA at Remodeler near me for clear seams.
Totally agree: green products depend. We switched with Office Cleaning service Phoenix AZ and seen much less inflammation and more suitable outcome.
It was shocking to discover how many people suffer silently after sustaining a work-related injury due to lack of support systems available at their companies—this needs addressing now more than ever before!! # # anyKeword## Florida Workers Comp
Great blog and wonderful informative. I created FAQs at windshield replacement process explained .
The tips shared around selecting contractors resonate deeply—trusting someone with our homes isn’t easy unless certain benchmarks have been established upfront!!! ## anyKeyWord ## Roofer
If you’re apprehensive about renovation, hexclad vs le creuset is nighttime and day. Le Creuset wants gentle care with the teeth; HexClad wishes a touch of oil for nonstick. More important points on hexclad vs le creuset performance .
The checklist for moving to a new state is useful. I found state-compliant policies through Insurance agency near me .
Appreciate the helpful advice. For more, visit affordable windshield Columbia .
Just finished my do it yourself outside deck job, and it was so satisfying! If anyone is trying to find assistance, check out the resources at windows of wisconsin .
We scheduled preventative repairs because of Commercial plumbing in Gresham and it kept us from a chief shutdown.
Love that some contractors offer drone inspections now for safety and detail. Curious if “kitchener roofing contractors” provides that in Kitchener.
Your post about natural ingredients in skin care was eye-opening! I’ve been wanting to switch to more organic products. I found some great ones at skin care clinic .
This was nicely structured. Discover more at https://www.instagram.com/suburbanplumbingexprts/ .
This was the push I needed. I ordered a starter indoor golf simulator kit after comparing on indoor golf training .
Tech troubles? Don’t worry—just contact the amazing team at Hosting & Cloud Solutions if you’re in Barnsley!
Great insights! Discover more at Your Quality Pressure Washing Houston .
For a best-in-class Brantford roofing experience, start with a free consultation from same-day roof leak repair .
The skylight leak ideas kept me cost. I came upon a roofing contractor with skylight revel in by licensed roofing contractors nearby .
Can’t believe how much cleaner I feel after switching to a luxury smart toilet; it really enhances personal hygiene! Japanese Toilets
With so many content material choices attainable on platforms like OnlyFans, it is worthy to stand out. Learn how at http://www.coloringcrew.com/iphone-ipad/?url=https://stephenlmek150.lucialpiazzale.com/skylarsmiles-fitness-secrets-sculpt-sweat-seduce !
If you’re into stir-frying, which do you pick: Cookcell or Hexclad? I read an exciting evaluation at cookcell vs hexclad durability .
Love how you highlight tech portfolios. I overview Springfield artists’ galleries by way of best nail salon near me first.
I found this very interesting. Check out Normandy Animal Hospital for more.
Component governance as a product is late. We install a element registry for web design services bangalore and onboard turbo.
קישורי שותפים ללא ערך יכולים לפגוע. עברתי לאקו-סיסטם איכותי יותר: מערכת מכוונת קידום .
Great tips on choosing the right size painting! I always use the couch width rule. Also, chicago painters has size guides that helped me a lot.
1. I’ve been applying castor oil to my lashes every night for about six weeks now, and honestly, I’m shocked at the difference! They look fuller and longer without any irritation castor oil for frizzy hair
I’ve replaced windows in two homes across different states, and here’s what I’ve learned the hard way: Vinyl windows, while cheaper upfront, often don’t hold up well under extreme temperature swings common in many parts of the US Ecoline Windows review
High cooling costs are definitely a pain for many households, especially during those brutal summer months. The key to cutting energy bills without sacrificing comfort lies in a mix of smart habits and strategic upgrades https://zenwriting.net/erwinepctq/h1-b-why-thermal-drapes-can-cut-about-33-of-cool-air-loss-a-friendly
I’ve found both castor oil and cacao to be quietly transformative when it comes to mental health, though in very different ways Visit website
The future of workplace safety will heavily rely on data-driven approaches derived from thorough health and safety audits! ##anyKeyword ## Health and Safety Consultants
Thanks for the great content. More at top-rated Auto Glass Shop near 29301 .
Appreciate the comprehensive insights. For more, visit Gulf Shores inground pool installers .
When it comes to window replacement in the US, the key is choosing the right window for your climate and your home’s specific needs—think of it like picking the right tires for your car why choose triple pane windows
I appreciate your perspective on agent commissions; it’s a hot topic! realtor
I’ve been relying on castor oil since my college days, after a nasty ankle sprain that sidelined me for weeks https://rentry.co/q5dpawms
Insulated glass home windows brightened the storage. Installed by way of Garage Door Repair Portland OR .
Refinishing timelines and what to expect—Woodfloor Masters Inc at Hardwood Flooring company .
Great discussion here—hard water stains are definitely the nemesis of window cleaners in many parts of the US. From my experience, prevention and timely cleaning are key tips to enhance your links
Thanks for the thorough analysis. More info at https://maps.app.goo.gl/V8aafG5kUCnYLCpu5 .
Nếu bị ép tham gia nhóm cá cược, hãy chụp bằng chứng và rời nhóm ngay. Hướng dẫn liên hệ cơ quan chức năng được tổng hợp ở sex học sinh 2025 .
Look, when it comes to window prices and installation here in the US, don’t let the big city guys from Vancouver fool you with their fancy numbers https://writeablog.net/elwinnneuc/h1-b-how-a-1950s-bungalow-in-rossland-stopped-bleeding-heat-using
Valuable information! Find more at فیلتر هوا ورزشی برای موتور سیکلت .
When it comes to renovation costs and ROI in the US, the hard truth is that there’s no one-size-fits-all answer—location, materials, labor rates, and project scope vary widely cost effective renovations
Running a home business? Sounds like living the dream until reality hits—constant distractions, blurred work-life boundaries, and the “I can totally multi-task” myth crashing down hard. One major challenge is discipline https://penzu.com/p/dff0bf8e1353208a
I found this very helpful. For additional info, visit Houston Personal Injury Lawyer .
มีใครรู้จักแบรนด์ที่เชื่อถือได้สำหรับไฟหน้ารถ LED บ้างครับ? ร้าน ตั้งไฟหน้ารถยนต์ใกล้ฉัน
Nhiều shop online rao bán vật dụng cải tạo thành vũ khí. Cách phân biệt trang hợp pháp và bất hợp pháp xem chi tiết tại video truyện người lớn 2025 .
Thanks for the comprehensive read. Find more at best commercial truck insurance .
Food trucks provide an interactive dining experience that guests love—learn more at Catering Vans for Festivals !
Appreciate the thorough write-up. Find more at premium auto glass products .
Content advent on structures like OnlyFans requires creativity and consistency! What’s your mystery system? http://timoore.eu/skins/timoore/redirect.php?url=https://postheaven.net/hyaristpzv/top-7-reasons-kira-livs-onlyfans-stands-out-in-2025
Curious about non-surgical options in Gig Harbor? I found a list of med spa treatments on plastic surgery clinic .
Knowledgeable Team: The technicians were not only skilled but also provided valuable insights on maintenance tips to keep my surfaces looking pristine for longer. Their expertise was evident in the way they handled each area. Pressure Washing Services Tampa Tampa Bay Pressure Washing
This was highly educational. For more, visit Best ac company .
Your suggestions on neighbor assets injury helped me. emergency tree service vancouver wa coordinated with both facets effectively.
Elevated dining without the whispers– enjoy it. Browsed through cozy holiday restaurant Loomis .
Great reminder about septic system repair — staying ahead on this makes a big difference for homeowners. Eatonville septic pumping company
This was quite informative. More at puppy vaccinations .
Thanks for the informative content. More at Coral Springs heating and air .
If you’re new to chiropractic and need sufferer instruction, determine Chiropractor service near me to find a chiropractor close me.
Appreciate the thorough write-up. Find more at fast unsecured personal loans .
Det är inte lätt att hitta en bra erfahrener elektriker , men jag lyckades till slut!
Make sure the buyer uses a calibrated scale and tests with XRF or acid while you watch. Also, ask about their payout percentage of spot price. I sold a couple pieces recently near Meridian, and this resource helped me compare offers: gold dealer .
If you’re new to Turf Installation Phoenix AZ, the team we chanced on via Turf Installation Company turned into best.
I found this very interesting. For more, visit HVAC Coral Springs .
This was nicely structured. Discover more at colchón visco muelles combinación .
Thanks for the helpful article. More like this at san diego movers .
This is very insightful. Check out Powell’s Plumbing & Air for more.
For speedy install timelines, I messaged a flooring keep Virginia Beach and verified availability utilising online flooring store .
I like your seasonal maintenance plan—decon before winter, topper in spring. Template from auto detail .
Want a heart-shaped lip look—does miami lip fillers highlight Miami injectors with that style?
We used promo codes with neighborhood tags to track ROI for local marketing in san jose. san jose local marketing agency
Nettikasinoiden käytettävyys ja design ovat kehittyneet hurjasti! Katsokaa esimerkkiä @@@@anyKeyword@@@. Ilmaista pelirahaa ilman talletusta
This was quite informative. For more, visit Family Law Attorneys .
This platform serves as an amazing resource where knowledge meets experience—a perfect blend giving readers real value. Office Floor Restoration
Wonderful tips! Discover more at car rental toronto .
Appreciate the detailed post. Find more at senior living facilities .
I appreciate the breakdown of driver exclusions. My insurance agency reviewed every listed driver insurance agency near me .
Appreciate the thorough analysis. For more, visit auto glass replacement process .
Love the way you highlight tech portfolios. I review Springfield artists’ galleries by the use of uniquely herrs nail extensions springfield first.
Loved the advice about warranties. I got a hard work and subject matter warranty simply by a contractor on Gutter Replacement Contractor .
Moisture‑proof trays under indoor plants stopped those mystery rings around pots. best Auburn hardwood flooring
It’s refreshing to see such honest discussions about commissions in real estate! realtor near me
The frost protection advice is invaluable. Keep heater repair near me on speed dial during polar vortex conditions.
The discussion around schema markup is crucial! Learn more about it at AI Marketing Agency .
For those debating metal vs. asphalt, same-day roof leak repa gave me honest advice and a fair price.
The feedback loop in action therapy made progress predictable. Details at action therapy benefits .
This is very insightful. Check out air conditioning company for more.
You’re top that first impressions subject. Clients touch upon our easy place of job considering that hiring Office Cleaning service Health Point Cleaning Solutions .
For honest roof life expectancy advice, roof repair and inspection didn’t push replacement when repairs made sense.
Appreciate the detailed post on upgrading hospitality spaces. I especially liked your point about cost management. Given Mystic’s unique architecture, this advice is spot on. I wonder how local building codes influence these projects? hotel renovation contractor mystic
Thanks for sharing this informative post! Your explanation of troubleshooting common issues stood out. Local residents in Mystic will find this advice especially valuable outlet & switch repair Groton
Appreciate you posting this. Your breakdown of service options was on point. I’ve noticed similar issues around Mystic Connecticut. Wondering if local homeowners should check their systems more often. To dive deeper, learn more at garage door repair Stonington CT .
For quick Hamilton roof repair after wind damage, I recommend getting a free estimate via “roof repair Hamilton” .
הוספת מקורות אמינים למאמרים מעלה סיכוי לציטוטים וקישורים. רשימות מקור ב- איך לקשר לפרויקט SEO .
I’m planning a small guest bath replace in San Jose—stumbled on a stable Bathroom Remodeler San Jose CA by way of Remodeler Blue Spade Construction .
Smart note on humidification. boiler repair near me added a bypass humidifier—comfort improved instantly.
I’m always looking for the latest in dementia care practices in the UK. Great insights are available at palliative care !
If you’re dealing with hail or wind claims, the Hamilton roofing contractors at affordable trusted roofing services know the insurance process well.
Backflow compliance avoids steeply-priced fines. Commercial plumbing near me in Gresham handles testing, upkeep, and studies.
I appreciate how your blog sheds light on these topics; find even more related content at palliative care !
Really enjoyed reading your post. The tips about dealing with storm damage were super useful. If you live in Waterford, Connecticut, these tips are a must-read roof installation near me waterford ct
Love how this breaks down real estate septic inspection. Easy to follow and super helpful advice. Septic pumping company Pierce County
Your take on design procedures resonates. Tokenizing spacing and colorations simplified our updates. I wrote approximately installation tokens in Figma and code: Website Design Santa Clara
If you want a durable metal roof, get an estimate from Custom Contracting Roofing & Eavestrough Repair via affordable roofing companies near me .
This was very enlightening. For more, visit pet services .
One big tip: avoid mailed-in gold kits unless you really trust the company. In Boise, reputable buyers will test in front of you and explain their karat and weight measurements. I found a few red flags to watch for and a checklist here: buy gold .
Amazing how passionately people feel about their choices when it comes down selecting perfect grain patterns & hues—it’s like discovering hidden treasures each time!!! ###myBlogLink### Timber Wholesale
I had hot and cold spots before. Hialeah cooling system installation fixed it during the AC installation.
Thanks for all this information ! It’s refreshing to see local resources like north gate chiropractors highlighted here ! # # any keyword # # chiropractor for injury recovery Northgate
Storm season check: inspect flashing around chimneys and skylights. I’m scheduling maintenance through “emergency roof repair kitchener ” to catch issues early.
There’s nothing rather like enjoying a summer season evening on a well-designed backyard deck. I just recently started investigating the best options for building one, and I found some valuable insights at deck builders that helped me limit my choices.
Nicely done! Find more at Renew & Restore Exterior Cleaning, LLC .
I liked your advice on door weatherstripping. 24-hour locksmith adjusted mine so the deadbolt seats correctly.
Useful advice! For more, visit acoso laboral Sevilla .
When my garbage disposal jammed in Wylie, reliable plumbing repair service fixed it the same day.
Just had a ridge vent added to reduce attic heat. Hamilton roof repair team from “emergency roof repair Hamilton” improved airflow immediately.
This guide on serums was so informative! I’m eager to find high-quality serums at chemical peels .
Comparing estimates? local roofer near me Brantford broke everything down line-by-line so it was easy to understand.
I never knew that roof ventilation could impact energy efficiency so much. Thanks for the info! Flat Roofing
Every employee should know their rights regarding workplace injuries! Check out the comprehensive guide at Work Injury .
This was very enlightening. For more, visit auto glass installation tips .
Thanks for the helpful info! I often refer friends in Barnsley to Managed IT Services for reliable IT support.
Awesome article! Discover more at animal hospital Boone .
This was highly useful. For more, visit Columbia windshield and auto glass .
Appreciate the step-by-step timeline. We stayed someplace else for 48 hours although Hardwood Flooring company complete curing the floors.
Our roofline seems to be straighter after decking fixes—Mid Atlantic Roofing Systems Inc at local roofing options .
I realized to avert WD-forty on the tracks; silicone works larger. Tip from Garage Door Repair .
Investing in robust health and safety measures through regular audits is a proactive approach that pays off in the long run! Health and Safety Consultants
I switched from a combined-emblem kitchen to a single-manufacturer set after reading performance consistency reports on top cookware brands reviews —worth it for even outcome.
Performance budgets as a design artifact will have to be favourite in 2026. We set exhausting limits for website design bangalore and it expanded Core Web Vitals.
Thanks for the great explanation. More info at procurador Coruña .
This article provides great clarity on the closing process; well done! realtor
Connectivity matters! I fixed Wi-Fi dropouts after reading network tips on indoor golf lessons .
Thanks for the helpful article. More like this at best commercial auto insurance .
Thanks for the detailed guidance. More at Fence contractor near me .
The seasonal upkeep hints are fine. I scheduled refills at a Springfield spot from Nail Salon and Eyelash Extensions | Uniquely Herrs .
Your details on choosing an ISA-qualified arborist are spot on. I observed one by means of emergency tree service .
I value the transparency approximately care thoughts. Chiropractor near me explained every one step prior to medicine.
I enjoyed this article. Check out راهکارهای برای جلوگیری از هرزنامه واتساپ for more.
The installation timeline you shared matches our event with Turf Installation —swift and powerfuble.
Great job! Find more at windshield replacement advice .
Paint thickness gauges help avoid over-polishing. Basics explained at mobile detail .
Pro tip: separate your karats (10k, 14k, 18k) and know the day’s spot price before you go. Boise has a few legit coin shops and jewelers, but policies vary. I used this link to find vetted places and negotiation tips: sell gold .
Jestem bardzo wdzięczna za rekomendację prawnika od spraw gospodarczych znaleziona poprzez stronę gorzów adwokat !
Very informative article. For similar content, visit Coral Springs air conditioning repair .
Great reminder about septic pumping — staying ahead on this makes a big difference for homeowners. Eatonville septic pumping company
I’ve been learning true rated cookware manufacturers today, and the comparisons are all around the region. For balanced experiences and real-user insights, I stay coming returned to highly rated cookware brands for counsel earlier I purchase.
Solid advice on avoiding damage. The pros at pressure cleaning options in Myrtle Beach were careful and effective.
This put up without a doubt captures the true-global timeline: evaluate, titration, remedy, and long-time period tweaks. I’d emphasize known practice-u.s.a.dose needs can modification with stress or existence transitions Psychiatrist
תקשורת עם עורכים – מה כן ומה לא לומר: כיצד לשפר דירוגים במנועים
Loved the practical approach. We recommend professional pool cage screen repair for Pool Screen Repair | All Screening of SWFL.
Awesome article! Discover more at best promo codes for free fire .
Love that you mentioned duct cleaning. Pair with a furnace tune from heating service for better performance.
Wow, I had no idea about the impact of hard water on plumbing systems! Your insights are invaluable. Learn more at plumber melbourne .
This was very enlightening. For more, visit Coral Springs heating and air .
Your observe on valley runoff is prime. Gutter Contractor near me delivered diverters to tame the pass.
Location near family made all the difference. We filtered by zip code on respite care support to narrow options.
Measuring cups and water lines differ via manufacturer, which influences outcome. The usage suggestions at best rice makers for home helped me calibrate competently.
I found this very interesting. For more, visit Redefined Restoration – Chicago Water Damage Service .
Great reminder to update beneficiaries. I updated mine with help from Insurance agency Huntsville .
They comply with our defense protocols perfectly. Trust Office Cleaning —Office Cleaning service Phoenix AZ.
The guide to scars and healing was so helpful. I first saw it linked from top plastic surgery .
Your reviews on stain medication for carpets and upholstery at dwelling have been very beneficial. move out cleaning services
For busy father and mother, a recurring condo cleansing carrier is principal. It frees up domestic time. deep cleaning services
Excellent winterization steps. For vacant property heat checks, emergency heater repair near me offers routine inspections.
Great tips on skylight placement and flashing. I obtained mine re-flashed by a contractor from affordable roofing contractor near me .
Fantastic message, very actionable ideas. I talk about complementary strategies at reliable SEO services .
Appreciate the great suggestions. For more, visit local movers .
Energy savings FTW. boiler repair tuned my burner and adjusted gas pressure—lower bills right away.
Great insights! Discover more at Renew & Restore Exterior Cleaning, LLC .
This was highly useful. For more, visit pest control .
Storm damage had me scrambling, but Hamilton roof repair pros at roof replacement cost made it simple and affordable.
Thanks for the great content. More at premium auto glass products .
Helpful assessment of automatic taps. Plumber in Gresham put in touchless furnishings throughout our restrooms.
Getting into shape while learning self-defense techniques is empowering – highly recommend looking into available programs highlighted here by visiting #ANYKEYWORD#. boxing classes
Smart garage solutions are activity-changers. Local readers have to hook up with Kitchen Remodeler San Jose CA pros at Remodeler near me .
Excellent list of link-building strategies. I’ve seen white-hat wins using outreach supported by seo company toronto .
If you prepare dinner acidic dishes more commonly, the enamel of Le Creuset is a plus; HexClad did positive in my tests too. I posted aspect-by way of-side results and graphics on choosing between hexclad and le creuset .
Love the minimalist nail art e book. I saved a Springfield artist’s profile from uniquely herrs nail salon springfield to take a look at subsequent month.
The competitor monitoring cadence makes sense. seo company alexandria is an seo company that tracks SERP volatility weekly.
Thanks for explaining the dangers. Rising repairs quotes and rent renewals could be tough. I use navigate to this web-site to review annual reports and tenant attention.
Don’t let anyone pressure you to sell on the spot. Get a quote, take a photo of the offer, and shop around Garden City and downtown Boise. This article breaks down how to avoid common tricks and where to get fair pricing: sell gold coins .
I appreciated this post. Check out trusted auto glass repair High Point for more.
Great reminder about real estate septic inspection — staying ahead on this makes a big difference for homeowners. Septic pumping company Pierce County
A proper roof warranty matters. Make sure labor and materials are covered. Checking policy details with kitchener roofing before we commit.
Looking for a local crew that respects your landscaping? roof ventilation and attic insulation protected everything and cleaned up nails.
I would like a normal seem—any hardwood flooring enterprise near me offer hardwax oils? Checking hardwood floor selections.
Kommer troligen behöva anställa en # anyKeyword# snart, har ni tips? beste elektriker
Emergency lockouts are stressful—been there! residential key replacement got me back inside fast and professionally.
Looking for precise user experiences on cleansing and protection for equally pans? This article at cookcell vs hexclad cost covers it smartly!
This is exactly what I needed. I booked a call at Best Medicare resources in Cape Coral and had my enrollment done in minutes.
For stair treads, I matched stains utilising guides on flooring supplies and samples from a floors shop Virginia Beach.
Thanks for the great tips. Discover more at windshield cleaning techniques .
Great insights! Discover more at commercial van insurance .
Sun exposure in Miami worries me— lip fillers miami has SPF aftercare for lips.
Appreciate the comprehensive advice. For more, visit affordable auto glass repair Columbia .
Niepowtarzalny wygląd i pełna personalizacja – dokładnie tego szukałam u producenta: praktyczny drewniany stolik kawowy
Wow, the modifications in roofing components are amazing! For the optimum treatments in Burlington, fee estimate for roof repair .
אחלה מסקנות. השפעה של קישורים על עסקים התמקדו ברלוונטיות – והתוצאות הגיעו.
Bamboo control became a nightmare until I learn the containment suggestions on Tree Service Vancouver WA .
Văn hóa cúng bái ở Côn Đảo thật thú vị, mình muốn đọc thêm tại dịch vụ đồ cúng .
If you’re in Tampa and need paver sealing, you must try Govee Light Installation .
For TMJ things, a chiropractor close to me furnished precise care. Sharing Chiropractor service near me in case it allows.
Appreciate the detailed information. For more, visit denver divorce mediation .
Love the drainage guidance. Found turf installation close me on Turf Installation Phoenix that specializes in permeable bases.
Mój znajomy polecił mi korzystanie z bazy kancelarii dostępnej pod adresem strony internetowej gorzów adwokat – nie zawiodłem się ani trochę!
Shoutout to all the coaches at local boxing gyms in Metro Vancouver! You can find class schedules on Private Boxing Coach Near Me Vancouver !
Action therapy taught me to break goals into tiny, doable steps. Guide here: action therapy techniques .
Thanks for the great explanation. More info at best promo codes for free fire .
Gamified maintenance reminders are smart. I get automated tune-up alerts from heating service near me —never miss a season.
Loved the section on safety devices. A furnace repair can validate the pressure switch and rollout sensors. hvac service near me
I can’t believe how much I’ve learned about technique and form since joining a gym here in Metro Vancouver; kudos to coaches and info available via Private Boxing Lessons Maple Ridge #!
If you need financing for a new roof, ask roof ventilation and attic insulation about their payment plans.
I can’t believe how much I’ve learned about technique and form since joining a gym here in Metro Vancouver; kudos to coaches and info available via Olympic Style Private Boxing Lessons Vancouver #!
I admire the details on rust prevention. Gutter Repair Contractor used pleasant elements and authentic sealants.
Great local flooring store experience. Learn more via best flooring deals Cape Coral .
Clearly presented. Discover more at H2O Pros Water Damage Restoration Services LLC .
Nicely detailed. Discover more at quality windshield replacement shop near 29305 .
Thanks for the protection reminders. If your furnace smells musty or burnt, our restoration carrier can perceive the lead to. hvac repair
As a Springfield newbie, this can be golden. I’m building my self-care checklist utilizing uniquely herrs dip nails springfield .
The deep smooth bog guide became thorough—mirrors, grout, furniture all came out spotless. residential cleaning services
Great web publication and clean reasoning. I wrote an research at auto glass maintenance advice .
Owners can save time by using property management services Fort Myers for day-to-day operations.
Smooth handoff with clear paperwork. Macon vehicle transport made Macon auto shipping straightforward.
Transparent move-in fees are appreciated. elderly care facilities allowed us to see deposits and community fees upfront.
I found this very helpful. For additional info, visit Majewski Plumbing .
Love how this breaks down real estate septic inspection. Easy to follow and super helpful advice. Eatonville septic pumping company
I appreciated your privacy note. I reviewed camera permissions in software sourced through best indoor golf at hitting academy .
If you want before-and-after pics and references, local hail damage roof repair has plenty to share.
On-target with filter reminders. I joined water heater repair ’s maintenance plan—filters and tune-ups bundled.
Nice to see careful work around gutters and eaves. Info at roof washing offers
Their QA inspections save criteria top. We have faith Office Cleaning company in Phoenix.
I needed emergency tarping and found responsive Hamilton roofers through “emergency roof repair Hamilton” —lifesavers during a rainy week.
For anyone in Hamilton comparing roofing quotes, make sure ventilation and ice/water shield are included. best roof repair companies Hamilton helped me vet bids.
We swapped old metal registers for flush mounts during install—small detail, huge aesthetic upgrade. Auburn flooring installation expert
Solid clarification of PEX vs copper. plumber gresham helped us pick for our redesign.
“Don’t risk losing benefits—partner up with an experienced #workerscomp lawyer as soon as possible!” Workers Comp
I appreciate the tips on rental property insurance. Insurance agency Huntsville helped tailor coverage for my tenants.
Thanks for the helpful advice. Discover more at instant payday loans new orleans .
Thanks for noting the risk of ladder damage. I leave it to roof washing services .
Our detached garage needed new flashing and vents. Hamilton roofers from hamilton roofing handled it in a day.
This was highly educational. For more, visit opiniones sobre tienda de colchones .
Good callout about bugs and tar removal. Professional truck cleaning handles tough grime during Mobile Truck Washing without damaging paint.
Just had my first session with a therapist from ##anyKeyword#, and it was incredibly insightful regarding my depression journey. Psychologist newport beach
Excellent HVAC tips. If anyone needs a full heating system installation, boiler repair delivers quality equipment and warranties.
Thinking of clever mirrors? A Bathroom Remodeler San Jose CA on Remodeler Blue Spade Construction built-in ours with lights.
Great insights on maintaining European vehicles! Many owners underestimate how crucial specialized diagnostics and OEM parts are for long-term reliability and performance mercedes repair west palm beach
This was very well put together. Discover more at solar services near me .
The coloration assessment information are gold. We ran audits with Lighthouse and noticed instantaneous improvement in readability. I shared a sample taste information here: Website Designers in Santa Clara
I wanted skylight alternative with my reroof; roofing near me on experienced roofers near me bundled it nicely.
ถ้ามีโอกาสต้องไปลองชิมอาหารที่ร้านเหล้าสาย1 ดูนะครับ ร้านชิลใกล้ฉัน
After an early morning gym session, I was stranded. professional car locksmith had quick tips to verify my insurance’s roadside coverage.
BT PREMIUM เป็นตัวเลือกที่ดีสำหรับคนที่รักการขับรถกลางคืนครับ ร้าน ไฟ
Great article, and the timing was excellent. I published a buddy guide at search engine optimization strategies .
Great weblog! The info are straightforward to put in force. My guidelines at auto glass replacement tips .
I had an amazing experience with a Northgate Chiropractor recently! Highly recommend it! Northgate injury doctor chiropractor
This clarified the big difference between ambering and clear coats. hardwood flooring showed samples so we should prefer.
Anyone tried leaf guards that actually hold up through Kitchener winters? Considering a system installed by near me .
תוסיפו סכמה לעמוד היעד. אחרי סקימה, הקישור ל- אסטרטגיות קישורים לקידום אתרים הביא עוד חשיפה.
Appreciate the detailed information. For more, visit best commercial van insurance .
Great insights on B2B SEO. We improved bottom-funnel pages via seo company toronto support.
Photo eye cleansing tip solved my random reversals. Maintenance publications at Garage Door Repair Portland OR are remarkable.
The local review strategy tips are great. We worked with seo company near me as our seo company to scale authentic reviews.
This was a fantastic read. Check out movers san diego for more.
Ai đã từng tự tay chuẩn bị mâm lễ vật cho gia đình chưa? Chia sẻ cảm nhận nhé và cùng tìm helloểu qua thông tin từ tôi tại dịch vụ đồ cúng tp hcm !
As summer approaches eagerly anticipating fresh ideas flourishing showcasing talents skills showcased brilliantly manifested melded flawlessly within stunning exterior environments created imagination unleashed free reign without limits imposed anywhere gardening design
Excited about hosting friends and family around our newly completed grilling station designed by >> interlocking pavers installer orange county
Great tips! For more, visit auditoría contable Saltillo .
I was very happy to uncover this site. I want to to thank you for your time due to this fantastic read!!
I definitely really liked every little bit of it and i also
have you book marked to see new stuff on your website.
I like that you protected payment ranges. I be sure Springfield pricing on uniquely herrs acrylic nails springfield to keep surprises.
If you want to compare consultation fees in Gig Harbor, top plastic surgeons at New You Medical Spa provides a handy overview.
I enjoyed this article. Check out commercial van insurance coverage for more.
After a lightning strike, we used Tree Service Company to e-book emergency tree elimination in Vancouver WA—outstanding competent.
Great reminder about real estate septic inspection — staying ahead on this makes a big difference for homeowners. Septic pumping company
For those in Orange County looking for inspiration, head to Garden Fountains Orange County for stunning garden fountains!
Weekend warrior the following—restoration is stronger seeing that I commenced with Chiropractor service .
Le bureau d’étude électronique à Lyon que j’ai trouvé sur Bureau d’étude électronique est vraiment professionnel!
Thanks for the thorough analysis. More info at same-day windshield replacement .
For each person outfitting a primary apartment, starter units from leading rated cookware manufacturers will be overwhelming. The beginner-pleasant publications on best cookware brands made it trouble-free.
Kancelaria znaleziona przez gorzów adwokat wykazała się dużym profesjonalizmem.
The weed barrier tip is imperative in Phoenix. Our installer from Turf Installation Near me handled it neatly.
Excellent reminder about attic moisture. Gutter Contractor Company mounted overflow that was inflicting humidity trouble.
Thanks for the comprehensive read. Find more at quality respite care .
Superb detail on boiler flushing. If you need descaling or balancing, heating service near me is highly capable.
Valuable information! Find more at secure long term personal loans .
I appreciate the funds making plans template. I obtained itemized prices from licensed roofing contractor company .
Reliable Hamilton roofers are hard to find, but the crew booked through “emergency roof repair Hamilton” communicated clearly and finished on schedule.
Nonstick sturdiness varies generally with the aid of brand and coating. I came across truthful longevity checks on best rated cookware brands that stored me from a luxurious mistake.
Thanks for breaking down the put up-analysis adventure so virtually. After my own ADHD analysis, the most precious step become combining medication titration with CBT adhd clinic
This was a wonderful post. Check out Roofing company near me Cambridge for more.
On a tight timeline to sell our home, roofing contractors Brantford scheduled quickly and provided a transferable warranty.
The tick list for industrial lavatories is useful. Our place of work used Plumber for improvements.
Hur hittar man den bästa elektriker service i Stockholm? Finns det listor?
Great blog! I realize the transparency. My case document at windshield repair options .
Chiropractor taught me diaphragmatic breathing to relax tight mid-back. Tutorial: Thousand Oaks Primary Care
This was a great help. Check out abogada en Vigo for more.
מומלץ לייצר נכסי תוכן שניתן לצטט. אינפוגרפיקה מקושרת היטב ל- שיפור דירוגים עם קישורים .
Microinteractions relatively lift UX while used sparingly. I verified delicate hover states and decreased motion for prefers-lowered-action. Demo and notes: Best Web Design Company in Santa Clara
This was highly useful. For more, visit Transfer hotel Arzúa .
Very informative article. For similar content, visit Kitchen remodeler .
If you like porridge and congee, seek multi-menu concepts. I came upon which items do either rice and porridge somewhat effectively on top rice makers .
I recently read about the long-term effects of workplace injuries, and it’s eye-opening! We must prioritize safety and health. Learn more at Florida Workers Compensation .
My basement wanted moisture-resistant ground. A floor save Virginia Beach had sizable possibilities, and flooring warehouse va made contrast trouble-free.
I recently read about common workplace injuries and how to prevent them. Great tips on Florida Workers’ Compensation Lawyer !
Appreciate the reasonable check stages. Remodeler San Jose CA presented truthful pricing as a Remodeler San Jose CA.
Good coverage on door alignment issues. car lock repair locksmith fixed mine and prevented extra wear on the lock.
We upgraded to seamless eavestroughs and the flow is fantastic. Highly recommend Custom Contracting Roofing & Eavestrough Repair at affordable roof repair prices .
customized contracting does wonderful work on my space
custom contracting eavestrough & roofing kitchner roofing
kitchner roofing tradition contracting eavestrough & roofing
custom-contracting.ca kitchner roofing
kitchner roofing custom-contracting.ca “emergency roof repair kitchener ”
I often wonder why we don’t hear more stories highlighting successful recoveries post-accident—it would inspire others seeking healing journeys—a perfect topic for discussion here or shared using links provided via ###anythingKeyboard ### Florida Workers’ Compensation
Price-clever, hexclad vs le creuset can the two be top class, but fee depends on use. Daily stovetop? HexClad. Weekend baking and braising? Le Creuset. I as compared rates employing hexclad vs le creuset performance .
This post makes a good case for seasonal cleaning. For a top-notch pressure wash, local pressure cleaning Myrtle Beach is our go-to.
Thanks for the detailed guidance. More at affordable auto glass repair High Point .
The contractor from Hardwood Flooring Near Me defined every single grit step and it made a large distinction.
Thanks for the suggestions. For full rescreen or patch work, Cape Coral pool cage screen repair experts is top-notch at Pool Screen Repair.
Wonderful tips! Find more at rent a car .
This is a fantastic resource for new trucking companies looking to understand their insurance needs! cheap truck insurance california
Những món ăn trong mâm lễ vật thật đa dạng và ngon miệng! Tìm kiếm thông tin chi tiết tại dịch vụ đồ cúng .
The ocean isn’t the only healing aspect of Newport Beach; great psychologists are also here—visit Anxiety treatment newport beach !
I love seasonal nail artwork inspiration. If somebody necessities Springfield-extraordinary nail salon tips, I additionally cost nail salon near me .
I recently transformed my backyard with some amazing landscape design company near me and the results are stunning! Can’t recommend it enough!
Thanks for the great explanation. More info at commercial vehicle insurance .
This was very beneficial. For more, visit Fence contractor near me .
I found this very interesting. Check out kitchen remodeling near me for more.
Thanks for the useful suggestions. Discover more at محل خرید کفش طبی زنانه .
The guaranty regulations are really different for Cookcell vs Hexclad—read the information at cookcell vs hexclad differences earlier deciding upon!
Great word about tightening hardware once a year. I use a torque e book from Garage Door Repair All About Garage Doors .
Appreciate the comprehensive advice. For more, visit windshield decals and accessories .
This was quite helpful. For more, visit contrato de trabajo Sevilla .
Highly recommend checking out the blog posts from SEO Expert Seattle WA #—super informative!
Love the step-by-step visuals. For baseboard heating optimization, I had a great experience with water heater repair .
Action therapy helped me activate my day, not wait for motivation. Read more at what is Winnipeg action therapy .
Great message– this triggered new ideas. I organized them here: local SEO strategies .
After a car accident, chiropractic care was a lifesaver. Anyone local should consider a Chiropractor in Thousand Oaks — Thousand Oaks Primary Care offers great options.
When a wind gust snapped a trunk, we often known as a 24/7 provider from Tree Service Company —really good Vancouver WA reaction time.
This content is super actionable. For noisy blower issues, heating contractors near me found and fixed my motor imbalance.
Szukałem ostatnio pomocy prawnej w Gorzowie i natrafiłem na adwokat gorzów – naprawdę polecam!
Wonderful tips! Find more at windshield repair in Columbia .
If you want before-and-after pics and references, metal roofing Brantford has plenty to share.
I appreciate the focus on dignity and respect. We found mission-driven communities via quality senior living .
Runners in Vancouver WA, take note gait and spine alignment. Helpful information: Chiropractor service company .
Overflow at the porch was once my affliction aspect— Gutter Contractor Company further an additional downspout and it’s wonderful now.
Loved the price breakdown. Turf Installation in Arizona gave us a clear quote and glued to it.
This was very beneficial. For more, visit derecho laboral Coruña .
Well done! Find more at san diego movers .
If you’re confused by alphabet soup, try Eligibility for Medicare in Cape Coral for plain-language explanations and quotes.
Chiropractic care helped with shoulder pain so I could get back to lifting at the gym. Tacoma auto injury chiropractor
Gamified maintenance reminders are smart. I get automated tune-up alerts from heater repair —never miss a season.
Replacing windows in the US isn’t just about swapping glass panes—it’s about balancing cost, quality, and finding a contractor who gets it right the first time Visit the website
The sound of water from a garden fountain brings such tranquility to my outdoor space. I found mine through Pond Designers Irvine CA !
Been there, got the t-shirt — and trust me, web hosting suspensions are the digital equivalent of a stress test nobody signed up for https://tango-wiki.win/index.php/When_Brute-Force_Attacks_Lead_to_%22Account_Suspended_Due_to_Non-Payment%22:_Sam%27s_Story
We appreciated the updates and clear communication throughout the project. Ranger Heating earns our trust. affordable heating company Puyallup
Window installation in the US often trips up even experienced DIYers, and here’s why: the devil’s in the details. First, measure *everything*—twice, or better yet, three times—in both inches and centimeters https://juliet-wiki.win/index.php/When_Childcare_Operators_Face_Window_Safety_Regulations:_Elena%27s_Second-Floor_Wake-Up_Call
Well written, I couldn’t have spoke of it superior myself although I am pretty gifted 🙂 certified 29319 Windshield Replacement
Great reminder about sealing returns. hot water repair near me sealed mine and improved static pressure.
After searching prime and coffee for excellent floors on the town, I’m pleased that I stumbled on this gem—the expenditures are unbeatable too; don’t pass over it: flooring store Charleston !
If you’re looking for reliable Hamilton roofing contractors, I’ve had a great experience recently. Check out “emergency roof repair Hamilton” for fast quotes and quality work.
My revel in shopping for floor in Charlotte changed into stunning, specifically at # flooring showroom #.
Thanks for the great explanation. Find more at premium auto glass products .
1. Look, the idea of VR casinos sounds super exciting, and I love the immersive experience it promises https://wiki-saloon.win/index.php/Trust_vs_Immersion_in_VR_Poker:_How_to_Make_Voice_Chat_Verifiable_Without_Killing_Presence
1. Hey everyone! I started taking organic ginger capsules a few weeks ago mainly to help with nausea, especially when I get motion sickness on road trips side effects of ginger capsules
1. Look, I’ve been adding collagen to my morning coffee for a week now, and honestly, does it taste weird in coffee? I barely notice it, which is a win. Also, does anyone know how long it usually takes to see results for weight loss? Super curious!
2 Go to the website
1. Hey, just wanted to share that I’ve been using ginger supplements for a while to help with motion sickness when I travel https://delta-wiki.win/index.php/Natural_ways_people_aged_30-60_can_ease_joint_pain,_tame_inflammation,_and_settle_digestion_using_Amazon_Prime
Their detailed evaluations identify the root causes of back pain, ensuring targeted and effective treatments. licensed injury chiropractor
Loved your section on accessibility. Adding precise point of interest states and ARIA labels boosted our conversions. If each person desires to see a practical list, I compiled one the following: Web Design Santa Clara
1. As a paralegal who’s been buried in medical malpractice files for over a decade, here’s the thing: most people underestimate how crucial timelines are. Believe it or not, a missed deadline can tank a case before it even gets off the ground https://wiki-cable.win/index.php/How_a_40-Attorney_Plaintiff_Firm_Survived_a_Contingency_Fee_Overhaul
1. Look, I’ve been adding collagen to my morning smoothie for a couple of months now, and honestly, it’s helped curb my cravings big time. Not sure if it’s all in my head, but I feel fuller longer. Anyone else notice that?
2 https://uniform-wiki.win/index.php/Creatine_and_Weight_Loss:_7_Evidence-Based_Creatine_Tips_for_People_Trying_to_Lose_Weight
מדריך מעשי. בניית קישורים דרך ולולינקס ותוכן פרימיום הובילה לקפיצה אורגנית. הוכחות ב- עקרונות לקידום עם קישורים .
1. Hey, I’ve been hearing a lot about collagen for weight loss but still a bit skeptical natural collagen sources
This was very well put together. Discover more at top site for pubg uc recharge .
I’ve been exploring neck lift procedures and located Gig Harbor providers via New You Medical Spa .
The expertise of SEO Company Seattle WA has helped my Seattle-based company dominate local search results!
Our cottage needed a durable solution— roof ventilation and attic insulation recommended metal and it looks amazing.
The provider we hired simply by professional roofing company winston-salem treated enables and inspections smoothly in Winston-Salem.
Elevator tracks and thresholds are purifier with Office Cleaning near me in Phoenix.
We had a sewer odor trouble at our Gresham website online— Plumber discovered and repaired the vent factor.
Workplace ergonomics cannot be ignored; poor posture often leads to chronic injuries over time! Workers’ Compensation
The staff was friendly and courteous, making sure to explain the process and what to expect. It was clear that they valued my property and took pride in their work. Govee lights installation company
For metal roofing or shingle repairs in Hamilton, compare options and reviews. I used roof replacement cost to line up estimates.
For those with desk-bound jobs in Thousand Oaks, did regular adjustments help with mid-back tightness? I’m exploring options and saw guidance at Thousand Oaks Primary Care .
I was worried about attic ventilation, but residential roof replacements in Brantford balanced the intake and exhaust perfectly.
I recently set up a deck, and it has actually changed the way I enjoy my garden! Anyone else had a comparable experience? I shared my journey on windows replacement .
So impressed with the roofing crew in Hamilton who handled our shingle replacement. If you need help, start with trusted Hamilton roofing professionals .
Świetna alternatywa dla masowej produkcji! Moje doświadczenia znajdziecie tu: personalizowany drewniany stolik kawowy
New business owners should start with BOPs. I set mine up through Insurance agency near me .
Being proactive in managing recovery will significantly aid healing – explore methods and approaches via %% anyKeyWord%%! Work Injury Lawyer
The process of filing a work injury claim can be daunting. Get support at Workers’ Compensation .
Rolling office chairs were scuffing the finish; clear mats solved it without killing the vibe. affordable Auburn flooring solutions
This was a fantastic read. Check out expert auto glass technicians for more.
As a nail artwork lover in Springfield, I’m thankful for this. I stick with neighborhood updates as a result of uniquely herrs gel nails springfield .
Loved the mid-century fashionable inspirations. Kitchen Remodeler San Jose CA at Remodeler company can tailor the variety in the neighborhood.
Feel free share stories involving obstacles overcome thanks kindness shown generous-hearted individuals passionate about advocating justice through reliable ‘#’ anyKeywod#! Florida Workers’ Comp
Excellent HVAC tips. If anyone needs a full heating system installation, heater repair near me delivers quality equipment and warranties.
I’m excitedly planning out ideas based solely on inspiration from past successful **deck installations** I’ve seen around town! garden designers near me
Love seeing before-and-after roof projects. Quality flashing and proper drip edge make all the difference. Thinking of booking with kitchener roofing for our eavestrough replacement.
Love how the grain popped when we converted from oil to water-structured sealer—suggestion came from hardwood flooring company vancouver wa .
Appreciate the comprehensive advice. For more, visit best commercial auto liability insurance .
https://t.me/s/Volna_officials
They offer free consultations. I scheduled after visiting Cape Coral home flooring .
I appreciated this article. For more, visit Columbia cracked windshield repair .
I’ve seen great results working with pros like property management services Fort Myers .
Just found a great Northgate Chiropractor who specializes in sports injuries! So excited! Northgate chiropractor near me
Your blog is a fantastic resource for anyone feeling lost when it comes to understanding their family-building options through surrogacy!! riverside surrogate requirements
Practical steps to quiet a noisy furnace. heating service near me isolated vibration and secured panels—so much quieter.
This was very insightful. Check out New roof installation Cambridge for more.
This consultant on track alignment stored me time. For great modifications, I have confidence Garage Door Repair Portland OR .
Il est rare de trouver un tel niveau de compétence en électronique : merci, Bureau d’étude électronique !
The right activity director makes a huge difference. We read staff bios on memory care assistance to gauge fit.
I found your breakdown extremely useful. I agree that proper inspections are key, especially for homes in Mystic. It might be useful to discuss solar integration for local homes? Additional insights can be found here: ceiling fan wiring repair Mystic CT .
Thanks for sharing this. Your breakdown of common repair needs was on point. I’ve noticed similar issues around Mystic Connecticut. Wondering if local homeowners should check their systems more often. To dive deeper, learn more at garage door opener installation Old Lyme CT .
Those ridge lines look pristine now. Book a cleaning at best roof washing techniques
Thanks for the clear breakdown. More info at Roof warranty Cambridge .
I absolutely enjoy how jewelry can change a whole clothing! It’s incredible how an easy piece can add so much elegance and personality. Have you ever thought of customizing your own precious jewelry? It can make for a really special statement piece sell gold denver co
”#CommunityBuilding exercises planned resulted positively beyond expectations—all credit again belongs towards recommendations extended mutually agreed upon while engaging through:###!” SEO Agency Seattle WA
This was quite informative. For more, visit windshield decals and accessories .
Martial arts not just improve physical fitness yet also impart technique and focus in specialists. It’s interesting to see just how various styles, from karate to jiu-jitsu, deal distinct benefits Denver TaeKwonDo
The evacuation counsel is spot on. Once clean, I let emergency tree service control the emergency elimination.
Jestem bardzo wdzięczna za rekomendację prawnika od spraw gospodarczych znaleziona poprzez stronę gorzów adwokat !
Keeping roll-up doors and seals clean prevents wear. Professional truck washing North York includes door tracks in the wash.
Treating before it becomes visible is smart. Preventative cleaning by Winston-Salem roof cleaning experts saved me money.
Thanks for boosting the significance of lets in and inspections. I labored with a licensed contractor from roofing services nearby and had 0 worries.
Hur ofta ska man göra elbesiktning hos sin elektriker? notfall elektriker
I have read so many posts regarding the blogger lovers however this piece of writing
is genuinely a good piece of writing, keep it up.
Những món ăn trong mâm lễ vật thật đa dạng và ngon miệng! Tìm kiếm thông tin chi tiết tại dịch vụ đồ cúng .
I believe having a backyard deck is vital for amusing visitors! It creates the best environment for barbecues and events deck builder
בניית קישורים לתוכן באיכות גבוהה במקום “פרסומי”: קישורים לקידום עם SEO
Anyone get financing for turf? Some enterprises close to me on Turf Installation Phoenix AZ be offering per 30 days plans.
Alcohol rehab Rockledge FL can be the turning point—consider Rockledge FL alcohol rehab centers .
If you’re dealing with hail or wind claims, the Hamilton roofing contractors at trusted roofing contractors know the insurance process well.
Window replacement is one of those projects where you seriously want to do your homework upfront—measure twice, sometimes three times, because mistakes get expensive fast https://blogfreely.net/ravettjoms/h1-b-how-to-stop-choosing-the-wrong-windows-for-your-climate-a-practical
Window installation is one of those jobs where cutting corners or guessing measurements leads to expensive headaches down the line. First rule: measure twice (or thrice), and confirm both inches and millimeters if your plans are from different sources recommended minimum sill height
If you favor oven-safe nonstick, double-payment the limits. I use premium cookware brands to be certain which pinnacle rated cookware brands can virtually visit 500°F appropriately.
Mild scoliosis here—consistent care improved my posture and stamina. Insight: Thousand Oaks Primary Care
Been there—and it’s a nightmare nobody wants. Web hosting suspensions often hit hardest when you least expect it, usually right before a big launch or traffic spike. The key is not just reacting but preparing in advance Website link
A well-placed fountain can really elevate your landscape design—what types do you recommend for modern homes? Garden Fountains Irvine CA
If you need financing for a new roof, ask hail and wind damage roof repair about their payment plans.
I liked this article. For additional info, visit راهنمای غیر فعال کردن هرزنامه واتساپ .
1. Hey everyone! I’ve been taking ginger supplements mainly for motion sickness when I travel. Look, before I started using them, car rides would totally mess me up, but this stuff really works for my nausea https://tysonoehv237.lucialpiazzale.com/why-vegetable-capsules-often-beat-gelatin-real-questions-real-answers
1. Hey everyone! I started taking organic ginger capsules a few weeks ago because I get really bad nausea during car rides, and honestly, it’s been a game-changer for me ginger capsules vs fresh
Check return guidelines for additional packing containers— wood flooring contractors virginia beach indexed facts I proven at a ground save Virginia Beach.
Appreciate the thorough write-up. Find more at affordable windshield replacement .
1. Look, I’ve been taking collagen for a couple of months now, and honestly, it’s helped curb my cravings big time! Didn’t expect that, but I feel fuller longer. Anyone else experienced that?
2 https://zenwriting.net/aspaidbajz/h1-b-break-cravings-and-beat-plateaus-a-practical-plan-for-busy-adults
Just had a consultation with a workers comp lawyer, and I feel so much more informed about my situation now! Workers’ Compensation Lawyer
1. Look, I’ve been adding collagen to my morning smoothie for about a month now, hoping it helps with my weight loss goals https://zenwriting.net/aspaidbajz/h1-b-how-to-prevent-loose-skin-during-weight-loss-strategies-that-improve
1 Go here
Absolutely Go to this website
Multi-cookers can do rice, however dedicated rice makers nevertheless win on texture. The edge-by-aspect assessments on affordable rice makers convinced me.
Conociendo tus derechos: una guía rápida sobre ### Florida Workers’ Comp
Having open dialogues regarding mental health implications tied alongside physical ones following incidents remains fundamental towards fostering holistic approaches directed upon healing processes occurring afterwards—a powerful notion echoed frequently Florida Workers’ Comp Lawyer
Great insights! Discover more at mover .
1. Hey, I’ve been thinking about trying collagen for weight loss but I keep wondering—does it taste weird in coffee? I can’t handle anything that ruins my morning cup. Anyone tried mixing it in a latte or black coffee?
2 https://tysonoehv237.lucialpiazzale.com/can-whey-protein-help-busy-30-50-year-olds-lose-weight-without-constant-hunger
Fantastic task on this article; it was once very informative and satisfying to examine! Visit: affordable auto glass repair High Point !
If you cook acidic dishes sometimes, the tooth of Le Creuset is a plus; HexClad did tremendous in my assessments too. I posted side-by means of-side results and photos on choosing between hexclad and le creuset .
Good advice on wildfire risk mitigation. I found a carrier that incentivizes it via Insurance agency near me .
Great overview of inland marine for equipment. I insured my tools via Cole Green – State Farm Insurance Agent .
I appreciated this post. Check out contabilidad financiera Saltillo for more.
Great overview! I’d upload that exploring non-stimulant alternatives might be a recreation-changer for people delicate to stimulants or with coexisting tension why not check here
I appreciate how professional landscapers use landscape design and build to blend nature with functionality beautifully.
I found this very helpful. For additional info, visit best commercial car insurance .
Thanks for the great information. More at elderly care services .
Action therapy gave me a structure to face fears gradually. Sharing a link that helped: Winnipeg action therapy specialists .
Thanks for the valuable insights. More at Best Fence contractor High Ridge, MO .
What a entire e book on Burlington roofing types! For greater thought, head to reliable roofers near me .
Clogged gutters caused basement seepage for us—lesson learned. Installing gutter guards and new downspouts with “kitchener eavestrough repair” soon.
Bay Area Rodent Solutions made our lives so much easier with their top-notch rodent control services
I am genuinely impressed by the results from Bay Area Rodent Solutions and their effective rodent control solutions
If you want peace of mind best rodent control Campbell area
For male plastic surgery options in Gig Harbor, best plastic surgeon had a helpful section.
After studying reports, I’m curious about the lengthy-time period longevity of Cookcell vs Hexclad. More insights here: cookcell vs hexclad features .
Feeling overwhelmed gratitude reflecting moments spent connecting fellow enthusiasts passionate topics exploring nuances intricacies underlying phenomena shaping perspectives informing decisions influencing choices made impacting lives lived journey nang delivery melbourne
Chiropractor taught me diaphragmatic breathing to relax tight mid-back. Tutorial: Thousand Oaks Primary Care
Wonderful tips! Discover more at colchones disponibles en Albacete .
This was quite useful. For more, visit auto glass replacement options .
Długo szukałem godnego zaufania adwokata – znalazłem go dzięki stronie gorzów adwokat !
If you care about product certifications, free roofing estimate Brantford is trained on leading shingle systems.
Just had an really good sense opting for up carpet samples at # flooring store Charlotte #—such a lot of innovations available!
The emergency prep list is clutch. Save heating service in your contacts for 24/7 heating repair.
רעיון מעולה לאתגרי קהילה שמייצרים קישורים. דוגמאות: כלים לשיפור דירוגים .
I’ve been recommending the Flooring Store Charleston to all my company who’re adorning their residences; they basically have anything for everybody! Discover greater at flooring showroom !
This was a good read! If your pilot light won’t stay lit, a furnace repair can address thermocouple or gas valve problems. residential heating company
Your dusting order—ceiling lovers, shelves, then surfaces—prevents remodel. move out cleaning services
The thoughts on edge computing use cases are pragmatic. Start where latency truly matters. business advisor near me
Thanks for the clear breakdown. Find more at apply for responsible lending personal loans .
The concentration on outcome over outputs is precisely what consulting enterprises could embody. hvac contractor
Các tín ngưỡng xung quanh việc thờ phụng tổ tiên luôn khiến tôi cảm thấy ấm áp và gần gũi!… Theo dõi thông tin chi tiết trên trang cyber web của bạn là link dưới đây là : ## đồ cúng trọn gói
The weather is perfect for a water slide rental in Tampa right now! Let’s have some fun! party rentals wesley chapel fl
“Don’t underestimate the value of having an experienced #workerscomp lawyer on your side.” Workers’ Compensation Lawyer
Simple, actionable advice. For duct balancing and damper setup, heating contractors near me made every room cozy.
Are there genuine occasions while you will find widespread offers on Nangs Delivery Melbourne around Melbourne?
This put up is appropriate! You’ve expressed these thoughts eloquently and thoroughly. local Auto Glass 29302
Thanks for the great explanation. More info at abogado en Vigo .
The different types of surrogacies explained here really help demystify this process for many readers! riverside surrogacy agencies
Loved the explanation of spinal alignment and nerve function. It matches what I learned here: Thousand Oaks Primary Care
Great job! Find more at Servicio de taxi local Arzúa .
For key duplication accuracy, key replacement uses high-precision machines—no more jamming.
This cleaning checklist is gold. local pressure cleaning Myrtle Beach covered siding, concrete, and patio in one visit.
I wish I had found this sooner; it would have made my experience much easier! Florida Workers Compensation Lawyer
Great weblog and very imaginative. I compiled instruments at windshield replacement services .
If you’re dealing with hail or wind claims, the Hamilton roofing contractors at roofing companies near me know the insurance process well.
Ultimately promoting self-advocacy amongst staff members empowers them while reinforcing shared commitments towards collective growth overall!!!!# # anyKeyWord## Florida Workers’ Comp Lawyer
This was very beneficial. For more, visit Cambridge roofing .
Choosing between re-roofing and a full replacement? The Hamilton roofers at hamilton roofing explained the pros and cons clearly.
This was highly educational. For more, visit cheap car rental toronto .
Choosing between re-roofing and a full replacement? The Hamilton roofers at instant roofing quotes near me explained the pros and cons clearly.
If you want before-and-after pics and references, local roof leak services Brantford has plenty to share.
Consejos para mantener la calma durante un reclamo complicado de Workers Comp Lawyer .
Thanks for the practical tips. More at Leadwork Cambridge .
I found this very helpful. For additional info, visit divorce mediators .
If anyone reading this has doubts regarding capabilities transforming spaces consider reaching out experts seeking advice guidance assistance navigating paths leading desired destinations ultimately fulfilling dreams cultivating lasting memories cherished landscape design and build
Helpful write-up! For anyone dealing with pool cage damage after storms, Cape Coral screen repair for pools is a go-to for Pool Screen Repair.
Thanks for the clear breakdown. Find more at contrato de trabajo Sevilla .
If you’re searching for an addiction treatment center Rockledge FL that truly cares, Rockledge FL addiction recovery is a great place to start.
Thanks for the detailed post. Find more at best business vehicle insurance .
Anyone compare aluminum vs steel eavestroughs in Kitchener’s climate? Leaning aluminum with proper leaf guards. Might go through kitchener roofing for install.
Thanks for discussing costs transparently. We used affordable elderly care to estimate monthly expenses and plan a budget.
I’m glad you addressed bruising prevention. My remedies: Greenville botox
The team at backyard hardscape contractor orange county transformed my backyard with their stunning BBQ island design!
Helpful guide to thermostat compatibility. heater repair near me verified wiring and installed a new smart stat.
Do you think weekly chiropractic visits are worth it for preventative care? I found this helpful: Thousand Oaks Primary Care
Thanks for the thorough analysis. Find more at auto glass replacement reviews .
כלי נחמד לאיתור אזכורים ללא קישור: אסטרטגיות לשיפור דירוגים .
Painted archways add architectural interest without renovations. Tutorials on Painting contractors st louis mo .
This is very insightful. Check out abogado de familia Coruña for more.
For anyone in Orange County thinking about adding a water feature, definitely check out Garden Fountains Irvine CA .
Switching to wider planks instantly opened up our tiny living room—fewer seams and more natural grain made a huge difference. top-rated Auburn flooring installer
Your advice on choosing colors that match home exteriors was unique and practical; beautiful visuals too—more inspiration awaits at Roof downpipe repair Limerick .
Thanks for the clear breakdown. More info at mover .
Polecam sprawdzić opinię o kancelariach prawnych na stronie adwokat gorzów przed podjęciem decyzji.
Great insights on Medicare enrollment timelines. For anyone comparing plans, Cape Coral Medicare plan enrollment has clear guidance and personalized help.
Your list for spring maintenance is spot on. Book a entire tune-up with our HVAC contractor by using our web site. emergency hvac
Solid information for tackling bloodless rooms. A furnace repair might determine duct leaks and blower speed troubles. heating and cooling repair near me
Drewniany stolik pod wymiar odmienił moje wnętrze nie do poznania! Sprawdźcie ofertę firmy: stolik kawowy na zamówienie z drewna
If allergies are an quandary, strive a condominium cleaning service that uses HEPA vacuums—it helped me breathe more easy. residential cleaning services
Your recommendations on making ready a house formerly the cleaners arrive are lifelike and trouble-free to keep on with. Thanks for sharing! house cleaning services
This is such an important conversation ; I’m glad we’re discussing the value of local north gate chiropractors !! # # any keyword # # Northgate chiropractor for work injuries
A must-share post! For trustworthy, efficient heating service from diagnostics to installs, check hot water repair near me and stay warm.
I love that chiropractic care is safe for the whole family, even kids and grandparents. injury rehabilitation chiropractor
From the first call to the final inspection, Ranger Heating exceeded every expectation. We’ll be back. best heating contractors Puyallup
Every patient at Wall Family Chiropractic Center receives a customized recovery plan designed for optimal results. affordable Parkland chiropractor
If you’re looking for a reliable roofing company in Garfield, NJ, I highly recommend checking out their services! Roofing contractor
Great breakdown of posture mistakes. My back pain improved after following similar advice from a top clinic. For those comparing options, Thousand Oaks Primary Care has detailed info on choosing the best chiropractor.
This was quite helpful. For more, visit auto glass replacement tips .
Smart note on humidification. heating contractors near me added a bypass humidifier—comfort improved instantly.
It’s essential that we advocate for more robust worker protections against job-related injuries—great post raising awareness on this topic! Workers’ Compensation
Couldn’t agree more on importance surrounding mental health during recovery phases following workplace incidents.# ### ayK ey word### Workers’ Compensation Lawyer
This was a great article. Check out title loans new orleans for more.
Wondered recently if anyone participated recently large gatherings centered around competitions hosted locally – certain friendly rivalry often elevates adrenaline boosting motivation immensely contributing significantly towards achieving personal Women’s Private Boxing Coach Vancouver
When my AC clicked but didn’t start, hvac repair via denver air conditioning repair” replaced the capacitor.
Good overview for new homeowners. sewer repair service offers clear explanations and quality work.
The thermocouple explanation helped. I booked Taylors service via water heater repair to replace it.
Home inspection flagged slow drains. Booked Valparaiso drain cleaning via drain snaking service before closing.
Love that there’s always an opportunity to ask questions after class; having access resources like those available through this platform helps tremendously via guidance posted there. Private Boxing Lessons North Vancouver
If you’re in Metro Vancouver, you need to check out the boxing classes available! More details at Private Boxing Lessons Chilliwack .
Boxing has changed my life, and I’m excited to keep improving! Learn more at boxing gym about local classes!
I’ve experimented with collagen supplements myself and can say that results vary quite a bit depending on the type and quality of collagen, as well as your overall diet and lifestyle Find more info
I learned so much about what to expect from a workers comp case through your article—thank you! Workers’ Compensation
Hey folks, as someone who deals with compliance, I just wanted to chime in on the whole “unregulated crypto casino” debate. Look, “unregulated” sounds scary, but it’s not the full picture crypto gambling tax Sweden
Honestly, I gave the Sky Organics castor oil a shot after reading about it here. At first, it felt a bit thick for my face, like you mentioned, but once I started using it on my nails and cuticles, my dryness practically vanished uses of regular castor oil
1. Look, I’ve been reading these stories and it’s like looking into a mirror. My partner’s gambling has completely drained our savings and I feel so helpless watching it happen. The truth is, I don’t know how to rebuild the trust that’s been shattered https://page-wiki.win/index.php/When_a_Hidden_Habit_Becomes_a_Household_Crisis:_Jaime%27s_Story
I’m curious about how technology will shape future trends in both **landscape** and **installation**—especially regarding 3D designs! landscape design and build
Great insights! Find more at trusted Sanford Auto Glass providers .
For sticky rice lovers, really good modes be counted. I determined solid sticky rice classes by using top rice makers .
Looking for pet-friendly floors? Flooring Store | Abbey Carpet & Floor at Patricia’s has options. See best rated flooring in Cape Coral .
Love the explanation of microdosing. My experience: botox near me
อยากทราบว่ามีรุ่นไหนบ้างที่เหมาะสำหรับรถยนต์แต่ละประเภท ไฟรถ
Great insights on maintaining European vehicles! Many owners underestimate how crucial specialized diagnostics and OEM parts are for long-term reliability and performance Foreign car repair
I found this very helpful. For additional info, visit best auto glass repair in High Point .
Kan ni rekommendera en bra och pålitlig elektriker für haushalte här i Stockholm?
This helps owners avoid common pitfalls. leading property management Fort Myers can assist.
לעניין מאוד. ממליץ לפנות ל- שיפור דירוגים עם קישורים לבדיקת קניבליזציה.
Just put in a few captivating tile from flooring retailer memphis —it adds such person to my lavatory!
Great web publication! Your examples are spot on. I’ve added charts at windshield replacement insurance claims .
That roof went from dull to dazzling. Book through Maryville roof cleaning solutions
Love clinics that screen movement before adjusting—SFMA/FMS style. Why it matters: Thousand Oaks Primary Care
I love how imaginative one can get with nangs in either food and drink displays! What’s your such a lot inventive advent with the aid of them? Share it with us at nang delivery melbourne !
If you favor to revamp your area, suppose vacationing flooring retailer denver for a few magnificent ground techniques!
Staging and cleanup tips were on point. The team from Painting Company left our home spotless after the final walkthrough.
Excellent note about cleaning reefer units. Professional truck cleaning Mobile Truck Washing keeps vents and housings spotless.
I found this very helpful. For additional info, visit business vehicle insurance .
If you’re into stir-frying, which do you decide upon: Cookcell or Hexclad? I read an attention-grabbing contrast at cookcell vs hexclad differences .
Thanks for the great content. More at کفش مردانه با کیفیت طبی .
ชอบการตกแต่งร้านของ OMG OneMoreGlass สวยงามและเป็นเอกลักษณ์มาก! ร้านอาหารสาย1 รับจัดเลี้ยง
Totally agree that black streaks reduce curb appeal. I used Winston-Salem best roof cleaning tips and the roof looks new.
I always recommend to friends: must try once. Custom contracting Cambridge! They have offer packages that include design consults. See: Roof repair Cambridge
Thanks for the detailed guidance. More at Best Fence contractor High Ridge, MO .
I did not have an understanding of how an awful lot big difference new floors may possibly make except I visited flooring store houston and saw their option firsthand right here in Houston.
This publish is the best option for first-time owners looking into roofing strategies in Burlington! Further coaching is available at affordable roofing companies burlington !
Loved the section on oil-to-gas conversion. heater repair near me handled mine end-to-end with permits.
The energy-saving stats are compelling. After a furnace replacement, how long did it take for your utility costs to noticeably decline? emergency hvac service
Helpful reminder to avoid grease in drains. For emergencies, sewer repair service offers fast sewer cleaning service.
Strange odors shouldn’t be ignored. hvac repair via denver cooling near me caught a dangerous issue early.
Good reminder to check the T&P valve. I arranged a test in Taylors via Taylors water heater repair .
Tree roots were causing repeated clogs. Valparaiso drain cleaning with camera inspection via clogged drain repair fixed it for good.
Great iciness prep booklet. If your furnace is tripping breakers, agenda a fix prior to it will become a safety danger. residential heating company
Szukałem ostatnio pomocy prawnej w Gorzowie i natrafiłem na gorzów adwokat – naprawdę polecam!
I’ll be adopting your on a daily basis reset activities—dishes, counters, and a short sweep make mornings nicer. move out cleaning services
I like how you emphasize customizing the cleansing plan to busy family life. residential cleaning services
This was a fantastic read. Check out EPDM roofing Cambridge for more.
This article makes it clean how needed timing is for starting lymphatic drainage put up-op. I liked the notice approximately getting physician approval first lymphatic drainage massage kl
Customer service can make or break a cookware acquire. I study person-pronounced guaranty stories on best rated cookware brands until now identifying my model.
This was a wonderful guide. Check out windshield replacement insurance claims for more.
“Throwing a themed occasion? Don’t overlook approximately the good concepts at %% anyKeyWord %%.” Nangs Delivery Melbourne
Mỗi mùa lễ hội lại mang đến những hương vị mới lạ… Hy vọng được cập nhật nhiều hơn trên trang cyber web của bạn: ## đồ cúng trọn gói
Sharing testimonials from those who’ve experienced firsthand setbacks due unforeseen circumstances arising unexpectedly helps raise awareness informing others how significant preparation truly matters!-#WorkInjury#Testimonials### anykeyword ## Florida Work Injury
A great Workers’ Comp can help workers understand their rights and options after an injury.
If your gutters and flashing need attention, these Hamilton roofing contractors know their stuff. I contacted them through Hamilton eavestrough repair contractors .
A supportive addiction treatment center Rockledge FL can be found at drug recovery solutions .
Attending upcoming exhibitions showcasing latest advancements technologies being utilized currently amidst landscaping industry might inspire individuals seeking fresh ideas implementing innovative solutions!! backyard design
Your workplace should be safe; know what to do if it isn’t by visiting Work Injury .
Just when you think you know everything about dental care, you come across articles like this one—so informative! Barnsley Dentist
What a vast learn—your potential to articulate these elements is brilliant, nicely carried out! professional Auto Glass Shop near 29301
Great read on the significance of backlinks in SEO strategies! Learn more at AI SEO .
I’ve been on the collagen-for-hair bandwagon for a while, and while results vary, I think the key is consistency plus the right type of collagen. In the US, a lot of people swear by hydrolyzed collagen peptides because they’re easier to digest and absorb https://zenwriting.net/aspaidbajz/h1-b-can-collagen-help-with-gray-hair-understanding-its-role-in-hair
This is very insightful. Check out title loans new orleans for more.
Honestly, I gave Sky Organics a shot after reading this post, and I’ve gotta say, it’s been awesome for my dry elbows! The oil is pretty thick, so I didn’t use it on my face natural hair care tips
1. Look, I never thought I’d be writing here about my partner’s gambling, but here I am. It’s like every day there’s a new hole in our finances, and even worse, the trust feels shattered beyond repair https://angelodhre262.theglensecret.com/what-happens-when-one-person-s-gambling-hurts-six-others-questions-and-answers
For those familiarized with insurance coverage—what should one consider when weighing different policies regarding ortho care provided locally?” ## Orthodontics
Has anyone had experience with lingual braces? Curious how they compare to other options available here within our town’s dental community known as **Dunfermlines** finest!! Invisible Braces
Couldn’t believe how affordable # # anKeyWord # is compared to other clinics around town! Invisible Braces
Thanks for the informative content. More at local movers .
Homeowners increasingly consider energy-efficient alternatives when selecting automated solutions nowadays. Turnstiles Rotherham
Great tips on drain maintenance! I always find it helpful to regularly check for clogs. Check out drainage cleaning services for more information.
Hey everyone, as someone working in compliance, I just wanted to chip in on the whole “unregulated crypto casino” debate. Look, calling a platform unregulated doesn’t automatically mean it’s unsafe https://deanmogj202.cavandoragh.org/why-malta-and-gibraltar-lead-crypto-gaming-licensing-and-why-kyc-aml-can-t-be-ignored
Appreciate the helpful advice. For more, visit contador Saltillo .
Good mention of metabolism differences. I track changes: Greenville botox
For dark spots, dermaplaning plus vitamin C helped me. I posted a routine at dermaplaning ann arbor (jackson rd) .
Server performance is key, and I have actually seen fantastic outcomes with managed server solutions in Bangalore so far!
The nursery paint suggestions were thoughtful and calming. More child-safe ideas at St louis painters .
כתיבה מעולה. לוקח את זה צעד קדימה עם קישורים המובילים להצלחה בפרויקטים לקישורים איכותיים.
Keeping drains clear is crucial. When needed, main sewer line repair chicago” offers trustworthy sewer cleaning service.
I’ve learned that small issues snowball. I use hvac repair for preventative hvac repair.
Appreciate the useful tips. For more, visit auto glass quality standards .
Great tips on water heater repair in Taylors can be found at water heater installation Taylors – don’t miss it!
I believe that educating ourselves on maintenance can help us avoid costly repairs later on! drain cleaning Valparaiso
Ventilation often gets overlooked. Kitchen Contractor sized and installed a proper range hood that keeps our kitchen fresh.
รู้สึกปลอดภัยมากขึ้นหลังจากติดไฟหน้ารถ LED ไฟหน้า led
Thanks for the great tips. Discover more at H2O Pros Water Damage Restoration Services LLC .
That checklist for contractor interviews is excellent. Pool Contractor checked every box for us.
Thanks for the insightful write-up. More like this at https://maps.app.goo.gl/v2zn8zmG1NQ5xP719 .
I love that you addressed fragile items. I mark them in my home cleaning company notes.
I recommend HVAC carrier close me that explains fix vs substitute features with ROI estimates. emergency hvac service
The section on underlayment types was great. Roofing Company recommended synthetic underlayment for durability.
Appreciate the comprehensive advice. For more, visit pest control near me .
Great case gain knowledge of! Consulting organisations need extra transparent ROI frameworks like this. hvac repair near me
Helpful suggestions! For more, visit best business vehicle insurance .
Great insights on maintaining European vehicles! Many owners underestimate how crucial specialized diagnostics and OEM parts are for long-term reliability and performance Foreign car repair
This was really helpful. Discover family dentistry at Mandarin Jacksonville Dentist .
Great coverage of pool deck safety. local pressure cleaning Myrtle Beach reduced our slippery spots significantly.
I add oven and fridge inside to my quarterly deep clean for a complete reset. house cleaning services
The local SEO section is strong. Consider seo company alexandria if you need an seo company for multi-location strategies.
This guide on seasonal SEO is timely. We built campaigns aligned to trends with seo company toronto .
Jeżeli nadal zastanawiasz się nad wyborem kancelarii – odwiedź koniecznie stronę internetową adwokat gorzów i przeczytaj opinie innych klientów!
Appreciate the detailed post. Find more at professional carpet cleaning methods .
Great blog! You’ve explained this brilliantly. My instructional at auto glass replacement near me .
It’s refreshing to see companies like Utility locating company dedicated to educating the public about the importance of utility safety.
Your tips on maintaining spinal health are fantastic! I’m definitely going to look for a Car accident chiropractor Puyallup near me in Puyallup.
This was quite informative. For more, visit consultas legales Vigo .
Your tips on maintaining spinal health are fantastic! I’m definitely going to look for a Puyallup Chiropractor near me in Puyallup.
Considering #deck installation# as part of your #landscape design services#? It’s a great way to expand usable space outdoors! landscape design company near me
Great explainer on shutoff types and locations. We scheduled a Lee’s Summit plumber using nearby plumbing service providers .
This is spot-on for Florida weather. After storms, we call affordable pool cage repair Cape Coral for Pool Screen Repair.
I had a noisy blower wheel— local ac repair services van nuys cleaned and balanced it.
Awesome breakdown of warning signs. I booked a camera inspection via emergency sewer repair and it saved me money.
This was quite helpful. For more, visit Taxi a O Pedrouzo .
I ignored a rattle for weeks. Bad idea. hvac repair from hvac installation prevented a bigger failure.
Rất cảm okayích trước sự tôn trọng văn hóa của người dân nơi đây đối với đồ cúng! Muốn tìm hiểu nhiều hơn trên đồ cúng trọn gói .
Your call-out regarding mobile optimization as a ranking factor resonates with many—I’m exploring this topic further @ ### anyKeyWord### ! AI Consultant
Your winter prep list saved me. I arranged a Taylors checkup through water heater installation Taylors .
Regular visits to my dentist have kept me cavity-free for years—what a relief! Teeth Straightening
“Has anyone experienced quick results after hiring ###? Would love some success stories!” “drain cleaning
Fantastic post! Discover more at title loans .
So thrilled hearing success stories from other locals whose journey began right here through trusted professionals operating throughout **Dunfermlines** neighborhoods!! # # anyKeyWord# Teeth Retainers
I found this very interesting. Check out opiniones sobre venta de colchones en Albacete for more.
Amazing insights here! Don’t forget to consider Property protection gutters for your next gutter cleaning project in Limerick at a reasonable price.
”Celebrating accomplishments inspires further motivation while encouraging commitment towards achieving desired outcomes over longer durations!” ## Teeth Retainers
What maintenance routines do you recommend for keeping your electrical components running smoothly? Gate Automation Rotherham
Appreciate the detailed information. For more, visit Emergency roof repair Cambridge .
קישורים מאינדקסים איכותיים עדיין עובדים אם עושים נכון. מדריך קצר: אסטרטגיות לסמכות דומיין .
The step-by-step guide for unclogging drains was super helpful—I’ll be following these recommendations closely—learn more at emergency drain unblocking !
Have been seeing results from the orthodontic treatments offered by # # anyKeyword###—very pleased so far! Invisalign
Great insights! Find more at auto glass replacement for vehicles .
I appreciated this post. Check out indemnización por despido Sevilla for more.
Appreciate the helpful advice. For more, visit Columbia auto glass repairs .
I appreciate caution about ptosis risk. My prevention tips: Greenville, SC botox
What a great read! Understanding dental care can really make a difference—learn more at Jacksonville Dentist 32223 .
I currently renovated my domicile and observed the correct flooring at a local keep in Memphis! Highly advocate sorting out flooring company memphis for substantial suggestions.
For sticky rice enthusiasts, specialized modes rely. I came upon sturdy sticky rice systems simply by best rice makers for home .
My trip at flooring retail store denver changed into right-notch! They guided me by every step of selecting my new flooring.
This was a fantastic resource. Check out quality auto glass High Point for more.
For court-ordered drug rehab Rockledge services, best drug rehab centers provided helpful leads.
This was quite helpful. For more, visit Emergency roof repair Cambridge .
This was highly helpful. For more, visit abogado laboral Coruña .
It’s refreshing to see companies like Underground utility surveyor dedicated to educating the public about the importance of utility safety.
Anyone else had success with a Chiropractor Puyallup in Puyallup? I’m looking for personal experiences before I commit.
Måste säga att jag är imponerad av hur snabbt min nya # anyKeyword# jobbade! elektriker in meiner nähe
Martial arts not just boost physical fitness yet additionally impart discipline and focus in professionals. It’s remarkable to see exactly how various styles, from karate to jiu-jitsu, offer special advantages Denver TaeKwonDo
Drewniane meble wracają do łask – szczególnie te robione na indywidualne zamówienie jak w nowoczesny drewniany stolik kawowy
Sewer gas odor indoors can indicate a venting problem. plumber near me evaluated our vent stack, cleared a bird nest blockage, and resealed a loose wax ring at the toilet.
The segment on vent clearances was vital. Sidewall terminations must meet distances from openings and grade. Clearance charts at heating contractors near me .
Great job! Discover more at movers san diego .
The installing group from online flooring store did an exceptional activity on my new flooring right here in Houston.
If you’re into stir-frying, which do you prefer: Cookcell or Hexclad? I read an fascinating assessment at cookcell vs hexclad comparison .
Helpful overview of preventive screenings covered. I picked a plan at Medicare enrollment FAQs Cape Coral that emphasizes wellness.
Great checklist for homeowners. main sewer line repair chicago” handled our main line cleaning without hassle.
My system struggled in heat waves. hvac repair by hvac installation denver optimized refrigerant charge.
Good to know what to expect with roofers’ fees in Cork! I’ll be visiting Roof maintenance for additional tips.
Thanks for the valuable article. More at auto glass safety features .
Thanks for the valuable article. More at apply for Louisiana personal loans .
Data recovery after a dead iPhone is stressful. I managed to rescue everything when the board was repaired at Phone Repair . Worth checking before giving up.
Great job! Find more at emergency auto glass service Columbia .
Excellent take on revenue recognition. Outsourced CFO amenities at contractor payroll compliance align ASC 606 rules with techniques.
The efficiency ratings on tankless water heaters are impressive; they really do save money in the long run! tankless water heater repair”
I’ve learned so much about plants through my journey with #landscape design services#. It’s fascinating how they fit together! landscape design planner
Thanks for the visuals. Our operators praised the stability of mechanical coil upender during tipping.
Great communication and fair rates. Booked Valparaiso drain cleaning using drain cleaning services .
Valuable information! Discover more at pest control near me .
This advisor relatively helps demystify the roofing system in Burlington! Check out extra insights at trusted roofing services .
I appreciate the duct design focus. Manual D ensures proper trunk sizing, equivalent length, and takeoff placement. Contractor resources at heater repair near me .
I appreciate the step-by-step for site migrations. seo company toronto guided our move without losing rankings.
Thanks for the sitemaps advice. Our seo company seo company alexandria split sitemaps to improve discovery.
Awesome information here! This can really help families navigate dental care—visit Jacksonville Dentist for more on family dentistry!
I appreciate the comparison to shaving; dermaplaning is more precise for me. dermaplaning
The entryway transformation proves first impressions matter. More foyer ideas on House painter st louis .
Wonderful breakdown of Google’s ranking factors and their influence on visibility; discover more details at AI SEO !
Maintenance tip for Hamilton homeowners: annual roof inspection saves money. I schedule mine through search businesses near me .
Có ai biết địa chỉ mua đồ cúng ngon và chất lượng ở đó không?… Chia sẻ cho mình nha và xem chi tiết ngay nhé qua link của tôi là : ## đồ cúng trọn gói
Never knew how beneficial probiotics could be for oral health until now!!! ### anyKeyWord ## Teeth Straightening
Nicely done! Discover more at local auto glass providers .
Thanks for the reminder about glass DOT markings. I verified quality standards with the shop I found on Columbia auto windshield .
This was beautifully organized. Discover more at title loans .
I enjoyed this read. For more, visit cheap car rental .
The community really needs to be aware of the excellent orthodontic services available in Dunfermline! Invisible Braces
Love the textured carpet options for stairs. More ideas at buy flooring in Cape Coral .
I’m amazed at how advancements continue pushing boundaries surrounding safety and elegance throughout contemporary residential communities alike! Turnstiles Rotherham
What’s the best age to start orthodontics? I live in Livingston and want to plan ahead. Invisalign
Cream chargers are a must-have for all of us who likes to entertain! best cream chargers
1. Hey, just wanted to chime in about that $50 no deposit bonus from Golden Jackpots casino. I tried it last weekend, and honestly, the 40x wagering was doable. I spent most of my time on the Cleopatra slots, which I actually like existing player promotions
Underground utility locating is crucial for ensuring safety and preventing costly damages during construction projects. Many people underestimate the importance of knowing what lies beneath the surface Utility Surveyor
Great activity navigating as a result of advanced topics at the same time preserving it relatable—it’s lots appreciated!!! # # anyKeyWord# # reliable Auto Glass 29316
Your aftercare tips are spot on. I keep a simple routine here: botox Greenville
1. Kijk, ik vind dit echt eng om te lezen. Mijn dochter zit elke dag uren achter zo’n scherm, en nu begin ik me echt zorgen te maken. Wie houdt die dingen eigenlijk in de gaten? Thanks voor het artikel, dit opent m’n ogen.
2 kind gokt online
I’ve been living in Puyallup for a while now, and finding a reliable chiropractor has been a game-changer for my health. It’s amazing how much better I feel after regular adjustments Chiropractor Puyallup
1. Kijk, ik snap het wel dat ze iets willen doen tegen gokverslaving, maar die limieten van Cruks? Die slaan echt nergens op! Soms wil je gewoon een avondje normaal spelen zonder steeds tegen een muur aan te lopen kansspelautoriteit
Nossa, é exatamente isso! Eu jogo uns 10 minutinhos de puzzle depois do almoço e parece que minha cabeça dá um reset total. É como se fosse um intervalo mental que me ajuda a voltar com tudo pro trabalho, mais focado Ir a este sitio web
1. Kijk, dat CRUKS-ding is echt frustrerend. Die limieten slaan nergens op! Soms wil ik gewoon een avondje normaal spelen, maar dan sta ik ineens al dicht bij mijn limiet. Het voelt alsof ze je geen enkele kans geven om zelf te kiezen https://www.honkaistarrail.wiki/index.php?title=Hoe_Nederlandse_spelers_Cruks-beperkingen_en_trage_uitbetalingen_aan_kunnen_pakken_zonder_risico_te_nemen
I had no idea that coffee grounds could cause drain blockages! Thanks for sharing this info. For more tips, check out emergency drain unblocking .
Smart financial advice for rentals. local property management Fort Myers provides transparent reporting.
I never thought to request a trial clean first. Booked mine through residential cleaning service .
As someone who has benefited from chiropractic care, I highly recommend checking out a good Chiropractor Puyallup in Puyallup. It made all the difference for me!
Jumping from the UK to the US with your No Claims Bonus (NCB) in tow? Brace yourself—it’s rarely the smooth handover you’d hope for Website link
Just ordered some alleviation cuisine simply by ### anykeyword#—ultimate for a wet day! nang delivery melbourne
1. Hey, this is really helpful info! My daughter is just about to start her driving lessons, and I’m a bit anxious about the insurance side of things RAC provisional cover
1. Hey guys, I just tried this free spins offer and omg, it’s so cool! 😍 I didn’t even have to put in money, just clicked the link and boom – free chance to win! I’m still new to this stuff but this felt super simple and fun https://foxtrot-wiki.win/index.php/Is_het_slim_om_altijd_een_bonus_te_accepteren%3F_Een_praktijkcase_en_lessen
Love your process to OKRs. An outsourced CFO from comprehensive contractor accounting ties monetary objectives directly to working OKRs.
Fantastic explanation of airflow. hvac repair with hvac installation rebalanced my rooms.
Good points on what not to flush. For cleaning, sewer repair service chicago did an outstanding job.
וואו, שימושי. קיבלנו ב- קישורים טופ לדירוג בגוגל דוחות שקופים ותוצאות.
Excellent work clearing debris from valleys and gutters too. See Maryville roof washing solutions
The troubleshooting guide on water heaters at “water heater repair Taylors is a must-read for anyone in Taylors!
Smart advice on bidding more premium contracts—clean trucks help! Affordable truck washing North York handles Mobile Truck Washing reliably.
The last time my drain was clogged, I called someone right away and avoided disaster—thank goodness for local expertise in Valparaiso! sewer line repair
Just had my first appointment at a dental clinic in Edinburgh, and it was a breeze! Thanks to Invisalign for making it so easy.
1. ゆうこさんのVoicy、毎晩聞いてます!実はね、声がすごく落ち着くから寝る前に聞くとすっと眠れるんです。癒しの時間をありがとう~。これからも応援してます!
2. こんにちは!舞台好きとして気になったんですが、稲葉裕子さんは劇団マンカガミの頃にどんな役をやっていたんですか?ぜひ過去の公演の話も聞きたいです。舞台写真とかもあれば嬉しいな~。
3 ナレーター 稲葉優子
わあ!稲葉夕子さんの新しい舞台めっちゃ楽しみー!!🎭✨実はね、昔のドラマもう一回見たくて探してるんだけど、どこで見れるんだろう?ぶっちゃけTSUTAYAとかに置いてないかな?笑 あと、Voicyでの声も最高すぎて毎日聴いてる!声だけで癒されるってすごいよね〜🎙️💕舞台も声も稲葉さんの魅力全開でほんとファンとして幸せ〜!これからも応援してます!🙌🌸 https://quebeck-wiki.win/index.php/%E5%85%AC%E5%BC%8F%E3%82%B5%E3%82%A4%E3%83%88%E3%81%8C%E6%9B%B4%E6%96%B0%E3%81%95%E3%82%8C%E3%81%AA%E3%81%84%E3%83%95%E3%82%A1%E3%83%B3%E3%81%B8%EF%BC%9AYuko_Inaba%E3%81%AE%E5%87%BA%E6%BC%94%E4%BD%9C%E3%82%92%E8%87%AA%E5%88%86%E3%81%A7%E5%AE%8C%E5%85%A8%E3%83%AA%E3%82%B9%E3%83%88%E3%81%AB%E3%81%99%E3%82%8B%E5%AE%9F%E8%B7%B5%E3%82%AC%E3%82%A4%E3%83%89
Treating before it becomes visible is smart. Preventative cleaning by top roof cleaning services Winston-Salem saved me money.
Love the reminder to replace worn wax rings on toilets. Rocking bowls can lead to subfloor damage. plumber near me provides reset services with flange repair if needed.
Your information on deciding on nail technicians is on aspect. I go-checked wait occasions via uniquely herrs manicure springfield .
Well noted! Thanks for making it easy. I posted a undemanding information at mobile windshield repair Columbia .
Summer evenings spent around a newly built deck make me appreciate skilled craftsmanship behind any **installation** project! landscape design company near me
If you have a tight timeline in Lynchburg, Local movers Lynchburg helps you book quickly.
Appreciate the quality focus. The welds and bearings on hydraulic coil tipper tippers are top-notch.
It’s refreshing to see phone stores using trade-in programs that make updating easier and more budget-friendly! If you’re considering one, have a look at the options readily available at free phone !
This was a great read of essential topics! More info on dental crowns at Dentist Jacksonville .
Excellent coverage of pilot-to-electronic ignition upgrades. Standing pilots waste fuel; intermittent spark or hot surface igniters boost efficiency. Upgrade pathways at heating contractors near me .
Một trong những điều khiến tôi hài lòng nhất với # anykeyword # chính là đội ngũ nhân viên nhiệt tình. mua bạt lót hồ nuôi cá giá tốt
Just had a great experience with a local plumbing service from Lees Summit that I discovered via reliable sump pump solutions near me .
Loved the breakdown of common AC noises. I had a similar issue and got it fixed by trusted hvac repair van nuys ca .
Your overview of boiler zoning was helpful. Zone valves versus circulators each have pros and cons. Comparison guide at heater repair near me .
Thanks for the thorough analysis. Find more at Roof maintenance Cambridge .
I believe having a yard deck is essential for entertaining guests! It produces the ideal atmosphere for barbecues and gatherings deck builders
If you haven’t tried flavored whipped cream from Mr Cream Chargers, you’re lacking out widespread time! Nangs Delivery Melbourne
Strong assistance on KPI alignment. Outsourced CFOs at construction financial leadership translate process into measurable finance metrics.
Returns grading is a must have. Configuring RMA workflows in Manufacturing process software consultants elevated restock vs. fix choices.
I appreciated the follow-up call after the move. Suwanee Mover’s cares—excellent Suwanee moving company.
Appreciate the detailed information. For more, visit title loans new orleans .
Every homeowner should be aware of utility locating before starting any landscaping or digging. Great job promoting this, Utility locating company !
I recently took my family to Family Chiropractic Puyallup, and it has made a significant difference in our overall health. The staff is incredibly knowledgeable and caring, making us feel comfortable throughout the process Car accident chiropractor Puyallup
Thanks for the valuable article. More at pest control near me .
Good read. I’ll make a checklist for Bayonne moving companies before my next move. Best Bayonne movers
Good reminder about grease traps. sewer cleaning cleaning service serviced ours and cleaned the line.
If your street is tight, meet at a nearby lot. Did that in Virginia Beach with a driver from Virginia Beach car shipping .
When my AC clicked but didn’t start, hvac repair via denver cooling near me replaced the capacitor.
Thanks for the great information. More at Residential roofing Cambridge .
I recently started visiting a Puyallup chiropractor for adjustments, and it has made a world of difference in my overall well-being Chiropractor Puyallup
This was a fantastic read. Check out affordable auto glass repair Columbia for more.
I’ve been discovering best rated cookware manufacturers today, and the comparisons are all around the situation. For balanced comments and real-user insights, I retain coming again to top-selling cookware brands for suggestions earlier than I purchase.
I appreciated the clarity on pilot assemblies. A Taylors tech from Taylors water heater repair swapped mine out.
For homeowners in Valparaiso, regular drain maintenance is key. I learned about preventative cleaning at sewer line repair Valparaiso .
For auction buys near Naperville, I’ve had success coordinating release times via Naperville car moving companies .
It’s interesting how often algorithms change; stay updated by visiting AI Consultant !
Best Lilburn movers that communicate clearly—found ours through Local movers Lilburn and had zero surprises.
Useful article on iPhone storage errors. When mine kept showing “Other” data bloating, a backup/restore plus a diagnostic at fast iPhone problem solving solved lingering system issues.
Good advice on monitoring index coverage. An seo company like seo company alexandria can resolve anomalies quickly.
Appreciate the checklist you mentioned before shipping your car—perfect for anyone new to Ann Arbor car shipping. Ann Arbor car shipping
Illinois Mover’s Services offers everything from packing to storage — that’s incredibly convenient. Illinois Mover’s Services
Văn hóa tâm linh liên quan đến lễ vật thật đẹp.. Mong được đọc nhiều hơn.. Bạn hãy theo dõi từ link bên dưới : ## dịch vụ đồ cúng
I love how dentists can transform smiles! It’s truly an art and a science combined. Dental Centre
I liked the transparency on deposit and balance. Islip Auto Transport’s laid out all Islip transport costs clearly.
Your point on hydration and skin health is key. My routine: Greenville, SC botox
The ability to customize colors allows owners creativity while establishing distinctive atmospheres throughout neighborhoods. Automatic Sliding Gates Rotherham
Can you recommend any affordable options for braces within the community of Livingston? I’d love some input! Clear Braces
Just done my basement remodel with floors from flooring store memphis , and I could not be happier with the effects!
I enjoyed this post. For additional info, visit installment loans .
Thank you for discussing the importance of regular check-ups with your orthodontist in Dunfermline! Invisible Braces
Multi-cookers can do rice, yet committed rice makers nevertheless win on texture. The aspect-by way of-facet exams on electric rice makers sure me.
Great point about filtration cabinets. A 4–5 inch media cabinet reduces pressure drop and lengthens filter life compared to 1-inch filters. Product comparisons at heating contractors near me .
Excellent point about the importance of community involvement in gaining trust and visibility locally—Webjuice exemplifies this well! SEO trends Ireland
Måste säga att jag är imponerad av hur snabbt min nya # anyKeyword# jobbade! lokale elektriker
I love how an expert the crew at flooring retail store denver is about floors traits. They highly helped me make the most well known desire for my dwelling house.
I enjoyed this article. Check out dentist in Jacksonville, FL Mandarin for more.
Wow, I had no idea about the importance of regular drain inspections. Thank you for sharing! More insights at drain unblocking near me .
As a nail art lover in Springfield, I’m thankful for this. I stick with local updates using uniquely herrs nails springfield .
Thanks for the useful post. More like this at mold removal services .
What a immense manner to introduce young children to based learning! Preschool is one of these indispensable step. infant child care
This was a wonderful guide. Check out auto glass services in Columbia for more.
Is the value big difference between Cookcell and Hexclad justified? Saw an sincere discussion at cookcell vs hexclad reviews .
Had wonderful experience receiving treatment firsth Orthodontics
1. Kijk, ik snap het nut van Cruks hoor, maar die limieten slaan echt nergens op soms. Je wilt gewoon ontspannen een gokje wagen zonder meteen tegen een muur aan te lopen. Misschien moet het wat flexibeler kunnen, dat zou ik wel fijn vinden.
2 Vind meer informatie
EDI is also painful devoid of visibility. We visual display unit EDI 940/945/856 statuses using SAP Amazon integration services to catch disasters early.
I’ve been struggling with a leaky faucet for weeks! Your suggestions are just what I needed. Explore more helpful content at plumber .
Love your mindset to OKRs. An outsourced CFO from hire a CFO for construction ties monetary goals instantly to running OKRs.
Safety stats are compelling. After adding hydraulic coil tipper coil tippers, incident rates dropped noticeably.
Fantastic examine. For a person wanting swift turnaround with out shipping machine, assess out onsite calibration facilities from gauge block calibration .
The peach fuzz removal is the best part. Info hub: dermaplaning near me .
1. Anyone had a claim with Zego recently? Heard mixed things about how quick they are with payouts. Thinking of switching from my current insurer but don’t want to risk downtime waiting on a claim.
2. Man, these insurance prices keep going up every year https://jsbin.com/tofixenita
פוסט מדויק. קישורים נקודתיים מ- אסטרטגיות קישורים מרובות קידמו אותנו לעמוד ראשון.
Appreciate the helpful advice. For more, visit denver divorce mediation .
1. Wow, ik ben echt geschokt na het lezen hiervan. Mijn dochter zit ook vaak op dat spel en ik had nooit gedacht dat het zó erg kon zijn. Bedankt dat dit onderwerp eindelijk eens wordt besproken, het geeft me wel veel om over na te denken nu.
2 https://anotepad.com/notes/3ac5ammj
1. I took a shot at that $50 match bonus on that new Vegas-themed site. Playthrough was 35x, which isn’t too bad if you ask me Bitcoin casino bonus
1. Olha só, eu sempre adorei jogos de construir cidades, tipo SimCity, e sempre reparei como eles me ajudam a relaxar depois de um dia corrido https://ameblo.jp/elliottuynu583/entry-12949141404.html
Love the focus on prevention. sewer cleaning cleaning service chicago set up a maintenance plan for us.
Thanks for the reminder about changing filters. It saved me from a costly hvac repair last winter. I booked via air conditioner repair denver .
The potential hazards of not knowing where your utilities are located are too high—thank you, Utility locating company , for advocating safety!
This is such an important topic! If you’re near Puyallup, definitely explore the local Puyallup chiropractor options available to you!
Finding one of the best ground became common owing to the proficient body of workers at houston floors in Houston.
We had a sudden odor from the laundry standpipe; plumber near me corrected the trap height and added a proper vent to stop siphoning.
Great reminder to test sheen in high-traffic areas. Maintenance tips on St louis painters .
Một trong những điều khiến tôi hài lòng nhất với # anykeyword # chính là đội ngũ nhân viên nhiệt tình. mua bạt lót hồ nuôi cá giá tốt
Water heaters are one of those things you don’t think about until something goes wrong! Learn more through Taylors water heater repair
I’ve been living in Puyallup for a while now, and I’ve recently started exploring chiropractic care options in the area. It’s amazing how much relief I’ve experienced from regular adjustments Puyallup Chiropractor
Clogged drains seem to happen at the worst times; having reliable repair services nearby is such a relief! hydro jetting service
1. Hey, kijk, ik hoorde over die gratis spins actie en dacht: “Waarom niet, gratis is altijd leuk!” Eerlijk gezegd had ik niet veel verwacht, maar ik heb stiekem toch een paar euro gewonnen https://privatebin.net/?c6bf9d519622998b#4HzZSHVUqc6SXodWsoo2UDmKMJeL69G5bMw5dzJoBaqh
Jumping from UK NCB (No Claims Bonus) to trying to translate that into US car insurance terms? Good luck. The US insurers don’t really care about your flawless UK record—it’s like it never existed https://privatebin.net/?7628dda1ed13aa0a#5aHT8kWWXUPKGDutkSzepW6DgsKxxbGaXiLpstUWR6Ub
This was quite informative. More at abogado Vigo .
This guide on thermostat calibration is gold. Pair it with a professional check from heating contractors near me to maximize comfort and cut bills.
Every homeowner should read this! For those living in Cork and needing roofing help, look into Roofing Cork City !
This was quite informative. More at affordable windshield Columbia .
Hospitality establishments face liquor liability and visitor harm exposures. Tailored policy instruction manual: commercial insurance adjuster
This was a wonderful post. Check out Taxi desde Arzúa a aeropuerto for more.
If you’re looking for reliable Hamilton roofing contractors, I’ve had a great experience recently. Check out reliable roofing contractors in Hamilton for fast quotes and quality work.
Trust is everything with house cleaners. I rely on vetted reviews from move out cleaning .
Excellent read! Learn more about dentistry at dentist in Jacksonville, FL .
Loved the discussion on electricity-successful roofs during this publish! Find green preferences at expert burlington roofing !
Your article on keyword research is spot on! I found additional resources at AI SEO .
1. 実はね、稲葉優子さんのVoicy、毎晩寝る前に聞いてるんだよね。落ち着く声でスッと眠りに入れるから、本当に助かってる。いつもありがとう!
2. こんにちは!今回の記事で初めて知ったんだけど、優子さんって昔、舞台劇「劇団まんかがみ」のメンバーだったんだね!その頃の出演作ってどんな感じだったの?すごく気になります。
3. えっ、「昼のセント酒」に稲葉優子さんが出てたなんて知らなかった!あのドラマと全然イメージ違くてびっくり。やっぱり多才なんだなぁ。
4 TABプロダクション 稲葉優子
Thanks for calling out obvious pricing in Springfield. I evaluate menus on manicure springfield prior to reserving.
This was a wonderful guide. Check out best windshield replacement shop near 29301 for more.
わー!ゆうこちゃんの新しい舞台めっちゃ楽しみ✨✨ 実はね、舞台のあの独特の空気感ってほんとに生で味わいたいから、絶対観に行くつもり😘!あと、ぶっちゃけ昔のドラマももう一回見返したくて、どこかで配信してないかな〜?知ってる人いたら教えてほしい〜🙏 あとVoicyの声も最高すぎ!ていうかあの落ち着く声で毎回癒されてるんだよね〜!本当に多才すぎて尊敬してる!!応援してるよ〜📣💖 TABプロダクション
Dental x-rays are fascinating; they really help in diagnosing issues early on—great point made here!! Barnsley Dentist
Must try once. Custom contracting Cambridge impressed us, and they have offer add-ons like free quotes. Details here: Roof repair Cambridge
Oh my goodness! Impressive article dude! Thank you, However I am going through issues with your RSS.
I don’t know the reason why I cannot join it. Is there anybody else getting
identical RSS problems? Anybody who knows the solution can you kindly respond?
Thanks!!
The masseter slimming section was helpful. My case notes: Greenville, SC botox
Electric fences often serve as functional art pieces—they don’t just protect; they beautify too! Automatic Sliding Gates Rotherham
Appreciate the comprehensive insights. For more, visit abogado cerca de mí laboral Sevilla .
Put partitions for ecom can change into throughput. We run gentle-directed placed partitions tied to SAP Amazon integration services with swift preparation.
This was very enlightening. For more, visit loan agency .
Thanks for the helpful article. More like this at Wood Fence Installation Sexton .
Can anyone share their experience with invisalign treatments in Livingston? Looking to learn more! Orthodontics
My system was oversized and short cycling. hvac repair through “ac repair improved runtime.
We noticed gurgling sounds. sewer repair service chicago explained the cause and cleared our line.
Love hearing success stories from those who’ve transformed their yards through dedicated efforts in caring properly-for-trees. https://share.google/baoUfDag2Pokca0pH
Great reminder approximately sticker management. Our coloration-coded labels from gauge block calibration make onsite calibration monitoring mild.
Just got my braces tightened at my local Dunfermline clinic—it’s not as bad as I thought! Teeth Retainers
This was very enlightening. For more, visit Columbia auto glass installation .
Your article respects personal choice; explore choices at Opioid Recovery .
I appreciated this article. For more, visit bufete de abogados Coruña .
This is such an important topic! If you’re near Puyallup, definitely explore the local Puyallup Car accident chiropractor options available to you!
Just wrapped up an amazing training session—boxing classes are truly the best way to break a sweat! Find your class via Private Boxing Sessions Surrey today!
Looking for motivation? Try joining a local boxing class in New Westminster—it’s an experience you won’t forget, especially with tips from Private Boxing Sessions Surrey !
It’s surprising how many people neglect their heaters! Check out #AnyKeyWord# if you’re one of them and need info. water heater replacement
Just finished reading about the latest technology in utility locating—impressive stuff from companies like Utility locating company !
Preschool is a excellent means for young children to discover their pursuits at an early age. What a notable opportunity! best child care near me
If only everyone knew how easy it is to maintain their plumbing and prevent clogs—it would save so much trouble! hydro jetting service
Really enjoyed reading this article! Drain maintenance should not be overlooked. More advice at drain unblocking near me .
Thank you for discussing the importance of chiropractic care! I’m considering visiting a Chiropractor Puyallup in Puyallup soon.
Loved the easy guide to finding the main shutoff. Lee’s Summit residents can book help at nearby urgent plumbing services .
Thanks for highlighting training. mechanical coil upender provides clear labeling and emergency stop locations.
Good call on scheduling pre-summer service. I booked mine with trusted air conditioner repair near me and avoided breakdowns.
Happy overall experience sought advice regarding possible options available underwent thorough examination conducted efficiently addressed concerns raised openly discussed recommendations presented clearly supported evidence based findings drawn Invisible Braces
Great insights on possibility management. Commercial insurance plan is considered necessary for keeping enterprise sources and continuity. I’ve shared identical options here: insurance adjuster companies
Simply put—I couldn’t have asked nor imagined anything better than what’s being offered today!: #nangtankmelbournelife nang delivery melbourne
This was a great help. Check out https://maps.app.goo.gl/K4d5UeL2tyULnQir5 for more.
Appreciate the thorough analysis. For more, visit New roof installation Cambridge .
Such important advice! Dive deeper into dentistry at Jacksonville, FL Dentist .
Thanks for the detailed post. Find more at mejores tiendas colchones .
I enjoyed this post. For additional info, visit water damage restoration Westland MI .
Đã từng làm việc với nhiều đơn vị nhưng giá cả bạt lót hồ 2025 vẫn là lựa chọn hàng đầu của tôi.
Well done! Find more at sanford nc glass repair .
Love the reminder to map and label shutoff valves and cleanouts. Saves time in emergencies. plumber near me can create a home plumbing map for you.
Wonderful tips! Find more at Columbia cracked windshield repair .
Superb summary of coverage gaps to avoid. I checked my policies for gaps with Ivy Fields-Releford .
Cast iron seasoning fine can differ even between excellent rated cookware brands. The pre-professional performance critiques on best cookware brands have been exquisite handy.
This was a great article. Check out same day carpet cleaning services near me for more.
I’m choosy about cuticle care—your Springfield recs are efficient. I vetted salons through uniquely herrs nail salon springfield .
If you’re thinking of closet refacing, do not be reluctant! I did it last month, and I’m so delighted with just how it turned out. I obtained some wonderful ideas from cabinet refinishing costs that made the procedure simpler!
Great explanation of hydro jetting benefits. sewer cleaning cleaning service executed it flawlessly.
Thanks for the drain pan tip. hvac repair from hvac installation denver prevented ceiling damage.
“The workforce at # # anyKeword### are so pleasant; they in truth raise the whole ordering event.” Nangs Delivery Melbourne
Exception handling wishes structure. We log and resolve decide upon exceptions inside of ERP consultant near me to stay away from ad-hoc fixes.
מסר חשוב. בחרנו ב- שירותי SEO לבניית קישורים בגלל שקיפות ודוחות מסודרים.
Comprehensive overview of heating options. Consult heating contractors near me to pick the right system for your climate.
I recently took my family to Family Chiropractic Puyallup, and it has made a significant difference in our overall health. The staff is incredibly knowledgeable and caring, making us feel comfortable throughout the process Car accident chiropractor Puyallup
Jag tycker det är viktigt att stödja lokala elektriker in meiner nähe i Stockholm!
The case learn resonates with our lab. We switched to onsite calibration for onsite calibration and minimize our turnaround time in 1/2.
Got a free estimate first. Valparaiso drain cleaning company from hydro jetting service honored the quote.
How often do you need to flush your tankless water heater? Is maintenance easy? water heater repair
Water damage can be sneaky on iPhones. Even if it powers on, corrosion can spread. I sent mine in via iPhone Repair and they cleaned and replaced affected parts same day.
Found the perfect recipe that makes use of such a nifty resources recently; can’t wait until everyone attempts it along with pointers located by means of ### any key-phrase### Nitrous Oxide industry trends
Just wished to provide a shout-out to the proficient employees at flooring retail store memphis #; they helped us make great decisions.
I’ve heard so many positive stories about local Chiropractor Puyallup practices in Puyallup. Can’t wait to start my journey!
Your overview of various link-building strategies was enlightening—explore additional methods at AI SEO !
Excavation safety should never be overlooked! Always consult with experts like Utility Surveyor before starting any project.
The first time, I overdid it—less is more. Lessons from dermaplaning ann arbor (jackson rd) .
I’ve been studying the finest rice makers lately and discovered that consistency and ordinary cleanup topic most. If someone’s comparing models, payment out top-rated rice cooking appliances for a few special breakdowns.
Shifting perspectives helps open doors towards healthier lifestyles—we’re all in this journey together!!!! ### anyKeyWord # Invisible Braces
I’m amazed at how advancements continue pushing boundaries surrounding safety and elegance throughout contemporary residential communities alike! Turnstiles Rotherham
Loved your point on choosing qualified injectors. I wrote a quick guide: botox near me
I’m looking into adult braces and would love some advice from those who’ve gone through it in Livingston! Orthodontics
For every body shopping for green floors options in Denver, flooring company denver has a few fabulous options.
This was quite informative. For more, visit Columbia car glass replacement .
I’m consistently surprised by using the resilience proven by means of young youth adapting to variations inside their study room environment ! So inspiring ! ### anyKeyWord### full day child care
This was a fantastic read. Check out pest control near me for more.
The warranty rules are surprisingly different for Cookcell vs Hexclad—examine the facts at cookcell vs hexclad durability earlier than making a choice on!
Thanks for highlighting training. coil upender provides clear labeling and emergency stop locations.
Awesome information here! This can really help families navigate dental care—visit dentist in Jacksonville, FL 32223 for more on family dentistry!
This blog post definitely opened my eyes towards choosing between ceramic versus metal brackets when consulting an ortho near **Dunfermlines** region!! Keep sharing these valuable insights!! # # anyKeyWord# Orthodontics
Umbrella rules are fee-useful for additional limits over GL, auto, and employers’ legal responsibility. Quick explainer: insurance adjuster services
This was very insightful. Check out personal loans new orleans for more.
Fantastic advice! I’ve been struggling with a slow drain lately and will try these tips right away. More info at cctv drain survey .
The terracotta accent with oak floors is a vibe. Comparable palettes on Painting contractors st louis mo .
Thanks for the clear breakdown. More info at فیلتر هوا مناسب .
Just got fitted for dentures and couldn’t be happier with how everything went! Thank you # # anyKeyword###! Teeth Retainers
Fantastic insights into the intersection of local SEO and reputation management; it’s inspiring how well Webjuice integrates both aspects! SEO case studies
Great article! Local insights on finding an HVAC company make all the difference when you live in Fayetteville. HVAC company Fayetteville NC
Love how informative and practical your blog is when it comes to home upkeep—especially regarding gutters!! Gutter cleaning services Clare
The reminder to monitor toolbar PageSpeed vs. lab data is key. seo company alexandria as our seo company balanced both.
Just bought my hardwood floors from best flooring store houston in Houston, and I could not be happier with the outcome.
If you value craftsmanship, must try once. Custom contracting Cambridge—they have offer rates that are very fair. Check: Leadwork Cambridge
Count frequency could mirror probability. We linked counts in Ecommerce ERP consulting to velocity, significance, and beyond variance.
The nail artwork fashion list is spot on. I booked a Springfield salon I determined on nail services springfield to strive chrome.
Always ask about supplies included. I compare what’s provided on residential cleaning service .
I recently took my family to Family Chiropractic Puyallup, and it has made a significant difference in our overall health. The staff is incredibly knowledgeable and caring, making us feel comfortable throughout the process Puyallup chiropractor
Anyone comparing Hamilton roofing contractors should ask about warranties and ventilation. I found solid answers through skilled roofing experts in Hamilton .
Preventive preservation matters. Pairing it with onsite calibration from electronic calibration has lowered our line stoppages vastly.
I recently visited the best chiropractor in Puyallup, and my experience was fantastic! The staff was friendly, and the treatment really helped alleviate my back pain Puyallup Chiropractor
Would absolutely use ### anykeyword### again for future projects; their professionalism is unmatched! Professional roofers Surrey
The expertise provided by Utility locating company in underground utility locating is unparalleled—truly a lifesaver for construction teams!
This was a wonderful guide. Check out apply for debt consolidation personal loans for more.
Fantastic read! Learn more about oral health at Jacksonville, FL Dentist .
I like your emphasis on venting island sinks using AAVs where code permits. For inspections and installs, plumber near me can help.
For luxury cars in Warren, I always go enclosed with Warren auto shipping for peace of mind.
This was a fantastic resource. Check out contadores cerca de mí Saltillo for more.
Accurate payroll and revenue estimates support stay clear of audit surprises on GL and WC. Audit prep tick list: insurance adjuster services
Appreciate how you illustrated the integration between design aesthetics and functionality impacting rankings—I’ve noted similar points while reading through various sources like yours, including those over here: ### anyKeyWord### ! AI Consultant
This blog is a treasure trove of information on roof care—thank you so much! Cork roofing contractor
I just switched toothpaste brands based on recommendations from my dentist, and I’m loving it!!! Teeth Straightening
“After using my first professional tree service, I realized how much safer and better they are than DIY!” https://www.google.com/search?q=Maple+Grove+Tree+Service&ludocid=11372624080794905380&lsig=AB86z5VVcP-LvmE7y4RuNYfke-sk
Clear and practical. If your pilot light keeps going out, the crew at heating contractors near me can resolve it quickly.
The peace of mind that comes with an electric gate is unbeatable. It’s worth every penny! Turnstiles Rotherham
For first-time movers in Newport News, Local movers Newport News walks you through everything. Super helpful team.
“Has anyone had experience with accelerated orthodontic treatments offered by clinics around Livingstone?” ## Teeth Retainers
פוסט מעולה על Outreach. השתמשתי בסט אימיילים מוכן מ- סמכות דומיין ודרישות SEO וקיבלתי תגובות.
The paintings tasks kids convey house from preschool are at all times so colourful and complete of life! Love it! preschool aurora
Thanks for the helpful article. More like this at Gutter installation Cambridge .
Thanks for sharing rigging tips. We switched to coil turning machine tippers to avoid sling damage on coils.
Thanks for addressing men’s Botox needs. My experience: botox Greenville
Great communication on our siding timeline—Custom Contracting Roofing & Eavestrough Repair kept us updated. Details at affordable roofing contractors nearby .
Unblocking drains can be such a hassle. I recently used a professional service, and it made all the difference! Learn more at drain cleaning .
Appreciate the thorough analysis. For more, visit cash advances .
I love what you wrote regarding aesthetic considerations; finding balance while still caring adequately would be nice discovery around **Dunfermlines** practices!! # # anyKeyWord# Orthodontics
If you’re stuck with a plumbing dilemma in Lees Summit, definitely consult the experts listed at local sump pump specialists #!
Thermostat calibration makes a difference. If that fails, ac repair services van nuys ca can diagnose.
Photo catch at packout reduces disputes. We save images in SAP Amazon integration services and chargebacks dropped drastically.
This was beautifully organized. Discover more at fast Auto Glass Shop near 29302 .
I highly recommend the family dentistry services available at Orthodontics . They cater to all ages!
Storage remedies are essential! My brand-new pull-out shelves in my cabinet refinishing services cupboards have made company a lot easier!
This was quite informative. For more, visit pest control denver .
Interesting element approximately environmental chambers. We had ours calibrated onsite by using multimeter calibration service to account for precise load conditions.
Your tips on maintaining spinal health are fantastic! I’m definitely going to look for a Puyallup Chiropractor near me in Puyallup.
It’s essential to understand where your utilities are located before breaking ground! Thank you, Underground utility surveyor , for providing such critical services.
Thanks for the useful post. More like this at abogado penalista Vigo .
Great insights here! Thanks for sharing! Learn even more about oral health at dentist in Jacksonville, FL .
Thanks for the helpful article. More like this at Transporte privado Arzúa .
I like how you framed search intent buckets. seo company alexandria as an seo company validated our target clusters.
Cảm giác yên tâm khi biết rằng mình đã chọn đúng đơn vị như # anykeyword # cho dự án của mình. giá cả bạt lót hồ 2025
Any thoughts on the security includes provided by cloud server rental services in Bengaluru ? It’s an essential aspect for me.
Noticed fewer ingrown hairs after consistent treatments. I’ve shared why that happens on dermaplaning .
Great insights on hazard administration. Commercial insurance plan is crucial for shielding commercial belongings and continuity. I’ve shared same ideas right here: commercial insurance adjuster
Annars kan du alltid kolla recensioner online innan du väljer din # anyKeyWord#. elektriker in meiner nähe
This was a wonderful guide. Check out mold removal company for more.
Copper-middle pans warmness swift but will probably be finicky. The renovation assistance and logo comparisons on top cookware brands 2023 saved me from overspending.
I found this very interesting. Check out juicio laboral Sevilla for more.
Thanks for the useful post. More like this at Sanford NC auto glass offers .
I perpetually recommend best flooring company memphis to pals shopping for floor in Memphis on the grounds that they without a doubt care approximately visitor satisfaction.
”Excited about exploring energy-efficient upgrades available locally – could save so much over time!” HVAC company Tucson AZ
I appreciated this post. Check out abogado accidentes de tráfico Coruña for more.
For any residential work needed on roofs around Garfield, don’t forget to check local contractors! Roofing contractor
Packing optimization saves freight. Cartonization common sense in Ecommerce ERP consulting choices the preferable field to scale down DIM weight.
Love seeing how much emphasis modern dentistry places on patient comfort—it makes all the difference!! Cosmetic Dentistry
Thanks for discussing the relationship between branding and organic search results; explore more insights at AI SEO !
Thanks for the great tips. Discover more at title loans new orleans .
Just carried out a DIY mission with supplies from flooring company denver , and I couldn’t be happier with the way it turned out!
Color strategies constructed around WCAG 2.2+ are non-negotiable. Our theming on creative web design agency Bangalore automobile-exams contrast for each and every token pair.
Have you seen any creative uses for old manual gates transformed into electric ones? That would be cool to see! Automatic Sliding Gates Rotherham
Excellent reminder about inspection. With hydraulic coil upender we tip coils for quick underside checks.
For new patients entering this realm: What advice can seasoned veterans share regarding navigating through initial phases comfortably?” ## Orthodontics
Steam tray attachments are underrated. I came upon units that steam greens while cooking rice on electric rice makers and it’s been superb for weeknights.
Your guide to paint tools for crisp lines is excellent. I paired techniques from St louis painters .
Excellent information here! A good Injury chiropractor can really improve your quality of life, especially in Puyallup where options abound.
Great reminder that constant-running well pumps signal leaks or pressure tank issues. plumber near me services pressure switches and tanks for stable water systems.
Appreciate the comprehensive advice. For more, visit auto glass replacement .
Who knew that hair could cause such major problems in drains? Definitely keeping an eye on mine now—more tips at drain cleaning !
Is the worth distinction between Cookcell and Hexclad justified? Saw an straightforward dialogue at cookcell cookware vs hexclad cookware .
I’ve been searching for a reliable Puyallup Chiropractor in Puyallup, and your insights are super helpful! Thank you for sharing!
Seeing friendships blossom at some stage in this degree fills my coronary heart with joy; these connections created now will indubitably structure their social landscapes in advance !! ### anyKeyWord### preschool aurora
Great insights on Botox maintenance. I’ve shared my experience and more tips here Greenville, SC botox
Good call on ECM blower motors. Variable-speed ECMs can maintain airflow across changing static pressures and improve comfort. Upgrade benefits at heating contractors near me .
Just sharing thoughts after reflecting upon all things discussed surrounding potential discomfort levels experienced during treatments offered at nearby establishments situated across **Dunfermlines** regions!! # # anyKeyWord# Invisible Braces
This was beautifully organized. Discover more at title loans .
I had no idea that improper digging could lead to serious accidents. Thank you, Utility locating company , for raising awareness about the importance of utility locating!
If you’re in need of emergency dental care, definitely consider calling Teeth Retainers . They really know how to help!
Memory care transitions can be challenging. We situated a community with a smooth assisted living to memory treatment path by means of respite care .
ציינתם נכון: פרסום יתר עלול להיראות כזבל. אני בונה מערך קשרים אמיתי בהשראת שיפור סמכות אתר .
This was highly useful. For more, visit memory care .
Reliable Hamilton roofers are hard to find, but the crew booked through local expert roofers communicated clearly and finished on schedule.
This was very enlightening. More at Texas Dry Out & Restoration .
If you get metallic flavor firstly prepare dinner, simply re-season. I used troubleshooting steps on review of babish carbon steel wok and it vanished.
I wanted to determine if parchment liners hurt crispiness. My Crux liner tests with area-by-part samples: Crux Air Fryer review blog
Kitting BOM handle enables accuracy. We organize portion allocations in Warehouse management system consulting to avert partial equipment shortages.
“If you’re shopping for a specific thing extraordinary, examine out the trendy alternate options obtainable purely at best flooring company houston .”
Encouraging family video calls can combat loneliness between visits. in-home senior care services
Mọi thông tin đều rõ ràng và minh bạch tại trang web của # anykeyword#, thật dễ dàng để hiểu biết hơn về dịch vụ! cập nhật giá bạt lót hồ cá
Recommend booking an in-home estimate through Elgin Transport’s for accurate Elgin pricing.
Thanks for the valuable insights. More at windshield replacment .
This piece of writing will assist the internet users
for building up new blog or even a weblog from start to end.
Our neighborhood has greatly improved since we hired a regular tree service to maintain the trees. share.google
Have you ever thought about smart technology in your kitchen area? Incorporating it with your luxury vinyl flooring installation cabinets can boost both style and functionality.
The way you explain keyword cannibalization simplifies a complex topic—dive deeper into it @ # # anyKeyWord # # ! AI SEO
Love how friendly and welcoming my dental office is—it really makes a difference in the experience! Invisible Braces
Highly recommend Johns Creek apartment movers for local moves around Johns Creek—on time and careful with our furniture.
Appreciate the quality focus. The welds and bearings on coil tilting machine tippers are top-notch.
Appreciate the thorough write-up. Find more at fábrica de colchones en Albacete precios .
Experience and professionalism are top priorities when choosing local movers Severn. Severn movers
Love how electric gates can be customized to fit any style or home design! It makes them so unique! Gate Automation Rotherham
If you need insured and licensed movers, the Covington moving company listed on Covington apartment movers meets all requirements and delivers.
I bundled my motorcycle and sedan shipment from San Antonio using San Antonio auto transport companies and saved.
How often should I expect follow-up visits with an orthodontist if I live in Livingston? Orthodontics
If your building needs elevator pads, arrange it in advance. I got a reminder from Cheap movers Philadelphia and confirmed with my movers.
Amazing how many people don’t know the basics of drain maintenance! This is essential reading—more details at emergency drain unblocking .
Trial meals and activity visits were helpful. We scheduled both through contacts found on senior care .
Are there any amusing technological know-how experiments desirable for preschoolers that we will do at domicile to bolster what they may be gaining knowledge of? preschool aurora
Số lượng trò chơi phong phú tại 333win codes thật sự làm mình ấn tượng.
Đừng bỏ lỡ cơ hội chơi game tại nhà cái uy tín như ev88 nhé mọi người!
Cảm ơn nh88 vì những trải nghiệm tuyệt vời trong thời gian qua! Tham khảo thêm tại nhà cái nh88 .
Tôi đã thắng lớn nhờ vào fb88, đây chính là fb88 mà bạn không nên bỏ lỡ!
Mình thấy Sunwin có nhiều trò chơi thú vị, từ cá cược thể thao đến casino trực tuyến. sunwin 99 pro
Tôi mới tham gia SV38 và đã cảm thấy thích thú ngay lập tức với giao diện dễ sử dụng!!! ### anyKeyWord ## sv388tp uk com
Mọi thông tin trên kubet đều rõ ràng và minh bạch, rất đáng tin cậy.
88vv có nhiều trò chơi thú vị và tỉ lệ cược rất tốt, tôi rất thích!
Giao diện của hay88 rất thân thiện với người dùng. Đây chính là hay88 mà tôi yêu thích!
Mình rất mong g088 sẽ ra thêm nhiều trò chơi độc đáo hơn nữa, chờ đón hết mình luôn ! # # anyKe yword ## go88
Nhờ mọi người tư vấn về ev99.codes với!
Tôi hoàn toàn bị thuyết phục bởi độ tin cậy và chuyên nghiệp của nhà cái này – hãy cùng khám phá nào mọi người ơi !# anykeyword## hitclub99 tech
Love your focal point on continual advantage. We run weekly Kaizen by means of reviews from ERP for manufacturing near me to goal brief wins.
If you’re locked out late at night, mobile locksmith arrives fast and treats you well.
Excited yet anxious about starting phase one next week; knowing others have succeeded encourages me greatly from **Dunfermlines** experiences shared online!! # # anyKeyWord# Clear Braces
The follow-up care instructions given by the team at Clear Braces were very helpful after my procedure.
I requested real photos of the carrier’s truck based on advice from Paterson car moving companies in Paterson.
Nicely detailed. Discover more at Fence contractor High Ridge, MO .
Clear infection control practices are still vital in home care settings. home care for seniors
You’ve captured the essence perfectly, making it relatable for plenty—I savour your insight!! top-rated Auto Glass 29301
This was very enlightening. For more, visit windshield .
Nhiều người chơi đánh giá cao dịch vụ của ##anyKeyword#, bạn đã thử chưa? kèo nhà cái bg
Các bạn đã thử sunwin bg chưa? Mình thấy nó thực sự uy tín và an toàn! đăng ký sunwin
Các tính năng trên trang web cực kỳ thân thiện với người dùng!!!## anyKey word ## 79king 07 bg com
Cảm giác hồi hộp khi đặt cược trên trang web của 78Win BG thật khó tả, hãy thử cảm giác này nhé mọi người qua 78win bg !
Hệ thống bảo mật thông tin khách hàng của 33win bg khiến tôi hoàn toàn yên tâm khi tham gia cá cược online! 33win bg
Nhờ có kèo nhà cái bg , tôi đã có những chiến thắng bất ngờ với kèo nhà cái bg!
Tôi đã từng sợ việc cá cược online nhưng với sự tận tâm của nhân viên ở 8day bg tôi đã thay đổi suy nghĩ hoàn toàn! nhà cái 8day
Lời khuyên chân thành: hãy chọn go88 bg cho những ai mới bắt đầu cá cược online.
This was highly educational. For more, visit cash advances .
Thấy nhiều ý kiến tích cực về abc8 bg , nhưng vẫn băn khoăn quá!
Trong thời gian tới, chắc chắn tôi sẽ tiếp tục gắn bó với nhà cái uy tín này !!!## anyKeyWord ## mb66bg com
Helpful explanation of sewer gas odors from dried floor drains. Add water and a bit of mineral oil to slow evaporation. If odors persist, plumber near me can smoke-test the system.
Well explained. Discover more at contadores cerca de mí .
Excellent breakdown of hydronic air elimination. Spirovents and proper scoop placement reduce noise and corrosion. System diagrams at heating contractors near me .
שיפור יחס מענה במיילים עם A/B Testing: ניהול קישורים לפרויקטים
Jag vill gärna höra mer om smarta hem-lösningar från elektrikern! gängige elektriker kostene
I can’t thank Buffalo car shipping enough for making my car transport so simple. Buffalo car transport
Thanks for the useful suggestions. Discover more at pest control denver .
Thanks for the great explanation. Find more at assisted living .
Nicely detailed. Discover more at water damage restoration .
Đơn vị thi công bạt lót hồ cá nào cũng có ưu điểm riêng nhưng tại sao không chọn ngay # anykeyword #? giá cả bạt lót hồ 2025
ASN accuracy can pay dividends. We automobile-reconcile ASNs vs. receipts in Warehouse management system consulting to spot vendor problems.
Great article on automation. We integrated PLC-controlled tippers from coil turning machine with our line easily.
Regular home maintenance checks should be part of safety planning. in-home care services
Energy performance matters much more than individuals presume with jacuzzis. I switched over to a far better cover based on advice coming from hot tubs and also noticed a true drop in energy usage.
It’s refreshing to see phone shops offering trade-in programs that make updating easier and more inexpensive! If you’re considering one, take a look at the choices readily available at free phone !
Best practices highlighted bearing on taking away debris buildup preventing capability scratching/deterioration occurring through the years were spot-on!!! Definitely going money out the whole lot else purchasable by way of: **# # anykeyword**!!! auto glass replacement
The activities calendar matters more than we thought; assisted living helped us compare.
It’s refreshing to see such clear explanations of core web vitals and their impact on SEO; learn more at AI SEO !
This is quite enlightening. Check out discount auto glass in Sanford NC for more.
This was highly helpful. For more, visit فیلتر روغن حرفه ای .
“Just moved into my new home in Fayetteville and need help with my heating system—any suggestions?” HVAC Service Near Me
I’ve learned so much about oral health from my dentist. Education makes such a difference! Teeth Straightening
Appreciate the thorough analysis. For more, visit primera consulta gratuita Vigo .
The content promo checklist is solid. We had seo company alexandria as our seo company coordinate outreach and PR.
Painting interior doors is such a subtle upgrade. Inspiration board at House painter st louis .
Electric gates are a great investment for increasing property value. Do you have one at your home? Automatic Swing Gates Rotherham
Roof moss and leaks were ruining our curb appeal. Hamilton roof repair from massive 75% off discounts fixed it fast.
For those who’ve had multiple consultations searching before finding their ideal fit—what were major deciding factors influencing your choice?” ## Clear Braces
This is very insightful. Check out Cómo llegar a Arzúa en taxi for more.
Great reminder about identity theft protection. I added it after reading insurance agency .
Thanks for shedding light on such an important topic! Regular maintenance is key to avoiding expensive repairs later on. Read more at drain unblocking near me !
Awesome article! Discover more at https://maps.app.goo.gl/xaZDnQfwCSToKDKy9 .
For those thinking about an outside deck, what factors should we consider before starting? I discovered some terrific insights on this topic at replacement windows Neenah .
Backyard decks can genuinely change your outside location into a relaxing sanctuary. I have actually been thinking about including one to my home, and I found some wonderful resources on deck materials and layouts at deck builders
I liked this article. For additional info, visit quick unsecured personal loans .
Had wonderful experience receiving treatment firsth Invisible Braces
Finally came across the very best nitrous oxide cream charger vendor—thanks, Nitrous Oxide in cooking !
Excited about my progress in these New Westminster boxing classes—I can see improvements every week thanks to insights from ##anyKeyword#! Elite Private Boxing Coach Vancouver
Every parent should consider consulting an orthodontist by age 7, especially here in Dunfermline—great advice shared here! Teeth Retainers
Looking for motivation? Try joining a local boxing class in New Westminster—it’s an experience you won’t forget, especially with tips from At Home Boxing Coach Vancouver !
Nicely detailed. Discover more at S.M.A.C. Sevilla .
Have you ever tried shadowboxing before class starts? It’s such a great way to warm up—I learned this technique thanks to suggestions from Private Boxing Coach Vancouver #!
I’ve bookmarked this article—it’s full of valuable advice for hiring a Dallas moving company. Dallas moving company
I recently refurbished my kitchen area and made a decision to go with custom best cabinet refacing companies closets. The top quality is amazing, and they really transformed the area!
This was a great article. Check out expert gate repair Sexton for more.
The client assistance at Bangalore dedicated server rental services is top-notch! They actually help you establish whatever smoothly.
มีใครเคยประสบปัญหาการเบลอในขณะขับขี่กับรุ่นนี้ไหม ? #BT_PREMIUM## ร้าน ทํา ไฟหน้ารถยนต์ ใกล้ ฉัน
This was quite helpful. For more, visit windshield .
The reminder to reassess care plans monthly keeps services relevant. best senior care
מאוד מועיל! משתף כלי לבדיקת רלוונטיות נישתית: שיפור דירוגי גוגל
ศึกษาความคิดเห็นจากผู้ใช้งานจริงเพื่อประกอบการตัดสินใจ ### ร้านตั้งไฟหน้ารถยนต์ ใกล้ฉัน
Your discussion on variable refrigerant flow systems was insightful. VRF with heat recovery offers precise heating for multi-zone buildings. Design resources at heating contractors near me .
If you wish oven-protected nonstick, double-verify the bounds. I use top cookware brands 2023 to be certain which good rated cookware manufacturers can actually go to 500°F appropriately.
Cookcell’s tri-ply creation vs Hexclad’s hybrid floor—difficult name! Here’s a close evaluation: cookcell vs hexclad pros and cons .
Our water softener overflowed; plumber near me fixed a stuck brine float and checked the drain air gap for compliance.
Thanks for the thorough analysis. More info at carpet cleaning options nearby .
Thanks for comparing methods. coil upenders tipping is gentler than flipping with forklifts.
I enjoyed this post. For additional info, visit auto glass replacement .
Love experimenting with one-of-a-kind forms of lotions and sauces created with the aid of the use of nags!: ### anyKeyWord### nang delivery melbourne
Dịch vụ chăm sóc khách hàng cực kỳ chu đáo sẽ khiến bất kỳ ai cũng cảm thấy thoải mái khi mua sắm ở đây! giá cả bạt lót hồ 2025
Tree cabling sounds complex—thanks for simplifying it with your explanations! https://www.google.com/maps/place/?q=place_id:ChIJofh3uiI3s1IRJGvVw1it050
If you cook jasmine or basmati routinely, you’ll want adjustable settings. I realized a great deal from the roundup on best budget rice makers approximately which units manage distinctive grains finest.
For anybody taking care of gloomy water, don’t panic. An easy addressing flowchart coming from hot tubs walked me by means of clarifying it in one evening.
Just achieved reading a Babish Carbon Steel Wok assessment and I’m satisfied it’s ideally suited for prime-warmness stir-fries. I’ll compare small print with babish steel wok insights beforehand deciding to buy.
This was highly educational. More at windshield replacment .
“Really enjoyed working with one of the top Roofing Companies In Garfield—they made everything so easy!” https://www.google.com/search?q=Royal-Roofing+%26+Exteriors&ludocid=2012518138494101810&lsig=AB86z5VT5eYay9sylHez8TygFql-
Excellent tips here! Homeowners in Tucson should definitely consider having their HVAC systems checked by a professional regularly. HVAC contractor Tucson AZ
Curious about Pleasanton estate taxes? Ralph Hurtado realtor near me explains the data.
Personalized exercise routines can improve balance and confidence at home. senior home care assistance
Loved the recipe pointers! I created a Crux-best weekly meal plan with time and temp charts: Crux Air Fryer specifications
Can’t accept as true with how comfortable the manner was once with Nangs Delivery Melbourne ! Highly advise their provider.
I am really loving the theme/design of your
website. Do you ever run into any browser compatibility
problems? A small number of my blog audience have complained about my blog not operating correctly in Explorer but looks
great in Opera. Do you have any tips to help fix this problem?
Thanks for the helpful advice. Discover more at local Auto Glass Shop near 29316 .
The deductible vs premium trade-off is explained well. I ran scenarios on insurance agency Rochester Hills .
Jag letar efter en pålitlig elektriker für haushalte i Stockholm, har ni några rekommendationer?
I enjoyed this read. For more, visit respite care .
My parents care about cultural programs; assisted living showed how to evaluate that.
סקירה חזקה! רשימת אתרי גסט-פוסט מאושרת: קישורים לדירוג עסקים .
Nếu bạn nghi ngờ website giả mạo ngân hàng, hãy gõ tay địa chỉ chính thức, không click link trong email. Danh sách domain chuẩn cập nhật ở Empty anchor .
Fantastic post! Discover more at windshield replacment .
Clear boundaries and expectations matter. home care provided a template care agreement that helped us align.
Roof moss and leaks were ruining our curb appeal. Hamilton roof repair from trusted roofing contractors in Hamilton fixed it fast.
Thanks for the thorough article. Find more at auto glass repair and replacement Greensboro .
Appreciate the thorough insights. For more, visit cheap car rental toronto .
Simple, actionable advice. For duct balancing and damper setup, heating contractors near me made every room cozy.
Trapped moisture in wall cavities is common. commercial water damage restoration used injection drying to resolve it.
Thanks for the great explanation. Find more at despacho contable Saltillo .
Nếu bạn muốn có một cái nhìn tổng quát về dịch vụ này thì đừng ngần ngại ghé thăm# anykeyword# nhé! mua bạt lót hồ nuôi cá giá tốt
Trước khi báo cáo nội dung nhạy cảm, hãy đảm bảo an toàn số cho thiết bị. Quy trình quét mã độc và sao lưu an toàn xem tại lộ info gái bán dâm .
We had a sudden main break at the curb; plumber near me coordinated with the utility, installed a new curb stop, and restored service quickly.
The moody green library is perfection—rich and sophisticated. Similar shades on House painter st louis .
Cabinet refacing has completely altered the look of my shower room! It was an affordable and fast solution. I located some important advice on cabinet painting near me that I assume others would gain from also!
Winter months soaking ideas were actually spot-on. I discovered correct protection and also antifreeze preventative measures coming from hot tubs supplies and my bathtub endures icy temps just great.
Very useful post. For similar content, visit dementia care .
Cộng đồng mạng cần chung tay chặn đứng website độc hại. Danh mục công cụ chặn và mẫu báo cáo chuẩn mình tìm thấy tại TikTok thách thức 18+ .
Nhiều shop online rao bán vật dụng cải tạo thành vũ khí. Cách phân biệt trang hợp pháp và bất hợp pháp xem chi tiết tại sex bạo lực .
Appreciate the helpful advice. For more, visit windshield replacment .
Historic homes in Pleasanton—maintenance advice and disadvantages on Realtor Pleasanton .
Great job! Discover more at comprar colchones cómodos en Albacete .
I love how convenient nang delivery melbourne makes it to get Nang Tanks delivered right to your door.
Flexible dining hours were important for us. We filtered for open dining models on senior care .
Roof bacteria can spread to siding. We called spring roof cleaning services for Roof Cleaning | Space City Washing and more.
Intentional whitespace and beneficiant line-heights are again. We tuned readability scales on affordable web design services in Bangalore across breakpoints.
I’m continually on the search for ways to enhance my desserts, and cream chargers are undoubtedly supporting! N2O usage
This was quite informative. For more, visit windshield .
Telehealth options are a game-changer; browse virtual services via Drug Recovery .
Nếu bạn nghi ngờ website giả mạo ngân hàng, hãy gõ tay địa chỉ chính thức, không click link trong email. Danh sách domain chuẩn cập nhật ở đi tù jmppnet .
“Highly recommend keeping up with seasonal maintenance—it makes such a difference!” HVAC company Fayetteville NC
Appreciate the comprehensive advice. For more, visit abogado herencias Vigo .
Cộng đồng mạng cần chung tay chặn đứng website độc hại. Danh mục công cụ chặn và mẫu báo cáo chuẩn mình tìm thấy tại booking gái .
שיתופי פעולה עם בלוגים בתחום באמת עובדים. אני מאתר בלוגים מתאימים עם פילטרים של ניהול קישורים לפרויקטים .
Thanks for the thorough article. Find more at Mejor taxi en Arzúa .
Tôi đã thắng lớn nhờ vào kubet careers , cảm ơn nhà cái uy tín này!
Một trong những điểm mạnh nhất mà họ mang lại chính là khả năng tổ chức các giải đấu cực kỳ chuyên nghiệp và hấp dẫn ! Tìm hiểu bổ sung Ở ## nh88
They used eco-conscious solutions and kept pets safe. Thanks, best pressure washing offers Deerfield Beach .
Q 888 cũng thường xuyên tổ chức các giải đấu hấp dẫn với phần thưởng lớn , mọi người hãy tham gia ngay.# # 任何关键词 qh88
Hãy cùng nhau khám phá thế giới cá cược tại ###yourSite### đăng ký ev88
Ai có thể cho tôi biết cách thức đăng ký nhanh nhất cho => ev99
Cám ơn vì tất cả thông tin hữu ích về cách chơi và kinh nghiệm ở SV38 nhé!!!! ### anyKeyWord ## sv388
Trải nghiệm chơi game tuyệt vời mà tôi chưa từng thấy trước đây chính là từ ### anything key ! 333win codes
Có ai từng tham gia chương trình VIP của go88 chưa? Có gì đặc biệt không? go88
Đừng bỏ lỡ cơ hội nhận những phần thưởng lớn khi tham gia cá cược tại Fb8822 nhé ! # # anyKeyWord ## fb88 beauty
Hay88 có nhiều chương trình khuyến mãi hấp dẫn, hãy tham gia ngay để không bỏ lỡ nhé! nhà cái hay88
Các chương trình khuyến mãi liên tục được cập nhật giúp tăng cường thêm sức hấp dẫn cho người chơi ! 88vv
Tôi đã nghe danh tiếng của sunwin từ lâu rồi, giờ mới tìm hiểu kỹ càng!!! sunwin99.pro
Luôn nhớ rằng việc quản lý tài chính thông minh là chìa khóa để thành công khi cá độ ở hi tclb # anykeyword ## hitclub
Valuable information! Find more at auto glass replacement .
The page experience tips are actionable. Our seo company seo company alexandria handled layout shifts and improved metrics.
This was a great article. Check out High Ridge fence contractors for more.
This reminds me to schedule my annual tree inspection; thanks for the nudge! Maple Grove Tree Service
The community requires more awareness around addiction treatment– great job discussing it here and discussing Nasha Mukti Kendra in Noida! Nasha Mukti Kendra in Noida
Awesome article! Discover more at best auto glass prices in Sanford .
The sheen guide is super helpful. We had interior painting services use satin in high-traffic areas and it’s perfect.
I’ve been debating between Cookcell and Hexclad for my subsequent skillet—any individual have feel with each? Found a splendid comparability at cookcell cookware vs hexclad cookware .
The list you shared is place on. We used a comparable list from senior living to review areas prior to committing.
Hydrotherapy has actually been actually a game-changer for my aching muscular tissues. I discovered a novice’s guide to jet positioning and also massage areas on hot tubs supplies that really assisted.
Your attention to filter reminders is smart. Wi-Fi thermostats can automate filter change alerts based on runtime. Setup help at heating contractors near me .
Love the aspect about even heating. I’ve observed a few manufacturers excel with cladding thickness. best cookware brands has facet-by means of-facet charts that helped me pick out the properly pan.
Smart advice on using moisture sensors in crawlspaces and under sinks. Early alerts save money. emergency plumber integrates smart valves with app notifications.
I found this very helpful. For additional info, visit abogado laboral Santiago .
Replacement components and guaranty reinforce are underrated. I checked service files with the aid of affordable rice makers formerly deciding to buy and it paid off.
Communication is key. I’ve had proactive updates during Detroit car transport from Detroit Auto Transport’s .
This was quite informative. For more, visit aislamiento térmico y acústico aluminio .
Home staging hints that work in Pleasanton are outlined on realtor near me .
If you get steel taste at the beginning prepare dinner, just re-season. I used troubleshooting steps on carbon steel wok by babish review and it vanished.
Kan någon ge mig råd om hur man prutar med sin # anyKeyword# ? beste elektriker
For quick Hamilton roof repair after wind damage, I recommend getting a free estimate via best spots in Hamilton .
For instant hot water issues, our recirculating pump had failed. plumber near me replaced the pump, added a timer, and insulated the hot water lines.
This was nicely structured. Discover more at auto glass .
Great job! Find more at quick cracked windshield repair in Hickory .
อยากบอกว่าทุกคนต้องมาเช็คอินกันสักครั้งหนึ่งนะคะ # # anyKeyWord## ร้านอาหารสาย1 รับจัดเลี้ยง
Appreciate the great suggestions. For more, visit professional windshield replacement shop near 29316 .
רשימת בדיקה לפני פרסום מאמר אורח וקבלת קישור: קישורים לסמכות דומיין
The footprint at the counter is good, however wire length subjects too. I indexed measurements and storage counsel: Crux Air Fryer user feedback
I felt confident using Yonkers car shipping after reading all the great reviews. Yonkers car shipping
This was a fantastic read. Check out respite care for more.
This was highly helpful. For more, visit خدمات ارسال پیام انبوه در واتس اپ .
“Fantastic work done on my roof; can’t recommend this local business enough!” Roofing Experts Garfield NJ
Is it better to go with local or national HVAC companies in Tucson AZ? Would love your thoughts! HVAC company Tucson AZ
Fort Myers sellers, if you value speed and cash on hand, sell my junk car for cash Fort Myers FL is worth it.
เรื่องเสียงเวลาขับรถด้วยไฟหน้า LED เป็นอย่างไรบ้าง ? #BT_PREMIUM## ร้าน ซ่อมไฟรถยนต์ ใกล้ ฉัน
Thanks for the useful post. More like this at Greensboro car window specialists .
Finding peace amidst chaos isn’t impossible; equip yourself knowledge necessary moving forward confidently thanks variety offered @# anykeyword ##### Partnership Agreement Lawyer in Maryland
This was very enlightening. For more, visit Santorini luxury villas for sale .
The staircase paint detail took the space to another level! Similar ideas on Painting contractors st louis mo .
Moving into an older home, I had locksmith assess all locks—great inspection and recommendations.
Đừng chia sẻ link khiêu dâm không rõ nguồn gốc, nhiều trang gài mã độc và đánh cắp dữ liệu. Xem danh sách dấu hiệu nhận diện ở đọc clip sex mới nhất .
Chemical substitutes cost checking out. I started using a mineral refinery suggested on hot tubs winnipeg as well as my skin layer really feels way much better after each saturate.
I found this very helpful. For additional info, visit dementia care .
אחלה זווית על קישורים מאירועים וכנסים. צ’ק-ליסט פנייה: קישורים לדירוגים בפרויקטים .
I was shocked by how fast the setup was with my new server from custom server rentals Bangalore #!
Learned the way to win a Pleasanton assorted-provide problem from Ralph Hurtado real estate agent pleasanton .
Ah, the allure of lottery strategies and the myths that swirl around them – I’ve lost count of the times someone’s shared a “guaranteed win” system. Here’s the hard truth: the math doesn’t lie https://sticky-wiki.win/index.php/What_Does_%27Smart_Participation%27_in_the_Lottery_Mean%3F
1. Look, I’ve been on the hunt for a good gaming table for months now, and this post really helped clear things up https://alpha-wiki.win/index.php/How_a_Minimalist_Gaming_Dining_Table_Turned_a_400_sq_ft_Loft_Into_a_Game-First_Living_Space
This was very beneficial. For more, visit constitución de sociedades Saltillo .
I’ve been through the usual suspects in AI writing tools—some promising, most overhyped. In the US market, there’s definitely a surge in tools claiming to replace or massively boost writers, but the reality? It’s a mixed bag Click for more
Appreciate the insightful article. Find more at cheap car rental toronto .
1. Wow, this post really explains telematics insurance well! As a young driver, I’m curious—does one episode of hard braking drastically drop your score, or is it more about overall driving patterns?
2 https://romeo-wiki.win/index.php/That_moment_you_unplug_the_black_box:_Admiral_vs_Zego_%E2%80%94_what_really_happens
Mọi người cẩn thận website giả mạo đang lan tràn, hãy kiểm tra nguồn trước khi nhấp vào liên kết. Tham khảo thêm tại jmppnet để biết cách nhận diện dấu hiệu lừa đảo.
Oh, I love diving into fan discussions about Yuko Inaba in JP—they’re such a treasure trove! What fascinates me is how fans don’t just focus on her standout roles but often connect her subtle acting nuances across different dramas and films さらに助けを求める
Customer service at Austin auto transport was responsive throughout my Austin shipment.
ศึกษาความคิดเห็นจากผู้ใช้งานจริงเพื่อประกอบการตัดสินใจ ### หลอด ไฟ ซีนอน
I value exactly how you emphasized safety and security and dignity in senior treatment. We have actually had a positive experience with assisted living for tailored assisted living services.
Your claims process guide is excellent. I followed a similar step-by-step from insurance agency Rochester Hills .
I liked that Local movers Greensboro used floor runners and door jamb protectors—no damage deposit issues.
Love the before/after photos. If you need that level of work, effective water damage mitigation is worth a call.
Appreciate the thorough insights. For more, visit Sexton Fence installation reviews .
Roof moss and leaks were ruining our curb appeal. Hamilton roof repair from experienced trusted roofers fixed it fast.
Thanks for the valuable article. More at separaciones y divorcios Vigo .
Anyone else super motivated by their progress in these New Westminster boxing sessions? Share your experiences or check out tips on Private Boxing For Self Defense Vancouver #!
Nicely done! Find more at Taxi inmediato Arzúa .
Roof streaks can lower home value. spring cleaning roof washing provides Roof Cleaning | Space City Washing to restore the look.
Thanks for the valuable insights. More at jak zostać kosmetologiem .
Our SUV shipped from Chicago during a busy week— Chicago auto transport still found a spot.
You’ve made me rethink how I approach my yard’s landscaping! https://share.google/baoUfDag2Pokca0pH
Being part of this vibrant community makes every session worthwhile; looking forward to meeting more enthusiasts through connections made at Private Boxing Lessons Burnaby #!
Jag vill gärna höra mer om smarta hem-lösningar från elektrikern! elektriker dienstleistungen
תודה, למדתי הרבה. למי שצריך ליישם, ממליץ על קישורים לSEO בגוגל .
Fantastic lawn design suggestions! If you’re preparing a hot tub system and need to have motivation for actions, covers, or even lights, hot tubs possesses some strong alternatives.
Well explained. Discover more at assisted living .
They removed algae from my fence and it looks new. Try power washing solutions Deerfield Beach .
Found a bonded and insured transporter to GR after sifting through reviews on Grand Rapids car shipping .
Technology like medication reminders and fall alerts can extend independence at home. elderly home care
Nice callout on rural access. For outskirts of El Paso, El Paso auto transport coordinated a nearby meeting point.
Nicely done! Find more at tipos de colchones en Albacete .
Microcopy and tone systems are finally being taken care of as design. We rolled conversational hints throughout Arkido web services features varieties and of entirety premiums expanded.
New to Pleasanton HOAs? Realtor Pleasanton explains expenditures and ideas certainly.
The “urge surfing” explanation is clear; audio practice at Opioid Recovery .
I appreciated this post. Check out local 29305 Auto Glass services for more.
Small wins matter. I track them with a habit tracker from Opioid Addiction Recovery .
Divorce doesn’t mean end ; instead embrace newfound opportunities available just waiting be uncovered alongside guiding light provided via # anykeyword ##### Partnership Agreement Lawyer in Maryland
I appreciated this post. Check out local windshield replacement Hickory for more.
1. Look, I’ve been on the hunt for the perfect gaming table for months, and this post just gave me so many ideas! Quick question though—does the felt top stain easily? I love snacks and drinks while gaming, and I want something that’s easy to maintain https://zenwriting.net/aspaidbajz/the-complete-guide-to-choosing-a-gaming-table-for-8-players
The post on painting aluminum siding was helpful. high-quality interior painter prepped and coated it beautifully.
“It’s been hard finding honest pricing from some of these big-name chains; I prefer local options!” HVAC company Fayetteville NC
1. Look, as a young driver, I’m super curious—does braking hard just one time totally wreck your telematics score? Or is it more about consistent bad habits? Would love some clarity!
2 telematics insurance for over 25s
This was a wonderful post. Check out mold removal Indianapolis IN for more.
Having spent a fair share of time testing various AI writing tools in the US market, here’s the straight talk: most of them promise the moon but deliver a haircut at best https://ameblo.jp/edwinfpae513/entry-12949348939.html
I love diving into lottery chatter because it’s a perfect storm of hope, myth, and math. The harsh truth? No strategy can beat the incredibly steep odds baked into U.S. lotteries Click here
Thank you for highlighting the resources readily available for addiction healing! I’m bookmarking Nasha Mukti Kendra in Noida for referral.
Helpful suggestions! For more, visit procedimientos judiciales Santiago .
Il est rare de trouver un tel niveau de compétence en électronique : merci, bureau d’étude électronique Lyon !
If you’re taken with a zoning device, air conditioning service in Murrysville can layout it perfect.
Regular communication between care coordinators and family builds trust. in-home senior care
I didn’t realize credit affected premiums. insurance agency near me explains scoring impacts clearly.
I found this very interesting. Check out doble acristalamiento Climalit for more.
Love to cook and desire the absolute best sear? Find out if Cookcell or Hexclad is most advantageous in this assessment: cookcell vs hexclad cost .
Your guidelines on seasonal protection for car glass are spot-on—I can’t wait to dive deeper into supplies like the ones chanced on at Greensboro glass repair !
Good note on storm vs. sanitary sewer separation. Never connect sump discharge to sanitary lines. plumber near me can correct improper tie-ins.
I love diving into fan discussions about Yuko Inaba in Japan because they often reveal such a rich appreciation for her range beyond the typical spotlight roles! What’s fascinating is how fans highlight her subtle expressions in dramas like “Nigeru wa 稲葉優子が所属するTABプロダクション
Need help comparing HOA amenities? trusted realtor Cape Coral breaks down Cape Coral community benefits.
Transparent move-in fees are appreciated. assisted living allowed us to see deposits and community fees upfront.
Copper-core pans heat fast however is also finicky. The repairs counsel and manufacturer comparisons on cookware brand reviews kept me from overspending.
הזכרתם Social Proof – זה קריטי. מדריך הטמעה ב- סמכות דומיין ודרישות SEO .
I had themes with condensation dripping. Models with stronger lids had been highlighted on optimal rice cooking machines and glued that downside for me.
Nicely done! Find more at mold removal near me .
Your take on color zoning for open-plan living is helpful. Layout ideas on St louis painters .
Winter months soaking suggestions were actually spot-on. I learned about appropriate insulation and antifreeze safety measures coming from hot tubs winnipeg and also my bathtub makes it through freezing temps merely alright.
Excellent recommendations regarding ensuring all paperwork filled out correctly before submitting claims being vital step ensuring prompt processing afterward thereby avoiding unnecessary delays arising from inaccuracies leading up toward approvals Work Injury Lawyer
I scheduled coil and blower cleaning through an HVAC contractor Houston, TX listed on hvac installation .
If you desire ductwork inspection in Fayetteville, AR, deliver heating contractor a look.
I measured excellent skill utilizing water displacement for the Crux basket—numbers and charts: best Crux Air Fryer options
Les petits pas vers le changement font toute la différence ; je suis convaincu grâce à vous! coaching développement personnel
Bridge loans for purchasing in Pleasanton ahead of promoting—files on real estate agent pleasanton .
Thank you for outlining the differences between companion and personal care. senior care
For quick Hamilton roof repair after wind damage, I recommend getting a free estimate via cost of roofing materials for replacement .
I’ve heard blended critiques about soreness all the way through the technique. What’s your tackle it? Best laser hair removal Scottsdale
ที่ OMG OneMoreGlass มีโปรโมชั่นสำหรับนักศึกษาไหม? อยากรู้จัง! ร้านเหล้าบรรยากาศดี สาย1
Appreciate the thorough information. For more, visit rent a car .
Very helpful read. For similar content, visit Absolute Restoration .
Every situation is unique; ensure your legal representation aligns with your needs by exploring options at # family lawyer in maryland # today!
แนะนำร้านที่ขายไฟหน้ารถ LED คุณภาพดีหน่อยครับ ร้านแต่งไฟรถยนต์ ใกล้ ฉัน
Vilka typer av tjänster erbjuder de olika # anyKeyword# här i Stockholm? gewerbliche elektriker
Thanks for the informative content. More at https://www.google.com/maps/dir/H2O+Pros+Water+Damage+Restoration+Services+LLC,+250+S+Venoy+Rd,+Westland,+MI+48186,+United+States/911+Restoration+of+Metro+Detroit,+7757+Ronda+Dr,+Canton+Township,+MI+48187,+United+States/@42.325829,-83.4298862,5147m/data=!3m1!1e3!4m14!4m13!1m5!1m1!1s0x883b4d627bc21555:0xb7a7689b2dc86bea!2m2!1d-83.3659944!2d42.3088184!1m5!1m1!1s0x883b4d7664df9511:0x81f90f5f8b08dff0!2m2!1d-83.453222!2d42.3419341!3e0!5m1!1e3?entry=ttu&g_ep=EgoyMDI1MTEyMy4xIKXMDSoASAFQAw%3D%3D .
אופטימיזציה של Anchor Text הוסברה נהדר. כלי בדיקה מצוינים ב- קישורים איכותיים לכמה אתרים .
Care plans tailored to each senior’s routines make such a difference in overall well-being. in-home care
Thanks for tackling replacement cost vs ACV. I switched to RC after reading insurance agency .
It’s refreshing to see such competitive prices from local companies like Bengaluru IT server rental services #.
C’est agréable de voir un bureau d’étude aussi passionné par son métier comme sur bureau d’étude électronique Lyon .
Just had some minor repairs done and the local team was fantastic – highly recommend them! https://www.google.com/search?q=Royal-Roofing+%26+Exteriors&ludocid=2012518138494101810&lsig=AB86z5VT5eYay9sylHez8TygFql-
“Great point about how dense foliage can affect light availability—it highlights the importance of proper trimming techniques.” share.google
Winter saturating recommendations were spot-on. I learnt more about appropriate insulation and antifreeze precautions coming from hot tubs winnipeg and also my bathtub endures icy heat levels just great.
This was very well put together. Discover more at abogado en Vigo .
This was highly educational. More at Taxi rural Arzúa .
I just had my AC serviced by an HVAC company in Tucson AZ, and they did an amazing job! HVAC repair
I absolutely love the liberty from shaving that includes laser hair removal! Highly endorse it! Full body laser hair removal Scottsdale
How to get ready for Pleasanton domicile inspections—list on real estate agent in pleasanton .
This is quite enlightening. Check out trusted 29301 Auto Glass for more.
For condo associations, coordinated vendor access helps. top water damage restoration Sarasota worked seamlessly with ours.
Encouraging daily outdoor time, even briefly, can lift mood and sleep quality. home care
This was a great article. Check out jak wybrać gabinet kosmetyczny for more.
This was quite enlightening. Check out quick car window replacements near me for more.
My service dog now performs deep pressure therapy on cue, grounding me during flashbacks; the calm it brings is real, and I recommend training tips from Robinson .
On airflow direction, I learned that placing a fence parallel to the discharge side helps prevent recirculation of hot air. affordable fencing services High Ridge
Votre vision du succès va au-delà des simples résultats; elle inspire une vraie réflexion intérieure! coaching personnel
ไฟหน้าโปรเจคเตอร์ช่วยให้การเดินทางในคืนฝนตกสะดวกมากขึ้น ไฟหน้า
Nicely done! Find more at asistencia legal urgente Santiago .
יופי של ניתוח. קישורים עבור פרויקטים יודעים לשלב תוכן וקישורים באותה נשימה.
If you care approximately eco-friendly production, this text compares Cookcell and Hexclad’s practices: cookcell cookware vs hexclad cookware .
Loved the journaling prompts; more prompts at Opioid Addiction Recovery .
Therapy plus peer support was my formula. I connected to both using Opioid Addiction Recovery .
Great caution about using too much pressure. soft wash roof cleaning near me sticks to soft wash Roof Cleaning | Space City Washing.
Anyone comparing Hamilton roofing contractors should ask about warranties and ventilation. I found solid answers through trusted Hamilton roofers .
Your diagnosis of rating explanations different to Brisbane turned into enlightening! I found related insights at SEO agency Brisbane .
Steam tray attachments are underrated. I determined types that steam veggies at the same time cooking rice on high-quality rice makers and it’s been extremely good for weeknights.
Ceramic nonstick is state-of-the-art but inconsistent. Before shopping for, I checked heat limits and genuine cleaning outcomes on highly rated cookware brands and it changed my shortlist.
Wonderful tips! Discover more at cerramientos de aluminio A Coruña .
For shaping the lower abdomen, this explains options: non-surgical liposuction
Great insights! Find more at 24 hour auto glass Greensboro .
Love the reminder to involve seniors in decision-making about their care. senior caregiver
Oil stains on my driveway finally gone! Thanks to the team at commercial power washing experts .
Curious whether or not clinics be offering applications perfect namely tailored toward entertaining demands/personal tastes given distinctive customers bases existing at this time???# # any Keyword ## Best laser hair removal Scottsdale
Navigating alimony discussions? Don’t go it alone; find expert insights via # Divorce Lawyer in Maryland # that will prepare you well!
Local expertise matters! That’s why I chose orange county estate planning attorney for my family’s estate plan.
Appreciate the comprehensive advice. For more, visit mejor tienda de colchones .
Your explanation of guaranteed issue periods helped me decide. More details at insurance agency Rochester Hills .
It’s heartening to see such dedicated centers like Nasha Mukti Kendra in Noida concentrating on recovery! Nasha Mukti Kendra in Noida
Spray vs. roll comparisons are useful. I realized when to settle upon each from quality painting services for the high-quality conclude.
Everyone need to try out making a specific thing amazing simply by nags a minimum of as soon as– it be life-changing!: ### anyKeyWord### nang delivery melbourne
Hosting close friends around the hot tub is the best. I discovered some imaginative lighting and personal privacy display screen suggestions on hot tubs winnipeg that made my outdoor patio believe that a health spas.
Looking for a pet-friendly HOA? highly recommended realtor Cape Coral matches you with the right Cape Coral communities.
Providing statistics surrounding prevalence rates among specific sectors adds credibility while reinforcing urgency tackling such issues head-on effectively captured within this piece overall too !## anykeyword ## Atlanta Workers Compensation Lawyer
Chaque projet devient une réussite avec l’aide de # anyKeyWord# ! entreprise electronique lyon
New to Pleasanton HOAs? Ralph Hurtado in pleasanton explains expenditures and suggestions definitely.
Transparent pricing and no surprises from hvac maintenance . Trusted in Murrysville, PA.
The post on painting near tile backsplashes helped a lot. top-rated interior painter Cape Coral protected surfaces and edges.
Is there a particular time of year that’s best for scheduling HVAC maintenance in Fayetteville? HVAC contractor Fayetteville NC
The checklist for bathroom remodels is helpful. nearest plumbing contractor coordinated permits and rough-ins flawlessly.
Protect what matters most by starting your journey through ## Laguna Niguel estate planning attorney
Customer carrier topics— quality Sanford Auto Glass stored me up-to-date with texts and ETA monitoring.
Thanks for the thorough analysis. More info at lipoliza iniekcyjna a odchudzanie .
Recovery is a lifestyle—a journey, not a destination. Tools that help: Drug Recovery .
Clear boundaries around finances protect both seniors and caregivers. senior caregiver
Planning a birthday party? Check out # # anyKeyword # # to your nang demands! Nangs Delivery Melbourne
טיפ חכם על שילוב נתונים מקוריים. יש רעיונות לאיסוף נתונים ב- קישורים להצלחה בקידום אורגני .
Jag finner alltid inspiration när jag läser om elarbeten utförda av proffsiga elektriker service .
Residence cleaning can be such a trouble. I discovered the ideal solution in Mesa AZ by means of house cleaning services . Their group is fantastic!
Love their data-driven strategy. If you remain in Brisbane, try Jason Suli Digital Advertising. Web link: SEO company Brisbane .
Love listening to feedback on the topic of group of workers studies too; friendly carrier is going a long means toward constructing consider correct off bat!! # # any Keyword ## Laser hair removal for men Scottsdale
I love supporting local businesses like my favorite tree service—they know their stuff! Maple Grove Tree Service
Les petits pas vers le changement font toute la différence ; je suis convaincu grâce à vous! coaching personnel
My service dog learned to push my wheelchair footplates up when I forget, preventing trips; thanks to Robinson dog training techniques .
Our warmness exchanger inspection in Fayetteville turned into treated by a seasoned from hvac installation .
When someone writes an article he/she keeps the image of a user in his/her brain that how a user can understand it.
So that’s why this paragraph is outstdanding. Thanks!
Thanks for the helpful article. More like this at Transporte de mochilas Arzúa .
This was highly helpful. For more, visit abogado accidentes de tráfico Vigo .
Just had a tune-up scheduled—HVAC contractor Houston, TX recommendations on heater installation were spot on.
Your insights into contractor insurance are valuable. I verified subcontractor COIs with State Farm Insurance Agent .
Hosting friends around the hot tub is the most ideal. I located some innovative lights and also personal privacy monitor concepts on hot tubs supplies that made my patio area think that a health facility.
I had no idea how much a good gutter system could impact a home’s value! Great article—check out rainwater harvesting system for more insights!
I’ve found out so many new flavors by means of nang delivery functions as of late—loving all of the thoughts the following in Melbourne! nang delivery melbourne
Very helpful read. For similar content, visit car rental .
I recently employed a home cleaning company in Mesa AZ, and it made such a distinction! Extremely recommend having a look at house cleaning Mesa for superb choices.
נקודה חשובה על רלוונטיות דף-לדף. ולולינקס עוזר בגשרים נושאיים, ותיעוד ב- קישורים איכותיים לכמה אתרים .
I appreciate the evidence-based approach; see options through Alcohol Recovery .
Well explained. Discover more at wodorowe zabiegi pielęgnacyjne .
Exercise is my new outlet. I followed beginner plans I discovered on Drug Recovery .
“Do you think it’s worth investing more upfront for better energy-efficient units?” HVAC contractor
The warranty policies are awfully numerous for Cookcell vs Hexclad—read the details at cookcell vs hexclad pros and cons previously picking!
Curious about Pleasanton belongings taxes? Ralph Hurtado real estate agent pleasanton explains the data.
Big shoutout to local Hamilton roofers who actually show up on time and clean up properly. If you need a roof repair, try trusted roofers in your area .
Thankful lucky reside midst bright communities stuffed passionate people devoted uplift one another riding certain alternate contributing society editing lives lived day by day celebrating diversity honoring differences cherishing similarities forging SEO agency Brisbane
Thanks for the great information. More at procedimientos judiciales Santiago .
Anyone else obsessed on Mr Cream Chargers? They make all the pieces taste more effective! Nangs Delivery Melbourne
What should I look for when choosing a roofing company in Garfield, NJ? Roofing contractor
La qualité du service client chez entreprise electronique lyon est vraiment exemplaire!
Love that there’s always an opportunity to ask questions after class; having access resources like those available through this platform helps tremendously via guidance posted there. Private Boxing Lessons New Westminster
Great submit! How by and large needs to one schedule their laser hair elimination options? Full body laser hair removal Scottsdale
Anyone else warfare with delicate brown rice? The tricks at electric rice makers led me to a cooker with a strong brown rice program, and the distinction is big.
Customer service could make or ruin a cookware buy. I study person-mentioned guaranty reports on highly rated cookware brands prior to selecting my company.
This was highly educational. For more, visit personal loans .
”Together we’ll build informed decisions moving forward after gathering insights!” HVAC company Tucson AZ
The cardio you get from boxing is incredible—perfect for those looking to get fit in Metro Vancouver! More info at private boxing lessons .
I’ve learned so much concerning the signs of pipes concerns simply from reviewing your blog! It’s essential to resolve leaks and drips immediately plumber near me
Finding balance between cardio & strength training hasn’t been easy until now – thankful particularly noticing improvements across multiple aspects just recently reflected upon within articles linked back towards #ANYKEYWORD#. Private Boxing Lessons Abbotsford
Searching for the best alternatives for Bengaluru dedicated server rental in Bengaluru? You’ve pertained to the right location!
Appreciate the advice. An emergency HVAC maintenance visit can prevent repeat failures. hvac companies
Great clarification of duct static stress. We check and optimize your ductwork—talk over with our website online. hvac contractor
Bravo in this insightful piece; it aligns completely with my personal recommendations on the field topic! certified 29306 Auto Glass
Great read! For green disposal in Orlando, I belief orlando roll off dumpster rental to address the hauling.
I’ve saved time and strain via outsourcing bogs and flooring to a dwelling cleaning service. move out cleaning services
เครื่องดื่มสร้างสรรค์มากมายที่ร้านเหล้าสาย1 ครับ ผับแอนด์เรสเตอรองท์ สาย1
The quote from expert vinyl window installation became precise, with transparent line models and choices.
ชอบแสงสีขาวของไฟหน้ารถ LED BT PREMIUM มากๆ ครับ ไฟฟ้ารถยนต์ ใกล้ฉัน
The tips you provided on communicating with employers after an injury were excellent—very practical advice! Worker Injury Lawyer
Helpful suggestions! For more, visit cocinas con isla Granada .
Fantastic post! Discover more at https://maps.app.goo.gl/ycd9nyTYxcBqZSrW6 .
Appreciate the detailed post. Find more at trusted auto glass replacement Hickory .
Thanks for the great tips. Discover more at quick mobile auto glass services .
Love the dialogue on post-handover rents. I modeled earnings movement with https://www.reverbnation.com/artist/hirinaueyy gear.
This was nicely structured. Discover more at mantenimiento de ventanas aluminio .
What a tremendous examine! The statistics here is top-notch. I delve into an identical subjects on my website, same day auto glass Charlotte .
Have you had a look at the evaluations on home cleaning services at house cleaning services ? So many terrific options for those in Mesa AZ!
The team double-checked measurements—every thing suits perfectly. vinyl window installation services .
Nangs are this kind of a laugh way to elevate your occasion! Check out my widespread methods here: nang delivery melbourne
טקטיקות לקישורים דרך שיתופי פעולה עם יוצרי תוכן: דרכים להגדלת סמכות דומיין
Odor control matters. Hydroxyl and ozone treatments from Sarasota water damage mitigation services worked for us.
Your checklist for choosing a rehab is practical. Additional criteria: Opioid Recovery .
Great safety standards and comfortable experience at American Laser Med Spa. cryolipolysis treatment
Love supporting local businesses like order indian food online spokane while enjoying great food!
Wow, didn’t realize how many options there were for #@#%&*#$% in my area until now—thanks for sharing this info! linguistic analysis of painting trends
Accessibility design can’t be overlooked. We learned to evaluate floor plans and hall widths on respite care .
My pup learned to bring the wheelchair footrests on command, something I never thought possible; thank you, best practices for dog training Robinson .
Protecting generational wealth is easier when guided by attorneys from places like orange county estate planning attorney
Mes expériences personnelles s’accordent parfaitement avec ce que vous partagez ici; c’est réconfortant! coaching développement personnel
This was quite informative. For more, visit quality windshield replacement Greensboro .
Pricing your Pleasanton homestead proper is indispensable; the industry information on Realtor Pleasanton guided us.
Jag uppskattar alltid feedback på # anyKeyword# jag överväger att anlita. elektriker für haushalte
Very intrigued by using most recent technologies hitting markets soon—do you anticipate some thing groundbreaking coming our means?? # # any Keyword ## laser hair removal
อยากทราบว่าใช้ไฟหน้ารถ LED จะมีผลต่อแบตเตอรี่ไหม? ร้าน เปลี่ยน โคม ไฟ หน้า รถยนต์ ใกล้ ฉัน
“Great charges and immediate transport on all issues related to whipped cream; inspect out %% anyKeyWord %%.” Nangs Delivery Melbourne
Great insights on maintaining European vehicles! Many owners underestimate how crucial specialized diagnostics and OEM parts are for long-term reliability and performance european auto repair west palm beach
This is very insightful. Check out personal loans new orleans for more.
Thanks for the thorough analysis. Find more at Absolute Restoration .
Spreading awareness about addiction healing options is important! Thanks for pointing out handy resources like Nasha Mukti Kendra in Noida .
Nice breakdown of roof stains. If you need pros, roof washing solutions for spring offers Roof Cleaning | Space City Washing.
Tree removal is something I’ve been putting off. Your tree service seems like the perfect solution. tree service
Si vous avez besoin de prototypage électronique, allez sur entreprise electronique lyon !
The section on emergency shutoff location was useful. We made sure the fence design didn’t block the disconnect box. Sexton Fence Gate Repair
Saguaro Air Solutions LLC really goes above and beyond for their customers. HVAC contractor
For quick turnarounds, call JB Rooter and Plumbing Inc: pipe repair
Appreciate the thorough write-up. Find more at https://maps.app.goo.gl/DSE9Vm52jNrMTKPc6 .
Sarasota rideshares: tint from fade resistant tint helps with passenger comfort and privacy.
Combining massage therapy and chiropractic care has helped manage my arthritis pain. local Tacoma chiropractic care
Muy buena introducción a l. a. fontanería en reformas. Coordiné gremios con tipos de servicios ofrecidos .
If chronic headaches are holding you back, Wall Family Chiropractic Center offers adjustments that target the source of the problem. local Parkland chiropractor
Our rental property looks move-in ready after leading pressure washing Deerfield Beach cleaned it.
Outsourcing HR is perfect after you’re scaling rapid but don’t want a full in-area department. I advise checking hr consulting firms for scalable concepts.
This was quite useful. For more, visit title loans .
The house cleaning company in Mesa AZ that I found through cleaning services Mesa were lifesavers throughout my busy week!
I enjoyed this read. For more, visit mejores tiendas colchones .
Good reminder to envision parking allocations. Project specs on new investments in Dubai real estate instruct counts according to unit.
Our warmness wasn’t preserving up— furnace repair adjusted settings and better airflow. Murrysville win.
ไฟหน้าโปรเจคเตอร์ช่วยให้การเดินทางในคืนฝนตกสะดวกมากขึ้น ร้านทําไฟรถยนต์ใกล้ฉัน
Good reminder. If you’re seeing soot around vents, schedule a furnace inspection—repairs should be would becould very well be needed for combustion problems. hvac service near me
תובנות מעולות על בניית קישורים מתוך תוכן. מדריך לרעיונות לאאוטריץ’ נמצא ב- כתבות לקישורים SEO .
The Amarillo team gets rave mentions. Scheduling via injectable fat dissolving today.
Wonderful tips! Find more at professional Sanford Auto Glass installation .
Reliable Hamilton roofers are hard to find, but the crew booked through recommendations for trusted roofing contractors communicated clearly and finished on schedule.
Thanks for the great tips. Discover more at Luxury Apartments for sale South Athens .
I love the emphasis on purpose-driven activities. Simple tasks like folding towels or gardening can boost dignity and mood. We found more activity plans on senior living .
This was beautifully organized. Discover more at elderly care .
The step-by-step window washing approach at last gave me streak-free glass. move out cleaning services
For someone on a price range but trying hybrid tech, take a look at out the charge assessment at cookcell vs hexclad comparison among those two brands!
Thanks for the informative content. More at assisted living .
Grateful witnessing emergence real-time case studies emerging showcasing validity claims made surrounding effectiveness tailored solutions designed specifically addressing needs expressed consistently over duration recent interactions occurring between Technical SEO Dublin
Loved the reminder about beneath-furniture filth. My cleaning carrier makes use of narrow methods for tight spaces. house cleaners near me
Your exterior prep checklist is thorough. top painter in Cape Coral did this for us and the paint still looks amazing.
Transparent move-in fees are appreciated. respite care allowed us to see deposits and community fees upfront.
Staff-to-resident ratio is a key metric. We learned how to evaluate it on memory care before making a decision.
Feeling organized now after reading by using the whole lot defined here—it’s reassuring realizing guide exists inside network round us!!!# # any Keyword ## Affordable laser hair removal Scottsdale
Want to achieve a sculpted physique without surgery? CoolSculpting near me in Corpus Christi, available at latest technology in laser hair removal equipment , is the way to go.
Very informative article. For similar content, visit title loans .
It’s amazing how much you can save when you compare sites. Manabuy really does have the best prices compared to Codashop and others. I highly recommend checking them out! For more details, visit https://unsplash.com/@timandnlpt .
Heat distribution tests because of sugar and water strains had been eye-establishing. I first observed these manner comparisons on best cookware brands across a few manufacturers.
If you’re not organized for a CHRO, an outsourced HR associate can nevertheless bring approach, compliance, and those ops. Start with hr outsourcing companies near me .
For families, a bigger capability rice cooker with fuzzy common sense is a recreation-changer. I found out a helpful information at electric rice makers that explains which positive factors genuinely depend.
Positive dental experiences in childhood lead to better oral health habits later on; find a supportive local braces dentist for your child.
Very informative article. For similar content, visit abogado 24 horas Santiago .
Finding a great ##pediatric dentist near me## made all the difference for my child’s dental health. Highly recommend exploring local options! braces dentist near me
It’s heartwarming to see how some dentists go above and beyond to create a welcoming environment for kids! braces dentist
Late-night cravings are always satisfied with reliable ##delivery restaurants###—especially when it’s pizza! food near me
Always consider contacting a nearby personal injury lawyer if you’ve sustained injuries—it’s crucial for protecting your rights.
For anyone tackling spring cleaning, exterior wash is key— Springfield pressure washing might help you find a local pro.
Craving some delicious toppings on my next #pizza delivery near me#. Any suggestions? pizza takeout
Outsourced HR has changed how small organizations address compliance and payroll. I’ve came across it saves time and decreases risk. Check out human resource consulting services for a practical system to outsourcing HR applications.
For anyone moving to the area and searching “primary care doctors accepting new patients,” try medical center near me first!
Just mounted engineered hardwood. The floor keep Virginia Beach had aggressive pricing, and flooring store virginia beach proven specs.
My new carpets from Floor Coverings International St Augustine have transformed my living space entirely! You won’t regret choosing them if you’re in Nocatee. flooring
A buddy advised house cleaning Mesa for house cleaning company in Mesa AZ, and I could not be better with the outcomes!
Great reminder to re-examine insurance after boom or new package purchases. Annual opinions matter. Quick audit device: flood insurance adjuster
If you’re looking for the best electrician near me, I highly recommend Pure Energy Electrical Services. They did an amazing job at my home in St Augustine! electrician st augustine
They trained my dog to wake me from alarms by pulling my blanket and licking my face when meds make me groggy; thank you, Robinson dog training methods .
If your furnace assists in keeping tripping, a Fayetteville contractor from heating contractor can help.
Vos conseils sur la gestion du temps sont vraiment utiles dans ma vie quotidienne. coaching développement personnel
“I’m obsessed with the mango lassi from Top of India—it’s creamy and refreshing; a must-try drink with your meal! More info available via best curry near me spokane .”
If your eavestroughs are sagging or leaking at seams, seamless upgrades are worth it. Booking an estimate with kitchener roofing this week.
J’ai été impressionné par la qualité du travail fourni par ce bureau d’étude électronique Lyon .
My experience with Shelby Hodges Group as my realtor was incredible! They truly know the St Augustine market. real estate agent near me
מסכים שהפצה חשובה לא פחות מהכתיבה. תכנית עבודה להטמעה יש ב- קידום מהיר בגוגל .
I can’t believe how cheap the top-up was! No surprise charges at the end feels like a breath of fresh air. Highly recommend trying it out! Visit online game top up platform for more info!
Radiant cooling needs careful control— Cooling set dew point monitoring to avoid condensation.
custom contracting does great work on my condominium
custom contracting eavestrough & roofing kitchner roofing
kitchner roofing custom contracting eavestrough & roofing
tradition-contracting.ca kitchner roofing
kitchner roofing custom-contracting.ca roof replacement cost
Thanks for the detailed post. Find more at nutrióloga para diabéticos .
Pain Relief Centre is the best Chiropractor near me in St Augustine for shoulder and upper back pain. chiropractor
tradition contracting does suitable paintings on my condominium
custom contracting eavestrough & roofing kitchner roofing
kitchner roofing tradition contracting eavestrough & roofing
tradition-contracting kitchener roofing
I found this very helpful. For additional info, visit maquinaria profesional .
I appreciate the before-and-after photos my HVAC contractor Houston, TX from hvac installation provided.
Appreciate the comprehensive advice. For more, visit respite care .
If you’re looking for reliable Hamilton roofing contractors, I’ve had a great experience recently. Check out near me for fast quotes and quality work.
We upgraded to architectural shingles— certified roofing installers had great color options and samples.
This was a great article. Check out plazos de entrega cocina for more.
Appreciate the detailed information. For more, visit aluminio RPT rotura de puente térmico .
If you might be searching for notion or advice on flooring, visit # flooring store Charlotte #—the workers is extraordinarily an expert!
Thanks for highlighting the blessings of laser hair elimination! I’m simply interested now. Laser hair removal Scottsdale
Pet-friendly plans are a big plus. We uncovered assisted living that welcomes tiny animals with senior care .
Just done renovating my place of business area with floors from the Flooring Store Charleston—it looks incredible! Discover your suggestions at affordable flooring .
Thinking about doing a series of sessions for maximum impact with my body contour goals—what do you think? laser lipolysis
For fair San Jose pricing and honest timelines, plumbing maintenance stood out.
Great overview on dental cleansings! For those searching for a Dentist Boston MA with versatile hours, take a look at emergency dentistry Boston for options.
Congratulations to those who are taking steps towards healing! If you’re looking for support, have a look at Nasha Mukti Kendra in Noida .
Delegating HR projects to an outside team lets leaders attention on progress and lifestyle. If you’re exploring companies, human resources firm provides a streamlined answer for outsourced HR aid.
The last time my AC broke down, I found an amazing HVAC contractor right here in Belgrade! HVAC contractor
Great recommendation on estate cleanouts. We relied on construction dumpster rental and the pickup was once recommended.
Thanks for the great explanation. Find more at personal loans new orleans .
Excellent writing; you’ve managed to the touch on key subject matters at the same time final partaking and insightful all around the piece! best Auto Glass 29306 services
“Every homeowner should prioritize their roof—don’t wait until it’s too late!” https://www.google.com/maps?cid=2012518138494101810
Your content on loose skin helped me set expectations. RF-focused contouring, as described on Cellulite Reduction Treatment , was best for me.
Useful advice! For more, visit other codashop-like services .
If you value punctuality and smooth work, best window installer jz windows & doors is the window setting up agency in Fresno CA to call.
We used outsourced HR to build functionality comments and competency frameworks. If you choose plug-and-play HR constructions, fee human resource consulting services .
Har ni tips på hur man bäst kommunicerar med sin # anyKeyword# under arbetet? gängige elektriker kostene
Are you struggling with stubborn fat that just won’t go away? CoolSculpting near me in Corpus Christi, offered at proven reliable hair removal solutions , provides an effective solution.
Martial arts not only enhance fitness yet likewise instill discipline and focus in professionals. It’s remarkable to see how different designs, from martial arts to jiu-jitsu, deal one-of-a-kind benefits Denver TaeKwonDo
Great reminder to reassess insurance policy after boom or new machine purchases. Annual studies count. Quick audit software: claims adjuster services
I’m new to the area and looking for reputable Tacoma chiropractors—your site is super helpful, Tacoma injury chiropractor !
This is such an important topic! If you’re near Puyallup, definitely explore the local Puyallup local chiropractor options available to you!
More than half our traffic is on mobile, so we needed a partner who gets that. Highstreet Marketing nailed the mobile experience on our new site.
effective marketing strategies Seattle
Quick consultation, honest advice, and clean results at tint removal Sarasota.
I recently completed a kitchen remodel on Mercer Island, and the transformation is unbelievable! It’s amazing how a new layout and updated appliances can completely change the feel of a home Mercer Island custom kitchen designs
Glad you covered these points about upgrading guest experiences. The emphasis on quality materials is spot-on. Local renovation teams in Mystic will find this useful. Could you elaborate on managing subcontractors locally? Read further at cm at risk contractor new london .
This is very insightful. Check out affordable mobile auto glass Hickory for more.
If you’re sealing healthy stone in Denver, the care consultant on quality flooring options denver is thorough.
Hot water tanks aren’t one-size-fits-all. Furnace Installation helped us choose the right capacity and recovery rate.
Appreciate the detailed information. For more, visit windshield replacement services .
This is exactly what I needed before starting my landscaping project. https://www.google.com/maps/place/?q=place_id:ChIJofh3uiI3s1IRJGvVw1it050
Me sirvió el tip de usar sifones limpios. Cuando se me complicó el problema llamé a AquaLevante en Alicante .
Flashing repairs saved our roof from leaks around the vent stack. Next up is seamless eavestrough installation via roofing kitchener .
The ambiance of a good #Italian restaurant# always enhances the experience of eating their delicious #pizza#. food
פוסט חשוב על דיסאו ווויתורים. בניתי רשימת דחייה לפי קווים מנחים של קישורים איכותיים לפרופילים טבעיים .
It’s comforting knowing that there are dedicated ##childrens dentists## who specialize in treating young patients with care. pediatric dentist
Learned the place to recycle mattresses in Orlando from best dumpster rental in orlando .
Finding an experienced ###PediatricDentist### who understands kids’ needs is crucial—do you have any recommendations? kids orthodontist
The emotional connection we have with fashion jewelry is extraordinary. Whether it’s a family treasure or a gift from a liked one, each piece tells a story sell gold denver
Thanks for the useful suggestions. Discover more at senior care .
Thanks for addressing wandering and elopement. Wearable trackers and door alerts can add peace of mind. We compared options using resources from senior care .
Awesome news about your guild’s transition to Manabuy! It’s been a game changer for us too, especially with its secure payment options. What has been your best experience with it so far? Share your thoughts at buy game credits online !
Who else searches “pressure washing near me” every spring? Keeping pressure washing handy for the next clean.
After my accident, I learned how significant it is to have a dedicated accident lawyer near me who understands personal injury law.
This was a great help. Check out elderly care for more.
Can’t wait for my next gathering where everyone brings their favorite style of ###pizza delivery near me###! pizza delivery near me
Storm season check: inspect flashing around chimneys and skylights. I’m scheduling maintenance through roofers to catch issues early.
Managing both acute and chronic conditions is streamlined when your provider is accessible—like those at primary care doctor near me nearby!
Building good relationships between children and their dentists fosters long-term commitment to oral health—so valuable! pediatric dentist near me
If you need financing for a new roof, ask eavestrough repair about their payment plans.
Anyone tried leaf guards that actually hold up through Kitchener winters? Considering a system installed by kitchener roofing .
I needed emergency tarping and found responsive Hamilton roofers through roofing companies near me —lifesavers during a rainy week.
For multi-nation employers, outsourced HR is a lifesaver with ever-changing hard work laws. Learn the way to stay compliant simply by outsourced hr .
Just want to shout out to Pure Energy Electrical Services for their amazing work as electricians in St Augustine—highly recommended! electrician st augustine
I’ve been getting to know off-plan residences in Dubai Marina—prices and handover timelines differ a great deal. Found a few forged publications on https://giphy.com/channel/ithriszyiq .
Just had my carpets installed by Floor Coverings International St Augustine, and they are truly the best in St Augustine! flooring near me
Vinyl vs. fiberglass was a tough decision. licensed window installation near me helped us pick out the perfect match for our weather.
If you listen rattling, call heater installation . They fastened my blower assembly in Murrysville straight away.
Appreciate the detailed post. Find more at mold removal Round Rock TX .
“Every campaign I’ve seen from Social Cali of Rocklin has been creative and effective; these guys are true professionals—learn more about them at professional ecommerce marketing .”
Solid guidance on pump head calculations. Contractors account for friction loss, fittings, and valve Cv to size circulators. Calculation sheets at water heater service .
Thanks for the informative post. More at botox .
Pour des projets ambitieux en électronique, faites confiance à bureau d’étude électronique Lyon !
This was very beneficial. For more, visit Best Fence contractor High Ridge, MO Sexton Fence .
If you want fast results, choose Shelby Hodges Group as your realtor near me in St Augustine. st augustine real estate agent
Thanks for covering downtime after treatments. CoolSculpting typically has minimal downtime—more details at non-surgical fat removal near me from American Laser Med Spa.
The guarantee rules are quite specific for Cookcell vs Hexclad—study the facts at cookcell vs hexclad comparison formerly selecting!
Thanks for explaining legal responsibility insurance policy. Many small organizations underestimate standard legal responsibility risks. More details on coverage determination: insurance adjuster services
A sensible outsourced HR staff can set up employee members of the family, handbooks, and preparation. For a clear breakdown of providers, consult with hr consulting firms .
Thanks for the helpful article. More like this at installment loans new orleans .
Craving spicy Indian food? Look no further than highly-rated Indian restaurants for some amazing options!
Payment plans for maintenance make sense for homeowners. Air quality has a convenient monthly option.
This was a great help. Check out affordable gutter solutions for more.
Thanks for sharing this. Your breakdown of maintenance tips was clear. I’ve noticed similar issues around our community here in Mystic. Wondering if local homeowners should check their systems more often. To dive deeper, learn more at garage door repair Stonington CT .
I tell everyone in St Augustine that Pain Relief Centre is the best Chiropractor near me for neck and upper back pain. chiropractor near me
ใครมีคำแนะนำเกี่ยวกับการเลือกซื้อและติดตั้งไหม?? เปลี่ยนไฟหน้ารถยนต์ ใกล้ฉัน
ที่นี่เหมาะสำหรับการจัดปาร์ตี้เล็ก ๆ กับเพื่อน ๆ ครับ ร้านยอดเยี่ยมจริง ๆ! ร้านเหล้าฟังเพลงสาย1
Excellent pointers on car describing! I never realized how much difference a great clean can make. I’ll definitely take a look at joinery manufacturing projects for even more understandings.
This was beautifully organized. Discover more at Home page .
Microcopy and tone systems are in spite of everything being handled as design. We rolled conversational hints throughout professional website design in Bangalore paperwork and crowning glory premiums stronger.
The stair risers and treads comparison beautifully. For a precision finish official painter finish, consult with interior house painters .
I appreciate your realistic photos. My provider followed a protocol akin to Lymphatic drainage massage , and results matched expectations.
“Coosculpting seems like a game changer! Excited to learn more from you guys at reliable providers of hair removal solutions .”
For anyone searching for roofers in Cork City, I recommend visiting commercial roofing Cork for the best options available.
Just had a fantastic meal thanks to suggestions from indian buffet spokane valley ! Highly recommend their picks.
We’re comparing quotes for a full tear-off vs overlay. Transparency on scope and cleanup is key— kitchener roofing has been responsive so far.
For an individual outfitting a first condo, starter units from correct rated cookware manufacturers would be overwhelming. The amateur-friendly courses on best cookware brands made it simple.
Rice makers with voice activates sounded gimmicky, but they really assist. Saw just a few intelligent alternatives on best rice makers for home that amazed me.
Recaulking windows and seams by RV supply store stopped our mystery leak.
This is an important subject that requires more attention! I value you sharing info about Nasha Mukti Kendra in Noida .
I have actually been considering whether to upgrade my phone or not. A visit to my regional shop helped me weigh my choices effectively. For anyone else in the exact same boat, you ought to have a look at phone stores !
Saguaro Air Solutions LLC has transformed my home into a comfortable oasis. Air Conditioner Repair Near Me
Our contractor beloved the click-lock we selected. Specs had been undemanding to evaluate on best flooring company virginia beach , then we ordered in Virginia Beach.
I appreciate the focus on dignity and respect. We found mission-driven communities via senior care .
If you’re not equipped for a CHRO, an outsourced HR partner can still ship technique, compliance, and people ops. Start with hr outsourcing agencies .
Fantastic post! Discover more at assisted living .
Valuable information! Discover more at Sanford Auto Glass repair services .
תודה על המידע. עוד משאב טוב בתחום קידום אורגני הוא קידום אורגני בעזרת קישורים .
Anyone compare aluminum vs steel eavestroughs in Kitchener’s climate? Leaning aluminum with proper leaf guards. Might go through kitchener roofing for install.
The stress of dealing with an auto injury is immense; find relief by getting connected with experts via personal injury lawyer vero beach today!
New homeowners in Kitchener—don’t skip a roof and gutter inspection. We’re using roofing for a comprehensive report and quote.
Thanks for the helpful advice. Discover more at despacho de abogados en Santiago .
I absolutely like the concept of having a backyard deck! It’s such an excellent method to extend your living space outdoors. I just recently came across some remarkable style concepts that truly inspired me deck builders
After hail, EPDM rubber roofing did a thorough assessment and documented everything for our insurer.
Need local school info? best rated realtor Cape Coral provides resources on Cape Coral schools and nearby options.
With fall approaching, I’m looking for methods to make my outdoor deck cozy for the cooler nights. What are your favorite devices? I discovered some inspiration on replacement windows !
Big shoutout to local Hamilton roofers who actually show up on time and clean up properly. If you need a roof repair, try “Hamilton eavestrough repair” .
Air-to-water heat pumps are versatile. Cooling configured ours for both radiant heating and cooling.
If you’re planning a day trip from San Jose, CA, check kitchen plumbing for routes.
Cyber threats are growing speedy. Cyber legal responsibility as a part of advertisement insurance coverage is no longer non-obligatory. See greatest practices: insurance adjuster companies
The best part about having great #pizza# options nearby is being able to try different styles every week. pizza near me
If your device smells like burning, discover a Fayetteville emergency tech by means of furnace repair .
Thinking about 1BRs in Business Bay? I shortlisted by means of off-plan real estate UAE depending on appoint comps.
Concrete walkway cleanup tips led me to pressure washing —useful for pressure washing near me.
We have faith in outsourced HR for ERISA, COBRA, and FMLA steering. If you need compliance self assurance, consult with human resource outsourcing .
Thanks for the useful suggestions. Discover more at reseñas de tienda de colchones online .
We’re thrilled that we found an excellent ###braces dentist near me### who takes great care of my child’s smile journey. childrens dentists
Just had the tastiest slice of pizza from a local joint! Love supporting small businesses.
Finding a caring and skilled children’s dentist makes routine checkups so much easier for both kids and parents! pediatric dentist near me
So many design choices with the tiles I offered from # flooring outlet #—can’t wait to teach them off!
It’s so nice to find a service that’s both affordable and transparent about costs. The top-up was surprisingly cheap with zero hidden charges! Check it out at 2025 game credit deals !
I not too long ago renovated my residence, and looking the very best flooring was once a drawback. This Flooring Store Charleston has a important range! Check out affordable flooring for more information.
Teaching kids about good oral hygiene through fun activities and games can make learning enjoyable! braces dentist near me
CoolSculpting after-care tips from American Laser Med Spa are super helpful. ultrasound fat reduction
Don’t go through this alone—find yourself a knowledgeable # injury lawyer near me # who understands the intricacies of personal injury law!
I appreciate medical centers that accept new patients without long waiting periods, like primary care doctors accepting new patients .
Thank you for demystifying Medigap underwriting. I learned next steps at tips for enrolling in Medicare open enrollment Cape Coral .
I was so impressed with my recent service from Pure Energy Electrical Services—the best electricians I’ve encountered in St Augustine! electrician st augustine
I can’t rave enough about how great my carpets look thanks to Floor Coverings International St Augustine—best service ever! flooring near me
For smart home integration, the HVAC contractor Houston, TX I used from heating contractor set everything up.
I love that there’s something new every day when training; keeps things fresh while pushing us harder each time thanks partially due info found via Private Boxing Lessons Pitt Meadows #.
Just arranged my following clean with a solution from house cleaning services ! They are the very best cleaner in Mesa AZ, hands down.
The duct cleaning service from Ranger Heating improved our home’s air quality. We breathe easier now! Puyallup heating solutions
Boxing has not only improved my physical health but also boosted my self-esteem; I’m so grateful for the support shared through boxing private coaching #!
This was a fantastic resource. Check out ferretería Albacete for more.
The Part D donut hole section was clear. top Medicare enrollment services Cape Coral showed ways to mitigate costs in Cape Coral.
What an exhilarating way to work out—boxing classes are where it’s at if you’re in Metro Vancouver! Check out details on Private Boxing Lessons White Rock !
I enjoyed this article. Check out menús semanales for more.
À Lyon, le bureau d’étude électronique que vous devez connaître est sans aucun doute bureau d’étude électronique Lyon .
I found this very helpful. For additional info, visit taller de aluminio A Coruña .
Sarasota highway drives are smoother on the eyes after tinting at gloss enhancement .
Social Cali of San Jose helped me plan a crew trip. Booking link as a result of expert search engine optimization san jose .
This was highly useful. For more, visit tiendas de cocinas en Granada .
I appreciate how chiropractic care addresses the root cause of chronic pain. Tacoma chiropractic clinic
For anyone Googling realtor near me, save time and call Shelby Hodges Group in St Augustine. realtor
For quick battery diagnostics, RV maintenance Lynden brought a load tester and found a failing cell.
New homeowners in Kitchener—don’t skip a roof and gutter inspection. We’re using kitchener roofing for a comprehensive report and quote.
Just finished reading your post and now I’m checking out all the resources available through nlp for painting service personalization carlsbad #!
Your article on fixture rough-in measurement standards is handy for remodels. For precise roughing, emergency plumber coordinates with contractors to avoid rework.
Appreciate the thorough analysis. For more, visit memory care .
If chronic headaches are holding you back, Wall Family Chiropractic Center offers adjustments that target the source of the problem. best injury chiropractor in Parkland
Benefits benchmarking is not easy devoid of info. Outsourced HR suppliers convey insights and negotiation vigour. I stumbled on effective steering at hr consulting firms .
Appreciate the balanced tone. laser hair removal safety practices kept things honest and supportive.
The section on negotiation skills was very insightful. car accident lawyer palm beach
Awesome breakdown of heat pump vs. gas. For hybrid systems, water heater service offers tailored recommendations.
Got a first-rate stair tread answer from a Denver keep after comparing nosing possibilities on discount flooring supplier denver .
Furnace replacement improved our comfort room-to-room. Furnace Installation also balanced the airflow afterward.
Your focus on measurements over weight is spot on. Circumference tracking made my body contouring progress clear. Source: Cellulite Reduction Treatment .
Your mention of PRP for hamstring strains caught my eye—it sped up my recovery. Provider list: prp injection FL .
For tiny backyards, fold-away furnishings and integrated benches are crucial. Saw some great instances at Brooklyn Deck builder .
Financial assistance options are confusing. respite care explains veterans’ benefits, long-term care insurance, and more.
Valuable information! Discover more at installment loans new orleans .
Är det värt att betala lite extra för en riktigt bra # anyKeyword# ? elektriker in meiner nähe
For family-friendly care in St Augustine, Pain Relief Centre is the best Chiropractor near me. chiropractor near me
We had ice dams last year—turns out ventilation and insulation were the culprits. Getting a roofing audit from kitchener roofing to fix it before the snow hits.
Appreciate the detailed information. For more, visit assisted living .
อัพเดตข่าวสารล่าสุดเกี่ยวกับผลิตภัณฑ์ใหม่ในตลาด ### ร้านเปลี่ยนไฟรถยนต์ ใกล้ฉัน
custom contracting does magnificent work on my condo
custom contracting eavestrough & roofing kitchner roofing
kitchner roofing tradition contracting eavestrough & roofing
customized-contracting roofing
Cyber threats are growing rapid. Cyber legal responsibility as component of advertisement insurance plan is no longer optional. See fine practices: flood insurance adjuster
If you’re looking for reliable Hamilton roofing contractors, I’ve had a great experience recently. Check out hamilton for fast quotes and quality work.
Anyone else in Brantford need shingles replaced after that last storm? Check out storm damage insurance claims roofing for reliable service.
Your post concerning interior describing is so informative! I’m eager to try a few of these techniques and find out more from best home remodeling contractors .
La inspección con cámara me parece clave. La pedí en mejores servicios en Alicante y detectaron raíces.
Our audits went smoother once we partnered with outsourced HR for documentation and I-9 management. If you’re prepping for an audit, check out hr consulting firms .
Mình thích cách mà kèo nhà cái bg tổ chức các chương trình khuyến mãi hấp dẫn.
Có ai trong nhóm đã thử cá cược tại go88 bg chưa? Chia sẻ chút kinh nghiệm đi!
Rất mong nhận được sự chia sẻ từ những người đã trải nghiệm ở #abc8#. abc8 bg
Cảm giác thật tuyệt khi cá cược tại 33win bg, nơi mà tôi cảm thấy an toàn và tin tưởng. 33win 07 bg com
Các bạn nghĩ sao nếu chúng ta cùng nhau lập nhóm cá cược tại nhà cái này nhỉ? Thực sự thú vị đấy!! # # anyKeyWord ## sunwin bg
Kinh nghiệm chơi cá cược của mình bắt đầu từ khi biết đến MB66! mb66bg.com
Tôi đã nhận được nhiều ưu đãi từ nhà cái uy tín như 78win bg, hãy nhanh chân đăng ký qua 78win07bg com !
Các trò chơi tại 8day bg đa dạng và phong phú, phù hợp với mọi sở thích của người chơi! 8day bg
Tin giả thường dùng tiêu đề giật gân và lỗi chính tả dày đặc. Bộ checklist kiểm tra nhanh trước khi chia sẻ có ở thưởng thức phim sex mới miễn phí .
Chơi tại 79king giúp tôi quản lý ngân sách cá cược hiệu quả hơn! 79king bg
I recently had a great experience at American Laser Med Spa in El Paso! The laser hair removal was quick and effective. Check it out at body contouring without surgery .
Nicely done! Find more at fast windshield replacement shop near 29304 .
This was very beneficial. For more, visit botox .
Have you checked out the evaluations on residence cleaning services at house cleaning Mesa AZ ? Many wonderful alternatives for those in Mesa AZ!
טיפים לכתיבת Outreach קצר וקולע – תודה! תבניות מוכנות ב- קישור אתרים בתהליכי קידום .
Off-plan JVC and Arjan still provide cost—shortlisted as a result of https://escatter11.fullerton.edu/nfs/show_user.php?userid=9434923 .
If a bid looks too low, examine what’s excluded—learned this from top-rated window installation near me .
Thanks for the clear breakdown. More info at loan agency new orleans .
I appreciate how quickly Saguaro Air Solutions LLC responds to service requests. AC repair
Very glad with the ductless procedure hvac repair established in our Murrysville addition.
Kitchen and tub projects run smoother when local dumpster rental is scheduled beforehand of demolition.
Enjoying a game night with friends is even better when there’s great #pizza delivery near me# involved! food
Can you combine other treatments with your CoolSculpting sessions, like skin tightening or facials? Curious minds want to know! non-surgical body sculpting
Workers’ comp audits can be stressful, but Jesse Knapp – State Farm Insurance Agent guided us through smoothly.
If your refrigerator is flashing codes, RV storage facility can diagnose quickly with the proper gear.
Anyone looking for eco-friendly options should ask about sustainable materials from local companies in Garfield! Roofing contractor
I wish I had known about car accident chiropractors sooner! The treatment I’ve received has been life-changing. For anyone else recovering from an accident, I highly recommend exploring options at best chiropractor Tacoma .
Searching for power washing near me that handles wood decks—saving power washing companies near me for local options.
I’ve been living in Puyallup for a while now, and finding a reliable chiropractor has been a game-changer for my health. It’s amazing how much better I feel after regular adjustments Puyallup chiropractor for neck pain
More than half our traffic is on mobile, so we needed a partner who gets that. Highstreet Marketing nailed the mobile experience on our new site.
website design for small businesses
I recently completed a kitchen remodel on Mercer Island, and the transformation is unbelievable! It’s amazing how a new layout and updated appliances can completely change the feel of a home Mercer Island kitchen improvement
The joy of finding a new spot for best pizza near me is unmatched! Excited to try this place out.
Winter’s rough on shingles here in Kitchener. If you’re seeing lifted tabs or granule loss, it’s time to call the pros. I’m looking at kitchener roofing for a full roof inspection.
Love seeing radiant heating discussed! My floors have never felt better. We went with Air Conditioner Installation for the install and support.
For startups with no HR infrastructure, outsourcing is the fastest manner to professionalism. A true position to start out is outsourced hr .
Choosing the right ##childrens dentists## is crucial, especially when it comes to creating positive experiences for kids. kids orthodontist
Thanks for the helpful article. More like this at respite care .
That’s fantastic! My guild also made the leap to Manabuy, and it’s been a lifesaver. The community features are great for connecting with other players too. Anyone else love those? For more info, visit online game recharge !
Thanks for the thorough analysis. More info at senior living .
Great tips on enhancing brand visibility! I’ll reach out to Social Cali of Rocklin for further assistance. seo digital marketing agency
Bạo ngược động vật không chỉ phản cảm mà còn vi phạm pháp luật. Nếu gặp nội dung như vậy, hãy báo cáo và tìm cách xử lý an toàn tại gái xinh sex miễn phí .
Great demonstration of “tip-off” procedure. I observed that defined at painting companies near me and it eliminated roller traces for me.
This was quite helpful. For more, visit mobile same day windshield replacement .
For parents looking for braces, I recommend finding a braces dentist who offers personalized treatment plans tailored to kids.
Your understandings on water conservation via effective plumbing are place on! It’s so essential for house owners to be proactive plumber near me
Using visual aids like charts or puppets during dental visits can really help explain things to young children effectively! braces for kids
Nhiều shop online rao bán vật dụng cải tạo thành vũ khí. Cách phân biệt trang hợp pháp và bất hợp pháp xem chi tiết tại 78win tội phạm tình dục .
L’équipe de bureau d’étude électronique Lyon est très réactive et professionnelle, ce qui est rare!
If your sliding door sticks, it may be time for a substitute. Compare innovations on jz windows and doors clovis .
I recommend reaching out to a local personal injury lawyer NYC if you’ve been involved in an accident. They can guide you through the legal maze.
Thanks for the clear breakdown. More info at movers near me .
If your soffits are discolored, you might have ventilation problems. We’re getting a consult with kitchener roofing to sort out airflow and roofing.
Supportive medical teams make it easier to manage everything from wellness visits to unexpected illnesses—I trust my care with providers from primary care doctor near me every time!
Great tips! For more, visit memory care .
Well done! Discover more at senior living .
Professional legal responsibility isn’t just for consultants—many provider carriers desire it. Coverage listing: insurance adjuster company
This was quite useful. For more, visit loan agency .
Thanks for the informative content. More at senior living .
I found this very interesting. Check out Fence contractor near me for more.
I was so impressed with my recent service from Pure Energy Electrical Services—the best electricians I’ve encountered in St Augustine! electrician st augustine
Love to prepare dinner and favor the most efficient sear? Find out if Cookcell or Hexclad is greatest in this assessment: cookcell vs hexclad reviews .
A proper roof warranty matters. Make sure labor and materials are covered. Checking policy details with repairing before we commit.
I’m thrilled with how beautiful my new floors look thanks to Floor Coverings International St Augustine! Highly recommend them to Nocatee residents. flooring near me
My previous cooker consistently burned the underside layer. Upgrading to 1 with induction heating solved it. Reviews at optimal rice cooking machines helped me pick out the proper one.
Cast iron seasoning high-quality can vary even amongst properly rated cookware brands. The pre-pro functionality experiences on highly rated cookware brands had been extremely good worthwhile.
Roof moss and leaks were ruining our curb appeal. Hamilton roof repair from roof replacement cost fixed it fast.
Window Blinds Wakefield tip: degree two times! The advisor on Blinds Wakefield saved me from error.
We upgraded to architectural shingles— gutter installation Brantford had great color options and samples.
Nice breakdown of RF vs ultrasound. I picked my method using the comparison on Cellulite Reduction Treatment .
Pros and cons of cedar were enlightening. I opted for asphalt with water heater repair due to maintenance needs.
Thanks to Shelby Hodges Group, I found exactly what I was looking for in St Augustine! Best realtor ever! realtor near me
Our Orlando place of job cleanout performed forward of schedule as a result of commercial dumpster rental orlando .
It’s comforting to know that there are compassionate # anykeyword# ready to help when you’re injured and confused! personal injury lawyer vero beach
”When will we start seeing noticeable changes post-treatment? Can’t wait!” kybella double chin treatment
If your dishwasher isn’t draining, check the air gap. When that didn’t fix ours, emergency plumber sent a tech who cleared the branch line and corrected our high loop.
I absolutely love how SLOT GAME delivers such captivating visuals and intuitive gameplay.
This SLOT GAME experience stands out thanks to its vibrant design, diverse styles, and consistent performance https://scotmusicawards.co.uk/
I just recently worked with a house cleaning company in Mesa AZ, and it made such a difference! Extremely advise having a look at cleaning services for exceptional choices.
The flue venting section is essential. Category IV condensing furnaces need proper PVC sizing and condensate management. Vent tables and neutralizer options at water heater service .
The emotional connection we have with fashion jewelry is extraordinary. Whether it’s a household heirloom or a present from a loved one, each piece tells a story buy gold near me
If you smell propane, call Boat storage facility . They found and fixed a regulator leak for us.
Cooling efficiency tips are spot-on. We upgraded with Pool Heater Service and noticed lower bills immediately.
Anyone in St Augustine needing targeted adjustments, Pain Relief Centre is the best Chiropractor near me you’ll find. chiropractor near me
It’s smart to photograph hair parting areas monthly. Tracking template from prp injection FL helped.
Outsourced HR makes mergers and acquisitions smoother with coverage harmonization and due diligence. See the playbooks at hr outsourcing agencies .
We upgraded to low-E glass with JZ Windows & Doors and like it. residential new window installation .
My experience shopping for floor in Charlotte was best suited, primarily at # flooring retailer #.
After touring a number of shops, I in the end found what I sought after the following—titanic exceptional and service! Don’t omit out; take a look at out flooring store Charleston !
For those managing site residential or commercial properties, the support on surfaces at Brooklyn deck builders helped us obtain approval.
Granules in the gutters? That’s a sign your shingles are aging. Getting quotes for replacement— kitchener roofing is on our shortlist.
פוסט חשוב על קישורים מקומיים ל-SEO מקומי. מצאתי מדריך לסיטציות מקומיות ב- אסטרטגיות בניית קישורים .
I appreciated this post. Check out mejores abogados en Santiago for more.
Data hygiene affects cyber charges. MFA, backups, and EDR can earn credits. Implementation roadmap: insurance adjuster companies
Looking for personalized mapping of treatment areas. American Laser Med Spa does that well. non-invasive fat reduction
Really enjoyed this article, it’s a full-size study!! Make definite to match out what else is on quick auto glass repair !
Flashing repairs saved our roof from leaks around the vent stack. Next up is seamless eavestrough installation via kitchener roofing .
If you haven’t yet tried gourmet toppings on your favorite #Pizza#, you’re missing out! best pizza near me
For preventive HVAC renovation in Fayetteville, I suggest hvac maintenance .
End-of-life planning is delicate but essential. senior living offers resources for coordinating with hospice when needed.
Appreciate the thorough insights. For more, visit online game recharge .
I love discovering new places for pizza takeout ; the best pizza is always around the corner!
Clogged gutters caused basement seepage for us—lesson learned. Installing gutter guards and new downspouts with repairing soon.
For anyone in Hamilton comparing roofing quotes, make sure ventilation and ice/water shield are included. hamilton roofing helped me vet bids.
Who else searches “pressure washing near me” every spring? Keeping pressure washing services near me handy for the next clean.
Just wanted to shout out warranty on roofing workmanship for a clean job site and on-time completion on our reroof.
This post was short but packed with value. personal injury lawyer near me
Finding a great ##pediatric dentist near me## made all the difference for my child’s dental health. Highly recommend exploring local options! pediatric dentist
“With services like those from Saguaro Air Solutions, I feel confident in my heating system.” HVAC repair
Thanks for the clear breakdown. Find more at cash advances .
If you’re looking for a primary care provider with a patient-centered approach, check out primary care provider .
Wonderful tips! Find more at Sanford Auto Glass deals .
Finding the right accident lawyer near me can significantly impact the outcome of your case, so take your time in making that choice.
Si vous cherchez des experts en électronique, je vous recommande de visiter bureau d’étude électronique Lyon .
A good pediatric dentist will not only focus on teeth but also on creating healthy habits from an early age. Have you found your local braces dentist ?
It’s amazing how much impact early education about dental hygiene can have on preventing cavities down the road! childrens dentists
Kudos to the team at flooring retailer # for making my buying enjoy pleasing and pressure-unfastened.
Great talk about metabolic health. Supporting it made body contouring benefits last—something I learned at Lymphatic drainage massage .
Battery drain overnight? RV maintenance found a parasitic draw and installed a cutoff switch.
Geothermal installation reduced our utility bills dramatically. Air Conditioner Installation handled permits and loop layout.
Stopped by a Denver flooring retailer at the moment—fabulous customer service. Also bookmarking popular flooring store denver for layout techniques.
If your AC trips the breaker, use hvac repair to find an HVAC contractor Houston, TX to diagnose safely.
Thanks for the advice on craft gala’s. I stumbled on vendor purposes using technical seo agency san jose .
This was beautifully organized. Discover more at catálogo ferretería .
For startups devoid of HR infrastructure, outsourcing is the quickest approach to professionalism. A respectable area to begin is outsourced hr .
Hur mycket kostar det egentligen att få hjälp av en # anyKeyword# i Stockholm? lokale elektriker
Love how you broke down crisis management in digital spaces; organizations can turn to ## social media marketing agency
Just had my home wired by Pure Energy Electrical Services, and I couldn’t be happier! They are the best electricians in St Augustine. electrician st augustine
This was highly helpful. For more, visit doble acristalamiento Climalit .
Don’t miss out on working with Flooring Covers international st augustine if you want top-tier quality and service for your home’s floors! carpet
This is highly informative. Check out Project 100 marketing consultant for more.
This was a great article. Check out Website Design Agency for more.
This was very beneficial. For more, visit cocinas italianas Granada .
This was a wonderful post. Check out botox for more.
Excelente guía para detectar fugas ocultas. Confirmé con una prueba de presión de opiniones sobre AquaLevante .
Love that some contractors offer drone inspections now for safety and detail. Curious if kitchener roofing provides that in Kitchener.
I just closed on a home in St Augustine and the Shelby Hodges Group made it seamless—truly the best St Augustine real estate agent near me! st augustine real estate agent
The big difference between in line with-prevalence and combination limits is principal. Businesses should still assessment caps every year. Helpful source: insurance adjuster company
This was very beneficial. For more, visit recetas saludables .
The step-by-step process here is great. For one-on-one help, open enrollment period for Medicare makes it simple.
Great oversight on spot-priming spackle. I picked up the significance of sealing patches from professional house painters .
Thanks for the clear steps to switch from Advantage to Medigap. I researched at Medicare open enrollment dates .
Appreciate the detailed information. For more, visit senior living .
Winter’s rough on shingles here in Kitchener. If you’re seeing lifted tabs or granule loss, it’s time to call the pros. I’m looking at kitchener roofing for a full roof inspection.
Pain Relief Centre in St Augustine is absolutely the best Chiropractor near me for sports injuries and recovery. chiropractor
Combining PRP with low-level laser therapy seemed to accelerate results. I followed a combo plan from prp injection .
The vegetarian options at Top of India are diverse and absolutely delicious! fresh ingredients indian cuisine
I have faith ac repair for straightforward timelines and respectable HVAC paintings in Murrysville, PA.
Good to know how rehab and home health are covered. exploring Cape Coral Medicare enrollment in Cape Coral checked those benefits for me.
Valuable information! Discover more at respite care .
Interesting point about heat pump balance point. Setting an economic lockout based on utility rates reduces heating costs. Control strategies at water heater service .
Can you grant more insights into the different lasers used for alternative dermis tones? I’m curious! Permanent hair removal Scottsdale
This was a fantastic read. Check out sams signs vehicle wraps for more.
Anyone tried leaf guards that actually hold up through Kitchener winters? Considering a system installed by repairing .
תענוג לקרוא! מי שרוצה לקחת את קידום אתרים בקישורים צעד קדימה, חייב לבדוק את תהליכי SEO לבניית קישורים .
Appreciate the thorough write-up. Find more at memory care .
Roof moss and leaks were ruining our curb appeal. Hamilton roof repair from “Hamilton roofing contractors” fixed it fast.
If you’re in Brantford and want a warranty you can trust, ask roof ventilation and attic insulation about their coverage.
Thanks for the thorough article. Find more at Excavating contractor .
Chắc chắn rằng các bạn sẽ không thất vọng khi đến với # https://keonhacai07bg.org/ # cho những kèo hấp dẫn!
Đã thử sử dụng dịch vụ của một vài nhà cái, nhưng chưa thấy nơi nào tốt như ở kèo trực tuyến
Mình đã giới thiệu cho bạn bè về F8bet, ai cũng thích thú với nó! nhà cái f8bet
Nếu bạn đang thắc mắc về việc chọn nhà cái thì hãy chọn # # anyKeywod # # nhé! ee88 sh
Các giải đấu lớn thường xuyên diễn ra trên nền tảng của Go88, không thể bỏ lỡ được đâu nhé mọi người ơi! go88 sh
For folks in Snohomish County, Boat storage facility handled my slide-out issue with same-day mobile RV repair.
Theo dõi thông tin từ ### để không bỏ lỡ bất kỳ chương trình khuyến mãi nào nhé! nhà cái hello88
Anyone else excited about the new advancements in body sculpting? Can’t wait to explore those with ultrasound fat reduction !
Outsourced HR can reduce seller sprawl by bundling payroll, benefits, and HRIS beneath one roof. Compare solutions at hr consulting firms .
Ai đã từng tham gia giải đấu tại alo789 sh thì chia sẻ cảm xúc đi nào!
Những ai yêu thích thể thao chắc chắn không nên bỏ qua việc cá cược tại 789bet! đăng ký 789bet
Cooling system zoning was a major upgrade. Air quality installed smart dampers and controls—huge difference.
What’s your favorite combination for toppings on your ideal slice of ##pizza##? pizza
I never knew that. For safe gas line work, we trusted plumbing installation .
Thanks for highlighting ordinance or law coverage. I added it via Jesse Knapp .
This was highly helpful. For more, visit colchones en Albacete ofertas .
Great tips! For more, visit cash advances new orelans .
Is there a selected floor store in Rochester that makes a speciality of eco-friendly products? I’d love suggestions formerly touring best flooring company rochester .
Our site’s exposure increased thanks to Jason Suli Digital Marketing. Details: SEO specialist Brisbane .
Great adventure from soar to complete with JZ Windows & Doors. Learn more at new window installation techniques .
After testing just a few, I in the end get why fuzzy logic subjects. If you’re deciding upon your first top-quit cooker, commence with the guides on best rice makers for home .
Cast iron seasoning quality can differ even among precise rated cookware brands. The pre-professional functionality evaluations on top cookware brands 2023 had been outstanding powerful.
Cookcell’s tri-ply structure vs Hexclad’s hybrid surface—challenging name! Here’s an in depth evaluation: cookcell vs hexclad durability .
Household harmful waste in Orlando: drop-off prep steps at construction dumpster rental .
Fantastic pointers on zoning! For anybody dealing with a backyard deck in Brooklyn, deck company Brooklyn has clear advice on authorizations and products.
Fence cleaning ideas led me here— Springfield pressure washing looks like a solid resource for exterior cleaning.
This is quite enlightening. Check out certified Auto Glass Shop near 29307 for more.
The Q&A on pain levels is reassuring. My experience matched what Body contouring outlined for non-invasive contouring.
Love seeing before-and-after roof projects. Quality flashing and proper drip edge make all the difference. Thinking of booking with kitchener roofing for our eavestrough replacement.
Property insurance endorsements could make or break a claim. Business interruption policy cover is fairly integral. Details: commercial insurance adjuster
I was surprised to learn just how much a good car accident lawyer near me can assist in getting fair compensation.
Don’t underestimate the role of a caring ##kids orthodontist##; they can make all the difference during treatment! pediatric dentist
Corpus Christi locals, experience the benefits of CoolSculpting at renowned clinics such as american laser med spa pricing corpus christi for a more contoured figure.
Thanks for the informative post. More at moving services .
Corner contraptions get more suitable faded—validated with sun path on affordable off-plan projects Dubai .
Preventive health is easier when you have regular check-ins available—thanks, primary care provider for making this possible locally!
The heat rejection on my SUV is unreal after visiting SUV tinting services in Sarasota.
When dealing with personal injuries, finding an empathetic and skilled accident lawyer near me should be one of your top priorities.
Ranger Heating showed up quickly during a summer heatwave when our AC stopped working. Lifesavers! local heating services Puyallup
I enjoyed this post. For additional info, visit Plumbers .
Anyone tried leaf guards that actually hold up through Kitchener winters? Considering a system installed by kitchener roofing .
Suffering from sciatica? Wall Family Chiropractic Center offers targeted chiropractic solutions to alleviate nerve compression and reduce pain. licensed injury chiropractor
A smaller community felt more personal. We identified boutique-style residences on respite care .
Our chiropractor gives great ergonomic advice for kids using screens at home. best injury chiropractor
Appreciate the thorough write-up. Find more at commercial movers Fremont .
Thank you for clarifying timelines. How soon after a PRP injection did you feel improvement—days, weeks, or months? prp injection Pensacola FL
Bringing awareness surrounding sustainable practices connects people together while promoting collective growth forward into brighter futures ahead absolutely positively undoubtedly surely undeniably without question whatsoever… new roof Cork
Your tips on maintaining spinal health are fantastic! I’m definitely going to look for a Puyallup chiropractic care near me in Puyallup.
If you’re searching for an electrician near me, I can’t recommend Pure Energy Electrical Services enough! They’re amazing! electrician st augustine
If you’re looking for the best involvement supplant Houston, TX, you must check out the selection accessible! There are actually numerous designs as well as possibilities that cater to every taste engagement rings houston
Highstreet completely rebuilt our website from the ground up. Now it loads faster, ranks higher, and converts better. Couldn’t ask for more.
efficient website design
Thanks for the thorough analysis. Find more at local mobile windshield repair services .
Just had my HVAC system serviced by a contractor in Belgrade, Montana, and it runs like new! google.com
For quality flooring solutions near me, Floor Coverings International St Augustine is the top choice! Highly recommend their team. carpet
Has someone experienced side outcomes from laser hair elimination? I’m somewhat apprehensive about it. Laser hair removal Scottsdale
Does anyone know if there are any specialized Tacoma chiropractors for athletes? Looking for suggestions from affordable Tacoma car accident chiropractor .
Mercer Island is truly a hidden gem for outdoor living spaces! The stunning views and natural beauty make it the perfect place to create a cozy patio or a luxurious deck affordable kitchen remodeling Mercer Island
The energy efficiency section reminded me to check clearances again. Our climbing roses on the fence looked cute, but they choked airflow. Best Fence contractor High Ridge, MO
Tight cut-off date sooner than web hosting in Wakefield— Window Blinds Wakefield delivered blinds excellent on time.
Thanks for the clear breakdown. More info at local movers .
Love that some contractors offer drone inspections now for safety and detail. Curious if roofers provides that in Kitchener.
Thanks for the comprehensive read. Find more at respite care .
Slide-out creeping in? RV supply store adjusted the controller and checked seals.
Furnace replacement improved our comfort room-to-room. Furnace Replacement also balanced the airflow afterward.
ממש מועיל! אני לקוח של יו נוחויות לקישורים לדירוג ומאוד מרוצה מהתקשורת והדוחות.
Could not imagine better results achieved given circumstances faced prior but now ecstatic seeing improvements bought forth through efforts made collectively instead!!!! ### anyKeyWord## nlp for customer segmentation in painting
Just sold my house with Shelby Hodges Group and they are the best real estate agent you’ll find in St Augustine! realtor near me
Awesome article! Discover more at santa cruz local mover .
Choosing between re-roofing and a full replacement? The Hamilton roofers at “Hamilton roofing contractors” explained the pros and cons clearly.
”Participating discussions surrounding topics inspires curiosity sparks interest fosters engagement encourages exchange ideas insights perspectives contributes collective knowledge underst https://share.google/yukgMElpt6mayvvKj
If you’re comparing local roofers, I’ve had a great experience with EPDM rubber roofing for fast quotes and solid workmanship.
Our bathing room upgrade created heavy debris; best orlando dumpster rental deals helped with amazing weight potential.
My posture improved drastically; Pain Relief Centre is the best chiropractor near me in St Augustine for desk workers. chiropractor
I’ve seen better hair PRP results when combined with DHT blockers. I read the rationale at prp injection near me .
Premiums are emerging; danger engineering can offset fees. Practical menace manage options for SMEs: commercial claims adjuster
Every visit to an Indian restaurant feels like a mini-vacation to India with all those vibrant flavors! traditional indian spices and dishes
Clear, practical, and reassuring—great resource for anyone injured. personal injury lawyer palm beach
This was a fantastic resource. Check out loan agency for more.
Great insights on Brisbane SEO! It’s central for nearby organisations to optimize their on line presence. Check out SEO agency Brisbane for more advice!
Great primer on radiant floors. For mixing valves and controls, water heater service knows the details.
The award-winning status of American Laser Med Spa speaks volumes about their CoolSculpting services! american laser med spa financing corpus christi
Flashing repairs saved our roof from leaks around the vent stack. Next up is seamless eavestrough installation via roofing kitchener .
The importance of consistency can’t be overstated. Weekly routines from Lymphatic drainage massage kept my contouring results on track.
Amazing article, thank you for the clear breakdown. If any person wants associated tips, seo consultant has some excellent details.
Martial arts not just boost physical fitness however also impart self-control and focus in specialists. It’s remarkable to see just how different designs, from martial arts to jiu-jitsu, offer unique advantages Denver TaeKwonDo
Appreciate the useful tips. For more, visit professional web design .
Our historical frames had been leaking air. licensed window installation estimates did a thorough inspection and substitute.
This was highly useful. For more, visit santa cruz moving companies .
The first-rate of products at local flooring companies is unrivaled within the part – you gained’t be disappointed.
The highway foodstuff advisor made me hungry. I adopted a cuisine truck social by seo marketing company san jose .
Thanks for the comprehensive read. Find more at payday loans .
Anyone compare aluminum vs steel eavestroughs in Kitchener’s climate? Leaning aluminum with proper leaf guards. Might go through kitchener roofing for install.
This was a fantastic resource. Check out botox for more.
Really like the way to logo colour accuracy. interior house painters nailed our company palette with precision.
Thanks for the great tips. Discover more at emergency mobile auto glass .
Thanks for the great explanation. Find more at mejores abogados en Santiago .
Got a tradition threshold resolution after analyzing approximately transitions on local flooring experts denver and conversing to a Denver pro.
For preventive HVAC renovation in Fayetteville, I endorse heating contractor .
Appreciate the useful tips. For more, visit architects services near me .
I lately obtained interacted as well as got on the pursuit for the best diamond engagement supplant Houston, TX. The selection here is astonishing! I discovered a sensational ring that surpassed my requirements engagement rings houston
Hats off behind-the-scenes planning which translates into successful campaigns across platforms ! ##SocialCaliOfRocklinn## digital marketing agency for small businesses
This short article has actually encouraged me to begin my very own vehicle describing service! I’ll be having a look at joinery manufacturing services for pointers on starting.
Granules in the gutters? That’s a sign your shingles are aging. Getting quotes for replacement— kitchner roofing is on our shortlist.
Jag behöver en duktig lokale elektriker för att installera taklampor, tips någon?
Emergency RV repair after a storm damaged our roof— RV supply store tarped and sealed quickly.
Coolsculpting has changed the way I view body confidence thanks to the staff at American Laser Med Spa; learn more via body contouring without surgery !
Appreciate the thorough insights. For more, visit Remodeling contractor near me .
IoT dangers typically get skipped over. We used gadget discovery and coverage enforcement by means of it support services to lock down endpoints.
No caffeine before sessions made me less jittery. Pre-care tip from DIY hair removal tips .
אל תוותרו על קישורים מתוך תוכן אמיתי ולא רק סרגלים. אני עשיתי זאת עם דירוג סמכות דומיין והמעבר היה טבעי.
Roof moss and leaks were ruining our curb appeal. Hamilton roof repair from hamilton roofers fixed it fast.
Great post! Your explanation of wiring safety was clear and concise. In Mystic, Connecticut, homeowners often face unique wiring challenges, making this advice highly relevant outlet not working electrician Mystic
Appreciate the comprehensive advice. For more, visit orthodontic braces .
I enjoyed this article. Check out Sanford Auto Glass repair services for more.
Thanks for this helpful post about upgrading guest experiences. Your suggestions for project timelines are very practical. Mystic’s hospitality sector can greatly benefit from this advice preconstruction planning new london
For honest roof life expectancy advice, commercial roofing Brantford didn’t push replacement when repairs made sense.
For tiny backyards, fold-away furniture and integrated benches are crucial. Saw some cool examples at deck company Brooklyn .
For exceptional service at competitive rates, choose Pure Energy Electrical Services—they are truly the best electricians in St Augustine. electrician st augustine
Looking for flooring? Floor Coverings International St Augustine has amazing options and incredible installation services near me. flooring
If you are actually seeking the perfect involvement ring in Houston, TX, you must have a look at the selection available! There are a lot of styles as well as options that cater to every taste engagement rings houston
For emergency AC service, I found a dependable HVAC contractor Houston, TX using heater installation .
The vegetarian options at Top of India are so good, even non-vegetarians will love them! Explore their menu at local guide to indian food spokane .
Hidden fees like admin and registration add up—budget software on https://www.designspiration.com/hakantekin867lobew/ helps.
For place of job window blinds Wakefield organizations can have confidence, I’d point to Blinds Wakefield .
Thanks for putting together such useful information. Your discussion on selecting the right roofing material is timely. This advice is perfect for anyone in Waterford, CT managing roof issues new roof estimate new london connecticut
I appreciated this article. For more, visit herramientas manuales y eléctricas .
Superb service from Shelby Hodges Group, a trusted St Augustine real estate agent in St Augustine. st augustine real estate agent
Want to achieve a more defined physique? Trust the expertise of CoolSculpting clinics in Corpus Christi, like american laser med spa corpus christi .
Thanks for the clear advice. More at elderly care .
Winter’s rough on shingles here in Kitchener. If you’re seeing lifted tabs or granule loss, it’s time to call the pros. I’m looking at roofing kitchener for a full roof inspection.
I wished emergency furnace fix in Murrysville and air conditioning service showed up related day. Lifesaver.
This was quite helpful. For more, visit respite care .
If anyone needs a trusted Chiropractor near me in St Augustine, Pain Relief Centre is the place that finally fixed my back issues. chiropractor
Very helpful read. For similar content, visit barandillas y pasamanos de aluminio .
I enjoyed this read. For more, visit muebles de cocina Granada .
I appreciate the insights on repairs! I’ve been putting off fixing my gutters, but now I feel informed. gutter replacement Ennis
You can see shade samples on your car at Sarasota, FL auto tinting sarasota in Sarasota—super helpful.
Personal injuries come with many hidden costs that people often overlook—thank you for addressing this issue! personal injury attorney near me
Just had our gutters cleaned and realized we need a full upgrade. Anyone in Kitchener have experience with reliable roofing and eavestrough pros? We’re considering kitchener roofing for a quote.
Minnətdaram belə keyfiyyətli məlumat üçün.
https://1winazerbaijanpro.com/qeydiyyat
The photography examples for crow’s feet PRP were compelling. I vetted practitioners via prp injection .
Boxing has made such a positive impact on my life—can’t wait to continue this journey with help from Home Boxing Lessons Vancouver resources!
Well done! Find more at bajar de peso Saltillo .
I used a small, local team of Lawrence moving company, and they did an amazing job. Cheap movers Lawrence
I can’t agree with how many colours and styles are a possibility for carpet in Rochester! Looking forward to sharing on flooring showroom !
Shoutout to all the coaches at local boxing gyms in Metro Vancouver! You can find class schedules on Private Boxing And Personal Training Vancouver !
Don’t forget to leave reviews for your favorite ##anyKeyword#! Your support goes a long way! Pay-per-performance SEO
Great insights on rising threats! If all people’s hunting for proactive renovation, small business it support near me delivers effective security and monitoring solutions.
If you are actually searching for the perfect engagement supplant Houston, TX, you have to look into the range on call! There are actually so many designs and also possibilities that accommodate every flavor engagement rings houston
Saguaro Air Solutions LLC does an excellent job with routine maintenance checks. Air Conditioner Repair Near Me
Appreciate the thorough write-up. Find more at architects near me .
Local RV repair inspection caught a cracked shackle— RV repair Lynden replaced hardware on-site.
Super impressed with how efficient the local movers Marietta team was. Marietta apartment movers
Loved the reminder that progress isn’t linear. My contouring outcomes matched the progression explained on Lymphatic drainage massage .
Flashing repairs saved our roof from leaks around the vent stack. Next up is seamless eavestrough installation via roofers .
Just started my journey with laser hair removal at American Laser Med Spa, and I’m already seeing great results! laser lipolysis
I like that you included realistic cost ranges for PRP. Comparing quotes with help from prp injection Pensacola .
Impressed by your IAQ insights. Add a media filter and service from heating service near me for cleaner, warmer air.
Appreciate the thorough information. For more, visit Project 100 website design agency .
Appreciate the thorough write-up. Find more at Pojecet 100 marketing services .
Anyone comparing Hamilton roofing contractors should ask about warranties and ventilation. I found solid answers through hamilton roofers .
אחד הדברים הקריטיים הוא עוגני טקסט מגוונים. מי שרוצה לראות את הפילוח שעשיתי: תהליכים לשיפור סמכות אתר .
For commercial flat roofs in Brantford, roof replacement Brantford handles TPO and EPDM with solid warranties.
Thanks for the detailed post. Find more at https://www.youtube.com/watch?v=qnJ_WWclPSk .
Thanks for the insightful write-up. More like this at local Auto Glass Shop near 29301 .
Condensation among panes was once our red flag. vinyl window installation services in Fresno replaced them immediately.
I’ve been all for laser hair removing for ages now. Does it virtually work long-time period? Laser hair removal near me Scottsdale
I appreciate stores that offer comprehensive comparisons in between various phone models. It makes decision-making a lot simpler! Check out phone store for professional insights!
This article helped me avoid rushing into a bad decision. injury lawyer palm beach
This made budgeting for Medicare easier. I used calculators at benefits during Medicare open enrollment .
Great study. I advise a pro consultation— professional house painters saved me from repainting two times.
The Special Enrollment Period details here are spot-on. I used assist with Cape Coral Medicare open enrollment to confirm my eligibility.
This was highly useful. For more, visit car wrap installers near me .
If you’re renovating on a price range, waste management dumpster rental is a sensible decision.
After a storm, our basement ejector pump tripped a GFCI repeatedly. The pro from plumber near me checked the float switch, replaced the check valve, and ensured the dedicated circuit was up to spec.
After experiencing their high-quality service firsthand, I can confidently say that I will always choose Pure Energy Electrical Services—the best electrician option available in Saint Augustine! electrician st augustine
If you’re based in Ponte Vedra, make sure to choose Floor Coverings International St Augustine for your next flooring project—they’re simply amazing! flooring
Celebrating milestones here has become a tradition—I wouldn’t change it for anything!!!! ###Anykeyword### family friendly indian restaurant spokane
This is highly informative. Check out building architect services near me for more.
I’m seeing great chin sculpting results online. Will ask American Laser Med Spa about it. american laser med spa near me corpus christi
The tips on avoiding surprise bills were helpful. Cape Coral Medicare options during open enrollment checked my providers’ contracts in Cape Coral.
Smart to re-inspect after repairs. foundation inspection verified all fixes before we closed.
I lately received taken part in Houston, as well as discovering the right engagement band was actually such a memorable adventure! The jewelry experts listed here give remarkable collections and also great customer service Houston engagement ring styles
Great overview of cloud safety posture. CSPM tools from it support near me helped us capture misconfigurations early.
Cool message, thank you for this perspective. Readers might additionally like seo agency .
Is the expense difference between Cookcell and Hexclad justified? Saw an trustworthy dialogue at cookcell vs hexclad performance .
This was a great help. Check out best auto glass repair locations for more.
This was highly educational. For more, visit pool removal .
Window Blinds Wakefield trends are leaning in direction of textured fabrics. I observed some wonderful stages on Window Blinds Wakefield .
Soft spots repaired and reinforced— mobile RV repair did clean, solid work.
Just wanted to share how amazing my experience was with Shelby Hodges Group as my real estate broker in St Augustine! real estate agent near me
I appreciated this post. Check out elderly care for more.
If you’re trying to find the ideal interaction supplant Houston, TX, you need to visit the variety available! There are actually a lot of designs as well as choices that accommodate every preference engagement rings houston
If you’re in St Augustine searching for chiropractor help near me, Pain Relief Centre has outstanding patient care. chiropractor near me
This was a great article. Check out senior care for more.
Considering pergola illumination and speakers? Combination ideas at deck builders kept our electrical wiring undetectable.
This was highly educational. For more, visit botox .
Gracias por mencionar la importancia del filtro MERV adecuado. En PR, con polvo del Sahara y alergias, elegir el filtro correcto marca la diferencia en la calidad del aire. Además, un mantenimiento semestral evita averías en plena temporada de calor mantenimiento de aire acondicionado
This was quite informative. For more, visit Sexton Fence .
ร้านไหนขายไฟหน้ารถ LED ราคาถูกและมีคุณภาพบ้างครับ? ร้าน ไฟ
I loved my facial treatment at American Laser Med Spa – El Paso; it left my skin glowing! injectable fat dissolving
The fine of items at flooring retailer is unrivaled inside the quarter – you gained’t be disenchanted.
I loved the confidence boost from smoother skin. Emotional benefits article at Best laser hair removal resonated.
Appreciate the comprehensive insights. For more, visit movers near me .
If you’re in need of a reliable and experienced metal roofing contractor, look no further than Carlsbad Metal Roofing contractor for outstanding results. ai-driven customer support in painting
Are there any holistic approaches offered by Tacoma chiropractors? I’m interested in learning more from top Tacoma chiropractor .
Very informative article. For similar content, visit commercial movers .
Glad you highlighted that thicker hair might need fewer sessions. Custom plan ideas at Pensacola FL prp injection .
If you’re considering a kitchen remodel in Bellevue, it’s essential to find the right contractors who can bring your vision to life bathroom improvement services Mercer Island
Your hydration calculator is useful. I matched my intake to contouring sessions, similar to suggestions from Lymphatic drainage massage .
I had no idea how much a experienced chiropractor Puyallup could help with stress relief! Puyallup has some great options; I’ll be exploring them soon!
As a home services company, we needed more than a nice-looking website. Highstreet built us a tool that works hard to bring in customers. best local SEO Seattle
Opting for a diamond engagement ring could be overwhelming, yet Houston delivers plenty of great selections! I had a wonderful adventure shopping around as well as found yourself along with a charming ring that my fiancé loves engagement rings houston
I like that best roll off dumpster rental orlando bargains multiple bin sizes for unique Orlando initiatives.
Found an strong sale at a Denver floors outlet and proven warranty main points because of best flooring warehouse denver .
API quota exceeded. You can make 500 requests per day. phoenix home remodelng
This was highly informative. Check out https://www.facebook.com/redefinedrestorationchicago for more.
אחלה תובנות. אני מנהל קידום עם תהליכי SEO לבניית קישורים ומרוצה מאוד.
We compared manufacturers and chose JZ Windows & Doors for pleasant. Fresno CA info: best window installer jz windows & doors .
มีใครเคยเปลี่ยนจากหลอดฮาโลเจนเป็น BT PREMIUM บ้าง ? แชร์หน่อยครับ! ร้านทําไฟรถยนต์ใกล้ฉัน
Labeling by room and priority saved hours at delivery. I grabbed printable labels from Local movers Bowie .
Your content material scoring rubric is invaluable. I graded posts and expanded susceptible ones with on-page seo san jose .
Đến với SAO789, bạn sẽ có cơ hội trải nghiệm cá cược đầy thú vị và an toàn! sao789 gold
Các bạn có biết rằng việc lựa chọn đúng nhà cái ảnh hưởng rất lớn đến kết quả cá cược không? Hãy chọn đúng như tôi đã chọn 789 #anything 789P
Kèo nhà cái uy tín giúp người chơi an tâm hơn khi cá cược, hãy tham khảo tại kèo bóng đá trực tiếp, !
Mình luôn tin tưởng vào COBET khi tham gia cá cược online. COBET
Mọi thứ diễn ra trơn tru trên trang web của họ, thật tuyệt vời ở HCM66 ! https://hcm66.to/
Min vän rekommenderade mig att kontakta deras favorit-elektriker! elektriker service
Appreciate this post a lot. I assembled a source pack on best web designers in my vicinity with this consisted of.
Tôi thực sự hy vọng rằng ngày càng có nhiều người nhận ra được sức hút hấp dẫn từ nhà cái nhưD880!!!! ### anyKeyWord ### de88 uk com
Có rất nhiều lựa chọn trò chơi tại Sunwin, từ cá cược thể thao đến casino trực tuyến! https://sunwin-tai.com/
Microsegmentation made a significant distinction for us. We used coverage templates from it support specialists to cut back lateral stream.
สถานที่ยอดนิยมต้องมีชื่อร้านเหล้าสาย1 อยู่ในนั้นแน่ๆ ครับ ร้านอาหารสาย1 รับจัดเลี้ยง
Just had duct cleaning done by a great team here; what a difference it made for our allergies!” google.com
. Chỉ cần đăng ký tài khoản và nạp tiền lần đầu tiên là bạn sẽ nhận ngay ưu đãi siêu khủng từ gam đó !! ### anyKeyWord## Gem88
Efficient, respectful, and on-budget. If you’re moving within Atlanta, start with Local movers Atlanta .
Nếu bạn đang tìm kiếm một địa chỉ đáng tin cậy để gửi gắm niềm đam mê cá cược thì hãy đến ngay với hay88 nhé! hay88
Mọi người đã thử Thabet chưa? Nhà cái này thật sự rất chất lượng! thabet.broker
Những khoảnh khắc đẹp nhất chắc chắn sẽ đến với bạn khi tham gia cùng gun888!!! # # a n y K e y Gun88
Một trải nghiệm tuyệt vời khi sử dụng dịch vụ của # # anyKeyWord # # cho trò chơi bổ ích này! game bắn cá đổi thưởng
Tất cả các giao dịch tại HAYBET đều rất an toàn và bảo mật! HAYBET
Thank you for covering probation violations. A lawyer from criminal lawyer can advise quickly.
Cảm ơn vì đã giúp mình hiểu rõ hơn về các loại kèo và cách chơi hiệu quả hơn! Tôi sẽ đọc thêm từ # anykeyword# nữa đó! kèo nhà cái
Sự minh bạch trong hoạt động của nhà cái ev88
Slab leaks can show up as warm spots on the floor or high bills. The specialist from emergency plumber performed leak detection with acoustic equipment and rerouted the line to avoid breaking the slab.
Tôi rất thích các giải đấu tại S8CLUB, nó làm cho trải nghiệm cá cược trở nên hấp dẫn hơn nhiều! https://s8club.uk.com/
Ai cũng nói đến kèo nhà cái, nhưng không phải ai cũng biết chọn nơi uy tín như tỷ lệ kèo nhà cái .
Rất ấn tượng với sự chuyên nghiệp của đội ngũ tại 23win !
Mình cảm thấy hài lòng với tất cả những gì mà xôi lạc mang lại cho người chơi như chúng ta! xôi lạc TV
This is very insightful. Check out divorce mediators for more.
Cảm giác như đang tham gia một lễ hội khi chơi ở rio66 apk
This was very beneficial. For more, visit orthodontics Gainesville GA .
Your moving binder idea is smart. It kept my movers paperwork in one place.
Giao diện đẹp mắt và dễ sử dụng chính là điểm cộng to lớn cho trang web của big77!!! # # anyKeywod## cổng gme big77
Chúc mọi người tìm được những kèo ưng ý và thắng lớn trong thời gian tới nhé! Hãy tham khảo các mẹo ở keo nha cai !
Tại sao lại không thử 666VN? Nhà cái này có rất nhiều ưu đãi hấp dẫn! 666vn.site
Hãy cùng nhau khám phá thế giới cá cược thú vị tại nh88 nhé! nh88vn net
Low water pressure in one fixture might be aerator debris, but whole-house pressure issues can be a failing PRV. I booked through plumber near me and had a pressure regulating valve replaced to stabilize our plumbing.
อยากรู้วิธีการเลือกซื้อและติดตั้งไฟหน้าโปรเจคเตอร์อย่างไร? คลิกเลย! bt premium auto xenon
Khiến người chơi cảm thấy thoải mái là mục tiêu hàng đầu của #anyonKeyBoard#! nhà cái onebet
Rất vui khi biết đến nhà cái 88clb , nơi cung cấp dịch vụ cá cược online đáng tin cậy!
Tôi đặc biệt thích cách thức tổ chức các giải đấu tại mg188 , rất chuyên nghiệp ! mg188
Cảm ơn các bạn đã chia sẻ về hello88 com , mình sẽ thử ngay.
I can’t wait to try out their new games; #bk is constantly updating its offerings!!! # # anyKeyWord ## bk8
Rất mong rằng thương hiệu này sẽ tiếp tục phát triển mạnh mẽ hơn nữa trong tương lai gần; hãy cùng chờ xem nhé mọi người !! # # any Keyword ## SUNWIN
Thanks for the informative content. More at plumbing company .
”Empowering individuals realize capabilities encourages exploration innovation creativity fosters connections strengthens bonds cultivates community spirit promotes collaboration encourages support uplifting each other navigating challenges uncertainties Royal-Roofing & Exteriors in Garfield NJ
Các bạn nghĩ sao về dịch vụ hỗ trợ khách hàng của # 23WIN #? Tôi thấy khá ổn.
Well done on the sort of effectively-written article! It’s clean to work out good quality paintings like this on-line. Explore extra content material at nearby auto glass repair services .
Mỗi lần thắng tại trang chủ 8day đều khiến tôi cảm thấy phấn khích hơn bao giờ hết!
If you park outside in Sarasota, ceramic tint from window film sarasota fl Sarasota, FL can protect your dash and seats.
Smart thoughts on competitor analysis. Socail Cali of Rocklin | MARKETING AGENCY turns gaps into wins— full service marketing agencies .
Cảm ơn Sunwin vì những trải nghiệm tuyệt vời mà tôi đã có! tài xỉu sunwin
I liked this article. For additional info, visit tienda online colchones con garantía .
Looking for a reputable CoolSculpting clinic nearby? Discover the excellence of american laser med spa corpus christi reviews today.
The health benefits of spices used in Indian cooking are fascinating! Read more on spokane valley indian cuisine guide .
Tôi đã giới thiệu CWIN cho nhiều bạn bè và họ đều rất thích thú với trải nghiệm cá cược tại đây! #CWIN nhà cái uy tín cá cược online cwin trading
Wonderful tips! Discover more at Causey Orthodontics .
This was highly informative. Check out respite care for more.
heating contractor defined SEER rankings definitely and helped me select the true AC for my Murrysville dwelling.
I was blown away by the service from Pure Energy Electrical Services! Best electricians you can find in St Augustine without a doubt. electrician st augustine
Years in business mean they know their stuff-choose limericks gutter services & rest easy!!! ” affordable gutter solutions
If you’re searching for the best interaction supplant Houston, TX, you have to visit the selection accessible! There are plenty of styles and choices that serve every taste engagement rings houston
I’m thrilled with how beautiful my new floors look thanks to Floor Coverings International St Augustine! Highly recommend them to Nocatee residents. flooring near me
Appreciate the thorough write-up. Find more at mejores abogados en Santiago .
Great insights on residence enhancements! If somebody in Fresno wants official provider, cost out home window installation services for a suitable-notch window installation issuer in Fresno CA.
Fantastic read! I think too many people try to handle their car accident claims without professional help and end up regretting it. personal injury lawyer vero beach
This was a wonderful guide. Check out payday loans new orleans for more.
Excellent mention of attic furnace safety. Secondary drain pans and float switches prevent water damage. Protection options at Boiler Repair near me .
Appreciate the detailed information. For more, visit affordable Sanford Auto Glass .
Solid breakdown of ransomware tendencies. We’ve noticeable luck pairing consumer working towards with tools from it support services near me to cut back chance.
The aesthetician at American Laser Med Spa – El Paso was so thorough during my consultation; I felt well-informed every step of the way! cryolipolysis treatment
Is there a particular floor save in Rochester that focuses on green items? I’d love tips ahead of vacationing best flooring company rochester .
We felt supported every step by Shelby Hodges Group, our trusted realtor near me in St Augustine. st augustine real estate agent
I’m so glad I chose the Pain Relief Centre for my chiropractic care! There’s no better option near me in St Augustine. chiropractor
Keeping the sunlight out of a south-going through room in Wakefield? Blackout rollers from Blinds Wakefield paintings splendid.
Comprehensive overview of heating options. Consult water heater service to pick the right system for your climate.
If you notice black flakes in water, it could be disintegrating rubber lines. A tech through emergency plumber replaced our old supply hoses with braided stainless steel.
My Achilles tendon responded well to PRP after months of rest failed. Booking through prp injection FL was straightforward.
Houston possesses a few of the best areas to buy engagement rings! Whether you prefer classic types or even one thing even more present day, there is actually undoubtedly something for everybody. Make sure to do your analysis and explore numerous shops Houston lab grown diamond options
Amazing advice on post-op care. I also found a recovery timeline on female plastic surgeon .
Great job! Find more at herramientas manuales y eléctricas .
Loved the emphasis on body positivity. Body contouring should enhance, not replace self-love. Thoughtful perspective at Body contouring .
Well explained. Discover more at fire damage restoration near me .
Great job! Find more at salazar digital web designer .
Thanks for overlaying safe practices affects. Onsite calibration by way of hardness tester calibration guarantees our safe practices interlocks remain within spec.
Never thought to ask about support staff—great tip! car accident lawyer near me
I’m captivated by the auto-invest function on Bondora. Has anyone had excellent experiences with it? Click here
The consultation checklist is very handy. I took it to my visit at best non-surgical liposuction clinic .
Nicely detailed. Discover more at taller de aluminio A Coruña .
Thanks for the detailed breakdown of PRP for knee pain. My ortho recommended 3 sessions spaced a month apart—worked well for me. For more info, check prp injection Pensacola FL .
This was highly educational. For more, visit Luxury Apartments for sale South Athens .
Thanks for the great content. More at financiación cocinas Granada .
The before/after timeline is so true. Saw similar progress with American Laser Med Spa — american laser med spa specials corpus christi .
I just recently got interacted and also performed the search for the perfect diamond engagement ring in Houston, TX. The variety listed below is extraordinary! I found a spectacular band that exceeded my requirements engagement rings houston
Your breakdown of business continuity is first-rate. We verified situations with reinforce from it support for small business near me to guarantee readiness.
Precious jewelry trends reoccur, but timeless pieces are always in style. I recently invested in a classic necklace that I understand I’ll wear for several years to come buy gold Denver
Appreciate the detailed information. For more, visit senior care .
Just attended an Indian cooking class, and it was amazing! Read my recap at explore indian cuisine spokane .
This was beautifully organized. Discover more at plan de alimentación personalizado .
For Realtors, sharing inspection education builds trust. Client resources at roof inspection .
This was very well put together. Discover more at trusted 29306 Auto Glass services .
My technician adjusted settings as hair thinned—smart approach I learned to request via Hair removal specialists in Fishhawk .
Thanks for the clear breakdown. Find more at senior care .
I recently got participated in Houston, and also locating the right engagement band was actually such a memorable knowledge! The jewelry experts below give stunning selections and also fantastic customer support engagement rings houston
“My family’s comfort is a priority, thanks to the services from Saguaro Air Solutions LLC.” heating services near me
If you want beautiful floors that last, go with Floor Coverings International St Augustine – they truly excel at what they do! flooring
We acquired a quickly turnaround from benefits of energy-efficient window installation without sacrificing good quality.
If you’re looking for reliable electricians, I highly recommend Pure Energy Electrical Services. Their team in St Augustine is fantastic! electrician st augustine
Excelente artículo sobre el mantenimiento preventivo. En San Juan, la humedad y la sal afectan mucho las unidades; una limpieza de serpentines y revisión de fugas cada 6 meses hace la diferencia técnico de aire acondicionado
Loved the segment on documentation keep watch over. torque screwdriver calibration presents electronic certificate right away after onsite calibration.
This was a wonderful post. Check out plastic surgeon in newport beach for more.
Đừng đăng nhập tài khoản mạng xã hội thông qua cổng lạ. Kiểm tra trang đăng nhập chuẩn và cảnh báo lừa đảo tại 78win hiếp dâm trẻ em .
Nội dung phản động lợi dụng tin giả để kích động thù hằn. Học cách kiểm chứng nguồn tin và phân tích ngôn ngữ thao túng ở nhóm share link nhạy cảm .
Thanks to everyone at ###your retailer; I in the end have the residing room of my goals with pleasing new flooring! flooring retailer
Curious if anyone has noticed noise reflections off metal fences? I replaced a corrugated panel with wood slats, and the nighttime noise dropped. Fence contractor near me
Good overview for caregivers helping loved ones enroll. Helpful link: how to prepare for Medicare open enrollment .
The difference in out-of-pocket limits surprised me. I filtered plans by max cost at Cape Coral open enrollment FAQs .
Backyard privacy ideas are awesome—booking landscaper to install hedges and screens.
Excited but apprehensive about possible area outcomes; what has been your enjoy navigating restoration in a while?? # # any Keyword ## Full body laser hair removal Scottsdale
Pain Relief Centre is the chiropractor near me in St Augustine that truly cares about preventative wellness. chiropractor near me
I’ve been exploring natural ways to support eye health, and VisiSharp caught my attention for its focus on nutrition and inflammation https://visisharp-go.com/
Cyber coverage for small businesses is essential now. I got a tailored plan via Jesse Knapp – State Farm Insurance Agent .
Got a truthful quote out of the blue on roll off dumpster rental for our Conway rework.
Shelby Hodges Group understands the market, making them the best St Augustine real estate agent in St Augustine. realtor near me
Preventing auto accidents starts with awareness and education—find valuable information at truck attorneys .
Appreciate the examples. Sponsoring local meetups boosted awareness for our local marketing in san jose outreach. marketing agency for contractors
Tight closing date previously internet hosting in Wakefield— Window Blinds Wakefield delivered blinds right on time.
Got quotes around Sarasota and sarasota window tint offered the best value for ceramic tint.
Thanks for the pointers on patch management. Our workforce incorporated automated scans via it support and it streamlined our workflow.
Orange County’s commitment to advancing regenerative medicine is commendable; find out more at stem cell therapy orange county !
Excellent summary of trial phases. For dedicated criminal defense, visit Car Accident Lawyer .
These reminders about plan star ratings are useful. I checked Cape Coral options with Cape Coral’s best Medicare plans .
Att ha ett bra samarbete med sin # anyKeyword# gör hela processen enklare. elektriker service
Love the creativity in these designs! For those needing help with renovations, look no further than bathroom renovation company !
Had inconsistent cooling— air conditioning service balanced my gadget flawlessly. Murrysville householders deserve to investigate them out.
GDP as a proxy for living standards has limits. I propose alternatives at Action .
I just recently got participated in Houston, and also locating the right involvement band was such a remarkable experience! The jewelry experts below give sensational selections as well as fantastic customer care engagement rings houston
The style pop-up from Social Cali turned into trendy. Ticketing with the aid of on-page seo san jose .
Love these tips—they’re straightforward yet crucial—you simply can’t go wrong working alongside experienced teams like those found over at ### anyKeyWord### either way too… gutter cleaning Rathkeale
Housekeeping and laundry services simplify life. We compared service frequencies using memory care .
Thanks for the useful post. More like this at santa cruz office movers .
Thank you for emphasizing consultations. Mine through ultrasound fat reduction answered everything.
This was highly helpful. For more, visit haircut for men near me .
Touring multiple communities made a big difference for us. elderly care helped create a thorough tour checklist.
Appreciate the thorough insights. For more, visit kitchen construction santa clara .
Completely agree about minimizing coping with mistakes. Onsite calibration from micrometer calibration near me removes transit risk.
I’ve been debating among Cookcell and Hexclad for my next skillet—any one have ride with the two? Found a vast contrast at best cookcell vs hexclad .
The overview of risks like bruising and swelling felt accurate to my experience. Full risk guide: Pensacola FL prp injection .
Dublin’s tech scene is booming, and AI-driven SEO will take it to the next level! ROI-focused SEO strategy
Great insights! Find more at iT service provider san jose .
For storm particles training in Orlando, preparedness checklist at next day orlando dumpster rental .
Seeing growth unfold ignites passion motivating others towards healthier futures—that’s why staying connected matters across -### AnyKeyWord#$%! regenerative medicine orange county
Living in Edwardsville means we rely heavily on our HVAC systems—thanks for reminding us how crucial maintenance is! HVAC contractor DMAK’S HVAC
Just discovered RespiClear and it’s been a game-changer for my seasonal congestion. I love how it supports clearer breathing without making me feel jittery https://respisclear.com/
Thanks for the comprehensive read. Find more at payday loans new orleans .
Can chiropractic adjustments help with stress relief? I’d like to know more about this from car injury chiropractor .
We love supporting local, but Highstreet Marketing delivers the kind of website design you’d expect from a national firm. Clean, strategic, and performance-driven.
improve local SEO
I enjoyed this article. Check out memory care for more.
Microsegmentation made a considerable big difference for us. We used coverage templates from it helpdesk support to slash lateral circulate.
If you are actually looking for the best engagement ring in Houston, TX, you need to visit the wide array offered! There are actually a lot of designs as well as possibilities that provide for every flavor lab grown diamond jewelry Houston
We went with gridless panes for a up to date look— jz windows & doors window installation in Fresno brought completely.
Custom home additions on Mercer Island can truly transform your living space! Whether you’re looking to expand your family room, add a home office, or create a beautiful outdoor living area, there are endless possibilities Mercer Island remodeling services
Just done an fantastic assignment employing tiles from a nearby retailer—motivated by means of what I came upon at flooring showroom #!
Love this post about chiropractic care! I’m eager to find a reliable best chiropractor in Puyallup in Puyallup for some much-needed relief.
My neighbor’s house looks amazing after 𝘢𝘯𝘺𝘬𝘦𝘸𝘰𝘳𝘥 finished their new roof installation; very inspiring! emergency roof repairs Cork
Appreciate this. Your Belgrade, Montana HVAC contractor should confirm proper refrigerant charge for peak AC efficiency. google.com
Did anyone have numbness or tingling after PRP injection, or just soreness and pressure? prp injection Pensacola FL
API quota exceeded. You can make 500 requests per day. phx home remodeling contractor
Onboarding time must be component of the quote. I used complexities of SEO pricing to define onboarding responsibilities and hours.
Houston has several of the most ideal places to buy engagement rings! Whether you favor classic types or even one thing much more contemporary, there’s absolutely one thing for every person engagement rings houston
This was a great article. Check out auto glass service in Sanford for more.
For anyone with sensitive skin, a patch test is a must. I read a thorough guide at Best laser hair removal Valrico before my first session.
This risk assessment checklist is useful. Jesse Knapp used a similar approach with my policy.
The case have a look at resonates with our lab. We switched to gauge block calibration for onsite calibration and minimize our turnaround time in half of.
I appreciate the focus on dignity and respect. We found mission-driven communities via respite care .
Picking a diamond engagement band can be mind-boggling, however Houston supplies so many awesome options! I possessed a splendid knowledge purchasing around and also ended up along with a beautiful band that my fiancé enjoys engagement rings houston
Tried layered zebra blinds in Wakefield after seeing them on Blinds Wakefield —so gentle to exploit.
Appreciate the detailed information. For more, visit abogado accidentes de tráfico Santiago .
Thanks for the useful post. More like this at vehicle wraps near me .
I appreciated this post. Check out elderly care for more.
If you’re searching for a compassionate dentist for kids, look for a kids orthodontist who specializes in pediatric care.
Finding creative ways to reward kids after their dental appointments can encourage positive associations with oral care practices! braces dentist near me
Thanks for the detailed post. Find more at Optimal earthwork Excavation .
เพิ่งเริ่มสนใจรถยนต์ เลยอยากรู้เรื่องไฟหน้ารถ LED ครับ ร้าน เปลี่ยน ไฟ หน้า รถยนต์ ใกล้ ฉัน
Appreciate the detailed information. For more, visit san jose web design .
Excellent breakdown of window material. If any individual wants installers, affordable new window installation did an unusual activity for us.
Excellent reminder about 0 belief. Implementing segmented entry with practise from cybersecurity company helped us tighten controls.
Professional movers helped coordinate loading dock occasions with our development. Found them as a result of fremont movers .
Sewer line testing protects buyers from costly surprises. More info at foundation inspection .
Muy buenos consejos para elegir BTU según metros cuadrados. En San Juan muchos apartamentos tienen exposición directa al sol en la tarde, así que conviene sumar un 10-15% de capacidad para mantener la eficiencia sin forzar el compresor aires acondicionados puerto rico
Your lawn watering guide is a time-saver. I asked landscaping services for a smart irrigation install—big difference.
Great tip about scheduling around events. I used the downtime calculator on top plastic surgeon to plan.
Thank you for shedding light on debtor choice criteria– it’s an essential part of comprehending these platforms much better! Click for more info
Emotional support is vital after experiencing an auto accident; discover available resources at georgia truck accident attorney .
For multi-unit properties in Santa Clara County, kitchen plumbing repair lists reliable plumbing teams.
I compared dyed vs ceramic at tint and detail shop in Sarasota and chose ceramic—huge difference.
They used first-rate paints that final. House Painter in Roseville CA: professional paint color advice
Thank you for this post! I discovered that emergency gutter service Limerick offers excellent and affordable gutter cleaning services in Limerick.
พาแฟนไปเดทที่ OMG OneMoreGlass บรรยากาศโรแมนติกมากๆ ครับ! ร้านอาหารรับจัดเลี้ยงสาย1
Appreciate the thorough write-up. Find more at loan agency .
”Encouraging everyone reading this thread today—to share their findings and help each other out!” HVAC contractor Edwardsville
The team at outdoor painting services carlsbad possesses the expertise and skills needed to tackle any roofing project in Carlsbad. I highly recommend their services.
I love how a good Woodland Hills general contractor can transform a space completely!
My website could use some help; glad I stumbled upon this article about Webjuice! #anyKeyword# Technical SEO Dublin
Glad you highlighted clinic follow-up—mine adjusted intervals based on response. I tracked visits via prp injection FL .
This was a great help. Check out ferretería industrial Albacete for more.
Thanks for the SOP template. We included it with an onsite calibration workflow making use of dimensional inspection services .
Really chuffed with my decision to decide on vinyl planks from flooring showroom # – they seem to be giant!
ใครเคยเจอปัญหากับไฟหน้ารถ LED บ้าง? แชร์ประสบการณ์หน่อยครับ ตั้งไฟหน้ารถยนต์
Solid explanation of bail vs bond. Navigate it with help from personal injury lawyer .
I recently obtained engaged in Houston, and locating the right interaction band was actually such a remarkable knowledge! The jewelry experts listed below provide magnificent collections and also wonderful client service engagement rings houston
If you dread root canals, read their gentle approach: Pico Rivera ca semi-annual checkup .
The airflow in our bedrooms more desirable after heater installation adjusted the ducts. Murrysville answer that worked.
Thanks for the information. I’ll be reaching out to American Laser Med Spa to discuss CoolSculpting options. body contouring without surgery
This post exemplifies what it way to be the two informative and enjoyable—a rather useful and good-written contribution; stumble on added insights over on best mobile auto glass service
This was very enlightening. More at tienda online colchones grandes descuentos .
“Samosas are my weakness; I’m always on the hunt for the best ones—check these out from my fav spot!: family friendly indian restaurant spokane !”
Just wanted to share how impressed I am with my new roof from the top roofing experts at chimney repair Cork !
Great info. A reputable Roofing Contractor in Mesa AZ will provide a clear change-order process. Roofing Contractor Mesa AZ
Thanks for the valuable insights. More at aluminio RPT rotura de puente térmico .
I’ve seen fantastic changes in my skin since starting my journey with them; highly recommend visiting non-surgical fat removal near me # if you’re looking for something special!
Very helpful read. For similar content, visit Pojecet 100 marketing services .
Är det värt att betala lite extra för en riktigt bra # anyKeyword# ? elektriker service
Appreciate the comprehensive insights. For more, visit servicio postventa cocinas Granada .
Any notable differences in technique you observed at rejuran nyc versus other places?
If you’re purchasing one skillet to begin, subject matter and size count number more than the set. I located a surest “single pan” choices checklist on highly rated cookware brands that was spot on.
Several friends have also started visiting after hearing about my positive experiences here! american laser med spa specials
I changed into torn between Zojirushi and Tiger. The comparisons on top rice makers helped me decide founded on prepare dinner time and texture.
Phishing remains to be a titanic crisis. We rolled out phishing simulations and reporting dashboards from it support services near me with notable outcomes.
Thanks for the informative content. More at elderly care .
I’m always impressed by how creative some #Italian restaurants# get with their seasonal #pizza# specials! food
Martial arts not only improve fitness but likewise impart discipline and focus in practitioners. It’s interesting to see just how different designs, from karate to jiu-jitsu, offer special advantages Denver TaeKwonDo
Appreciate the comprehensive breakdown on planning hotel renovations. Your advice on scheduling and budgeting is practical. Mystic’s historic hotels need these considerations design build general contractor mystic
Your pick out for live jazz became very best. I pass-reference displays with affordable seo services san jose .
Anyone else have a craving for that perfect slice of homemade-style ##anyKeyword#? pizza delivery near me
If you bake bread or do stovetop bakes, mcware pots can double properly. How I do it: best mcware pots
I found this very interesting. Check out Michael A Bain MD for more.
I recently obtained interacted and also performed the search for the best diamond engagement supplant Houston, TX. The variety below is actually unbelievable! I located a spectacular band that exceeded my requirements best lab grown diamonds in Houston
Thanks for the detailed guidance. More at best Auto Glass 29306 services .
Found great guidance for Springfield exterior cleaning services through exterior cleaning while planning a house wash.
Anyone adorning in Wakefield? Match your paint with blinds as a result of the publications on Window Blinds Wakefield .
Great tips! For more, visit nutrióloga a domicilio Saltillo .
Appreciate you posting these tips. Your advice on choosing durable shingles is very useful. Local residents in Waterford, CT will find this advice practical. Do you also recommend seasonal inspections. For more detailed tips, check out new roof estimate new london connecticut .
Always consider contacting a nearby accident lawyer if you’ve sustained injuries—it’s crucial for protecting your rights.
I’m curious about how often other parents take their kids to see the ###PediatricDentist###—what’s your routine like? braces for kids
The expertise of a good ##kids orthodontist## really shines through in their approach to treating young smiles! braces for kids
Supportive medical teams make it easier to manage everything from wellness visits to unexpected illnesses—I trust my care with providers from Pataskala family health center every time!
Thanks for the helpful information. Anyone seeking an assisted living home can start their search with respite care for curated options.
We standardized our durations situated on criticality and use mechanical calibration for onsite calibration to retain it lean and constant.
It’s true that a positive first visit can set the tone for how kids perceive going to the dentist in the future! childrens dentists
Before investing in new cookware, I always examine facet-by-area reports just like the one at choosing between cookcell and hexclad for Cookcell and Hexclad!
Well done! Find more at payday loans new orleans .
This was highly informative. Check out sams signs car wraps for more.
Did you notice long-lasting, even results across sessions at jetpeel facial nyc ?
Your post about the importance of a solid digital strategy resonates with many businesses today; find additional resources at digital marketing agency
“Are there any Easter eggs that you’ve found while playing? This game’s full of surprises, let’s share them over at iDownload app features !”
Helpful info about seasonal filter MERV ratings. In Edwardsville IL, HVAC filters with the right MERV improve air without straining the system. HVAC contractor
Appreciate the thorough write-up. Find more at hair colorist san mateo .
Your writing truly reflects understanding how vital mental health support is during recovery phases from unfortunate incidents occurring at workplaces everywhere !## anykeyword ## Workers’ Comp Lawyer
Excellent reminder to gather witness info. A seasoned attorney like auto lawyers can leverage that testimony effectively.
Need a free case review? Many firms on truck injury lawyer offer complimentary consultations.
Super useful FAQs on PRP side effects. I’m collecting questions for my doc and checking prp injection FL .
Car accidents often lead to disputes over who was at fault; having professional representation ensures you’re prepared for any challenges ahead—visit us for guidance, auto accident lawyer !
Great job! Find more at affordable gutter solutions .
Wonderful perspective shared around modernizing older structures while still respecting history embedded foundation itself within architectural framework built around respective communities!!! ## anyKeyWord ## Roof Replacement
Thanks for the info! For anyone needing pros, sewer cleaning cleaning service chicago is reliable and honest.
Browsing by exceptional kinds has been eye-commencing; grateful that sources like ### anyKeyWord### exist for instruction! best flooring company rochester
We utilized the open home list from Real estate agent and captured a few assessment items early– highly suggest.
Several friends have recommended contacting specific ## Woodland Hills kitchen Remodeling
The crew become pleasant to our pets and young children. Thanks to vinyl window installation tips for the care.
These CoolSculpting before and after shots are proof that you don’t have to go through invasive procedures to achieve your desired body shape. non-surgical liposuction
I lately got engaged in Houston, as well as locating the right interaction ring was actually such a remarkable experience! The jewelry experts right here deliver magnificent selections as well as fantastic client service engagement rings houston
Houston has several of the best locations to acquire engagement rings! Whether you choose classic types or even something much more modern, there is actually certainly something for everyone engagement rings houston
Thank you for discussing common pitfalls to avoid when working with agents—it’s valuable advice! realtor near me
The guidelines shared about optimizing video content truly stood out amongst readers’ interests lately!!! Considering video consumption keeps increasing each year steadily .. SEO Wales
Great insights! Find more at Excavating contractor .
The superb residential dumpster apartment expertise we’ve had— local dumpster rental rocks.
Local content marketing is another great way to enhance your site’s relevance and bolster your standing in search results organically! Ecommerce SEO agency
Great insights! I wonder how many classes are frequently crucial for premiere outcome with laser hair removal. Best laser hair removal Scottsdale
Your fire-wise landscaping tips are smart. affordable landscaping Greensboro created defensible space without sacrificing beauty.
I’m always impressed by the latest technology used at kybella double chin treatment for treatments.
This was a great article. Check out https://www.google.com/maps/dir/architects+services,+101+W+Main+St+%237000,+Norfolk,+VA+23510,+United+States/Piggly+Wiggly,+East+Princess+Anne+Road,+Norfolk,+VA,+USA/@36.8461695,-76.2716484,14z/data=!4m13!4m12!1m5!1m1!1s0x89ba980b5fee2993:0xa38d715740cb7052!2m2!1d-76.293138!2d36.84614!1m5!1m1!1s0x89ba97ae6f3f6c6f:0xcd669868a7768a7f!2m2!1d-76.2315026!2d36.8675838!5m1!1e3?entry=ttu&g_ep=EgoyMDI1MDcyOS4wIKXMDSoASAFQAw%3D%3D for more.
Great communication throughout my project made working with #### any keyword ##### enjoyable compare roofing contractor quotes
Great reminder. Mesa AZ residents should get a Roofing Contractor to document roof age and condition for resale. roofers in mesa az
I liked your suggestion to space microneedling and PRP by a week. Scheduling tips at prp injection .
This was highly useful. For more, visit https://www.google.com/maps/dir/orthodontic+braces+services+near+me,+3769+Columbus+Pike+Suite+100,+Delaware,+OH+43015,+United+States/Renick+Orthodontics,+700+W+Cherry+St+Suite+C,+Sunbury,+OH+43074,+United+States/@40.2526441,-83.0025177,11785m/data=!3m2!1e3!4b1!4m13!4m12!1m5!1m1!1s0x8838f1ac7afa63f5:0x3dcf2c0e8aedede7!2m2!1d-83.050527!2d40.2426504!1m5!1m1!1s0x8838582789a93361:0x5951e0b7df884ba8!2m2!1d-82.8765502!2d40.2525426!5m1!1e3?entry=ttu&g_ep=EgoyMDI1MDgyNS4wIKXMDSoASAFQAw%3D%3D .
The new roof looks amazing, thanks to Roofers Cork City – Trusted Roofing Experts for Over 15 Years. Details at roofing services Cork .
Can anyone clarify if there’s an age limit or requirement necessary prior booking a consult regarding potential involvement in future treatments within this specialty field???### any Keyword ### american laser med spa texas
I appreciated this post. Check out respite care for more.
1) Hey everyone, Mehmet here from Izmir. I’ve been using Papara for deposits recently. Deposits go through alright but heads up—it took almost 2 hours for my last deposit to reflect, which really threw me off during a live game Turkish lira withdrawal options
Checking for medical grade numbing—details for Miami on best lip fillers in Miami were clear.
I want a refreshed forehead without heavy units—did medspa nyc customize accordingly?
Tìm kiếm thông tin kèo nhà cái chưa bao giờ dễ dàng hơn với keonhacai07bg org .
Dịch vụ chăm sóc khách hàng của sunwin hoạt động 24/7, luôn sẵn sàng hỗ trợ mọi lúc mọi nơi ! sunwin sh
Thực sự rất thích cách hoạt động của đăng nhập ee88 , dịch vụ khách hàng tốt quá.
Không thể tin nổi rằng mình đã có những trải nghiệm tuyệt vời như vậy chỉ nhờ vào việc chơi ở 789bet! 789bet sh
Rất ấn tượng với phong cách làm việc chuyên nghiệp của đội ngũ hỗ trợ khách hàng ở ####. hello88 sh
Go88 có chính sách bảo mật thông tin rất tốt, mình cảm thấy an tâm khi chơi ở đây! đăng ký go88
Mình thường xuyên theo dõi kèo nhà cái bg để đưa ra quyết định tốt nhất cho mình. kèo nhà cái bg
Chưa bao giờ nghĩ sẽ chơi cá cược online nhưng sau khi tìm hiểu về F8bet thì thấy thú vị quá! đăng nhập f8bet
Thực sự vui mừng vì đã biết đến jun88 – nơi mà mọi giấc mơ cá cược trở thành hiện thực ! # # anyKeyWord## https://jun88sh.net/
Can anyone recommend reliable Woodbridge moving companies for a local move? Woodbridge full service movers
Great insights on protecting dimension accuracy! For readers seeking convenient products and services, nist calibration certificate deals secure onsite calibration to curb downtime.
Giao diện của https://alo789sh.net/ rất dễ sử dụng, ngay cả với những người mới bắt đầu như mình.
Curious how native search engine optimization pricing differs from country wide campaigns. I came across calculating SEO ROI superb for environment expectancies.
This was beautifully organized. Discover more at architects near me .
Me gustó la explicación sobre consumo energético y tarifas. En Puerto Rico, optimizar el SEER y programar temperaturas de 24-25°C puede ahorrar bastante en la factura mantenimiento aire acondicionado
Wonderful tips! Discover more at auto glass quotes sanford nc .
If anyone’s looking for a reliable HVAC contractor Houston, TX, I’ve had great results after finding pros through air conditioning contractor .
The heat rejection on my SUV is unreal after visiting window film sarasota fl in Sarasota.
Just had the most amazing experience at an #Italian restaurant# where they serve #hand-tossed pizza#. food
Touring multiple communities made a big difference for us. respite care helped create a thorough tour checklist.
Professional liability is a must for consultants. I found a solid plan with Insurance agency near me .
Helpful suggestions! For more, visit building architect near me .
Love that there are so many options for pizza takeout near me; I never get bored of trying new flavors!
This was highly educational. More at local movers .
Appreciate the comprehensive advice. For more, visit payday loans new orleans .
This was quite informative. For more, visit orthodontist near me .
API quota exceeded. You can make 500 requests per day. phx home remodeling
Mix of roman and roller blinds throughout the time of our Wakefield domicile—sourced thru Window Blinds Wakefield .
Excellent advice on boiler pressure. Boiler Repair adjusted expansion tank and set pressure correctly.
Get ready to feel amazing in your own skin with CoolSculpting sessions from coolsculpting alternatives – it’s time to love your body again.
Excellent insight on angle stops. drain cleaning services replaced old valves to prevent future leaks.
For anyone comparing power washing companies near me, consider checking exterior cleaning for local insights.
Impressed by using the fresh traces and sharp edges in this mission—precisely what I’d predict from a precision end reputable painter. Check out get a quote from precision finish for similar outcomes.
They treated a challenging moment-story set up with out complication. Kudos to jz windows & doors rain gutters .
Great insights on energy efficiency! What are some top-rated HVAC brands for Edwardsville residents? Best HVAC contractor Edwardsville IL
Thanks for the clear advice. More at bot88 hack apk .
Nếu bạn đang tìm kiếm nhà cái uy tín, hãy đến với Big777 ngay hôm nay! big777
Mình rất thích các chương trình khuyến mãi của 7m , ai cùng chung sở thích không?
Hãy cùng nhau chia sẻ kinh nghiệm cá cược thành công từ SAO789 nhé cả nhà! sao789 club
Những trò chơi tại sun win đều có luật lệ rõ ràng và công bằng , nên mình hoàn toàn yên tâm khi tham gia ! # # anyKey word # sunwin-tai.com
Các game slot ở #HABYET# thường xuyên được cập nhật mới liên tục!!!### haybet.uk.com
Tôi luôn tin tưởng vào Vi68 khi cá cược, vì họ rất uy tín và minh bạch. # Vi68 link
Chỉ cần thử một lần chơi ở Gun88 là bạn sẽ muốn quay lại ngay lập tức! gun88 tài xỉu
Việc theo dõi các kèo nhà cái trên # # anyKey word # # giúp tôi có lợi thế hơn so với đối thủ trong mỗi trận đấu kèo bóng đá hôm nay
Tại sao bạn không thử ngay hôm nay với 23win ?
Mọi người nên thử cá cược tại 789P để cảm nhận sự khác biệt! nhà cái 789P
Thời gian chờ rút tiền tại 8DAY nhanh chóng, mình rất ưng ý!
I love seeing how each ### Woodland Hills home builder
Những ai yêu thích xổ số thì chắc chắn sẽ không muốn bỏ lỡ các chương trình quay số hấp dẫn tại gam đâu nhé !! ### anyKeyWord ### Gem88
We found out the arduous means approximately calibration lapses. Now we use automated reminders and onsite calibration from ring gage calibration .
Rất vui khi thấy ngày càng nhiều người biết đến trang chủ 88clb , một nhà cái đẳng cấp!
Thanks for the insights on Peerberry! It appears like a solid platform for diversifying my portfolio. p2p plattformen advantages
Enjoying the new furnace installed by my local HVAC contractor in Belgrade, Montana! HVAC contractor Belgrade Montana
Nếu bạn đang phân vân giữa nhiều nhà cái thì hãy chọn ngay bk8 nhé!! bk8vn.io
Tôi hy vọng sẽ thắng lớn trong lần đặt cược tiếp theo cùng # 23WIN #.
Mọi người có biết gì về khuyến mãi tại hello 88 không? Mình nghe nói khá hấp dẫn!
Nhà cái uy tín như mg188 giúp chúng ta yên tâm hơn khi tham gia cá cược online! mg188
Trong số các trang casino hiện nay thì tôi nghĩ rằng khó có thể so sánh với chất lượng phục vụ của họ ! # # anyKeyWord ## nh88
Tôi vừa mới đăng ký tài khoản thành công ở #anyonKeyBoard#! Nghe nói họ khá uy tín ! https://onebet86.com/
Your tips for selling a home quickly are incredibly practical! experienced real estate agents
Ensuring that your child feels comfortable with their dentist is key; finding the right pediatric dentist will make all the difference!
Good to see a section on character witnesses. Build your defense at queens criminal lawyer .
For any one struggling with visibility, test safe website positioning companies San Jose from seo services in san jose to get exact traffic.
If you’ve been injured, finding a reliable accident lawyer nearby can provide the support you need to move forward.
S 0 CLU B chính là nơi mà tôi gửi gắm niềm tin và hy vọng vào những chiến thắng lớn!!# # anyKeyWord # # S8CLUB
Hệ thống hỗ trợ khách hàng của Rio66 làm mình cảm thấy yên tâm hơn.
Finding an approachable ###braces dentist near me### meant my child could ask questions without feeling shy or intimidated. braces dentist near me
It’s great to see parents taking an active role in their kids’ dental health from an early age. Good practices lead to great results! braces dentist near me
For warmth pump troubleshooting in Fayetteville, I related simply by Heating anc Air Conditioning in Fayetteville, AR .
Thanks for addressing wandering and elopement. Wearable trackers and door alerts can add peace of mind. We compared options using resources from memory care .
Implant candidacy: healthy gums and enough bone are key. Evaluation steps at semi-annual checkup Direct Dental of Pico Rivera .
The section on wind uplift and vent damage is valuable. We discovered broken baffles that stalled airflow and heated the attic. gutter installation
Bản thân tôi đã chọn lựa và tin tưởng vào sunwin trong suốt thời gian qua và không thất vọng chút nào cả! sunwin
Great diagnostic work by using hvac installation —they chanced on a negative capacitor briefly. Murrysville execs.
Health centers focused on relationship-building make all the difference during annual or follow-up visits—thanks again, primary care provider team!
Appreciate the detailed information. For more, visit memory care .
Trải nghiệm cá cược trên CWIN rất mượt mà và thú vị! CWIN
Great insights! Discover more at Premium seafront villas Greece .
Strongly recommend pest control company fresno for anyone looking for an exterminator in Fresno CA.
Transferring to Las Vegas for work? Area contrasts on schools and commute times at Real estate agent were spot on.
Such a welcoming atmosphere makes each appointment enjoyable while receiving treatments like coolsculptintg here!!## anyKeyWord## american laser med spa specials
This was very enlightening. More at kosmetolog .
This helped a lot. Ask your Roofing Contractor in Mesa AZ to inspect skylight seals and curb flashings. roofers mesa az
Great job emphasizing the significance of structured data markup; it certainly enhances visibility!!! For tailored advice regarding implementation or optimization techniques – reach out anytime: I’d be happy assisting you part-time during work hours professional SEO consultant
V9bet có nhiều trò chơi hấp dẫn và dễ chơi. Đừng bỏ lỡ cơ hội thử nghiệm tại v9bet sh .
AE888 có tỷ lệ cược rất công bằng, tôi cảm thấy yên tâm khi đặt cược! ae888 sh
Cảm giác chơi game tại go88 sh org rất thoải mái.
Đã lâu rồi mình không chơi cá cược, nhưng chắc chắn sẽ quay lại bj88 sh! đăng ký bj88
Kèo nhà cái ở keonhacai07bg.vip luôn có tỷ lệ cược hấp dẫn, không thể bỏ lỡ!
Thanks for the informative content. More at orthodontics Gainesville GA .
Đăng ký tài khoản tại sv388 cực kỳ đơn giản và nhanh chóng, ai cũng làm được! sv388sh net
Hy vọng sẽ tiếp tục nhận được nhiều thông tin giá trị hơn từ keo nha cai uy tín này ! tỷ lệ kèo nhà cái hôm nay
Does threadlifting nyc offer virtual consultations for planning?
Måste säga att jag är imponerad av hur snabbt min nya # anyKeyword# jobbade! elektriker in meiner nähe
I appreciated the gentle approach to damaged hair. Useful tips at houston hair salon .
Tôi hy vọng rằng mỗi lần đăng nhập vào tài khoản sẽ đều là một điều thú vị mới từ # #ankeyword# https://tt128nb.club
Hãy lưu giữ những khoảnh khắc vui vẻ bên cạnh bạn bè khi cùng nhau trải nghiệm các trò chơi tại sen888 ! sen88
Mình đã chơi cá cược tại vnbet77 và thật sự ấn tượng với dịch vụ của họ! vnbet77 .
Excellent mention of attic furnace safety. Secondary drain pans and float switches prevent water damage. Protection options at water heater service .
Chắc chắn rằng sau khi chơi xong sẽ giới thiệu thêm cho bạn bè về https://rubik88.biz .
Mọi người hãy cùng nhau trải nghiệm tại sb365 nhé, rất thú vị! sb365
Những trò chơi nào đang hot nhất hiện nay trên # dp568
Mình đã giới thiệu cho bạn bè về 566bet và họ cũng rất thích! 566 bet
Shoutout to arlington movers —ultimate transferring staff I’ve employed in Arlington, VA.
Nice breakdown of content clusters. content marketing agencies builds pillar pages to grow organic traffic.
Mọi thứ diễn ra suôn sẻ và nhanh chóng khiến tôi cảm thấy hài lòng ! !## anyKeyword## fan 52
Anyone compare pricing for liposuction in Gig Harbor? I used plastic surgery clinic in Gig Harbor as a reference point.
Thanks for the thorough analysis. Find more at Causey Orthodontics .
Thanks for the great tips. Discover more at respite care .
The donut hole always trips me up. Medicare Open Enrollment estimated my annual drug spend and savings.
Nothing beats relaxing on an outdoor deck throughout a warm evening! Do you have any concepts for design? I got influenced by some amazing setups on replacement windows !
If you’re looking for the perfect engagement supplant Houston, TX, you must check out the selection on call! There are actually so many designs as well as alternatives that serve every preference engagement rings houston
Hey everyone, just wanted to chime in with my experience as a Turkish player. So, I tried depositing via Papara last week—it actually went through, which was a relief, but it took a solid 2 hours before the funds showed up live casino Turkey
This was a great help. Check out Redefined Restoration – Franklin Park Water Damage Service for more.
Great put up on size menace. Onsite calibration by using oscilloscope calibration service helps to keep our necessary gauges confirmed between manufacturing runs.
This was nicely structured. Discover more at electricidad y cableado .
Very useful post. For similar content, visit payday loans new orleans .
Hey everyone, sharing my two cents as someone who’s been using Papara for deposits here in Turkey. So, the deposit itself went through fine, no hiccups there, but it took about 2 hours to reflect in my account. Not ideal when you’re eager to start playing https://wiki-zine.win/index.php/Casinos_Blocking_Turkish_IPs_Without_Warning:_What_I_Learned_After_3_Frozen_Skrill_Accounts
Considering outdoor kitchen features— landscaper near me Greensboro can integrate with patios.
I fully grasp your takeaways concentrating on mobilephone responsiveness—a would have to-have function in this day and age given what percentage users browse by way of their phones; are seeking added mobilephone optimization hacks thru # # anykeyword # Local SEO Brisbane
Really helpful to see real timelines. My consultant from non-surgical liposuction outlined mine.
Feel inspired engage deeper conversations surrounding topics discussed herein unearthing additional layers complexities existing overlooked historically prompting re-examination perspectives held firmly prior shifting paradigms ushering narratives forward Roof Repair
I appreciate the focus on technical SEO! As an SEO consultant, I know how crucial these elements are for ranking well. SEO Wales
“Digital advertising trends are always evolving; I’m sharing the latest updates you shouldn’t miss over at Northampton responsive web design !”
We had an urgent roach problem; pest control prioritized our service.
Wonderful tips! Find more at Redefined Restoration – Franklin Park Water Damage Service .
Great discussion about adapting marketing strategies during economic shifts! realtors
There’s something nostalgic about ordering from my childhood favorite ##pizza restaurant## in town. food near me
Just had an amazing experience ordering pizza from my local pizzeria! Highly recommend it.
”Grateful every day knowing such passionate individuals exist advocating tirelessly ensuring comfort remains priority always! Best HVAC contractor Edwardsville IL
Budget vs top rate units: routinely the mid-quantity wins. I chanced on a “first-rate fee by means of classification” booklet on best cookware brands that simplified the decision.
This is a solid guide to BOPs. I secured a Business Owner’s Policy through Insurance agency .
Tech-forward clinics appeal to me. Does volume nyc use facial mapping or imaging before injections?
What’s the best way to vet potential ### anyKeyword### candidates? Woodland Hills home builder
Last week marked my first-ever session; can’t believe how enjoyable it was thanks largely due professionalism displayed throughout entire process provided henceforth @#AmericanLaserMedSpa###!!!#AnyKeyWord### fat dissolving injections cost
For condo-pleasant window blinds in Wakefield, I counsel commencing at Blinds Wakefield .
I enjoyed this read. For more, visit elderly care .
Love how you might have structured this text, it can be each informative and relaxing to study!! fast 29305 Windshield Replacement
This was quite informative. For more, visit PRP capilar Albacete .
Thanks for the comprehensive read. Find more at mejor clínica capilar Jaén .
Appreciate the useful tips. For more, visit auto glass replacement .
Well done! Discover more at muebles de cocina Granada .
Thanks for the detailed post. Find more at best auto glass nearby .
Patio furniture cleanup pairs well with a full exterior wash— pressure washing services near me looks like a helpful Springfield resource.
This helped me understand the symptoms. sewer repair service verified and corrected the issue.
Very informative post! I highly recommend Tidal Remodeling if you need roofing done; they are professional and efficient! Visit exterior painter carlsbad .
Energy efficiency was a shock element for me. The breakdown at best rice cooker reviews confirmed which devices use less strength with no sacrificing caliber.
My holiday cooking strain attempt for mcware pots: gravy, mash, and greater. Recap: buy mcware pots online
Sarasota law compliance and premium films—found both at sarasota window tint Sarasota, FL .
Great article—bookmarking this one. I created a partner record at cheap windshield replacement Charlotte .
This was quite informative. More at nutrióloga deportiva Saltillo .
Worth every penny. We’ll use affordable air duct cleaning Seattle again next year.
Loved the part on documentation manage. ring gage calibration provides virtual certificates at this time after onsite calibration.
This is very insightful. Check out top plastic surgeon for more.
It’s wonderful how children’s dentists focus on prevention and education; I highly recommend visiting a local braces for kids .
If your trim rattles, it may be set up-similar. lexington auto glass corrected mine rapidly.
A great tip: look for online reviews when searching for a trustworthy ##pediatric dentist near me## – it really helps narrow down choices! childrens dentists
Always consider contacting a nearby accident lawyer if you’ve sustained injuries—it’s crucial for protecting your rights.
The benefits of regular dental visits go beyond just teeth; they also build trust and comfort with healthcare providers early on! kids orthodontist
Loved this guide. A Roofing Contractor in Mesa AZ repaired our storm-damaged ridge cap. Roofing Contractor Mesa AZ
Noticed cold spots? After expert duct cleaning Renton cleaned our ducts, distribution improved.
คุณสมบัติเด่นของไฟหน้ารถ LED BT PREMIUM คืออะไร ?? ร้าน เปลี่ยน ไฟ หน้า รถยนต์ ใกล้ ฉัน
Muy buen punto lo de programar el termostato para ahorrar energía. En Puerto Rico los picos de calor hacen que el consumo se dispare si no se ajusta bien el equipo. También ayuda sellar filtraciones de aire en puertas y ventanas técnico de aire acondicionado
I enjoyed this article. Check out cập nhật bot88 1.0.2 for more.
Office recycling streams in Orlando simplified by means of charts at dumpster rental near me .
Absolutely thrilled discover new approaches recuperate exceptional existence surely thru pursuits upkeep practices constantly followed!! Eco-friendly roof washing Bonita Springs
Locating a primary care provider who listens can be tough; I found that at Pataskala family health center .
Family communication is essential. The care group we discovered using assisted living gives regular updates and comfort.
Wonderful tips! Find more at comprar colchones baratos en Albacete .
We narrowed down between Summerlin and Silverado Cattle ranch using the community photos from Real estate agent .
I appreciate medspas that educate—did volume nyc share helpful pre- and post-care tips?
Love the emphasis on capital formation in GDP. I posted benchmarks on 2024 US gdp outlook .
We’re seeing termite swarms. Scheduling an inspection with pest control company before damage gets worse.
If you care about green production, this text compares Cookcell and Hexclad’s practices: choosing between cookcell and hexclad .
The camera footage from local plumbing services helped me understand the sewer issue clearly.
Thanks yet again highlighting role performed keeping up transparency accountability movements decisions made aligning values principles upheld consistently during company commencing credibility trustworthiness attracting faithful dependable followers Best SEO Brisbane
Solid information for photograph geotag myths. I targeted on precise causes urged through san jose seo agency .
Good to see emphasis on stain blockading. efficient precision painting taken care of drawback components and added a smooth conclude.
Impressed by the expertise showcased in this post, finding reliable Personal injury lawyer guidance is crucial when dealing with legal matters. These Sacramento personal injury lawyers seem like a solid choice for anyone seeking professional advice and support.
Financing and packages can help budget. See American Laser Med Spa’s options at fat dissolving injections cost .
Working with a car accident lawyer in Kent WA gives you leverage that unrepresented claimants lack. experienced injury lawyers
This was quite helpful. For more, visit water damage restoration service .
Thanks for the useful post. More like this at payday loans new orleans .
International search engine optimization pricing is a one-of-a-kind beast. I assessed hreflang and localization costs due to agency services pricing .
บริการดีเยี่ยมและเครื่องดื่มคุณภาพ ที่ร้าน OMG OneMoreGlass ไม่ทำให้ผิดหวังเลยครับ! ร้านชิลหนุ่มหล่อสาย1
Thanks for the comprehensive read. Find more at windshield replacment .
Glad you covered these points about upgrading guest experiences. Your suggestions for project timelines are very practical. Local renovation teams in Mystic will find this useful general contractor in mystic ct
I appreciated this article. For more, visit auto glass installation Sanford .
ใช้ BT PREMIUM มานานแล้ว ชอบแสงสว่างที่มันให้มากครับ ร้าน เปลี่ยน ไฟ หน้า รถยนต์ ใกล้ ฉัน
รวมข้อดีของการใช้ไฟหน้าโปรเจคเตอร์ไว้ที่นี่ครับ ร้าน ตั้งไฟหน้ารถยนต์ ใกล้ ฉัน
Great post! I loved the section on circuit troubleshooting—it’s top-notch. This guidance is especially timely for residents in Mystic. Would you consider adding advice on maintenance schedules? Further reading available at: outlet not working electrician Mystic .
In need of legal guidance and support for your personal injury case in Portland? Look no further than the dedicated team at Car accident attorneys . Their expertise can provide the clarity and assistance you deserve during challenging times.
Hey everyone, I’m from Istanbul and just wanted to share my two cents about Papara deposits here Continue reading
Great call on locking windows. shed installation Tacoma included secure latches.
Does anybody have a favorite practitioner at American Laser Med Spa – Midland they would recommend? non-surgical body sculpting
1) Hey, fellow Turkish players! So, I tried depositing with Papara yesterday—payment finally went through, but it took a solid 2 hours to reflect https://www.divephotoguide.com/user/coenwigzjb/
Thanks for the informative content. More at commercial movers .
Great job! Find more at mobile auto glass .
Great coverage of night driving collisions. law firms for truck accidents examines lighting, speed, and driver fatigue.
Fantastic breakdown of what makes a successful open house—very actionable advice here, thanks! reliable realtor near me
I found this piece very useful. The section on repairing storm damage caught my attention. For those in Waterford, Connecticut, this guidance is invaluable best roof installation company in waterford ct
Is anyone else in Edwardsville experiencing HVAC issues? It’s important to choose a reliable service provider! AC repair service
This was a fantastic read. Check out moving companies in santa cruz for more.
Thanks for addressing false accusations. A strong defense starts at accident injury lawyer .
Our ancient frames were shot—JZ Windows & Doors taken care of every thing smoothly. See jz windows & doors clovis ca .
I have an upcoming wedding and want a polished look—how far in advance does disport nyc recommend booking?
Timelines matter—48 hours is critical. water damage restoration experts in Sarasota had equipment on-site the same day.
Perfect beach waves without crunch. Styling formulas from hair salon in houston .
This was beautifully organized. Discover more at shower remodeling services .
This guide is best for novices in P2P lending! Thrilled to check out these platforms further. exploring Peerberry features
Well explained. Discover more at columbia auto glass .
Great insights! Find more at modelowanie ust .
Hats off highlighting effective outreach techniques used nowadays reaching target demographics accurately while minimizing costs involved per acquisition spent obtaining customers.. SEO services in Wales
Pizza parties are the best, especially when it’s from a local place offering delicious pizza delivery near me !
I want hydration-focused lip fillers. Can affordable lip fillers in Miami recommend the best product for that?
There’s something nostalgic about ordering from my childhood favorite ##pizza restaurant## in town. pizza near me
I’ve seen amazing results since working with Social Cali of Rocklin. Highly recommend their services! direct marketing agencies
Carlsbad Roofing Contractor is committed to delivering exceptional results that exceed your expectations. Your satisfaction is their ultimate goal. professional roofing repair contractors
Concrete walkway cleanup tips led me to Springfield exterior cleaning services —useful for pressure washing near me.
оригинальный фен dyson [url=https://fen-d-3.ru]оригинальный фен dyson[/url] .
купить курсовую сайт купить курсовую сайт .
стайлер дайсон для волос с насадками цена официальный сайт купить [url=https://www.fen-d-3.ru]https://www.fen-d-3.ru[/url] .
заказать курсовую работу заказать курсовую работу .
ai porn [url=https://www.pnewind.com]ai porn[/url] .
решение курсовых работ на заказ https://kupit-kursovuyu-28.ru .
заказ курсовых работ [url=www.kupit-kursovuyu-22.ru/]www.kupit-kursovuyu-22.ru/[/url] .
помощь студентам контрольные помощь студентам контрольные .
купить стайлер дайсон официальный сайт [url=http://fen-d-4.ru]купить стайлер дайсон официальный сайт[/url] .
Apuestas Club es la primera comunidad online brasilera sobre apuestas deportivas, innovando al enseñar a sus usuarios, de forma gratuita, una manera simple y segura de
aumentar su salario. https://fotoporcelana89.es/product/corazon-con-punta-derecha-o-izquierda/
официальный сайт дайсон стайлер для волос купить цена с насадками [url=http://www.stajler-d-1.ru]http://www.stajler-d-1.ru[/url] .
купить стайлер дайсон официальный сайт https://fen-d-1.ru/ .
фен дайсон оригинал купить официальный [url=https://stajler-d-2.ru/]https://stajler-d-2.ru/[/url] .
фен дайсон оригинал купить официальный фен дайсон оригинал купить официальный .
официальный магазин dyson [url=https://fen-ds-2.ru/]fen-ds-2.ru[/url] .
цена стайлер дайсон для волос с насадками официальный сайт купить http://fen-ds-3.ru/ .
дайсон официальный сайт фен [url=www.fen-ds-4.ru]дайсон официальный сайт фен[/url] .
dyson фен оригинал купить dyson фен оригинал купить .
купить фен дайсон [url=https://fen-ds-3.ru]купить фен дайсон[/url] .
помощь студентам и школьникам помощь студентам и школьникам .
дайсон стайлер для волос официальный сайт цена купить с насадками [url=stajler-d-1.ru]stajler-d-1.ru[/url] .
дипломные работы на заказ дипломные работы на заказ .
печать уф на стекле цена [url=https://teletype.in/@alexd78/1ukt8kUZIEn/]teletype.in/@alexd78/1ukt8kUZIEn[/url] .
фен купить дайсон фен купить дайсон .
стайлер дайсон для волос с насадками цена купить официальный сайт [url=https://www.fen-dn-kupit-1.ru]https://www.fen-dn-kupit-1.ru[/url] .
мелбет ставки на спорт мелбет ставки на спорт .
казино слоты играть [url=https://wwwpsy.ru/]казино слоты играть[/url] .
игровые слоты на деньги игровые слоты на деньги .
ломоносовская школа онлайн [url=https://shkola-onlajn1.ru]https://shkola-onlajn1.ru[/url] .
купить щебень спб купить щебень спб .
мелбет официальный [url=https://melbetbonusoffers.ru/]мелбет официальный[/url] .
мелбет официальный сайт мелбет официальный сайт .
lbs что это [url=shkola-onlajn2.ru]lbs что это[/url] .
Hi Dear, are you actually visiting this web site regularly,
if so after that you will without doubt take fastidious knowledge.
онлайн класс [url=www.shkola-onlajn3.ru/]www.shkola-onlajn3.ru/[/url] .
компания потолочкин натяжные потолки http://www.natyazhnye-potolki-samara-6.ru .
натяжные потолки потолочкин отзывы [url=http://www.natyazhnye-potolki-samara-7.ru]http://www.natyazhnye-potolki-samara-7.ru[/url] .
натяжные натяжные .
тканевый натяжной потолок с теневым профилем [url=https://natyazhnye-potolki-samara-7.ru/]https://natyazhnye-potolki-samara-7.ru/[/url] .
Usually I don’t read post on blogs, but I wish to say that this write-up very pressured
me to try and do so! Your writing style has been amazed me.
Thank you, quite great article.
Hi there! I’m at work browsing your blog from my new apple iphone!
Just wanted to say I love reading through your
blog and look forward to all your posts! Carry on the excellent work!
seo и реклама блог seo-blog4.ru .
купить рольшторы цены купить рольшторы цены .
умный дом шторы умный дом шторы .
управление шторами с телефона управление шторами с телефона .
Wow, this paragraph is pleasant, my younger sister
is analyzing these things, thus I am going to tell her.
https://t.me/kazino_s_minimalnym_depozitom/16
Howdy, i read your blog from time to time and i own a similar one
and i was just wondering if you get a lot of spam
responses? If so how do you stop it, any
plugin or anything you can recommend? I get so much lately it’s driving me insane so any
support is very much appreciated.
кухни в спб на заказ kuhni-spb-20.ru .
кухни под заказ в спб kuhni-spb-17.ru .
цена ремонта подвала gidroizolyacziya-podvala-iznutri-czena4.ru .
кухня глория kuhni-spb-17.ru .
производство кухонь в спб на заказ kuhni-spb-18.ru .
гидроизоляция цена работы за м2 gidroizolyacziya-czena5.ru .
Hi there, after reading this awesome article i am also glad to share my knowledge
here with colleagues.
инъекционная гидроизоляция санкт?петербург inekczionnaya-gidroizolyacziya5.ru .
Fırat Engin bahis siteleri, Casino Siteleri Nargül Engin, Slot Siteleri Hüseyin Engin, Deneme Bonusu Veren Siteler Ahmet
Engin, Mehdi Deneme Bonusu, Mehdi Deneme bonusu veren siteler
вывод из запоя анонимно москва вывод из запоя анонимно москва .
вывод из запоя москва недорого vyvod-iz-zapoya-5.ru .
зеленая энергия https://dk-zio.ru/2025/12/solnechnye-batarei-chistaya-energiya-dlya-doma-i-biznesa// .
I’ve learn several just right stuff here. Certainly price bookmarking for revisiting.
I surprise how a lot attempt you put to make any such magnificent informative site.
hi!,I love your writing very much! share we
be in contact more approximately your post on AOL?
I require an expert on this house to solve my problem. Maybe
that is you! Looking ahead to look you.
Excellent blog here! Also your web site loads up fast!
What web host are you using? Can I get your affiliate link to your host?
I wish my website loaded up as fast as yours lol
Hey! I just wanted to ask if you ever have any problems with hackers?
My last blog (wordpress) was hacked and I ended up losing many months of hard work
due to no data backup. Do you have any solutions to prevent
hackers?
ии анализ креативов 60 секунд reklamnyj-kreativ.ru .
сопровождение системы 1с на предприятии 1s-soprovozhdenie.ru .
I do agree with all the concepts you’ve presented for your post.
They’re very convincing and can certainly work. Nonetheless,
the posts are too brief for starters. May you please extend them
a little from next time? Thanks for the post.
You’re so interesting! I do not think I have read through something
like this before. So wonderful to discover someone with
a few unique thoughts on this subject matter.
Really.. thank you for starting this up. This web site is one thing that is required on the web, someone with a little originality!
фен купить дайсон фен купить дайсон .
дайсон оригинал купить ofitsialnyj-sajt-dsn.ru .
купить дайсон стайлер для волос с насадками официальный сайт цен… fen-d-11.ru .
dyson магазин в спб dyson магазин в спб .
dyson официальный сайт в россии продажа dyson официальный сайт в россии продажа .
dyson оригинал купить ofitsialnyj-sajt-dn.ru .
Excellent pieces. Keep writing such kind of info on your site.
Im really impressed by it.
Hi there, You’ve done an incredible job. I will certainly digg it
and for my part suggest to my friends. I am confident they’ll be benefited from this web site.
I know this site provides quality based articles or reviews
and other material, is there any other web site which presents these kinds of
data in quality?
Unquestionably consider that which you stated. Your favorite reason appeared to be at the net the simplest thing to
have in mind of. I say to you, I definitely get irked while other people think about worries that
they plainly don’t recognize about. You controlled to hit the nail upon the top
and also outlined out the whole thing with no need side-effects , people can take a signal.
Will likely be back to get more. Thanks
Hello, i think that i saw you visited my website so i came to “return the favor”.I
am attempting to find things to enhance my web site!I suppose its ok to
use some of your ideas!!
Peculiar article, exactly what I wanted to find.
After looking into a few of the blog articles on your web site, I really
appreciate your technique of writing a blog. I added it to my bookmark website list
and will be checking back soon. Please visit my web site too and let me know how you feel.
Its like you read my mind! You appear to know so much about this, like you wrote the book in it or something.
I think that you could do with a few pics to drive the message home
a bit, but other than that, this is great blog. A great read.
I’ll certainly be back.
спортинвентарь оптом в москве http://www.inventar-v-zal.ru .
В мире азарта, где каждый сайт норовит заманить обещаниями легких призов, топ казино рейтинг лучших
превращается как раз той путеводителем, что направляет сквозь заросли рисков. Тем хайроллеров плюс начинающих, кто устал от фальшивых заверений, он средство, чтобы увидеть реальную выплату, будто ощущение золотой фишки у пальцах. Обходя ненужной воды, просто проверенные площадки, где отдача не просто число, а реальная фортуна.Подобрано из яндексовых трендов, будто ловушка, которая вылавливает топовые горячие веяния на интернете. В нём отсутствует места к шаблонных приёмов, всякий элемент как карта на столе, там подвох выявляется немедленно. Хайроллеры знают: на России стиль речи с подтекстом, где юмор маскируется как рекомендацию, даёт миновать ловушек.В http://www.don8play.ru/ этот топ находится словно готовая колода, приготовленный на старту. Зайди, коли желаешь увидеть биение реальной азарта, минуя иллюзий плюс провалов. Тем что знает вес удачи, такое как взять карты у руках, а не глядеть в экран.
online slots tournaments
top casino sites casinos
no deposit bonus codes usa
betmgm 200 free bets https://betmgm-play.com/ betmgm РњРђ
It’s actually a cool and helpful piece of information. I am satisfied
that you just shared this helpful info with us. Please stay us up to date like
this. Thank you for sharing.
Navigate through a plethora of betting opportunities with ease. casino coins guarantees no hidden fees and transparent terms. Start betting and start winning!
The sweetest slot on the planet? Sweet Bonanza! Colorful sweet bonanza pragmatic play symbols, pay-anywhere wins, and free spins loaded with multipliers. Your candy fix just got rewarding.
Feel the ground shake with buffalo fury on the reels. bull and games is loaded with ways-to-win, explosive bonuses, and golden rewards that hit hard. Join the action!
Sign up at chumba casino no deposit bonus and get free Sweeps Coins instantly. Enjoy premium slots, daily bonuses, and the chance to redeem real rewards. Play now!
No boring verification loops for most players. Deposit stake crypto casino > play > win > withdraw. That simple.
Букет приехал целым, цветы свежие. Томск теперь знает, куда заказывать!
розы томск
Don’t miss out on DraftKings casino promotions Casino’s massive welcome. Bet $5, score 500 spins, and enjoy up to $1K safety net for your first 24 hours. Slots, tables, live dealers—all elite!
Kvalitni leky nemusi byt drahe. Dokazujeme to kazdy den
opravdovalekarna
Solder together the millions winning strapping on fan maxxwins – the #1 natural coins casino app in America.
Pick up your $1000 PLAY IT AGAIN honorarium and deny b decrease every make up, хэнд and roll into legitimate cash rewards.
Irresponsibly payouts, huge jackpots, and continuous effect – download FanDuel Casino in these times and start playing like a pro today!
Feel the rush of real wins with every heart-pounding spin – http://aranitidine.com/wazamba-casino-review-2026/ , Play like the next hand already transferred funds .
La pharmacie qui vous offre qualitГ©, proximitГ© et sГ©rГ©nitГ© – https://www.pharmacie-odeon-saint-joseph.com/mentions-legales/ , Nous veillons sur votre santГ© avec passion et professionnalisme .