
In a world where access to clean water is increasingly uncertain, knowing how to filter water at home can be a lifesaver. Whether you’re preparing for emergencies, camping trips, or simply want to reduce your reliance on bottled water, creating a DIY water filter is a practical and eco-friendly solution.
This comprehensive guide will walk you through the process of building an effective water filter using easily accessible materials. We’ll also discuss common mistakes to avoid, the benefits of homemade filters, and provide seasonal tips to enhance your filtration system.
🧰 Materials You’ll Need
Before you begin, gather the following items:
- Plastic or glass container: Acts as the main body of your filter.
- Coarse sand: Filters out larger particles.
- Fine sand: Removes smaller impurities.
- Gravel or small stones: Provides structural support and aids in filtration.
- Activated charcoal: Essential for removing toxins and improving taste.
- Cotton balls or cheesecloth: Serves as the first layer to catch large debris.
- Plastic or glass tube: Functions as the drainage outlet.
- Lid or cork: Seals the filter to prevent contamination.
🔧 Step-by-Step Instructions
1️⃣ Prepare the Container
- Cut the Container: If using a bottle, cut off the bottom to create an open top. This will allow you to pour water into the filter.
- Create a Drainage Hole: Poke a small hole in the cap or bottom of the container to serve as the outlet for filtered water.
2️⃣ Add the First Layer
- Insert Cotton or Cloth: Place a layer of cotton balls or cheesecloth at the bottom of the container. This acts as a pre-filter to catch large particles and debris.
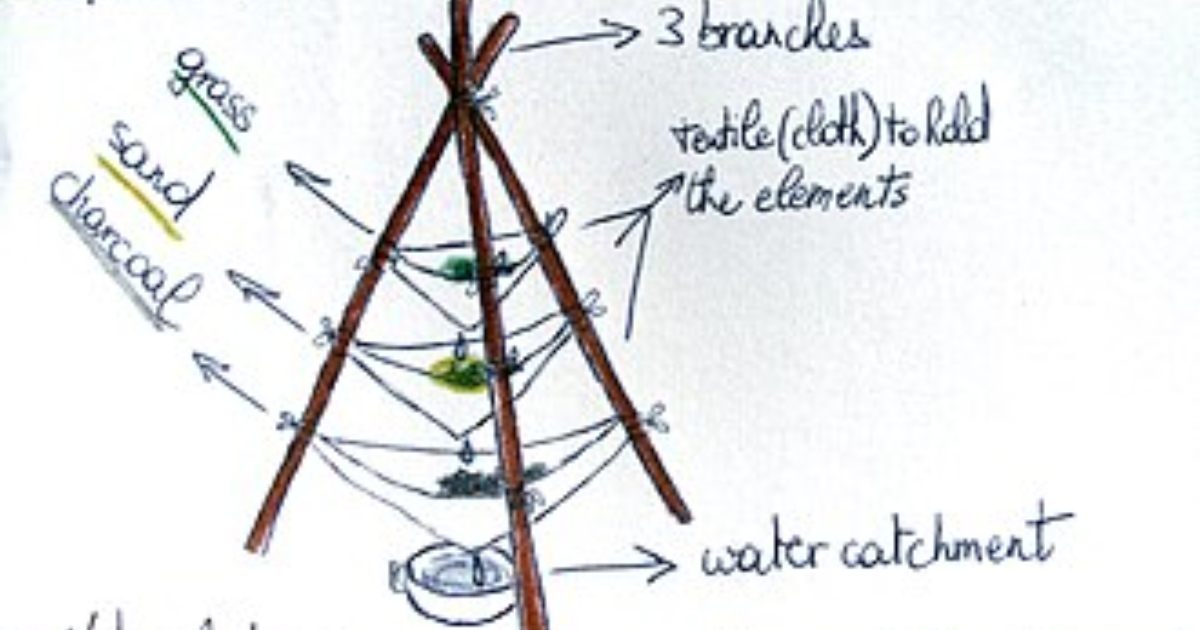
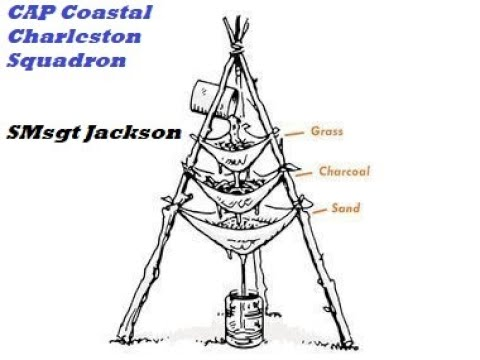
3️⃣ Layer the Filtration Materials
- Coarse Sand: Add a 5 cm layer of coarse sand on top of the cotton. This will trap larger particles.
- Fine Sand: Add a 3 cm layer of fine sand above the coarse sand to filter out smaller impurities.
- Gravel or Small Stones: Add a 3 cm layer of gravel to provide structural support and further filtration.
- Activated Charcoal: Add a 3 cm layer of activated charcoal. This is crucial for removing toxins, chlorine, and improving the taste of the water.
4️⃣ Seal the Filter
- Secure the Lid: Place the lid or cork on the container to prevent contamination and ensure a tight seal.
5️⃣ Test the Filter
- Add Water: Slowly pour dirty water into the top of the filter.
- Collect the Output: Place a clean container under the drainage hole to collect the filtered water.
- Observe: Watch as the water passes through each layer, becoming progressively cleaner.
⚠️ Common Mistakes and How to Avoid Them
- Using Contaminated Materials: Ensure all materials, especially sand and gravel, are clean and free from contaminants.
- Improper Layering: Always layer from coarse to fine materials to ensure effective filtration.
- Skipping the Boiling Step: Even after filtration, always boil the water for at least 1 minute to kill any remaining pathogens.
- Neglecting Maintenance: Regularly clean and replace the filtration materials to maintain the filter’s effectiveness.
🌟 Benefits of a DIY Water Filter
- Cost-Effective: Save money by using inexpensive materials.
- Eco-Friendly: Reduce plastic waste by filtering and reusing water.
- Emergency Preparedness: Be ready for natural disasters or situations where clean water is scarce.
- Customizable: Tailor the filter to meet your specific water quality needs.
🌦️ Seasonal and Regional Tips
- Summer: Ensure the filter is kept in a cool, shaded area to prevent bacterial growth.
- Winter: Protect the filter from freezing temperatures, which can damage the materials.
- Arid Regions: Use rainwater as a primary source for filtration to conserve groundwater.
- Urban Areas: Consider adding an additional layer of activated charcoal to remove chlorine and other chemicals commonly found in tap water.
🧰 Tools and Materials Checklist
| Item | Emoji |
|---|---|
| Plastic/Glass Container | 🧴 |
| Coarse Sand | ⛱️ |
| Fine Sand | 🏖️ |
| Gravel/Stones | 🪨 |
| Activated Charcoal | ⚫ |
| Cotton/Cloth | 🧵 |
| Tube | 🚰 |
| Lid/Cork | 🧢 |
❓ Frequently Asked Questions
Q1: Can I use this filter for drinking water?
While the filter improves water clarity, it’s essential to boil the water for at least 1 minute to ensure it’s safe for drinking.
Q2: How often should I replace the filtration materials?
It’s recommended to replace the materials every 2-3 months or when you notice a decrease in water flow.
Q3: Can I add more layers for better filtration?
Yes, adding more layers can enhance filtration, but ensure the water flows through each layer without obstruction.
Q4: Is activated charcoal necessary?
Activated charcoal significantly improves water quality by removing toxins and odors. It’s highly recommended for optimal filtration.
🏁 Conclusion
Building your own DIY water filter is a rewarding project that not only provides you with clean water but also empowers you to take control of your water quality. Remember to maintain the filter regularly and always boil the water before consumption to ensure safety.
If you found this guide helpful, please share it with others and leave a comment below with your experiences or any questions you may have. Stay hydrated and safe!
Note: This article is for informational purposes only. Always consult with a water quality expert or local authorities for advice on water purification methods suitable for your area.
How to Build a Rainwater Harvesting System
- Anchor Text: “Learn how to create a sustainable water collection system”
- Link: https://www.greenbuildingadvisor.com/article/how-to-build-a-rainwater-harvesting-system
Understanding Water Filtration Technologies
- Anchor Text: “Explore the different water filtration methods”
- Link: https://www.water.org/our-work/water-crisis/water-purification
DIY Water Filter Projects and Tips
- Anchor Text: “Check out more DIY water filtration ideas”
- Link: https://www.instructables.com/How-to-Make-a-Water-Filter/
Cihangir su kaçak tespiti Beklenenden Hızlı Çözüm: Sorunun bu kadar hızlı çözüleceğini tahmin etmemiştik. Çok teşekkürler! https://communiti.pcen.org/read-blog/28282
review [url=https://web-foxwallet.com/]Fox crypto[/url]
Bulgurlu su kaçağı tespiti Evimdeki su kaçağı sorununu hızlıca çözdüler, gerçekten profesyonel bir ekip! https://netglu.com/read-blog/11921
official source https://web-foxwallet.com
https://animixonline.ru/
интернет https://skinwoo.ru/
buy generic amoxil – https://combamoxi.com/ buy amoxicillin generic
order fluconazole 100mg for sale – https://gpdifluca.com/# order forcan without prescription
order cenforce 100mg online cheap – cenforce 100mg pill order cenforce 50mg
when will cialis become generic – ciltad generic where to buy generic cialis
what happens if you take 2 cialis – cialis las vegas cheap cialis by post
best price for viagra 100mg – on this site viagra 100mg street price
More posts like this would persuade the online play more useful. este sitio
More text pieces like this would create the интернет better. purchase amoxil generic
Thanks on putting this up. It’s okay done. https://ursxdol.com/furosemide-diuretic/
This is the kind of serenity I have reading. https://prohnrg.com/product/orlistat-pills-di/
This website positively has all of the information and facts I needed adjacent to this subject and didn’t identify who to ask. https://aranitidine.com/fr/sibelium/
The reconditeness in this piece is exceptional. https://ondactone.com/product/domperidone/
This is the type of enter I turn up helpful.
https://proisotrepl.com/product/tetracycline/
This website absolutely has all of the information and facts I needed to this participant and didn’t positive who to ask. http://bbs.yongrenqianyou.com/home.php?mod=space&uid=4272507&do=profile
purchase dapagliflozin pills – janozin.com order forxiga for sale
xenical where to buy – https://asacostat.com/ brand xenical 60mg
More text pieces like this would make the web better. https://myvisualdatabase.com/forum/profile.php?id=118719
Your writing is so eloquent and engaging You have a gift for connecting with your readers and making us feel understood
It’s clear that you are passionate about making a positive impact and your blog is a testament to that Thank you for all that you do
You can conserve yourself and your stock close being alert when buying panacea online. Some pharmacopoeia websites function legally and offer convenience, reclusion, rate savings and safeguards as a replacement for purchasing medicines. buy in TerbinaPharmacy https://terbinafines.com/product/crestor.html crestor
The thoroughness in this draft is noteworthy. purchase topamax online cheap
I am in fact enchant‚e ‘ to glitter at this blog posts which consists of tons of of use facts, thanks representing providing such data.
We stumbled over here different page and thought I may as
well check things out. I like what I see so now i am following you.
Look forward to finding out about your web page for a second
time.
Here is my web blog :: buy xanax without prescrition
https://t.me/s/ef_beef
https://t.me/s/RejtingTopKazino
https://t.me/s/bEeFCASiNo_OfFiCiAlS
Just wanna state that this is extremely helpful, Thanks for taking your time to write this.
Die Freispiele werden nach unseren RTBet Casino Erfahrungen an 10 Tagen mit jeweils 20 Stück gutgeschrieben. Obendrauf gibt es 1 Gratis-Pick für die Bonuskrabbe, sodass du dein Glück versuchen und mit dem Greifautomaten Freispiele oder Boni herausfischen kannst. Unser RTBet Casino Erfahrungen haben gezeigt, dass das Unternehmen Rabidi immer wieder überrascht und neue lukrative Extras bietet. Derzeit bietet RTBet Casino keinen Zwei-Wege-Authenticator oder eine Zwei-Faktor-Authentifizierung (2FA) für verbesserte Sicherheit während des RTBet Casino Logins an. RTBet Casino ist eine bekannte internetbasierte Gaming-Plattform, die viele verschiedene Casino-Spiele von über 100 Anbietern bietet.
Bei RTbet können zudem Wetten auf Kings of Glory, Valorant oder Age of Empires abgegeben werden. RTbet bietet ein gigantisches Portfolio an Sportwetten auf über 40 verschiedene Sportarten an. Die Wettlizenz aus Curacao bietet Dir also nicht nur Sicherheit, sondern auch mehr Wettmöglichkeiten.
References:
https://online-spielhallen.de/betano-casino-cashback-so-holen-sie-das-beste-heraus/
50 Freispiele bieten eine solide Anzahl an Gewinnchancen. Spielautomaten tragen meistens zu 100% bei, während Tischspiele wie Blackjack oder Roulette oft nur 0% bis 10% beitragen oder komplett ausgeschlossen sind. No-Deposit Boni haben oft höhere Umsatzanforderungen (z.B. 40x, 50x oder sogar 70x) als Einzahlungsboni. Wichtige Bonusbedingungen verstehen (die “Kleingedruckten”)Ein Bonus ohne Einzahlung ist zwar “gratis”, aber nicht bedingungslos. Ein Casino Bonus ohne Einzahlung (No-Deposit Bonus) ist ein Bonus, den Sie von einem Online Casino erhalten, ohne dass Sie zuvor eine Einzahlung auf Ihr Spielerkonto vornehmen müssen. Ein Bonus ohne Einzahlung sofort bedeutet, dass du nach dem Anmelden ohne Einzahlung sofort Bonusguthaben oder Freispiele erhältst.
Wer keine Lust hat, sein Geld bei einem neuen Online Casino zu riskieren, der sucht vielleicht nach Wegen kostenlos zu spielen. Melde dich für unseren zweiwöchigen Newsletter an und erhalte Zugang zu Turnieren, erfahre alles über die besten Bonusangebote, Warnungen vor unseriösen Casinos und mehr! Besonders beachten sollte man die Höhe der Umsatzbedingungen, die maximale Einsatzhöhe je Spiel und die Spiele, die man mit dem Bonus nutzen darf, um den Bonus freizuspielen.
Manche Casinos mit no deposit Bonus begrenzen zudem den maximalen Einsatz pro Spin oder Runde, solange Sie mit Bonusgeld spielen. Auch Echtgeld-Boni ohne Einzahlung werden angeboten, allerdings sindCasino Freispiele bei Registrierungsehr beliebt bei den Nutzern. Dennoch solltest du dich so verhalten, als würdest du mit deinem Echtgeld spielen. Diese Option ist die perfekte Lösung für jeden, der neu im Bereich der Online Casinos ist und einen Eindruck davon gewinnen will, wie es ist, hier zu spielen. Viele Casinos ermöglichen es dir, hiermit zu spielen und echtes Geld zu gewinnen.
References:
https://online-spielhallen.de/hitnspin-casino-test-2025-jetzt-bonus-sichern/
Gamblers with their own strategies maximize their victorious chances to win a Bitcoin casino jackpot. A diverse range of themes will mesmerize even the pickiest gamers. Our Bitcoin limits are a minimum of 1Mbtc bet estimate and a maximum of 400Mbtc bet estimate. All you need is good internet and accessibility online. Also, a live croupier is controlling the wheel, cards, and table without any automation or robotic system. We operate under the laws of Curacao.
Sign up at 7Bit and start every day with a lavish bitcoin casino bonus. The foremost condition is that players can’t withdraw bonus money before they fulfill wagering demands in full. You can find actual bitcoin casino bonus codes on the 7BitCasino website in the Promotions section.
References:
https://blackcoin.co/goat-spins-casino-in-australia-real-money-casino-wins/
Aston wants the DBS to be seen as a serious drivers’ car, which is why it’ll come only with a manual gearbox and feature ceramic brakes as standard. That’s no accident, because the Vanquish is due to cease production later this year, effectively making the DBS Aston Martin’s new flagship when it goes on sale. Precise details of the production spec are still sketchy, but a few choice bits of info have leaked out of Gaydon. When Kirley swerved around a flinching Vesper Lynd – actually stunt performer Nikki Berwick doubling for actress Eva Green – these weights were enough to pitch it onto its roof, making the first shot of the crash sequence you see in the movie. Unfortunately, the Aston proved a lot more stable than those crusty 5-Series and, with only limited chances to get this right, the ramp was raised to 18 inches to make sure the Bond car turned turtle. Sure enough, when they hit the ramp at 105km/h, the Bee-Ems barrelled three or four times, in exactly the way Powell was looking for.
Had he just worn the shirt over his bare chest and buttoned the shirt, I think he would have looked much neater. The loud Liberty-print shirt is uncharacteristic for Bond and makes him stand out too much in the crowd for it to be a practical choice. The Madagascar outfit has many fans, but I find that it’s one of the weakest looks of the Bond series. A dark t-shirt is visible under the cardigan, which would slightly detract from the look if it were more visible.
References:
https://blackcoin.co/popular-variations-of-casino-slots-game-rules-and-descriptions/
Not all chatbots are equipped with artificial intelligence (AI), but modern chatbots increasingly use conversational AI techniques such as natural language processing (NLP) to understand user questions and automate responses to them. These days, chatbots are starting to integrate conversational AI, such as natural language processing (NLP), to understand questions even if they aren’t grammatically correct and then respond based on data they have collected. AI chatbots manage customer interactions by using conversational AI to understand and respond to user queries in real time.
Ajman’s real estate market is regulated by the Ajman Real Estate Regulatory Authority (ARERA), established in December 2008 to bring regulation to bear on Ajman’s fast-growing and uncontrolled property boom. The list of cities for which data is available in the Ajman Metropolitan Area has been updated in the corresponding sources. Both Manama and Masfout are fertile regions and support widespread agricultural development. The city and main territory of Ajman is bordered to the landward side by Sharjah, while Manama shares borders with Sharjah and Fujairah. It consists of a small town that provides essential services and valleys sustained by subsistence farming and marble quarrying. Manama is in the plains at the foothills of the Hajjar Mountains some 60 km east of Ajman city.
References:
https://blackcoin.co/royal-reels-casino-australia-in-depth-review/
Get immediate answers to customer queries and suggestions for phrasing responses. Sandalwood was used in the beams and supports for the construction of the roofs. The company is a joint venture between the Private Properties Administration and the Public Real Estate Investment Company, the company plays an effective role in the development of the real estate sector in the Emirate of Ajman. By 2008 the growth of real estate speculation and investment had led to the establishment of a real estate regulator, the Ajman Real Estate Regulatory Agency. A development boom followed the opening of Ajman’s real estate market to global investors in 2004, with ‘true’ freehold on offer. This led to real estate prices rising rapidly, from $11 per square foot and, by 2007, developers had announced projects worth $21.78 billion, consisting of around 65,000 units in all.
For example, a customer browsing a website for a product or service might have questions about different features, attributes or plans. That’s a great user experience and satisfied customers are more likely to exhibit brand loyalty. AI chatbots are commonly used in social media messaging apps, standalone messaging platforms, proprietary websites and apps, and even on phone calls (where they are also known as integrated voice response, or IVR). When combined with automation capabilities including robotic process automation (RPA), users can accomplish complex tasks through the chatbot experience.
References:
https://blackcoin.co/high-limit-slots-play-25-100-500-slot-machines-online/
online australian casino paypal
References:
https://thesecurityexchange.com/employer/streamlining-your-finances-my-experience-with-neteller-to-paypal-transfers/
online pokies paypal
References:
https://hirenhigher.co.nz/companies/die-besten-online-casino-mit-paypal-im-test-2025/
online casino that accepts paypal
References:
https://tiroljobs24.at/unternehmen/best-paypal-casinos-2025-online-casinos-accepting-paypal/
casino sites that accept paypal
References:
https://stepfortune.com/employer/online-pokies-usa-play-for-free-or-real-money/
online slots uk paypal
References:
https://praylotto.kr/bbs/board.php?bo_table=free&wr_id=146
casino avec paypal
References:
http://www.jobteck.co.in/companies/best-real-money-slots-online-top-slot-games-to-play-2025/
Хотите знать, кому можно доверять в мире онлайн-казино? Наш справочник проводит независимую экспертизу: проверяем лицензии, процесс выплат и качество игр. Рейтинги объективны — мы не торгуем позициями. Принципы оценки открыты для всех. Подойдёт как новичкам, так и опытным игрокам. Следим за изменениями и регулярно обновляем информацию. Узнать о рейтингах казино
betmgm Kentucky online casino betmgm play mgm bet promo
Experience the adrenaline from betting on your favorite games. In casino coins, exclusive tournaments and promotions are available. Become part of the winners today!