
Did you know there’s a natural method to accelerate the growth of new branches and young plants for your orchids? Orchids are delicate, tropical plants requiring specific care to flourish. By providing the right combination of light, water, and nutrients, you can encourage robust growth and longer-lasting blooms. Let’s explore this step-by-step technique!
Essential Orchid Care
Orchids thrive on careful balance. Being tropical plants, they need indirect sunlight and high humidity to develop healthy roots and leaves. Each type of orchid, such as the popular Phalaenopsis (moth orchid), has its own light and humidity needs. Although they require plenty of light, avoid direct sunlight, which can scorch their leaves. Water is also essential but must be managed precisely; orchids prefer a consistently moist substrate without standing water, which can cause root rot.
With targeted fertilization and care, you can keep your orchids blooming throughout the year. Proper pruning of dry stems after each blooming cycle can also encourage the growth of new buds.
Encouraging New Branches and Plant Growth
Here’s a practical and natural method to promote new branch and plant growth for orchids:
- Prepare the Garlic Water Solution
- Take one clove of garlic and cut it into small pieces.
- Place the chopped garlic in a glass container with about 300 ml of water, sealing it with a lid.
- Let the garlic infuse in the water for about 4 hours.
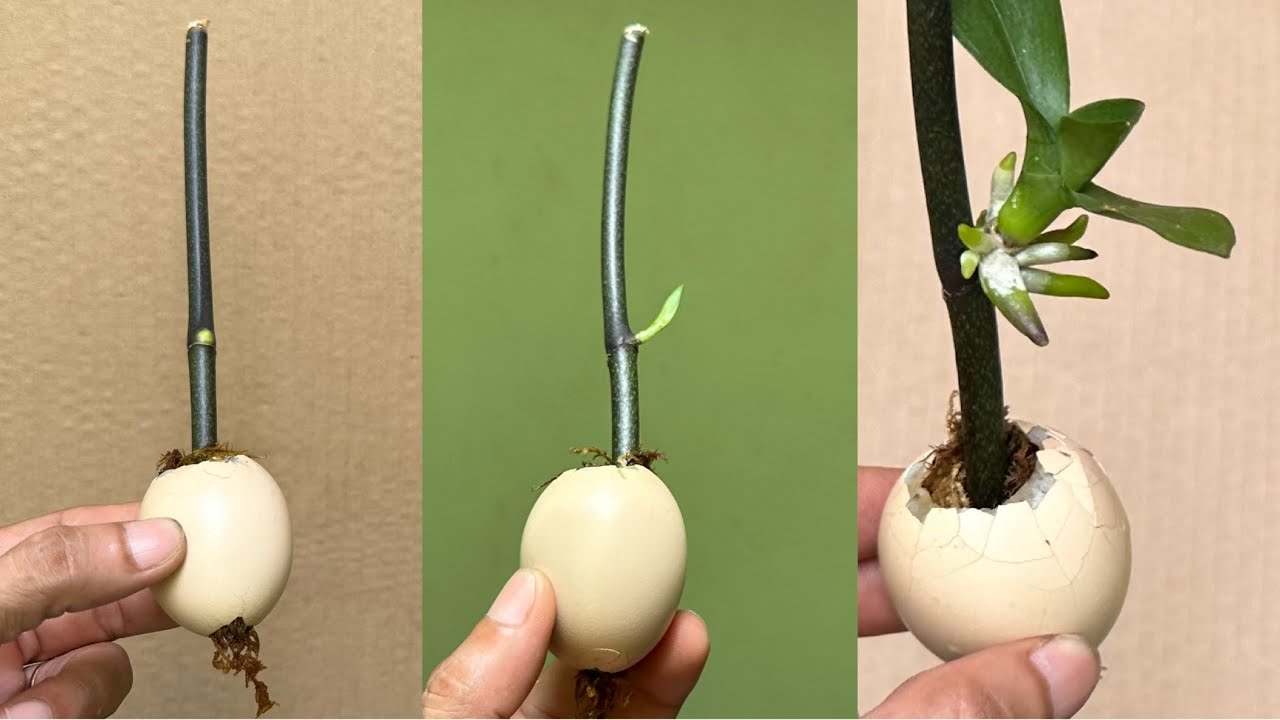
- Prepare the Egg Shell Container
- Carefully make a small hole on one end of an egg, empty it, and make another hole on the opposite side.
- Clean the shell thoroughly with water and set it aside.
- Prepare the Orchid Stem
- Take an orchid stem and make a diagonal cut at one end to enhance water absorption.
- Strain the garlic water into a glass container and submerge the orchid stem in it for about 20 minutes.
- Gently pat the stem dry with a cotton pad.
- Create the Moss Bed
- Soak some moss in the garlic-infused water, then wring out excess moisture.
- Fill the egg shell with the damp moss and place the orchid stem inside.
- Assemble the Growth Chamber
- Cut off the neck of a plastic bottle to create a small container.
- Place the egg shell with the orchid inside the bottle container and add a bit of water.
- Seal the setup, creating a miniature greenhouse that will retain humidity around the orchid.
After about four weeks, replace the water to maintain freshness. In approximately two months, you’ll see healthy new roots and leaves. When your new orchid plant is ready, transfer it to a transparent pot with orchid soil to encourage continued growth.
🌺 With these simple steps, you can nurture vibrant, blossoming orchids at home, enjoying their elegant beauty all year round! 🌺