
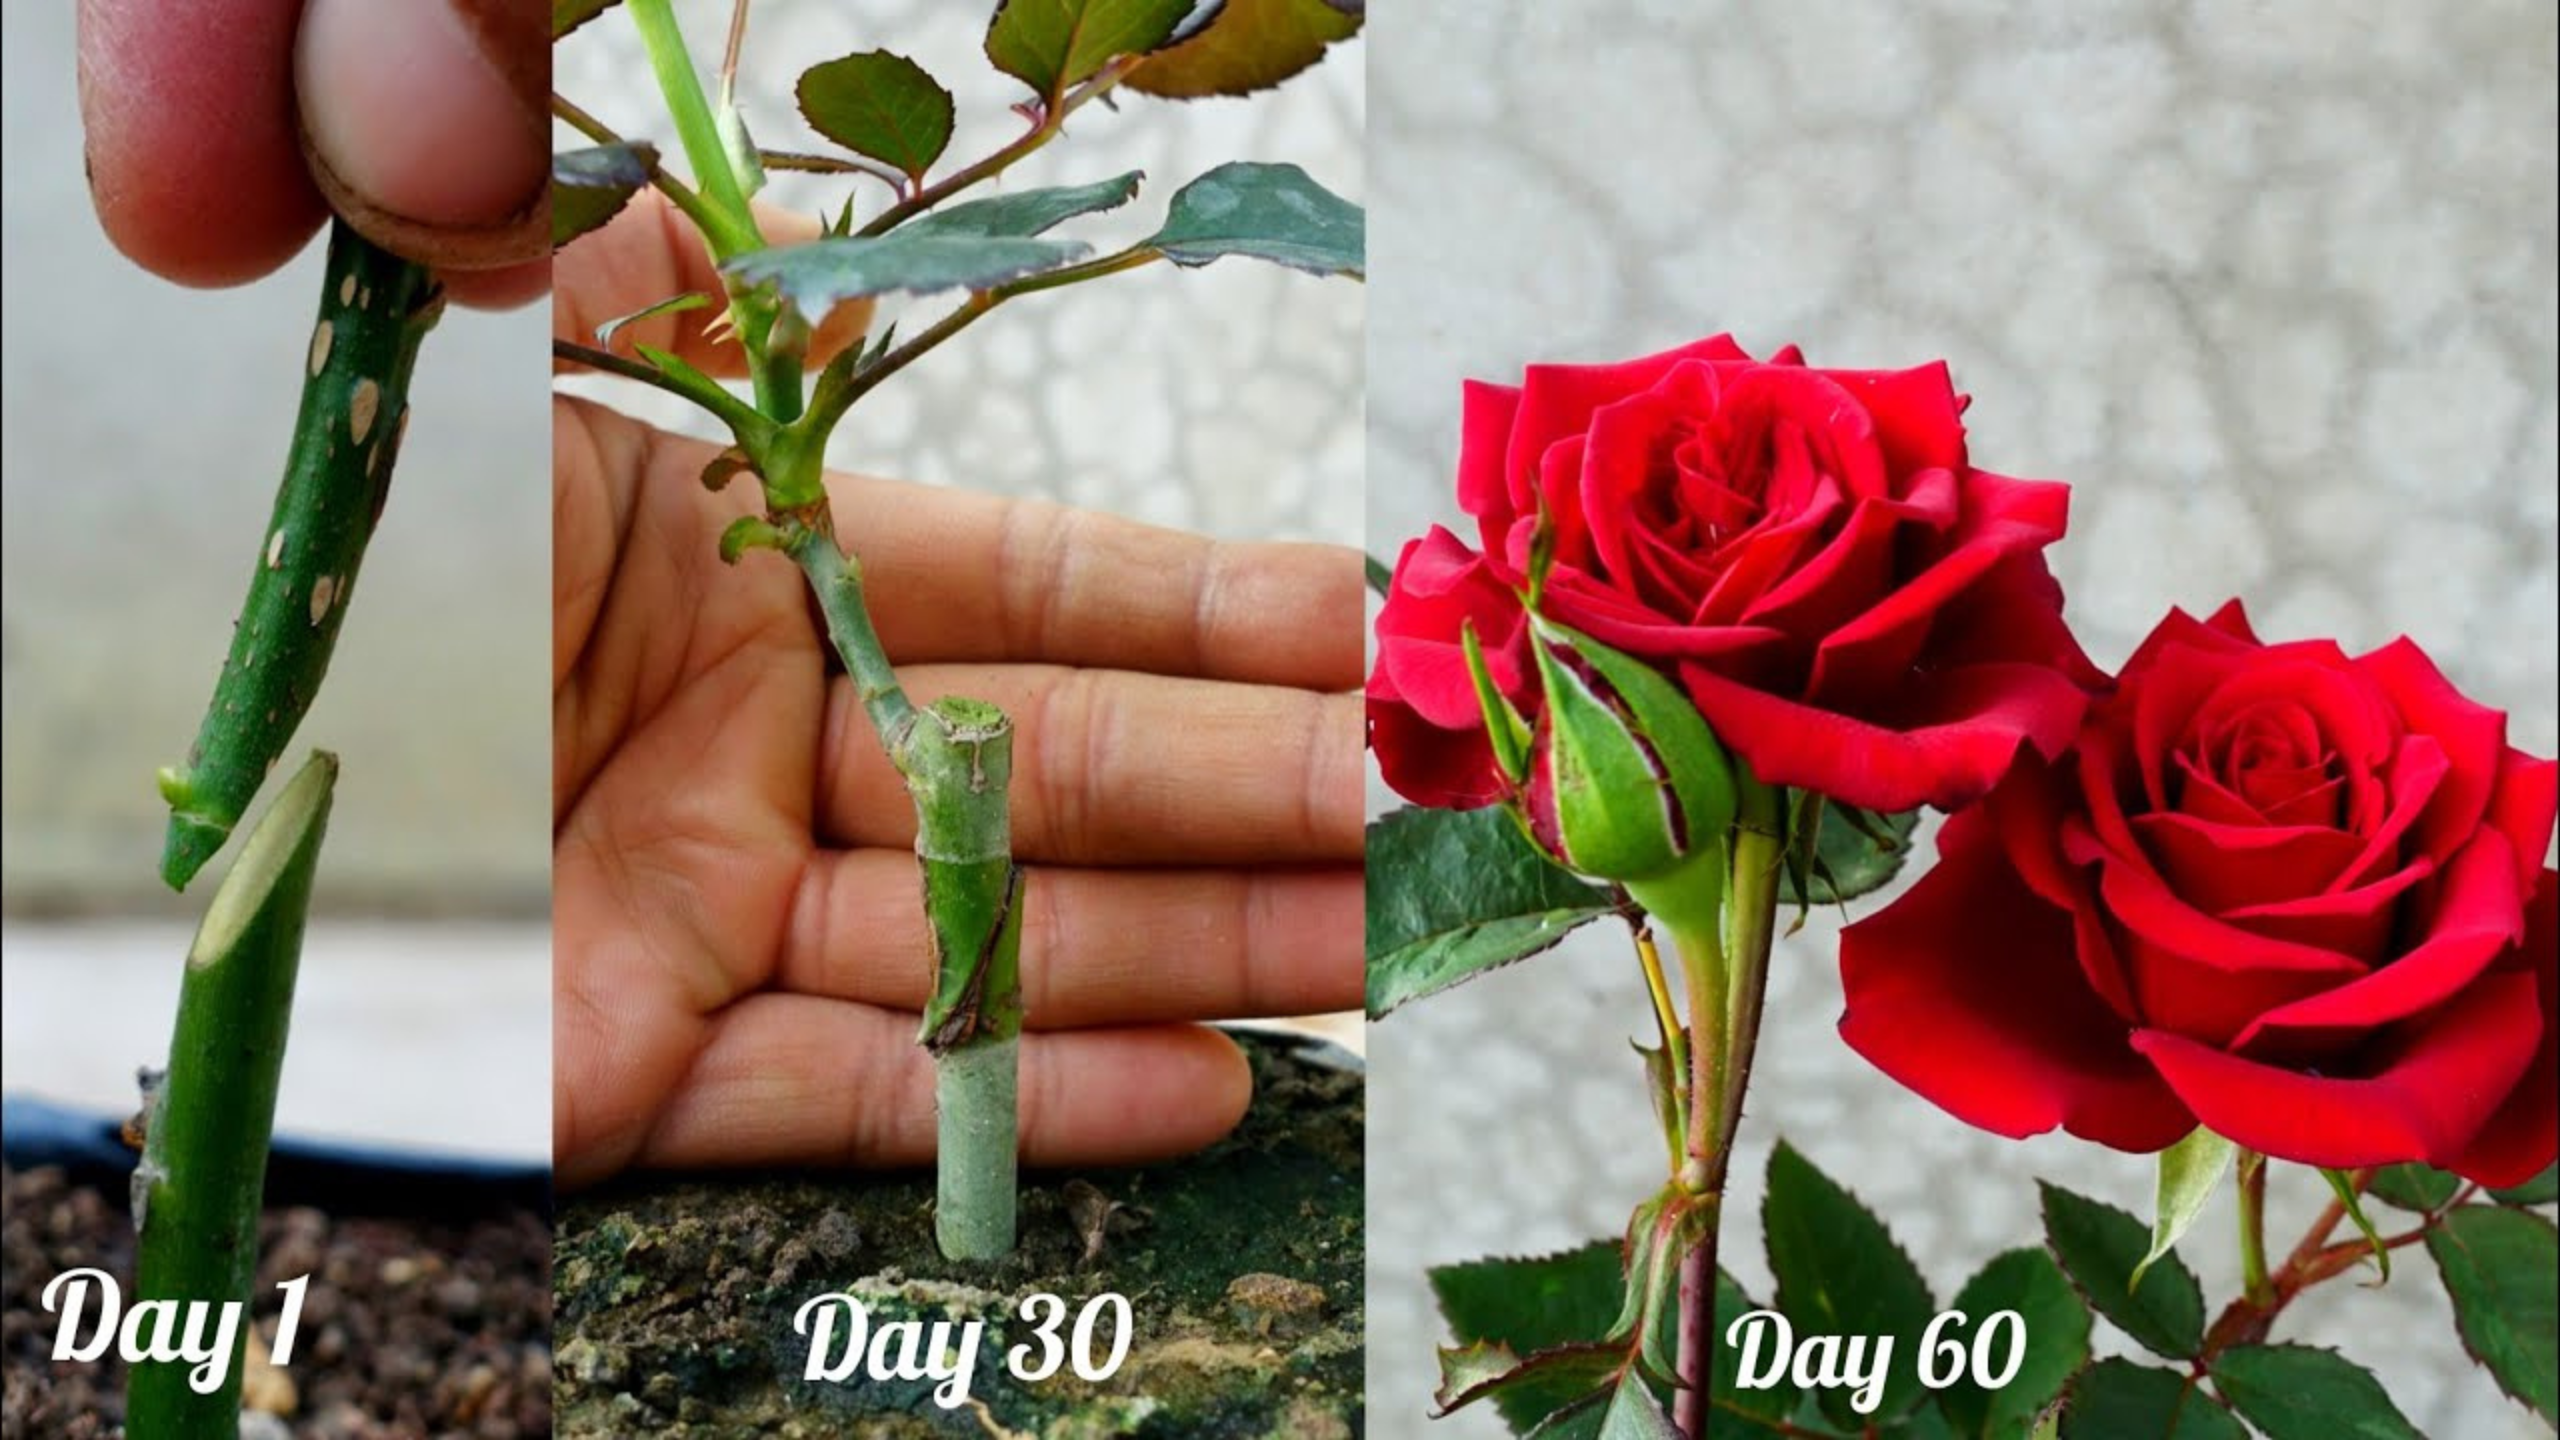
Grafting roses is a rewarding gardening technique that allows you to grow multiple rose colors on a single plant. Whether you’re aiming for a stunning multi-colored display or simply want to experiment with new varieties, grafting is a practical and creative solution.
This guide walks you through the entire process—from timing and tools to aftercare—making it easy for beginners and seasoned gardeners alike. Let’s dive into the art of rose grafting and learn how to give your garden a vibrant new look.
When to Graft: Choose the Right Season
Timing is everything.
The best time to graft roses is during the summer, specifically when your rose bushes are in active growth. At this stage, the plant’s sap is flowing vigorously, which increases the chances of successful grafting.
Why summer?
The warmer weather encourages rapid healing and helps the grafted stem bond more efficiently with the rootstock. Avoid cold or dormant seasons, as the plant’s slowed metabolism can hinder the process.

Prepare Your Tools: Sanitize for Success
Don’t skip this step!
Clean, sharp tools are essential to avoid damaging your plants or spreading disease.
What you’ll need:
Grafting knife or sharp pruning shears
Rubbing alcohol or methylated spirits (also known as alcohol de quemar)
Clean cloth or paper towel
How to clean your tools:
Wipe the blades thoroughly with alcohol before and after each cut. This helps prevent bacterial and fungal infections, which could compromise your graft.
Selecting and Preparing the Scion (Cutting)
What is a scion?
A scion is the piece of rose stem you want to graft onto the host plant (also known as the rootstock). Choose stems that are healthy, disease-free, and contain at least three healthy buds.
How to prepare the scion:
- Cut a stem about 6–8 inches long.
- Trim the leaves but leave the buds intact.
- Shape the bottom end into a “V” wedge using a clean knife. This shape allows it to fit snugly into the rootstock’s cut and maximizes contact for sap flow.
Choose the Right Rootstock
What is a rootstock?
The rootstock is the existing rose plant that will host your new cutting. Ideally, use a two-year-old stem from a strong, disease-resistant plant.
Preparing the rootstock:
Select a sturdy, straight stem.
Make a vertical cut about 1 cm deep using your knife. This is where the “V” wedge of your scion will be inserted.
Tip: Try to match the thickness of the scion and the rootstock as closely as possible for the best results.
Grafting: Joining the Scion to the Rootstock
Now comes the exciting part—joining the two stems.
Steps:
- Insert the “V”-shaped base of your scion into the cut you made in the rootstock. It should fit tightly without wobbling.
- Wrap the graft union firmly with grafting tape or parafilm to hold the scion in place and seal in moisture.
Why the wrap matters:
This protective layer helps prevent the entry of pests, bacteria, and air pockets that could dry out the graft. Keep it in place until the graft has visibly bonded and new growth begins.
Post-Graft Care: Nurture for Strong Growth
Proper aftercare ensures your graft thrives. Follow these steps to give your roses the best chance at success:
- Water generously: Keep the soil moist (but not waterlogged) for the first 15 days to support healing.
- Monitor growth: New shoots may appear early. Prune the first few to direct the plant’s energy into strengthening the graft.
- Remove the tape: Once the scion begins growing independently—usually after 3–4 weeks—carefully remove the grafting tape.
- Soil and nutrition: Use a balanced mix of garden soil and compost to nourish the plant. Roses love rich, well-drained soil.
- Light and air: Plant in a spot that receives at least 6 hours of sunlight daily and has good airflow to prevent fungal problems.
Final Tips for Beautiful Multi-Colored Roses
Label your grafts: If you’re adding multiple colors, label each one to keep track of your varieties.
Start small: Begin with one or two grafts until you’re confident in your technique.
Practice patience: Some grafts may take longer to show results. Be patient and give your roses time to adapt.
By following these steps, you’ll not only learn a valuable gardening skill but also enjoy a stunning display of roses in different hues—all from the same plant.
order amoxicillin online – https://combamoxi.com/ buy cheap amoxicillin
buy fluconazole without prescription – click diflucan oral
cenforce price – cenforce rs order cenforce generic
cialis coupon 2019 – ciltad generic cialis canada
what happens if you take 2 cialis – https://strongtadafl.com/# generic tadalafil canada
viagra sale sa – https://strongvpls.com/ legal order viagra online canada
The thoroughness in this draft is noteworthy. ciclo de synthroid
Thanks on sharing. It’s outstrip quality. prednisone 20 milligrams
Thanks for putting this up. It’s okay done. https://ursxdol.com/cenforce-100-200-mg-ed/
This is a topic which is forthcoming to my verve… Diverse thanks! Quite where can I upon the acquaintance details for questions? https://prohnrg.com/product/metoprolol-25-mg-tablets/
This is the big-hearted of writing I truly appreciate. https://aranitidine.com/fr/ivermectine-en-france/
Greetings! Jolly gainful par‘nesis within this article! It’s the crumb changes which liking turn the largest changes. Thanks a lot towards sharing! https://ondactone.com/simvastatin/
This is the stripe of topic I have reading.
levofloxacin 250mg uk
More articles like this would make the blogosphere richer. http://zqykj.com/bbs/home.php?mod=space&uid=302444
buy dapagliflozin 10mg for sale – https://janozin.com/ dapagliflozin 10 mg over the counter
purchase orlistat generic – on this site buy xenical 60mg sale
I am in fact happy to glance at this blog posts which consists of tons of of use facts, thanks object of providing such data. http://iawbs.com/home.php?mod=space&uid=916778
You can keep yourself and your dearest nearby being wary when buying prescription online. Some pharmaceutics websites function legally and put forward convenience, reclusion, cost savings and safeguards as a replacement for purchasing medicines. buy in TerbinaPharmacy https://terbinafines.com/product/trental.html trental
This is the gentle of scribble literary works I rightly appreciate. TerbinaPharmacy
With thanks. Loads of expertise!
https://t.me/s/dragon_money_mani/30
Die progressiven Jackpots in der Spielbank Wiesbaden sind ein besonderes Highlight. Der Wiesbadener Mega-Jackpot kann sogar mehrere hunderttausend Euro erreichen! Zusätzlich bietet die Spielbank Wiesbaden Mystery-Jackpots, bei denen der Jackpot-Wert bis zur Ausschüttung geheim bleibt. Die Spielbank Wiesbaden ist besonders für ihre hohen Jackpots und ein umfangreiches Angebot an Automaten bekannt.
Dies bedeutet, dass es schwierig ist, die besten online casinos zu finden. Aachen und Bad Neuenahr sind dabei die Adressen, die am nähesten gelegen sind und eine große Auswahl an Spielautomaten und traditionellen Tisch- und Kartenspielen bieten. Sie haben insgesamt über 200 Automatencasinos zur Auswahl, wenn Sie Spielautomaten in Köln spielen wollen. In diesen deutschen Spielcasinos können Sie zum Beispiel die weltweit beliebten Spielautomaten von Merkur oder Novoline spielen. Wenn Sie sich daran beteiligen möchten, in online Casinos zu spielen, muss Ihnen klar sein, dass es eine erhebliche Anzahl an Optionen gibt. Hier kannst du Roulette, Blackjack, Poker, Punto Banco, Bingo und Ultimate Texas Hold’em an insgesamt mehr als 30 Spieltischen zocken und sogar an elektronischen Roulette Terminals und Videopoker Automaten spielen.
Die Spielbank bietet die größte Vielfalt aller Spielbanken in Bayern und so kann man neben Automaten mit und ohne Jackpot auch Roulette, Blackjack, Poker, Bingo (jeden Mittwoch) und das neue Würfelspiel Dice52 spielen. Wo man in und um München Spielautomaten mit höheren Einsätzen und auch Roulette, Poker oder Blackjack spielen kann, erfährst du im nachfolgenden Casino München Guide. München ist die drittgrößte Stadt Deutschlands und hat auch für Glücksspielfreunde einiges zu bieten. Hier spielen Sie nicht selbst, sondern müssen eine Wette auf den Spieler, den Croupier oder auf ein Unentschieden abgeben.
References:
https://online-spielhallen.de/netbet-casino-bewertung-eine-umfassende-analyse/
Venlo Casino Auszahlungsmethoden
References:
https://online-spielhallen.de/greatwin-casino-auszahlung-ein-umfassender-leitfaden/
Our comprehensive responsible gaming framework combines advanced technological tools with dedicated support resources to ensure every player maintains healthy gaming habits. The platform supports both traditional payment methods and modern cryptocurrency options, ensuring instant deposits and efficient withdrawals. KingBilly provides Australian players with comprehensive banking solutions that combine security, speed, and convenience. Try games in free demo mode before playing with real money. Relish every moment where excitement, security, and support converge to elevate your play to new heights.
Activate session reminders to stay on track, and view detailed history to monitor your activity. Set deposit, loss, and session limits, enable cool‑off periods, or apply self‑exclusion directly from your profile. Use filters to sort by volatility, features, or provider. Terms are clear and visible in your account area. Unlock tiered VIP rewards after your King Billy Casino login.
References:
https://blackcoin.co/top-online-casinos-and-games-in-new-zealand/
Clear game history displays and trend tracking tools enhance the experience without affecting random outcomes. Rocketplay offers multiple versions, including Punto Banco and specialty tables with side bets and bonus options. Many versions also provide built-in strategy guides to help players refine their gameplay. Rocketplay’s table games section is packed with classics, offering multiple variants to suit all skill levels and betting styles. Rocketplay Casino offers a rich slot collection packed with top titles from industry leaders like NetEnt, Microgaming, Pragmatic Play, and BGaming. Higher levels mean bigger cashback, exclusive bonuses, faster payouts, and personalized support.
Whether you’re on the bus, beach, or couch — Rocketplay keeps things simple and fast. You can make deposits, claim promos, and cash out just like you would on desktop. It installs fast and runs smooth, perfect for anyone who likes their casino one tap away. If you prefer a standalone app, Android users can grab the Rocketplay APK directly from the site. Rocketplay works like a charm on mobile — no downloads needed.
They’re perfect for players who prefer straightforward sessions with smaller, more frequent wins. Rocketplay rewards loyal players with a 10-level VIP program that starts as soon as you register. All bonuses come with a 40x wagering requirement, to be completed within 5 days. The first deposit doubles with a 100% match bonus, activated with just a $30 AUD minimum deposit. For those who prefer apps, Rocketplay offers dedicated iOS and Android applications with faster performance and offline account access. The interface is designed for touch control, making navigation and gameplay effortless.
References:
https://blackcoin.co/instant-withdrawal-casinos-australia-15-fast-payout-casino-sites/
paypal casino uk
References:
https://applunch.site/marinamcinnis
paypal casinos online that accept
References:
https://exelentsmart.com/employer/paypal-casinos-2025-best-online-casinos-accepting-paypal/
mgm bet casino betmgm-play betmgm super bowl promo
Ignite sparks of joy with every successful wager. In crowns coins casino, seasonal promotions keep things fresh. Sign up and let the wins flow!
Crave big wins? Sweet Bonanza serves them up with vibrant graphics and high-volatility action. Bonus sweet bonanza bonus buys and ante bets make it even sweeter. Spin away!
Ride the buffalo wave to wealth. buffalo slots real money triggers multiplier magic, retriggers, and life-altering jackpots. Spin now!
Chumba Casino: the social casino that actually pays out real cash prizes. Claim chumba casino $100 free play right now and start your winning streak. Join the fun!
pragmatic play stake Originals are — Crash, Plinko, Mines, Dice and more. Combine them with the best slots and live dealers online. Your next big win is one click away.
Make DraftKings casino review Casino your go-to. New players score 500 spins for $5 wagered and up to $1,000 lossback protection. Spin big, win bigger—now!
Leky za ferovou cenu – zadne skryte poplatky, zadne triky
opravdovalekarna
Upon the millions winning momentous on fanduel casino Colorado – the #1 natural in dough casino app in America.
Get your $1000 PLAY IT AGAIN gratuity and modify every spin, хэнд and roll into bona fide cash rewards.
Fast payouts, huge jackpots, and non-stop action – download FanDuel Casino any longer and start playing like a pro today!
Spin until the word “unlucky” needs therapy – https://www.tekno50.com/forum/genel-konular/jak-lubisz-krecic-i-wygrywac-kategorie-slotow/ , Spin until even RNG starts taking notes .
Besoin d’un conseil santГ© ? Notre Г©quipe est lГ pour vous – https://gowork.fr/pharmacie-du-magny-sermamagny , Besoin d’un conseil santГ© ? Notre Г©quipe est lГ pour vous .