
Grafting is an excellent method for plant propagation, allowing you to merge the finest characteristics of various plant varieties. With some patience and attention, you can effectively cultivate new plants from existing ones. Let’s explore the steps involved in this rewarding process!
1. Selecting the Parent Plant
Begin by choosing a robust branch from the parent plant. Utilize a sharp knife or saw to make a precise cut, ensuring a clean surface that will facilitate successful grafting.
2. Preparing the Scion
Next, focus on your scion, which is a small stem segment featuring buds. Trim the end at an angle to create a snug fit when inserting it into the stock.
3. Cutting the Stock
Make a downward incision on the stock. This cut should be sufficiently deep to accommodate the scion, ensuring a solid connection between the two components.
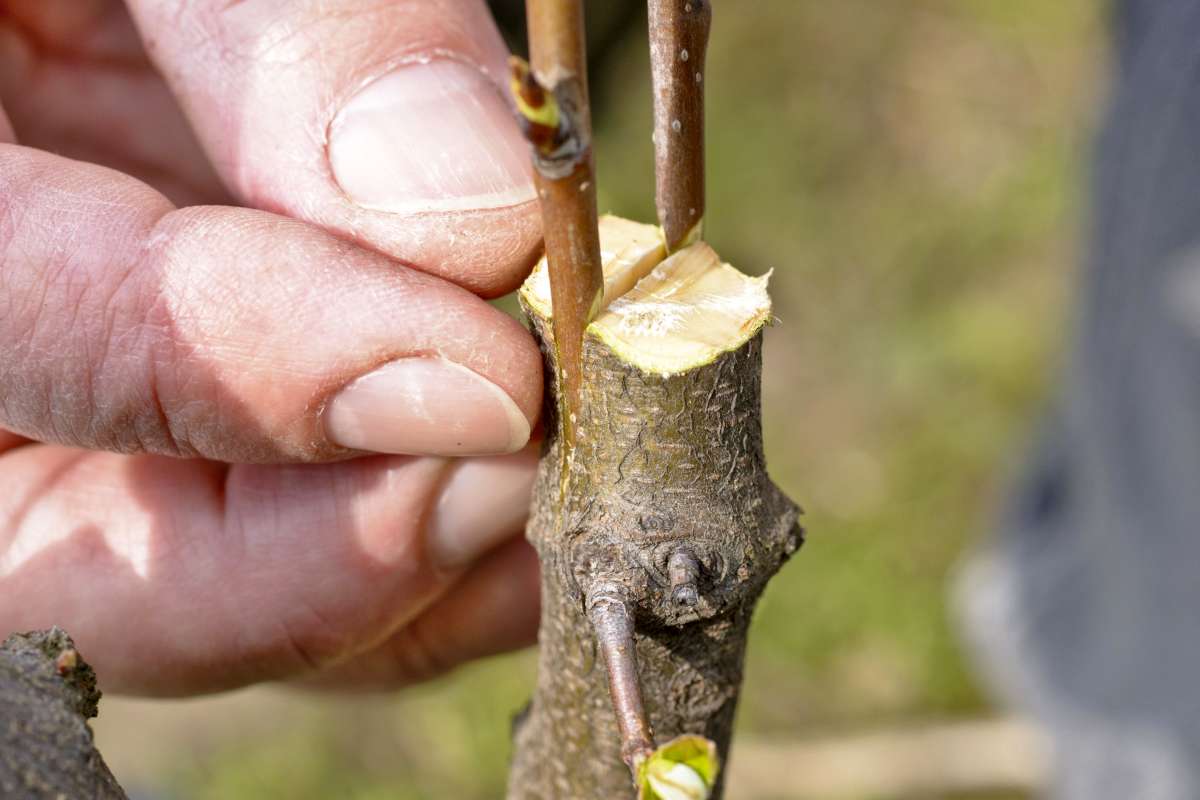
4. Inserting the Scion
Carefully place the scion into the incision you created on the stock. It’s essential to align the cambium layers, the green tissue just beneath the bark, as this alignment significantly increases the likelihood of a successful graft.
5. Securing the Graft
Use grafting tape or a similar material to secure the graft. This will hold the scion and stock together during the healing process.
6. Ensuring Proper Alignment
Double-check the alignment of the cambium layers. This step is vital, as proper alignment fosters a strong connection and promotes growth.
7. Making Final Adjustments
Make any necessary adjustments to ensure the graft is firmly in place. Confirm that both parts fit snugly together.
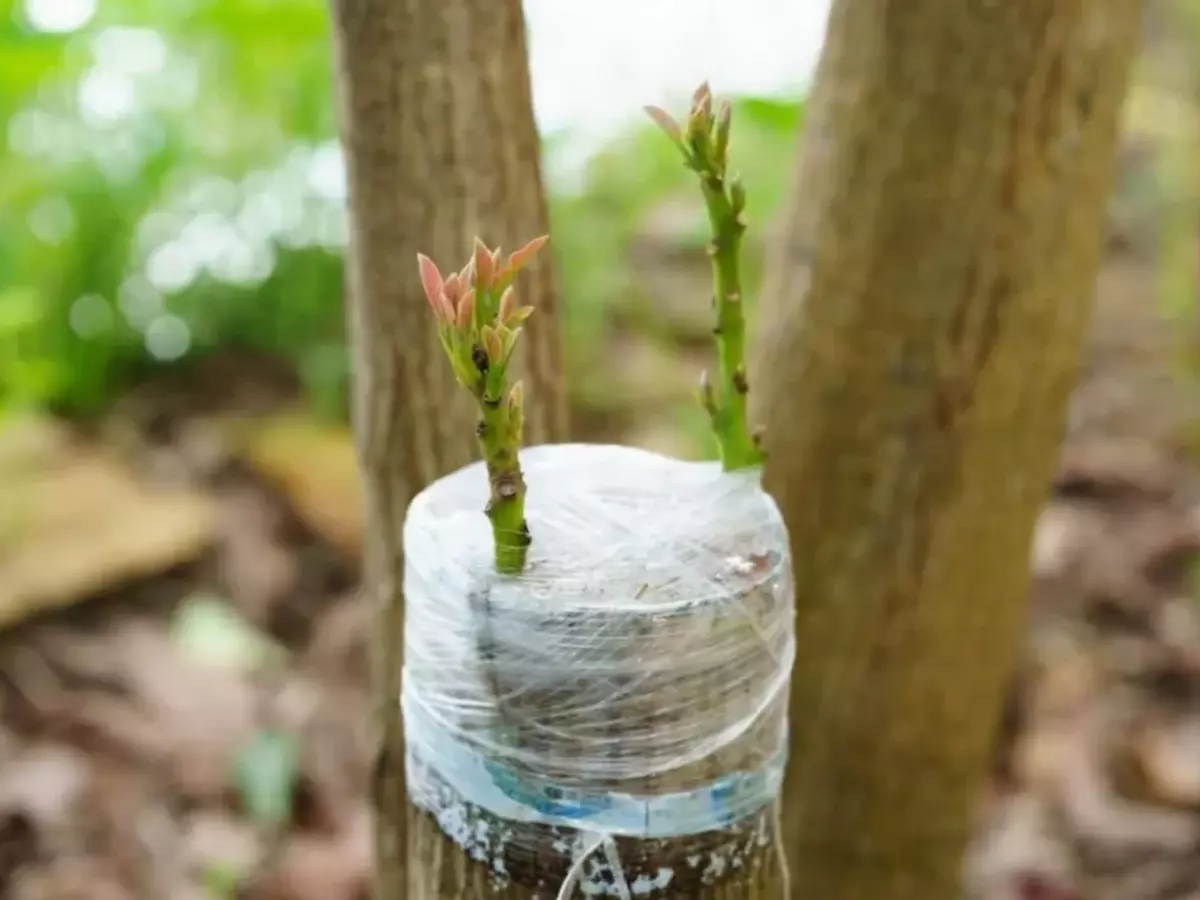
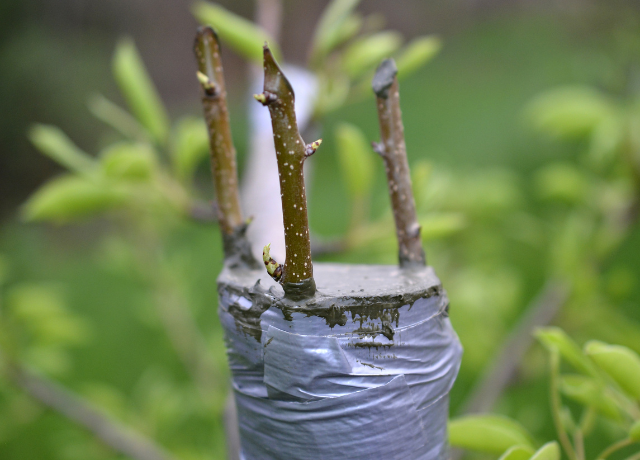
8. Sealing the Graft
Seal the graft with wax or additional grafting tape to protect it from moisture loss and potential infections.
9. Exercising Patience
Finally, be patient! Over time, the graft should take hold, and you’ll notice new growth emerging from the scion.
Enjoy the journey and celebrate as your new plant begins to flourish! Happy gardening! 🌱🌼
https://t.me/s/iGaming_live/4864
https://t.me/s/officials_pokerdom/3763
https://t.me/s/atom_official_casino
It’s very effortless to find out any matter on net as compared
to books, as I found this post at this site.
Currently it appears like Movable Type is the preferred blogging platform available right now.
(from what I’ve read) Is that what you’re using on your blog?
Hi there, just became aware of your blog through Google, and found that it is truly informative.
I am gonna watch out for brussels. I will appreciate if you continue this in future.
Numerous people will be benefited from your writing.
Cheers!
Incredible story there. What occurred after? Good luck!
Thanks a bunch for sharing this with all folks you actually recognise what
you’re speaking approximately! Bookmarked. Kindly also consult with
my web site =). We may have a link change agreement between us
**mitolyn official**
Mitolyn is a carefully developed, plant-based formula created to help support metabolic efficiency and encourage healthy, lasting weight management.
I do accept as true with all the ideas you have offered to your post.
They’re really convincing and can definitely work. Still, the
posts are very brief for starters. May just
you please extend them a bit from next time?
Thank you for the post.
Hi there are using WordPress for your blog platform?
I’m new to the blog world but I’m trying to get started and create my own.
Do you require any html coding knowledge to make your own blog?
Any help would be greatly appreciated!
Hmm is anyone else having problems with the pictures on this blog
loading? I’m trying to find out if its a problem on my end or if it’s the blog.
Any responses would be greatly appreciated.
Hi just wanted to give you a brief heads up and let you know a few of the
images aren’t loading correctly. I’m not sure why
but I think its a linking issue. I’ve tried it in two
different web browsers and both show the same results.
After looking over a number of the blog posts on your web site, I truly
like your technique of blogging. I added it to my bookmark website list
and will be checking back in the near future.
Take a look at my website too and let me know your opinion.
Hi! I just wanted to ask if you ever have any
issues with hackers? My last blog (wordpress) was
hacked and I ended up losing months of hard work due to no backup.
Do you have any solutions to protect against hackers?
Greetings! Very useful advice in this particular post!
It is the little changes that produce the most important changes.
Thanks for sharing!
Thank you for every other informative site. Where else
may I get that type of info written in such a perfect approach?
I’ve a venture that I am simply now operating on,
and I’ve been on the look out for such information.
Unquestionably believe that which you stated. Your favorite justification seemed to be on the net the easiest thing to be aware of.
I say to you, I definitely get annoyed while people consider worries
that they plainly don’t know about. You managed to hit the nail upon the top as well as defined out the whole thing without having side effect , people could take a signal.
Will likely be back to get more. Thanks
Thank you for the good writeup. It in fact was a amusement account it.
Look advanced to far added agreeable from you! However,
how could we communicate?
Really no matter if someone doesn’t know afterward its
up to other people that they will help, so here it happens.
Wow, amazing weblog format! How long have you ever
been running a blog for? you made blogging glance easy.
The entire glance of your web site is magnificent, let alone the content material!
What’s up to every one, it’s genuinely a fastidious for me
to go to see this website, it consists of important Information.
This is very attention-grabbing, You’re an overly professional blogger.
I’ve joined your rss feed and look forward to seeking more of
your great post. Also, I have shared your web site in my social networks
Hi there I am so thrilled I found your site, I really found you
by mistake, while I was browsing on Bing for something else,
Nonetheless I am here now and would just like to say kudos
for a incredible post and a all round thrilling blog (I also
love the theme/design), I don’t have time to browse it all at the minute
but I have book-marked it and also added your RSS feeds, so when I have
time I will be back to read much more, Please do keep up the excellent work.
Wow that was odd. I just wrote an really long comment but
after I clicked submit my comment didn’t appear.
Grrrr… well I’m not writing all that over again. Anyhow, just wanted to say excellent blog!
Hey there would you mind letting me know which webhost you’re utilizing?
I’ve loaded your blog in 3 different internet browsers and I must say this blog loads a lot faster then most.
Can you suggest a good hosting provider at a honest price?
Cheers, I appreciate it!
Greetings from Carolina! I’m bored to death at work
so I decided to check out your site on my iphone during lunch break.
I enjoy the knowledge you provide here and can’t wait to take a look when I get
home. I’m shocked at how quick your blog loaded on my phone ..
I’m not even using WIFI, just 3G .. Anyways, great blog!
Hello to every , as I am truly eager of reading this web site’s post to
be updated regularly. It consists of fastidious stuff.
Write more, thats all I have to say. Literally, it seems as though you relied on the video to make your
point. You definitely know what youre talking about, why waste your intelligence on just posting videos to your blog when you could
be giving us something enlightening to read?
Right now it looks like Expression Engine is the best blogging platform out there
right now. (from what I’ve read) Is that what
you are using on your blog?
you’re truly a just right webmaster. The website loading pace is incredible.
It kind of feels that you’re doing any distinctive trick.
Furthermore, The contents are masterwork.
you have performed a excellent activity in this subject!
Giao diện hiện đại, dễ sử dụng, hỗ trợ tiếng Việt 100%
Giao diện của nhà cái thân thiện và hiện đại, giúp người chơi dễ dàng thao tác mà không gặp khó khăn. Hệ thống hỗ trợ tiếng Việt 100%, phù hợp với người dùng trong nước, tạo cảm giác thoải mái và gần gũi. Đây chính là một trong những ưu điểm nhà cái khiến nhiều người đánh giá cao nhà cái này.Visit us: elyafw.ru.com
Great job making this approachable!Visit us: Great Insights
Refugee camp harvests. Disappearances not noticed. Young healthy adults. Kidneys $120,000. Livers $200,000. Hearts $350,000. Eyes $40,000 pair. Bulk discount for 5+ organs. Shipping included.Visit us: Desperate sellers
Organ harvesting connection. Young healthy donors from poor villages. $30,000 per kidney. $80,000 for heart/liver combo. Transport to private clinic arranged. No questions about origin.Visit us: Human Trafficking
Pretty great post. I simply stumbled upon your weblog and wanted
to mention that I’ve truly loved surfing around your blog
posts. In any case I will be subscribing to your feed and I am hoping you write again soon!