
Keeping your vegetable garden healthy—especially when growing moisture-loving plants like tomatoes—requires consistent watering. But staying on top of this can be tough, especially during hot spells or if you’re away for a few days. The good news? You can make a simple, cost-effective automatic watering solution using nothing more than an old plastic bottle.
This DIY trick is a favorite among both novice and experienced gardeners for a reason: it’s easy, sustainable, and surprisingly effective.
When you water from above, moisture often evaporates before it reaches the roots—or ends up on the leaves, increasing the risk of fungal diseases like powdery mildew. A bottle-based system, on the other hand, delivers water slowly and directly to the soil where plants need it most: at the roots.
It also helps prevent overwatering and underwatering, maintaining an ideal level of moisture for growth.
Step-by-Step: How to Make an Automatic Waterer
You don’t need special equipment or advanced DIY skills. Here’s how to make your own vegetable waterer in just a few minutes:
- Choose the Right Bottle
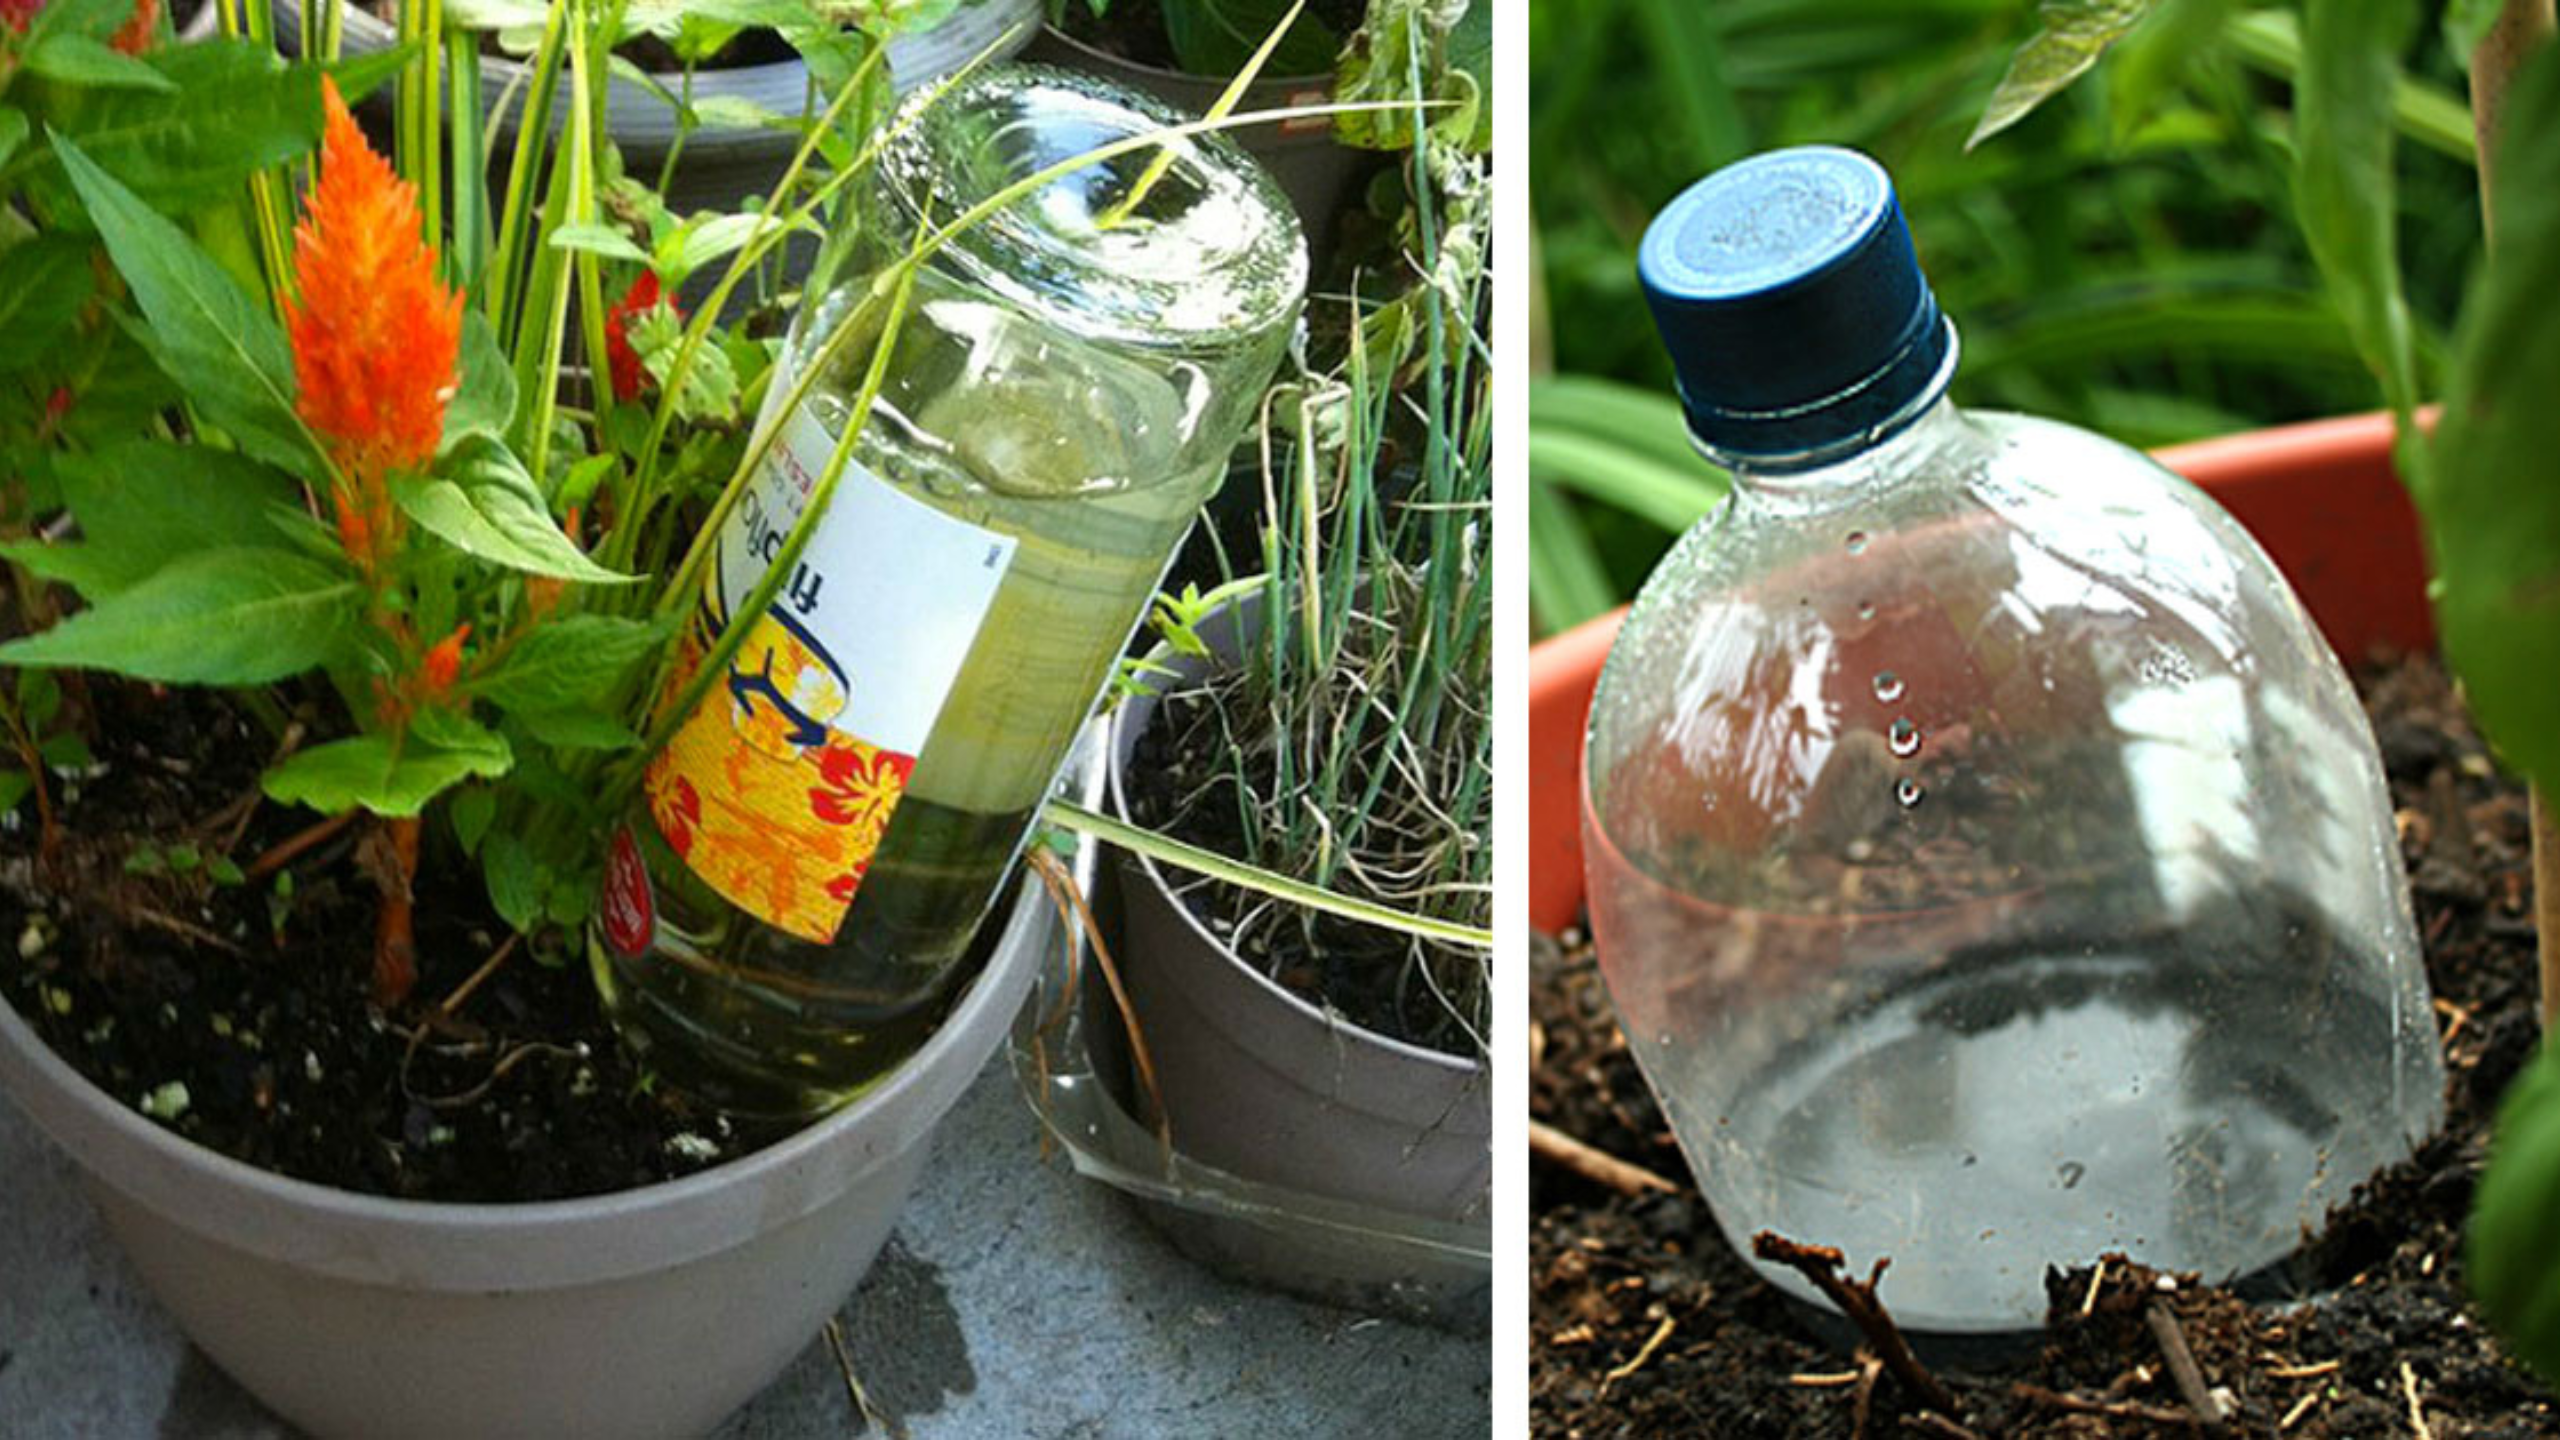
Start with a clean, used plastic water bottle—any size will do, but 1-liter or 2-liter bottles are ideal for medium-sized plants. This is a great way to repurpose household waste and reduce your environmental footprint.
- Make the Holes
Using a sharp knife or needle, poke small holes around the lower half of the bottle, especially near the bottom. These holes should be just big enough to allow water to slowly seep out. A few additional holes on the sides help distribute the water more evenly underground.
Tip: Too many holes will cause water to drain too quickly. Start with 4–6 holes and adjust as needed.
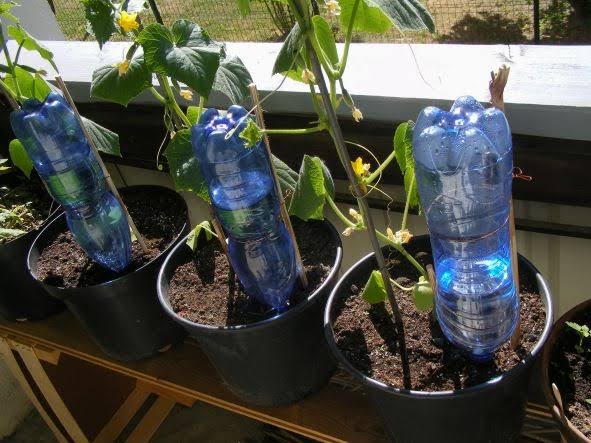
- Bury the Bottle
Dig a small hole next to the base of your plant. Place the bottle upright with the cap off (or loosely screwed on), leaving the neck of the bottle exposed above ground for easy refilling. Pack soil around the bottle to keep it steady.
If you’re setting up a new garden bed, bury the bottle at the same time you plant to avoid disturbing established root systems later on.
- Fill with Water
Pour water into the bottle until it’s full. Over time, water will gradually seep into the surrounding soil, keeping it consistently moist without flooding your plant.
For added benefit, you can mix in a little compost tea or diluted liquid fertilizer to nourish your plants while watering.
The Benefits: Why Gardeners Love This Hack
Setting up a bottle waterer might take only five minutes, but it delivers long-lasting perks:
Consistent Moisture
Plants thrive with a steady water supply. This system keeps the root zone damp without the extremes of drying out or waterlogging.
Reduced Fungal Risk
Because the water goes straight into the soil, the leaves stay dry. That helps prevent diseases caused by too much surface moisture, like blight and mildew.
Hands-Free Hydration
Whether you’re going on vacation or just don’t want to water every day, this setup has your back. It’s perfect for busy schedules or hot summer weeks when soil dries out fast.
Eco-Friendly and Budget-Conscious
Reusing a plastic bottle saves money and keeps plastic out of landfills. Want to go one step further? Try swapping the bottle for a terracotta olla—a traditional clay watering pot. Terracotta naturally lets water seep into the soil and works well for both outdoor and indoor plants.
Pro Gardening Tips
Planting Time Matters: For best results, install your bottle when planting seedlings. That way, roots can grow around the moisture source.
Monitor Moisture Levels: In extremely hot or dry climates, you might need to refill bottles more frequently. Adjust bottle size or add more bottles if needed.
Upgrade with Mulch: Covering the soil around your plants with organic mulch helps retain even more moisture and protects bottle tops from sun damage.
Why This Method Works So Well
Vegetables, especially during flowering and fruiting stages, require consistent watering to produce high yields. The bottle waterer method provides slow, steady hydration that mimics how plants naturally absorb moisture. It minimizes waste, reduces labor, and improves overall plant health.
Unlike drip systems or soaker hoses that can be expensive or require installation, this method is nearly free and accessible to everyone.
In Summary
Effective watering doesn’t need to be complicated or costly. By transforming a plastic bottle into an automatic waterer, you give your plants exactly what they need, right where they need it—at the roots.
This DIY solution is:
Simple to set up
Incredibly low-maintenance
Environmentally friendly
Perfect for gardens of any size
So next time you finish a bottle of water, don’t toss it—give it new life in your garden. Your vegetables will thank you!
https://t.me/officials_pokerdom/4056
https://t.me/s/iGaming_live/4866
https://t.me/s/official_pokerdom_pokerdom
Sehen Sie sich dafür auch Jackpot City an, das
von unseren Experten zum Top Echtgeld Online Roulette Casino für den December
2025 gekürt wurde. Deshalb haben wir für Sie die besten Echtgeld Online Roulette Casinos in Deutschland getestet und empfehlen Ihnen die Top Anbieter in der nachfolgenden Casino Liste.
Onlinespielcasino.de unterstützt den verantwortungsvollen Umgang mit Glücksspiel.
Matthias hat ein Gespür für spannende Spielautomaten, fesselnde Tischspiele und lukrative Bonusangebote.
In seinen Artikeln nimmt er kein Blatt vor den Mund und bietet euch einen Mehrwert durch
echte Praxiserfahrungen.
Wir erklären euch, wie ihr euch bei einer Echtgeld Spieleseite anmeldet, wie
ihr euer Konto verifiziert und was für eine schnelle Auszahlung zu beachten ist.
Wer noch neu ist in der Welt der virtuellen Glücksspiele, weiß nicht unbedingt, was es am
Anfang zu beachten gibt und wie ein erfolgreicher Einstieg gelingt.
Beachtet, dass in manchen Echtgeld Spielhallen die
Spiele des Entwicklers unter “Greentube” zu finden sind, einer
Marke des Unternehmens Novomatic, zu dem Novoline als
Marke gehört.
References:
https://online-spielhallen.de/1red-casino-bewertung-meine-10-jahre-erfahrung-auf-den-prufstand-gestellt/
The platform processes transactions efficiently with zero commission fees and competitive processing timeframes that meet the expectations of modern online gaming enthusiasts.
The platform operates under comprehensive regulatory oversight ensuring player safety and
fair gaming practices through multiple security layers. The platform features several branded exclusives unavailable elsewhere, giving
Australian players access to unique entertainment options.
Australian players seeking a reliable, entertaining,
and rewarding gaming destination should definitely give it
a try. Mobile optimisation ensures seamless gaming across all devices, while the comprehensive live casino creates authentic gambling experiences
that rival physical venues. Fast withdrawal processing
demonstrates respect for players’ time and financial needs, with e-wallet transactions completing within hours rather than days.
Popular FAQ categories include account management, bonus conditions, deposit procedures,
withdrawal processes, and technical troubleshooting for mobile users.
From classic pokies to innovative video slots, roulette,
blackjack, poker, and live dealer games, there’s something for everyone.
The intuitive layout ensures seamless navigation, making it easy for players to find
their favorite games or explore new ones. Disclaimer – Our website acts
as an independent source of information and
provides online casino reviews, detailed descriptions of the services
offered, as well as ratings and recommendations for players.
New players often rush into gaming without fully understanding terms and conditions,
leading to disappointment when bonus requirements aren’t met.
Understanding typical errors helps Australian players avoid costly mishaps
and maximise their gaming experience while maintaining responsible gambling habits.
References:
https://blackcoin.co/amunra-casino-a-complete-review-of-the-egyptian-themed-gaming-platform/
This platform is designed with every type of player in mind—whether you prefer immersive slots, classic table games,
or exciting live dealer experiences. When selecting an online gambling destination, Australian players look for a blend
of reputation, accessibility, and user experience, and this brand delivers on all fronts.
Skycrown Casino offers 24/7 multilingual support, enticing bonuses,
tournaments, and personalized promotions for players worldwide.
Enjoy slots, table games, and live dealer options right from your smartphone, with quick transactions and full support for players worldwide.
From licences and payment methods to supported currencies and withdrawal speeds, this section covers everything at
a glance. Before you dive into the pokies lobby or claim your welcome deal,
it’s worth knowing the key details about SkyCrown Casino.
Aussies signing up for the first time can grab a generous welcome
package that boosts both their bankroll and their chances to try more pokies.
The support team responds quickly, and the banking system is
transparent with easy-to-follow steps for verification.
mobile casino paypal
References:
https://bluestreammarketing.com.co/employer/best-paypal-online-casinos-accepting-us-players-2025
online pokies paypal
References:
quickfixinterim.fr
В джунглях ставок, где каждый ресурс норовит заманить заверениями быстрых джекпотов, рейтинг казино рф
становится как раз той ориентиром, что проводит через дебри подвохов. Тем ветеранов да начинающих, которые надоел с фальшивых обещаний, такой инструмент, чтобы ощутить реальную отдачу, будто тяжесть золотой фишки на ладони. Минус пустой воды, просто надёжные площадки, где выигрыш не просто число, но ощутимая фортуна.Собрано из гугловых трендов, словно паутина, что вылавливает наиболее свежие веяния в рунете. Здесь отсутствует пространства про стандартных трюков, всякий момент как ставка в столе, там блеф выявляется немедленно. Игроки видят: по стране манера письма с иронией, там юмор притворяется словно намёк, помогает избежать рисков.На https://www.youtube.com/@Don8Play/posts этот рейтинг ждёт будто готовая карта, готовый на игре. Зайди, коли хочешь увидеть биение настоящей ставки, обходя мифов и провалов. Для что любит тактильность выигрыша, это будто держать карты в руках, вместо пялиться на экран.