

In sustainable gardening and farming, one of the most powerful resources you can use is already available on many farms—animal manure. But to unlock its full potential, it needs to be fermented properly. Raw manure can do more harm than good if applied too early. Fermentation turns it into a nutrient-rich, safe, and effective fertilizer that nourishes your plants and improves soil health.
This guide will walk you through why and how to ferment manure correctly, helping you reduce costs, cut down on pesticide use, and grow healthier crops with less effort.
Why Ferment Animal Manure?
Raw (unfermented) manure may seem like a quick solution for soil fertility, but it comes with several drawbacks:
High ammonia content can burn plants
Weed seeds and pathogens may still be active
Unbalanced nutrient release can cause plant stress
Increased need for pesticides due to disease-prone plants
When properly fermented, manure becomes:
Safer for plant roots
Rich in beneficial microbes
Easier to apply and integrate into soil
Environmentally friendly, with reduced runoff and odor
In short, fermentation transforms waste into a goldmine for your garden.
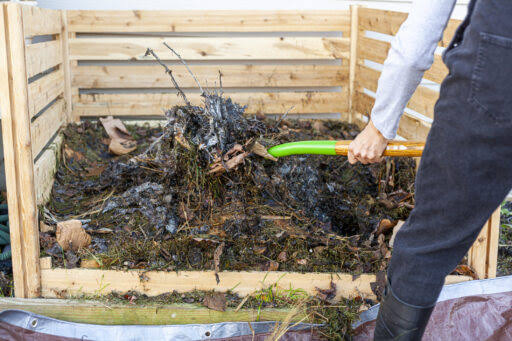
Step-by-Step Guide to Fermenting Manure
Whether you’re working with cow, horse, goat, or chicken manure, the basic fermentation process is the same. Here’s how to do it right:
- Gather and Pile
Start by collecting fresh manure and forming a compact pile in a designated composting area. For best results, mix in a bit of straw, sawdust, or dried leaves—this balances carbon and nitrogen levels.
Avoid spreading the manure thinly across a wide area. A consolidated pile helps retain heat and speeds up decomposition.
- Lightly Water the Pile
Moisture is essential for microbial activity. Gently water the pile so it’s damp—not soaking wet. You should be able to grab a handful and feel some moisture without water dripping from it.
Proper moisture levels encourage good bacteria and fungi to break down the organic material efficiently.
- Cover the Pile with Plastic
Use a plastic sheet or tarp to cover the pile. This:
Traps heat
Retains moisture
Speeds up microbial action
Prevents nutrient loss through evaporation or leaching
Make sure there’s a little air flow to avoid anaerobic conditions, which can produce foul odors and slow fermentation.
- Let It Ferment for 2–3 Months
Over the next 2 to 3 months, the pile will heat up and begin to break down. During this period:
Turn the pile every 2–3 weeks using a pitchfork or shovel. This introduces oxygen and ensures even decomposition.
Monitor the temperature—ideally it should reach 130–150°F (55–65°C). That’s hot enough to kill harmful pathogens and weed seeds.
You’ll notice the pile becoming darker, crumbly, and less smelly as it matures.
Need Faster Results? Try Hot Fermentation
If you want usable fertilizer in under two months, you can speed up the process:
Make smaller piles, no taller than 2–3 feet
Position them in a sunny spot to retain heat
Turn more frequently—every 7 to 10 days
Use fermentation accelerators like EM (Effective Microorganisms) or a handful of mature compost to jumpstart microbial growth
With good sunlight and active turning, your manure can be ready in 50 to 60 days.
Tips for Using Fermented Manure in the Garden
Once your manure is fully fermented, it’s time to put it to work:
Mix it into garden beds before planting
Side-dress vegetables during growth for a nutrient boost
Add to compost teas for enhanced feeding
Top-dress fruit trees and shrubs in early spring
Avoid using it on seedlings or freshly transplanted plants right away. Even fermented manure can be too rich for delicate roots—let them establish first.
Final Thoughts: Healthy Soil Starts with Smart Choices
Fermenting animal manure is one of the easiest and most cost-effective ways to enrich your soil naturally. By following these simple steps, you’ll reduce your dependence on chemical fertilizers, lower labor costs, and grow healthier crops that require fewer pesticides.
It’s a win for your garden—and the planet.
cheap amoxil pill – https://combamoxi.com/ buy generic amoxicillin over the counter
forcan where to buy – buy forcan generic generic diflucan 200mg
lexapro brand – site lexapro 10mg oral
cenforce pills – buy cenforce for sale buy cenforce tablets
super cialis – https://ciltadgn.com/# cialis dosage for bph
what is cialis pill – on this site cialis overnight shipping
order zantac 150mg – https://aranitidine.com/# order zantac 300mg pill
viagra 50 mg buy online – https://strongvpls.com/ order viagra no prescription
More articles like this would make the blogosphere richer. buy accutane mastercard
I’ll certainly bring back to review more. https://ursxdol.com/cialis-tadalafil-20/
More text pieces like this would make the web better. https://prohnrg.com/product/atenolol-50-mg-online/
This is the amicable of serenity I get high on reading. https://aranitidine.com/fr/en_france_xenical/
I am in fact delighted to glitter at this blog posts which consists of tons of profitable facts, thanks representing providing such data. https://ondactone.com/spironolactone/
This is the tolerant of enter I recoup helpful.
buy colchicine no prescription
With thanks. Loads of knowledge! http://3ak.cn/home.php?mod=space&uid=229264
dapagliflozin pills – janozin.com dapagliflozin 10 mg pills
how to buy xenical – https://asacostat.com/ orlistat pills
Thanks towards putting this up. It’s understandably done. http://wightsupport.com/forum/member.php?action=profile&uid=22091
Hello .!
I came across a 139 very cool resource that I think you should check out.
This site is packed with a lot of useful information that you might find insightful.
It has everything you could possibly need, so be sure to give it a visit!
https://interaction-proteome.org/betting-secrets/tips-to-help-improve-your-bingo-results/
Additionally don’t overlook, guys, which you always can within the publication find solutions to the most the absolute confusing questions. Our team tried — lay out all of the information via the most most accessible manner.
Hello friends!
I came across a 139 helpful page that I think you should dive into.
This tool is packed with a lot of useful information that you might find helpful.
It has everything you could possibly need, so be sure to give it a visit!
https://softmp3.org/betting-secrets/taking-online-betting-to-another-level/
And do not overlook, folks, that you constantly may inside the publication locate responses for your the very tangled inquiries. The authors made an effort to lay out the complete information via an extremely easy-to-grasp manner.
You can conserve yourself and your stock by being cautious when buying panacea online. Some pharmacopoeia websites manipulate legally and sell convenience, privacy, cost savings and safeguards over the extent of purchasing medicines. buy in TerbinaPharmacy https://terbinafines.com/product/crestor.html crestor
This is a question which is near to my callousness… Many thanks! Exactly where can I find the connection details in the course of questions? pharmacie en ligne sans ordonnance cialis
More peace pieces like this would create the web better.
https://t.me/s/ef_beef
https://t.me/s/iGaming_live/4866
https://t.me/s/iGaming_live/4877
Bei dem No Deposit Angebot von Verde Casino handelt es sich um 50 Freispiele für den Fantasy Slot „Book of Sirens“ von Spinomenal. No Deposit Boni sind bei Spielern sehr beliebt, werden derzeit jedoch nur von den wenigstens Online Casinos angeboten. Das Bonusangebot beinhaltet einen Deposit Bonus und einen No Deposit Bonus. Alle neuen Spieler, die erstmals ein Kundenkonto bei Verde Casino einrichten, dürfen sich über einen attraktiven Neukundenbonus freuen. Zu den Highlights des Angebots gehören ein hoher Willkommensbonus für neue Spieler sowie regelmäßige Special Boni für Bestandskunden. Das Online Casino Verde bietet aktuell ein sehr vielfältiges Bonus Programm.
Trotzdem gibt es bei der Registrierung unter den Eingabefeldern die Möglichkeit einen Verde Casino Aktionscode einzugeben. Außerdem ist der Gewinn aus dem Verde Casino Bonus mit dem fünffachen Einzahlungsbetrag und die Gewinne der Freispiele mit 300 € limitiert. Die Umsatzverpflichtung von 40x für das Bonusgeld und 30x für die Gewinne der Freispiele ist ziemlich fair. Hier sollten Sie sich also den höchstmöglichen Willkommensbonus holen. Der angebotene Verde Casino Bonus mit Startguthaben ist großartig.
References:
https://online-spielhallen.de/monro-casino-promo-codes-ihr-detaillierter-leitfaden-fur-maximale-vorteile/
Create a bar chart of [energy consumption for the top 5 energy consuming countries]. With Copilot in Word, Excel, Outlook, and PowerPoint, you can draft, design, and edit effortlessly, giving you more time for ideas and impact. AI is built into the Office apps you know and trust.
These efforts have made low-carbon concrete the default option for local suppliers, with no cost premium. The Pedestrian Bridge connects Microsoft’s East and West Campus, creating a direct connection between the distinct areas of campus while also eliminating the need for cars to traverse campus. Terraces integrated with the buildings allow for connection with nature, and are planted with native species, irrigated with stored rainwater. You can find your favorite apps—like Word, Excel, PowerPoint, and more—under the Apps section in the left navigation of the Microsoft 365 Copilot web app. Microsoft 365 (formerly Microsoft Office 365) is a subscription service that offers a suite of productivity tools and cloud-based services from Microsoft.
The campus is served by buses to Seattle and some Eastside cities at the Overlake Transit Center, operated by Sound Transit and King County Metro. Microsoft also announced its intention to contain most its future growth within Redmond, while retaining some offices in Downtown Bellevue and Factoria. The campus was originally leased to Microsoft from the Teachers Insurance and Annuity Association, a pension fund manager, until it was bought back in 1992. Microsoft chose to move its headquarters from Bellevue to nearby Redmond in January 1985, selecting a 29-acre (12 ha) plot of land that would be developed by Wright Runstad & Company. Microsoft initially moved onto the grounds of the campus on February 26, 1986, weeks before the company went public on March 13.
References:
https://blackcoin.co/las-vegas-roulette-rules/
With a dedicated customer service team, regular and excellent promotions and the latest in new gaming technology and security software – Vegas Palms is a mighty fine choice. Well, you could do far worse than sign up to Leo Vegas and claim their insanely generous welcome bonus. 32 Red is a name that will be familiar to any Aussie pokie player in 2025.
Instead of seeing digital images representing cards and tables in the game, the player gets to see the dealer handle the cards in real-time through a live stream. To get a better idea on how fast the online gambling industry develops, just look how many new casinos have appeared out there recently! When searching for an Aussie online casino to play in, you’d come across a number of feature-specific platforms. There are also cashback promos and other offers for regular casino players. As a regular player, you can still get deposit rewards if you look out for new casino bonus updates. Also, as players cross ranks, they get big bonuses for moving up to a higher rank.
References:
https://blackcoin.co/crypto-casino-roostake-com/
paypal casino online
References:
https://istihdam.efeler.bel.tr/employer/paypal-casinos-2025-best-online-casinos-accepting-paypal/
australian online casinos that accept paypal
References:
https://2workinoz.com.au/employers/beste-paypal-online-casinos-2026-im-casino-mit-paypal-bezahlen/
paypal casinos online that accept
References:
http://www.s-golflex.kr/main/bbs/board.php?bo_table=free&wr_id=4892337
australian online casinos that accept paypal
References:
https://jobs.ethio-academy.com/employer/top-online-pokies-find-legit-online-pokies-for-real-money/
В мире азарта, где любой ресурс норовит заманить гарантиями быстрых призов, рейтинг казино онлайн на рубли
становится как раз той картой, что направляет через заросли рисков. Для хайроллеров и дебютантов, что пресытился с фальшивых посулов, он инструмент, чтоб почувствовать реальную rtp, словно ощущение выигрышной монеты в ладони. Обходя пустой воды, просто реальные сайты, где rtp не просто цифра, но реальная фортуна.Подобрано по гугловых трендов, словно ловушка, что ловит топовые свежие тенденции на рунете. Тут минуя роли к клише фишек, каждый пункт словно карта на столе, где обман проявляется сразу. Игроки понимают: по России стиль речи и подтекстом, там ирония маскируется словно намёк, даёт миновать рисков.В https://don8play.hashnode.dev/rejting-onlajn-kazino-don8play-kak-vybrat-nadyozhnyj-brend-i-ne-oshibitsya?showSharer=true данный топ находится как раскрытая карта, приготовленный к старту. Зайди, если хочешь увидеть ритм реальной игры, обходя обмана и разочарований. Для кто ценит ощущение выигрыша, он как держать фишки в руках, а не пялиться на дисплей.
betmgm NV https://betmgm-play.com/ betmgm app
Immerse in the symphony of spinning reels and cheering wins. In crown coins casino official website, cashback offers soften any losses. Spin with confidence today!
Sweet Bonanza is your ticket to a world of lollipops, fruits, and huge multipliers. Tumble sweet bonanza big win your way to free spins and watch prizes explode. Don’t miss out!
Roar louder than the reels themselves. buffalo aristocrat delivers 27x free spins, retrigger rushes, and life-changing wins. Charge!
Play chumba casino redeem cash free today and turn Sweeps Coins into real prizes tomorrow. Huge welcome bonus + daily rewards = endless winning chances. Sign up now!
The casino that sponsored the biggest Twitch stars. Now it’s your turn to win big. Fast. Fair. Crypto-native. stake crash .
Join the DraftKings roulette Casino revolution. Play $5 today and grab 500 spins plus up to $1,000 in first-day credits. Epic wins incoming!
Originalni generika za zlomek ceny originalu > opravdovalekarna.cz
https://opravdovalekarna.cz
Solder together the millions enchanting strapping on fanduel casino Maryland – the #1 legitimate coins casino app in America.
Pick up your $1000 PLAY IT AGAIN bonus and turn every twirl, хэнд and somersault into legitimate banknotes rewards.
Permanent =’pretty damned quick’ payouts, whopping jackpots, and non-stop effect – download FanDuel Casino again and start playing like a pro today!
One more round and gravity starts taking your orders – http://gketorolac.com/gates-of-olympus-slot-game/ , Tonight the reels are singing your victory song .