
Whitewashing your fruit trees is a simple yet effective way to protect them from sunburn, temperature fluctuations, and pests. By applying a whitewash to the trunks and branches of your trees, you create a protective layer that can help prevent damage while supporting healthy growth. If you’re new to whitewashing or want to improve your technique, this guide will walk you through the steps to successfully whitewash your fruit trees and keep them thriving.
1️⃣ Choose the Right Time (Spring is Ideal!)
The best time to whitewash your fruit trees is early spring, just before the sun starts to get stronger. This is because springtime allows the tree to benefit from the protective whitewash before the intense summer heat. Applying it too late in the season might not give the tree enough time to benefit from the protection, so aim to do it when the threat of frost is gone but before the scorching sun arrives.
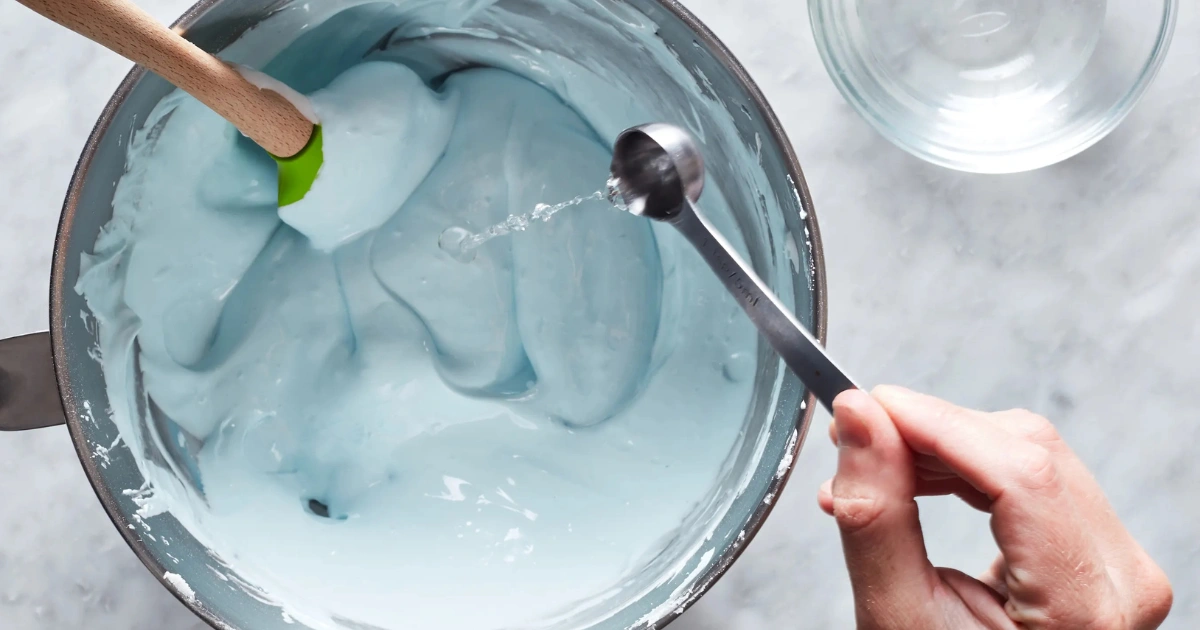
2️⃣ Mix Your Lime Paint Easily
The key ingredient for whitewashing is lime. Hydrated lime or powdered lime is readily available at garden centers and is easy to work with. To create the perfect whitewash, mix lime with water until the consistency is smooth and creamy—similar to the thickness of thin yogurt. This consistency allows the paint to go on smoothly and adhere to the tree’s bark.
Relatable mistake: I once made the mistake of making the mixture too thick, which resulted in it going on like frosting. Unfortunately, it cracked and peeled off later on! So, it’s important to get the texture just right.
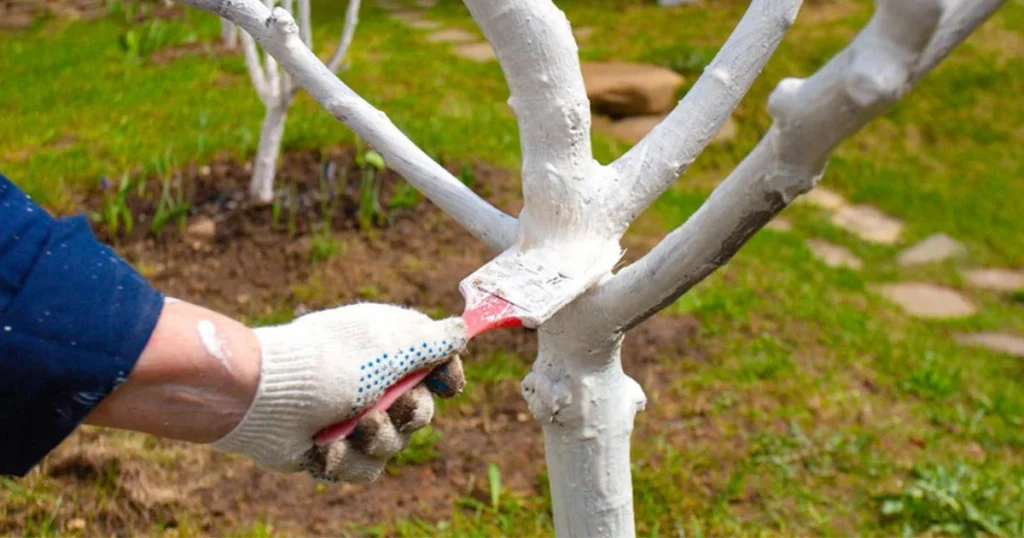
3️⃣ Apply the Whitewash from the Trunk to the Lower Branches
When it comes time to apply the whitewash, focus on the trunk, main branches, and lower parts of the tree. These areas are the most vulnerable to sunburn and pests, especially during the hot summer months. Use a paintbrush or a sprayer to coat these sections thoroughly, ensuring even coverage.
Be sure to avoid getting the whitewash on the fruits themselves, as this can lead to unsightly and unnecessary damage.
4️⃣ Protect Your Fruits
It’s important not to apply the whitewash directly onto the fruits of the tree. If you’re concerned about accidentally coating them, use materials like cardboard or aluminum foil to create a temporary shield around the fruit while you apply the whitewash to the rest of the tree. This simple step will help ensure your fruit stays clean and undamaged by the whitewash.
5️⃣ Reapply After Heavy Rain
One of the downsides of whitewashing is that it can be washed away by heavy rain. After a big storm, check your trees to see if the whitewash has been diminished or removed. If the coating looks patchy or thin in places, reapply the whitewash to maintain full protection. This is especially important if you’re in an area that frequently experiences rainfall.
6️⃣ Quick Bonus Tip: Apply on a Dry, Calm Day
For the best results, apply the whitewash on a dry day with minimal wind. If it’s too windy, the mixture can be blown off or dry unevenly, making it less effective. Additionally, a dry day ensures that the mixture adheres better to the tree and dries evenly. Avoid applying the whitewash during wet conditions, as it may not adhere properly.
Conclusion
Whitewashing your fruit trees is a simple, effective way to protect them from the elements and ensure they thrive throughout the growing season. By following these easy steps, you’ll help reduce sunburn, prevent pests, and maintain healthy trees. Whether you’re a seasoned gardener or a beginner, this easy task can make a world of difference to the health and longevity of your fruit trees.
Happy gardening, and may your harvests be bountiful and healthy!
I’ve been absent for a while, but now I remember why I used to love this website. Thank you, I?¦ll try and check back more often. How frequently you update your site?
Only a smiling visitor here to share the love (:, btw outstanding design.
pg
TKBNEKO เปิดประสบการณ์ใหม่แห่งการเดิมพันออนไลน์ ระบบการเงินรวดเร็ว ด้วยระบบสแกน คิวอาร์โค้ด
ในยุคที่ โลกออนไลน์พัฒนาอย่างรวดเร็ว TKBNEKO เข้ามาสร้างมาตรฐานใหม่ให้กับวงการ ด้วยระบบการให้บริการที่ ล้ำสมัย เสถียร และ ตรวจสอบได้ พร้อมต้อนรับสมาชิกทุกท่านสู่ มิติใหม่แห่งความสนุก ที่ เปิดโอกาสให้ทุกคนสร้างรายได้
เหตุผลที่ควรเลือก TKBNEKO
TKBNEKO มุ่งมั่นที่จะมอบประสบการณ์จากเกมลิขสิทธิ์แท้ โดยเฉพาะเกมที่ ผ่านการรับรองจากสถาบันที่น่าเชื่อถือ และ เป็นที่นิยมในระดับสากล เพื่อให้ผู้เล่นทุกคน มั่นใจ ได้ว่า จะได้รับความเพลิดเพลินกับเกมที่ โปร่งใส ปลอดภัย และ ได้มาตรฐานระดับสากล
ระบบการเงินที่เหนือกว่า
เรามุ่งเน้นความสะดวกของผู้เล่น เพื่อให้คุณ เพลิดเพลินกับการเดิมพันอย่างต่อเนื่อง
ฝากขั้นต่ำ: เริ่มต้นเพียง 1 บาท
ถอนขั้นต่ำ: ขั้นต่ำ 1 บาท
เวลาฝากเงิน: เงินเข้าภายใน 3 วินาที
ยอดจำกัดการถอน: ไม่มีลิมิตการถอนรายวัน
ฝากง่าย เพียงสแกน QR Code
เพียงคุณสแกน โค้ดคิวอาร์ ระบบของเราจะ ประมวลผลอย่างรวดเร็ว ขั้นต่ำเพียง เริ่มต้น 100 บาท และสามารถฝากได้สูงถึง ไม่เกิน 500,000 บาทต่อครั้ง เริ่มต้นได้ทันที กับ แพลตฟอร์มของเรา ที่ ใช้งานง่าย ทำกำไรได้รวดเร็ว
คลังเกมคุณภาพ
เรารวบรวมเกมยอดนิยมหลากหลายประเภท รองรับทุกความชอบของผู้เล่น
สล็อต: ธีมมากมาย พร้อมลุ้นรางวัลใหญ่
เกมสด: สัมผัสประสบการณ์คาสิโนแบบเรียลไทม์
กีฬา: เดิมพันกับแมตช์การแข่งขันจากทั่วโลก
ยิงปลา: สนุกกับการยิงปลาแบบได้เงิน
อัปเดตโปรโมชันล่าสุด
อย่าลืมแวะมาเยี่ยมชมที่หน้า โปรโมชั่น เพื่อรับ โบนัสสุดคุ้ม ที่เรามอบให้สมาชิกทุกท่าน นอกจากนี้ยังมีระบบ VIP สำหรับลูกค้าคนสำคัญ และช่องทาง พาร์ทเนอร์ สำหรับผู้ที่สนใจสร้างรายได้ร่วมกับเรา
ฝ่ายบริการลูกค้า
หากมี คำถาม หรือ ความคิดเห็น สามารถติดต่อทีมงานของเราได้ตลอด 24 ชั่วโมงที่หน้า ติดต่อเรา และ แบบฟอร์มติดต่อ ทีมงาน ของเรา ยินดีให้บริการทุกท่านด้วยใจ
Những sản phẩm cá cược thể thao luôn được thiết kế với 4 phong cách khác nhau như OW – Sự đa dạng, TP – Tượng trưng cho hiện đại, SB – Sự truyền thống, KS – Trải nghiệm. Bảng tỷ lệ kèo xn88 – Trải nghiệm cá cược trực tuyến an toàn và đẳng cấp chính thức luôn cập nhật mới mỗi ngày để tiện cho anh em chủ động tham khảo, tỷ lệ thưởng luôn hấp dẫn, tối ưu cơ hội chiến thắng cho thành viên tham gia. TONY03-02O
สล็อต
TKBNEKO มอบมิติใหม่ของเกมออนไลน์ ธุรกรรมรวดเร็ว ด้วยระบบสแกน QR Code
ในยุคดิจิทัลที่ เทคโนโลยีพัฒนาอย่างรวดเร็ว TKBNEKO พร้อมยกระดับการให้บริการ ด้วยระบบที่ ทันสมัย รวดเร็ว และ โปร่งใส เพื่อให้ผู้เล่น อุ่นใจ ทุกครั้งที่ใช้งาน
จุดเด่นระบบฝาก-ถอน
ฝากขั้นต่ำ: เริ่มต้น 1 บาท
ถอนขั้นต่ำ: 1 บาท
เวลาฝากเงิน: ภายใน 3 วินาที
ยอดถอน: ไม่มีลิมิต
เติมเงินง่าย แค่สแกน
สแกน คิวอาร์ ระบบจะ โอนเงินเข้าทันที ขั้นต่ำ เริ่ม 100 บาท สูงสุด ไม่เกิน 500,000 บาทต่อครั้ง
หมวดหมู่เกม
สล็อต: ธีมหลากหลาย
เกมสด: ดีลเลอร์สด
กีฬา: เดิมพันลีกดัง
ยิงปลา: ลุ้นกำไรทันที
โปรโมชั่นและสิทธิพิเศษ
ติดตามหน้า โบนัส พร้อมระบบ สมาชิกพรีเมียม และโปรแกรม พันธมิตร
ติดต่อเรา
สอบถามข้อมูลได้ตลอด 24 ชั่วโมง ผ่านหน้า ติดต่อเรา ทีมงาน TKBNEKO พร้อมดูแลตลอดเวลา
ทดลองเล่นสล็อต pg ซื้อฟรีสปิน