

Looking for a hassle-free way to water your plants? Root watering using plastic bottles might just be the method you’ve been searching for! Whether you have 20-ounce bottles, 2-liter containers, or even gallons, this technique can work wonders for your garden. Let’s explore how to set it up and why it can benefit your plants.
Why Use Bottle Watering?
Efficient Water Delivery
One of the most significant advantages of root watering is efficiency. Instead of scattering water over the soil surface, you’re delivering moisture directly to the roots where it’s needed most. This can help ensure that your plants receive adequate hydration, especially during hot weather or droughts.
Reducing Evaporation
Watering from the top can lead to evaporation, which means your plants may not get the moisture they need. By using bottles buried in the soil, you minimize this issue, allowing the water to penetrate deeply where roots can absorb it effectively.
Less Waste
This method also helps reduce water waste. Instead of oversaturating areas and wasting water, this technique allows you to control precisely how much water your plants receive.
What You’ll Need
- Plastic Bottles: You can use bottles of various sizes, so choose according to your needs—20 ounces, 2 liters, or even gallon-sized containers work perfectly.
- Tools: You’ll need a sharp object like a knife or a nail to poke holes in the bottles.
- Digging Tool: A small shovel or trowel will help you create the necessary hole for your bottle.
Step-by-Step Guide to Bottle Watering
1. Prepare Your Bottles
Before you start, make sure your plastic bottles are clean. Remove any labels, as this will help you avoid confusion later.
2. Dig a Hole
Next, dig a small hole next to your plant, ensuring it’s deep enough to accommodate the size of your bottle. Typically, the hole should be in the root area of the plant.
3. Poke Holes in the Bottle
Now, take your sharp tool and poke holes in the bottle. The more holes you puncture, the quicker the water will flow out. Consider using different sizes of holes to create a custom watering rate.
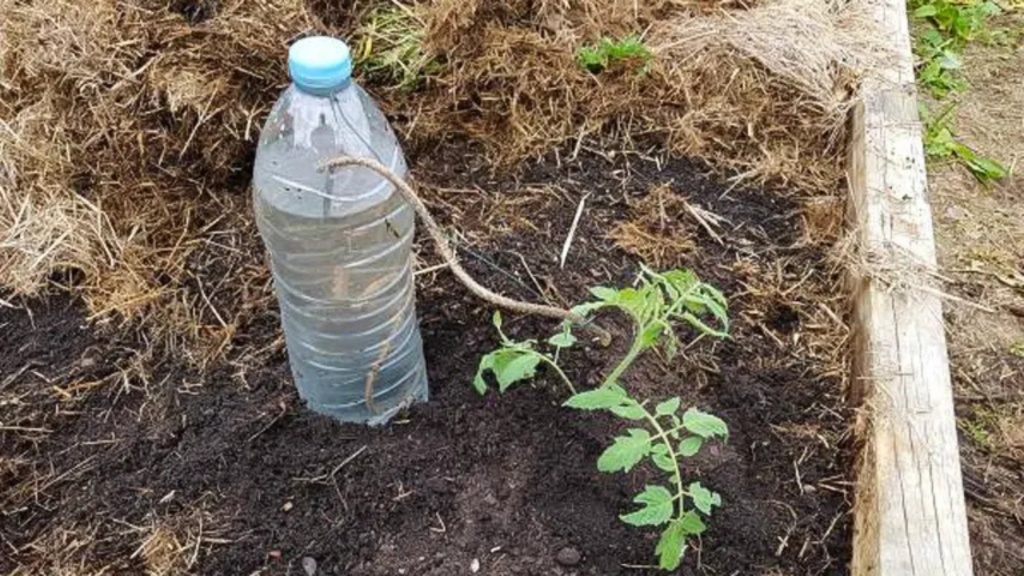
4. Position the Bottle
Place the bottle upright in the hole, with the lid side facing up. Make sure it is level with the ground or mulch so that it doesn’t tilt. This positioning helps guide the water downward to the root zone effectively.
5. Fill with Water
Once the bottle is in place, fill it with water. You can either leave the lid off or replace it after filling. Some gardeners prefer to keep the lid on to prevent bugs and debris from entering the bottle. Just remember that if you keep the lid on, this will slow down the outflow of water.
6. Monitor and Adjust
Monitor how your plant responds to this watering method. You may need to adjust the number of holes based on your observations. If the soil feels too dry or too wet, tweak the bottle placement or the number of holes accordingly.
Common Questions
How Often Should I Water?
The frequency of watering will rely on several factors, including the type of plant, the weather, and your soil conditions. Consider checking the soil moisture level regularly and adjust your watering schedule as needed.
Can I Use This Method for All Plants?
While many plants will benefit from root watering, certain delicate flora may require more specific care. Always consider the individual needs of your plants before implementing this method.
What About Seasonal Changes?
In the hotter months, plants require more water, so regularly check and refill your bottles. As temperatures drop, your plants may need less water, leading to a different watering routine.
Conclusion
Root watering with plastic bottles is a simple yet effective way to ensure your plants receive the moisture they need. By following these steps, you can optimize your watering strategy, reduce waste, and foster healthy plant growth.
Give it a try in your garden, and feel free to share your experiences! Happy gardening!
This easy guide allows you to enhance your watering efforts and possibly improve your gardening outcomes. If you have any additional questions or tips to share, let us know in the comments below!
https://t.me/s/site_official_1win/75
https://t.me/s/iGaming_live/4864
https://t.me/s/RejtingTopKazino
Auch das Mindestalter für beliebte Online Casinos wird besprochen, inklusive der
Regeln für Altersverifikation und Jugendschutzmaßnahmen in diesen virtuellen Spielhallen.
In den Niederlanden sind eine Vielzahl von Casinospielen populär, darunter
klassische Tischspiele wie Roulette, Blackjack und Poker.
Einige Casinos in den Niederlanden haben wir persönlich besucht.
Online-Casinos setzen verschiedene Jugendschutzmaßnahmen ein, um sicherzustellen, dass das Casino Alter eingehalten wird.
Diese Maßnahmen garantieren, dass nur berechtigte Personen Zugang erhalten und minderjährige Spieler konsequent ausgeschlossen werden. Zudem wird häufig eine Adressbestätigung verlangt,
um Identität und Alter eindeutig zu überprüfen. Spieler müssen bei der Registrierung einen gültigen Ausweis, wie
Personalausweis oder Reisepass, vorlegen.
References:
https://online-spielhallen.de/stake-casino-deutschland-eine-umfassende-bewertung-fur-spieler/
The platform’s gaming library features certified Random Number Generators (RNG) audited by independent testing laboratories.
The platform imposes no withdrawal fees on its end, though payment
providers may charge their standard rates. PayID withdrawals process within 1-3 hours for verified accounts,
transforming the traditional 3-5 day wait into a same-day reality.
Minimum deposits start at just $20 AUD, making the platform accessible whether you’re testing the waters or
ready to dive deep.
The minimum deposit is usually around AUD 20, making Lucky Green Casino accessible to players of all budgets.
Progressive jackpot pokies, on the other hand, offer massive prizes that
can grow into the millions, creating life-changing opportunities for
the luckiest players. The games come with varying paylines, themes,
and volatility levels, allowing you to choose between high-risk
thrillers or more consistent low-stake options.
Pokies are the heart of Lucky Green Casino, and the platform offers hundreds of them
to suit every player’s style and budget.
Powered by leading software studios like Pragmatic Play, Betsoft, Microgaming, and NetEnt, each
game offers high-quality graphics, seamless performance, and fair results.
The platform’s game aggregation system delivers smooth performance across all devices without requiring software downloads.
This diverse approach ensures regular content updates while providing players access
to unique titles unavailable at many competing casinos. Aviator leads this category as the most popular crash game, challenging players to cash out before the plane crashes.
Bar Roulette 2000X presents Lucky Green’s most unique live offering, combining traditional roulette gameplay with
enhanced multiplier potential. Evolution Gaming and Pragmatic Play
Live power the majority of live games, including multiple blackjack variants, European and American roulette, baccarat, and poker games.
The pokies selection dominates the library with over 1,800 titles spanning classic three-reel
slots, modern video slots, and progressive jackpot games.
References:
https://blackcoin.co/casino-basics/
Some sites take a bit longer to process things on their end,
but most payouts complete same-day. Keno is especially popular
thanks to its lottery-style draws, while bingo adds a more social twist with chat features at
some sites. Some games even add jackpots or a small cashback if you don’t get lucky.
Also known locally as instant-win cards, online scratchies let
you reveal symbols for instant prizes, just like the paper
tickets at newsagents. Australians have loved scratch cards
for decades, and the online versions feel almost the same, just faster.
If you’re looking for real cards, real dealers, and high-energy tables, this is a standout pick.
It’s not the largest library of games on our list, but Casinonic manages to pack a punch where it counts.
With over 7,000 games, Skycrown has a library that’s just hard to beat.
Socially speaking, live dealer casinos are a
great way to take your casino adventure to an even higher level.
If you have an eye for new and shiny things—and the most current AU online casino features such as
AR and VR—you have come to the right place! Nowadays, it is not enough to just simply launch your brand new online casino AU—it
has to be great from the get-go! The online casino industry
is getting more and more competitive each year. We look at terms, max bonus, wagering, no deposit bonuses and many more factors.
In this list we have filtered out the absolute best Australian casino bonuses based on our algorithm.
online slots uk paypal
References:
talentsplendor.com
paypal casino uk
References:
wsurl.link
Хотите знать, кому можно доверять в мире онлайн-казино? Наш справочник проводит независимую экспертизу: проверяем лицензии, процесс выплат и качество игр. Рейтинги объективны — мы не торгуем позициями. Принципы оценки открыты для всех. Подойдёт как новичкам, так и опытным игрокам. Следим за изменениями и регулярно обновляем информацию. Узнать о рейтингах казино