

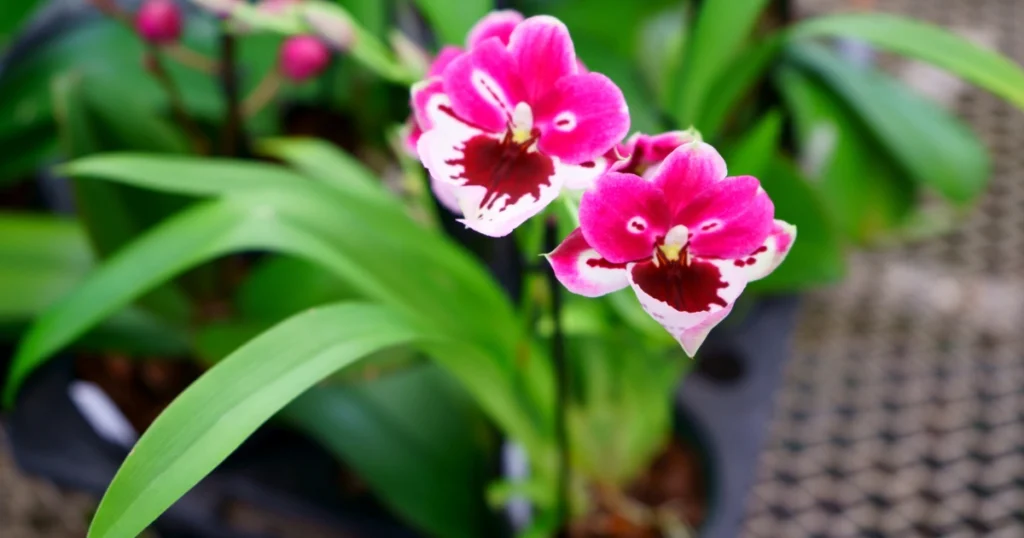
Are you worried about your orchid? Are the roots dry or rotting, and the leaves wrinkled or soft? Don’t panic—and definitely don’t toss it! Even a struggling orchid can be saved with the right care. The secret lies in a gentle but powerful method called hydrotherapy, which rehydrates the plant without risking further rot.
Whether you’re an orchid enthusiast or a first-time grower, this guide will walk you through step by step how to bring your dehydrated orchid back to life.
How to Tell if Your Orchid Is in Trouble
Start by checking the leaves. Are they:
- Wrinkled?
- Soft or limp?
- Dull and lacking firmness?
Next, inspect the roots. Carefully lift the orchid from its pot and take a close look:
- Are the roots gray, dry, or hollow?
- Are some brown, mushy, or rotting?
- Is the potting medium compacted or overly wet?
These are clear signs of dehydration or root rot. But if your orchid still has a few firm, fleshy roots, even if they’re pale, green, or white—it still has a chance to recover.
What Is Orchid Hydrotherapy?
Hydrotherapy is a gentle rehydration technique used to help struggling orchids absorb moisture again. It works by soaking the healthy roots in clean water for short daily periods, allowing the plant to recover slowly without the risk of further decay.
Think of it like giving your orchid a controlled drink, without drowning it.
Step-by-Step Guide to Save a Dehydrated Orchid
Here’s exactly how to perform hydrotherapy and nurse your orchid back to health.
1. Remove the Orchid from Its Pot
Take the plant out of its current pot. Gently remove all of the old potting medium (bark, moss, or mix). Be careful not to damage the roots during this step.
2. Trim the Dead and Rotten Roots
Using clean, sterilized scissors, cut away anything that looks:
- Brown
- Mushy or soggy
- Dry, gray, and hollow
Keep only the healthy, plump roots that feel firm when pressed. These are the roots that can still absorb water and revive the plant.
3. Soak in a Tall Glass of Water (Hydrotherapy)
Take a glass about 10 to 15 cm (4 to 6 inches) tall and fill it with clean, room-temperature water. Place the orchid inside so that only the roots are submerged—not the leaves or crown.
Let the orchid soak during the day (about 8 to 12 hours). Then remove it at night, allowing the roots to dry and breathe.
This method helps the plant rehydrate without staying constantly wet, which prevents rot.
4. Repeat for 7 Days
Continue this soak-and-dry cycle for one full week. You should start to see improvement by day 4 or 5. The leaves may become firmer, and the roots will look more plump and slightly green.
Be patient—this is a gentle process that mimics how orchids absorb dew and humidity in nature.
5. Prepare for Repotting
Once the plant has recovered some strength, it’s time to move it back into a pot with fresh growing medium.
Choose a clean pot with good drainage and a special orchid potting mix (typically bark, perlite, and moss). Do not reuse the old potting material—it may contain bacteria or fungus.
6. Repot the Orchid Carefully
- Place a layer of orchid mix in the bottom of the pot
- Position the orchid upright in the center
- Gently fill in around the roots with more mix, covering them but keeping the plant stable
- Leave the crown (where the leaves meet the roots) above the surface
7. Add Humidity Support (Optional)
To help the plant stay hydrated without overwatering, you can place expanded clay pebbles or gravel in the saucer under the pot. Add a bit of water to the saucer (but not enough to touch the pot’s bottom). This creates a gentle humidity chamber around the orchid.
Aftercare: How to Keep Your Orchid Healthy
Now that your orchid is on the road to recovery, here’s how to care for it moving forward:
- Use only rainwater, distilled water, or filtered water. Tap water can contain salts and chlorine that harm orchids.
- Place the orchid in bright, indirect light—a north or east-facing window is ideal.
- Water only when the top inch of the potting mix is dry. Never let the roots sit in standing water.
- Avoid fertilizing until the plant shows signs of new growth. Then feed with a weak orchid fertilizer every two weeks.
- Keep it away from cold drafts and dry heating vents.
🪴 Summary: How to Rescue an Orchid with Dry or Rotten Roots
- Remove the orchid from its pot and clean the roots
- Trim off any mushy or dry roots
- Soak the healthy roots in water during the day, let dry at night
- Repeat for 7 days
- Repot into fresh orchid mix
- Keep in a bright, humid spot and water carefully
- Use rainwater or distilled water to prevent mineral damage
Bonus Tip: What Water Is Best for Orchids?
To keep your orchid happy long-term, use:
- Rainwater collected outdoors
- Distilled water from the store
- Boiled and cooled tap water, only if nothing else is available
Avoid hard tap water or softened water, which can lead to salt buildup and root damage.
Final Thoughts
Even if your orchid looks like it’s on the brink of death, it’s often just dehydrated and stressed. With a bit of patience, care, and hydrotherapy, you can bring it back to life and enjoy those stunning blooms once again.
Have you tried saving an orchid before? Let us know in the comments and share your success stories or questions. Every orchid deserves a second chance—with your help!
https://t.me/s/Online_1_xbet/686
https://t.me/s/Online_1_xbet/2690
https://t.me/s/Official_1xbet_1xbet
https://t.me/s/rating_online/3
https://t.me/s/rating_online/5
https://t.me/rating_online/8
https://t.me/rating_online/5
https://t.me/s/rating_online/4
https://t.me/s/rating_online/2
https://t.me/rating_online/6
https://t.me/s/rating_online/9
https://t.me/rating_online/13
https://t.me/rating_online/9
https://t.me/Online_1_xbet/2576
https://t.me/Online_1_xbet/2745
https://t.me/Online_1_xbet/2994
https://t.me/Online_1_xbet/2320
https://t.me/Online_1_xbet/2681
https://t.me/Online_1_xbet/2223
https://t.me/Online_1_xbet/3234
https://t.me/Online_1_xbet/2159
https://t.me/Online_1_xbet/2657
https://t.me/Online_1_xbet/3031
https://t.me/Online_1_xbet/2815
https://t.me/Official_1xbet_1xbet/s/1536
https://t.me/Official_1xbet_1xbet/s/424
https://t.me/Official_1xbet_1xbet/s/713
https://t.me/Official_1xbet_1xbet/s/513
https://t.me/Official_1xbet_1xbet/s/204
https://t.me/Official_1xbet_1xbet/s/180
https://t.me/Official_1xbet_1xbet/s/379
https://t.me/Official_1xbet_1xbet/s/1346
https://t.me/Official_1xbet_1xbet/s/233
https://t.me/Official_1xbet_1xbet/s/177
https://t.me/Official_1xbet_1xbet/s/1490
https://t.me/Official_1xbet_1xbet/s/1040
https://t.me/Official_1xbet_1xbet/s/326
https://t.me/Official_1xbet_1xbet/s/114
https://t.me/Official_1xbet_1xbet/s/274
https://t.me/Official_1xbet_1xbet/s/519
https://t.me/Official_1xbet_1xbet/s/383
https://t.me/Official_1xbet_1xbet/s/146
https://t.me/Official_1xbet_1xbet/s/1469
https://t.me/Official_1xbet_1xbet/s/1549
https://t.me/Official_1xbet_1xbet/s/462
https://t.me/Official_1xbet_1xbet/s/1013
https://t.me/Official_1xbet_1xbet/s/419
https://t.me/Official_1xbet_1xbet/s/843
https://t.me/Official_1xbet_1xbet/s/1253
https://t.me/Official_1xbet_1xbet/s/228
https://t.me/Official_1xbet_1xbet/s/1263
https://t.me/Official_1xbet_1xbet/s/273
https://t.me/Official_1xbet_1xbet/s/783
https://t.me/Official_1xbet_1xbet/s/1281
https://t.me/Official_1xbet_1xbet/s/908
https://t.me/Official_1xbet_1xbet/s/1244
https://t.me/Official_1xbet_1xbet/s/1050
https://t.me/Official_1xbet_1xbet/s/1493
https://t.me/Official_1xbet_1xbet/s/784
https://t.me/Official_1xbet_1xbet/s/1496
https://t.me/Official_1xbet_1xbet/s/1472
https://t.me/Official_1xbet_1xbet/s/640
https://t.me/Official_1xbet_1xbet/s/227
https://t.me/Official_1xbet_1xbet/s/1205
https://t.me/Official_1xbet_1xbet/s/836
https://t.me/Official_1xbet_1xbet/s/472
https://t.me/Official_1xbet_1xbet/s/401
https://t.me/Official_1xbet_1xbet/s/1029
https://t.me/Official_1xbet_1xbet/s/1332
https://t.me/Official_1xbet_1xbet/s/823
https://t.me/Official_1xbet_1xbet/1687
https://t.me/s/Official_1xbet_1xbet/1813
https://t.me/Official_1xbet_1xbet/1777
https://t.me/s/Official_1xbet_1xbet/1778
https://t.me/s/Official_1xbet_1xbet/1811
https://t.me/Official_1xbet_1xbet/1602
https://t.me/Official_1xbet_1xbet/1801
https://t.me/Official_1xbet_1xbet/1612
https://t.me/Official_1xbet_1xbet/1808
https://t.me/Official_1xbet_1xbet/1835
https://t.me/Official_1xbet_1xbet/1705
https://t.me/s/Official_1xbet_1xbet/1792
https://t.me/Official_1xbet_1xbet/1723
https://t.me/Official_1xbet_1xbet/1753
https://t.me/Official_1xbet_1xbet/1660
https://t.me/s/Official_1xbet_1xbet/1767
https://t.me/Official_1xbet_1xbet/1817
https://t.me/Official_1xbet_1xbet/1787
https://t.me/Official_1xbet_1xbet/1646
https://t.me/Official_1xbet_1xbet/1797
https://t.me/s/Official_1xbet_1xbet/1855
https://t.me/Official_1xbet_1xbet/1656
https://t.me/Official_1xbet_1xbet/1832
https://t.me/s/Official_1xbet_1xbet/1729
https://t.me/Official_1xbet_1xbet/1648
https://t.me/s/Official_1xbet_1xbet/1667
https://t.me/s/Official_1xbet_1xbet/1641
https://t.me/s/Official_1xbet_1xbet/1858
https://t.me/s/Official_1xbet_1xbet/1843
https://t.me/Official_1xbet_1xbet/1822
https://t.me/s/Official_1xbet_1xbet/1606
https://t.me/s/Official_1xbet_1xbet/1819
https://t.me/s/Official_1xbet_1xbet/1624
https://t.me/Official_1xbet_1xbet/1622
https://t.me/Official_1xbet_1xbet/1734
https://t.me/Official_1xbet_1xbet/1615
https://t.me/Official_1xbet_1xbet/1713
https://t.me/s/Official_1xbet_1xbet/1664
https://t.me/Official_1xbet_1xbet/1850
https://t.me/Official_1xbet_1xbet/1715
https://t.me/s/Official_1xbet_1xbet/1844
https://t.me/Official_1xbet_1xbet/1754
https://t.me/s/Official_1xbet_1xbet/1602
https://t.me/Official_1xbet_1xbet/1775
https://t.me/s/Official_1xbet_1xbet/1648
https://t.me/Official_1xbet_1xbet/1680
https://t.me/s/Official_1xbet_1xbet/1715
https://t.me/Official_1xbet_1xbet/1658
https://t.me/s/Official_1xbet_1xbet/1619
https://t.me/s/Official_1xbet_1xbet/1685
https://t.me/Official_1xbet_1xbet/1791
https://t.me/s/Official_1xbet_1xbet/1639
https://t.me/s/Official_1xbet_1xbet/1598
https://t.me/Official_1xbet_1xbet/1651
https://t.me/s/Official_1xbet_1xbet/1738
https://t.me/s/Official_1xbet_1xbet/1791
https://t.me/Official_1xbet_1xbet/1650
https://t.me/s/Official_1xbet_1xbet/1622
https://t.me/Official_1xbet_1xbet/1683
https://t.me/Official_1xbet_1xbet/1670
https://t.me/s/Official_1xbet_1xbet/1617
https://t.me/s/Official_1xbet_1xbet/1748
https://t.me/Official_1xbet_1xbet/1752
https://t.me/s/Official_1xbet_1xbet/1693
https://t.me/s/Official_1xbet_1xbet/1615
https://t.me/Official_1xbet_1xbet/1836
https://t.me/Official_1xbet_1xbet/1731
https://t.me/s/topslotov
//t.me/s/official_1win_aviator](https://t.me/s/official_1win_aviator)
https://t.me/s/reiting_top10_casino/10
https://t.me/s/reiting_top10_casino/7
https://t.me/s/reiting_top10_casino/8
https://t.me/s/reiting_top10_casino/4
https://t.me/reiting_top10_casino/9
https://t.me/reiting_top10_casino
https://t.me/s/reiting_top10_casino/3
https://t.me/s/reiting_top10_casino/5
https://t.me/reiting_top10_casino/7
https://t.me/reiting_top10_casino/10
https://t.me/s/reiting_top10_casino/6
https://t.me/reiting_top10_casino/2
https://t.me/s/reiting_top10_casino/9
https://t.me/reiting_top10_casino/5
https://t.me/reiting_top10_casino/6
https://t.me/s/reiting_top10_casino/2
https://t.me/reiting_top10_casino/4
https://t.me/reiting_top10_casino/3
https://t.me/reiting_top10_casino/8
https://t.me/s/Gaming_1xbet
https://t.me/s/PlayCasino_1xbet
https://t.me/s/PlayCasino_1win
https://t.me/s/PlayCasino_1xbet
https://t.me/s/PlayCasino_1win
https://t.me/s/ofitsialniy_1win/33/Reino
https://t.me/s/ofitsialniy_1win
https://t.me/s/iw_1xbet
https://t.me/s/Official_beefcasino
https://t.me/s/bs_1xbet/31
https://t.me/s/bs_1xbet/17
https://t.me/bs_1xbet/32
https://t.me/s/bs_1xbet/2
https://t.me/bs_1xbet/43
https://t.me/s/bs_1xbet/31
https://t.me/bs_1xbet/35
https://t.me/s/bs_1xbet/28
https://t.me/bs_1xbet/3
https://t.me/bs_1xbet/46
https://t.me/bs_1xbet/46
https://t.me/s/bs_1xbet/24
https://t.me/bs_1xbet/18
https://t.me/bs_1xbet/40
https://t.me/bs_1xbet/13
https://t.me/s/bs_1xbet/35
https://t.me/s/bs_1xbet/24
https://t.me/s/bs_1xbet/24
https://t.me/bs_1xbet/51
https://t.me/bs_1xbet/5
https://t.me/s/bs_1xbet/36
https://t.me/bs_1xbet/26
https://t.me/s/bs_1xbet/46
https://t.me/bs_1xbet/27
https://t.me/bs_1xbet/33
https://t.me/s/bs_1xbet/3
https://t.me/s/bs_1xbet/30
https://t.me/bs_1xbet/11
https://t.me/bs_1xbet/45
https://t.me/bs_1xbet/12
https://t.me/bs_1xbet/5
https://t.me/bs_1xbet/32
https://t.me/bs_1xbet/23
https://t.me/bs_1xbet/45
https://t.me/bs_1xbet/46
https://t.me/s/bs_1xbet/5
https://t.me/bs_1xbet/44
https://t.me/s/bs_1xbet/29
https://t.me/bs_1xbet/44
https://t.me/s/bs_1xbet/23
https://t.me/s/jw_1xbet/914
https://t.me/jw_1xbet/640
https://t.me/s/jw_1xbet/232
https://t.me/jw_1xbet/688
https://t.me/jw_1xbet/680
https://t.me/s/bs_1Win/381
https://t.me/s/bs_1Win/793
https://t.me/bs_1Win/1101
https://t.me/bs_1Win/320
https://t.me/bs_1Win/1151
https://t.me/s/bs_1Win/472
https://t.me/bs_1Win/985
https://t.me/s/bs_1Win/734
https://t.me/bs_1Win/857
https://t.me/bs_1Win/1108
https://t.me/s/bs_1Win/1135
https://t.me/bs_1Win/470
https://t.me/s/Official_mellstroy_casino/36
https://t.me/Official_mellstroy_casino/23
https://t.me/s/Official_mellstroy_casino/38
https://t.me/s/Beefcasino_rus/31
https://t.me/Official_mellstroy_casino/7
https://t.me/Official_mellstroy_casino/27
https://t.me/Official_mellstroy_casino/15
https://t.me/s/Official_mellstroy_casino/51
https://t.me/Official_mellstroy_casino/57
https://t.me/Official_mellstroy_casino/54
https://t.me/Official_mellstroy_casino/45
https://t.me/Official_mellstroy_casino/28
https://t.me/s/Best_promocode_rus/2964
https://t.me/s/Best_promocode_rus/2727
https://t.me/s/Beefcasino_rus/57
https://t.me/ud_DragonMoney/56
https://t.me/s/ud_Starda/62
https://t.me/s/ud_1xSlots/56
https://t.me/s/ud_GGBet/62
https://t.me/s/ud_Vodka/61
https://t.me/ud_Booi/47
https://t.me/ud_Leon/59
https://t.me/s/ud_Vulkan/50
https://t.me/s/ud_Martin/64
https://t.me/s/ud_Pin_Up/51
https://t.me/s/ud_Booi/54
https://t.me/ud_Lex/51
https://t.me/ud_Martin/52
https://t.me/s/ud_Stake/45
https://t.me/ud_1xbet/44
https://t.me/ud_CatCasino/60
https://t.me/s/ud_Irwin/55
https://t.me/Beefcasino_rus/59
https://t.me/s/ud_Pin_Up/45
https://t.me/ud_Daddy/46
https://t.me/s/ud_Starda/61
https://t.me/ud_Lex/62
https://t.me/s/ud_Sol/62
https://t.me/ud_Flagman/59
https://t.me/ud_Kometa/55
https://t.me/ud_Vulkan/63
https://t.me/ud_Sol/14
https://t.me/s/ud_JoyCasino/3
https://t.me/s/UD_lex
https://t.me/s/UD_drIp
https://t.me/s/Ud_IZZI
https://t.me/s/Ud_KEnT
https://t.me/s/UD_pinCo
https://t.me/s/official_1win_aviator/78
https://t.me/s/Ud_monRo
https://t.me/s/Ud_GAMa
https://t.me/official_1win_aviator/55
https://t.me/s/UD_jEt
https://t.me/s/uD_fRESH
https://t.me/s/ud_1Go
https://t.me/s/ud_MarTin
https://t.me/s/tf_1win
https://t.me/s/Top_bk_ru
https://t.me/s/tf_1win
https://t.me/s/Top_bk_ru
https://t.me/s/kfo_1win
https://t.me/s/ud_1Go
https://t.me/s/ud_gIZbo
https://t.me/s/uD_mArTIN
https://t.me/s/ud_keNT
https://t.me/s/ud_PLAYfortunA
https://t.me/s/uD_StAkE
https://t.me/s/ud_riObet
https://t.me/s/uD_1xbeT
https://t.me/s/uD_Izzi
https://t.me/s/ud_1xSlOtS
https://t.me/s/UD_PInco
https://t.me/s/UD_vULKAn
https://t.me/s/ke_1Win
https://t.me/s/ke_CatCasino
https://t.me/s/ke_DragonMoney
https://t.me/s/ke_Sol
https://t.me/official_1win_aviator/272
https://t.me/s/kef_beef
https://t.me/s/ke_Irwin
https://t.me/s/ke_Booi
https://t.me/s/ke_Pokerdom
https://t.me/s/ke_1xSlots
https://t.me/s/ke_Flagman
https://t.me/s/ke_MrBit
https://t.me/s/ke_Daddy
https://t.me/s/ke_Casino_X
https://t.me/s/ke_kent
https://t.me/s/ke_JoyCasino
https://t.me/s/ke_Legzo
https://t.me/s/ke_Volna
https://t.me/s/ke_Riobet
https://t.me/s/kef_Rox
https://t.me/s/ke_Martin
https://t.me/s/ke_PlayFortuna
https://t.me/s/ke_Gizbo
https://t.me/s/ke_Leon
https://t.me/s/ke_Pinco
https://t.me/s/ke_Fresh
https://t.me/s/ke_mellstroy
https://t.me/s/ke_Stake
https://t.me/s/official_1win_aviator/47
https://t.me/s/ke_Drip
https://t.me/s/ke_1Go
https://t.me/s/ke_Jet
https://t.me/s/kef_Lex
https://t.me/s/ke_Izzi
https://t.me/s/ke_Gama
https://t.me/s/ke_GGBet
https://t.me/s/ke_Kometa
https://t.me/s/ke_Vulkan
https://t.me/s/ke_Vodka
https://t.me/s/top_kazino_z
https://t.me/s/topcasino_v_rossii
https://t.me/s/a_Top_onlinecasino/3
https://t.me/s/a_Top_onlinecasino/20
https://t.me/a_Top_onlinecasino/4
https://t.me/a_Top_onlinecasino/11
https://t.me/s/a_Top_onlinecasino/2
https://t.me/s/a_Top_onlinecasino/14
https://t.me/s/a_Top_onlinecasino/10
https://t.me/s/a_Top_onlinecasino/11
https://t.me/s/a_Top_onlinecasino/12
https://t.me/a_Top_onlinecasino/12
https://t.me/topcasino_rus/
https://t.me/s/official_Kent_ed
https://t.me/s/official_Sol_ed
https://t.me/s/official_Starda_ed
https://t.me/s/official_Martin_es
https://t.me/s/official_Fresh_ed
https://t.me/s/official_GGBet_es
https://t.me/s/official_DragonMoney_ed
https://t.me/s/official_PinUp_ed
https://t.me/s/official_Vodka_ed
https://t.me/s/official_Monro_ed
https://t.me/s/official_1xbet_ed
https://t.me/s/official_Kometa_es
https://t.me/s/official_Flagman_es
https://t.me/s/official_Lex_ed
https://t.me/s/official_1Go_es
https://t.me/s/official_Riobet_es
https://t.me/s/official_Riobet_ed
https://t.me/s/official_1xSlots_ed
https://t.me/s/official_R7_es
https://t.me/s/official_Drip_ed
https://t.me/s/official_CatCasino_ed
https://t.me/s/official_Kometa_ed
https://t.me/s/official_JoyCasino_es
https://t.me/s/official_Gizbo_ed
https://t.me/s/official_DragonMoney_es
https://t.me/Flagman_egs/6
https://t.me/?@DragonMoney_egs/22
https://t.me/s/Stake_egs/14
https://t.me/iGaming_live/4635
https://t.me/s/Drip_egs/13
https://t.me/s/R7_egs/20
https://t.me/s/Leon_egs/20
https://t.me/s/MrBit_egs/22
https://t.me/s/Sol_egs/7
https://t.me/MrBit_egs/4
https://t.me/s/CasinoX_egs/7
https://t.me/MostBet_egs/11
https://t.me/s/Monro_egs/9
https://t.me/JoyCasino_egs/22
https://t.me/s/Riobet_egs/15
https://t.me/Booi_egs/3
https://t.me/s/Fresh_egs/3
https://t.me/PinUp_egs/4
https://t.me/s/Stake_egs/8
https://t.me/s/Rox_egs/7
https://t.me/MostBet_egs/7
https://t.me/Leon_egs/13
https://t.me/PlayFortuna_egs/8
https://t.me/Pokerdom_egs/22
https://t.me/s/Vodka_egs/20
https://t.me/va_1xbet/17
https://t.me/va_1xbet/14
https://t.me/s/iGaming_live/4746
https://t.me/va_1xbet/18
https://t.me/s/va_1xbet/6
https://t.me/va_1xbet/9
https://t.me/s/va_1xbet/12
https://t.me/s/va_1xbet/21
https://t.me/va_1xbet/16
https://t.me/s/va_1xbet
https://t.me/s/va_1xbet/19
https://t.me/s/va_1xbet/7
https://t.me/va_1xbet/22
https://t.me/s/va_1xbet/11
https://t.me/surgut_narashchivaniye_nogtey/12
https://t.me/s/surgut_narashchivaniye_nogtey
https://t.me/ah_1xbet/6
https://t.me/ah_1xbet/9
https://t.me/ah_1xbet/5
https://t.me/s/ah_1xbet/15
https://t.me/ah_1xbet/2
https://t.me/ah_1xbet/10
https://t.me/ah_1xbet/14
https://t.me/ah_1xbet/18
https://t.me/s/ah_1xbet/8
https://t.me/s/ah_1xbet/2
https://t.me/s/ah_1xbet/17
https://t.me/ah_1xbet/16
https://t.me/ah_1xbet/20
https://t.me/s/ah_1xbet/7
https://t.me/s/Best_rating_casino
https://t.me/reyting_topcazino/17
https://t.me/topcasino_rus/
https://t.me/a_Topcasino/3
https://t.me/a_Topcasino/4
https://t.me/top_ratingcasino/2
https://t.me/a_Topcasino/2
https://t.me/a_Topcasino/8
https://t.me/top_ratingcasino/6
https://t.me/top_ratingcasino/10
https://telegra.ph/Top-kazino-11-14-2
https://t.me/s/kazino_bez_filtrov
https://t.me/kazino_bez_filtrov
https://t.me/da_1xbet/7
https://t.me/da_1xbet/4
https://t.me/da_1xbet/15
https://t.me/da_1xbet/11
https://t.me/da_1xbet/10
https://t.me/da_1xbet/3
https://t.me/da_1xbet/5
https://t.me/rq_1xbet/650
https://t.me/rq_1xbet/1489
https://t.me/rq_1xbet/831
https://t.me/s/rq_1xbet/618
https://t.me/s/rq_1xbet/1515
https://t.me/s/rq_1xbet/909
https://t.me/s/rq_1xbet/1224
https://t.me/s/Official_1xbet1/936
https://t.me/s/Official_1xbet1/1311
https://t.me/s/Official_1xbet1/291
https://t.me/s/Official_1xbet1/861
https://t.me/s/Official_1xbet1/1288
https://t.me/Official_1xbet1/877
https://t.me/Topcasino_licenziya/48
https://t.me/s/Topcasino_licenziya/55
https://t.me/s/Topcasino_licenziya/14
https://t.me/s/Topcasino_licenziya/19
https://t.me/Topcasino_licenziya/5
https://t.me/s/Topcasino_licenziya/8
https://t.me/s/reyting_kasino
https://t.me/top_online_kazino/9
https://t.me/top_online_kazino/10
https://t.me/s/top_online_kazino/7
https://t.me/top_online_kazino/4
https://t.me/s/reyting_luchshikh_kazino
https://t.me/s/top_online_kazino/4
https://t.me/s/top_online_kazino/5
http://www.google.so/url?q=https://t.me/Official_1xbet_1xbet/122
http://idorchestercollection.com/__media__/js/netsoltrademark.php?d=https://t.me/Official_1xbet_1xbet/1708
http://wjb.bodybygod.com/__media__/js/netsoltrademark.php?d=https://t.me/s/Official_1xbet_1xbet/458
https://www.avito.ru/surgut/predlozheniya_uslug/apparatnyy_manikyur_i_pedikyur_s_pokrytiem_4030660549?utm_campaign=native&utm_medium=item_page_ios&utm_source=soc_sharing_seller
http://huangmiller.com/__media__/js/netsoltrademark.php?d=https://t.me/s/Official_1xbet_1xbet/1080
https://t.me/om_1xbet/14
https://t.me/om_1xbet/10
https://t.me/s/om_1xbet/13
https://t.me/top_casino_rating_ru/9
https://t.me/top_casino_rating_ru/8
https://t.me/s/om_1xbet/14
https://t.me/om_1xbet/3
https://t.me/om_1xbet/5
https://t.me/om_1xbet/6
https://t.me/top_casino_rating_ru/10
https://t.me/s/om_1xbet/15
https://t.me/s/om_1xbet/8
https://t.me/of_1xbet/512
Скачай 1 вин ставка и получи мгновенный доступ к онлайн казино и ставкам на спорт с высокими коэффициентами, лайв-ставками и фриспинами! Удобный личный кабинет, быстрый вывод средств, бонусы за депозит до 200%, промокод на бонусы, кэшбэк до 15%, минимальный депозит от 100? — все для реальных выигрышей и круглосуточной игры с выгодой.
1win скачать онлайн — приступайте к игре прямо сейчас и получайте бонусы за депозит до 5000 рублей! Оставайтесь в плюсе с высокими коэффициентами на ставки на спорт и лайв-ставки, получайте фриспины в слотах и кэшбэк до 15%. Быстрый вывод средств и круглосуточный доступ позволяют выигрывать реальный деньги легко и удобно!
1 1win зеркало — ключ к мгновенному доступу к лучшему онлайн казино и ставкам на спорт! Получайте бонусы за депозит до 5000 руб., выигрывайте в слоты и лайв-ставках с высокими коэффициентами, получайте фриспины и кэшбэк до 10%, а быстрый вывод средств и круглосуточный личный кабинет обеспечивают максимальную выгоду и комфорт. Воспользуйтесь промокодом и начните выигрывать уже сегодня!
https://t.me/s/Official_Ru_1WIN
https://telegra.ph/Beef-kazino-11-25
https://t.me/officials_pokerdom/3456
https://t.me/Martin_officials
https://t.me/s/lex_officials
https://t.me/s/Jet_officials
https://t.me/s/Drip_officials
https://t.me/s/Fresh_officials
https://t.me/s/Sol_officials
https://t.me/s/Beefcasino_officials
https://t.me/s/Martin_casino_officials
Genauso wichtig (und für viele datenschutzbewusste Zocker
sogar besonders relevant) ist aber, dass ihr keine sensiblen Dokumente übermitteln müsst.
Casinos mit geprüfter Lizenz und verschlüsselten Zahlungssystemen bieten Schutz auf höchstem Niveau.
Daher bieten sie die gleiche Sicherheit, wie herkömmliche Online Casinos.
Crash Games sind schnelle Echtzeitspiele mit steigendem Multiplikator, der aber jederzeit
„crashen“ kann. Tischspiele haben den Vorteil, dass man hier auch mit Strategie arbeiten kann.
Casinos ohne Verifizierung bieten eine besonders umfangreiche und vielfältige Spielauswahl an.
Manche Online Casinos bieten sogar beide Varianten an – Casinospaß mit Konto, aber auch ohne Konto.
Eine Authentifizierung mittels Auweisdokument ist sehalb überflüssig und der Glücksspielanbieter kann defintiv ausschließen, dass minderjährige Personen am Glücksspiel teilnehmen. Wenn ihr über diesen Dienstleister die
Zahlungstransaktion abwickelt, erfolgt die Altersabfrage in Verbindung mit der Ersteinzahlung.
Da dieser Vorgang in Online Casinos ohne Verifizierung so unkompliziert ist, gewinnen No Account Casinos immer mehr an Bedeutung in der Glücksspielszene.
Da euer Konto die ganze Zeit über mit dem Casino gekoppelt war, müsst ihr eure Bankingdaten nicht exta noch einmal angeben und ihr müsst euch auch nicht erneut legitimieren.
Mittels sofortiger, schneller Einzahlung mit Trustly kommt man ohne Registrierung und
ohne Angabe einer Mailadresse aus.
References:
https://online-spielhallen.de/lex-casino-bewertung-ihre-umfassende-analyse/
https://t.me/kazino_s_minimalnym_depozitom/2
We deposit, play, and most critically, we run through the withdrawal process to see which sites treat your winnings as a priority, not
a problem. He loves getting into the nitty gritty of how casinos
and sportsbooks really operate in order… Yes, almost all live dealer platforms are fully optimised for mobile play, working
smoothly on both iOS and Android devices through your browser or dedicated casino apps.
The number of games, variants, and software providers varies from one casino to the next.
Trusted providers are essential for a high-quality
online live casino experience.
Licensed and reputable online casinos are synonymous with safety.
Depending on the size of your first deposit, you’ll have to
wager a certain amount of real money to cash out your bonus winnings.
All the casino sites we listed here, like Ricky Casino,
Roby Casino, and Casinonic, pay out real money provided that
you place real money wagers. Using similar ranking categories, our team of experts handpicked Canada’s top real money casino sites.
Whether you’re on a computer or smartphone, the best online
gambling sites should offer an immersive gaming experience.
That’s why we prioritized the top Australian online casinos that put customer
service at the forefront.
References:
https://blackcoin.co/best-live-casinos-in-australia-2025-guide/
Most US states don’t have licensed and legal online casinos.
Also, some online casinos have their own poker rooms and sportsbooks.
Online casinos features every game you could play in a brick-and-mortar casino, plus additional games.
Microgaming is a pioneer and inventor of online casino software.
Licensed casinos are required to offer responsible gambling tools.
Full layouts make it easier to track bonuses,
compare games, or run multiple tables at once.
References:
https://blackcoin.co/best-payid-pokies-in-australia-a-comprehensive-guide/
casino mit paypal einzahlung
References:
http://www.sunti-apairach.com
online casino australia paypal
References:
bluestreammarketing.com.co
https://t.me/s/It_ezcasH
В джунглях игр, где всякий ресурс стремится зацепить обещаниями быстрых выигрышей, обзор и рейтинг казино
является как раз той картой, что ведет через заросли рисков. Тем профи да начинающих, что пресытился из-за фальшивых посулов, он помощник, чтобы увидеть реальную отдачу, будто вес ценной ставки у пальцах. Минус лишней ерунды, лишь реальные сайты, там rtp не просто показатель, а ощутимая удача.Собрано по гугловых поисков, будто ловушка, что ловит топовые горячие веяния на интернете. В нём минуя места к шаблонных трюков, всякий пункт словно ход в столе, где обман выявляется сразу. Хайроллеры знают: на России манера речи и подтекстом, в котором ирония притворяется как совет, даёт миновать рисков.В https://www.don8play.ru/ этот рейтинг находится будто готовая колода, готовый к игре. Посмотри, если хочешь почувствовать биение реальной игры, минуя иллюзий и провалов. Для тех знает ощущение приза, такое как держать фишки у пальцах, вместо пялиться по дисплей.
https://t.me/ta_1win/1156
https://t.me/s/Russia_Casino_1WIN
https://t.me/s/official_1win_official_1win
https://taptabus.ru/1win
https://t.me/s/portable_1WIN