

Wattle weaving is a centuries-old technique that combines functionality with rustic charm. By intertwining flexible branches around sturdy stakes, you can create a durable and aesthetically pleasing raised garden bed. This method not only recycles natural materials but also adds a touch of traditional craftsmanship to your garden.
🌿 Introduction
Incorporating sustainable practices into gardening is more important than ever. Building a wattle raised garden bed is an excellent way to utilize natural resources, reduce waste, and enhance the visual appeal of your outdoor space. This guide will walk you through the process of constructing your own wattle garden bed, ensuring a rewarding and environmentally friendly gardening experience.
🛠️ Materials and Tools Needed
Before you begin, gather the following materials and tools:
- Flexible branches or twigs (willow or hazel are ideal)
- Sturdy stakes (about 2 feet longer than the desired height of the bed)
- Hammer or mallet
- Pruning shears
- Garden gloves
- Measuring tape
- Soil and compost mix
📏 Planning and Design
- Determine Size and Location: Choose a sunny spot in your garden that suits the size of the bed you intend to build.
- Sketch a Design: Draw a rough sketch of your bed, noting dimensions and shape to guide your construction.
🧹 Preparing the Site
- Clear the Area: Remove weeds, rocks, and debris from the chosen site.
- Level the Ground: Ensure the ground is even to provide a stable foundation for your bed.
- Mark the Outline: Use string or chalk to outline the perimeter of your bed.
🌿 Gathering Materials
- Collect Branches: Gather long, flexible branches or twigs. Willow and hazel are preferred for their pliability and strength.
- Cut to Size: Trim the branches into uniform lengths, considering the height and circumference of your bed.
🔨 Installing Stakes
- Prepare Stakes: Cut stakes to the desired length (bed height plus 2 feet).
- Position Stakes: Hammer the stakes into the ground at regular intervals along the marked outline, leaving about 2 feet protruding above ground.
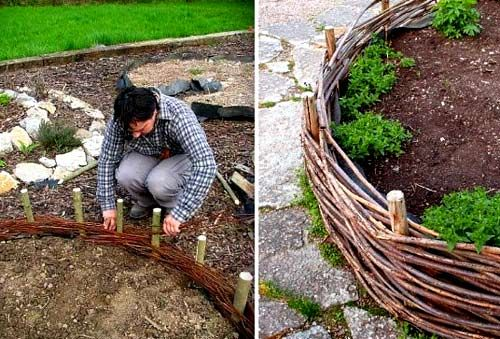
🧶 Weaving the Wattle
- Start Weaving: Begin at one corner, weaving the flexible branches horizontally between the stakes.
- Alternate Sides: Alternate the side each branch starts on to create a sturdy interlocking structure.
- Bend and Weave: Gently bend the branches as needed, weaving them tightly.
- Trim Excess: Use pruning shears to trim any excess lengths.
🧱 Building Up the Walls
- Add Layers: Continue adding layers of woven branches until the desired height is reached.
- Ensure Stability: Make sure each layer is tightly interwoven for maximum stability.
🔒 Securing the Top
- Tuck Ends: Tuck the ends of the final layer of branches into the weave to secure them.
- Optional Finish: For a neater finish, add a more rigid border on top.
🌱 Filling with Soil
- Prepare Soil Mix: Combine garden soil with compost to create a nutrient-rich environment for plants.
- Fill the Bed: Fill the wattle raised bed with the soil-compost mixture.
🌼 Planting
- Choose Plants: Select plants suitable for the size of the bed and the available sunlight.
- Plant Accordingly: Plant your seeds or seedlings as per their specific requirements.
💧 Maintenance
- Water Regularly: Keep the soil moist but not waterlogged.
- Add Mulch: Apply mulch to help retain moisture.
- Prune as Needed: Maintain the wattle structure by pruning and tidying as necessary.
⚠️ Common Mistakes and How to Avoid Them
- Using Dry Wood: Dry branches are brittle and hard to weave. Use freshly cut, green wood for flexibility.
- Inadequate Stake Depth: Shallow stakes can lead to instability. Ensure stakes are driven deep enough into the ground.
- Loose Weaving: Loose weaves compromise the bed’s structure. Weave branches tightly for durability.
🌟 Benefits of Wattle Raised Garden Beds
- Eco-Friendly: Utilizes natural, biodegradable materials.
- Cost-Effective: Reduces the need for purchased materials.
- Aesthetic Appeal: Adds rustic charm to your garden.
- Customizable: Easily tailored to fit various garden sizes and shapes.
🌍 Seasonal and Regional Tips
- Best Time to Build: Late winter to early spring, when branches are most flexible.
- Regional Considerations: In areas with high humidity, consider using rot-resistant wood like cedar for stakes.
🧰 Tools and Materials Checklist
- 🪵 Flexible branches (willow, hazel)
- 📏 Measuring tape
- 🔨 Hammer or mallet
- ✂️ Pruning shears
- 🧤 Garden gloves
- 🪣 Soil and compost mix
❓ FAQs
Q: How long does a wattle raised bed last?
A well-maintained wattle bed can last several years, depending on the materials used and environmental conditions.
Q: Can I use other types of wood besides willow or hazel?
Yes, as long as the branches are flexible and durable.
Q: Do I need to treat the wood to prevent rot?
Using rot-resistant wood for stakes can help, but treating the wood is optional and depends on personal preference.
🌈 Conclusion
Building a wattle raised garden bed is a rewarding project that combines sustainability with creativity. Not only does it provide a functional space for your plants, but it also enhances the natural beauty of your garden. We encourage you to try this eco-friendly method and share your experiences with us.
Happy gardening! 🌿
Anchor Text: tips for building raised garden beds
URL: https://extension.psu.edu/raised-bed-gardening
Why: This comprehensive guide from PennState Extension offers practical advice and complements your content without competing.
Anchor Text: how to choose the right soil mix
URL: https://www.almanac.com/raised-bed-soil-mix-recipe
Why: The Old Farmer’s Almanac provides trusted, beginner-friendly guidance on preparing a soil-compost mix.
Anchor Text: natural wood types for outdoor projects
URL: https://www.woodmagazine.com/materials-guide/lumber/wood-species-uses
Why: A resource from Wood Magazine that helps readers pick rot-resistant or regionally suitable woods for their wattle beds.
https://t.me/s/bEEFCASiNo_oFfICIaLs
Dort erwarten die Spieler lukrative Vergünstigungen und Vorteile wie der Zugang zu exklusiven Angeboten, Turnieren, Geburtstagsboni und vieles mehr.
30Bet Casino bietet weder ein traditionelles
Treueprogramm, dem Spieler automatisch beitreten, sobald sie Einsätze tätigen, noch einen VIP-Club mit bestimmten Voraussetzungen und
klaren Regeln. Sobald Sie Ihre Willkommenspakete
aufgebraucht haben, bietet das Casino viele zusätzliche Anreize, um Ihre Bankroll frisch zu
halten. 30Bet Casino ist ein legitimes und voll lizenziertes Online-Casino, das faire Spiele und relevante Bedingungen anbietet.
Der Support kann während der Stoßzeiten langsam reagieren, aber sobald Sie online sind, sind sie ein unschätzbarer Vorteil
in Ihrem Casino-Abenteuer, besonders wenn Sie unerfahren sind.
Geben Sie den gewünschten Einzahlungsbetrag ein und folgen Sie den Anweisungen. Für Spieler, die ein umfangreiches Spielangebot, lohnende
Boni und Zuverlässigkeit suchen, ist 30bet Casino definitiv einen Besuch
wert. Zusammengefasst ist 30bet ein frisches und empfehlenswertes Online-Casino,
das schon viel richtig macht. Auch die Integration von Sportwetten macht 30 bet zu einer All-in-One-Plattform, die Casino und
Wettbegeisterung verbindet. Zum Abschluss fassen wir die herausragenden Vorteile von 30bet Casino noch einmal zusammen. Derzeit stellt 30bet keine native App im App Store oder Google Play Store zur Verfügung.
References:
https://online-spielhallen.de/admiral-casino-aktionscode-ihr-schlussel-zu-exklusiven-vorteilen/
Remote access software allows users to connect to and control another device from a distance,
enabling remote desktop work, IT support, and secure data
access. TeamViewer is one of the best remote access software
solutions for Windows, offering cross-platform support,
advanced security, and an intuitive user experience. TeamViewer is a
leading remote access software solution, offering
fast, secure, and reliable remote connectivity for businesses and individuals alike.
TeamViewer’s software provides secure, instant access to employee devices across your business, letting your IT team solve problems and provide support from anywhere.
Connect, support, and manage devices from anywhere with TeamViewer’s
remote access solution.
TeamViewer is secured by end-to-end 256-bit AES encryption, two-factor authentication, and
other industry-grade security features, such as conditional access,
SSO, and much more. With TeamViewer, ECU can provide remote support to
3,700 staff members and 31,000 students across four campuses.
With TeamViewer, establish a connection by entering the partner
ID of the remote device, or connect through your saved contacts after setting up
your account. TeamViewer employs industry-leading security measures
including end-to-end encryption, two-factor authentication, and detailed access logging to
ensure safe connections.
References:
https://blackcoin.co/best-payid-pokies-in-australia-a-comprehensive-guide/
This establishment manages to strike a careful balance after mingling the excitement of gambling and the dynamic vibe particular to
Sydney. Exceedingly sophisticated, The Star casino has been designed to
anticipate the desires of every player who sets foot inside.
If you are travelling to and about Sydney and want everything that a casino has to offer, then be sure to check out the Star.
There’s plenty of casino action available at the Star, as well
as great dining, luxury accommodations, and engaging entertainment.
Facebook Marketplace offers a user-friendly platform for small
businesses to engage with customers. Buying and selling on Facebook Marketplace has never been easier, but if you’re new to
the platform, you might wonder how shipping works. Although he
doesn’t share much about his private life, Frank does have a public Instagram, where he sometimes posts photos with his family.
While most shipments arrive on time, delays can sometimes happen. The responsibility for a secure transaction and timely delivery
ultimately lies with the buyer and seller. While it facilitates communication and provides tools for shipping, it doesn’t directly manage payments or the shipping itself.
It’s essential to understand that Facebook
Marketplace serves as a platform to connect buyers and sellers.
This enables buyers to conveniently track their
package’s journey through the platform. For even greater
convenience, Facebook Marketplace allows you to create a QR
code for your shipping label.
References:
https://blackcoin.co/cocoa-casino-review/
us poker sites that accept paypal
References:
copya.co.kr
online casinos that accept paypal
References:
https://amcoa.org/forums/users/aletheairby3/edit/?updated=true/users/aletheairby3/
**mitolyn reviews**
Mitolyn is a carefully developed, plant-based formula created to help support metabolic efficiency and encourage healthy, lasting weight management.