
If you’re looking for a sustainable way to manage your kitchen waste while enriching your garden, vermicomposting is an excellent choice. Not only does it reduce garbage going into landfills, but it produces nutrient-dense compost that your plants will love. Creating your own vermicomposter at home is simple, affordable, and eco-friendly. Let’s explore a step-by-step guide to building an effective three-tote system that transforms everyday scraps into garden gold.
Why Choose Vermicomposting?
Before we dive into the how-to, it’s helpful to understand why vermicomposting is so beneficial:
- Reduces Trash: Kitchen scraps like vegetable peels, coffee grounds, and eggshells are transformed rather than thrown away.
- Creates Natural Fertilizer: The resulting compost, rich in nutrients and beneficial microorganisms, boosts plant health.
- Produces Worm Tea: The liquid that drains from the system acts as an excellent organic plant fertilizer.
- Eco-Friendly & Cost-Effective: No need for chemical fertilizers, and you recycle waste naturally.
Materials You Will Need
Gathering your supplies is straightforward:
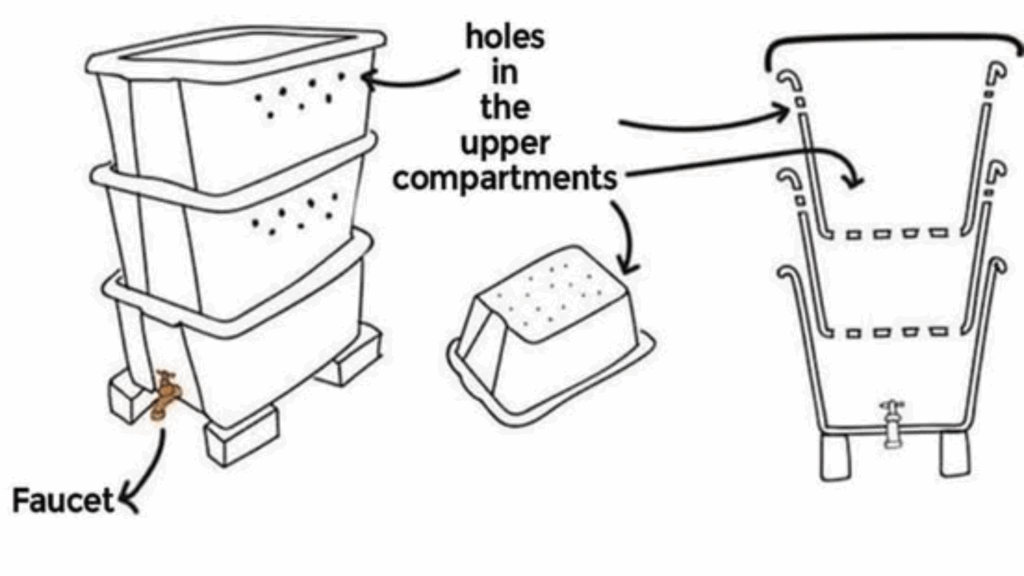
- Three sturdy plastic totes — recommendations: Roughneck brand for durability
- One lid for the totes to keep pests out
- A cooler drain or similar drainage item to manage excess liquid
- Power drill equipped with a quarter-inch drill bit
- Bricks or blocks for elevating the system
Step-by-Step Guide to Building Your Vermicomposter
1. Prepare the Totes
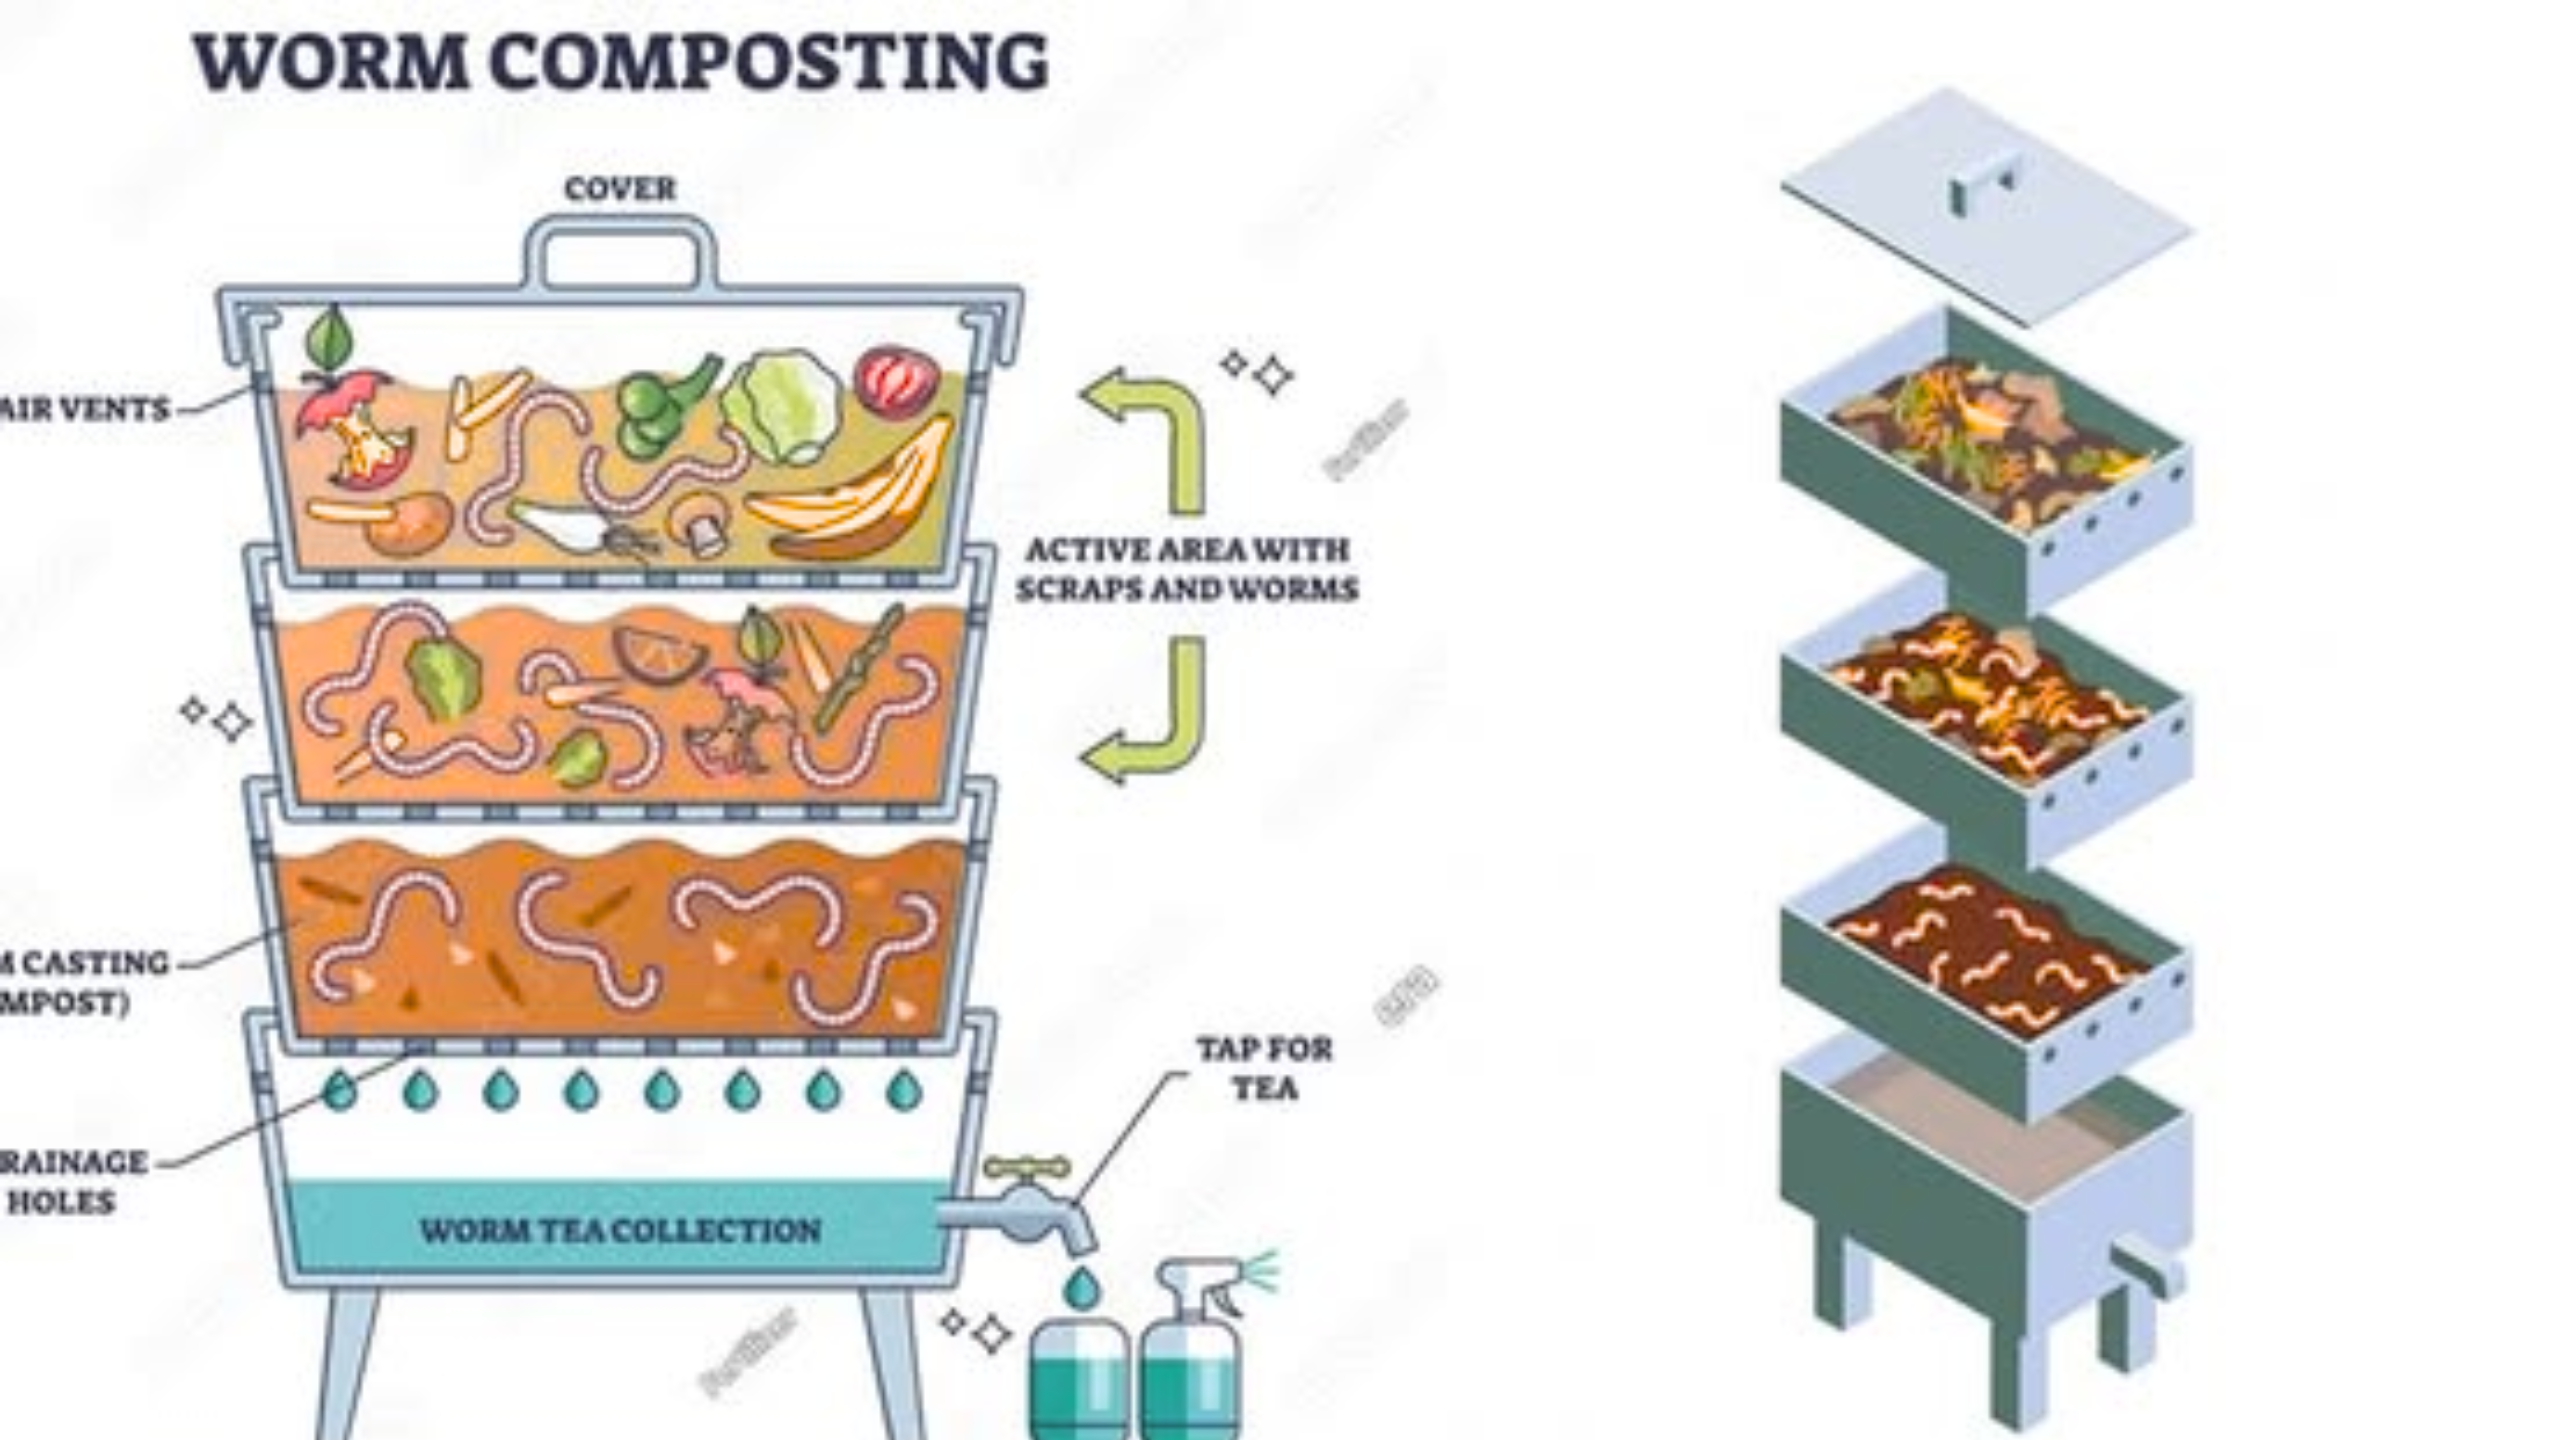
Start by drilling quarter-inch holes in the bottom of two of the totes. These will serve as the drainage and worm migration layers. Proper drainage prevents waterlogging and promotes healthy worm activity.
Next, drill additional holes around the upper edges of these same totes. This ensures proper airflow, reducing odors and keeping the environment comfortable for your worms.
2. Set Up the Drainage System
The bottom tote functions as your drainage collector. Install the cooler drain on the recessed side—this will allow excess liquid, also called worm tea, to drain away effortlessly.
These drainage holes are crucial—they help you gather the nutrient-rich liquid fertilizer to be used later on your plants.
3. Assemble the System
Stack the two drilled totes above the drainage tote. The top tote will serve as the primary feeding and bedding area, with worms living and composting within it.
Initially, place your worms, bedding, and kitchen scraps into the top tote.
4. Transfer and Manage the Worms
Carefully transfer your worms into the upper tote with bedding and food. As composting progresses, the worms will naturally migrate upward toward the new food sources, leaving behind rich castings—perfect for harvest.
When the top tote becomes filled with worm castings and is mostly free of worms, swap the positions so the filled tote is moved to the middle, and a fresh one is placed on top for ongoing composting.
5. Maintain Your System and Harvest
Regularly add kitchen scraps—vegetable peels, coffee grounds, crushed eggshells—to the top layer. As worms consume the scraps, they move upward, leaving behind a layer of dark, crumbly compost in the lower tote.
Once your bottom tote is full of castings and mostly devoid of worms, harvest the compost and use it directly in your garden beds or containers.
Don’t forget—the liquid drain from the bottom tote is your worm tea. Dilute this nutrient-rich liquid with water (about 1:10 ratio) and use it as a natural fertilizer to give your plants a healthy boost.
6. Elevate for Better Drainage and Accessibility
Place your entire compost system on bricks or blocks. Elevating the setup improves drainage, makes it easier to access, and helps keep pests away.
Tips for Successful Vermicomposting
- Monitor moisture: Keep bedding moist but not soggy. Worms breathe through their skin, so proper moisture is essential.
- Avoid certain foods: Don’t feed worms meat, dairy, oily foods, or citrus—these can cause odor issues or harm your worms.
- Keep it covered: Use the lid to protect your system from pests and to retain moisture.
- Stay patient: Worms need a little time to establish and get to work, but once they do, you’ll see steady compost production.
Final Thoughts
Constructing a homemade vermicomposter is both a practical and rewarding project. It connects you directly to sustainable gardening practices while turning waste into valuable resources. The three-tote system is cost-effective, straightforward to set up, and adaptable to various space constraints.
As you become more familiar with worm behavior and composting cycles, feel free to tweak and personalize your system—adding more totes or adjusting feeding routines. With consistent care, your vermicomposting setup will produce rich organic fertilizer that helps your garden thrive, all while reducing your ecological footprint.
Happy composting!
Enjoy the benefits of your own organic, nutrient-packed soil—happy worms, happy plants, happy gardener!
amoxil ca – https://combamoxi.com/ purchase amoxil for sale
buy diflucan 100mg without prescription – cost diflucan 200mg diflucan order online
generic cenforce 100mg – cenforce rs buy cenforce online
find tadalafil – https://ciltadgn.com/ purchasing cialis
cialis with out a prescription – https://strongtadafl.com/# tadalafil medication
order ranitidine 300mg without prescription – how to buy zantac ranitidine online
50 off viagra – https://strongvpls.com/# can you just buy viagra
The reconditeness in this serving is exceptional. order lasix pill
This is the make of post I find helpful. online
More posts like this would bring about the blogosphere more useful. https://ursxdol.com/sildenafil-50-mg-in/
Greetings! Extremely productive suggestion within this article! It’s the scarcely changes which choice espy the largest changes. Thanks a a quantity towards sharing! buy omeprazole generic
More posts like this would create the online play more useful. https://aranitidine.com/fr/clenbuterol/
The depth in this piece is exceptional. https://ondactone.com/spironolactone/
I couldn’t hold back commenting. Profoundly written!
levofloxacin 250mg for sale
This is the kind of writing I rightly appreciate. http://anja.pf-control.de/Musik-Wellness/member.php?action=profile&uid=4705
dapagliflozin online order – on this site forxiga 10 mg price
xenical medication – https://asacostat.com/ orlistat without prescription
You can shelter yourself and your stock nearby being wary when buying prescription online. Some pharmacy websites manipulate legally and put forward convenience, reclusion, cost savings and safeguards over the extent of purchasing medicines. buy in TerbinaPharmacy https://terbinafines.com/product/synthroid.html synthroid
I’ll certainly bring back to be familiar with more.
https://t.me/s/official_pokerdom_pokerdom
betmgm va online casino betmgm play betmgm VT
Discover a haven for gamblers seeking variety and excitement. casino coins provides secure banking and round-the-clock customer service. Register today for instant access to premium games!
Sweet Bonanza turns simple spins into spectacular win streaks thanks to its unique tumble mechanic. Multiplier sweet bonanza bonus bombs make every bonus round unforgettable. Get spinning!
Feel the ground shake with buffalo fury on the reels. buffalo gold collection free play is loaded with ways-to-win, explosive bonuses, and golden rewards that hit hard. Join the action!
Play the best social casino slots at chumba online casino — completely free to start! Daily login bonuses + welcome Sweeps Coins give you endless chances to win big. Join now!
Deposit once. Keep winning stake live betting for weeks thanks to rakeback + bonuses.
Ready to win big from home? Sign up at DraftKings casino Michigan Casino now and get 500 bonus spins after a $5 wager, plus 100% of your net losses back up to $1,000 on day one. Join the action with massive jackpots and premium live dealer experiences!
Usetrete stovky az tisice korun na sve pravidelne lecbe
https://opravdovalekarna.cz
Upon the millions winning strapping on fanduel casino Illinois – the #1 legitimate coins casino app in America.
Reach your $1000 PLAY IT AGAIN gratuity and turn every spin, хэнд and roll into bona fide cash rewards.
Firm payouts, whopping jackpots, and habitual activity – download FanDuel Casino again and start playing like a pro today!
Play like the next spin already paid rent – http://gketorolac.com/betano-casino-2026-review-games-bonuses-expert-tips/ , Your cursor leaves scorch marks on the interface .
Votre bien-ГЄtre est notre mission : bienvenue chez nous – https://santeenfrance.fr/pages/testcovidpharmacie/page:143 , Une pharmacie oГ№ professionnalisme rime avec humanitГ© .