

Pallet furniture is not just a trend for your living room or patio; it’s also a practical and visually appealing way to create a raised garden bed in your outdoor space. If you’ve ever thought about adding a touch of greenery to your yard while utilizing these sturdy wood pallets, you’re in the right place.
In this guide, we’ll walk you through the entire process of building your very own pallet raised garden bed, covering everything from materials needed to planting. Let’s dig in!
Why Choose a Pallet Raised Garden Bed?
Building a raised garden bed with pallets has numerous advantages:
- Cost-Effective: Pallets are often free or low-cost, making them a budget-friendly option for gardening enthusiasts.
- Versatile: They can be used for various plants, including vegetables, herbs, and flowers, allowing for a personalized garden.
- Good for the Environment: Repurposing pallets reduces waste and promotes sustainable gardening practices.
- Easy Maintenance: Raised beds offer better drainage and soil quality, making them easier to maintain than traditional garden beds.
What You’ll Need for Your Pallet Raised Garden Bed
Materials:
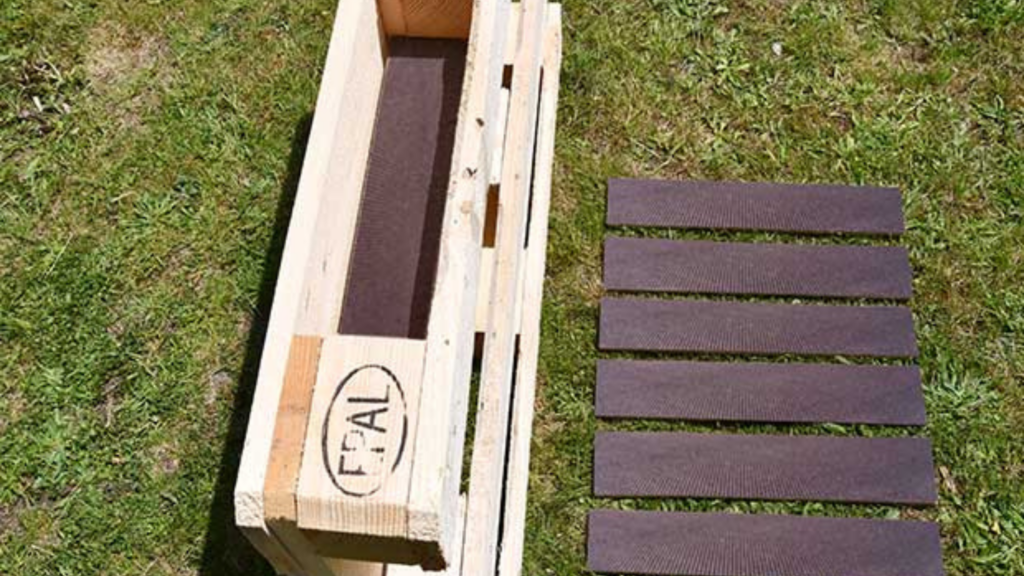
- 2 Europallets (standard size)
- Raised bed elements (optional)
- 2 spruce boards (4000 x 120 x 23 mm)
- 1 plywood or film board (1200 x 600 x 9 mm)
- Screws
- Hardwood oil or a suitable wood treatment
- Weed barrier fabric
- Layering material (e.g., garden cuttings, compost)
Tools:
- Jigsaw and/or circular saw
- Power drill/screwdriver
- Paintbrush
You can find all of these materials at your local hardware store, like Globus Baumarkt.
Step-by-Step Instructions
1. Prepare the Base
The first step is to create a weather-resistant base that allows for proper drainage.
- Cut the Spruce Boards:
- Cut the boards into six pieces, each 120 cm long.
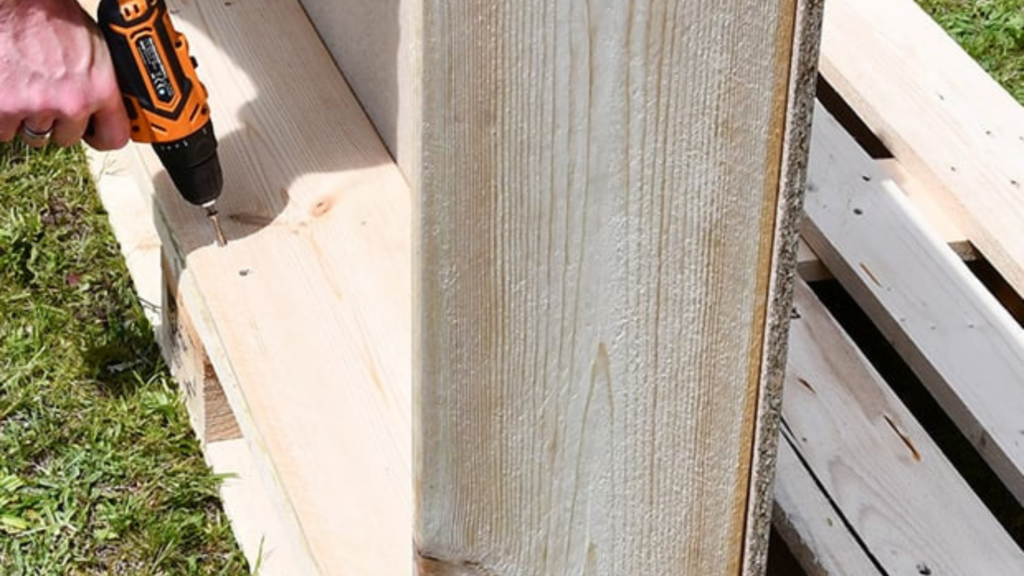
- Attach to the Frame:
- Fasten the boards along the bottom side of the raised bed frame, leaving a gap of about 1 cm between each piece. This will facilitate water drainage.
2. Create the Pallet Bed Frame
Next, you need to combine the two pallets to form the base of your raised bed.
- Join the Pallets:
- Screw the pallets together from the inside, ensuring a strong connection. It’s easier with two people, but a skilled DIYer can manage alone.
- Secure your screws into the wooden blocks of the pallets to ensure they do not interfere with planting later.
- Add Extra Support:
- For added stability, install two horizontal braces made from timber just below the raised bed frame.
3. Treat the Wood
To enhance the longevity of your raised garden bed, treat the wood with a natural, food-safe oil.
- Apply Hardwood Oil:
- Use a paintbrush to evenly coat all wooden surfaces to protect against weather damage and pests.
4. Install the Weed Barrier
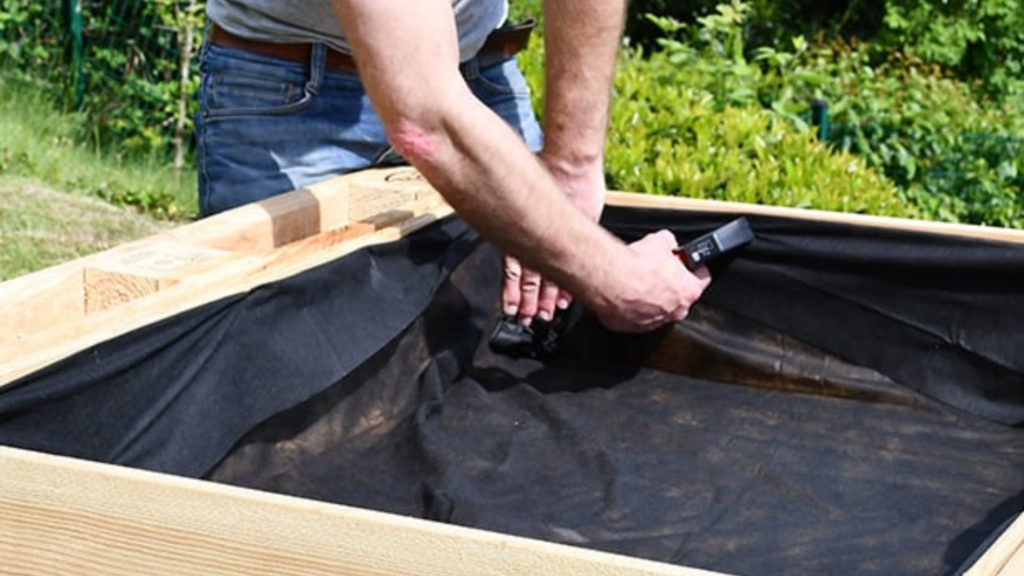
Now, it’s time to line your bed to prevent weeds from growing through.
- Cut the Weed Barrier:
- Measure and cut the weed fabric to fit inside the raised bed.
- Secure the Barrier:
- Staple the barrier along the edges to hold it firmly in place, which will keep it from shifting while you add soil.
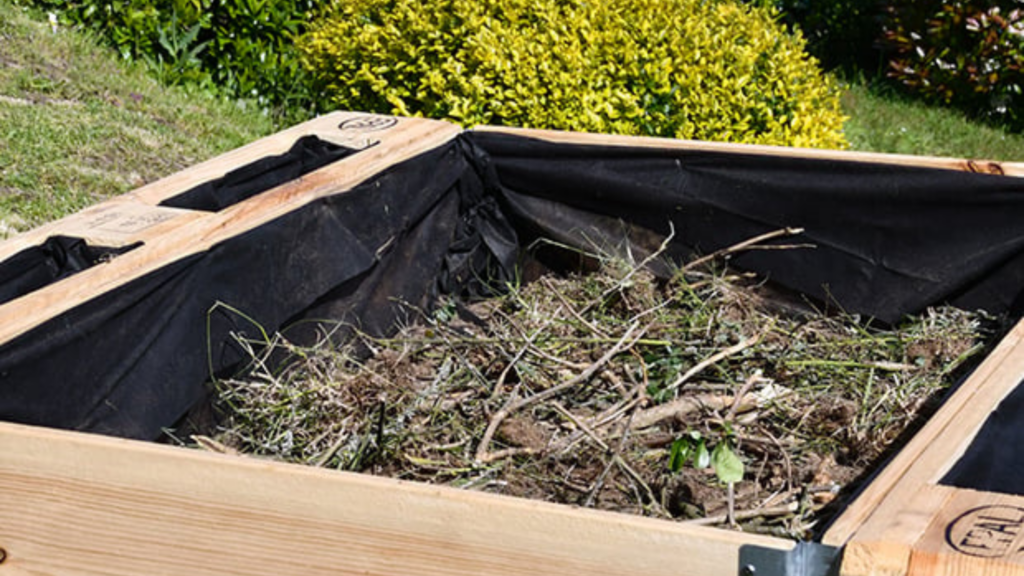
5. Fill the Raised Bed
Filling your raised bed correctly is crucial for plant health. Follow these layering steps:
- Layering Materials:
- Begin with a layer of coarse garden cuttings as the first layer.
- Follow with a finer layer of woody materials, then add green waste (like kitchen scraps), and finally top it off with nutrient-rich compost.
6. Planting Your Garden Bed
Once your raised bed is filled, it’s time to start planting!
- Choose your favorite vegetables, herbs, or flowers to grow. Some popular choices include:
- Herbs: Basil, thyme, and parsley for fresh kitchen supplies.
- Vegetables: Lettuce, tomatoes, and bell peppers to create a vibrant garden.
- Plant Spacing: Make sure to space out your plants adequately (for example, allow room between lettuce plants so they can grow and expand).
Final Thoughts
Building a pallet raised garden bed is not just a fun weekend project; it’s an investment in your gardening future. With this simple guide, you’re on your way to creating a beautiful, functional, and eco-friendly space in your yard. Embrace the joy of gardening and watch your plants thrive!
Feel free to explore additional DIY projects like building a garden organizer or crafting a stylish grilling station using pallets for even more creative outdoor solutions. Happy gardening!
By incorporating these steps and tips, you’ll create a raised garden bed that not only looks great but also serves your gardening needs for years to come. If you have any questions or need further assistance, don’t hesitate to reach out!
Crash-Spiele beinhalten typischerweise Wetten darauf, wann ein zufälliges Ereignis eintreten wird,
wie zum Beispiel ein Preis, der auf null fällt, oder ein Timer, der sein Ende erreicht.
In Spielbank Bad Kissingen bieten diese Spiele eine spannende
Möglichkeit, sein Glück zu testen und möglicherweise groß
zu gewinnen. Crash-Spiele sind ein aufregendes Erlebnis,
bei dem die Spieler den Adrenalinkick genießen können, während sie auf das Ergebnis verschiedener Ereignisse wetten. Diese vielfältigen Optionen sprechen unterschiedliche Geschmäcker und
Vorlieben an und stellen sicher, dass die Spieler ein Spiel
finden können, das zu ihrer Stimmung und ihrem Können passt.
Das Casino verfügt über eine Vielzahl von Video-Slots, elektronischem Roulette und Videopoker-Spielen,
mit etwa 100 Spielautomaten, die den Gästen zur Verfügung
stehen.
Jahrhunderts und den Jahrzehnten danach erreichte das kommerzielle Glücksspiel unter staatlicher
Aufsicht in ganz Europa seine Blüte. Doch das Glücksspiel hat in Bad Kissingen eine
weitaus längere Geschichte. Ein Erlebnis sind zweifelsohne die festverankerten Specials unter der Woche wie beispielsweise
Montags-Bingo oder interessante Besucherpakete für das Automaten- oder Klassische Spiel.
Anhänger des Automatenspiels kommen in der unteren Etage auf ihre Kosten. Ein Highlight
ist das Pokerangebot, welches in einer clubartigen Lounge untergebracht ist und vornehmlich in der Spielweise Texas Hold’em gespielt wird.
References:
https://online-spielhallen.de/meine-umfassenden-jet-casino-erfahrungen-ein-tiefer-einblick/
The maximum withdrawal per transaction is A$7.500.
In both cases, this is faster compared to most casinos.
According to the main page, the usual transaction time is 10 minutes.
SkyCrown withdrawal methods are a little different.
If you still have any questions, feel free to contact online helpers to find the answer or
problem solution. Moreover, the casino is not available in all countries.
Quality Game ProvidersReputable casinos work only with trusted
software developers. Top-Notch SecurityLook for casinos that use SSL encryption to
protect your data — the same tech that banks use. Just open the site in your mobile browser and jump right
into the action. Copyright © 2024 myskycrown.com is operated and owned by Hollycorn N.V., a company legally registered and incorporated under the laws of Curaçao.
References:
https://blackcoin.co/bridge-poker-rules/
This extensive review reveals excellent benefits and looks at what makes this casino unique in the competitive online
gaming sector. This deposit bonus from Richard Casino has a wagering requirement of
40-times the value of your bonus. This welcome deposit bonus from Richard Casino has wagering requirements of 40x bonus.
Aside from that, this bonus also comes with 100 free spins on selected games.
Richard Casino offers a deposit casino bonus with a value
of 100% up to €1,000.
The casino partners with top-tier software providers such as NetEnt,
Microgaming, Pragmatic Play, Evolution Gaming, and Play’n GO, guaranteeing high-quality graphics,
fair outcomes, and an engaging gaming experience. The casino prioritizes fast and secure transactions, ensuring that players receive
their winnings quickly and without unnecessary
delays. Your data and funds are protected, and every game is designed to offer a safe and transparent gaming experience.
With its trusted license, diverse game selection, and fast payouts, Richard Casino is an excellent choice for Australian players.
Enjoy slots, live dealer games, and table classics with just a few taps – anytime,
anywhere in Australia!
The bonuses don’t expire quickly, allowing weeks or months between deposits.
Getting the most value from Richard casino bonuses requires strategic thinking rather than just claiming everything
available. While not technically a no-deposit bonus, it provides free playing
funds from existing activity. Some players find it easier to copy-paste Richard casino codes
on a desktop to eliminate spelling errors. Whether you’re
using the Richard casino app (mobile website) or the desktop version,
the bonus claiming process remains identical.
Tuesday has become legendary among regular Richard casino players, and honestly,
it should be.
online australian casino paypal
References:
logisticsdirectuk.com
paypal casinos
References:
http://www.livorise.com