
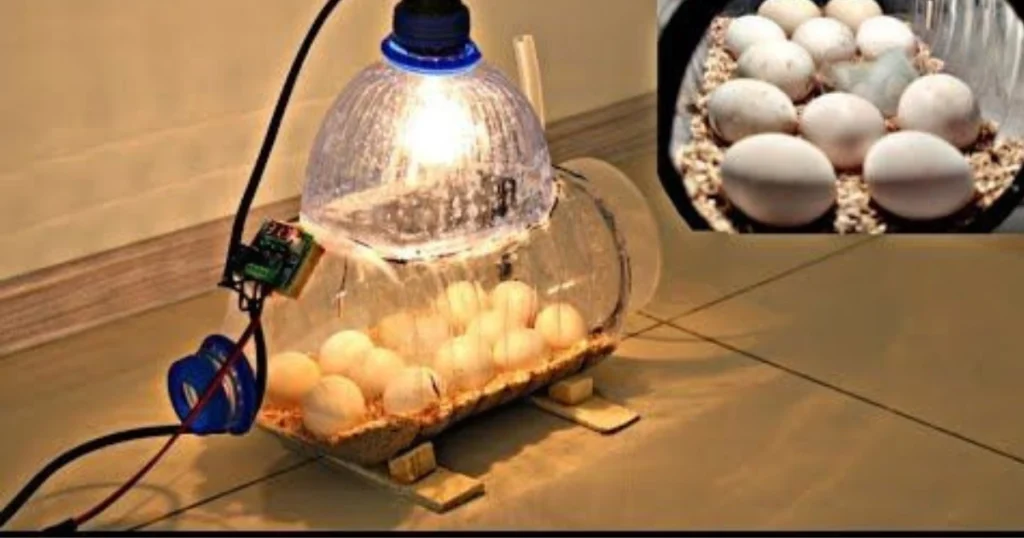
A homemade egg incubator can be created with very basic materials, making it possible to hatch a few eggs without expensive equipment. One of the simplest approaches uses a large plastic bottle, a light bulb, and a warm, protected environment to create the conditions needed for incubation.
This method is best suited for educational purposes or small backyard projects, where only a few eggs need to be incubated at a time.
How a Simple Egg Incubator Works
Eggs require three main conditions to hatch successfully:
- Stable temperature
- Proper humidity
- Gentle air circulation
A small enclosed space, like a plastic bottle, helps trap heat. A low-wattage light bulb provides warmth, while the surrounding materials help maintain humidity and protect the eggs from sudden temperature changes.
Materials Needed
To build a basic bottle incubator, you will need:
- One large plastic bottle or container
- A small light bulb
- Electrical cord and socket
- Bedding material such as grain husks or wood shavings
- Fertilized eggs
- A thermometer (recommended for better results)
Using a thermometer greatly improves the chances of successful hatching because temperature control is critical.
Step-by-Step Setup
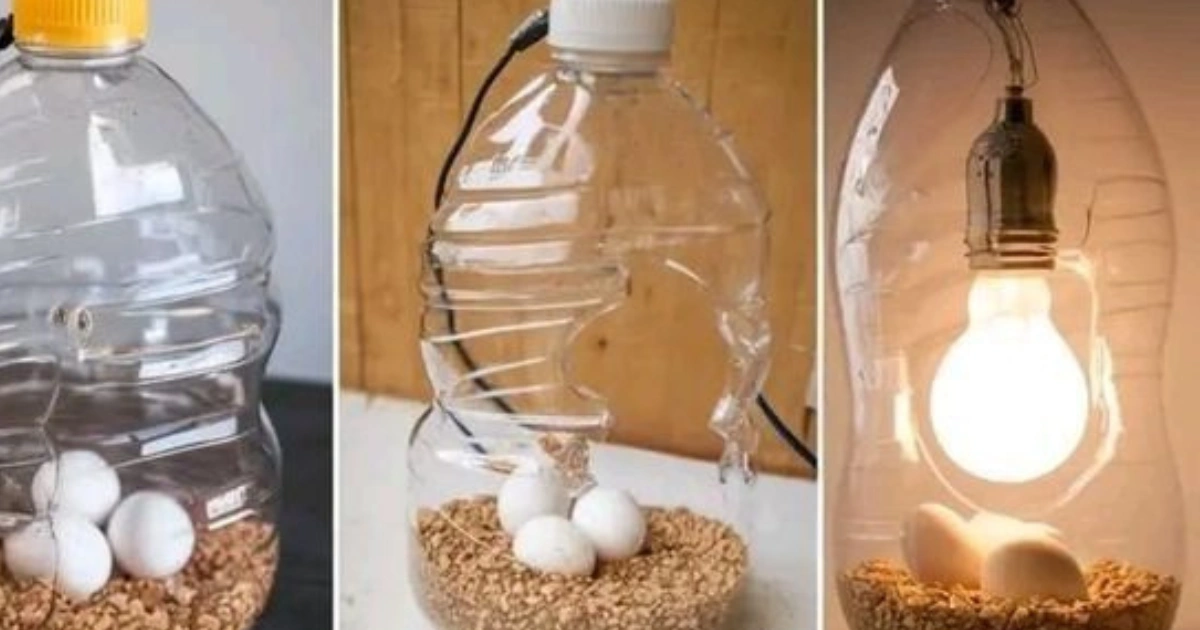
1. Prepare the container
Clean the plastic bottle thoroughly and cut an opening if needed for ventilation or access.
2. Add the bedding
Place a layer of dry bedding at the bottom. This cushions the eggs and helps regulate moisture.
3. Install the heat source
Attach a small light bulb through the cap or top of the bottle. Make sure the bulb does not touch the eggs or bedding directly.
4. Place the eggs
Arrange the fertilized eggs gently on the bedding. Keep them slightly spaced apart.
5. Monitor the temperature
The ideal incubation temperature for chicken eggs is about 37.5°C (99.5°F). Adjust the bulb distance or wattage if necessary.
6. Turn the eggs daily
Eggs should be turned several times a day to prevent the embryo from sticking to the shell.
Important Safety and Success Tips
- Always use fertilized eggs.
- Avoid overheating the container.
- Provide small ventilation holes.
- Check the temperature regularly.
- Keep the incubator in a draft-free location.
Even small temperature changes can affect hatch rates, so monitoring is essential.
Expected Hatching Time
Chicken eggs typically hatch after about 21 days. During the final three days, the eggs should no longer be turned, and humidity should be slightly increased to help the chicks break through the shell.
Limitations of a Bottle Incubator
While this method is simple and affordable, it has some drawbacks:
- Temperature may fluctuate more than in commercial incubators.
- Humidity control is limited.
- Hatch rates may be lower.
- Suitable only for small batches of eggs.
For larger or more consistent hatching, a proper incubator is recommended.
FAQ
Can store-bought eggs hatch in this incubator
No. Eggs must be fertilized by a rooster to develop into chicks.
What temperature is best for chicken eggs
The ideal temperature is around 37.5°C (99.5°F) throughout the incubation period.
How often should eggs be turned
Eggs should be turned at least three times a day until the final three days before hatching.
Do eggs need ventilation
Yes. Small ventilation holes are necessary to allow fresh air exchange.
Is this method reliable
It can work for small projects, but results may vary depending on temperature control and humidity.
Primary keyword: DIY egg incubator
Related keywords: homemade egg incubator, bottle incubator, small egg hatcher, backyard chick incubation, simple incubator setup, chicken egg incubation, DIY hatching system, low-cost incubator**
Bước xác minh tài khoản (KYC) tại 888slot apk có phần linh hoạt hơn so với nhiều nền tảng khác. Bạn chỉ cần xác minh danh tính khi rút tiền lần đầu hoặc khi số tiền rút vượt ngưỡng quy định, thường là 10 triệu VND. Quá trình này yêu cầu ảnh CMND/CCCD và một tấm ảnh selfie cầm giấy tờ tùy thân, đảm bảo an toàn cho cả người chơi và nền tảng. TONY03-31
Backbiome is an advanced daily wellness supplement formulated to help support spinal comfort, reduce feelings of built-up tension, and promote freer, smoother movement throughout backbiome everyday life.
Boostaro is a modern men’s wellness boostaro formula created to support daily vitality, stamina, and confidence through a practical, natural routine.