
Creating a pathway or patio with pavers can add a great deal of charm and function to your garden or outdoor space. Whether you’re constructing a new walkway, a backyard patio, or a garden path, understanding the correct method for laying pavers is key to achieving long-term durability and a smooth, attractive surface. Here’s a step-by-step guide to help you lay pavers successfully, ensuring they stay secure and maintain their beauty for years.
Step 1: Plan Your Design
Before you even begin, it’s important to plan out the design of your paver layout. Decide the size, shape, and overall look of your path or patio. For a more intricate design, you might want to sketch out the layout, and even consider purchasing different types of pavers for visual contrast.
Step 2: Gather the Necessary Materials and Tools
To lay pavers correctly, you’ll need a few essential materials and tools:
- Pavers: These are the stones or tiles you’ll be laying down. Choose the type that suits your design.
- Concrete Edge (Optional): This helps to keep the pavers secure and can prevent them from shifting over time.
- RCA Base (Recycled Concrete Aggregate): This material serves as a stable foundation for your pavers.
- Fine Sand: Used as a leveling material for the surface beneath the pavers.
- Compacted Soil or Gravel: Helps to create a solid base.
- Tools: A shovel, rake, broom, wheelbarrow, rubber mallet, and a level.
Step 3: Prepare the Area
The first physical step is to prepare the area where you plan to lay the pavers. Mark the boundaries using string and stakes. Once the area is marked, you will need to dig out the soil to a depth of around 4–6 inches for a standard paver installation (deeper if you are laying pavers for a heavy load area, like a driveway).
Ensure that the area is level and that there is proper drainage for water to flow. A slight slope (about 1 inch for every 8 feet) will help direct rainwater away from the pavers. Once you’ve dug the area, compact the soil to create a solid foundation.
Step 4: Add the RCA Base
Now it’s time to add the RCA base. Spread it evenly over the compacted soil, creating a depth of about 3–4 inches. The RCA base will provide stability and drainage. Once spread, use a plate compactor to firmly press the base into place. A compacted base will ensure that the pavers stay level and secure over time.
Step 5: Lay the Sand
Next, spread a thin layer of fine sand (about 1 inch) over the compacted base. This layer helps to level the surface further, making sure that your pavers sit evenly. Use a rake to spread the sand and a board to screed it smooth. The sand also serves as a bedding layer that allows the pavers to settle into position.
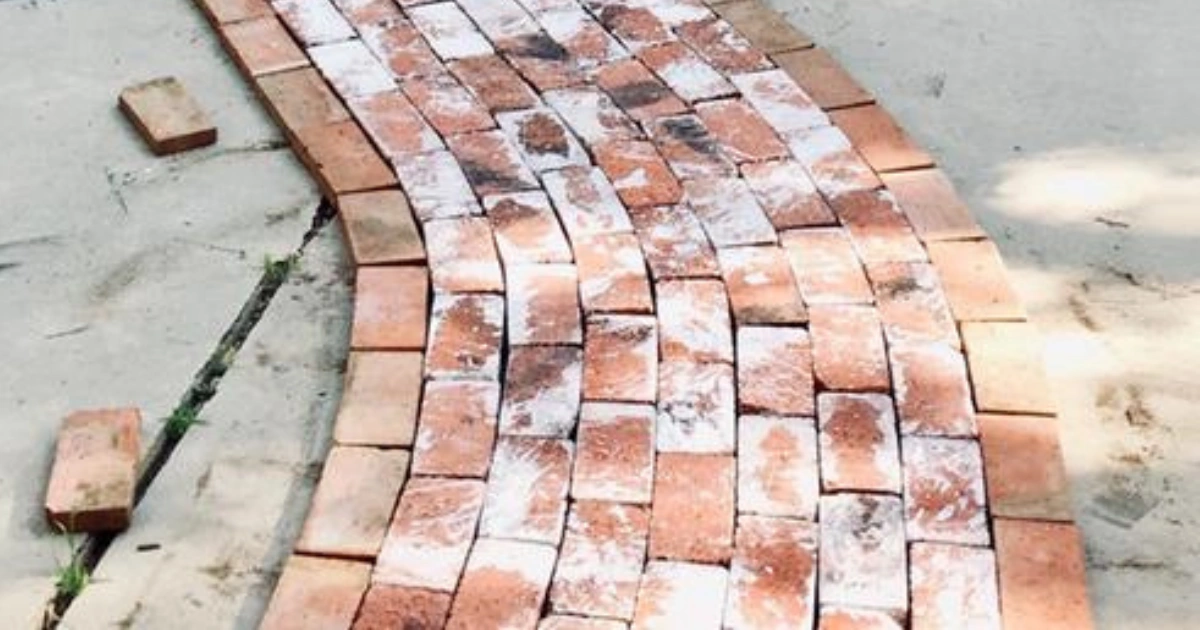
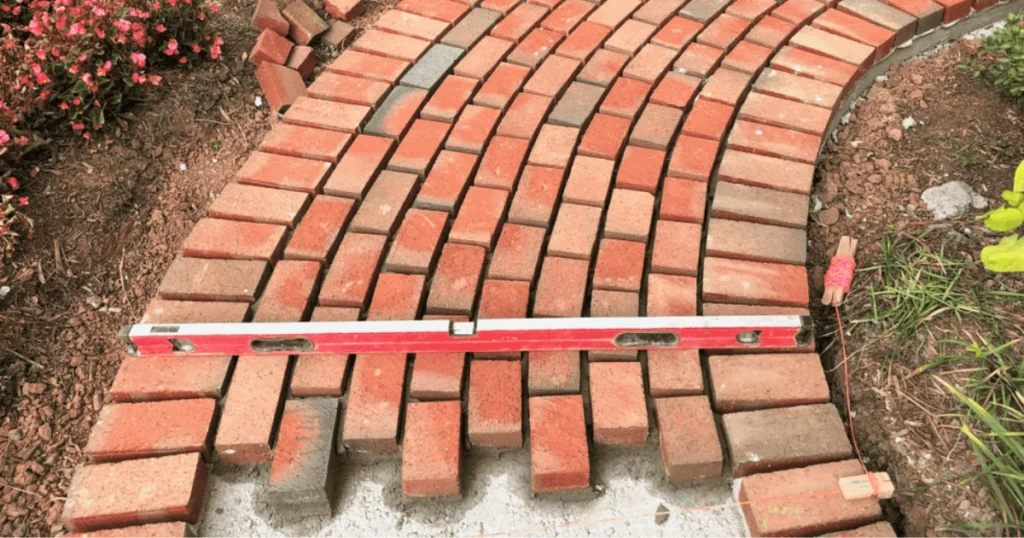
Step 6: Lay the Pavers
Start laying the pavers at one corner, working your way across the area. As you lay each paver, leave a small gap (about 1/8 inch) between them to allow for movement and expansion. For perfectly aligned pavers, use a rubber mallet to tap them gently into place. Always check the level of the pavers with a leveling tool to ensure that they are even with one another.
For straight-edged paths or patios, use a string line to keep the pavers in line. If you’re working with curves, lay the pavers around the edges gradually, ensuring that each stone fits snugly.
Step 7: Fill the Joints with Sand
Once all of the pavers are laid, spread fine sand over the surface and use a broom to sweep it into the gaps between the pavers. This is an important step because the sand helps to lock the pavers into place. After filling the gaps, lightly mist the surface with water to settle the sand.
You may need to repeat this process a few times to ensure that all the gaps are completely filled with sand.
Step 8: Compact the Pavers
Use a plate compactor over the pavers to set them into the sand bed. This step is crucial because it ensures the pavers are firmly seated in the sand and prevents them from shifting. When you compact the pavers, be sure to place a layer of cardboard or a rubber mat between the compactor and the pavers to avoid damaging them.
Step 9: Clean and Seal the Pavers (Optional)
Once the pavers are laid and compacted, give the surface a final cleaning with a broom. If you prefer, you can also seal the pavers with a special sealer to enhance their color and durability. This will also protect them from stains and the weather.
Tips for Success
- Proper drainage: Ensure that your paver project includes proper drainage to prevent water from pooling in your path or patio. A slight slope is key to keeping water from collecting.
- Edge Restraints: Install edging or restraint materials, especially if your paver installation borders a garden bed or lawn. This will prevent the pavers from shifting out of place.
- Be patient: Don’t rush through the process. Taking your time to level, compact, and lay the pavers properly will ensure that your pathway or patio lasts for years.
Conclusion
Laying pavers is a rewarding DIY project that can significantly improve your outdoor living space. By following the steps above, you can create a sturdy and visually appealing pathway, patio, or driveway that will withstand the test of time. With a little preparation, patience, and attention to detail, you’ll be able to enjoy your newly paved space for many years to come
Bảo mật thông tin luôn là ưu tiên hàng đầu tại 888SLOT . Toàn bộ dữ liệu người dùng được mã hóa bằng chuẩn SSL 256-bit – mức bảo vệ cao nhất hiện nay, tương đương với các ngân hàng quốc tế. TONY01-29O
bestcasinoBangladesh.online
?Salud por cada buscador de emociones !
En muchos casinos extranjeros, la experiencia gastronГіmica tambiГ©n juega un papel crucial. casinos fuera de espana. Los restaurantes gourmet y las opciones de comidas internacionales atraen a una gran variedad de comensales. Esto permite a los visitantes disfrutar de una cena de alta calidad antes o despuГ©s de jugar.
Los casinos online internacionales ofrecen opciones de juego responsables. Esto se traduce en herramientas para autoexcluirte y establecer lГmites de gasto. Conocer estas opciones es crucial para mantener el control en el juego.
Casinos online internacionales: por quГ© todos estГЎn hablando de ellos – п»їhttps://casinos-fuera-de-espana.vercel.app/
?Que la fortuna te acompane mientras alcanzas excepcionales jackpots sensacionales!
дайсон пылесос купить [url=https://pylesos-dn-9.ru/]дайсон пылесос купить[/url] .
https://t.me/s/portable_1WIN
ทดลองเล่นสล็อต pg
สล็อต PG เกมสล็อตออนไลน์ที่คนค้นหาเยอะ ใช้งานง่าย ฝากถอนรวดเร็ว
คำค้นหา สล็อต PG ถูกค้นหามากขึ้นเรื่อยๆ ในกลุ่มผู้เล่นเกมสล็อตออนไลน์ เพราะเป็น ค่ายเกมที่มีชื่อเสียง ด้าน งานภาพคุณภาพสูง ความ ลื่นไหล และ อัตราการจ่ายรางวัลที่น่าสนใจ เกมของ PG ผลิตโดยค่ายมาตรฐาน ที่รองรับการเล่นทั้งบน โทรศัพท์มือถือ และ เดสก์ท็อป
ข้อดี ของ PG Slot
pg slot เป็นเกมสล็อตออนไลน์ที่ออกแบบมาให้ เปิดเกมได้ทันที เล่นผ่าน ระบบออนไลน์ และรองรับ ทุกอุปกรณ์ ไม่ต้องดาวน์โหลดแอป ผู้เล่นสามารถเข้าเล่นผ่าน หน้าเว็บ ได้ทันที ภาพและเสียงถูกพัฒนาในรูปแบบ 3D ให้ความคมชัด พร้อมเอฟเฟกต์ สมจริง
คุณสมบัติหลักของเกม pg slot ได้แก่
มีรอบโบนัสให้ลุ้นบ่อย
ระบบตัวคูณ
เดโม่ฟรี
มีเมนูภาษาไทย
ฝากถอนง่าย ไม่ต้องรอนาน
แพลตฟอร์ม สล็อต PG โดยทั่วไปให้บริการ การฝาก-ถอน อัตโนมัติ 24 ชั่วโมง ขั้นต่ำเริ่มต้นเพียง หลักหน่วย ขึ้นอยู่กับ ระบบของผู้ให้บริการ การทำรายการใช้เวลา ไม่กี่วินาที ผ่าน QR Code หรือระบบ ธนาคารบนมือถือ ทำให้ธุรกรรมเป็นไปอย่าง ไม่สะดุด
แนวเกมที่คนเล่นเยอะ ใน pg slot
เกม สล็อต PG มีธีมหลากหลาย เช่น
ธีม แฟนตาซี
ธีม ลุยด่าน
ธีม เอเชียและโชคลาภ
ธีม สัตว์และธรรมชาติ
เกมยอดนิยมมักเป็นเกมที่แตกง่าย พร้อมระบบ โบนัสรอบพิเศษ และ โอกาสทำกำไรสูง เหมาะกับทั้ง ผู้เล่นเริ่มต้น และ สายสล็อตจริงจัง
ความปลอดภัย
สล็อต PG ใช้ระบบที่ได้มาตรฐาน มีการ รักษาความปลอดภัย และใช้ระบบสุ่มผล ระบบสุ่มมาตรฐาน เพื่อให้ผลลัพธ์ ยุติธรรม แพลตฟอร์มที่ให้บริการ PG Slot ควรมี ความปลอดภัยสูง
สรุป
PG Slot เป็นตัวเลือกยอดนิยมสำหรับผู้ที่ต้องการเล่นสล็อตออนไลน์ ด้วยจุดเด่นด้าน กราฟิกคุณภาพ และการทำธุรกรรมที่ รวดเร็ว ผู้เล่นสามารถเริ่มต้นได้ ทันที ฝากถอนสะดวก และเลือกเกมได้ จำนวนมาก เหมาะสำหรับ ทั้งมือใหม่และมือโปร ในโลกของเกมสล็อตออนไลน์
мелбет верификация
Скачать Melbet: Android, iOS и компьютер
Приложение Melbet объединяет букмекерскую контору и казино в едином приложении. Доступны live-ставки, слоты, онлайн-трансляции, аналитика и быстрые финансовые операции. Загрузка занимает 1–2 минуты.
Android (APK)
Скачайте APK с официального сайта, запустите установщик и завершите установку. При необходимости включите доступ к установке сторонних приложений, затем войдите в аккаунт.
iOS (iPhone)
Откройте App Store, найдите «Melbet», нажмите «Получить», после установки выполните вход.
ПК
Перейдите официальный сайт, авторизуйтесь и создайте ярлык на рабочий стол. Веб-версия работает как отдельное приложение.
Функционал
Live-ставки с обновлением коэффициентов, игровой раздел с тысячами игр, прямые трансляции, подробная статистика, push-оповещения, регистрация за минуту и поддержка 24/7.
Бонусы
После установки доступны бонус на первый депозит, промокоды и бесплатные ставки. Условия зависят от региона.
Безопасность
Загружайте только с официального сайта, контролируйте адрес сайта, не передавайте пароль третьим лицам и активируйте двухфакторную аутентификацию.
Установка занимает несколько минут, после чего доступен весь функционал Melbet.
скачать зеркало мелбет
Установить Melbet: APK, iOS и ПК
Мобильная версия Melbet объединяет букмекерскую контору и казино в одном интерфейсе. Доступны live-ставки, слоты, прямые трансляции, статистика и быстрые финансовые операции. Загрузка занимает несколько минут.
Android (APK)
Скачайте APK с официального источника, запустите установщик и подтвердите установку. Если требуется включите разрешение на установку из неизвестных источников, затем войдите в аккаунт.
iOS (iPhone)
Откройте App Store, введите в поиске «Melbet», выберите «Получить», после установки выполните вход.
ПК
Перейдите официальный сайт, войдите в личный кабинет и создайте ярлык на рабочий стол. Браузерная версия функционирует как отдельное приложение.
Функционал
Live-ставки с мгновенным обновлением линии, казино и слоты, прямые трансляции, подробная статистика, уведомления о матчах, быстрая регистрация и круглосуточная служба поддержки.
Бонусы
После загрузки доступны бонус на первый депозит, акционные коды и фрибеты. Правила начисления определяются регионом.
Безопасность
Загружайте только с официального сайта, контролируйте адрес сайта, не передавайте пароль третьим лицам и включите 2FA.
Загрузка выполняется быстро, после чего доступен весь функционал Melbet.
Выбирая надежную платформу, стоит обратить внимание на хостинг для хрумера https://www.olx.ua/d/uk/obyavlenie/progon-hrumerom-dr-50-po-ahrefs-uvelichu-reyting-domena-IDXnHrG.html, который обеспечивает бесперебойную работу.
188v con tự hào là bến đỗ an toàn cho những ai đam mê bộ môn nổ hũ với hàng loạt hũ lớn được phá mỗi ngày. TONY03-11O
Backbiome is an advanced daily wellness supplement formulated to help support spinal comfort, reduce feelings of built-up tension, and promote freer, smoother movement throughout backbiome everyday life.