

Rosemary is one of the most rewarding herbs to grow at home. It is aromatic, drought-tolerant once established, and incredibly versatile in the kitchen and garden. While rosemary can be grown from seed or layered stems, propagating rosemary from cuttings remains the most dependable and beginner-friendly technique.
This guide explains how to propagate rosemary from cuttings step by step, using proven methods that improve success rates and reduce plant loss. By understanding how rosemary naturally grows and how its roots respond to moisture, light, and airflow, you can produce healthy plants that last for years.
Why Propagating Rosemary from Cuttings Works So Well
Rosemary is a semi-woody perennial herb. That means it readily produces roots from young stems when conditions are right. Unlike seed propagation, which can be slow and unpredictable, cuttings create clones of the parent plant with identical flavor, growth habit, and hardiness.
Key benefits of propagating rosemary from cuttings include:
- Faster establishment compared to seeds
- Higher success rate with minimal equipment
- Consistent plant quality
- Ability to multiply a single healthy plant
For home gardeners, this approach offers reliability without complicated techniques.
When to Take Rosemary Cuttings
Timing plays an important role in successful propagation. The best time to take rosemary cuttings is during active growth periods when stems are flexible and green.
Ideal times include:
- Late spring through early summer
- Early fall in mild climates
Avoid taking cuttings during extreme heat or cold. Soft, fresh growth roots more easily than woody stems taken from the base of the plant.
Tools and Materials You Will Need
Before starting, gather everything you need to avoid unnecessary delays that can stress the cuttings.
Basic supplies include:
- Clean, sharp scissors or pruning shears
- Small pots or containers with drainage holes
- Well-draining potting mix
- A healthy, mature rosemary plant
Optional but helpful materials include rooting hormone powder and transparent containers for monitoring moisture.
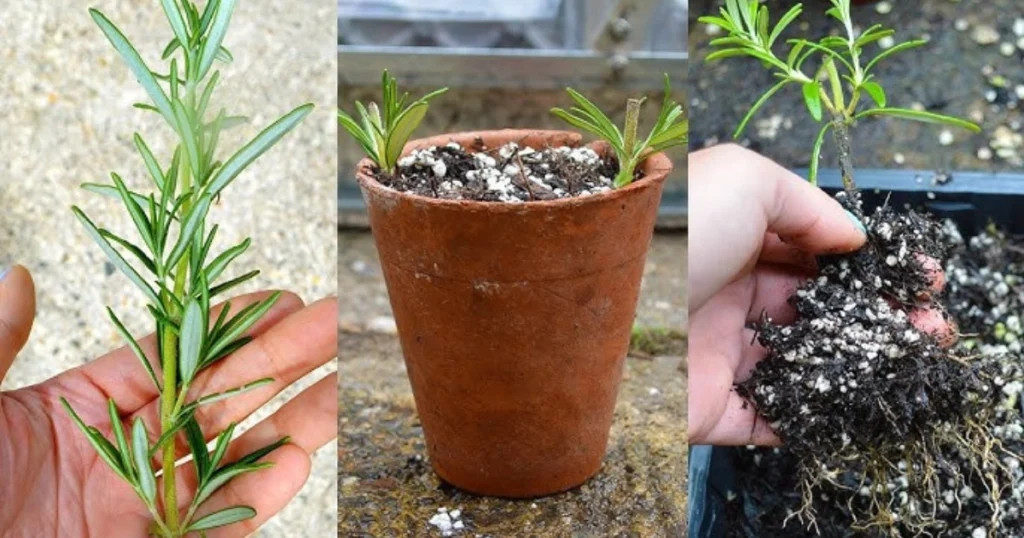
Step 1: Selecting and Preparing Rosemary Cuttings
Choose healthy stems from the parent plant that show no signs of disease or pest damage. The best cuttings come from new growth near the tips of the plant.
Each cutting should be:
- About 4 to 7 inches long
- Green and flexible, not woody
- Contain several leaf nodes
Remove the lower leaves from the bottom half of the stem. This prevents leaf rot and encourages root development at the exposed nodes.
Step 2: Choosing the Right Propagation Medium
Rosemary roots need air as much as moisture. Heavy soil that stays wet for too long increases the risk of rot.
A suitable propagation mix should be:
- Light and well-draining
- Able to retain slight moisture without becoming soggy
Many gardeners use a blend of potting mix with added perlite or coarse sand. This creates the ideal balance between moisture retention and aeration.
Step 3: Planting the Rosemary Cuttings
Fill your containers with the prepared potting mix and gently moisten it before planting. Insert each cutting into the soil with the leafless portion buried and the leafy top exposed.
Spacing matters. If using one container for multiple cuttings, ensure there is enough room for airflow between stems.
Optional step: Dipping the base of each cutting in rooting hormone can speed up root formation, especially in cooler environments.
Alternative Method: Rooting Rosemary Cuttings in Water
Some gardeners prefer starting rosemary cuttings in water. This method allows you to observe root development but requires careful monitoring.
To root rosemary in water:
- Place cuttings in a glass with the lower nodes submerged
- Change the water every two to three days
- Keep the container in bright, indirect light
Roots may take two to four weeks to appear. Once roots reach about one inch long, transplant the cutting into soil to prevent weak water-grown roots.
Step 4: Watering and Early Care
During the rooting phase, consistent moisture is important, but excess water is harmful. The soil should feel lightly damp, not saturated.
Key care tips include:
- Water gently when the surface begins to dry
- Avoid standing water in saucers
- Do not fertilize during the rooting stage
Place the cuttings in bright, indirect light. Direct sunlight at this stage can cause dehydration before roots fully develop.
Step 5: Light and Temperature Requirements
Rosemary cuttings prefer stable, mild conditions while rooting. Extreme temperatures slow or halt root formation.
Optimal conditions include:
- Temperatures between 65°F and 75°F
- Bright but filtered light
- Good air circulation without drafts
Once roots form, gradually increase light exposure to help the plant adjust.
Step 6: Transplanting Rooted Cuttings
After several weeks, gently tug the cutting to check resistance. If it resists being pulled out, roots have formed.
At this stage:
- Transplant into a larger pot or garden bed
- Use well-draining soil
- Water thoroughly after transplanting
Once established, rosemary tolerates direct sunlight and reduced watering frequency. Gradual acclimation helps prevent shock.
Common Mistakes When Propagating Rosemary
Many failed attempts are due to small but critical errors. Avoiding these increases success significantly.
Common mistakes include:
- Overwatering the cuttings
- Using dense or compacted soil
- Taking cuttings from woody stems
- Exposing young cuttings to harsh sunlight
Patience is essential. Rosemary can be slow to root, especially in cooler conditions.
Caring for Rosemary After Propagation
Once transplanted, rosemary prefers conditions similar to its Mediterranean origins.
Long-term care tips:
- Water deeply but infrequently
- Ensure excellent drainage
- Prune lightly to encourage bushy growth
- Protect from prolonged frost in colder zones
With proper care, propagated rosemary plants can thrive for many years.
Frequently Asked Questions
How long does it take for rosemary cuttings to root?
Most rosemary cuttings root within two to six weeks, depending on temperature, moisture, and light conditions.
Can rosemary be propagated from grocery store stems?
Yes, fresh store-bought rosemary can sometimes root if the stems are green and not dried out. Success rates vary.
Is water or soil propagation better for rosemary?
Soil propagation generally produces stronger roots, while water propagation allows easier monitoring. Both methods work if conditions are correct.
Should rosemary cuttings be covered to increase humidity?
Light humidity can help, but excessive moisture increases rot risk. Good airflow is more important than high humidity.
Can rosemary survive winter outdoors?
In mild climates, rosemary survives outdoors year-round. In colder zones, container-grown plants should be protected or moved indoors.
Internal Linking Suggestions
To enhance topical relevance, consider linking this article with related content on secretsofthegreengarden.com such as:
- “Growing Herbs in Small Garden Spaces”
- “How to Improve Soil Drainage Naturally”
- “Best Perennial Herbs for Year-Round Harvest”
External Authoritative Resources
For additional research-backed guidance, the following sources provide reliable horticultural information:
- Royal Horticultural Society: rosemary growing and care guides
- University of Florida IFAS Extension: herb propagation resources
- Penn State Extension: home herb gardening fundamentals
Final Thoughts
Propagating rosemary from cuttings is one of the simplest ways to expand your herb garden without additional cost. By
I appreciate how genuine your writing feels. Thanks for sharing.
Читать далее kra47.cc
Tours in Turkey Booking online was simple and secure. https://vnbride.com/?p=14455
So simple, yet so impactful. Well written!
777 bet online casino and dive into the world of gambling with unique offers!
777bet has carved a niche for itself with its exceptional services.
UNESCO Pamukkale tours I’ll definitely recommend TravelShop Booking to my friends and family. It’s rare to find such reliable service these days. https://www.tapascenter.com/?p=7640
Когда вы намечаете поездку на территорию Канарских островов, в частности на Тенерифе, имеет смысл заранее понять, что посетить на Тенерифе и какие объекты действительно достойны внимания. К примеру, парк Monkey Park Tenerife и плавательные зоны Lago Martianez в Пуэрто де ла Крус – замечательные места для отдыха с семьёй. Не обойдите стороной посетить курортный пляж Тереситас и легендарное драконовое дерево, а для любителей активного отдыха важной будет информация о линии bus tenerife и расписании teneriffa bus 343 fahrplan.
Более того, если интересно, как спланировать поездку на Празднование Карнавала на Тенерифе 2025 года (carnevale tenerife 2025, karnawał na teneryfie 2025), рекомендую посмотреть программу programme carnaval tenerife 2025 и добавочные советы по транспорту и экскурсиям. Для комфорта ориентирования на картографическом материале канарских островов и нахождения маршрутов станет полезным этот веб-ресурс: флориш . Равным образом стоит сосредоточиться на метеоусловия, скажем, погода на Тенерифе в предзимний период и март, чтобы основательнее подготовиться к перемещению.
Discover the best slot machines with mrlucky88.
Joining the gaming community under the name mrlucky88 opened various opportunities.
этот контент krab1at
здесь Усн, осно
диплом медсестры с аккредитацией купить диплом медсестры с аккредитацией купить .
Hiking tours Turkey A great company that truly cares about guests. https://kamaleyeoptics.com?p=3452
Доброго!
Современные технологии позволяют купить постоянный виртуальный номер за минуту. Каждому нужен купить постоянный виртуальный номер для безопасности личных данных. Сейчас самое время купить постоянный виртуальный номер без лишних документов. купить постоянный виртуальный номер — это цифровая свобода и приватность. Вы можете купить постоянный виртуальный номер для регистрации в любых сервисах.
Полная информация по ссылке – https://sanktpeterburgweb.ru/virtualnye-nomera-dlya-indonezii-kak-vybrat-i-podklyuchit/
постоянный виртуальный номер для смс, купить виртуальный номер для смс навсегда, купить виртуальный номер навсегда
купить виртуальный номер, постоянный виртуальный номер для смс, купить виртуальный номер навсегда
Всего наилучшего и комфорта в общении!!
Hey there everyone! If you’re keen on uncovering your particular color season, resources like Color Analysis Pro and seasonal color analysis quizzes can be a perfect start. For example, the deep summer color palette has some gorgeous muted tones that function really well for folks with an amber skin tone or olive skin color. Studying skin tone charts and skin complexion charts can also assist you determine if you lean towards a cool winter color palette, light spring color palette, or maybe even a soft autumn color palette.
When using programs like Color Analysis Pro or color analysis.pro, you can also check out features like virtual hair color try ons and AI color analysis free to see which hair colors or clothing colors suit your yellow undertone skin or neutral skin tone perfectly. If you want to investigate further or need guidance cancelling subscription options like color analysis pro cancel subscription, look at this resource what season colors am i for more suggestions on seasonal colour analysis and skin tone color charts.
Try your hand at online games on 125win and win big prizes!
Players can reach the team via various channels including chat, email, and phone calls.
купила диплом врача видео http://r-diploma28.ru .
Ankara tour packages Excellent experience from beginning to end. https://narsingditv.com/?p=2357
https://mega-store.asia/ – NEW WEBSITE HERE!!! mega HERE
**ignitra**
ignitra is a premium, plant-based dietary supplement created to support healthy metabolism, weight management, steady energy, and balanced blood sugar as part of an overall wellness routine
Such a well-structured and engaging article. Thank you!
**neuro sharp**
neurosharp is a next-level brain and cognitive support formula created to help you stay clear-headed, improve recall, and maintain steady mental performance throughout the day.
**finessa**
Finessa is a natural supplement made to support healthy digestion, improve metabolism, and help you achieve a flatter belly.
Backbiome is an advanced daily wellness supplement formulated to help support spinal comfort, reduce feelings of built-up tension, and promote freer, smoother movement throughout backbiome everyday life.