
Water conservation is no longer optional—it’s essential. Whether you’re managing a homestead, garden, or simply planning ahead, elevated tanks and cisterns are an efficient and eco-friendly way to store water using the power of gravity. But many homeowners and gardeners hesitate, unsure how to transport and install them correctly.
This guide will walk you through every step: from selecting the right model to lifting and securing it—without costly mistakes or safety risks.
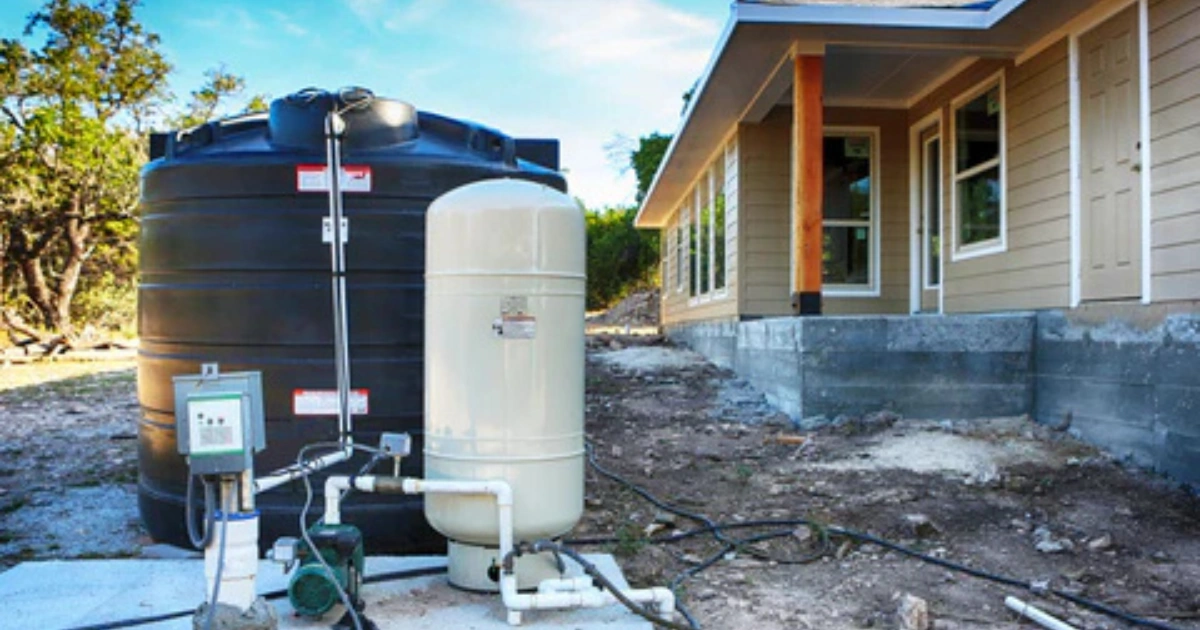
🌍 Why Choose an Elevated Tank or Cistern?
An elevated water storage system relies on gravity to create water pressure—no need for electric pumps. This makes it perfect for:
- Irrigating your garden
- Providing emergency water supply
- Collecting rainwater efficiently
- Boosting water pressure naturally
If you’re already using methods like rainwater harvesting, elevated tanks are a natural next step. (Check out this guide on rain-saving tips from Secrets of the Green Garden.)
🧠 How to Choose the Right Tank or Cistern
Here are a few factors to consider before investing:
1. Tank Size
- 500–1000 liters: small gardens or household backup
- 1000–5000 liters: medium-size use
- 5000+ liters: large-scale or community needs
2. Material
- Plastic (polyethylene): Lightweight, UV-resistant, affordable
- Metal (galvanized or stainless): Long-lasting, durable, but heavier
- Concrete: For permanent installations, but harder to move
3. Usage Type
- Drinking water: food-safe, sealed, opaque tanks
- Garden/utility use: open-top or opaque poly tanks
4. Shape
- Vertical cylinders: better for gravity
- Horizontal tanks: more stable on low stands
5. Budget and Transport
- Remember: larger tanks might need professional transport or lifting tools
🧰 Tools & Materials Checklist
Here’s what you’ll need for safe transport and installation:
- 📦 Tank or cistern
- 🧤 Gloves
- 🛠️ Wrench and screw set
- 📏 Level
- 🧱 Concrete base or bricks
- 🪜 Ladder or scaffold
- 🛻 Pickup or flatbed trailer
- 🏗️ Rope, straps, or ratchet ties
- 🌧️ Rainwater diverter system (if applicable)
🪜 Step-by-Step Guide: Transporting and Installing an Elevated Water Tank
1️⃣ Prepare the Base
- Clear and level a solid foundation (gravel, concrete, or paving blocks).
- Make sure it’s strong enough to hold a full tank (1L of water = 1kg).
- For tall tanks, consider anchoring the base to avoid toppling.
2️⃣ Transport Safely
- Use a flatbed trailer or strong pickup truck.
- Secure with ratchet straps, ensuring no movement during transport.
- Protect plastic tanks from heat or sharp corners during travel.
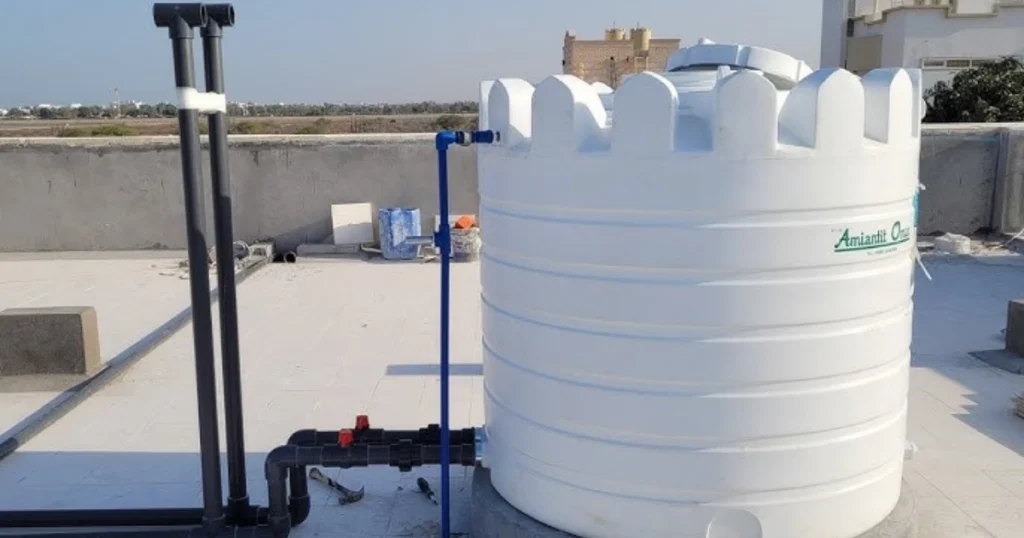
3️⃣ Build the Elevated Structure
- Use metal stands, treated timber, or concrete platforms.
- Height: at least 1 meter for decent pressure (for showers/sprinklers).
- Use a spirit level to ensure balance—an uneven base leads to tipping.
4️⃣ Place the Tank Carefully
- Use multiple people or mechanical assistance to lift.
- Never roll the tank on its side, especially on rough terrain.
5️⃣ Install Pipes and Fittings
- Attach an outlet tap at the bottom.
- If using rainwater: install a first-flush diverter to keep the water clean.
- Use Teflon tape or silicone to seal all fittings.
6️⃣ Test for Leaks
- Fill the tank halfway, check all connections.
- Tighten fittings gently—don’t overtighten plastic parts.
7️⃣ Connect to Use
- Use hoses, gravity-fed drip lines, or garden taps.
- Optional: connect overflow pipe to another tank or soakaway.
⚠️ Common Mistakes to Avoid
- Skipping base preparation: uneven bases can crack your tank
- Overloading elevated stands: always calculate full water weight
- Installing in direct sun without UV protection
- Using untreated timber: leads to rot and instability
- Poor sealing of fittings: leads to leakage or pressure loss
💧 Benefits of Elevated Water Storage
- Saves electricity—no pump required
- Water always available—even during outages
- Encourages water saving and rainwater use
- Reduces your garden’s dependence on municipal water
🌦️ Seasonal and Regional Tips
In cold climates: insulate pipes and cisterns to prevent freezing
In dry zones: install large-capacity tanks with shade cover
In tropical regions: use mosquito-proof screens on tank openings
Windy areas: anchor tanks and stands securely against tipping
🔗 Internal Resource Highlight
Looking to build your own tank stand? Don’t miss this guide on DIY garden structures—perfect for creating a stable base for your cistern.
❓ Frequently Asked Questions
What is the best base for an elevated tank?
Concrete slabs or compacted gravel are ideal. The base must be level and strong enough to support full weight.
Can I install an elevated tank myself?
Yes, if it’s under 1000L. For larger sizes, use professional help or lifting tools.
How high should the tank be for good pressure?
For gravity-fed systems, 1 meter gives ~0.1 bar. For decent pressure, go 2 meters or more.
How do I prevent algae or pests?
Use sealed, opaque tanks. Add mosquito mesh and clean the system every 6 months.
What’s the difference between a cistern and a tank?
A cistern usually refers to large underground or ground-level containers, while tanks can be elevated and come in various materials.
🙌 Final Thoughts: Start Storing Smart
Installing an elevated water tank or cistern is one of the smartest and most sustainable upgrades you can make for your home or garden. With a bit of planning and careful installation, you’ll enjoy free water, better pressure, and peace of mind.
Have you installed a tank before? Got tips or questions? Share your thoughts below—we’d love to hear your experience! And don’t forget to share this article with friends who might benefit.
932901 565470Sweet web web site , super style and design , rattling clean and utilize genial . 899992
572875 850829Will you care and attention essentially write-up most with the following in my webpage in essence your site mention of this blog? 267996
https://t.me/s/iGaming_live/4864
برای دوستانی که به دنبال یک راهکار مطمئن برای وریفای حساب در بروکرهای فارکس هستند، پیشنهاد میکنم خدمات شوپی را بررسی کنند. این مجموعه به صورت تخصصی، وریفای قانونی حساب های فارکس را با مدارکی ارائه میدهد که کاملاً معتبر بوده و به نام خودتان صادر میشود. این روش دائمی است و ریسک بلاک شدن حساب شما را به صفر میرساند. کیفیت و پشتیبانیشان واقعاً عالی است.
https://t.me/s/Volna_officials
Theo iGaming Asia (2024), 888slot apk thuộc Top 5 nhà cái phát triển nhanh nhất khu vực, với mức tăng trưởng người dùng lên tới 62%/năm. TONY12-15
Das Casino liegt direkt am Flughafen und ist daher
leicht zu finden und gut erreichbar. Leider wird hier aber kein Poker angeboten,
und auch Baccarat konnte ich nicht spielen. Die Spielhalle ist
täglich geöffnet und Besucher können neben besten Tablegames und Casino Slots auch um interne Jackpots mitspielen. Grand Casino Bern wurde von der ESBK
mit einer A-Konzession ausgestattet und bietet damit vernetzte Jackpots, Slotautomaten und eine Menge
Tischspiele an. Den Sieg konnte ich zwar nicht erringen, aber ich habe es immerhin geschafft,
mich in die Geldränge zu spielen. Die Tickets für diese
Events sind entweder direkt im Casino oder online auf dessen Internetseite
erhältlich.
Dann spielen Sie jetzt online! Tickets für Veranstaltungen im Stadtcasino Basel können Sie
online direkt bei den jeweiligen Veranstaltern erwerben. Wenn du dich entscheidest, um echtes Geld zu spielen, stelle bitte sicher, dass du nicht mehr spielst, als du
es dir finanziell leisten kannst zu verlieren. Casinospieler erhalten präzise Informationen über sichere Online-Glücksspiele und Online-Casinos in der Schweiz.
Dank seiner Erfahrung und fundierten Kenntnisse in diesen Bereichen liefert er wertvolle Informationen für Casinospieler
in der Schweiz. Das Casino in Basel zählt zu den insgesamt 11 Casinos, bei denen die Spieler bereits ab einem Schweizer
Franken um den riesigen Schweizer Jackpot spielen können.
Die Tischspiele wie Black Jack, Roulette und Ultimate Texas Hold’em öffnen ab 14.00 Uhr.
Das Grand Casino Basel bietet ein umfangreiches
Entertainmentprogramm an. Zwar spielt man nicht gegen andere Spieler, aber der
Croupier ist mindestens eine genauso große Herausforderung.
Wenn man also alle Chips verspielt hat, dann kann man mit einem bestimmten Geldbetrag erneut Chips kaufen und somit wieder am Turnier teilnehmen.
References:
https://online-spielhallen.de/izzi-casino-freispiele-alles-was-sie-wissen-mussen/
Mit den E-Wallets von Neteller und Skrill
lässt sich der Willkommensbonus nicht aktivieren. Hierbei kannst du dir mit einer Mindesteinzahlung von 20€
einen 100% Bonus bis zu 200€ abholen, sofern du dich für Sportwetten interessierst
und den angebotenen Casino Bonus nicht nutzen möchtest.
Das Beste daran – der reguläre Willkommensbonus beträgt lediglich 500€.
Neben einem Bonusguthaben von bis zu 2.500€ kannst du dir auch bis zu 250 Freispiele sichern.
Teilnahme ist einfach – spiele die ausgewählten Slots und sichere dir automatisch die Chance auf große Gewinne.
Spinrollz bietet seinen Spielern regelmäßig attraktive Aktionen,
die das Spielvergnügen erhöhen und zusätzliche Gewinnchancen schaffen. Die Freispiele werden in Häppchen über mehrere Tage verteilt (z. B.
40 bis 60 pro Tag), um den Spielspaß zu verlängern. Mit dem Willkommenspaket aus 100 % Bonus bis zu 500 € + 200 Freispiele +
1 Bonus Crab ist der Einstieg direkt spannend. Alternativ bietet die PWA-Variante App-ähnliche Bedienung ohne Store-Download.
Zur Wochenmitte können Sie mit einer Einzahlung von €20 Freispiele auf ausgewählte Slots
der Woche erhalten. Die Freispiele werden über zehn Tage hinweg in Paketen zu je
20 vergeben. Neue Spieler erhalten einen 100 % Bonus auf ihre erste Einzahlung bis zu €500
sowie 200 Freispiele. Entdecken Sie, welche Belohnungen und Promotionen SpinRollz auf unserer offiziellen Glücksspielseite bietet.
References:
https://online-spielhallen.de/exklusiver-irwin-casino-promo-code-sichern-sie-sich-ihre-vorteile/
https://t.me/s/kazino_s_minimalnym_depozitom/14
Crown Casino offers a wide range of reliable,
fast, and secure payment options for all players. All pokies are
optimized for mobile play, so whether you’re on the couch
or on the move, the reels are just a tap away.
From classic three-reel favorites to the latest video slots packed
with bonus features and cutting-edge graphics, we’ve
got something for every type of player.
I’ve played at a lot of casinos, and Crown Casino has
some of the best table game setups I’ve seen. Crown Casino delivers a high-end casino experience with great service and a
luxury vibe. Offering fast payouts and secure transactions,
Crown Casino ensures seamless gameplay across all devices,
especially on mobile. Many players use this model in social
gaming and it fits the easy-to-use layout of Crown Casino.
Highly recommend for anyone looking for a fun, legit sweepstakes casino.
The slots run perfectly on my iPhone, and the site is
super fast. I redeemed my Sweeps Coins for cash and had the money in my bank account within 48 hours!
I signed up, got my free coins, and hit a jackpot within days.
Play using Gold Coins for fun or Sweeps Coins for the
chance to redeem real cash prizes, 100%
legally in most U.S. states.Get started with 100,000
Gold Coins + 2 FREE Sweeps Coins when you sign up.
References:
https://blackcoin.co/casino-rsm-club-in-depth-review/
Một số dòng game nổi bật phải kể đến tại asia slot365 login phải kể đến như baccarat, rồng hổ, xì dách, xóc đĩa, xì tố, poker,….đều có mặt. Các dealer nữ xinh đẹp, được đào tạo bài bản chuyên nghiệp, nóng bỏng luôn đồng hành và chắc chắn không làm anh em thất vọng. TONY12-26
Progressive mega jackpots, fixed jackpots with max wins of over 25,
000x, Hold & Win jackpot games… you name it – Ricky Casino has
it. The 40x wagering requirements for the welcome bonus are within the industry standards, but some of
its competitors, like King Billy, offer a lower WR of 30x.
While we’re at it, I can also confirm that not only are the payments reliable, but DragonSlots provides the quickest crypto withdrawals of
all AU casinos.
Here at NoDepositKings we feature safe and reliable casinos and update our list daily.
When it comes to land-based casinos things are different. However,
understand that this law targets operators, not individual players.
That is because operators are not allowed to open up internet gambling sites that specifically target Australians.
Players need to know that they are allowed to place online bets
and won’t face any legal repercussions for doing so as
long as the site they are gambling on isn’t located in Australia.
References:
https://blackcoin.co/plinkocasino-a-complete-overview/
The platform partners with top-tier software providers, delivering over
2,000 games, including pokies, table games, and live dealer options.
You may effortlessly accessthese games on your mobile device
and enjoy live gaming from the comfortof your home. We’ll go over all you need to know about games,
bonuses,payment methods, and more in this review of RocketPlay Casino so you canplay comfortably.
The combination of over 2,500 games from 50+ providers, cryptocurrency support, and exceptionally fast withdrawal processing creates
a compelling value proposition for Canadian players.
RocketPlay Casino supports various deposit and withdrawal options, including credit cards, e-wallets, and
cryptocurrencies. The casino frequently updates its promotional calendar, ensuring
continuous rewards for regular players. The
VIP program rewards loyal players with exclusive benefits,
such as higher withdrawal limits, personalized promotions, and dedicated customer
support. In addition to welcome bonuses, RocketPlay Casino features weekly promotions, free
spin rewards, cashback offers, and high-stakes tournaments.
A second deposit bonus offers a 200% match up to AUD 1,000,
requiring a minimum deposit of AUD 50.
References:
https://blackcoin.co/imperial-poker/
He’d been running a dodgy scrap metal business, and used fire bombings to scare clients
to sell him scrap metal at a cheaper price. The infamous mobster was arrested numerous times; he’d been convicted for everything from criminal mischief to assault.
To start things off- he assaulted Victoria Gotti, who is the daughter of John Gotti.
Facebook marketplace then provides you with a shipping label complete with the home address of the buyer.
Once you’ve sold an item, you’ll receive a notification from Facebook that you
have items to ship. Using a prepaid shipping label from the marketplace is typically easier than creating your own shipping label because Facebook will provide the shipping label
for you. The item could be shipped through FedEx, UPS, USPS, or
another shipping provider. You’ll want to choose the shipping method that makes
sense for you based on the shipping carriers you
prefer to use and how you want to present the shipping costs to your buyers.
You can sell items that you find at yard sales, or even household items that you no longer use around your own home.
“I don’t know how things change, but something does. He asked me on a date. We went out for dinner. Then it was slightly different. I’m really, really happy. John and I are having such a nice time but we’re taking things slowly. There are lots of other people to consider.” Last December, she claimed that the
presenter made ‘rude joke after rude joke’ during her time on MasterChef.
While John has remained mostly tight-lipped on his
former co-star Wallace’s behaviour on-set, his wife has
spoken out about what she witnessed on the show.
The TV chef has found himself embroiled in the scandal engulfing his shamed MasterChef co-star Gregg Wallace, who has been sacked
by the BBC after multiple allegations of misconduct were upheld following a seven-month investigation. Despite both being wed to different partners at
the time, their friendship developed into romance, with John, 59, capturing Lisa’s heart through a touching love letter.
References:
https://blackcoin.co/sol-casino-in-depth-review/
australian online casinos that accept paypal
References:
kairoskonnectinc.com
online casino paypal
References:
centerdb.makorang.com
australian online casinos that accept paypal
References:
https://reputable.cc/profile/samuellangston
australian online casinos that accept paypal
References:
http://www.leeonespa.com/bbs/board.php?bo_table=free&wr_id=7998
online casino paypal einzahlung
References:
https://bengalhive.com/employer/the-best-australian-payid-gambling-portal/
casino online uk paypal
References:
https://www.cbl.health/employer/real-money-online-casinos-in-australia-for-2025/
اکثر شمارههای خارجی بعد از مدت کوتاهی از کار میافتند چون مجازی یا اجارهای هستند. اگر دنبال راهی مطمئن برای داشتن شماره دائمی و بدون مسدودی هستید، از سیم کارت فیزیکی کانادا شوپی استفاده کنید. شماره شما برای همیشه فعال باقی میماند و تمام پیامکهای امنیتی و تراکنش را با موفقیت دریافت میکند.
В джунглях азарта, где любой сайт норовит заманить обещаниями быстрых выигрышей, рейтинг надежных онлайн казино
является как раз той ориентиром, которая проводит мимо ловушки подвохов. Игрокам профи и дебютантов, что пресытился из-за пустых посулов, такой средство, дабы увидеть настоящую выплату, будто вес золотой монеты на ладони. Минус лишней болтовни, только реальные площадки, там выигрыш не только показатель, но конкретная везение.Собрано по гугловых поисков, будто ловушка, что захватывает наиболее горячие веяния в интернете. Тут минуя пространства для стандартных фишек, каждый момент как ставка в столе, где подвох раскрывается сразу. Игроки видят: на России стиль разговора и сарказмом, там сарказм скрывается как рекомендацию, даёт миновать ловушек.На http://www.don8play.ru такой топ лежит как открытая колода, приготовленный к старту. Посмотри, когда хочешь увидеть пульс реальной игры, минуя обмана да разочарований. Для тех ценит ощущение выигрыша, он будто иметь ставку в ладонях, минуя пялиться на дисплей.
Backbiome is an advanced daily wellness supplement formulated to help support spinal comfort, reduce feelings of built-up tension, and promote freer, smoother movement throughout backbiome everyday life.