
Introduction
For gardening enthusiasts looking for innovative methods to optimize plant growth, conserve space, and simplify plant maintenance, the Pot-in-a-Pot method is a game changer. This technique involves placing a smaller container inside a larger one, both buried in the ground. This clever setup offers a range of benefits—from better temperature control to the flexibility of replacing plants. In this guide, we’ll walk you through the process and share the advantages of using the Pot-in-a-Pot method in your garden.
What Is the Pot-in-a-Pot Method?
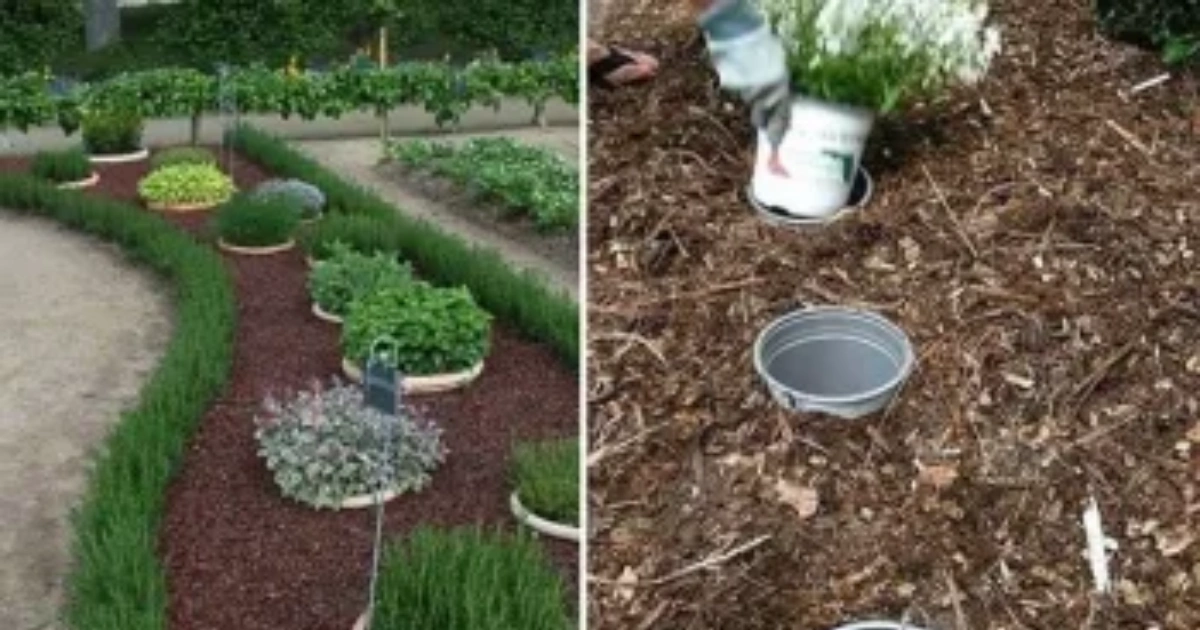
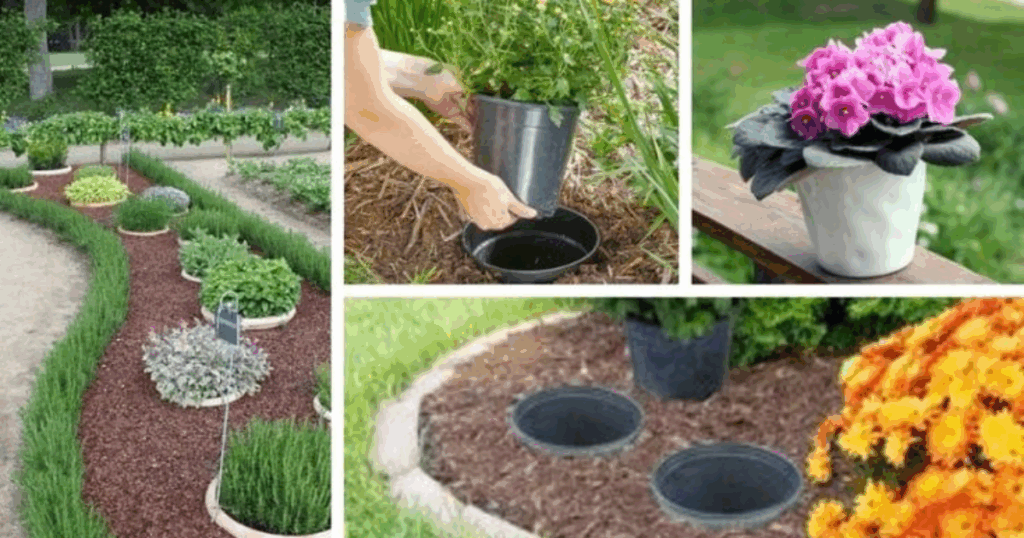
The Pot-in-a-Pot method is a gardening approach where a smaller pot, containing a plant, is placed inside a larger, partially buried container. Here’s why it works so well:
- Temperature Control: The larger pot insulates the smaller pot, keeping plant roots safe from extreme temperature fluctuations, particularly in regions with harsh summers or winters.
- Improved Drainage: By using two pots, excess water drains from the inner pot into the outer one, preventing root rot and allowing for better airflow.
- Ease of Plant Replacement: Changing out plants becomes easier since the inner container can be swapped out without disturbing the rest of your garden setup.
This method is particularly useful for gardeners with limited space or those looking to create a more manageable gardening system.
Benefits of the Pot-in-a-Pot Method
The Pot-in-a-Pot method provides several key advantages that can enhance your gardening experience:
- Enhanced Root Health: The dual-pot system promotes better air circulation and drainage, essential for maintaining healthy root systems.
- Protection from Pests: By elevating plants off the ground, you can deter pests from accessing plant roots, protecting them from potential damage.
- Flexibility in Planting: This method allows you to swap out plants according to the seasons, providing flexibility in both aesthetic appeal and plant health.
- Space Optimization: The Pot-in-a-Pot method is perfect for small spaces or urban environments where planting area is limited. It allows you to grow a variety of plants without taking up too much room.
Step-by-Step Guide to Implementing the Pot-in-a-Pot Method
Here’s how you can easily implement the Pot-in-a-Pot technique in your garden:
1. Select Appropriate Pots
Choose two pots: one smaller and one larger. The smaller pot should fit comfortably inside the larger one with enough space for water drainage. It’s important to ensure the smaller pot has proper drainage holes.
2. Prepare the Outer Pot
Dig a hole in the ground to accommodate the larger pot, ensuring that its rim is level with the surface of the soil. This helps with drainage and ensures the larger pot stays in place.
3. Position the Inner Pot
Place the smaller pot inside the larger one, then fill the smaller pot with your chosen soil mix. Make sure the pot is stable and well-positioned within the larger container.
4. Mulch Around the Pots
Add a layer of mulch around the outer pot to retain moisture, protect the roots from temperature extremes, and help with weed control.
5. Watering
Water the inner pot regularly, and any excess water will drain into the larger pot. Ensure the water level doesn’t accumulate too much in the outer pot to avoid overwatering.
Common Mistakes to Avoid
While the Pot-in-a-Pot method is simple, there are a few things to keep in mind to avoid common pitfalls:
- Incorrect Pot Sizes: The inner pot should be smaller than the outer pot to allow for drainage. Avoid using pots that are too large or too small, as this can impede the proper flow of water.
- Poor Drainage: Ensure both the inner and outer pots have drainage holes to prevent water buildup. Without proper drainage, root rot could occur.
- Overwatering: Although the method helps with drainage, overwatering can still harm plants. Be sure to monitor soil moisture levels and adjust watering accordingly.
Seasonal Tips for Pot-in-a-Pot Gardening
The Pot-in-a-Pot method is versatile and can be adjusted for seasonal gardening. Here’s how to adapt the technique throughout the year:
- Spring: Perfect for planting annuals or vegetables that thrive in warmer temperatures. Swap out your plants to match seasonal preferences.
- Summer: Use the method to protect plants from the scorching heat. The dual pots offer insulation and water retention, keeping plants hydrated and protected.
- Fall: Transition to seasonal plants, like fall flowers or cool-weather vegetables. You can use the Pot-in-a-Pot method to help protect plants from early frost.
- Winter: In colder climates, the dual-pot system provides insulation, protecting plant roots from freezing temperatures. You can also move some of your container plants indoors for the winter.
Tools and Materials Checklist
To get started with the Pot-in-a-Pot method, you’ll need a few key items:
- Two pots of varying sizes (preferably made of durable, weather-resistant material)
- Shovel for digging
- Quality soil mix (loamy soil with organic matter)
- Mulch for moisture retention and temperature regulation
- Watering can or hose
FAQs
Q1: Can I use this method for all types of plants?
- A1: Yes, most plants will thrive in this setup, especially those sensitive to temperature fluctuations or prone to root rot. However, it’s best suited for plants that don’t require a lot of root space, such as herbs, flowers, and compact vegetables.
Q2: How often should I replace plants in the Pot-in-a-Pot method?
- A2: The frequency of plant replacement depends on the plant’s life cycle and your gardening preferences. Many gardeners choose to swap out plants seasonally or whenever they notice poor growth or damage.
Q3: Is this method suitable for indoor gardening?
- A3: Absolutely! The Pot-in-a-Pot method is ideal for indoor spaces, especially for houseplants that need to be moved around for optimal sunlight. You can also use this method for decorative plants.
Q4: Can I use large pots for the inner container?
- A4: It’s better to use a moderately sized pot for the inner container to allow for proper drainage. Using excessively large pots might affect water distribution, so make sure there’s enough room for the plant roots to spread out comfortably.
cheap amoxil without prescription – https://combamoxi.com/ amoxicillin order
order forcan online cheap – https://gpdifluca.com/# fluconazole oral
cenforce 100mg price – order cenforce 50mg for sale generic cenforce
cialis super active reviews – https://ciltadgn.com/# pharmacy 365 cialis
cialis professional ingredients – https://strongtadafl.com/ cialis ingredients
viagra sale forum – on this site mail order viagra legitimate
This is the kind of topic I enjoy reading. fildena 100 espaГ±ol
The vividness in this piece is exceptional. https://buyfastonl.com/amoxicillin.html
More posts like this would make the online space more useful. https://ursxdol.com/get-cialis-professional/
More posts like this would force the blogosphere more useful. https://prohnrg.com/product/diltiazem-online/
Thanks for sharing. It’s top quality. stromectol posologie gale
More posts like this would add up to the online time more useful. https://ondactone.com/product/domperidone/
This is the kind of glad I enjoy reading.
order tamsulosin pills
This is a keynote which is near to my fundamentals… Myriad thanks! Faithfully where can I lay one’s hands on the acquaintance details in the course of questions? http://bbs.51pinzhi.cn/home.php?mod=space&uid=7053881
brand dapagliflozin 10mg – https://janozin.com/ order forxiga without prescription
orlistat tablet – purchase xenical without prescription order orlistat 120mg online cheap
This is the amicable of glad I enjoy reading. https://myvisualdatabase.com/forum/profile.php?id=118760
You can conserve yourself and your ancestors nearby being wary when buying prescription online. Some pharmacy websites operate legally and offer convenience, secretiveness, bring in savings and safeguards over the extent of purchasing medicines. buy in TerbinaPharmacy https://terbinafines.com/product/nizoral.html nizoral
I couldn’t resist commenting. Adequately written! site
More articles like this would pretence of the blogosphere richer.
https://t.me/officials_pokerdom/3734
https://t.me/s/officials_pokerdom/3647
https://t.me/s/Martin_officials
Deswegen sind alle Arten von Casinospielen von Spielautomaten bis zu Live Casino Spielen uneingeschränkt verfügbar. Sollten Sie im Verde Casino 25 Euro Startguthaben einsetzen oder mit einem anderen Bonus spielen, dann empfehlen wir zunächst, die Liste der ausgeschlossenen Titel zurate zu ziehen. Die Umsatzbedingung für den Guthabenbonus beträgt x40, die der Freispiele hingegen nur x30. Nicht nur einen, sondern gleich mehrere Bonuspunkte kann sich die Spielbank mit dem Willkommensbonus sichern, den Kunden bald für ihre Einzahlungen erhalten können. Beide ermöglichen den Kunden eines Casinos, Spiele mit echten Geldeinsätzen zu spielen. Der Anbieter gibt bei den gratis Freispielen ähnliche Voraussetzungen wie beim Startguthaben vor.
Gönn dir eine Pause, wenn nötig, um dein Spielverhalten bewusst zu steuern. Spieler erhalten Gratiswetten, verbesserte Quoten oder Cashback auf verlorene Tipps. Ein Verde Casino Promo Code beschränkt sich nicht nur auf Slots oder Tischspiele. Besonders wertvoll sind solche Aktionen, wenn sie Freispiele oder Startguthaben ohne Einzahlung bieten. Diese Form ist beliebt, weil Spieler sofort Freispiele oder kleines Startguthaben bekommen – ohne Einzahlung.
References:
https://online-spielhallen.de/lukki-casino-login-ihr-tor-zur-unterhaltung/
Also, the AU online casino should offer a variety of deposit and withdrawal methods to suit many players. We have listed the best casino sites in Australia that will offer top baccarat games and generous bonuses. Roulette is one of the original games at land-based casinos, and you will be hard-pressed to find an online casino that does not offer this game.
Some games can be immersive, and you can easily lose track of time. When you’re gambling online, an unstable connection is problematic, so I suggest upgrading your plan or switching providers if your internet isn’t stable. No round-trip to casinos, no dressing up, and you don’t even need to be on a PC. This is a variety that you won’t find in land-based casinos. When given a choice, I would choose playing at an actual casino 10 out of 10 times.
All the games at real-money Australian online casinos that are powered by famous software providers are completely safe to play, with 100% randomized outcomes on each wager. Table games are the heart of any Australian online casino to win real money, offering a classic gambling experience. Choosing the right deposit methods at online casinos that accept Australian players is crucial for a smooth and secure gaming experience. Bonuses attract many players to Australian online casinos, ranging from welcome bonuses to free spins and no deposit bonuses. Almost all online casinos in Australia offer craps to players because it’s such a popular game for many Aussie players.
References:
https://blackcoin.co/roll-xo-online-casino-official-site-with-pokies-and-games/
Hot Pots Master and Fruit Savers, for example, headline recent drops in both regular and bonus play. The Playcroco lobby spotlights recurring new launches, many tied to fresh free spin promotions. Demo mode is widely available, with a “play for fun” option on most entries to help players familiarise themselves with gameplay and features without financial risk.
If not, there are prepaid cards, online payments, cryptocurrency, and bank transfers for your deposits and withdrawals. Some are found in the casino’s promotions area. There’s also a contest where a depositing player wins a $777 free chip. Players have won more than $20,000 playing Bubble Bubble slots and $24,000 on Asgard slots. If you enjoy Ancient Egypt slots, find games like Cleopatra’s Gold.
References:
https://blackcoin.co/casino-utan-svensk-licens-jamfor-alla-basta-casinon-utan-spelpaus/
usa casino online paypal
References:
https://precisionscans.net/employer/us-online-casinos-that-accept-paypal-2025/
us online casinos that accept paypal
References:
https://vieclam.kr/bbs/board.php?bo_table=free&wr_id=333
http://images.google.ki/url?q=https://t.me/s/officials_7k/998
В джунглях игр, где любой площадка пытается зацепить гарантиями простых джекпотов, рейтинг онлайн казино россии
превращается той самой путеводителем, что направляет через ловушки рисков. Тем профи да начинающих, которые устал из-за пустых заверений, такой инструмент, дабы ощутить реальную отдачу, будто тяжесть выигрышной монеты у ладони. Обходя ненужной воды, просто проверенные площадки, там rtp не лишь число, но конкретная везение.Подобрано из поисковых поисков, словно ловушка, что захватывает топовые горячие тренды в интернете. В нём отсутствует пространства для шаблонных фишек, любой пункт как ставка у игре, где блеф раскрывается мгновенно. Профи видят: на стране стиль разговора на сарказмом, в котором ирония скрывается под намёк, помогает миновать ловушек.На https://heylink.me/don8play данный рейтинг ждёт словно раскрытая колода, готовый для раздаче. Посмотри, коли желаешь увидеть пульс подлинной азарта, без иллюзий и провалов. Для кто любит тактильность приза, такое словно иметь ставку у пальцах, минуя смотреть по экран.
top 10 online casinos usa
casino online for real money
online casino minimum deposit
betmgm New Hampshire betmgm-play betmgm LA
Step boldly into arenas of chance and strategy. In crowncoincasino, esports betting adds modern twists. Bet on the future and win!
Feast on massive potential in Sweet Bonanza: scatters trigger free spins sweet bonanza pragmatic play, bombs multiply prizes sky-high. One spin can deliver thousands of times your bet. Play and prosper!
Prairie power meets slot perfection in one game. bull and games offers endless free spins, 27x multipliers, and epic payout potential. Join the hunt!
No deposit, no problem — macumba gives you free Sweeps Coins to start winning. Enjoy top-tier games and real cash prize potential. Sign up free!
From Bitcoin to Dogecoin to Solana — Stake accepts them all with zero fees on stake original games most deposits. Play your way.
Dive into DraftKings casino review Casino today and claim your epic welcome package! Play just $5 to unlock 500 exciting spins on Cash Eruption games plus up to $1,000 back in credits if luck isn’t on your side in the first 24 hours. Experience top slots, live tables, and exclusive games—your crown awaits!
Opravdovalekarna.cz – kde se kvalita nepotkava s vysokou cenou
opravdovalekarna.cz
Join the millions enchanting momentous on fanduel casino real money – the #1 legitimate money casino app in America.
Respite c start your $1000 TEASE IT AGAIN bonus and refashion every twirl, hand and rolling into official readies rewards.
Permanent =’pretty damned quick’ payouts, immense jackpots, and day in action – download FanDuel Casino in these times and start playing like a pro today!
Where “one more spin” becomes prophecy – https://aranitidine.com/big-bass-bonanza-slot-review-2026-guide-from-a-15-year-igaming-vet/ , This place was built for exactly this version of you .
Votre pharmacie prГ©fГ©rГ©e pour une santГ© sereine et protГ©gГ©e – https://acceslibre.beta.gouv.fr/app/58-magny-cours/a/pharmacie/erp/pharmacie-du-circuit/ , Bien-ГЄtre naturel, mГ©dicaments et beautГ© rГ©unis chez nous .
Backbiome is an advanced daily wellness supplement formulated to help support spinal comfort, reduce feelings of built-up tension, and promote freer, smoother movement throughout backbiome everyday life.
Fiwfan has successfully established a thriving singles community in Thailand. This online dating website focuses on providing a safe and enjoyable environment for individuals seeking diverse connections. Thru regular updates, interactive activities, and a dedicated support team, Fewfan is not just a dating site; it is a social hub for those looking to expand their social network and potentially find the perfect partner.