
Rediscovering Nature’s Fences
Have you ever looked at your garden and wished for a boundary that was more than just functional — something that helps nature while looking rustic and beautiful? Enter the dead hedge: a centuries-old technique making a big comeback in eco-conscious gardening.
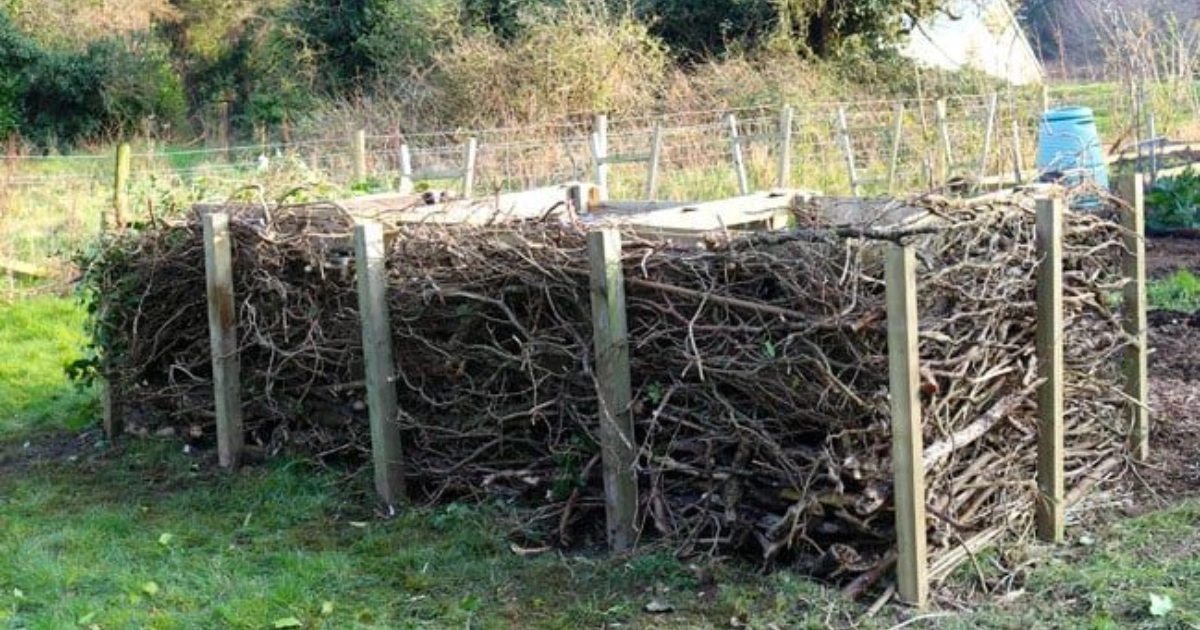
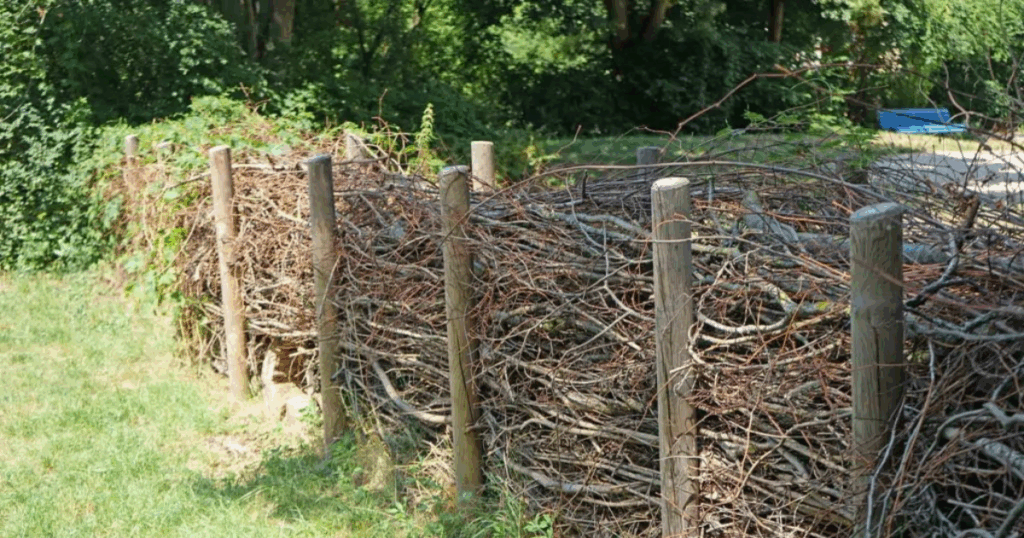
A dead hedge is a natural fence made by stacking woody debris, such as branches and twigs, between upright wooden stakes. Think of it as nature’s recycling project turned garden masterpiece. Not only does it define your space and provide privacy, but it also shelters countless species, from birds to insects, who struggle to find refuge in modern, sterile gardens.
In a world of plastic and concrete, a dead hedge brings something refreshingly earthy. Its rough, organic look blends seamlessly into a wildlife-friendly garden, creating a sense of harmony with the land. If you’re dreaming of an eco-resilient, budget-friendly, and wildlife-promoting structure, you’re in the right place.
👉 For more natural fencing ideas, check out the inspiring guides over on Secrets of the Green Garden to plan a truly wildlife-first backyard.
What Is a Dead Hedge?
At its core, a dead hedge is a pile of natural prunings and plant matter stacked between two rows of untreated wooden posts. The brushwood forms a dense, stable barrier, with the posts keeping everything in place.
This simple structure has a fascinating history. Farmers in medieval Europe often built dead hedges to keep livestock out of fields or to create quick protective screens. Today, gardeners use them to add a rustic border that doubles as a biodiversity magnet.
Unlike a living hedge (which consists of living shrubs and trees), a dead hedge reuses the woody material you’d otherwise discard. This makes it wonderfully sustainable. In other words, you turn pruning waste into a wildlife shelter — nature’s version of upcycling!
How to Build a Dead Hedge: A Step-by-Step Guide
Ready to build your own? Here’s a straightforward process to get started.
1. Choose the perfect spot
- Look for a flat, stable area
- Avoid locations with underground utilities
- Ideally, place it where wildlife will benefit most
2. Gather your materials
- Two parallel rows of untreated wood stakes
- Plenty of branches, twigs, and woody cuttings
- Pruning shears or loppers
- Gardening gloves
- A hammer or mallet
👉 See Wildlife-Friendly Gardening Tips for inspiration on selecting native branches that support your local insects and birds.
3. Set up the stakes
- Drive two rows of stakes into the ground, spacing them about 50 cm apart
- Make sure stakes are tall enough to hold the brush pile without tipping
- Hammer them deep so they stay stable
4. Start layering the branches
- Place larger, stronger branches at the bottom
- Criss-cross branches for strength
- Pack smaller twigs and leaves in between to create a dense fill
5. Compact and secure
- Gently press down with a rake to settle the materials
- Check that the pile is secure and doesn’t shift
- Top up over time as it naturally compresses
6. Maintain and replenish
- Check the hedge every season
- Fill gaps as organic matter decays
- Enjoy watching local wildlife move in!
Benefits of a Dead Hedge
Why should you consider a dead hedge over a standard fence or a plastic screen? The advantages are powerful:
✅ Biodiversity boost — Offers essential shelter for birds, hedgehogs, amphibians, and insects.
✅ Zero waste — Uses garden cuttings you’d otherwise throw away.
✅ Aesthetic charm — Rustic, natural style that fits beautifully in wildlife-friendly gardens.
✅ Cost-effective — You’ll spend virtually nothing if you reuse local prunings.
✅ Soil enrichment — As branches break down, they slowly feed your soil.
Seasonal & Regional Tips
🌸 Spring and Summer
- Best time to build, with plenty of fresh prunings
- Many animals start nesting — dead hedges become crucial shelters
🍂 Autumn and Winter
- Great for clearing garden debris
- Helps protect overwintering insects
- In cold climates, the hedge buffers wind
🌍 Regional Variations
- In wet areas, focus on rot-resistant wood
- In Mediterranean climates, prune olive or fig branches for a local touch
- In temperate Europe, hazel and willow are classic
Common Mistakes to Avoid
❌ Using treated wood — This can leach chemicals into your soil and harm wildlife.
❌ Building too narrow — A thin hedge may collapse quickly and offer little habitat value.
❌ Placing it near open flames or BBQs — Dead hedges can catch fire.
❌ Ignoring local regulations — Always check city codes if you live in an urban area.
Tools and Materials Checklist 🛠️🌿
✅ Untreated wooden stakes
✅ Pruners or loppers
✅ Hammer or mallet
✅ Heavy gloves
✅ Branches, twigs, leaf litter
✅ Compost bin nearby for excess
FAQs
How long does a dead hedge last?
Typically 5 to 7 years, depending on wood type and local weather.
Are dead hedges safe for urban backyards?
Yes, if you maintain them well and keep them away from fire sources.
Do they attract unwanted pests?
Generally no — dead hedges encourage beneficial insects and small mammals, but inspect regularly to avoid rodent nests.
Final Thoughts
A dead hedge is more than a fence — it’s a living contribution to your local ecosystem. It costs little, supports biodiversity, and recycles what you might otherwise throw away. Plus, it looks wonderfully rustic and natural.
👉 If you’d like more ways to design a wildlife-friendly garden, don’t miss these inspiring fencing ideas — they’ll spark even more creativity for your backyard!
Have you tried building a dead hedge? Share your experience below in the comments — let’s keep growing ideas together! 🌿
Demander à ChatGPT
Thank you, I’ve just been looking for information approximately this topic for ages and yours
is the greatest I’ve came upon so far. But, what about
the conclusion? Are you sure concerning the supply?
взгляните на сайте здесь кракен войти
Excellent site you’ve got here.. It’s hard to find excellent writing like yours nowadays.
I rezlly appreciate individuals like you! Take care!!
여성알바
такой [url=https://kra33–at.at/]кракен тор[/url]
Подбирая компании для квартирного перевозки важно проверять её наличие страховки и опыт работы .
Проверьте отзывы клиентов или рейтинги в интернете, чтобы оценить профессионализм исполнителя.
Сравните цены , учитывая расстояние перевозки , сезонность и услуги упаковки.
https://ferdinand.com.ua/forum/topics/zakazat-kvartirnyj-pereezd-s-gruzchikami-v-kieve.20983/
Требуйте наличия страхового полиса и уточните условия компенсации в случае повреждений.
Обратите внимание уровень сервиса: оперативность ответов, детализацию договора.
Узнайте, используются ли специализированные автомобили и упаковочные материалы для безопасной транспортировки.
проверика контрагента [url=www.proverit-kontragenta.ru]proverit-kontragenta.ru[/url] .
I enjoy, cause I discovered exactly wht I was taking a look for.
You’ve ended my 4 day lengthy hunt! God Blesss you
man. Have a great day. Bye
정보이용현금화
I like the valuable information you provide in your articles.
I’ll bookmark your weblog and check again here frequently.
I am quite certain I’ll learn lots of new stuff right here!
Best of luck for the next!
amoxicillin online order – https://combamoxi.com/ buy cheap amoxil
buy fluconazole 200mg pill – https://gpdifluca.com/ diflucan ca
cenforce buy online – https://cenforcers.com/# cenforce uk
cialis drug – https://ciltadgn.com/ cialis canadian pharmacy
how well does cialis work – strongtadafl difference between sildenafil and tadalafil
sildenafil 50 mg cost – order viagra from canada buy viagra in ottawa
The vividness in this piece is exceptional. https://buyfastonl.com/gabapentin.html
More articles like this would frame the blogosphere richer. online
More text pieces like this would insinuate the интернет better. https://ursxdol.com/amoxicillin-antibiotic/
More posts like this would create the online play more useful. https://prohnrg.com/product/orlistat-pills-di/
More delight pieces like this would insinuate the интернет better. https://aranitidine.com/fr/lasix_en_ligne_achat/
I couldn’t weather commenting. Warmly written! https://ondactone.com/product/domperidone/
Greetings! Very gainful suggestion within this article! It’s the scarcely changes which wish turn the largest changes. Thanks a a quantity towards sharing!
https://doxycyclinege.com/pro/sumatriptan/
More articles like this would frame the blogosphere richer. https://myrsporta.ru/forums/users/ovyar-2/
order dapagliflozin pills – https://janozin.com/ purchase dapagliflozin generic
orlistat pill – buy cheap generic xenical cheap xenical 120mg
This is the type of enter I turn up helpful. http://iawbs.com/home.php?mod=space&uid=916896
You can protect yourself and your ancestors close being wary when buying prescription online. Some pharmaceutics websites manipulate legally and provide convenience, secretiveness, sell for savings and safeguards for purchasing medicines. buy in TerbinaPharmacy https://terbinafines.com/product/sildalis.html sildalis
With thanks. Loads of conception! sibelium en ligne
I am in truth delighted to glitter at this blog posts which consists of tons of worthwhile facts, thanks towards providing such data.
https://t.me/s/RejtingTopKazino
Wir verwenden auf unseren Seiten Affiliate-Links und erhalten möglicherweise eine Provision für Kunden, die an Online Casinos verwiesen werden. Casino.guru sieht sich als eine unabhängige Informationsplattform über Online Casinos und Online Casinospiele, die von keinem Glücksspielanbieter oder irgendeiner anderen Instanz kontrolliert wird. Teilen Sie Ihre Meinung mit oder erhalten Sie Antworten auf Ihre Fragen. Die Situation konnte schließlich geklärt werden, nachdem der Spieler alle ausstehenden Beträge, einschließlich einer letzten Zahlung von 150 €, auf seinem Konto erhalten hatte. Ein Spieler aus Belgien konnte seine Gewinne in Höhe von 261 USDT aufgrund eines laufenden KYC-Verfahrens nicht abheben, obwohl er zuvor bereits erfolgreich Auszahlungen ohne KYC-Prüfung erhalten hatte. Der Spieler hat die Möglichkeit, die Beschwerde zu einem späteren Zeitpunkt erneut einzureichen, um weitere Unterstützung zu erhalten.
Mit über 3.000 Spielen von führenden Entwicklern finden sowohl Einsteiger als auch erfahrene Spieler hier ihre Lieblingsspiele. Als lizenziertes Online-Casino bietet die offizielle Website eine sichere Umgebung für Spieler, die Wert auf Transparenz und faire Bedingungen legen. Willkommen bei Immerion Casino – einer modernen Glücksspielplattform, die durch schnelle Registrierung und eine umfangreiche Spielauswahl überzeugt. Auf der Webseite sind direkte Links zu diesen Hilfsangeboten zu finden, wodurch Spieler bei Bedarf unkompliziert Unterstützung erhalten können.
References:
https://online-spielhallen.de/meine-detaillierten-locowin-casino-erfahrungen/
At online casinos, you can find secure banking options such as credit/debit cards, e-wallet solutions, and cryptocurrencies. From the classics like blackjack and roulette to innovative game shows, live dealer games provide a diverse set of options for players, all streamed in real-time with professional dealers. Instant play casinos can be accessed directly from your device’s web browser, offering immediate access to a wide range of casino games. On the other hand, e-wallets like PayPal and Skrill, along with Venmo, are popular among online casino players for their swift transaction processing and strong security features. These advantages make cryptocurrencies a go-to choice for many online casino players. Cryptocurrencies are an attractive banking option for online casino players.
Yes, the best online casino sites in Australia offer players the option to play games for free. This includes the classics like roulette, blackjack, craps, baccarat, sic bo, and other online casino games like online pokies with real money. The best Aussie online casinos let’s you deposit with a debit card so you can start playing games right away. When it comes to online casinos, finding the best bonuses can significantly enhance your gaming experience. Yes, the top-rated online casinos in Australia offer live dealer games from leading providers, such as Evolution.
References:
https://blackcoin.co/instant-casino-awaits-a-comprehensive-look/
Try your luck at the freshly rebuilt casino, which has a total area of 65,000 square feet. With award-winning restaurants and five bars, there’s plenty to do.
View current jackpot sums for games like Golden Dollars Grand, Dinomite, Highway Zone, Players Paradise Gold, and more. The hosts will gladly answer any questions you may have about membership requirements and advantages. There is no limit, and there is a buy-in ranging from $100 to $300 for Texas Hold ’em. On both the Main Gaming Floor and the Private Gaming Room, there are over 1,400 pokies and video poker machines, making it a pokies lover’s delight. Below we take you through what you can expect from the casino in detail. Many attractions are within walking distance of the casino, located on the picturesque Gold Coast.
With the redesigned private gaming rooms Sovereign and Oasis, the land based casino delivers the finest in premium gaming experiences. Mississippi stud poker, three card poker, Caribbean stud poker, and Texas Hold ’em bonus poker are among the poker games available on the casino floor. Only two poker tables are available in the poker room, with the majority of the games being Texas Hold ’em ($2/$3). After you’ve finished spinning the reels, walk over to the table games area to try your hand at your favorite table casino games. More information on premium membership access and advantages will be sent to eligible members.
References:
https://blackcoin.co/discover-avantgarde-casino/
online casino that accepts paypal
References:
http://qpskkk.shop/bbs/board.php?bo_table=free&wr_id=1933
best online casino usa paypal
References:
http://www.xn--vk1bj3qdukp4i.com/bbs/board.php?bo_table=free&wr_id=9312
**mitolyn reviews**
Mitolyn is a carefully developed, plant-based formula created to help support metabolic efficiency and encourage healthy, lasting weight management.
Хотите знать, кому можно доверять в мире онлайн-казино? Наш справочник проводит независимую экспертизу: проверяем лицензии, процесс выплат и качество игр. Рейтинги объективны — мы не торгуем позициями. Принципы оценки открыты для всех. Подойдёт как новичкам, так и опытным игрокам. Следим за изменениями и регулярно обновляем информацию. Узнать о рейтингах казино
mgm bets promo betmgm-play mgm free bet
Discover the art of winning with guided tutorials. casino coins ensures mobile optimization for seamless play. Learn, play, and earn on the go!
Unlock the magic of Sweet Bonanza — a slot where every tumble feels like opening a gift! Free spins sweet bonanza tricks with stacked multipliers create jaw-dropping moments. Spin away!
Dive into the iconic world of prairie power and fortune. wonder 4 buffalo brings Aristocrat’s masterpiece with free spins galore, multipliers up to 27x, and progressive prizes. Your jackpot journey starts here!
Spin your favorite slots with free Sweeps Coins at chumba casino legit. Real prizes are waiting — sign up and claim your bonus today. Let’s play!
High rollers get treated like royalty on best stake slots 2026 . Dedicated VIP manager + insane limits. Welcome to the top.
Experience DraftKings exclusive games Casino royalty. Wager $5 for 500 bonus spins and up to $1,000 credits back. Win the day, every day!
Az 80 % zpet do vasi penezenky pri nakupu leku!
opravdovalekarna.cz
Upon the millions enchanting strapping on fanduel casino Arizona – the #1 legitimate money casino app in America.
Get your $1000 WITH IT AGAIN bonus and refashion every relate, hand and rotate into real coin of the realm rewards.
Irresponsibly payouts, whopping jackpots, and habitual activity – download FanDuel Casino in these times and start playing like a pro today!
Fortune wrote you into the script as the final boss – http://calcitriolc.com/mostbet-casino-recenze-2026-pravdive-zkusenosti-experta/ , Where small screens birth uncomfortably large egos .
Des mГ©dicaments, des conseils et un sourire : bienvenue dans notre pharmacie – https://www.medicum.fr/spe-ville/pharmacien/magny-cours/pharmacie-circuit , Besoin d’un mГ©dicament ou d’un conseil ? Nous sommes lГ pour vous aider .
Backbiome is an advanced daily wellness supplement formulated to help support spinal comfort, reduce feelings of built-up tension, and promote freer, smoother movement throughout backbiome everyday life.