
Are you inspired by the vibrant colors and hardy nature of bougainvillea? Do you want to expand your lush display without spending a fortune on new plants? Propagating bougainvillea from cuttings is an easy, affordable, and rewarding process. Whether you have a balcony or a garden, you can create new plants to enjoy for years to come. Follow this step-by-step guide to ensure success and watch your bougainvillea thrive.
Why Propagate Bougainvillea?
Before diving into the how-to, let’s understand why propagating bougainvillea is a fantastic idea. These plants are known for their stunning, colorful bracts that bloom almost year-round in warm climates. They are resilient and low-maintenance, making them an excellent choice for both beginner and experienced gardeners.
Propagation allows you to:
- Expand your garden or balcony with more of these beautiful plants
- Save money compared to buying new plants
- Create a personalized landscape by selecting specific colors or varieties
- Enjoy the satisfaction of growing plants from cuttings
Now, let’s explore a foolproof method to get your bougainvillea cuttings rooted quickly and successfully.
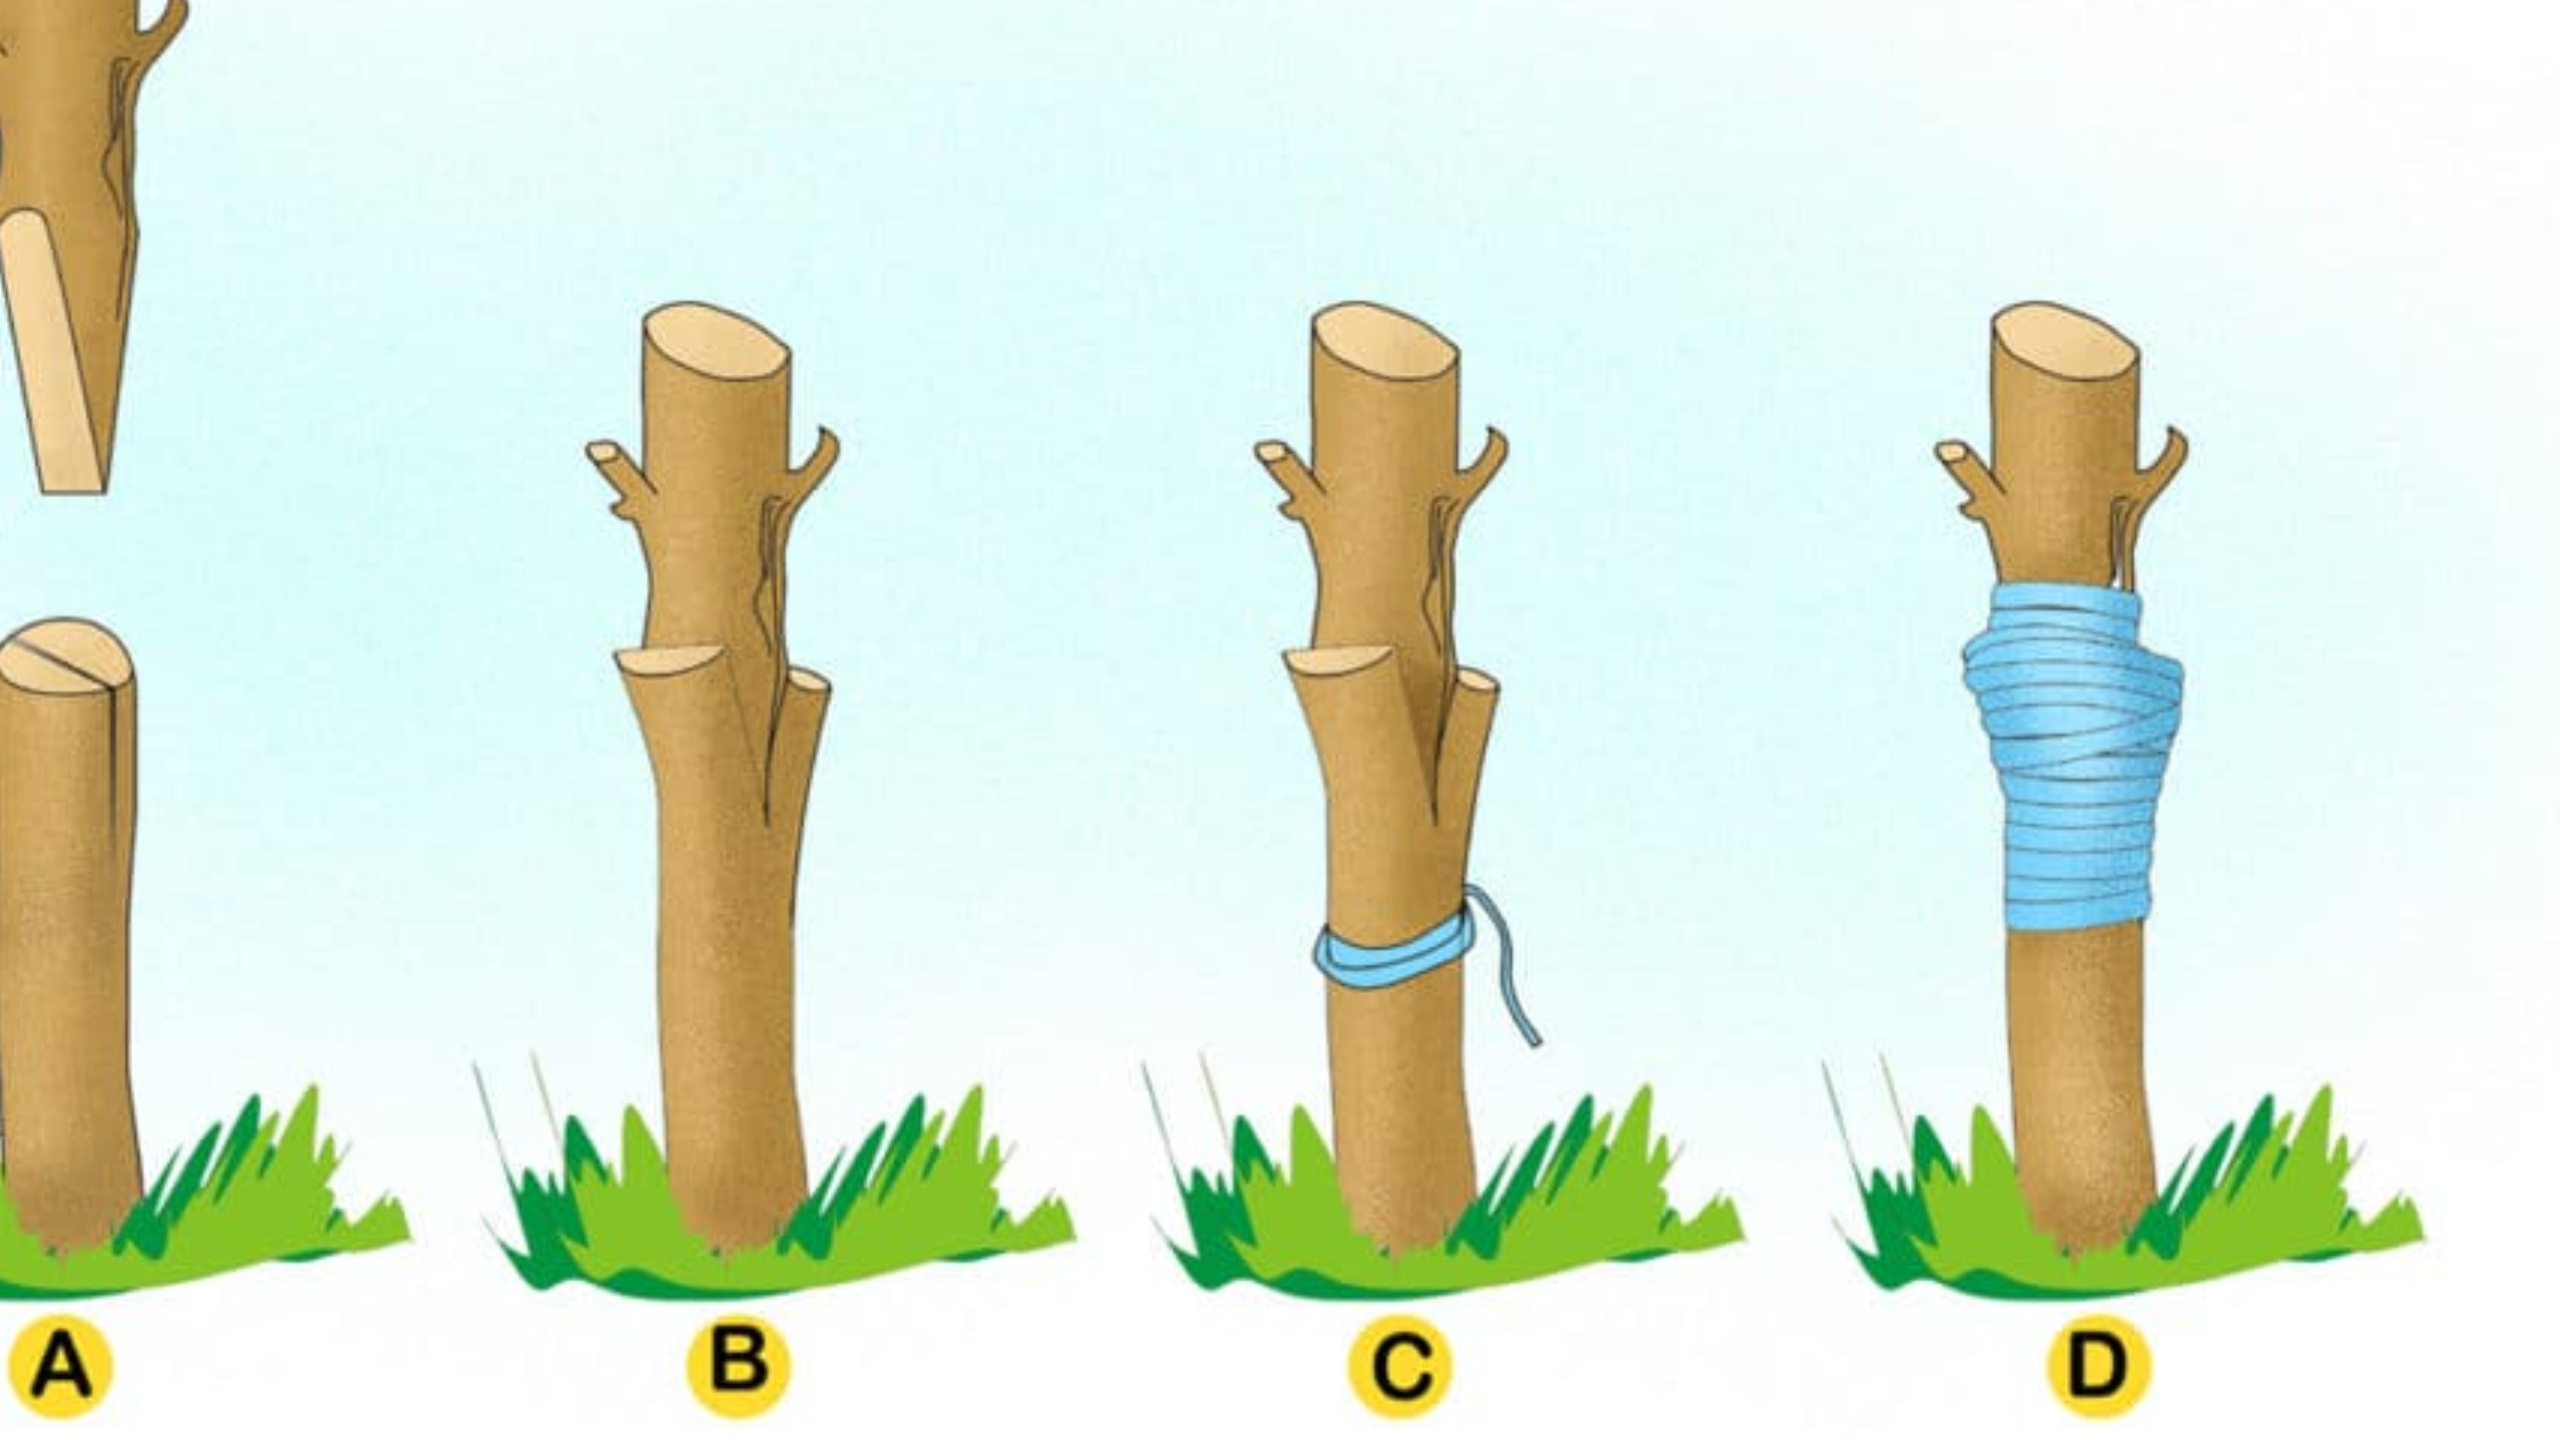
Step 1: Selecting the Right Cutting
Start with a healthy, mature bougainvillea branch. Look for a branch that’s around 15 cm (about 6 inches) long, ideally from a non-flowering stem with good vigor.
Using clean, sharp scissors or pruning shears, cut just below a leaf node (a small bump on the stem where leaves grow). This is crucial because roots will develop from this point.
Tip: Disinfect your tools with alcohol before making cuts to reduce the risk of disease.
Step 2: Preparing the Potting Mix
The key to successful rooting is the right soil environment. Prepare a container with a balanced mix of equal parts of coarse sand and peat moss or organic compost. This mixture drains well, providing stability while maintaining moisture.
Make small holes in the soil—about 2-3 cm deep—using a pencil or stick. Gently insert the cuttings, ensuring at least one node is buried in the soil. Carefully remove any leaves near the base to prevent rot and to direct energy toward root development.
Step 3: Creating a Humid Environment
Once your cuttings are in place, press the soil gently around them to stabilize. Mist the soil lightly with water to dampen it without over-saturating.
To keep the humidity high, cover the pot with a transparent plastic bag or a clear plastic container. This environment mimics a mini greenhouse, promoting root growth.
Pro tip: Poke a few small holes in the plastic for airflow, preventing mold or rot.
Step 4: Finding the Ideal Location
Place your propagation container in a bright spot that is shielded from direct sunlight. Indirect sunlight or filtered light is perfect—think of a shaded patio or a bright windowsill.
If possible, elevate the container slightly to avoid water pooling underneath. Consistent, gentle warmth and light are essential for healthy root development.
Step 5: Care and Monitoring
Keep the soil consistently moist but not soggy. Check regularly—watering when the top inch feels dry. Use a spray bottle for gentle misting to maintain high humidity.
If you want to boost rooting success, consider using a commercial rooting hormone or stimulant. These products contain hormones like auxin, which encourage root formation and speed up the process.
Step 6: Patience and Transplantation
Rooting typically takes about 4 to 6 weeks, though it can vary based on conditions. After this period, gently tug on the cuttings—resistance means roots have formed.
Carefully remove the plastic cover and check for healthy root development. Once your cuttings have a good root system, transplant them into larger pots or directly into your garden or balcony, where they can grow freely.
Tips for Success
- Use healthy, disease-free cuttings for the best results.
- Maintain consistent moisture without waterlogging.
- Provide ample light but avoid harsh Direct sun initially.
- Be patient—rooting can take time, but persistence pays off!
Final Thoughts:
Propagating bougainvillea from cuttings is a simple and effective way to multiply your plants and enhance your outdoor or indoor space. With a little patience and care, you can enjoy a lush, colorful display of these stunning plants. Whether you’re an experienced gardener or just starting, this method is accessible and rewarding.
Get your tools ready, select the perfect cuttings, and watch your garden flourish with vibrant bougainvillea! Happy gardening!
amoxil over the counter – combamoxi amoxicillin over the counter
diflucan 200mg uk – https://gpdifluca.com/# buy fluconazole paypal
buy cenforce for sale – where can i buy cenforce cost cenforce 50mg
erectile dysfunction tadalafil – ciltad genesis how to get cialis without doctor
cialis 5mg cost per pill – https://strongtadafl.com/ canadian pharmacy online cialis
genuine pfizer-viagra for sale – https://strongvpls.com/ can you buy viagra vietnam
I’ll certainly carry back to be familiar with more. accutane para que es
The sagacity in this serving is exceptional. prednisone may treat
This website positively has all of the bumf and facts I needed there this subject and didn’t know who to ask. https://ursxdol.com/doxycycline-antibiotic/
Thanks recompense sharing. It’s first quality. https://prohnrg.com/
With thanks. Loads of knowledge! https://ondactone.com/spironolactone/
This is the compassionate of writing I positively appreciate.
https://doxycyclinege.com/pro/losartan/
More posts like this would add up to the online space more useful. http://www.01.com.hk/member.php?Action=viewprofile&username=Zqogga
dapagliflozin usa – on this site order forxiga 10mg online cheap
buy orlistat without prescription – xenical cheap orlistat over the counter
The reconditeness in this piece is exceptional. http://furiouslyeclectic.com/forum/member.php?action=profile&uid=24892
You can keep yourself and your family by way of being heedful when buying prescription online. Some pharmaceutics websites operate legally and put forward convenience, secretiveness, rate savings and safeguards for purchasing medicines. buy in TerbinaPharmacy https://terbinafines.com/product/bentyl.html bentyl
The depth in this ruined is exceptional. TerbinaPharmacy
More posts like this would make the blogosphere more useful.
863903 641308hi and thanks regarding the certain post ive genuinely been looking regarding this kind of information online for sum time these days hence thanks a whole lot 713832
https://t.me/s/flagman_official_registration
Wenn Sie in Deutschland spielen, dann wird der
Euro als Spielwährung verwendet. Dies ermöglicht Ihnen, auf
der Casino Boomerang Website zu spielen und Ihre Gewinne
ohne Probleme auszuzahlen. Sie müssen dies jedoch nicht tun, wenn
Sie nur Spielautomaten spielen und die Demoversion nutzen möchten. Hier können Sie leicht eine breite Palette der besten Unterhaltung mit der Möglichkeit, für echtes Geld und für Spaß ohne Risiken zu spielen finden.
Alles, was Sie dafür tun müssen, ist ganz normal
im Casino weiterzuspielen. Neben den Slots gibt es auch eine breite Auswahl an Tischspielen, wie Online Roulette und
Online Blackjack. Hier finden Sie nämlich nicht nur einen tollen Willkommensbonus, sondern auch Boni für Bestandskunden, Tausende Online-Casinospiele, eine native App und einen freundlichen Kundendienst.
References:
https://online-spielhallen.de/verde-casino-promo-code-2025-alle-bonusangebote/
https://t.me/s/dragon_money_mani/30
Good info. Lucky me I recently found your site by accident (stumbleupon).
I have saved as a favorite for later!
Whoa! This blog looks exactly like my old one!
It’s on a completely different topic but it has pretty much the same page layout and design. Excellent choice of colors!
I couldn’t refrain from commenting. Exceptionally well written!
It’s going to be finish of mine day, however before ending I am reading this fantastic piece of writing to improve my know-how.
Amazing! Its genuinely remarkable post, I have got much clear idea on the topic of from
this paragraph.
Every weekend i used to pay a visit this site, because i want enjoyment, as this this website conations genuinely nice funny information too.
You’ve made some really good points there. I checked on the
net to find out more about the issue and found most people will go along with your views on this web site.
Ahaa, its nice conversation regarding this post here at this webpage, I have read all
that, so now me also commenting at this place.
Hey there! I could have sworn I’ve been to this blog before
but after browsing through some of the post
I realized it’s new to me. Nonetheless, I’m definitely glad
I found it and I’ll be book-marking and checking back frequently!
Yes! Finally something about universities.
I am no longer positive the place you’re getting your info,
however great topic. I needs to spend some time studying much more
or figuring out more. Thanks for excellent info I was in search of this info for my mission.
Hey there! I’ve been following your blog for a while now and finally got the bravery to go ahead and give you a shout out from New Caney
Tx! Just wanted to mention keep up the excellent work!
Hello friends, how is the whole thing, and what you desire to say regarding
this paragraph, in my view its genuinely awesome for me.
Extra services from Manta include a listings administration service and
website development.
I will immediately seize your rss as I can not in finding your e-mail subscription hyperlink or newsletter service.
Do you’ve any? Please permit me realize in order
that I could subscribe. Thanks.
betmgm bet 10 get 200 betmgm-play betmgm North Carolina
It’s nearly impossible to find educated people on this topic, but you sound like
you know what you’re talking about! Thanks
Since the admin of this web site is working, no hesitation very soon it will
be famous, due to its feature contents.
Hi, I do believe this is an excellent blog. I stumbledupon it 😉 I will revisit yet again since i have book marked
it. Money and freedom is the best way to change, may you
be rich and continue to guide other people.
What’s up to every body, it’s my first go to see of this weblog; this blog consists
of awesome and in fact excellent data in support of visitors.
Hello! This is my first comment here so I just wanted to give a quick shout out and say I genuinely
enjoy reading your blog posts. Can you recommend any other blogs/websites/forums that go over the same topics?
Appreciate it!
Excellent post. I was checking continuously this weblog and
I am impressed! Extremely useful info specially the last section :
) I handle such information much. I used to be
looking for this certain info for a very long
time. Thanks and good luck.
always i used to read smaller articles which as well clear
their motive, and that is also happening with this piece of writing which I am
reading at this place.
I am extremely inspired with your writing talents and also with the layout for your blog.
Is this a paid subject or did you modify it yourself? Anyway stay
up the excellent high quality writing, it is uncommon to see a great blog like this one today..
I’m impressed, I must say. Rarely do I encounter a blog that’s both
educative and interesting, and without a doubt, you’ve hit the nail on the head.
The issue is something which not enough people are
speaking intelligently about. I am very happy I came across this
during my search for something regarding this.
Hello! Do you know if they make any plugins
to safeguard against hackers? I’m kinda paranoid about losing everything I’ve
worked hard on. Any tips?
mcluck Mississippi online casino McLuck mcluck casino pa login
It’s not my first time to pay a visit this site, i am browsing this site dailly and get pleasant data from here all the time.
wonderful issues altogether, you simply gained a logo new reader.
What might you recommend about your put up that you just made some days ago?
Any positive?
WOW Vegas is a exceptionally rated free-play policy with thousands of slots and rugged gambler rewards programs. Proper and unimperilled, it lets users enjoy wow gold vibes while collecting Sweepstakes Coins suited for implicit bona fide rewards.
Great post.
Yes! Finally someone writes about click here.
Hello to all, how is everything, I think every one is getting more from this website, and
your views are fastidious for new users.
Your style is really unique in comparison to
other folks I have read stuff from. Thank you for posting when you
have the opportunity, Guess I’ll just bookmark this page.
Discover the art of winning with guided tutorials. crowncoins casino ensures mobile optimization for seamless play. Learn, play, and earn on the go!
Hi there, I discovered your web site by means
of Google at the same time as looking for a similar matter, your site got
here up, it appears to be like good. I’ve bookmarked it in my
google bookmarks.
Hi there, simply changed into alert to your blog via Google, and found
that it is truly informative. I am gonna watch out for brussels.
I’ll be grateful in the event you continue this in future.
Numerous other people will be benefited out of
your writing. Cheers!
Hello there, You have done an incredible
job. I’ll definitely digg it and personally recommend to my friends.
I’m confident they will be benefited from this website.
Dive deep into Sweet Bonanza and let the candies cascade into epic win combinations! Multiplier bombs best casino for sweet bonanza explode during bonuses for maximum excitement. Taste victory today!
I am in fact grateful to the owner of this web site who has shared
this fantastic paragraph at here.
If some one needs expert view about blogging and site-building after that i advise him/her to visit this weblog,
Keep up the good job.
Magnificent beat ! I wish to apprentice at the same time as you amend your website, how could i subscribe for a blog website?
The account helped me a applicable deal. I
had been a little bit acquainted of this your broadcast offered vivid transparent idea
What i do not understood is in truth how you are no longer really a lot more
well-appreciated than you may be now. You’re so intelligent.
You realize thus significantly when it comes to this topic,
made me in my opinion imagine it from a lot of varied angles.
Its like women and men don’t seem to be fascinated except
it’s something to accomplish with Lady gaga! Your personal stuffs nice.
All the time handle it up!
wonderful submit, very informative. I wonder why the
other specialists of this sector do not realize this.
You should continue your writing. I’m sure, you have a huge
readers’ base already!
Fuel your fortune with prairie thunder and lightning spins. play buffalo slots online unleashes free games with rising multipliers and huge buffalo jackpots. Get in the game!
Wonderful beat ! I would like to apprentice while you amend your site, how
can i subscribe for a blog web site? The account helped
me a acceptable deal. I had been a little bit acquainted of this your
broadcast provided bright clear concept
chumba casino slots: free to play, real money to win. Get your welcome Sweeps Coins bonus and experience the ultimate social casino. Start now!
Want anonymous crypto gambling with huge multipliers? stake vip has been delivering it for years. Jump in.
DraftKings casino Michigan Casino: Thrills without the risk. New users score 500 spins after $5 + up to $1,000 lossback protection. Discover why players choose us!
Kvalita, na kterou se muzete spolehnout. Cena, ktera vas potesi
doxycyklin bez predpisu
Join the millions enchanting colossal on fanduel casino Florida – the #1 legitimate coins casino app in America.
Get your $1000 TEASE IT AGAIN bonus and modify every relate, хэнд and rotate into bona fide cash rewards.
Fast payouts, huge jackpots, and habitual fight – download FanDuel Casino any longer and start playing like a pro today!
Hello to every one, it’s in fact a nice for me to visit this web page, it consists of priceless
Information.
I am in fact grateful to the owner of this web page who has shared
this impressive piece of writing at at this place.
Just wish to say your article is as amazing. The clearness
to your put up is just nice and i could assume you are a professional in this
subject. Well with your permission allow me to take hold of your feed to stay updated with coming near near post.
Thanks one million and please carry on the enjoyable work.
Step into the spotlight — fortune is watching – https://xparacetamol.com , Where “maybe next time” got permanently banned .
My brother recommended I might like this website.
He was once totally right. This submit actually made my day.
You can not believe just how so much time I had spent for this info!
Thank you!
Hi to every one, because I am in fact keen of reading
this webpage’s post to be updated on a regular basis. It carries fastidious information.
Hi, i think that i saw you visited my weblog thus i got here to return the desire?.I’m trying to find things to improve
my website!I suppose its good enough to make use of some of your ideas!!
My spouse and I stumbled over here different web address and thought I should check things out.
I like what I see so now i’m following you.
Look forward to checking out your web page repeatedly.
La pharmacie qui vous simplifie la vie et prend soin de vous – https://www.pharmacie-odeon-saint-joseph.com/mentions-legales/ , La pharmacie qui vous accompagne Г chaque Г©tape de votre vie .
Heya outstanding website! Does running a blog such
as this require a large amount of work? I’ve absolutely no
knowledge of coding however I was hoping to start my
own blog in the near future. Anyway, if you have any
recommendations or tips for new blog owners
please share. I understand this is off subject but I simply
wanted to ask. Thanks a lot!
Excellent site you have here.. It’s difficult to find quality
writing like yours nowadays. I honestly appreciate people like you!
Take care!!
I have been browsing online greater than three hours as of late, but I by no means found any fascinating article like yours.
It is pretty price sufficient for me. In my opinion, if all site
owners and bloggers made excellent content as you did, the
internet might be a lot more helpful than ever before.
Its such as you read my mind! You appear to understand a lot about this,
such as you wrote the ebook in it or something. I feel that you just could do with some % to pressure the message house a
little bit, however instead of that, that is fantastic blog.
A great read. I will definitely be back.
Excellent post. I was checking continuously this blog and
I’m inspired! Very useful info particularly the final part 🙂 I maintain such information a
lot. I was seeking this certain information for
a long time. Thanks and best of luck.
Fantastic goods from you, man. I’ve keep in mind your stuff prior to and you are simply extremely wonderful.
I really like what you have bought here, certainly like what you’re stating and the best way during which you
assert it. You are making it entertaining and you continue to care for to keep it wise.
I can’t wait to learn far more from you. That is really a great site.
This information is invaluable. Where can I find out more?
These are really impressive ideas in concerning blogging.
You have touched some pleasant things here. Any way keep up wrinting.
This is really interesting, You’re a very skilled blogger.
I’ve joined your feed and look forward to seeking more of your excellent post.
Also, I’ve shared your site in my social networks!
I’ve read some just right stuff here. Certainly value bookmarking
for revisiting. I surprise how so much attempt you put to create this kind of magnificent informative site.
You can definitely see your expertise in the article you write.
The world hopes for even more passionate writers like you who aren’t afraid
to say how they believe. At all times follow your heart.
Great article, just what I was looking for.
Oh my goodness! Impressive article dude! Many thanks, However I
am going through troubles with your RSS. I don’t understand why I can’t join it.
Is there anybody getting the same RSS problems? Anyone that knows the answer will you kindly respond?
Thanks!!
Backbiome is an advanced daily wellness supplement formulated to help support spinal comfort, reduce feelings of built-up tension, and promote freer, smoother movement throughout backbiome everyday life.
I’m not that much of a internet reader to
be honest but your blogs really nice, keep it up!
I’ll go ahead and bookmark your site to come back in the future.
All the best