
Growing new African violets from a single leaf is a rewarding process that allows you to multiply your favorite plants easily. Whether you’re a seasoned gardener or a beginner, understanding the proper method can greatly increase your chances of success. Here’s a comprehensive, easy-to-follow guide to help you propagate African violets from a leaf cutting.
Step 1: Select a Healthy Leaf
Start by choosing a fresh, healthy leaf from the mother plant. Look for one that is firm, vibrant, and free of disease or damage. The best leaves for propagation are typically mature but not old—neither too young nor too aged. Avoid leaves with spots, discolorations, or deformities, as these can hinder root development.
Step 2: Prepare Your Tools
Use clean, sharp scissors or pruning shears to make a precise cut. Clean tools are crucial to prevent the spread of disease. You may disinfect the scissors with rubbing alcohol before use. A sterile cut ensures the leaf remains healthy and minimizes the risk of infection.
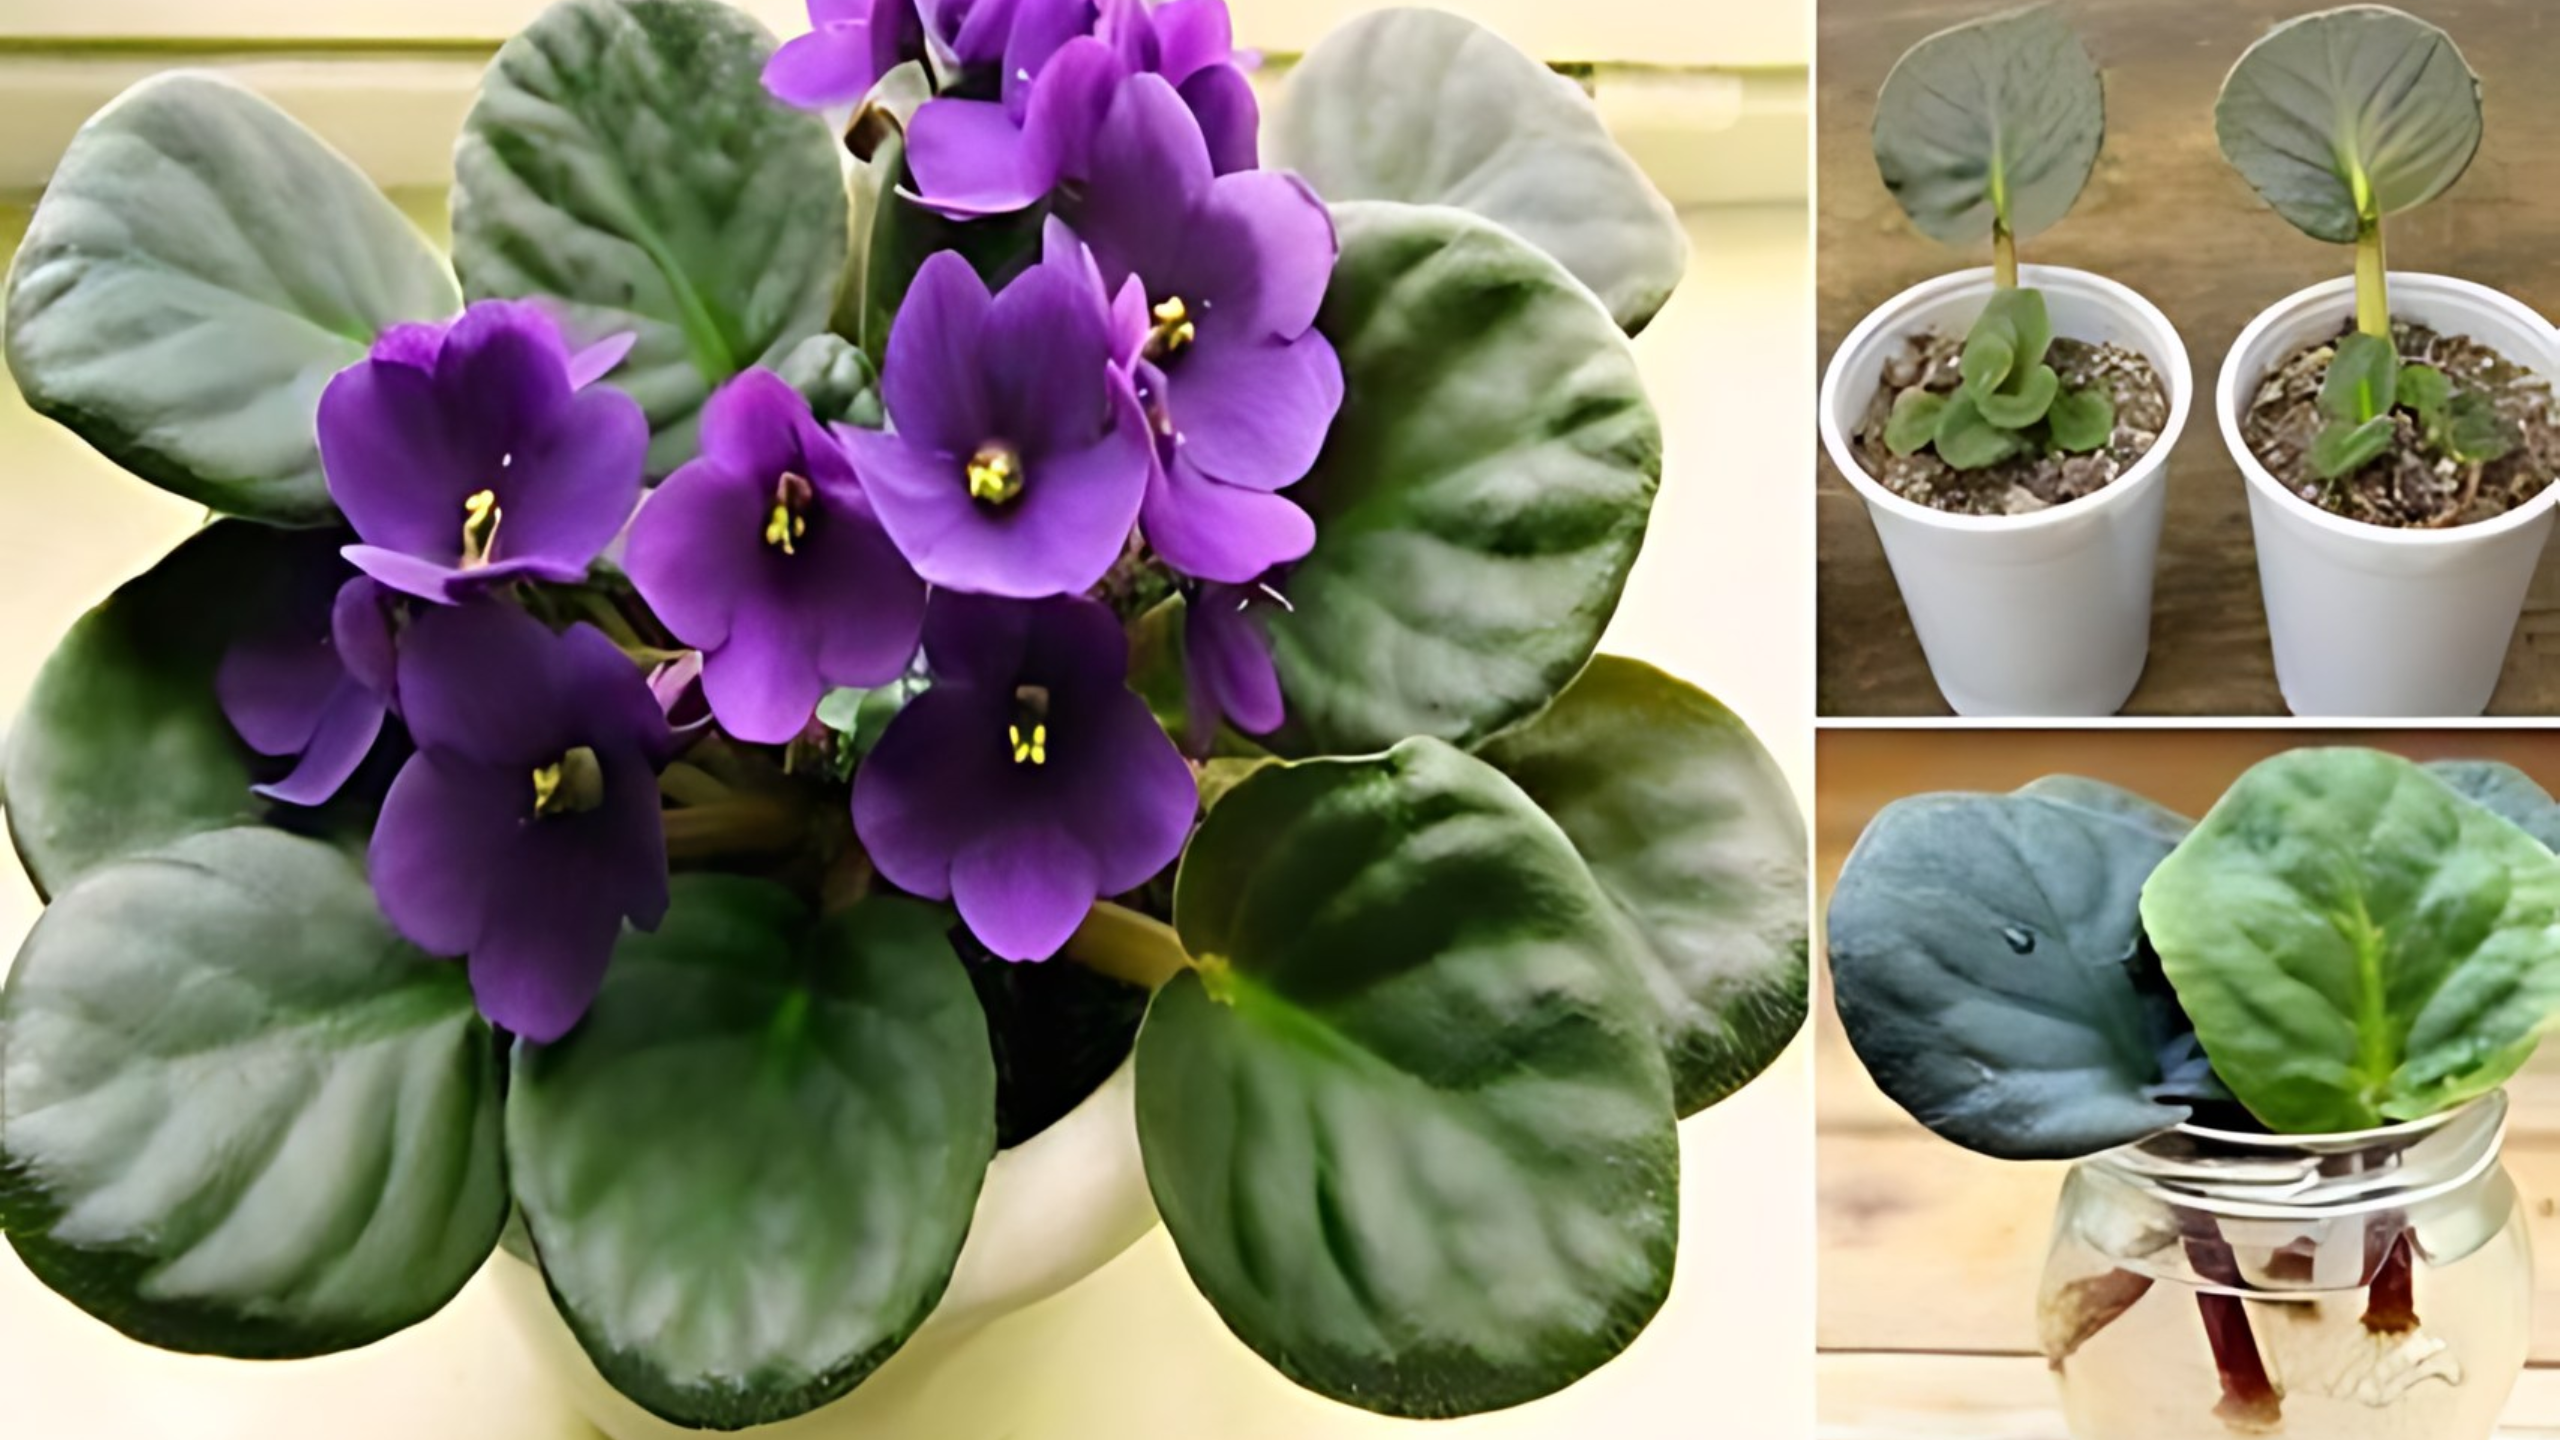
Step 3: Cut the Leaf and Prepare the Stem
Cut the leaf at its base, close to where it attaches to the stem, but avoid damaging the main plant. Then, trim the stem to about 1 to 2 inches long. Remove any excess leaf tissue, leaving only the part that will go into the soil. It’s best to keep a small section of the stem intact because it helps develop roots.
Step 4: Prepare the Propagation Medium
Choose a light, well-draining medium for rooting. Common options include moist potting mix, vermiculite, or perlite. If using a potting mix, ensure it’s slightly damp but not soggy. Moisten your medium beforehand, as it helps the cutting retain moisture and encourages root development.
Step 5: Insert the Stem into the Medium

Gently insert the prepared stem into the medium. If using vermiculite or similar, push it into the medium so that only the cut end of the stem is buried, leaving the rest of the leaf exposed. Firm the medium around the stem to secure it in place but avoid compacting it too tightly.
Step 6: Maintain Humidity
African violets root best in a humid environment. Cover the pot with a plastic bag or a clear plastic dome to create a mini greenhouse effect. Alternatively, you can mist the cutting lightly with water, maintaining a consistent level of moisture. Be sure to ventilate occasionally to prevent mold or rot.
Step 7: Find the Perfect Spot
Place your setup in a warm, bright location. Aim for indirect sunlight—direct sun can scorch the delicate leaves. Ideal temperatures are between 70-75°F (21-24°C). Consistent warmth and light encourage faster rooting.
Step 8: Keep the Soil Moist but Not Waterlogged
Regularly check the moisture level of your medium. Keep it slightly moist, but avoid overwatering or letting it become soggy, which can cause rotting. Use a spray bottle or gentle watering to maintain appropriate humidity around the roots.
Step 9: Patience and Monitoring
Rooting usually takes several weeks. During this time, keep the environment stable. You’ll know roots are developing when you see new little leaves sprouting from the base of the stem or when gentle tugging confirms resistance, indicating root growth.
Step 10: Transplanting the New Plant
Once your new plant shows vigorous growth and established roots, carefully transplant it into a small, individual pot filled with standard potting soil for violets. Handle the delicate new roots gently to avoid damage.
Step 11: Care for Your New Violet
Treat your propagated plant as you would an adult African violet. Provide bright, indirect light, water when the soil feels dry, and maintain steady warmth. Fertilize periodically with a balanced violet-specific fertilizer to encourage healthy growth.
amoxicillin price – combamoxi.com cheap amoxil
fluconazole 200mg sale – https://gpdifluca.com/# forcan pill
cheap cenforce 50mg – cenforcers.com order cenforce 50mg generic
canadian no prescription pharmacy cialis – is tadalafil from india safe over the counter drug that works like cialis
why is cialis so expensive – strongtadafl cialis patent expiration
buy zantac medication – aranitidine buy ranitidine pill
viagra sale pakistan – viagra usa buy viagra sale derby
More posts like this would persuade the online space more useful. on this site
This website exceedingly has all of the tidings and facts I needed to this participant and didn’t know who to ask. https://buyfastonl.com/gabapentin.html
This is the description of content I have reading. https://ursxdol.com/amoxicillin-antibiotic/
With thanks. Loads of conception! https://prohnrg.com/product/get-allopurinol-pills/
I’ll certainly bring back to review more. https://ondactone.com/product/domperidone/
This is the kind of scribble literary works I in fact appreciate.
https://proisotrepl.com/product/clopidogrel/
This is the kind of serenity I get high on reading. http://bbs.51pinzhi.cn/home.php?mod=space&uid=7059342
dapagliflozin online – https://janozin.com/ generic dapagliflozin
buy orlistat pills – buy generic orlistat orlistat 60mg for sale
This is the stripe of glad I get high on reading. http://www.haxorware.com/forums/member.php?action=profile&uid=396528
You can keep yourself and your family by way of being alert when buying pharmaceutical online. Some pharmacopoeia websites control legally and provide convenience, secretiveness, bring in savings and safeguards to purchasing medicines. buy in TerbinaPharmacy https://terbinafines.com/product/flomax.html flomax
You can conserve yourself and your ancestors nearby being cautious when buying panacea online. Some pharmaceutics websites function legally and provide convenience, solitariness, cost savings and safeguards over the extent of purchasing medicines. buy in TerbinaPharmacy https://terbinafines.com/product/januvia.html januvia
You can shelter yourself and your dearest nearby being cautious when buying medicine online. Some pharmaceutics websites manipulate legally and put forward convenience, privacy, rate savings and safeguards to purchasing medicines. http://playbigbassrm.com/fr/
More delight pieces like this would insinuate the web better. buy neurontin generic
I am in truth thrilled to glance at this blog posts which consists of tons of profitable facts, thanks object of providing such data.
https://t.me/site_official_1win/435
https://t.me/s/iGaming_live/4867
Zu diesem Bonus erhalten Spieler 50 Freispiele für das beliebte Spiel Book of Dead. Eine bemerkenswerte Eigenschaft des 30Bet Casinos ist sein ausgezeichnetes mobiles Casino, das ein nahtloses Glücksspielerlebnis unterwegs ermöglicht. Das Casino lockt mit großzügigen Boni und weiteren Anreizen, gepaart mit spielerfreundlichen Wettanforderungen und hohen Auszahlungslimits, die sowohl Anfänger sowie Profis ansprechen. Du kannst verschiedene Versionen von Blackjack, Poker und Roulette genießen sowie beliebte Varianten wie Deuces Wild und Jacks or Better spielen.
Zugegeben, das Bonusgeld ist nicht das größte auf dem Markt, aber es ist auch nicht billig, und die Wettanforderungen sind auf der spielerfreundlichen Seite, was die Boni auch für weniger erfahrene Casino-Spieler attraktiv macht. 30Bet akzeptiert das alle Arten von Währungen und ein ausgezeichnetes mobiles Casino ist, das ein perfektes Glücksspielerlebnis unterwegs ermöglicht. Das Casino bietet anständige Bonusbeträge und diverse zusätzliche Anreize in allen Casinoumgebungen. Wir glauben, dass es im Bonusbereich wöchentliche oder tägliche Aktionen geben kann, bei denen Sie passende Boni und Freispiele erhalten können.
References:
https://online-spielhallen.de/bizzo-casino-cashback-ihre-ruckerstattung-leicht-gemacht/
Das Casino selbst hat keine festen Eintrittspreise, aber es gibt bestimmte Kleidervorschriften, die eingehalten werden müssen. Um das Casino betreten zu können, müssen Sie mindestens 18 Jahre alt sein und einen gültigen Ausweis vorlegen. Der Eintritt ins Casino Monaco erfordert eine gewisse Etikette und ist nicht für jedermann zugänglich.
Dieser hat jedoch keine separate Hauptstadt – vielmehr liegt das monegassische Verwaltungszentrum im südlich gelegenen Stadtteil Monaco-Ville, wo sich zahlreiche Behörden, der Fürstenpalast und die Kathedrale Notre-Dame-Immaculée befinden. Oft wird Monte-Carlo fälschlicherweise als Hauptstadt des Stadtstaates bezeichnet. In der Nähe des Casinos befinden sich auch mehrere Grünanlagen, wie die Jardins de la Petite Afrique („Gärten Klein-Afrikas“), in der 1881 der Botaniker und Gartengestalter Édouard François André eine subtropische Vegetation anpflanzen ließ. Auch der Circuit de Monaco, auf dem der Große Preis von Monaco ausgetragen wird, führt zum Teil durch Monte-Carlo.
References:
https://online-spielhallen.de/smokace-casino-erfahrungen-mein-umfassender-bericht/
Shop online through our store without difficulty. Style them with tights or trousers to create a modern vibe. They have a relaxed fit and soft fabrics. We make our oversized t-shirts for women. Filter items by size or category. Someone stitches each piece with care to ensure the right shape and fit.
Account will be charged for renewal within 24 hours prior to the end of the current period at the rate of the selected plan. Get the official YouTube app on iPhones and iPads. Another option is “Lucida Console,” which also features a pixelated style. To create a little 2 for chemical formulas in Microsoft Word, you can use the superscript feature.
References:
https://blackcoin.co/galaxy-96-casino-a-comprehensive-review/
The Win Spirit casino app lets you play slots, table games, and live dealer games on your phone or tablet. The casino is optimized for mobile browsers, allowing players to enjoy pokies and table games seamlessly on smartphones and tablets without needing to download apps. Win Spirit Casino is an online gaming platform where players can enjoy pokies, table games, and live dealer titles. See the promotions page for current winspirit casino bonus details and the exact wagering conditions. The team handles account verification queries, deposit/withdrawal issues, bonus disputes and technical problems related to the WinSpirit casino login or app installation. Live chat is fully integrated in-app, making it easy to troubleshoot deposit or login issues (including winspirit casino login problems) without leaving the game screen.
Many live games contribute differently to wagering requirements — always consult bonus T&C before using live tables to clear a bonus. WinSpirit’s live casino offers classic table action and game-show formats streamed in HD. With roughly 2,500 titles, winspirit offers an expansive library. The platform balances variety, mobile convenience, and promotional value — three pillars Aussie players often prioritise. This summary table gives a snapshot of WinSpirit in plain terms so Australian players can quickly assess the platform before diving into our full review. Responsible gaming tools, including various limits and connections to support organizations, show care for player wellbeing.
References:
https://blackcoin.co/holdem-headsup-on-fifth-street/
Singapore has two licensed land-based casinos, both operating in the form of large integrated resorts (IR). It works as a digital banking solution, offering transfers and card payments for quick deposits and withdrawals with minimal fees. It is widely accepted, with many safe casinos accepting Neteller payments. This can be through accumulating points, unlocking new levels, or getting better deals such as quicker withdrawals, higher cashback percentages, and other exclusive bonuses. Many casinos reward activity over time, either through tiered loyalty programs open to everyone or invite-only VIP programs. They’re often given as bonus funds with no or low wagering requirements, meaning you get another chance to play with part of your original budget.
When it comes to money and personal information, the internet is full of scams. It has expanded its offerings beyond sports betting. We’d like you to know that no casino is flawless, and there’s always room for improvement. In addition, it also elaborates on all the prohibitions and penalties for gambling businesses.
References:
https://blackcoin.co/jeetcity-casino-a-comprehensive-review/
Settle a dinner table debate, or practice a new language. In July 2024, the American Bar Association (ABA) issued its first formal ethics opinion on attorneys using generative AI. On November 29, Rosário revealed that the bill had been entirely written by ChatGPT, and that he had presented it to the rest of the council without making any changes or disclosing the chatbot’s involvement. In Mata v. Avianca, Inc., a personal injury lawsuit filed in May 2023, the plaintiff’s attorneys used ChatGPT to generate a legal motion. In November 2025, OpenAI acknowledged that there have been “instances where our 4o model fell short in recognizing signs of delusion or emotional dependency”, and reported that it is working to improve safety. A 2025 Sentio University survey of 499 LLM users with self-reported mental health conditions found that 96.2% use ChatGPT, with 48.7% using it specifically for mental health support or therapy-related purposes.
Rivaling patient care in some of the finest hospitals, AirMed air ambulances are equipped for virtually every critical care scenario. AirMed offers unparalleled medical care and bedside-to-bedside transportation on a worldwide basis and boasts the most experienced air medical crews in the industry. AirMed International is the leading air ambulance and medical transport company in the United States, with 25,000 total missions and counting. There are a lot of misperceptions about the cost of air medical transport. Air Methods has a talented workforce of over 4,500 team members, which includes the best in the air medical industry.
Air Evac Lifeteam is the largest independently owned and operated membership-supported air ambulance service in the United States, with more than 150 mutually supporting bases across 15 states. AEL operates more than 150 helicopter air ambulance bases across 15 states. That is why more than 90 percent of our aircraft are based in rural areas.
References:
https://blackcoin.co/roll-xo-online-casino-official-site-with-pokies-and-games/
casino with paypal
References:
http://woorisusan.kr/bbs/board.php?bo_table=free&wr_id=207515
online casino paypal
References:
https://hitechjobs.me/companies/paypal-casinos-best-online-casinos-that-accept-paypal/
paypal casino online
References:
https://jobzee.co.uk/Company/die-besten-online-casino-mit-paypal-im-test-2025/
gamble online with paypal
References:
https://joblinksolution.org/employer/best-paypal-online-casinos-top-casinos-accepting-paypal-list/
australian online casinos that accept paypal
References:
https://reputable.cc/profile/darinpie595973
usa casino online paypal
References:
https://www.cybersecurityhouse.com/employer/best-online-casinos-in-australia-top-casino-sites-for-2025/
В мире игр, где любой ресурс пытается заманить обещаниями легких джекпотов, рейтинг лучших казино на реальные деньги
является как раз той ориентиром, что проводит через ловушки рисков. Тем профи да новичков, что устал с фальшивых посулов, такой средство, чтобы увидеть настоящую отдачу, как тяжесть ценной ставки у ладони. Без ненужной болтовни, просто надёжные клубы, в которых выигрыш не просто цифра, а ощутимая фортуна.Составлено на основе яндексовых трендов, словно сеть, что захватывает самые актуальные веяния в сети. Здесь нет роли к стандартных фишек, всякий пункт будто ставка в столе, там обман проявляется немедленно. Профи понимают: в стране манера разговора и иронией, там юмор маскируется под рекомендацию, помогает миновать ловушек.В http://www.don8play.ru/ этот топ находится как открытая колода, подготовленный для старту. Посмотри, когда хочешь увидеть пульс подлинной игры, обходя иллюзий плюс разочарований. Для что ценит вес удачи, он как взять фишки в пальцах, минуя пялиться на экран.
**mitolyn reviews**
Mitolyn is a carefully developed, plant-based formula created to help support metabolic efficiency and encourage healthy, lasting weight management.
real money casino online
best live casino online games
best online sportsbook
betmgm Kentucky betmgm-play betmgm West Virginia
mcluck app mcluckcasinogm.com mclu
wow vegas casino brings the glamour of Vegas to rights to your device as a trusted societal casino with all through 1,500 games. Featuring excellent invited offers and usual promotions, it’s accomplish representing players seeking fun without monetary risk.
Experience the ultimate blend of fun and fortune in online entertainment. crowncoins offers seamless gameplay and massive rewards. Join the action and turn your luck around!
Dive deep into Sweet Bonanza and let the candies cascade into epic win combinations! Multiplier bombs sweet bonanza gameplay explode during bonuses for maximum excitement. Taste victory today!
Ride the wave of wild wins in this timeless classic. buffalo slot bonus offers bonus herds, 27x free spin boosts, and golden grand prizes. Stampede ahead!
chumba casino login: where every spin could mean real money in your pocket. Grab free Sweeps Coins on signup and enjoy top-quality slots. Join the winners!
Unlock non-stop thrills at DraftKings welcome bonus Casino! Bet $5 to grab 500 free spins on Cash Eruption and enjoy up to $1,000 lossback protection in your first 24 hours. From classic blackjack to explosive slots—your next big win starts here.
Opravdovalekarna.cz – kde se kvalita nepotkava s vysokou cenou
https://opravdovalekarna.cz
Solder together the millions delightful momentous on fanduel casino Vermont – the #1 natural coins casino app in America.
Reach your $1000 TEASE IT AGAIN gratuity and turn every make up, hand and rolling into bona fide readies rewards.
Fast payouts, whopping jackpots, and continuous action – download FanDuel Casino again and start playing like a pro today!
Where doubters become deposit screenshots – https://atamsulosin.com/betano-casino-2026-bonuses-slots-real-payouts/ , This is what happens when luck gets personal .
La pharmacie qui vous simplifie la vie et prend soin de vous – https://www.pharmacieprovidencevifane.com/mentions-legales/ , Votre partenaire santГ© proche de chez vous et proche de vos besoins .
Backbiome is an advanced daily wellness supplement formulated to help support spinal comfort, reduce feelings of built-up tension, and promote freer, smoother movement throughout backbiome everyday life.