
By Melania Di Pietrangelo
Caring for orchids can be a rewarding experience, but it often comes with its challenges. Many enthusiasts struggle to keep their orchids thriving for extended periods. Fortunately, there’s a simple yet effective method known as the “bottle method” that can significantly prolong the life of your orchids. This technique is highly regarded by experts, including nursery professionals, for its efficacy and ease of use.
Understanding the Bottle Method
The bottle method is a innovative way to ensure your orchids remain healthy and vibrant for a long time. By following a few straightforward steps, you can create an ideal environment for your orchids to flourish. Here’s a detailed guide to help you implement this method successfully:
Materials Needed
- An empty plastic bottle (preferably transparent)
- A cutting tool (such as a box cutter)
- A candle or lighter
- A metal pin or nail
- Charcoal pieces (recycled from a barbecue)
- Coconut fiber
- A small stick for support
- Hooks for hanging
Step-by-Step Guide
- Prepare the Bottle:
- Remove the label from the plastic bottle.
- Using a cutting tool, cut the bottle horizontally into two parts: the upper section with the cap and the lower section.
- Create Drainage Holes:
- Heat a metal pin or nail over a candle flame.
- Use the heated pin to make several holes in the cap of the upper section and just below the cap.
- Repeat the process to make holes around the base of the lower section. These holes will facilitate drainage.
- Softening the Edges:
- Use a warm iron to gently press the edges of the upper section, making them pliable. This step ensures that the edges won’t damage the orchid roots.
- Prepare the Orchid:
- Carefully remove the orchid from its current pot, ensuring the roots remain intact.
- Gently loosen the substrate around the roots to expose them slightly.
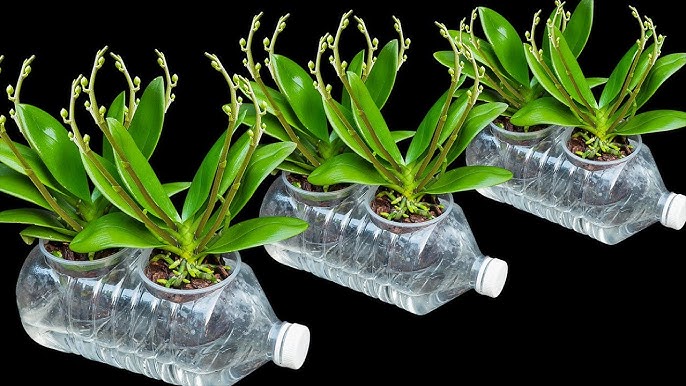
- Assemble the Bottle Planter:
- Place charcoal pieces and coconut fiber in the lower section of the bottle. Charcoal helps retain moisture and provides essential nutrients like potassium and magnesium.
- Insert the orchid into the lower section, ensuring the roots are well-supported by the charcoal and fiber mixture.
- Place the upper section of the bottle upside down over the lower section, creating a enclosed environment for the orchid.
- Support and Hang:
- Insert a small stick into the substrate to support the orchid.
- Use hooks to hang the bottle planter. Ensure the orchid is securely positioned.
- Watering:
- Water the orchid sparingly, ensuring the charcoal and fiber mixture remains moist but not waterlogged.
Benefits of the Bottle Method
- Extended Lifespan: The bottle method creates an optimal environment for orchids, extending their lifespan significantly.
- Improved Nutrition: Charcoal and coconut fiber provide essential nutrients that promote healthy growth and vibrant blooms.
- Easy Maintenance: The enclosed environment of the bottle planter reduces the need for frequent watering and protects the orchid from pests.
By following these steps, you can enjoy the beauty of your orchids for a much longer period. The bottle method is a game-changer for orchid enthusiasts, offering a sustainable and effective way to care for these delicate plants. Give it a try and watch your orchids thrive! 🌺
🌸 Highlights: Extending the Life of Your Orchid with the Bottle Method 🌸
🍃 Materials Needed:
- Empty plastic bottle
- Cutting tool
- Candle or lighter
- Metal pin or nail
- Charcoal pieces
- Coconut fiber
- Small stick
- Hooks
🌱 Steps:
- Prepare the bottle.
- Create drainage holes.
- Soften the edges.
- Prepare the orchid.
- Assemble the bottle planter.
- Support and hang.
- Water sparingly.
Enjoy long-lasting, vibrant orchids with this innovative method! 🌷